Cat toy made of fabric. How to sew a cat with your own hands: a master class from Deliya-toys. Taking necessary measurements
In chapter:Soft toy "Kitten" can be sewn from absolutely any fabric - felt, faux fur, fleece and even from a waffle towel. To sew a larger cat, you need to increase the pattern proportionally. As a filler, you can use wool, synthetic winterizer, holofiber or synthetic winterizer. You can also use natural bulk materials - buckwheat, rice, peas, in which case the toy will turn into a pleasant anti-stress.
Size: any
materials:
- main fabric to choose from - fleece, velor, terry towel, faux fur...
- filler to choose from;
- two black buttons or beads (or doll eyes);
- basic threads, matching in color + black and pink;
- scissors;
- pattern.
Operating procedure:
First of all, download and print the pattern:
We transfer the details of the pattern to the selected fabric, leaving seam allowances of 5-8 mm:

We sew the middle of the back of the head (points G-B) and the middle of the front of the muzzle (points A-B). The front part of the head (and at the same time the back part) must be sewn at the points F-E-D-C-B-C-D-B-F.
We sew the two side parts of the body with the breast, leaving the points K-F (for the head) and R-Q (for the tail) open. Since the ears do not fill, they must be "separated" with a seam (on the front side of the head) from the rest of the head. Now you need to sew in the tail made (by the way, the tail can be sewn already filled, or first sewn around the perimeter of the hole, then filled with the body).
We turn the head and body of the cat on the front side.


We fill the head and body of the future soft toy and sew up the holes for filling.
Welcome to my workshop! Today we will again engage in creative work with our crumbs! We have on the agenda -. I propose to try to make it in several versions.
- different fabrics,
- patterns of cats to get different models,
- and decorating methods.
So go ahead!
craft material
Since our fluffy will be made of fabric, let's see what material is suitable.
Can be crafted from:
- Monochromatic or multi-color fabrics;
- Fine chintz and dense denim. But it is better not to use stretch knitwear if you want the shapes of the craft to be preserved.


Think about how you will connect the details, because the craft will be voluminous. And for this you need at least 2 parts, and between them a filler. How to connect:
- Glue. Preferably one that grabs quickly and holds for a long time.
- Threads. How to sew under the tree? The easiest way to do this is with a sewing machine. But you can also do it by hand.
Filler:
- Cotton wool;
- Sintepon;
- Small cereals such as millet, buckwheat, rice or peas;
- Sawdust is ideal if you want to add essential oils and use the cat as an aroma sachet;
- silicone balls.
You need to fill it tightly enough, stuffing and ramming the material.


We diversify models
If you do with the baby, think that he do it yourself can make. From here the complexity of the toy will depend.
Perhaps it will be:

Consider the age, and abilities, and perseverance of your crumbs, if you do it with a child, so that he is interested.
Decorate our cats
If cat we have already sewn it, we need to decorate it. How to do it?
Let's see the options:
- Using simple threads, embroider "eyes", "nose", "antennae" and "smile" on the muzzle of fluffy;
- Make a cute bow on the ears, neck or ponytail;
- Button eyes will look great;
- valentine or a flower in the paws of a mustachioed-striped one will be very handy.
Now that we have dismantled all the components, let's start manufacturing together toys.
Pattern
Patterns can be printed out, you can draw it yourself - it's not difficult to draw a cat without details or circle any cat you like on the screen (we put the sheet on the screen and circle it directly on it, as we did before on the translation window). Pictures enlarge on click


Step-by-step photo of making a March cat

I will try not only to describe in words what we will do with my baby, but also to attach photo to understand the sequence of steps.
We will need:
- Paper;
- Pencil;
- Textile;
- Threads;
- Ribbon;
- Scissors;
- Needle;
- Chalk or soap for cutting;
- Marker.

And now step by step about the work.
- Draw each detail on paper and cut it out. What details do we need to draw: head, ears, paws, tail, body.

- Fold the fabric in half. Using patterns, cut out parts of the product, each part has 2 identical pieces, only paws, 4 of each pair and ears. To "hold" each part with the other, we pin it with pins.

- Sew each piece, leaving a small gap.

- Unscrew the parts and fill them with cotton wool. Cotton wool should be torn off in small pieces and pushed tightly.

- Sew up the holes with a hidden seam.

- Sew all the details in place. The ears are slightly gathered, and only then sewn on. It will turn out as if they are a little voluminous.

- Draw eyes and a nose with a felt-tip pen. Don't forget the mustache!

- We decorate the cat.
We make “fingers” on the paws, sewing them with a couple of stitches.

We tie a bow and hand over a flower!

Our kitten is ready! It is not sewn very neatly, but I ask you to make a discount on what the kids made! If you sew yourself, then of course it will turn out much more accurately.
It was a pleasure to work with you! Subscribe and go to other articles with crafts, I briefly call them My Workshop! Drop by Show your friends so they can craft with us. And that's all for today! Bye bye!
See also articles

Here you will find 4 simple workshops, and 3 of them do not even require sewing!
Almost all breeds of smooth-haired cats get cold in winter, especially if the house has low heating or is not very warm for some other reason. In this case, the owners have to dress their pet.
Also, many people choose outfits for an animal just like that, for beauty, and some even prepare costumes for exhibitions and real fashion shows, where cats dressed in chic outfits are the main models.

Dressing your pet in specialized salons can cost a lot of money. It will be much more profitable to sew clothes for a cat with your own hands. This can be done relatively simply by following these recommendations.

Types of clothes for cats that you can sew with your own hands
To start sewing clothes for cats, you do not need to draw a pattern every time, just do it once, and then make the necessary adjustments as necessary. This pattern is suitable for sewing many types of clothes. With it, you can make a comfortable T-shirt so that a Sphynx or a cat of another smooth-haired or bald breed does not overheat in the sun. For this, knitted fabric will be the best choice of matter.

If you take a denser material and make a slightly smaller cut for the neck, as well as openings for the paws, you get a warm sweater, jacket, sweatshirt or blanket for winter walks on the street or living in poorly heated rooms.

When choosing elegant jewelry and an interesting color composition, you can create a dress or costume in which the pet will not be ashamed to show up at exhibitions.
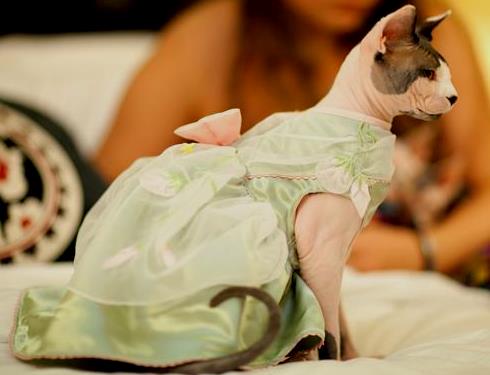

Carnival costumes for cats look very cute:


When creating a sketch and pattern, it is extremely important to think over the location of the details in such a way that the cat can breathe and move freely without getting entangled in an abundance of jewelry. Do not sew on any sharp or piercing jewelry, as well as those elements that the animal can tear off and swallow.
Taking necessary measurements
The most important parameters for a cat costume pattern are the girth of the neck (measurement 1), the length of the back of the animal from the neck to the tail (measurement 2) and the size of its torso in girth, which is measured in the area immediately behind the front paws (measurement 3).

Additionally, depending on the purpose of the clothes, the following data may be required to create a pattern: the distance from the front to the hind legs; the volume of the cat's waist, which means the girth of the torso in the area of \u200b\u200bthe hind legs.
After obtaining the necessary numbers, it will be possible to start building a pattern. Later, the pattern made according to the received scheme must be attached to the pet and the required adjustments made, and before that, the dimensions should be removed with a small margin, so as not to redo the work later.
Pattern of clothes for a cat: a few simple ideas
- The simplest pattern for cat clothes is if you take as a basis a leg or sock of suitable sizes, on which you mark the holes for the paws with chalk, and then carefully cut them out with nail scissors.

This will save time on drawing up the pattern and will only require overcasting the edges, sewing on the necessary fasteners, decorations and any useful accessories, such as loops for a leash.

- The second simple pattern of clothes for the cat in this photo:

To build such a pattern, you will need to measure the circumference of the cat's neck, the length of the back, the circumference along the bottom and the distance between the legs. Be sure to provide allowances for the fastener and correctly mark the holes for the paws.

It is very easy to sew clothes according to such a pattern - you just need to cut out a part with allowances for seams, cut holes for the paws, hem or edging the edges of the part, sew on any fastener.
- Let's move on to a more complex pattern, for the construction of which you need to spend a little more time than for the previous ones:

The pattern consists of two parts and is universal, on the basis of which you can build many models, supplementing them with various details: a hood, sleeves, pockets, make a fastener on the shoulder, on the sides, etc.

- To build a pattern for a cat overalls, you need one measurement - the length of the back (measurement 2, that is, the AB line in the diagram).

Now the resulting number must be divided by eight (8), the resulting measure will be the side of the grid square on which the pattern will be built. Then you need to draw a grid and transfer the contours of the pattern along the cells.
Thus, you can make any patterns for the cat. The resulting pattern consists of 2 parts: a large part is the right and left sides of the overalls, a smaller part is a wedge that covers the chest and stomach of the animal, it is sewn between the front legs (the narrow part is towards the front.) When sewing the overalls, they try on a cat, during which the length and width of the product are adjusted. At the bottom of the legs, allowances must be provided into which the elastic is inserted. It is better to sew a jumpsuit from two layers - for the top, use raincoat fabric, which is practical in care, for lining it is better to take flannel or soft fleece. If desired, the product can be supplemented with a hood.

When constructing a pattern of clothes for a cat, any existing model is usually taken as a basis, from which the outlines of future details are drawn. The sketch should be drawn on checkered paper, where the size of one cell is equal to a tenth of the cat's back length parameter. Given this proportion, the rest of the details are drawn, and then a pattern is created. In this case, the scheme must be adjusted to existing measurements.
Paper sketches should be drawn in full size, so that later the details can be attached to the fabric and made a pattern. Be sure to try on the cut out details on the animal itself, so as not to miscalculate the size. For convenience, individual elements can be baited a little with tape, giving the template the shape of future clothes.
Cutting fabrics, fitting and tailoring
Before cutting, the fabric must be washed and ironed to make sure how much it shrinks. In this case, this should definitely be taken into account when sewing and select a slightly larger size than the animal needs.
The layout of the workpieces is carried out on a matter folded in half from large elements to smaller ones so that the direction of the shared thread becomes parallel to the fold edge.
Then do the following:
- fasten the paper template with pins to the fabric and carefully circle the pattern;
- then cut out all the necessary details, not forgetting the seam allowances;
- sweep them with a bright thread and put the resulting clothes on the cat;
- if there are any problems, apply the markup necessary for correction with chalk.
Well-fitted clothing items can be finally connected. First, fasten the upper, located on the back, and the lower, passing along the stomach, halves of the suit. The seams on the sides and in the shoulder girdle are sewn with a zigzag stitch with flat overlapped stitches. The width of the armhole must be selected depending on the purpose of the wardrobe item, narrowing it for the winter version of the suit, and expanding it for the summer T-shirt.
Then you need to process the edges of the clothes. To do this, you can use a braid with an elastic band. It is attached on the front side with the same zigzag stitches, stretching a little before that so that the braid does not gather and does not squeeze the edges too much. This will not only prevent the edges from fraying, but will also be a good decoration for the cat costume.
The last step is sewing fasteners and accessories to decorate the costume. There are a large number of fasteners that you can choose from for a cat costume. There are several recommendations in this regard, but first of all, it is necessary to take into account the breed of the animal.
The zipper is best for smooth-haired pets, otherwise the hair will get stuck in the mechanism. In the same way, the hairs will linger on Velcro. Universal fasteners are buttons that can be placed either on the back or under the chest of the animal.
After completing all these operations, you will make a luxurious costume for your pet.

Summing up
So, on the basis of one pattern, you can make a large number of costumes and significantly update your cat's wardrobe. For those who know how to sew, this will not be a problem and will not require serious financial costs. Moreover, sewing costumes for a pet will be a great opportunity to realize your interesting ideas and turn into a great long-term hobby.
Cute textile cats can be both a toy for a child and a cozy decorative element of your home.

What is the main difference between a toy designed for games and a decorative toy? In the first case, the most important is the strength of the toy, in the second - the appearance. Of course, a toy can be both beautiful and durable, but most often you have to sacrifice something :) For example, when making eyes for a decorative toy, you can paint them beautifully with acrylic paints. But for a play doll or toy, this is no longer entirely acceptable, since a child can either scratch the paint or simply gnaw or lick it off. Those. when making a toy for a child, it is better to sew or embroider eyes.
I sewed cats for my children. So what do we need?
- Textile. If you want a soft toy, then it can be fleece, felt, fur, velor, flannel, velsoft, etc. If you want a decorative toy or just a harder, more shaped toy, then linen or cotton is best, in my opinion, interesting toys are also made from burlap.
I used fleece. It is convenient to work with this material, it is soft and the kids like it, and the most important thing is that my children chose it themselves, each preferred the fleece of their own color), so in my case it was a choice without a choice
- Stuffing. It can be anything: synthetic winterizer, synthetic winterizer, wool or sliver, someone even fills with cotton wool. I stuffed with padding polyester and finished with padding polyester, but one padding polyester would be enough.

Print this pattern in the usual A4 format, cut and circle on the material of your choice. By the way, I must say, I really enjoyed tracing with disappearing felt-tip pens. It is convenient and does not leave any traces of your notes.
Outlining your patterns, do not forget that the cat should not only have a body with a head, but also 2 arms, 2 legs and a tail.


When cut and turned out, this is what happened :)

Already almost a cat:

So that the ears were not too thin, I made a pattern of the ears (2 pieces) and licked the resulting piece inside, to the ears. You may or may not want to do this:

Then we sew the ears, you can also mark yourself so that the seam is more even:

Now we are stuffing. It is more convenient for me to immediately form the desired shape and volume from the sitepon, and then fill it with the resulting lump:

So we stuffed our heads:

Then we stuff the body in the same way:

Here's what happens. Please note that I do not hem the bottom yet:

Now we outline where we will have eyes and a nose. Eyes I decided to make buttons, as I wrote earlier

Now I'm sewing as planned. Since the bottom is not hemmed - all the knots will remain inside

We embroider a mouth, antennae, hairs:

To make the cat a little pot-bellied, I finished it off with synthetic fluff. This is optional, I just love chubby cats

Now the legs. They are already stitched with us, do not forget to fill them with synthetic winterizer or synthetic winterizer. Then we pin with pins the way we want to sew the legs:

And then we sew:

Now, with a hidden seam, we sew the bottom of the calf, with the legs already sewn on. I go back and forth a few times to make the seams stronger.

Here's how to make a blind seam (picture from the Internet). In fact, this is just a scary name), the seam is very simple and convenient:

Voila, the legs are sewn on:

Now sew on the handles. I sewed with a blind seam just in a circle

Now we sew the tail in the same way. To make it softer, I did not stuff it:

That's all! The cat is ready


