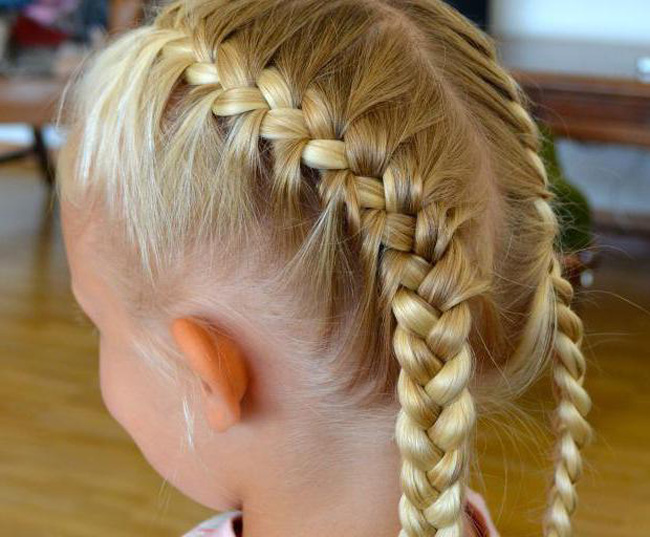
Beautiful weaving spikelets. And here we see a masterpiece done in reverse. French braid on the side
It looks equally impressive both on medium length and on long hair. A few modeling techniques and based on a braid, you can make several types of evening and business styling that will not go unnoticed by others.
Weaving itself is not a complicated process, but not everyone knows how to do it on their own. Learning to weave is easy, you just need to understand the technique and use the tools at hand. The main assistant will be mirrors installed opposite each other. By controlling the sequence and thickness of the strands, you can get used to it and subsequently do your hair without them.
Many variations on the spikelet theme have been invented, but the main distinguishing features are:
- parting shape;
- the number of strands at the beginning of the braid (2 or 3);
- weaving method (from bottom to top and vice versa);
- the thickness of the beams used.
What is necessary
For self-weaving a spikelet, you will need only a few items:
- a comb with a thin handle and long teeth for separating strands;
- several hairpins;
- two mirrors to control the process.
You also need to be patient, because haste and fuss will not give you the opportunity to master the technique of weaving.

How to braid a spikelet
Medium length hair is the easiest to braid. The short ones are too naughty, it is difficult to fix them, since the slightest turn of the hand provokes a strand to fall out of the braid. Long strands are difficult to style due to constant tangling. It is difficult to hold a heavy curl in your hand and redirect it with your fingers in the right direction, but you can still get used to it.
Walkthrough:
- Comb washed dry hair;
- Starting from a bang or other place on the top of the head, collect a strand, distribute it into three equal beams (the base of the braid);
- Insert the first bundle between the second and third;
- Third beam redirect between the first and second;
- Beams during weaving to correct, comb if necessary;
- Then the second beam is inserted between the third and the first, supplemented by a new strand on the side of the same thickness;
- Next, weaving is performed in a similar way with the capture of side hair, alternately on the left and right sides;
- After weaving all the side strands of the braid braided without them to the desired length;
- The remaining tail is fixed elastic band or hairpin;
- Curly hairs are stacked with the help of invisibility;
- Correct the links of the spikelet.

How to braid 2 spikelets
The hairstyle is reborn from the past. True, then it was relevant for schoolgirls. Now modern girls and young women have seized the initiative. Appearing in society with such braids is considered very stylish and fashionable.
Weaving order:
- Comb your hair well and highlight an even parting passing through the center of the head;
- Braids are woven separately on each side, starting from the hairline;
- Divide the base into two identical thin strands, cross them among themselves;
- Interlace the main bundles, complementing with free strands (thin);
- It is not necessary to stretch and create a tight weave, a free braid will look more voluminous, it will be easier to correct it;
- Fix the result with an elastic band;
- Perform similar steps but from the other side.
A side parting, dividing the head from one ear to the other, will allow you to create a braid around the head. Reception and the principle of weaving do not change. An offset parting is needed when weaving. Separate spikelets are connected below the back of the head and intertwined with a continuous oblique, or superimposed on each other and fixed with an elastic band, and the place of combination is chopped off with beautiful hairpins (hairpins, invisible).
There is a way to weave two spikelets using three bundles, which is based on classical weaving. This hairstyle will keep its shape in the most inclement weather. But to form beautiful links, thick hair is required.
 Separate spikelets are connected below the back of the head and intertwined with a solid oblique, or overlap each other and are fixed with an elastic band
Other hairstyle variations
"Fish tail"
A hairstyle made of thin buns looks spectacular. Weaving steps:
- Separate from the left temporal part and the right one beam at a time and direct them towards yourself;
- Folding strands crosswise, put them in your right hand;
- With your left hand, separate a new strand from the left side, pull out and connect with the right beam;
- Fix the braid with your right hand, and with the right, repeat the previous action, but on the right side;
- The braid weaves to the base of the head or to the desired length, after which it is fixed with an elastic band.
 Looks impressive hairstyle made of thin beams
Such a hairstyle will be appropriate for a holiday and in everyday life. It holds its shape very well throughout the day, is not afraid of wind and wet weather. Weaving around the head can give originality, but not in a straight line, but with bends. If you straighten the links on one side, you get a real masterpiece.
The technique of weaving around the head is performed in the sequence:
- Comb your hair, highlighting a strict parting in the middle of the head;
- Three strand base starts from the right side in the usual way;
- You need to braid, adhering to a semicircular shape.(go along the back of the head, adding new strands);
- Finish weaving approximately near the ear on the left side, fix the ponytail with an elastic band and hide in the strands with the help of invisibility;
- The process is then repeated, but already on the left side;
- When docking with the first streamer, you need to fix the second and hide the remaining tail in the spikelet with hairpins or stealth.
 Weaving around the head can give originality, but made not in a straight line, but with bends
purl
Ideal for thin hair. Weaving adds volume, creates a beautiful shape. The sequence is:
- Comb your hair neatly and highlight the beam at the crown;
- Split it into three equal parts;
- The left strand is placed under the middle and right bundles;
- Bring the right under the left and the middle strand;
- The pigtail weaves inside, forming the purl effect of a classic spikelet;
- Further manipulations are repeated, but with the addition of free strands of the same thickness on each side;
- Respecting the principle, braid to the ends of the hair and fix the braid with an elastic band;
- Fix the links;
- To create volume stretch each link.


Braids are an immortal classic, the best decoration for a woman's head. It was relevant hundreds of years ago, and remains fashionable today.
Looking at fashionable glamorous persons of not disgusting appearance, many girls are thinking about mastering the art of weaving a spikelet on their own heads.
It's great: to be able to turn disheveled hair into a standard of femininity and beauty in minutes. Voluminous spikelets with elongated strands look especially great.
An openwork braid falling from the shoulder - what else is needed to win the hearts of knights and cause bouts of suffocating envy among acquaintances and girlfriends?
Only to master the weaving of a braid can be difficult. Each girl can braid a simple braid on another person. And how to do it on your own head?
What if trying to be a beauty queen ends up turning your head into a sloppy nest?
Do not rush to cut your head bald, pull yourself together. There is a way to learn how to make beauty with your own hands.
It is in your power to teach your hands to weave real masterpieces:
- Firstly, since others have learned, you can also master the art of braiding.
- Secondly, the bears in the circus did not immediately learn how to ride a bicycle.
- Thirdly, patience and work made a man out of a monkey, and you will be made a master with a black belt for weaving braids of any complexity.
You will become a real guru, able to braid a spikelet even to Dmitry Nagiyev in a couple of minutes.
On yourself, on another, without a comb, in weightlessness or with your hands tied behind your back. Ready to start learning?
The scheme of weaving a spikelet on your beloved - three steps to mastery:
| № | Important Points | Details |
| 1 | Procedure | Prepare everything you need: a comb, elastic band or hairpins. Moisten your head slightly if it's warm outside or you have time to dry at home. Meningitis does not contribute to the development of useful skills. Get dressed in advance so that dressing up doesn't break your fragile masterpiece. Sit in front of a mirror in a comfortable position |
| 2 | Helpful notes | Learning to make a spikelet. Comb the curls back, take the top strand with your hand. Divide into three parts, bind together. Take it slow to see what happens. Tighten. Attach strands from the sides, try to tighten them tighter so that it is even. Watch the thickness: all strands should have approximately the same thickness. Make the first upper strands thicker if you want to get a clear braid |
| 3 | What else will help the rukozhop? | If you do not know how to weave a spikelet on someone, it is useless to learn from yourself. Ask a friend to show you how the spikelet is made, practice on it. The more practice, the better the result |
How to braid two spikelets for a girl
Weaving two spikelets is a simple task. Follow the proposed scheme, and you will be happy.
The scheme of weaving two spikelets:
- We comb the curls.
- We make a vertical parting, clearly dividing the head into two identical halves with a straight line.
- We pin up half of the hair so as not to interfere. It is necessary.
- We start weaving from the crown in the second half.
- We braid the braid, leaving the tail.
- Tie in a bow or tie with an elastic band.
- We make the second spikelet in the image and likeness of the first.
Fishtail diagram for the dumb
Fishtail - a type of pigtail, characterized by thin streams flowing into each other.
For ladies who have hardly mastered the usual spikelet, this hairstyle will seem like something transcendental.
Let's try to figure it out using the example of photo lessons. It's better to see once than hear a hundred times:

The figure above shows the implementation of the fishtail. The hairstyle is unique in that even in a tousled look it looks very cute.
It is appropriate at a social event, in the office, on a walk, on a date, and even on a community work day. Universal option.
And here we see a masterpiece done in reverse:

The scheme is no different, only the strands are braided not forward, but backward. Reverse method. But ordinary spikelets on both sides will look no less beautiful.
hairstyle around the head
Russian braid around the head - what could be more beautiful? With such a hairstyle, our grandmothers and great-grandmothers went on a date, charming our grandfathers and great-grandfathers at first sight.
How to create this on your head? Remember the bears on the bike: it was harder for them anyway. You will master this method too.

Evolving to masters: learning to make a circular spikelet:
- They undertake such work, having previously mastered a simple spikelet. Moscow was not built at once, and the spikelet did not immediately weave.
- Practice on others: skill lies in practice. Open your salon for your friends: invite them to visit you for hair-pulling workshops. You will be able to give professional lessons later.
- For circular weaving, it is necessary to visually transfer the spikelet to the plane of the head. Start at the back of your head. Divide your head into sections so that the curls do not tangle.
- Try until you succeed. Remember about the monkeys: they worked hard before becoming individuals who learn to braid using the Internet.
Little trick! Let's open a secret: our grandmothers did not know how to skillfully braid a spikelet around their heads. The braids of the girls of those times were as thick as an arm, to the waist and below.
The girls braided an ordinary braid and laid it around their heads so that idle gentlemen would not pull on it.
Step by step instructions for a pigtail turned inside out
Reverse Braid: A great way to create a tight, standout braid.
Its size will depend on the thickness of the hair. But even liquid curls can be given volume by stretching the strands.
Let's turn to the figure, which shows the scheme of rearranging the strands:

This is how the spikelet is done in reverse. The strands do not go on top of the braid, but are pulled down. Otherwise, this method is no different from the usual spikelet.
Armed with theoretical knowledge, proceed to practice. Do not give up with temporary setbacks, try and everything will work out.
Useful video
Modern girls no longer want to be like defenseless princesses. Superheroines became their idols. Like Katniss from The Hunger Games or the fearless Lara Croft. It's just uncomfortable to perform feats with loose hair. The heroines found a way out and braided their hair into a stylish spikelet.
Each mother can also appreciate the benefits of a French braid: weaving lasts a long time, the hairstyle turns out to be neat, and braiding an ear is quite simple. The main thing is to follow the instructions.
It is difficult to imagine a small child ready to sit for an hour in place without moving for the sake of restoring beauty.
Experienced mothers are sure that weaving an ear does not take so much time. You can cope with the "fish" tail in 10-15 minutes. However, even at this time it is necessary to occupy the fidget with something.
The whole family will need help. While mom is practicing hairdressing, the father of the family can hold the little fashionista in his arms, and, if possible, prevent her from “spinning”. Older children are also happy to take part in this difficult task. Their task is to build funny faces and amuse the "model".

Older girls won't have this problem. However, how to weave a spikelet for a child? To make it neat and strong, experienced mothers advise adhering to the following rules:
- The hairstyle is done exclusively on clean, dried and combed hair;
- Children have very delicate skin on their heads, which means that it is categorically not recommended to fix them with fixatives. It is better to take simple rubber bands for hair;
- Curly and unruly hair can be moistened with warm water;
- Do not tighten the weave very tightly. Girls walk with a spikelet all day, the hairstyle should be comfortable. In addition, a tight braid can cause headaches;
- To make the spikelet more magnificent, you can slightly dissolve the side strands. The main thing is not to overdo it, otherwise the hairstyle will “not live” until the evening;
- You can weave small beautiful accessories or a ribbon into an elegant ear;
- And most importantly: do not delay the weaving process. The child will not appreciate it.
An unusual braid can be braided for both a girl with long hair and the owner of a short haircut. There is one more unspoken rule: when braiding, mothers are advised to ensure that the face of the fashionista remains open. Otherwise, the hair will interfere with reading and writing.

Step by step: instructions for weaving a spikelet
So, if the child is on a chair, a comb is in his hands, and there are about 10 minutes of free time, you can start braiding a spikelet. Consider in detail how to braid a spikelet for a child.
Step-by-step instruction:
- Comb hair with a soft massage;
- At the forehead, collect a strand and divide it into three equal parts. A thin strand is taken on a thin spikelet. On thick, respectively, large;
- At the beginning of weaving, the ear resembles an ordinary braid. The right strand is crossed with the middle one;
- Next, weave in the side strands. It is necessary to take a little hair from the side strand and weave it into the ear along with the left strand;
- The same must be done on the right side;
- The strands must be of the same thickness;
- Weaving can be finished at neck level and secured with a hairpin (elastic band). Or braid the rest of your hair.

This is a simple spikelet, which is often called the "French braid". Many mothers prefer the so-called "fishtail" to such a romantic spikelet. It also doesn't require a lot of time.
To braid a fishtail, you need:
- Divide hair into equal parts;
- On each side, take a thin strand and throw them on the other part of the head;
- To prevent the spikelet from unwinding, it is recommended to hold the strands tightly with your fingers.

In kindergarten, elementary and high school, a spike braided around the head will look advantageous. For those who have mastered a simple spike, it will not be difficult to braid it.
Hairstyle "spikelet around the head":
- First of all, you need to make a straight parting;
- At ear level, take a thin strand and start weaving an ear along the forehead line. First to the second ear, then around the head;
- The hair that remains can be braided. And, if this is a small child, tie it with an elastic band or ribbon. Older girls can hide the braid inside the spikelet, and fix the hair with hairpins or invisible.
So that during the hairdressing work the hairs do not crumble, it is worth spraying them from time to time with plain water from a spray bottle.

Spikelet spikelet strife
To date, there are several dozen types of hairstyles using spike weaving.
The most popular types of spikelet:
- French (simple);
- Double;
- "Fish tail";
- On the side;
- around the head;
- Zigzag;
- For short hair;
- For long hair.
Above, we have already considered the French braid, weaving around the head and the fishtail. The rest of the hairstyles can also be braided by a little fashionista. Let's consider their differences.
The double ear has recently entered the "adult" fashion. So, high school students will be just crazy about him. It floats quite simply. Hair is divided into two equal parts. And on each side, the already familiar French braid is braided.

With an unusual spikelet on its side, there should also be no problems. The child's hair should be combed to the left or right side. Then braid again according to the already familiar instructions.
The situation is more complicated with a zigzag ear:
- Moms need to start weaving just below the left temple;
- First, let the ear “grow” towards the forehead. Strands are woven exclusively from the left side of the head;
- To make the hairstyle look spectacular, you need to make about 5 weaves (if the head is small - 3-4);
- It is recommended to finish weaving at the level of the back of the head.
On long hair, you can experiment with each of the listed types of hairstyles.

Girls with short hair are also worthy of a spikelet. To braid it, you need to divide the hair into equal parts. Start braiding the ear from the ear itself. At the ends, it is recommended to tie the weave with an elastic band, or, at an older age, stab it with an invisible one.
Every mother will appreciate that you can braid a child quickly. This keeps the hair all day long.
In the next video - a good example of how to weave a spikelet correctly.
“Spikelet”, “dragon”, “French braid”, “fishtail” - all these names are the classic women's hairstyle, which is distinguished by beauty, convenience and ease of weaving. This is one of the ways to braid a braid suitable for women of any age. And if you learn the basic version of the spikelet, then, starting from this, you can vary the hairstyle in various ways.
The French braid is not a new invention. It appeared - as we understood from the name - in France, and later it went out of fashion, then returned. But there are perhaps good reasons to consider this type of hairstyle a classic, because it is beautiful, elegant, and comfortable ... Such hairstyles should not disappear from use: simplicity and beauty are eternal!
But 10 years ago, the approach and view of the spikelet was different. Then it was believed that the hero of our story is suitable only for solemn events, for an elegant and spectacular exit. A cool and playful fishtail was a serious, strict hairstyle.
Now there is no such limited approach. Spikelet is suitable for almost any occasion: a friendly meeting, a party, a business trip, a walk ... whatever you want. The only criterion is the correct weaving. This is where the main lessons really need to be learned.
Basic spikelet weaving technique
So, there is a fairly simple scheme that will make it easy to braid a spikelet with your own hands. We will analyze different options, but the main type of braid on which we will be based is the following:

Follow each item from the step-by-step instructions. We will explain step by step so that you can properly style your hair, as in the pictures.
- Wet your hair a little - just a little bit. This will make them more obedient and allow you to lay neater. If there is mousse, then you can use it. The main thing is that the hair becomes more obedient and does not unravel. Collect a strand of hair at the crown, as shown in Figure 3. Tie with an elastic band, since during weaving both hands will be busy with us, and there will be three strands.
 Figure 3. The elastic band holds the first strand of hair.
 - Leaving the fixed strand in the center, collect two more on either side of it.

- Shift the right strand to the left side, and transfer the central one to the right so that it runs under the right strand of hair.

- Lay the left strand also to the right, but it should fit over the right, as shown in the figure.

- Now draw over the left strand, which is currently on the right side, our central strand, but be sure to weave an additional strand together with it, having previously gathered it into one bundle. A voluminous knot of the spikelet base should already be formed on the head.

- Continue in the same pattern on both sides until you reach the neck area.

- Having reached the neck area, make a continuation in the form of a regular braid. Thus, the tail of the spikelet will be completed.

Well, the spikelet is ready. The elastic band holding the central strand is either carefully cut and removed, or hidden under the hair. Apply a little varnish and straighten it a little so that the dragon takes on a voluminous look.
This step-by-step instruction is just a base, the simplest foundation on which many other types of spikelet are based. Now, having knowledge of this base, you can change the look of your hairstyle according to your fantasies.
Side French braid
It will look beautiful and neat, for example, a spikelet braided on its side. It is both stylish and youthful, and looks good on the head of adult women. In principle, the scheme is the same as we said, only when adding side strands, it is necessary to twist it like a tourniquet.
Step by step:
- Comb your hair back;
- On the left or right side, collect a larger strand and make three small strands out of it;
- Start making a regular spikelet, as in the first steps of our instructions - before we began to weave additional strands;
Weave an additional small strand into the pigtail from the side that was chosen in the first paragraph of this instruction; - Add the next strand on the other side of the head;
- In turn, add strands on both sides, while not forgetting to tighten the pigtail so that the hair does not unravel and the spikelet does not lose its shape;
- In the final part, everything is the same as in the usual spikelet. At the base of the neck, braid a regular braid. Secure the braid links with hairpins and gently straighten each one to make the hairstyle more voluminous.
In Figure 10, you can see a step-by-step illustration of the spikelet on its side in order to follow the execution of all instructions correctly.
 Figure 10. Pigtail on the side
 French braid inside out
This type of pigtail is not much different from the classic spikelet in the way it is woven. It looks very solid, the links are pronounced and puffy. Undoubtedly, such a hairstyle will look very elegant.
- On the left or right side of the hair caesura, select a larger strand and divide it into three equal strands.

- Move the right strand under the center strand. And move the last one up and to the right as in Figure 12.
 Figure 12. First link
 - Then pass the strand on the left under the right and it goes into the central part of the pigtail.

- Start picking up strands from both sides of the pigtail, as has been shown many times.

- Connect the extra strand to the central one, which is now to the right of the pigtail.

- Draw two strands connected together under the central one.

- Do exactly the same with the left side.

- Continue weaving the links of the spikelet until you run out of additional strands. Then weave a regular braid, finishing with a ponytail. Straighten out for volume.

Actually, now you know how to weave several types of French braids. Show your imagination, you can use completely different ways to make the spikelet look more spectacular, more beautiful. Adjust the tightness of the braids so that they do not fall off and do not deteriorate, and on the other hand, they are not tightened too much. Change the central braid to shift the location of the entire braid. Experiment with color and use hairspray.
You can braid a spikelet around your head or do it in the French style. Here's what the last one looks like:

The same hairstyle can be made double. By the way, a great solution for your daughter.

The spike weaving technique basically follows the same laws, as you can see. Surprisingly, this is a truly versatile hairstyle, while it always looks beautiful and neat. The little dragon does not allow the hair to fall on the face, which is very convenient and practical.
Braiding pigtails, try to capture the strands on each side in the same amount, evenly. How much hair you capture will determine the shape, which means the beauty of your hairstyle. In addition, it must be said that the French braid is woven, as a rule, for straight hair, so if you have curls, you will have to thoroughly stroke them with an iron, level them so that the appearance of the spikelet does not deteriorate.
You can decorate the pigtail in different ways: with rhinestones, a bow, a rim, various hairpins. In this, perhaps, the matter is limited only by your taste.
If you want, then make two spikelets on the sides. It is not necessary to braid it tightly and collected. Lower the hairs, straighten the hairstyle so that it looks like you have been wearing it for more than a day. Look at Figure 21 and see for yourself:
 Figure 21. Add simplicity
 You see - there is no need to create a strict hairstyle. Improvise.
It does not hurt to release a few strands from the braid. Lower them so that they fall casually on both sides of the head.
If you made two spikelets, is there really a need to bring them into a mirror-symmetrical form? For what? After all, the hairstyle will look interesting if they are absolutely asymmetrical. Let go of the reins and cast off the blinkers! - let your imagination run wild. Believe me, this advice is no less important than the step-by-step instructions!
Make the spike “upside down”, i.e., so that the weaving goes from bottom to top. Only in this case, you should not make the tail in the form of an ordinary braid, but simply braid the remaining hair, tie it so that it looks beautiful.
In fact, the French braid is a hairstyle that MUST be free from restrictions. Monotony contradicts the very meaning of female beauty, because the main goal is to pleasantly surprise. Take a look at figures 22 and 23.
 Rice. 22. Different approach
  Rice. 23. Another option
 It seems that these are two different pigtails. No! – This is a simple spikelet, laid with taste, but in different ways. Models and world celebrities use this elegant and simple hairstyle to their advantage. Make yourself a fashionable and beautiful pigtail for yourself, your girlfriend or daughter. You can be sure that with sufficient dexterity and diligence, it will turn out just great.
Video tutorials on weaving spikelets of hair
Hairstyle "spikelet" is back in fashion! Popular about 10 years ago, over time, for some reason, she was forgotten, giving way to more “free” hairstyles. But, as you know, fashion is gradually returning, slightly changing the old images, making them subject to modern trends.


So, if in the past "Spikelet" assumed perfect smoothness, accuracy, now the times of strict rules are in the past, and now the hairstyle even insists on slight negligence.
In the past, the spikelet was considered a very feminine and elegant hairstyle, which corresponded to a strict business style. In addition, the spikelet was an excellent option for a solemn appearance.


Today, a modern spikelet, or as it is also called a French braid, is a more democratic hairstyle, it fits perfectly into various styles. Depending on the variant, the spikelet is suitable for a friendly meeting, going out, walking with friends, or a business meeting.

If earlier girls tried to braid their hair without flaws, now a disheveled “spikelet” is nothing more than a fashionable necessity.


How to braid a spikelet? (photo)
The hairstyle is not at all complicated. Hair must be combed, then take a strand of hair from the forehead, divide it into three parts.


To the strand of hair, which is on the side (right or left), we sketch an additional strand of hair from the same side.


The more often you capture additional strands, the more interesting your “spikelet” will turn out to be in the end. In general, the thickness of the strand should be determined by eye and depend on how thick your hair is.


When you braid the spikelet, you can collect the remaining hair in a ponytail or braid it.

Spikelet hairstyle options (photo)
The classic spikelet today has known many transformations.
- So, for example, on the hair you can braid not one spikelet, but two (on the sides), as well as many spikelets that turn into small French braids.
- In addition, the “image” of the hairstyle itself has changed. Today, spikelets are relevant, braided not tightly, but loosely.
Modern trendy spikelet looks like you are wearing it for the second day. - It is not at all necessary to grab all the hair, release a couple of thin strands, framing the face.
- You can make this version of the spikelet hairstyle. Take a small strand of hair and braid a thin spikelet and secure it with an invisible or elastic band. Leave the rest of the hair free. Where exactly to braid the spikelet, choose yourself. You can make two spikelets in this way, and it is not at all necessary that they be symmetrical.
- A spikelet braided from the bottom up will look very original(from the back of the head to the line of the forehead). The remaining hair can be beautifully styled or wound into curls.
- You can conditionally divide the head into sectors, braid several spikelets, connecting them at the crown. Moreover, you can braid both all the hair, and leave it partially loose.


Spikelet hairstyle - how to weave a fishtail (photo)
Another version of the spikelet is the fishtail hairstyle..


The level at which the spikelet will be located may vary depending on your desire. The number of spikelets can also be changed.
In order for you to master the technique of weaving the fishtail hairstyle for the first time, try to perform it, having previously collected the hair in a bun.


Who suits the spikelet hairstyle? (photo)
Such a spikelet looks very beautiful on wheat-colored or highlighted hair. Stunning play of light, slightly tousled look - you will look playful and seductive!
Spikelet is a very popular hairstyle among brides. Still would! After all, she is very comfortable, beautiful and romantic. And most importantly, the hairstyle keeps on the head for a very long time!


