Inscription happy new year coloring stencil. How beautiful to write "Happy New Year!"
Greetings to all subscribers and guests of the blog site
We continue the New Year's theme of decorating the house for the upcoming holiday. At the moment I am at work. I work on a rotational basis for 15 days. That is 15 at work, 15 at home. And this means that I will only get home on December 1st. And my son and I will start decorating and decorating the apartment for the New Year.
We bought a new tree last year. Most of the toys and garlands for her were also purchased from the store. But part of it was done with my son. At that time he was 2.5 years old and therefore the main part of the work was done with his wife, and he only watched the whole process with interest. It's interesting, after all, when from a set of different pieces of paper, all kinds of ribbons and multi-colored buttons.
And the whole interest of Arthur (the name of his son) was that he hung the finished toys on the Christmas tree himself (at least where he could reach). And if he could not, then he showed the place where they needed to be attached. You can probably imagine what came out of it, at his age.))) Of course, after he fell asleep, we outweighed everything over again.
This was the end of our joint work last year. We decorated the Christmas tree for several days, taking into account the manufacture of home-made toys, and in the end we got such a beauty.
Since we now have a lot of Christmas decorations, I decided to do carving with my son this year. By the way, he copes with this business perfectly, in his 3.5. I've always liked the patterns on the windows, but somehow we never decorated them. Let's fill that gap this year.
That is, you do not have to sit for hours on the Internet in search of something suitable. You just need to write to me what you like and I will send it to you. Or you can download the picture you like to your computer and then print it. To do this, right-click on the image and select "save image as..."
 After, select a folder to save and click save. Everything is pretty simple.
Well, now, let's start looking and choosing patterns, according to which we will do art with an interesting name - vytynanka.
To make it easier for you to cut, I suggest you watch a video that gives tips to make this task easier.
Window stencils for A4 cutting
Immediately make a reservation that all the pictures are of different sizes. But when printed, they will automatically adjust to the format in which you print (A3 or A4). If you need a small image, then an editor like Microsoft Word can easily handle this task.
You just need to insert the picture you like into the editor field and, by dragging the mouse pointer over the corner of the picture, adjust it to the size you need.

Do not forget to put some unnecessary board under the paper so as not to spoil the table at which you will be working.
That's all! And now we start...
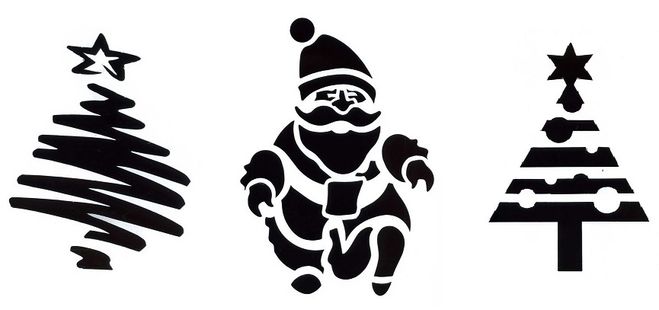
Father Frost
Our selection will be opened by the main symbol of each year. I offer you a choice of 10 different options with his participation.


Snow Maiden
An equally important hero is the Snow Maiden. Where would Santa Claus go without her?


Kids will most like the Snow Maiden in this design - in the form of Masha)


Snowman


The version below is also very good. And I think this snowman can handle it.


Check out some great work. I wonder how much time and work spent on such magnificence?

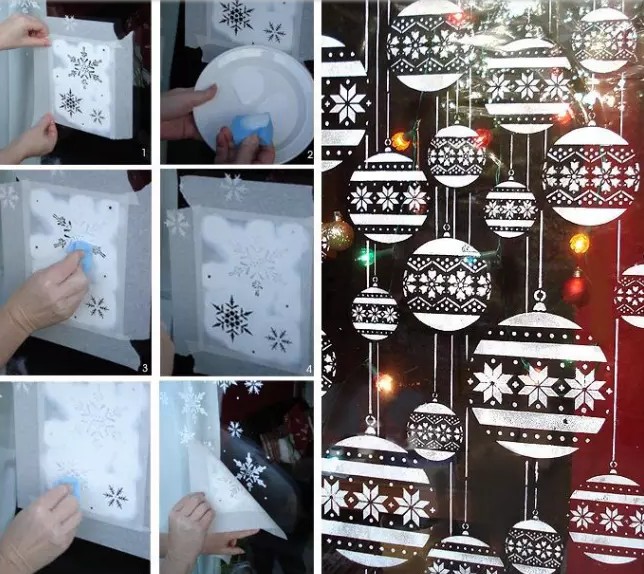
Glue the cut stencils to the window. For this you will need:
- tassel
The brush must be soaked in water. Then rub the soap well and apply on the template, as if with glue. We put it in the right place on the eye, straighten it and blot it with a towel. We do the same with the rest of the figures.
And then we admire the result.
New Year's vytynanki on the windows - templates for printing
Below are a variety of compositions. With the help of them on the windows you can create a real miracle no worse than Frost does.


With this house you can create such a picture on the window

There is a tree house. It remains only to add snowflakes that will imitate stove smoke. Cool idea, in my opinion.


Here is another example that I really liked and proves that fantasy has no limits.

And here is a video story that motivates, even very motivates ...
Stencils of pigs on the windows for the new year 2019
Since we are celebrating the Year of the Pig, let's not forget about it. We will also make its image on our windows.
Peppa pig, beloved by all children, will decorate the windows in the children's room.

And Nyusha from Smeshariki can make her company.


Pig Window Stencil Templates
Here, without further ado, it is clear what the next cutouts will be.


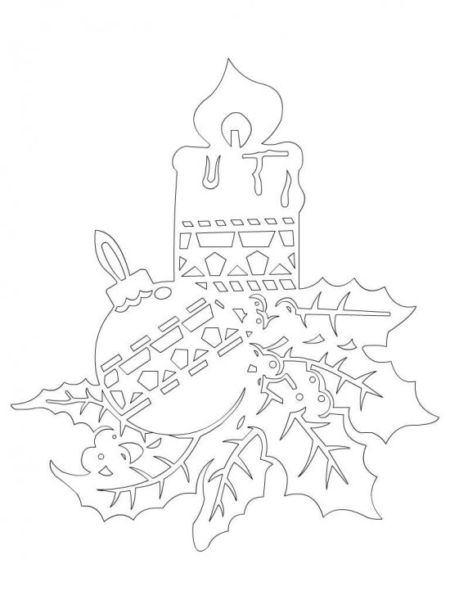
Vytynanki Christmas balls, bells and Christmas trees
What is a holiday without toys, balls and Christmas trees? Below you will also see design examples that I found on the Internet.
Christmas balls


Christmas trees


For greater effect, you can make a whole city on the windowsill from the same cutouts, which will further emphasize window decorations and make the mood even better. See how it's done...
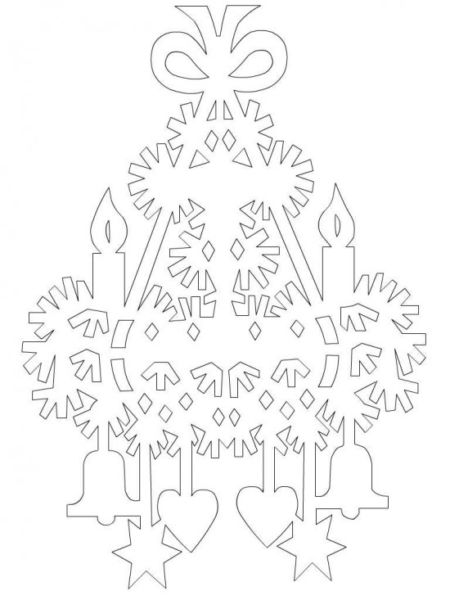
bells


Schemes for cutting snowflakes on windows
And, of course, snowflakes. Please note that in each composition on the windows, there are always snowflakes. It is they who create the atmosphere of winter and holiday. After all, the new year is associated with snow, and snowflakes are snow.


And now a little more difficult options. Although the fold lines are indicated here. So you can simply cut the snowflake along the contour, bend it in the right places and cut it out.


Stencils for cutting letters and numbers for window decoration
Finally, the numbers in various versions and the cherished phrases "Happy New Year"


Choose, cut and decorate! Wish you luck! If you are interested, then in the future I can put up photos of our work (show what we did).
Well, now I say goodbye to you and wish you creative success. With coming! Bye.
Hello friends! Today we again continue the theme of creating a New Year's atmosphere by cutting out handmade paper products. That is, we will talk about again.
In this post you can find silhouettes of fairy-tale characters, the main characters of Santa Claus and the Snow Maiden, snowmen, deer, balls, snowflakes and much more. You will see ready-made window design options, and you can also download and print the proposed stencils and templates. And then carefully cut them out and stick them on the windows, or decorate other corners of your interior.
But remember that it is window decoration that is an integral part of the magical New Year's holiday. With paper protrusions, you can decorate only glass, or create a whole composition using a window sill. And use large clippings to decorate the walls in the rooms.
If you have very little time to create a festive interior, then cut a lot of carved ones and paste them all over the house.
So, in order to make windows festive, use plain paper, better of course, not only white, but also other colors. Also stock up on sharp thin scissors, and preferably a sharp clerical knife, and materials for sticking jewelry (toothpaste, double-sided tape, soapy water).

After you prepare all the necessary tools and materials, you will need to choose paper decorations. In our case, these will be flat accessories for gluing to the glass surface, since there are also three-dimensional elements.

The size, shape and color of the products will depend on the area of \u200b\u200bthe room, the level of illumination and the size of the window itself. The main thing is that the decorations do not interfere with the free passage of light into the room, and the rest depends only on your imagination.

After determining the plot on the New Year's window, start creating stencils. If you can draw well, then you can come up with patterns on your own, but if it’s tight with artistic skills and imagination, then take ready-made vytynankas, print them on paper, and then start cutting.
This traditional paper decor will not take much time and will not require special skills, but it will help you create a real pattern and impress not only you, but also those around you.
The abundance of accessories is appropriate only on a large window, so do not overdo it! And try to choose openwork jewelry.
After cutting out the decorations, decide on their placement on the glass. You can use symmetrical, central or asymmetrical placement.

Well, then choose a method for attaching jewelry and, in fact, glue them. This is how easy and fast you decorate the window.
Now I propose to watch a video story on how to properly cut out decor accessories.
Well, samples of the design of New Year's windows.


Decorations on the windows for the New Year 2019 (templates inside)
Well, let's get down to choosing and creating flat paper toys. For starters, the most popular characters are Ded Moroz and Snegurochka.


Of course, do not forget about funny snowmen.


You may also need an image.


And don't leave your loved ones behind.


Even from these elements, you can already create a fairy tale on the window.
Jewelry stencils for cutting A4 size: you can download and print
I want to say that many flat accessories can be cut not only according to a pattern, but also according to a symmetrical pattern. This, for example, applies to Christmas decorations.
Another great idea would be backlit clippings. Just glue translucent paper, such as tracing paper, on the inside, and carefully stretch a small garland (one of the lights) through it. It will look something like this:

So keep a bunch of different stencils with balls, bells, cones, numbers, animals, etc.


Do not forget about the symbol of the upcoming New Year 2019 - mischievous pigs.


Do-it-yourself window decorations for the New Year in kindergarten and school
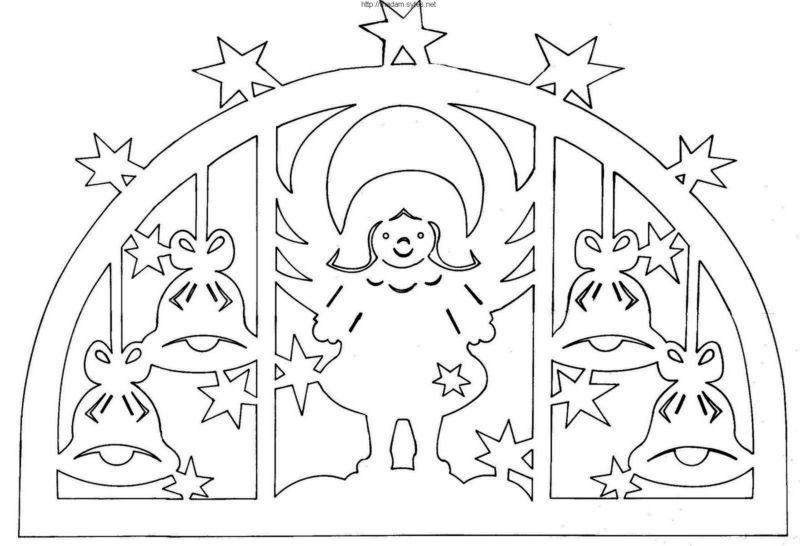
And I want to separately make a thematic selection of paper decorations for educational institutions. After all, our children rejoice most of all on the approach of the holiday. So schools and kindergartens should not only arrange matinees, but also magically decorate the premises.


Hello everyone, hello!
I think that you have already been waiting for me, I promised and still I can’t publish this post. And now it's finally happened. With pleasure I want to offer you everything that I found on the Internet. All the same, how many beautiful and cool decorations have been invented by people to decorate their house, apartment or any room on New Year's Eve. And you just need to take ready-made stencils, attach them to a sheet of paper, cut them out and you will get a new masterpiece. Which is easy to place on the window and that's it, admire your health. All templates are simple, but at the same time they are amazing!
So, today, friends, I propose to plunge into the world of vytynanok or kirigami. By the way, do you know what it is? Yes, quite right, this is such a special technique that appeared for the first time, as sources indicate, in China. So, occupy yourself with something interesting and creative, such work will only bring joy.
In addition, you can create crafts in the form of or, because all these symbols are required on New Year's Eve. Do you agree?
Even if you are not yet sure what you will succeed, I am sure that after viewing this note you will obviously want to bother, as they say, it will excite you, touch the nerve and wake up the master in you). You yourself will not notice, you will become wizards. Ah ha, like Santa Claus, paint all the windows with such a beautiful paper decor.
Well, then, I ask you to get straight to the point. Choose plots, compositions or individual characters, whatever you want. And do not forget about the main symbol of this year - the yellow pig. By the way, you can do it, or make it from improvised means.
Before moving on to the very process of creating crafts, you need to learn the main thing. All the pictures that you see here must first be downloaded to your computer. How do you do it? And so, right-click and select Save Image As.

And then paste them into a Word text document and stretch around the corner to the size you need.

Then take the cutter and start creating, carefully cut out the motif or composition you need along the line. Move from the biggest details to the smallest.
Remember, in order to do this type of work, it is necessary to do this not on the very surface of the table, but to put something even, but not necessary, for example, a board.

First of all, I will show you stencils of snowflakes, because they are in great demand. You cut off the black background, turn the blank over and stick it on the window.
There is such a variety here, and inside there are treasured animals or New Year's heroes, decor. In general, such decorations on the windows look amazing. Look, even from them the author figured out a Christmas tree.

So, here are the long-awaited templates. And by the way, you can use them in different ways, the first option is to cut and stick, and the second, attach the sheet to the window and, where you cut out, apply toothpaste by spraying a drop. Oh, you'll find out more about that later. Catch).


You can take the most openwork or carved fluffs, of course they are more difficult to cut.


What did you get the job done? Then rather take any of the proposed materials and glue the stencils to the stele. How to do this and what, there are many ways, choose:
- double-sided tape or tape;
- milk;
- toothpaste;
- soap solution;
- water;
- liquid paste;
- PVA glue or stationery.

Frosty patterns for printing and cutting
We continue to create a New Year's atmosphere and let's decorate the glass with something snowy, such as icicles. Or draw some kind of patterned motif, as Grandfather Frost does. Choose a picture and print.

Here is a pattern in an angular style. 


Cut out numbers and letters for New Year's Eve
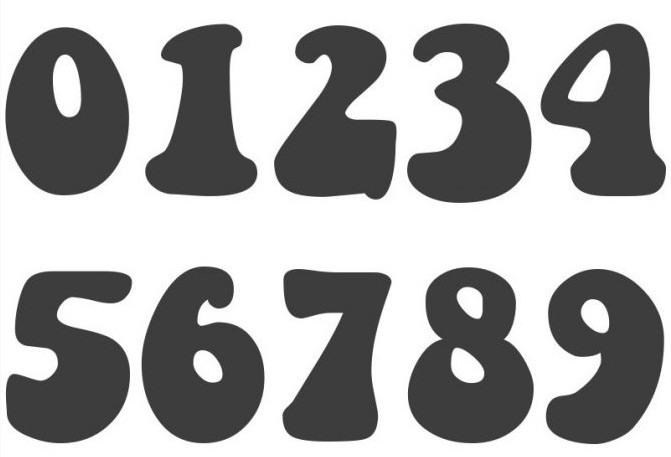
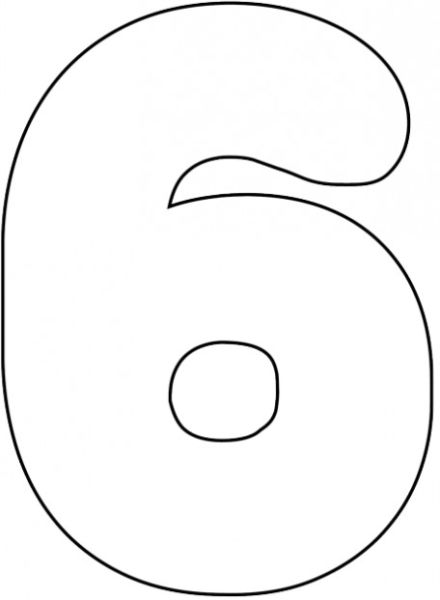
I think that numbers or numbers will definitely come in handy for you, because every time you can’t go without them, so take them into your piggy bank, especially when there are plenty of options and there is plenty to choose from.
I tried to find all sorts of designs and sizes. To make it easier for you to choose. Decorate halls and groups, use them in schools and kindergartens, cafes, etc. I even found multi-colored ones, and huge ones, but which ones do you need, maybe small ones? Well, isn't it lovely?


We figured out the numbers, now take the templates for the letters of the cherished words: "Happy New Year."


Or use this version of the most necessary words for January 31, which are made in the form of a garland.


Do-it-yourself paper window templates
I want to show you a video on this topic. Yes, you can already guess what it will be about. After all, the window is easy to arrange, if you only want it. You can put or make any, like those that I showed in, you can put and use. And by the way, don't forget about . Lots of options, get creative!
And here is another cool idea in the form of a deer. If you need this particular template, let me know, I will send it. I think it will be excited when you go and such a friend smiles at you from the window).
Among other things, you can paint a window with toothpaste using all the same stencils, if you don’t know how to do it, look. From myself I want to add that it is better to paste the paste, or rather, how to wet the white solution on a toothbrush and wave it over the bristles with any stick. That is, you will get splashes in the form of droplets.

In addition, you can use white gouache, choose what is more convenient for you.
Now the plot itself, if you still do not understand anything. Let's go look.
And remember, we created a house or a hut for a snowy composition with you, it also turned out so cool. Many people thanked me for the schematic, it is not mine, but taken from the Internet, but I share it completely free of charge. That's what happened, cool!

How to decorate windows for the New Year: beautiful templates and diagrams in A4 format
Well, friends, a variety of options that I managed to get for you. Let it be Santa Claus and the Snow Maiden with a Christmas tree, also a cheerful and mischievous snowman and a bunch of other characters. Many print and decorate with angels or depict winter fun. You can often find stories from children in this topic. In general, create a fairy tale, I wish you good luck!
All these sketches will easily fit on a landscape sheet or A4, if you don’t know how to do this, then read above, I showed how.


Friends, today I got templates for Frozen and Olaf. Available in large sizes on 2, 12, 18, 28 sheets. Write if anyone needs. There is also Pechkin (2 and 3 sheets), Matroskin (2 sheets), Sharik (2 sheets).


And yet, here are such large stencils for three-leaf windows that I found in the social. Vkontakte networks.


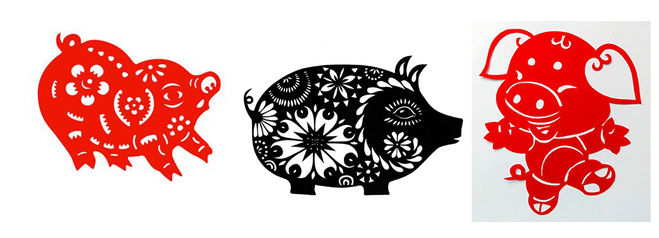
Vytynanka Pig - a symbol of the New Year 2019
Who can't do without this year? Of course, without a funny and playful boar, or as the kids like to say - pigs. This is the most important guest who will come to visit you on January 31st. Meet.


To be honest, I have a document in which a bunch of piglets and all that kind of stuff, and with numbers and muzzles of grunts. Who needs to contact I will send. Here, of course, I didn’t show everything, but only a small part, you can’t display everything in the note, there are too many of them.


New Year's paper stencils for windows for cutting
Well, in conclusion, I would like to please you with new products and ideas of what you can put on your glass. What an awesome view from the outside, all the neighbors will envy. All in all, I definitely recommend it.
The main thing is to come up with a plot, for example, it can be any fairy tale, or how children play snowballs in the yard. Take any favorite cartoon and chudite. By the way, there are a lot of ideas on this topic, where people show and share their work in a group in contact. Who needs to send a link.
Create reindeer. Do not forget to also glue or draw the main character on the window - I mean Grandfather Frost and his sleigh carriage.


The Snow Maiden can also be located nearby.


Also a Snowman for winter compositions is necessary.


You can also carve a forest beauty Baba Yaga).


A spruce twig or Christmas tree will still look cool.


Funny bunnies in the clearing also certainly look beautiful.


Vytynanki Christmas balls and toys (pictures)
And here are a couple more ideas, because bells always remain in fashion, it is with them that we transform everything on holidays. Let them be everywhere, and with them the balls. I suggest you check out this collection. Take note, too, my friends.


From everything you see, you will decorate your apartment awesomely cool and attractive. Create masterpieces, especially since it is not at all difficult to do when you have everything at hand for work.

Happy holidays gentlemen! See you soon, good luck and Siberian health! Bye.
If you do not have the makings of a calligrapher, then it is better to buy a ready-made New Year's card with a beautifully designed greeting, and make the inscription "Happy New Year" yourself. You can copy a congratulatory phrase from a ready-made template or print your favorite picture on a printer and make a stencil out of it. A beautiful inscription with "New Year" can be designed in a simple and concise style, or you can experiment with various patterns in the form of unusual curls, snowflakes, stars and other artistic elements.
Below are several options for how you can write the phrase "Happy New Year" beautifully. The inscription using a variety of curls looks very elegant.


The inscription, stylized as the Old Russian alphabet, looks unusual and fabulous.


The inscription "Happy New Year", made in the Soviet style, will look no less original.


If you want to draw the inscription "Happy New Year" on a poster or make a festive banner to decorate a room, then it is better to use letter stencils in A4 format. The letters printed on the printer can be colored or cut out from colored paper.

 A congratulatory inscription can be made in any color scheme. Alternatively, the inscription can be decorated in a winter style by painting the letters in blue with a smooth transition to white. If desired, the letters can be smeared with PVA glue and sprinkled with semolina - this will give them volume and relief.
The inscription "Happy New Year" will look very cute if you decorate the letters with New Year's caps or draw a hanging Christmas ball under each letter. Next to the congratulatory inscription, you can depict a thematic drawing: a New Year tree, a bottle of champagne, Santa Claus, chimes, a symbol of the coming year, etc.
How beautiful to write letters for the design of a poster, stand.
From this article you will learn how to make a beautiful inscription for the design of a poster, stand, birthday or any other holiday.
Beautiful Russian letters printed in a beautiful font for decoration: letter templates, print and cut
You can organize a holiday without thematic inscriptions, but if you are preparing a stand, a poster, then photographs or pictures alone will not be enough: after all, you need to write a congratulation at least. You can’t do without text when decorating a holiday. Unusual and original letter templates will also be useful in the advertising industry, as decorations that complement the theme of the event.
You can’t do without text when decorating a holiday
- In order not to look for templates every time before the next event or event, you can find suitable stencils and cut them out on thick cardboard. Such blanks are suitable for repeated use.
- It will only be necessary to attach the stencil to the place allocated for the inscription on the poster or wall and carefully apply a thin layer of paint. You need to fill in the letters so that the paint does not leak under the stencil.
- You can have a great time with your child in preparation for the holiday. The very process of writing a text will interest the baby, a joint lesson will contribute to the development of memory, awaken creative activity. Also, thanks to the cutting of letters, the child will form the initial knowledge of the alphabet.

 How to write a beautiful lettering
 - You can cut out the letters along the contour with scissors. But it is more convenient to do this with a clerical knife.
Beautiful letters are painted directly on a concrete or asphalt surface. - Graphic elements can also be applied to a wooden surface, metal, bricks.
Knowing the technology of applying letters to the surface, you can independently make an inscription for any production facility, advertise the service sector. - Letters written according to a pre-prepared template look neat and clear, and you can fantasize and select various options for writing text endlessly.

 Knowing the technology of applying letters to the surface, you can independently make any inscription
 Options for beautiful block letters:


Beautiful Typeface Option #1


Option of beautiful block letters No. 3
 Option of beautiful block letters No. 3
Beautiful block letters option No. 4
Beautiful Russian capital letters for decoration: letter templates, print and cut
If you need to make the inscription in capital letters, then look for the appropriate option in this section.

 Beautiful Russian capital letters for decoration: option number 1

Beautiful Russian capital letters for decoration: option number 2

: letter templates, print and cut
In this section you will find a selection of beautiful Russian letters for decorating a New Year's event.

 Beautiful Russian New Year letters for decoration

Beautiful Russian New Year letters for decoration


Beautiful New Year's inscription for decoration


Beautiful Russian New Year letters for decoration


So that the inscription itself does not mention the winter frosty clear days, it is worth looking for the corresponding letter templates for decorating the holiday. To make your search easier, we have collected them in this section.


Beautiful Russian capital letters for decoration: letter templates, print and cut
- In art schools and other specialized educational institutions, for years they have been taught to create inscriptions, to correctly position texts on a poster. Therefore, all the nuances of writing letters cannot be disclosed within the framework of one article. Yes, we will not try. After all, now there are many ways to bypass the process of writing a text: letters and entire inscriptions can be printed on a printer, redrawn from a finished poster, cover onto tracing paper, and then transferred to a poster or other surface.
- If necessary, you can simply paste the text printed on a black and white or color printer. But if you have time, then you can experiment with colors, texture and apply paint in some unusual way.

 What tools do you need to write beautiful text

Beautiful Russian capital letters for decoration

 Beautiful Russian capital letters for decoration
 Beautiful Russian letters with monograms for decoration: letter templates, print and cut
- Get started by creating a sketch. You will save yourself the time spent on creating a poster or lettering for an event if you write the text in a small format, displaying the maximum amount of detail.
- During the preparation of the sketch, you should have a clear idea of \u200b\u200bwhat your inscription should end up with. It will be possible to proceed to the final execution only after preliminary sketches. The decision on the location of the text also needs to be made at the stage of creating a sketch.
- When starting to write text, you should follow a simple and simple rule: all characters must have the same width. Also, the inscription should consist of the same combination of thin and wide lines. Avoid overlapping graphic elements, characters of different heights, different lengths or widths. Between the letters, in whatever format you create them, the same distance must be maintained.
- If the above requirements seem too complicated for you, then write the letters without complicating them with various additional elements. Take your time, because this activity is only for the patient.
- If you are not sure that you can write a beautiful inscription on a large-format canvas, then use a stencil for work. Now there are many sites where you can find stencils for printing, made in various styles.
- But if you find it difficult to draw with a stencil, then choose the appropriate font, print the letters on the computer. Next, you will need to carefully cut out the letters and place them on the poster, gluing the bottom. such an inscription will also look good.
 Beautiful Russian letters with monograms for decoration

Beautiful Russian letters with monograms
Beautiful Russian letters are fun for decoration: letter templates, print and cut
If you are going to design a poster in a humorous way, with cheerful notes, then look at the letter templates presented in this section.


Beautiful Russian letters fabulous for decoration: letter templates, print and cut
Special templates are suitable for decorating a children's holiday in a fairy-tale theme. You will only need to find the appropriate ones from this section and print.


Beautiful Russian letters children's cartoons for decoration: letter templates, print and cut
Children's event can be decorated with cartoon original letters. Where to find them? In this section!


Beautiful Russian letters are large for decoration: letter templates, print and cut
- Whatever font you choose to design a stand, poster, the letters must remain legible. Otherwise, the beauty you create will turn the text into a puzzle. When creating an inscription, of course, you can be guided by your own taste or idea of the design of the future text, but the trinkets will only complicate the text, and not make it more beautiful.


- When using a computer program or ready-made templates, you should not count on the special “beauty” of the inscription or its uniqueness. This is explained simply: the creators of such templates do not bother looking for information about a well-designed font.
- For example, you can follow one of the template links and see the letters in the provided font in different widths. Letters can be created in violation of all requirements. In one font there may be both rounded wide letters and elongated ones, some may have protruding ends.
If you think this font is beautiful, then use it to design a poster. However, you should not expect that the result will please everyone.


Here is an example of a readable simple font:


Beautiful Russian letters are voluminous for decoration: letter templates, print and cut


Beautiful multi-colored Russian letters for decoration: letter templates, print and cut


Beautiful Russian letters multi-colored for decoration

 Beautiful Russian letters multi-colored for decoration
 Beautiful Russian letters with flowers for decoration: letter templates, print and cut


How beautiful to write letters for the design of a poster, stand, holiday: sample letters for writing
When creating text, follow the following sequence:
What you need to create beautiful letters on a large format poster or paper sheet:
fountain pen for ink and ink
- Fountain pen nib set (tips of different thicknesses)
- wide markers (special, for a glossy surface)
- paint for these markers (specialized stores sell paint with various overflows, for example, metallic)
- in the absence of a fountain pen, felt-tip pens, colored pencils, gouache or watercolor can be used

 In the absence of a fountain pen, you can use felt-tip pens, colored pencils, gouache or watercolor
 A narrow nib can be used to write vertical dashes and lines, a wide nib can be used for the side parts of letters. With this method of writing, letters acquire volume.
- If you decide to use felt-tip pens or colored pencils, then start by outlining the outline of the letters. This is done with a simple pencil. The contour is further outlined with a felt-tip pen, and only then the letter is painted over with paints or pencils.
- So that the inscription does not look boring, you can draw shadows behind the letters. This will create the illusion of a wall behind the three-dimensional letters that cast a shadow. Letters drawn in 3D also take on extra volume. Technical part: recommendations
- determine where the inscription will be located
- without pressing hard on a simple pencil, we make a horizontal line on the sheet (there should be no traces after using the eraser): we apply alternating stripes along the font height and line spacing
- if you decide to make an oblique inscription, then immediately prepare an oblique line according to the type of school copybooks, but place the lines less often
- after drawing the auxiliary lines, we begin to write letters with a simple pencil, observing the maximum accuracy of the configuration and adhering to the width of the letters of the selected font
- errors made when writing letters are corrected immediately with an eraser
- we circle the finished inscription with a pen, felt-tip pen or marker
- do not erase draft and auxiliary lines (they can be removed only after the main inscription is completely dry)
- We print the template you like on the printer
- We put carbon paper on a sheet of paper
- We put the original text on top and circle it with a pen or pencil
- After that, we remove the carbon paper and the template, circle the contours formed again with a pen or felt-tip pen
How to apply text using carbon paper?
Do not be afraid to draw lines with a pen over a pencil. The ink will cover the contours drawn earlier with a pencil and the letters will be drawn evenly and evenly. But if you skip the stage of drawing pencil lines, then the inscription will come out sloppy.
You can choose from the letter outlines suggested in our article and use them as cheat sheets when creating your text.


