DIY Mother's Day Crafts. Ideas for primary school and kindergarten. DIY crafts for Mother's Day for kindergarten and school. How to make original crafts from napkins and colored paper for Mother’s Day – master classes
Do-it-yourself Mother’s Day crafts for kindergarten or school are created from a variety of materials, but the palm, nevertheless, belongs to colored paper and the most ordinary napkins. They are used to make very simple children's appliqués, original bouquets, and beautiful holiday cards. For preschoolers and children in grade 1, simple work options are selected that require a minimum of effort, while high school students are tasked with making more intricate and unusual products.
We bring to your attention several master classes on making beautiful thematic gifts. Follow the step-by-step instructions, create small, bright masterpieces with your own hands and delight your loved ones with pleasant holiday gifts.
DIY crafts for Mother's Day from napkins in kindergarten - master class
This interesting master class will tell you how to make a beautiful and touching craft from paper napkins in kindergarten for Mother's Day. Having mastered the lesson, kids will get an idea of unconventional ways of working with napkins, develop fine motor skills and learn accuracy, perseverance and patience. The finished craft will turn out very tender and attractive and will definitely delight a loved one on this holiday.
Necessary materials for crafts from napkins for Mother's Day
- red cardboard sheet
- stationery glue pencil
- paper napkins (pink and white)
- narrow satin ribbon or braid
- scissors
- double sided tape
- simple pencil
- template in the shape of a child's palm
- yellow colored paper
- sheet of white landscape paper
Step-by-step instructions for DIY napkin crafts for Mother's Day
- Draw a large heart on a piece of red cardboard by hand, and then carefully cut it out with scissors.

- Turn the heart over with the white side facing you, attach a template of a child’s hand to it and trace it with a simple pencil.

- Take several white and pink napkins and cut them into four identical strips. Then cut each strip with scissors into squares measuring 3x3 centimeters.

- Roll the napkin squares into lump balls, being careful not to press the paper too hard. The final round should be slightly fluffy, not hard. There is no need to wet the napkins with water during the manufacturing process.

- Gently coat the drawn palm with glue along the contour and lay it out in snow-white lumps. Then fill the entire internal space with them. Place the balls close to each other.

- When your palm is filled with balls, set the workpiece aside for a while so that everything sticks well. Then cut a piece of satin ribbon or braid of a suitable length and glue it to the top of the heart using double-sided tape. This is a suspension loop.

- Lubricate the empty surface of the heart on the outside with glue and lay it out with pink lumps of napkins. Move from the edges to the middle and place the lumps as close to each other as possible so that there is no gap between them. Place the balls adjacent to the white palm especially carefully so as not to disturb the shape of the hand and fingers.

- Take a white sheet from a regular sketchbook, draw a flower with petals on it with a pencil, cut it out with scissors, and glue a bright yellow eye in place of the middle. Twist the edges of the petals slightly and glue the chamomile to the heart.

- Glue a handwritten or printed holiday poem to the back of the item.

DIY crafts for 1st grade for Mother’s Day – “Loving Heart” postcard made of paper step by step

In 1st grade, you can make very beautiful and original greeting cards from paper with your own hands for Mother’s Day. Children will cope with such work without any difficulties, and mothers will receive bright, spectacular and memorable gifts from their children on their wonderful holiday.
Necessary materials for making a DIY Mother's Day card
- thick tinted paper A5 size
- scissors (stationery and curly)
- simple pencil
- corrugated paper
- stapler
- set of colored paper
- set of colored viscose napkins
- PVA glue
Step-by-step instructions on how to make a DIY paper card for Mother's Day in 1st grade

DIY crafts for Mother's Day - simple crafts for school

At school on Mother's Day you can make beautiful, but very simple crafts with your children. To create a mini-presentation you will need the most ordinary materials and a very small amount of time. The finished work will look attractive, impressive and catchy and will definitely delight your mother on the day of the most tender, inspired and touching holiday.
Supplies Needed for a Simple Mother's Day Craft
- tinted sheets of A5 paper
- set of children's colored paper
- simple pencil
- scissors
- narrow braid
- pearl beads
- glue "Moment"
Step-by-step instructions for making a simple paper craft for Mother's Day at school
- Fold the tinted A5 sheets in half, like a traditional folding card. Cut each part along the edge with scissors so that it looks like a tea cup.
- Using scissors, cut out flowers in the shape of tulips and daisies from red and yellow colored paper.
- Cut long strips from green paper - these will be the stems of the future flower bouquet.
- Glue a piece of white paper of the same shape onto the outer part of the postcard blank. From colored paper, cut out the outline of a tea cup 1 centimeter wide and glue it on top of the white background. From paper of the same color as the outline, cut out a flower and glue it to the outside of the card.
- Form flowers. To do this, glue red and yellow buds to the green stems, and attach a pearl bead in place of the middle. Collect flowers into bouquets of three, glue them together at the bottom of the stems and attach them with glue to the inside of the card.
- Cut the braid into small pieces, tie it into a bow and glue it over the stems of the bouquet.
- On the second inside side of the card, write in your own hand or glue a ready-made beautiful congratulation for Mother’s Day.
DIY crafts for Mother's Day from colored paper - master class

The master class describes in detail the process of making a spectacular and original children's craft for Mother's Day with your own hands. This step-by-step tutorial explains how to turn sheets of plain colored paper into a bright, eye-catching and eye-catching bouquet. A child in kindergarten, a 1st grade student, and an older student can easily cope with the task. Well, for those who want to create a more unusual work, we advise you to pay attention to another master class showing how to make a beautiful Mother’s Day card from paper napkins that are familiar to everyone.
Necessary materials for a bouquet for Mother's Day made of paper
- set of colored paper
- scissors
- simple pencil
- clip
Step-by-step instructions for making your own bouquet for Mother's Day from colored paper
- Fold a sheet of green A4 paper in half, but do not bend it. Using scissors, cut the sheet from the fold side, not reaching the edge by about 2-3 centimeters.
- Roll the cut sheet into a tube, secure the edge with a paper clip so that it does not unroll, and fluff out the stripes on top.
- Cut out flowers with petals of different shapes and sizes from brightly colored paper. Glue middle circles of contrasting tones into the center of each of them.
- Glue the finished flowers to the edges of the green stripes of grass and place the finished bouquet on a suitable stand.
Good day!
Autumn time, the charm of the eyes... Yes, how pleasant it is to walk through the forest when you rustle under your feet. I just want to do something with my own hands for the most beloved person in the world. I hope you guessed who? After all, the kindest holiday is coming soon - Mother's Day.
After all, only mommy will be able to appreciate your gift, which, according to tradition, is given to preschoolers and schoolchildren from year to year. For her, so that they would not bring great joy and happiness. Whether it’s a craft in the form of a paper postcard or something else, it doesn’t matter. The main thing is attention, and how you hand it to her, what words or choose when you meet.
When I was little, I also loved to sit and get busy; once I remember I gave my relatives a pincushion, which I knitted with knitting needles. She turned out to be such a funny little girl. And so many years have passed, and it still stands on the shelf, and needles and pins are stored in it.
And now I myself have two cheerful and mischievous sons, who every year from kindergarten bring me small souvenirs, which I happily accept and cherish.
Just today, you can already think about what you will give your mother on this day, which is traditionally celebrated in Russia on the last Sunday of November. Typically, scrap or scrap materials are used for such work. Probably the most popular product is. Or would you prefer to give it to her? There are a lot of options, let's figure it out.
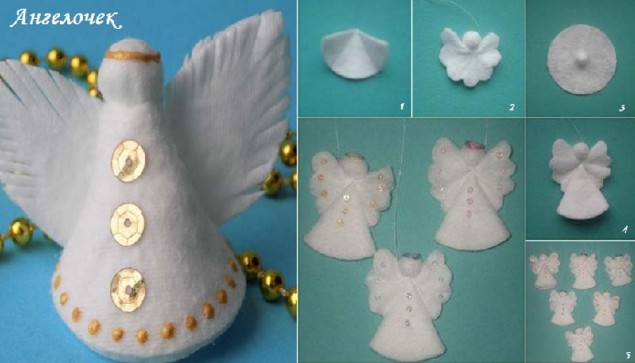
Any gift or souvenir from children's hands looks quite cute. I think that we all associate our mother with an angel. Therefore, I would like to invite you to make it in the form of a simple postcard. I think you will like this idea too. The only thing you can’t do with children of the first or second youngest group is this charm, because the work will be difficult for them. But with older kids (senior or preparatory groups) they can handle it easily.
Therefore, I am giving you a detailed master class on how to make this souvenir.
We will need:
- photo paper
- scissors
- glue stick, PVA glue
- satin ribbon
- openwork paper napkin
- white paper napkin
- decorative hole punch
- markers or colored pens

Stages:
1. Make a printout on a photo printer with the words: “Mommy! You are my guardian angel". Take the background for the postcard light blue or soft blue. Do the work like this, as shown below, the words should be on top.
Then, with the preschoolers, bend the sheet so that you get a thing that will be rectangular in shape and resemble an envelope. Make two vertical folds.

2. Then use a hole punch to make decorative holes along the side parts. Also make two holes and insert a satin ribbon into them.


5. Cut the blank along it. As you can see, you will get delicate wings.

6. Also roll the handles into a cone from the remaining napkin. And the head is made of an ordinary white napkin in the form of a ball.

7. Then proceed to the next step. On a landscape sheet, draw a circle, and on it a face, and glue paper hair in the form of strips, glue the head to the ball, and then to the body.
Cut the hair with decorative scissors with a wavy edge.
Glue the angel onto the card.

8. Decorate the craft with rhinestones or sequins. It turned out cute and quite beautiful. Good luck!

Once, I already showed you, here I think it would also be appropriate. After all, anyone, especially a mother, will be happy with such a souvenir with wishes.

You need to take the templates and print them on office paper (if anyone needs them, they are in Word format, please contact me, I will send them by email).

This is what happened, it’s cool)).
Now all that remains is to assemble the flower, glue all the petals together with a ribbon, and make the middle out of squares.

The size of the squares should be 3.5 cmX3.5 cm, fold them like this.


Then fold it like this.
Glue all the resulting blanks together, and then glue them to the middle of the flower.

I don’t know about you, but I still often use the word sunshine in my speech. After all, our mother really looks like him. She gets up early in the morning and goes to bed when everyone is already asleep.

We will need:
- template in the form of an A4 sheet
- strips of colored paper
- glue stick
- felt-tip pens

Stages:
1. Glue rays from multi-colored strips, roll each piece like this and glue the edges.

2. Fold the A4 sheet as shown in this photo. Then glue a circle in the middle and cut it into two halves. Glue the rays to it.
Advice! You can make rays from satin ribbons, but it will be more difficult with them, since they will be difficult to glue to the sheet.

3. Now glue another circle, and it should be yellow, let it dry, draw a face.
Inside the card, write beautiful lines or congratulations for your mother. You can take them, there is a whole collection of poems. Or come up with your own wish.

This is such an unusual and at the same time beautiful card as a gift for mommy on this bright holiday. Good luck!
In a group or in a reception area, you can place the joint work of the teacher and children in the form of palms, and arrange a bright bouquet out of them.

The next option is also very easy, you will need double-sided colored paper, glue, and scissors.

Stages:
1. Take a sheet of green paper and make an accordion out of it.

2. Then find the middle and glue the two parts of the workpiece together to make a lush fan.

3. Now the most creative process, draw any flowers, lilies of the valley or tulips. Maybe even roses. Cut them out.

4. You can give the children ready-made templates, or you can have them draw and cut them out themselves.

5. Then spread the finished pieces on the fan using glue. As you can see, a mini-flower bed has come out that mom or grandma will also like. It will definitely lift everyone's spirits. So, what do you do, creative victories!

A simple DIY gift for mom Paper flowers
The next souvenir I want to show you is paper flowers. They are very often given as a gift for such a holiday, and also for. There are many options, but I would like to show you a bouquet that you can create together with sweets. Cool idea, isn't it?

We will need:
- scrapbooking paper
- any candy
- bamboo sticks cellophane
- glue or glue gun
- scissors
- pencil
- green corrugated tape
- colored ribbons
Stages:
1. Wrap each candy in a plastic bag, like in this picture below. If the candies are flat, then you can even put two pieces.

2. Then, after you have crumpled up the cellophane, take a stick and insert it into it.
 3. To secure the bamboo, you will need green adhesive tape or regular tape. You can also take regular corrugated paper in the form of a long strip and rewind the stick with it. In some places, glue it with glue so that the paper does not unravel.

4. Using a simple pencil, make designs of flowers and leaves.

5. Now bend each petal up.

6. Pierce each bud with a bamboo stick from top to bottom. The candy will be inside the flower.

7. Now glue each petal, or rather its edge, to each other using a gun.

8. Add more petals to make the tulip even more voluminous.

9. Continue working on the stem and glue the leaves to it. And your souvenir will be completely ready. If you want, you can find even more ideas for such sweet gifts in. Feel free to follow the link.

And the second autumn-spring option in the form of a large basket or pot, but with a lush mass of flowers.
We will need:
- colored napkins of different shades and white
- inflated balloon
- PVA glue and superglue
- any basket
- stapler
- white threads
Stages:
1. Cover the balloon with white napkins and make it look like decoupage. You need to dilute PVA glue in water in the proportions of 0.5 tbsp of glue per 100 ml of ordinary water.
Let the wipes dry completely. As soon as this happens, release the air.

2. In the meantime, while the product is drying, you can do other work. Crumple the yellow napkin (which is already folded four times, they are packed like this in the pack) in half, then in half again. Along the edge, cut out a shape resembling a circle.

3. Also fold the blue napkin in half. Cut out a circle, it should be larger than the yellow one. Cut the edges of the workpiece.

4. Now connect the two pieces with a stapler.
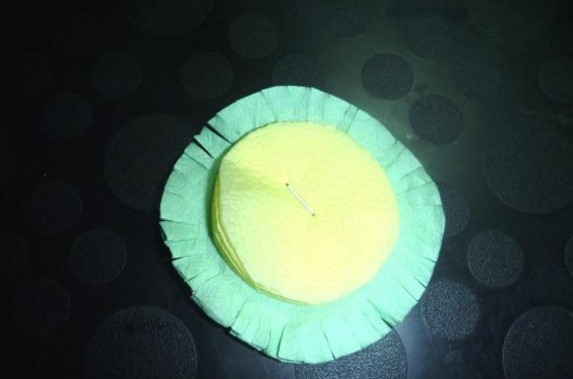
5. Afterwards, gently fluff the flower with your hands. You need to make a whole bunch of such blanks to cover the entire balloon.

6. Decorate the craft with flowers and glue the base to the basket.

For collaboration, you can also do work in the kirigami style. Or decorate a music room or group or classroom with such flowers. You fold a piece of paper in the same way as if you were doing.

The result will please you and never disappoint you. Take note.

Beautiful Mother's Day cards for children. Master classes with diagrams and pictures
This year we even have competitions on this topic. Why not. Therefore, I invite you to take part in it too. Before this, you and I had already made such souvenirs, and then one MK caught our eye, but its shape is not as primitive as everyone else’s. The author tried his best, so go for it, maybe it will be useful to you too.
Stages:
1. Take green cardboard. Bend it almost in half, but leave a couple of centimeters (2 cm).


3. Use a pencil to mark two curved lines to create something similar to a flower pot or perhaps remind you of a trapezoid. Cut along these contours with scissors.

4. Cover the top, which was 2 cm, with a different color or use corrugated cardboard; alternatively, you can decorate it with scrapbooking. Glue a butterfly for decoration.

5. Now you will need another blank in the shape of a fungus.

6. Cover the hat with corrugated leaves and flowers to make it green or light green. And write on the leg.

7. Now insert the fungus into the pot. The result was a craft with a surprise inside.

Also, everyone's favorite asters can also be used in postcards. Take leaves of different colors and cut them into strips 2.5 cm and 3 cm thick. Make a fringe, but do not cut to the end about 5 mm.

You will still need strips 7 mm thick; roll the cores out of them using a toothpick.

Then glue the ends together with glue and let dry. It is to these washers that you glue the prepared fringed strips.


Afterwards, all you have to do is lightly fluff the product with your hands so that the aster comes out.

Make leaves in quilling style.

This work is done in the same way, using a toothpick, only then you need to give the desired shape with your fingers.

In conclusion, you need to think about how you will arrange all the elements and where the inscription with your wishes will be written. The craft can be used in labor lessons in primary school or kindergarten, children aged 5-7 years.

And finally, I would like to give you ready-made blanks in the form of coloring pages.


Crafts for Mother's Day from cotton pads and paper napkins
In fact, to make a craft yourself you don’t need much patience and materials. You can even use improvised materials to create an applique and even a picture. To do this, you can take regular cotton pads, cocktail sticks and straws, etc.
Take the instructions and create, let this time there be calla lilies that will fit perfectly on a plate, for example. This is an excellent option for elementary school students (grades 1-2), but children in grades 3-4 will definitely cope with this work even better.


In the same way, you can do the job and put the flowers in a vase or a regular disposable cup.


Here is another masterpiece, simple and at the same time beautiful.

In addition, you can also adopt these MKs.


And after you learn how to assemble such compositions, build a topiary.


But for kids 2-4 years old, such an application will be possible. Cotton pads will have to be decorated using a pipette and colored paints, or rather a solution of water.

As they say, let your imagination run wild. Then dry the circles and glue them onto the sheets.

If you are a creative person, then you can also use such a cute character, did you know who he is? Yes, this is a guardian angel and, as you can see, it is also made from ordinary cotton wool. See the working steps below.


Or this is a miracle.
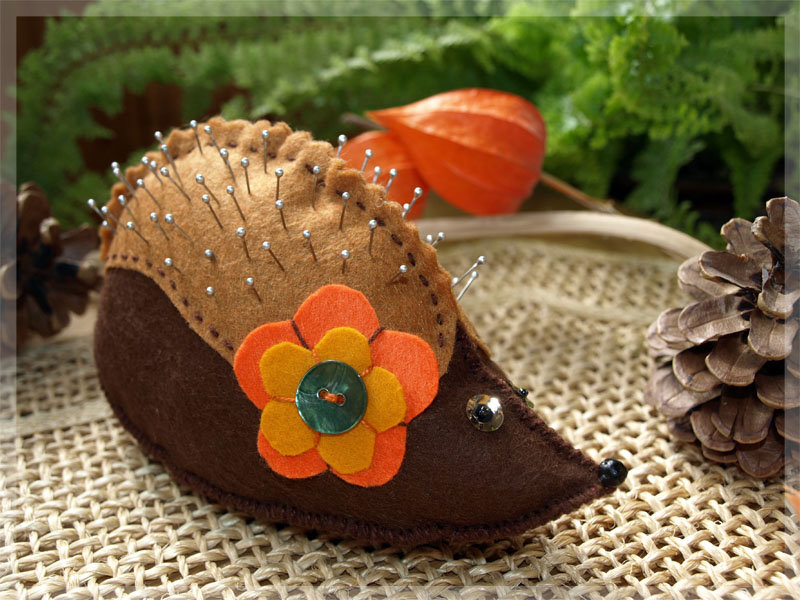
Any housewife loves to dress up and decorate the house, and therefore you can give your beloved mother a brooch for her curtain or blouse for her interior.

How to make a craft for mom? (step-by-step instructions for primary school children)
Here is another memorable gift that can show off on your mother’s shelf for a long time. Moreover, it will be unusual, but quite bright. Teachers, take note and create together with the students.

We will need:
- cardboard
- colored wool threads
- flower template
- needle

Stages:
1. So, hand out the handout and have the child circle the flower-shaped blank.


3. After changing the thread, take it of a different color.


5. Glue a small pompom in the middle.

Here is another perky and incredibly cute masterpiece. Which is made of little arms and legs.
We will need:
- finger paints
- napkins
- sheet A4
- juice straws

Stages:
1. Dip the foot of a child’s foot in paint, and then make a print.

2. Do the same and blot your hand.

3. Cut out the blanks and then glue them onto a stick.


Unusual pasta creations as a gift for mom - quick and easy
Well, such a gift is really unusually cool, and it’s a pleasure to make it. For example, give your mother beads made from multi-colored pasta. Which can be painted with acrylic paints, but it is better to use food coloring for eggs with the addition of vinegar, or buy ready-made ones.

The easiest way is to place the noodles in bags and add the prepared bright solution to them.

Then put the blanks on a thread and the souvenir is ready.

You can create other souvenirs, for example these. Here are a couple of ideas for you.


If you want, you can also make this year’s new box from this material, and this video will help you. You will definitely like it, all the work steps are clearly shown, use:
By the way, they also lay out entire paintings from pasta. So, you can also create such a composition if you wish.

Children's crafts for mommy in 5 minutes (all new items)
Now let's look at another option made from sticks. Surprised? If you're an ice cream lover, you probably have a mountain of these trinkets lying around. Paint them any color you like and let dry.

Take the photo and cut out the image of the head, glue it onto thick cardboard.

Turn the workpiece over and glue the halves of the sticks onto ceiling tile glue or use a heat gun.

This is such a cute flower, put it in a jar.

Or I can suggest this product, it also looks great. You will get nice daisies.


And now another new thing, it will be a postcard, but it will be voluminous. It looks cool, and it’s very easy to create! See for yourself.
We will need:
- a photo where the baby stretched his hand forward or a picture with the same way
- wire
- tape or glue
- threads
- stationery knife
- corrugated paper: yellow and green color

First you need to make a flower on a wire out of corrugated paper, and then insert it by making a cut in the picture.

Well, another wonderful bouquet.

We will need:
- disposable cup
- construction gypsum
- PVA glue or glue gun;
- old newspaper
- thread for fixing newspaper
- spray paint
- simple pencil
- decorative thread (knitting thread, ribbon, ribbon);
- corrugated paper
- stapler

Stages:
1. Wrap a pencil with decorative ribbon or string. Glue the ends with a glue gun. Form a ball from the newspaper with your hands and stick it onto the prepared stick. Tie with thread for a round shape.

2. Make flowers from corrugated paper, secure the middle with a stapler. Fold a sheet of paper several times and cut out a circle. Make the cuts as we did earlier in this post. Fluff the workpiece.

3. Pour plaster into a glass and insert a stick with a ball. Let it harden. And then finish the craft, glue the flowers.

4. Charm your mothers with such a wonderful gift. I'm sure she'll like him.

Another idea that I also liked, especially if you are having a party that day. Look how funny the beads turned out.

Or design cool cups.

There is also such an idea from wrapping paper, you can build something like this beauty.

Or you can even take real balloons and make a card out of them.


I hope you will have enough great ideas to make a craft and give it to your beloved mom for Mother’s Day. Be sure not to forget about this day, which is celebrated once a year. I wish you creative success and patience.
Bye everyone and see you again tomorrow.
Best regards, Ekaterina
Mother's Day is an international holiday when all mothers and pregnant girls are congratulated. Mom is the most important person in our lives, so people simply cannot remain indifferent to this holiday. When, if not on this day, is it worth saying the most important and warm words for a loved one who gives us all the warmth, care, affection and love. Congratulate your mothers on this bright holiday, present them with a piece of your warmth along with cards that you made yourself.
Happy Mother's Day card
A handmade card decorated with roses will bring your mother much more pleasure than just a bouquet of flowers. This project is not as difficult as it might seem at first glance. You just need to read the instructions and everything will immediately become clear.
The materials and tools you will need are PVA glue (it’s more convenient if it’s in the form of a pencil), a fairly thick sheet of A4 paper, double-sided tape and double-sided multi-colored paper.

To begin, cut out a square from colored paper, the sides of which will be equal to 2.5 cm. Next, bend it in four: twice in half. The resulting small square needs to be folded in half again, only this time diagonally. On the resulting triangle, draw a semicircle as shown in the illustration and cut out the shape along the line. Open the structure, you should get a flower. Now cut out another petal and glue it in the place where there is a void. This way you will combine the flower into one complete piece. In a similar way, you need to make many flowers of different shades.


The next step will be to combine all the flowers into one bouquet. Study the illustration below, apply double-sided tape to the petals in the same way and collect all the flowers together.
The last stage of work remains: fold a sheet of thick paper in half and place a bouquet of flowers in the center. The card for mom is ready, all you have to do is enter your wishes.
Mother's Day greeting card in 20 minutes
This card for mom looks very impressive, but making it yourself is very quick and easy. For materials and tools, you will need thick paper of any color you like for the base. In this example, red paper was used. Additionally, prepare colored paper of two shades, a serpentine of two colors, multi-colored paper on which notes will be written, a pen, a knitting needle or a toothpick, tweezers, glue, and scissors.

To begin, prepare the base by folding the selected sheet of paper in half. Now, from paper of a different shade, cut out a sheet of the same shape as the front part of the base, but slightly smaller. Glue it to the base using PVA glue, placing it in the center. Now cut out another rectangle from construction paper of a different color. It should also be smaller than the previous two layers of paper. Secure it with glue in the center.
Now that the base is ready, leave it to dry and start making the decorative part. You need to cut out four identical strips of serpentine and decorate them into petals in the manner illustrated in the photo.

All the details of the flower are ready, all that remains is to glue them into the overall structure.


Cut out a piece of scrap paper and glue all the pieces to the finished card.
This is how I managed to make a card with a rose for Mother’s Day in such a simple way.
Postcard with a bouquet of roses
This master class offers you step-by-step recommendations for creating a cute card with a bouquet of roses for your mother.
Prepare half of a thick green sheet and a second sheet of white paper.
You need to make a frame from white paper, as shown in the illustrations below. For this you will need curly scissors. You can do without them, but the work will be more difficult. To begin, fold the paper in half twice and cut along the edge with curly scissors. Then cut out the middle, leaving about 1.5-2 cm from the edge. You should have a folded frame.

Fold it like an accordion and cut out all sorts of patterns on the folds. You may not succeed the first time. You can initially practice on a separate piece of paper so that you end up with a very beautiful postcard frame. To create patterns on the corners, fold the frame in half.
Now unfold the finished frame with patterns, use a brush to thoroughly coat it with glue and glue it to the base of thick green paper.

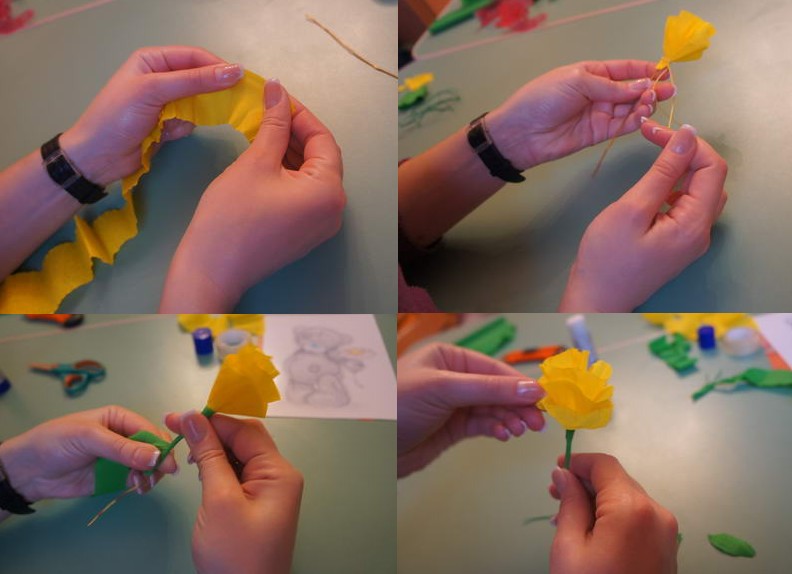
The base of the card is ready. Leave it to dry and move on to creating roses. You will need an ordinary napkin of the color that most closely matches the shade of the rose. Cut it into strips about 2 cm wide and bend it like an accordion. Cut an oval on one side and unfold the stripes. You should get something like in the illustration.

Take an ordinary match and wrap the edge of the strip around it, securing it with glue. Continue rolling the strip, creating pleats at the base. You need to shape the bud in such a way that the petals do not coincide with each other.
Next you need to form the stem of the rose. To do this, use a multi-layer napkin, cut it into strips 2 cm wide. Take one of the strips, squeeze it a little at the edge, apply glue to it and start wrapping it around the base of the rose. When the napkin is well fixed, wrap it further so that you get a kind of tourniquet. It will serve as the stem of our rose.

From another piece of napkin you need to make a leaf for a flower. Fold a green napkin in half, cut out a piece in the shape of a folded sheet and make cuts in the form of a small fringe along the edge. Glue the leaf to the stem, and the rose for a future postcard is ready.

For the card you need to make nine roses, three of which will have leaves on their stems. Next, take the ribbon, slightly curl its edges with scissors and glue it in the center of the card. Now you need to glue all 9 roses onto it one by one, forming a beautiful bouquet. Tie it with a ribbon and your mom's card is ready. All you have to do is write an inscription with your wishes.
Arrangement of roses on a postcard
A composition of roses looks so beautiful and noble that it will not leave anyone indifferent. These flowers managed to simultaneously combine severity, tenderness and grace. Therefore, roses are exactly the flowers that are best suited as a gift for mom. Let's try to make a few pieces and decorate a postcard with them.
To work, you will need a thick base (choose the color and size of the paper at your discretion), paper intended for quilling, a wooden skewer or knitting needle (to twist the paper), as well as those tools that almost no craft can do without. - this is PVA glue, as well as scissors.
The first step is to make rosebuds. To do this, choose paper of different shades, let them be gentle. Cut the paper into separate, not very wide strips (the size of the roses will depend on the width) and start twisting the bud.

Take one of the strips and start wrapping it around the toothpick. First make a few turns, then bend the paper strip towards you 90 degrees. Next, you need to make another turn of the paper, as shown in the photo. Continue wrapping the strip of paper around the toothpick, occasionally folding it, turning it over, and securing it with glue. Form a complete bud and secure it with glue at the end. When it's dry, remove the rose from the toothpick. It turned out very nice, didn't it?
In a similar way, make a certain number of roses of different colors and sizes. Now move on to making leaves and curls. Everything here is much simpler than it might seem. Take a long strip of green color, fold it several times and wrap all the folds with a curl from the same strip of paper. Don't forget to fix everything with glue at the base. Make several large and several small leaves. All you have to do is make small green curls. To do this, just take one strip of paper (you can take a different shade of green) and twist it on both sides onto the sticks (you need to twist it in different directions). You should get it as illustrated in the photo.

All you have to do is lay out the composition on a base of thick paper and glue it well. Now the bright and beautiful card with roses is ready.
Postcard with a large bouquet of roses for mom
This version of a postcard for mom looks very beautiful and impressive thanks to a large bouquet of roses, and the manufacturing process is absolutely not complicated.

The work of creating roses is based on the very common quilling technique. The bouquet looks very elegant and bright. Making a card can take from half an hour to one hour, it all depends on the number of roses. Therefore, be patient and diligent. Let's start.
To work, prepare several sheets of thick paper of different colors, a stick for twisting, glue in the form of a pencil, double-sided tape, ribbon, and also curly scissors (if you don’t have them, you can use regular ones).
To begin, cut out many multi-colored circles of the same shape. Cut them in a spiral, as illustrated in the photo. The cuts can be made straight or curly; the final appearance of the flowers will depend on this. If you make the cuts curly, you will get more openwork roses.

Now you need to form a bud from each spiral. To do this, take a wooden skewer, knitting needle or a special twisting tool, and start twisting the part in a spiral from the edge to the center. When the bud is fully formed, secure its end by gluing the tip to the center of the spiral.

Fold the base card in half, then try all the flowers onto it. Check if there are enough of them, and if not, complete the number of roses required to create a full bouquet.

Cut out a flower vase from dark paper. Attach double-sided tape to the back of the vase.

Prepare the base of the composition by cutting out a green rectangle. It should be slightly smaller than the postcard itself. Place it in the center of the greeting card using double-sided tape.

All that remains is to glue the vase onto the card and place a bouquet of roses on top of it. If you wish, you can further decorate the greeting card. In this version, a tape and a piece of paper with an inscription were glued. You can glue beads onto individual rosebuds. Now the postcard for your beloved mother is ready.
Universal card with roses
This card is suitable for absolutely any celebration or occasion; you don’t need a lot of materials. Prepare thick, brightly colored cardboard, a small thick white sheet, a ribbon and artificial roses; you can pick up a few beads and rhinestones for decoration.

Fold colored cardboard in half. Cut a square of white cardstock that is the same width as the base of the card. Secure double-sided tape to the back of the light square. Glue this piece to the bottom of the card.

You need to place a ribbon at the junction of the white and colored parts of the greeting card. Make an inconspicuous slit on the right side of the card as close to the fold as possible. You need to insert a ribbon into it.

A bouquet of artificial roses needs to be glued under the ribbon with double-sided tape. Tie the ribbon into a decorative bow over the bouquet. Additionally, secure it with glue or double-sided tape. The postcard is almost ready. All you have to do is glue a rectangle of light paper inside for wishes, and also decorate the card with beads or rhinestones. Now everything is ready.

Making a rose for a postcard
If you want to make a card with a rose but have no idea how to make one, this tutorial will teach you how to make a rose that can be used to make absolutely any card. The process of making it is very simple, you only need one strip of paper, but the result is impressive - the rose looks luxurious.

Prepare thick paper of the desired color, scissors (use curly ones if you have them), a small brush (sponge), PVA glue, and a stick for curling the petals.
First of all, you need to cut out a strip of paper, the width of which will be about 3 cm. If you have curly scissors, use them. If there are no such scissors, make a wave with ordinary scissors.

Using a brush or sponge, tint the tips of the future petals with acrylic paint. This way the rose will look more alive and natural.
Now you need to make cuts along the entire strip. The gaps should be 2.5 cm. However, first you need to leave a gap of about 5 cm - the bud will be formed from it. Curl the edges of the petals using a previously prepared stick.

Make a cut in the middle of each petal (bottom). Glue them together with glue overlapping - this way you will be able to form convex petals.

Now start twisting the bud from the largest gap. Twist the strip, periodically coating it with glue. If you want a fuller rose, make an additional strip in a similar manner. As a result, you can add green leaves.

Now the rose is ready.
Hello. You all know that it is always nice to receive gifts on any occasion. And if they are from our children, and made with our own hands, then they simply have no price. Any mother, and any father, always rejoices at the creativity of their children, and this is an indisputable fact.
Therefore, on the eve of the upcoming Mother's Day holiday, I decided to prepare a special selection that contains various ideas for making children's crafts for this event.
The work can be done by children of different ages, from the youngest group of kindergarten to elementary school. Of course, adult cooperation will be required. And since this will be a surprise for mom, grandmothers and fathers, educators and teachers should come to the rescue. So, dear adults, let's all surprise our most beloved person on earth together.
For those who have forgotten, let me remind you that this special holiday is celebrated on the last day of autumn. Therefore, do not forget to choose and make a gift in advance with your child, and also learn it to express all your love and gratitude to your mother.
Today, first of all, I will focus on the step-by-step processes of making work. Also, I will not leave ready-made photo options without attention, and will provide you with a bunch of interesting and original ideas.
If suddenly you don’t like anything (although I doubt it), then go to the article on the topic of manufacturing. There is also a cool selection of homemade gifts for our mothers.
We’ll start with products that can be used not only by older children, but also by little ones. I dedicate this section to kindergarten. You can create and craft from any material, be it plasticine, paper, etc.
Bouquet of multi-colored palms (for the younger group)

To do such soulful work you will need plain white A4 paper, paints, water and brushes.
Now make blanks on a white sheet, just draw green stems and “tie” them with a blue ribbon. With your child, paint his palms with any color. Next, help him make prints on the branches. That's all, the gorgeous bouquet is ready!
Also invite the kids to simply make a gift. Here's what might come of this idea.

You can also make greeting cards with younger preschoolers.
Card with balloons
Choose a photo of your son or daughter and cut it out. Inflate small balloons with your child and tie them with multi-colored woolen threads. Leave long ends. Glue colored paper slightly smaller than white onto a white sheet of paper. Next, glue the photo and balloons. This gift looks very impressive!

Postcard “Colorful buttons”
Well, this is the simplest option. Ask your child to draw the stems or print them out on paper in advance. Then choose multi-colored buttons, maybe of different sizes, and glue them. At the back, help me write a congratulation.

With the guys in middle group, you can create such charming butterflies.

First, paint the paper with different colors from light to dark. While the base is drying from colored paper, fold the butterflies according to the diagram below.

Well, then glue them onto the dried base and complete everything with a twig and leaves, which can also be made from paper or drawn.
Interesting work that requires artistic skills. Ask the children to draw a portrait of their mother. And then make frames together.

For seniors And preparatory group options are a little more complicated.
For example, you can make ekibans like this. The stand will be plastic bottle caps. The tree itself is a wooden popsicle stick. Cut the foliage out of paper in the shape of hearts of different sizes. Glue them together and then glue them onto a stick.

A beautiful bouquet is made from ordinary cotton pads. Plus use the quilling technique for decoration.

In this option, you will have to try and cut out the baskets. Make flowers together in any way known to you. We have already talked about how you can make tulips. If you haven’t read the article, be sure to check it out here

Of course, flowers are a common gift. Try creating a homemade bouquet.

Flower vase
You will need: green paper, napkins or corrugated paper, scissors, glue.

Manufacturing process:
1. Take a sheet of green paper and fold it in half. Step back about 3 cm from the bottom and draw a horizontal line with a pencil. At the top, draw parallel lines at intervals of 1-1.5 cm.

2. The resulting parallel lines must be cut to a horizontal line not reaching 3 cm from the edge.

3. Unfold the sheet with the cuts.

4. Turn the sheet over to the other side and fold it not exactly edge to edge, but at a distance of 1 cm.

5. After this, coat with glue and glue.

6. When the paper sticks well, roll the workpiece into a tube.

7. The result is a stable vase with petals.

8. Make flowers from a napkin or corrugated paper, as shown in the photo.

9. Glue the finished flowers to the stems.

10. You can decorate the resulting bouquet to your liking, for example by gluing sequins or tying it with a satin ribbon.

You can also use the idea of decorating pebbles. Paint them with paint, glue felt hearts on top and the souvenir is ready.

Or plasticine, beloved by all children. It will help you create whole pictures.

And I also liked these beads. Mom will definitely be delighted!

Making DIY crafts for Mother's Day in elementary school
A very interesting and creative craft in the shape of a fish, made using the technique of appliqué and trimming. Look how lovely it is.
Fish

You will need: white sheet of cardboard, red sheet of cardboard, bright tinted or colored paper, pencil and eraser, glue.
Work process:
1. Take a white piece of cardboard and draw a fish on it. Cut it out.

2. Make fins and a tail from red cardboard: draw and cut out.

3. Cut thin strips from tinted paper. These will be scales.

4. Now fold each strip in half and connect, securing with glue. You will get “droplets”.

5. Glue these “scales” following the drawn line.

6. Fill the entire body of the fish, gluing each next edge under the previous one.

7. Take the paper from which the muzzle will be made. It can be peach, red or white. Cut it into small squares. And using the end of a pencil, crumple them.

8. Then glue all the parts.

9. When filling out the muzzle, make sure that there is no empty space between the paper.

10. After the work has been done, glue the fins and tail. The gift is ready.

You can also make a vase from a bottle and flowers from any available material.

Or, for example, make such a sweet composition. It is done simply.

And for those who like to work with threads, offer to do some handicrafts and make a real box for storing jewelry.

If mom is a fashionista, then she will definitely like the next work in the form of a stylish handbag.

Here is another version of a homemade vase. Everything is as simple as shelling pears.

Or, for example, girls can sew needle beds. Always a necessary thing in every home.
For lovers of beading, an option with a bracelet. Here's what it looks like along with the diagram.

I also found a cool idea with a pattern on a candle. I think it will be very nice to receive such a gift and then use it.

Take baking paper and draw a design on it. Just remember that it will be transferred to the candle in a mirror image.

Then attach the drawing to a thick candle and fix it. Next, treat the candle with hot air, such as a hairdryer. Beautiful candles are ready.

And don’t forget about everyone’s favorite postcards.

And try to make a unique vase from a simple jar.


Simple crafts for mom made from colored and corrugated paper
And now I want to offer you products that can be made from ordinary paper or cardboard. For example, you can make a souvenir in the form of a radiant sun.
Sun

You will need: colored paper, glue, scissors, pencil, stick (wooden skewer), felt-tip pens.

Manufacturing process:
1. Cut out two large circles and one small one. Next, take yellow paper and draw lines at a distance of one cm.

2. Start folding the workpiece like a fan.

3. Then cut the end at an angle.

4. Make another “fan” and connect them together with glue.

5. Using a different color, do the same as with yellow paper.

6. Connect all the resulting parts into a circle, firmly gluing them with glue.

7. Hide the stick in one of the cells. Glue it with glue too.

8. Draw a face on a small circle.

9. Glue it onto the large circle. Glue the muzzle on the front side, and the second large circle on the back side. Decorate the sun as you wish.
I would also like to suggest making a shoe with a sweet surprise inside. For the product, it is better to take thick paper or colored cardboard.

Print and cut out the template.

Bend and glue the parts along the dotted lines.


Decorate the shoe. And inside, put a transparent organza bag with gummies.

Here's an idea with a beautiful paper plate mural.

Well, for example, you can make a candy bouquet composition from corrugated paper.

Or create these beautiful flowers.

How do you like this touching composition in the shape of a heart?

Of course, any flowers made from corrugated paper look very impressive, so get creative and use your imagination. I propose to make a very simple craft that even kids can handle.
Flower for mom

You will need: corrugated paper, scissors, glue, disposable spoons and cup, cotton pad, paints, brush.
Manufacturing process:
1. Fold corrugated paper or a regular napkin several times. Place a spoon on it and draw a petal slightly larger than the spoon itself. Cut out the petals.

2. Glue the petals to the spoon.

3. Make a small ball from a cotton pad or cotton wool. This is the middle of the flower. Glue it. You can also decorate it with sparkles.

4. Make a stand from a plastic cup. You can leave it as it is, or paint it with any color using paint. Also paint the remaining white part of the spoon green to create the stem. Turn the glass upside down and carefully make a cut. Insert the finished flower into it.
Master class on making cards for Mother's Day + templates
Well, as promised, I’m sending you a couple of templates for creating postcards yourself. Print them out for your kids and they will be happy to color them!


DIY crafts for mom from cotton pads, napkins and pasta
Now I offer another very interesting master class. In it I will show how you can make a touching craft from ordinary paper napkins in the shape of a heart.
Congratulatory heart

You will need: a sheet of red cardboard; office glue; pencil; paper napkins (pink and white); narrow satin ribbon or braid; scissors; double sided tape; simple pencil; template in the shape of a child's palm; yellow colored paper; a sheet of white landscape paper.
Manufacturing process:
1. Draw a big heart on red cardboard and cut it out.

2. Now turn the heart over with the white side of the cardboard and trace a child’s hand on it using a stencil.

3. Cut the napkins into 4 identical strips. Then cut each strip into approximately 3 by 3 squares.

4. Roll into balls from these squares, but do not press the napkins too much.

There is no need to wet the wipes with water!

6. Make a loop from the ribbon and glue it to the handle using double-sided tape.

7. Grease the remaining empty part of the heart with glue and place pink lumps of napkins tightly.

8. Make a flower from plain white and colored paper and glue it to the side.
9. On the front side of the cardboard, that is, the red side, glue a beautiful wish or poem.

And more ideas for creativity:
- Postcard;

- Bouquets.


Callas from cotton pads

We will need: thick green paper; long green cocktail tubes; cotton buds; yellow gouache or watercolor; PVA glue; white cotton pads; beautiful ribbon.

Manufacturing process:
1. Take cotton swabs and paint one end yellow.

2. When the sticks are dry, take a cocktail straw and insert the stick into it so that the yellow part is visible. Place the cotton pad on the tube, making sure that the yellow stamen is in the middle. Twist the disk as shown in the photo and secure it with glue at the base.

3. Make the required number of flowers in this way. Also cut out petals from green construction paper.

4. Take your flowers and petals, wrap and tie them with ribbon.
Look what beautiful bouquets you can still create!


Well, it remains for us to consider the gifts that are made from pasta. In fact, this is not a difficult job either. You need to come up with a composition, paint the pasta and place it on the base. In general, look, choose and do not judge strictly).


In children's institutions, do not forget to make collective congratulations, for example, create a wall newspaper or make a group gift.


This is where I finish writing. I think that I have more than enough ideas for making crafts for Mother’s Day. Now it's up to you. Create with your children and delight your beloved mothers.
Volumetric card “Flowers for Mom”. Step-by-step instructions with photos
Olga Viktorovna Strebnyak, teacher at MBOU “Elementary school - kindergarten No. 21” in Salsk, Rostov region.
Description: The material contains information on making cards for Mother's Day; it will be useful for educators, teachers, additional education teachers, parents and those who like to do handicrafts.
Purpose: Can serve as a gift, interior decoration.
Target: making a card for Mother's Day.
Tasks:
- broadcast of creative experience;
-development of creative thinking, creative imagination;
- developing interest in making cards with your own hands, introducing and using them in working with children.
- creating a festive mood.
Materials for work:
- a sheet of colored cardboard size A 4;
- double-sided colored paper;
- glue stick;
- scissors;
- openwork napkin;
- figured hole punches;
- printed inscription.


I really want my mother to smile,
So that I never feel sad in my life,
So that you always succeed,
So that you don’t find out that there is trouble.
On Mother's Day, my love, I wish you
May you remain like this forever!
I dedicate these lines to you -
To a wonderful mother, tender and dear!
The wonderful holiday “Mother's Day” is approaching. A beautiful and original three-dimensional card will be an excellent gift for our mothers. It can be done with children over 6 years old. At first glance, it seems that it is very difficult to make a postcard, but after reading the instructions you can understand that it is not at all difficult.
The process of making such a postcard develops fine motor skills, logic, spatial thinking, and teaches children perseverance and accuracy.
Progress:
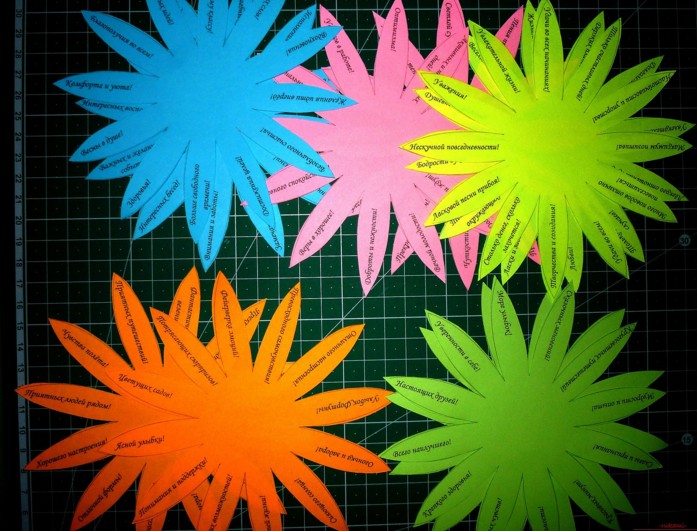
We fold each sheet of colored paper in half and cut it, we get eight halves. We remove one leaf, you can use it to make flower cores.
Fold the sheet at the corner to form a triangle. Cut off the remaining part

unfold it, it turns out to be a square.

We need 7 such squares.
Fold the squares into triangles three times.


Cut off the upper part of the triangle in a semicircle to make a petal (petals can be made of any shape).

We unfold it and we have a flower with 8 petals.

Cut off one petal.

Using a figured hole punch we get a small flower, cut off one petal from it

and glue it to the center of the large flower.

Glue adjacent petals together. We got a voluminous six-petal flower.

The same must be done with all other colors.
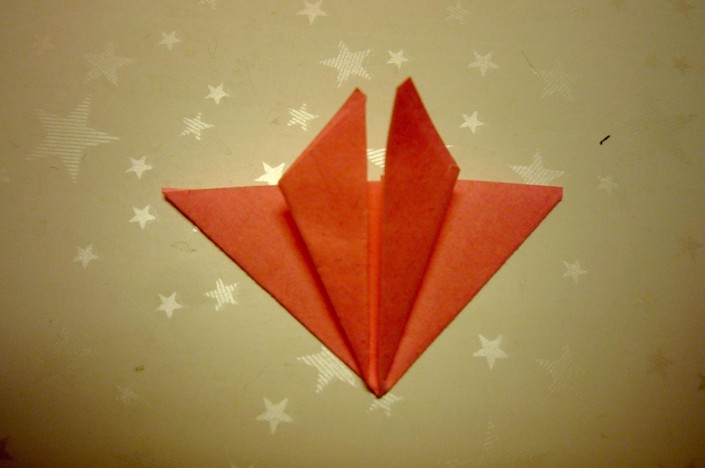
We fold each flower in half and begin assembling the bouquet.

You need to glue the flowers in the following order. Place one flower folded in half with the petals facing up (in this case it is a red flower)

Apply glue to the top of the right and left petals. A very important point should be noted here: you only need to glue the edges of the petals!
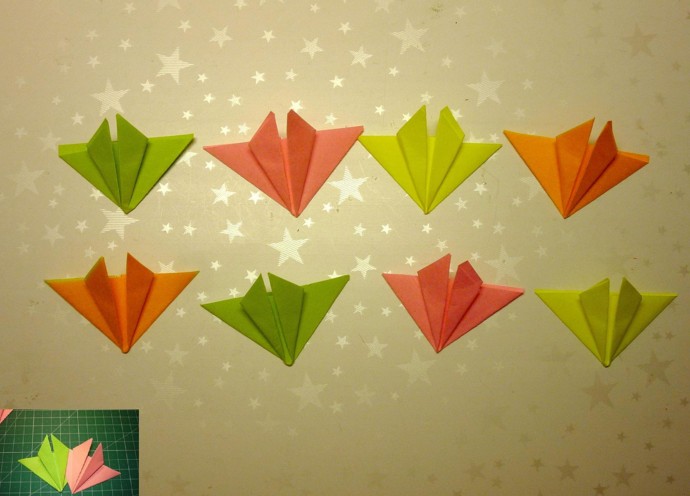
We glue two flowers (purple and turquoise) to them as shown in the photo, leaving the central petal free.

Next, apply glue to the tips of the three central petals and glue one blank (blue flower) to them.

Again we glue two flowers on the left and right sides (white, orange).

We glue the last blank (green) to the three central petals.

Fold a sheet of cardboard in half

and attach the bouquet to the card, as shown in the photo
Apply glue to the middle petal (marked with a cross) and glue it to the base of the card.
Next, we do the same on the reverse side, close the card, and put it under the press for a while.

We open it and our flowers open up, forming a wonderful bouquet.

Let's start with the design. We glue half a sheet of openwork napkin onto the title page, decorate it with flowers obtained using a figured hole punch, and the inscription “The best in the world.”

We use the remaining part of the openwork napkin to decorate the corners inside.


