Crochet openwork square motifs. Three ways to connect motifs - crochet. How to crochet square motifs
Of course, you can connect knitted items by simply picking up a regular thread to match, sewing them with a needle. But in some cases it is more reasonable to use a hook.
Connection with single crochets
The easiest way to connect the parts of a knitted product is to fasten them with a seam made with columns without. To do this, the hook is inserted into the loops of the last row of both stitched elements at the same time, then the working thread is pulled through them and 2 loops formed on the hook are knitted.
The seam in this case is quite dense, but neat. You can lay it from the wrong side, or you can from the front. It makes sense to do this when knitting products, for example, from "grandmother's squares" or other sufficiently large and dense elements. In this case, the connecting seam will serve as an additional decorative element. It can be performed, for example, with a thread that is contrasting or different from the main color of the product in tone.
Connection in the process of knitting
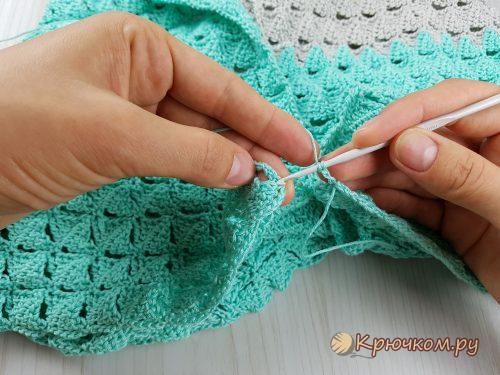
If the product is made of openwork squares, circles, triangles or other repeating motifs, it will look much neater if the elements are connected to each other during the knitting process. As a rule, on the diagram of a knitted element, the junctions of motifs are indicated.
Most often, a joint of this kind is performed using arches from air loops. In order to “tie” one element to another, half of the chain of air loops is made according to the scheme, then the hook is inserted under the arch from the air loops of the previous element and the loop is knitted in the usual way, thus connecting the motifs. Next, the second half of the chain is knitted.
The complexity of this connection method lies in the fact that the craftswoman needs to calculate in advance the required number of motifs and draw up a diagram of their layout on the pattern.
Connection using chains of air loops
When creating products from separate small elements, for example, using the technique of Irish lace, sometimes the elements are connected by simply sewing them together (coupling lace). Of course, you can also do this with a hook, as described above. But in this case, the knitted fabric will be quite dense and inelastic. This connection method is suitable for knitting outerwear.
Much more often, elements of Irish lace are connected using an irregular grid. This is a crocheted mesh of small (2-4 loops) chains of air loops and double crochets. The general principle of such a grid can be described as follows: a chain is knitted from one element, which is fixed on the edge of a nearby element. If the distance between the elements is large enough, arches are made from air loops, attached in random order to the previously knitted arches.
Despite its apparent simplicity, this method of connecting motifs requires great skill, but the result is worth it: the mesh gives the product made by the "Irish" a unique airiness and lightness.
Motives can be connected in the process of their implementation: Starting from the second motive, when knitting the last row, attach the motive that is being performed to others previously connected.
Connection in the last row of dense motifs:
The connection is made with a hook while knitting the last row. Knit the first motif (detail) completely, break the thread, tuck in the ponytails.
Knit the next motive (detail), reach the side that needs to be attached. Link the column of the last row fig.1. Pull the hook out of the loop, crochet under the pigtail of the part to be attached, which is opposite fig.2, grab the left loop from the column of the second part fig.3, pull the loop out from under the pigtail fig.4, link the next column fig.5, repeat all steps (Fig. 1, 2, 3, 4, 5). Front connection view fig.6, from the wrong side fig.7. For an example of such a connection, see Hook - Models - Socks 31.
Connection in the last row of openwork motifs:
The connection is made with a hook while knitting the last row. If openwork motifs are connected in dense areas, then the connection method described above can be used.For an example of such a connection, see Hook - Models - Shawls - Model 101.
If openwork motifs (details) are connected in sections of chains of air loops, it is necessary to tie the first motif (detail) completely, break the thread, fill the tails.
Knit the next motive (detail) to the point where the motives are connected. Motives, as a rule, are connected in the center of chains of air loops. You need to knit half the loops of the chain, then insert the hook under the arch from the air loops of the first motive fig.8, grab the working thread, pull out the loop fig.9, grab a working thread fig.10, pull through two loops on the hook (= single crochet), continue to knit the rest of the arch with chain loops. Similarly, attach the motif at other points. A single crochet can be replaced with a connecting post.
Pay attention to connecting several motifs at one point fig.13. For example, connecting four squares in the corner.
When connecting the third motive in the corner, insert the hook under the threads formed by a single crochet when connecting the second motive fig.11.
When connecting the fourth motive in the corner, insert the hook under the threads formed by a single crochet when connecting the third motive fig.12.
You can not connect the first, second, third motifs in the corner. Perform the connection when knitting the fourth motive: enter sequentially into the corner of the first, then the second, then the third motive, perform the connection.
For an example of a mixed connection, see Hook - Models - Shawls - Model 107, Model 164..
- It's a smart idea to arrange all the squares in the right order to see how they will look when connected.
- The squares must be laid out face up.
- We recommend that you start with the bottom two squares of the middle row of the product.
- With this method, the connecting seam will also turn out to be flexible, but, unlike the seam "over the edge", the stitches will be invisible on both sides of the finished product.
Thread the needle. Take a large darning (collar) needle. Thread the end of the yarn through the eye of the needle and pull out the end long enough so that it does not slip out of the needle as you work.
- Do not tie a knot at this stage.
- Use a thread slightly thinner than the one from which the squares are connected.
Insert the needle into the lower left corner of the first square. Take the right square of the first pair. Pass the needle from the bottom up into the middle bow of the extreme loop in the lower left corner of the square.
- Under the middle bow, we mean the connecting thread that runs between the front and back bow of the extreme loop. This thread is only visible from the side.
Insert the needle into the lower right corner of the second square. Take the square, which in your product will be located immediately to the left of the first. Pass the needle from the bottom up into the middle bow of the extreme loop in the lower right corner of the square.
- Do not tighten the thread yet.
Repeat the same steps along the entire edge. Pass the needle from the bottom up into the middle bow of the next loop on the edge of the first square. Then - in the middle bow of the next loop on the edge of the second square.
- Continue sewing the aligned edges of the squares to the end in the same way.
- Leave the thread loose at first to make the process easier.
Tighten the connecting seam. Take the hanging ends of the connecting thread. One comes from the bottom, the other from the top. Pull the top end up and the bottom end down to tighten the seam. Now the squares will fit snugly together.
- At this step, the seam should become "hidden", hidden between two squares.
Do the same for the next two squares. Take the next two squares and repeat the same steps to sew them together.
- The next pair should connect to the top edge of the first pair.
- Use the thread left over from the top of the first pair to sew the second. In this case, the second pair of squares will connect with the first.
Sew the next squares either horizontally or vertically. When you add squares vertically, it must be done in pairs, as when connecting the second pair to the first. When you expand the product horizontally, you can sew one square to the right or left of the original pair using a new blind stitch.
- At the end of the work, fasten the thread with a knot on the edge of the last square from its wrong side.
Master class on connecting motifs from Efimiya Andreevsky.
Here is our reader's comment on the connection of motives in the last row: "... how is it? .." Therefore, I decided to show how to connect motives with each other. Maybe it will help someone, because we once started with the ABC.
Motifs are knitted from cotton thread "Maxi", hook 0.75. The motifs are connected in different colors, so that the connection between them is better seen. We knit a motif according to the scheme:

The arrows in the diagram show the junctions of other motifs. 1st row. We knit 6 air. loops, we close the loop in the ring. 2nd row. Air lifting loop, 12 tbsp. single crochet, conn. loop in air lifting loop. 3rd row. From each st. without a crochet of the last row we knit on a lush st. from 3 columns with two crochets + 5 air loops.
We knit the first lush st. like this: 5 air. loops +2 tbsp. with 2 crochets; We close all the loops from the hook in one go. After the 12th Art. we knit two air. loops + 1 st with 1 yarn over according to the scheme. Further, the scheme is slightly modified. 4th row. According to Art. with one crochet we knit 3 tbsp. without nak. Further on all the arches from 5 air. loops knit 5 tbsp. without a crochet. In the last arch of 2 air. loops knit 2 tbsp. without nak. We close a number of connections. loop. 5th row. * 6 air. loops and transition to another arch: art. with 1st nak., 5 air. loops and st. without a crochet in the next arch. From * to * - repeat following the pattern. We are finishing a series of connections. loop. The 1st motive is ready. (Photo-1). We knit the 2nd motive and proceed to the connection of the 2nd motive to the 1st. 


It can be not only dense, but also airy. In this master class, we offer you 2 ways to connect any knitted parts with a hook. Moreover, the details can be connected not only with a hook, but also with knitting needles. You can also connect not only parts of clothing, but also motifs. Everything is very simple, such seams will take you quite a bit of time.
Video master class on crocheting knitted parts:
Description of the process of connecting knitted parts using single crochets:
Please note that stitching is done on the front side of the product.
- We introduce the hook into the right part and knit 1 air loop. Then insert the hook from top to bottom in the left part, pull the thread and knit 2 loops on the hook.


- Next, we collect 6 air loops. This amount is selected depending on the pattern.

- Now, again, insert the hook into the left part from top to bottom and pull the thread.

- You have 2 loops on your hook.

- Next, we introduce the hook into the right part from the bottom up, i.e. from the inside. In this case, the working thread should be to the right of the hook, i.e. like a hook.

- Pull up the third loop. Now we grab the working thread and stretch it through 3 loops on the hook. Then again we collect 6 air loops and so on ...

As a result, you should get a seam like this:

Description of the process of connecting knitted parts using double crochets:
This method is more like a sirloin net, as it uses double crochets and 2 or 3 air loops. The connection method here is basically the same as RLS, the only difference is in the yarn.
- In the right part we type 2VP, they replace the SSN.
- Now we make a yarn over, insert the hook into the left side of the product from top to bottom, pull out the thread and knit only the yarn over. You have 2 loops on your hook that need to be knitted together.

- Both halves are connected and the hook is in the middle. Now we collect 2VP.

- We make a crochet, in the left half we knit as before, i.e. pull up the loop and knit only the yarn over. You have 2 loops on your hook.

- Then again we make a crochet, the working thread should be behind the hook, i.e. on the right, insert the hook into the right half from the inside.

- We pull the loop and knit only the yarn over. You have 3 loops on your hook that you now need to knit together.

- Then repeat the steps again. Cast on 2 air loops in the middle, first hook the left side of the product from the front side, and then the right side from the inside.

Here is what you should end up with:

As you can see, with this connection method, you can “play” in any way, i.e. vary both the number of air loops and the size of the columns themselves.
We hope the master class was useful for you!


