Faux fur rooster pattern. DIY fabric cockerel toy
The symbol of the coming year, 2017, is the rooster. Although there is still enough time before the New Year, you can practice making souvenirs for your loved ones with your own hands now. We offer a simple master class on sewing a cute rooster, as well as several patterns that make it very easy to sew a “chicken coop owner.”


Variegated fighting cock Raymond: making lesson
The patterns for this bright and easy-to-make toy were invented by one of the foreign craftsmen, and it quickly spread across the blogs of domestic sewing enthusiasts. This feathered fighter's name is Raymond. A special feature of the craft is the use of fabric of different textures:
- felt;
- fleece;
- cotton;
- calico;
- brocade, etc.

Any scraps of fabric you have at home will be suitable for making this toy. To decorate the rooster, we will need large buttons of different sizes, and the eyes can be borrowed from any old soft toy.
To sew Raymond's rooster, we will need
- textile;
- sewing machine or thread and needle;
- patterns;
- padding (cotton wool, padding polyester, etc.).
In our proposed version, the legs of the toy are made of fabric. Such a rooster can be placed on a windowsill, in a flowerpot, to decorate a work desk, etc. If desired, you can make it stand up - to do this, you need to insert a rigid wire frame into the leg parts.
Let's start sewing toys
- Print the patterns on a printer. All details are given in actual size, but you can enlarge or reduce them if desired.
- Transfer the patterns to thick paper and cut out. The number of parts is indicated on the patterns themselves.
- Attach the pieces to the scraps of fabric and cut out. We calculate the amount of material so that all paired parts are made of the same fabric (for example, the body is made of checkered felt, the wings are made of fleece, etc.). Don't forget to leave a seam allowance (1.5-2 cm).
- We sew the parts together by hand or on a sewing machine, leaving a small gap for stuffing.
- We fill all the parts with stuffing, except the legs and eyes, and sew up the gaps.
- We connect the parts of our toy. Handsome fighting cock Raymond is ready!

Soft toy “Peter the Cockerel”
This toy has fewer parts than the previous one and even a novice master can make it. The craft is made from any soft material: fleece, felt, flannel, etc. The number of parts is indicated on the pattern.

The operating algorithm is similar:
- print and cut out the pattern pieces;
- sew paired pieces together and fill with stuffing;
- connect the parts to each other;
- add decor - eyes, ribbon straws for the tail, etc.

Tilde roosters
Tildas are a whole trend in crafting, which was started by the Norwegian sewing master Tori Finanger. Main features
New Year 2017 is the year of the Fire Rooster, so it is very important not only to decorate the owl’s home in accordance with all the preferences of the owner of the year, but also to give appropriate gifts. For example, any child really loves soft toys, so they will probably like a toy rooster, especially since you can sew it yourself.
Who doesn't love tilde toys?
Toys made in the tilde style appeared a long time ago, however, despite this, they remain popular today. And this is not surprising, because they are very easy to make and are also great for interior decoration and as a gift. Therefore, if you are interested in sewing such a toy yourself, then take into account some nuances:
— to sew a doll, use exclusively natural plain fabrics, for example, cotton, fleece or linen, and colored materials are better suited for making clothes;
— the lobe seam should be laid strictly in the center of the toy’s head.
Many needleworkers prefer to use decorative elements and cosmetics to decorate the gilda. This allows you to make the toy more realistic and stylish. For example, using regular powder you can give your toy a blush or create a kind of tan. As an alternative to cosmetics, you can use other available products, such as colored pencils or cocoa powder.
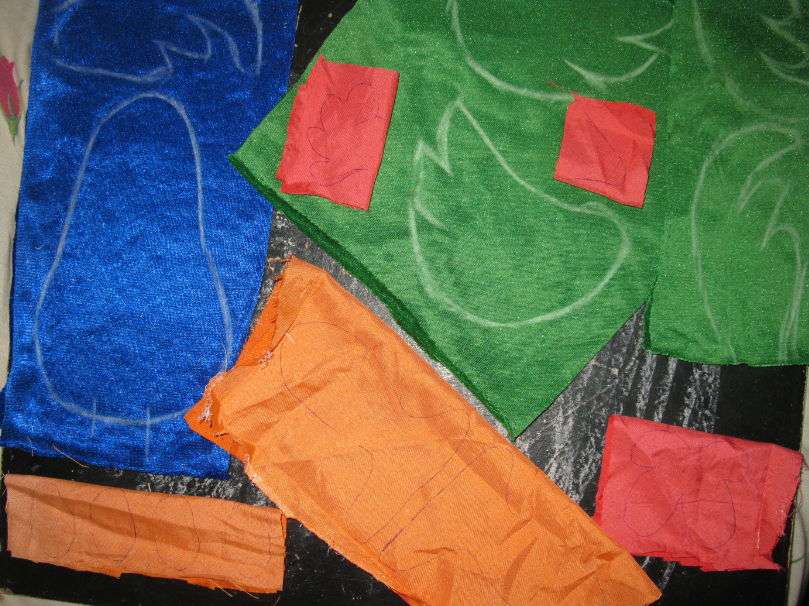
Toy cockerel: cutting
 Making any toy begins with cutting and preparing everything necessary for further sewing. Cutting is done according to a pattern, a large number of which can be found online on thematic sites dedicated to the subject of cutting and sewing. Just choose any pattern you like, then cut out bases from cardboard based on it. It is worth noting that cutting can be done based on the dimensions indicated in the pattern, or if desired, you can increase the dimensions. In this case, it is necessary to take fabric approximately 3 millimeters larger. This reserve is needed for seams.
Toy “Tanned Cockerel”
If you want to sew an original cockerel gilda, then before starting the sewing process you can boil the fabric in coffee, then dry it and thoroughly coat it with glue mixed with coffee powder. This will give the fabric not only a unique color, but also an amazing coffee aroma that will fill the room with fragrance, which, if desired, can be enhanced with a small amount of vanilla.
To make such a toy, absolutely any pattern that vaguely resembles a human figurine is suitable. The end result will be an original toy that resembles a man with a rooster's head and wings.
To give the rooster stability, before sewing on the legs, small wooden skewers are attached to the body of the rooster, which are stuck into the main part of the toy approximately 4 centimeters, and the excess part is simply cut off. And to make the toy even more stable so that it can stand without problems, the legs can be made from polymer clay or salt dough, which is used for modeling.
To decorate the toy, various wardrobe elements are used, which are sewn separately according to given sizes.
Soft toy cockerel: the easiest sewing method
If you don’t want to bother too much with a toy, then you can sew not a tilde, but a soft toy in the shape of an ordinary rooster, which sits majestically on its nest. This is the simplest variation of the toy that even inexperienced seamstresses can make. Just find a suitable pattern online and get to work.
DIY rooster pattern
 A toy in the shape of a rooster can be used to decorate a New Year tree, interior, or simply placed in the middle of the table. In addition, this toy will be a wonderful gift for children who love soft toys. The options for sewing a toy discussed above were based on the use of a pattern, however, you can easily make a pattern yourself.
All that is necessary is to adhere to the following sequence of actions:
- Decide on the size of the toy, then draw a circle on cardboard, the diameter of which will be equal to the size of the rooster’s head.
- An oval is drawn under the circle, which will be the body of the bird, and connected to the circle with two lines that act as the neck.
- On both sides of the proposed body, draw two more ovals of slightly smaller size and sharpen them at the ends to give them a little feathering. They will be the wings of the future toy.
- Below the main oval, another small oval is drawn, which will play the role of a tail. Its lower part needs to be made a little pointed so that it looks like feathers.
- Using an oval, we make a small notch on the body of the bird so that it looks like the protruding chest of a rooster.
- On the circle that acts as the head, draw the eyes and beak.
- In the same way, we make a pattern for the comb and beard, and proceed to sewing the toy.
New Year 2017 is the year of the Red (Fire) Rooster, and the most popular gift will be its figurine or image. The needlewomen of Krestik have a good tradition: to prepare thoroughly for the New Year holiday. And this year will be no exception. Many of us will make or are already making a rooster with our own hands, or even not one, but several at once! After all, you must definitely please your family and friends with a handmade symbol of the year, and yourself with the fascinating process of creating this very symbol using various handmade techniques.
Creating a kind of GUIDE TO MASTER CLASSES from the Internet is also a tradition of our handicraft site, which was born a year ago. For you, dear craftswomen, we have selected only the best master classes online. Admire, look closely, discuss and choose the most colorful rooster! And then sew/knit/draw/blind/weave it. So, what technology can you use on the eve of the New Year holiday?
If you don’t have time to work, it doesn’t matter. The article contains links to craftswomen who sell finished works.
Cockerels made of paper and on paper
Making cards with the kids
If you are not a professional cardmaker, then before you start creating cards, be sure to read our article “Learning to make New Year cards with your own hands using the Scrapbooking technique.” In it you will not only find many ideas, but also get acquainted with the basic rules for creating postcards.
Any cockerel drawn by your child can be placed on a postcard. If it’s difficult for your child to figure out how to draw a rooster with his own hands, then show him this step-by-step instructions:

And then, it’s a matter of technology. Cut out the cockerel and make it the centerpiece of the composition. For example, your card can be this simple but cute. In your work, use New Year's paper and a bright red ribbon, add snowflakes, twigs and other holiday paraphernalia. Once you have a basic idea, the process of creating a card becomes much easier!

Photo from the site http://itsapatchworklife.blogspot.ru
If your child likes to color black and white pictures, give him this opportunity. Print the card template with a cockerel on thick cardboard and let your child get to work. Next, by cutting out a ball blank, you can add voluminous snowflakes to the card, glue half-beads imitating New Year's balls, etc., etc. Give free rein to your and your baby's imagination))

YOU WILL NEED IT
You will find 8 more templates for coloring, as well as 2 step-by-step instructions for drawing more realistic roosters in the archive, which you can download quickly and for free!
Take note of the idea with a cockerel on a stick, like on Elena Yurchenko’s postcard. Her cockerels are cut out of felt, or you can cut them out of paper.

Roosters made of colored paper
An applique made of colored paper can also be placed on a greeting card. But such an application can itself act as a postcard. To draw and carefully cut out all the details, children will need the help of their parents, but they can glue them themselves.

Olga-15 suggests making funny cockerels out of paper in her master class.
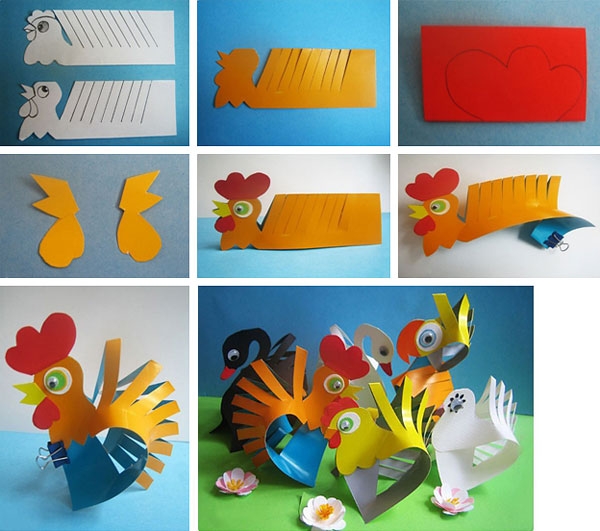
The Rooster blank is a rectangular sheet of flexible paper or thin cardboard, folded in half lengthwise. Its size is 13.5x10 cm. We make 7-10 inclined slits along the fold line (approximately every 1 cm). Their angle of inclination is 50-70 degrees, and their depth is ¾ of the height of the folded sheet.
Ekaterina Ivanova in her video tutorial shows how to make a red rooster using the Origami technique:
Roosters using Quilling technique
A very interesting idea is to lay out only a luxurious rooster tail from quilling paper. It's not as hassle as laying out a whole rooster, and it can turn out very impressive! Here is a rooster without a tail as a basis (see the photo below for how it looked in the original).

Print it on a color printer, and then fantasize about the tail. As an example, here is one such work (although the tail here is modest, but you will try, right?))

And if you are not afraid to make a whole rooster using the Quilling technique, then you can use this ready-made postcard as a basis:

Or this template:

A cheat sheet on the basic elements of Quilling to help you:

Button applique
And here are absolutely stunning handsome roosters, made of multi-colored buttons, half-beads, rhinestones and beads! You can take the contours of the cockerels from our archive as a basis (link just above).


Crochet cockerels
Many needlewomen are familiar with the crochet hook and will be happy to knit a cockerel from multi-colored threads. And Krestik will help you decide on a model and offer several master classes on this type of needlework.

You can also buy knitted cockerels from Svetlana.


Felt roosters
The fastest and easiest options for creating a symbol of 2017 are felt roosters. The material is easy to process, holds the shape of the toy well, and does not require processing of seams. On the contrary, hand stitches along the face of the product give it a special flavor and charm.


Photo from the site https://madeheart.com


Photo from the site http://ktototam.ru/
A rooster figurine carefully cut out of thick felt will be both a Christmas tree decoration and a pendant.

Photo from the site http://ktototam.ru
And if you decorate the felt cockerels with embroidery, flowers and other decorative elements, it will turn out incredibly beautiful!

Photo from the site http://mmmcrafts.blogspot.ru

Roosters in Tilda style
Well, how can we manage now in our lives without the tilde-Rooster? On the ToySew website there is a master class on sewing this popular toy.

Master Vetic on her blog posted patterns for the Rooster and Chicken Peas based on the tilde pattern. An interesting couple will turn out if you put in the effort and patience!

And for inspiration:

Cockerel Yurik from Orange Toys

Maria Fedorova made a funny video about her tilda roosters (the link to the patterns is in the description of the video!):
Coffee cock toys
Aromatic, or coffee, toys compete with tildes in popularity. There are roosters using this technique.

A coffee cockerel can be like this:

Photo from the site http://zabavochka.com
You can easily sew it yourself using one of the patterns suggested above. “Cross” talked about all the intricacies of creating coffee toys in this master class.
If you think that you cannot cope with such work yourself, contact a specialist. Yulia Charikova made enough branded toys with the smell of coffee and put them up for sale at this address.

Fur interior toys
Oksana Svyatkovskaya will show her vision of a rooster and show how to sew it correctly using ready-made patterns. Her Rooster is made of faux fur, but who’s to say that it doesn’t happen or that it’s not good?)


In the workshop Everything for creativity (dljatvorchestva) there are a lot of blanks for painting and decoupage. Choose and create!

This is the beauty you can get:


If you don’t want to make a souvenir in the shape of a rooster, then you can decorate any wooden surface with an image of a rooster. The scope for creativity here is simply limitless!!! Here are just a few examples for inspiration:


Roosters felted from wool
Some craftswomen make wool toys that look like real ones! Let's admire and be inspired! And if you really want to buy one of these beauties, then look for them at the Masters Fair (the link is on each photo).


Elenia collected in one place many different Roosters felted from wool and suggested to MK how to create one of them. It turns out very cute!
Roosters embroidered with cross stitch, beads and ribbons
Perhaps you love embroidery more than other types of needlework. Then you can place the symbol of the year on a pillowcase, decorate it in the form of a panel, a picture in a frame or a brooch. The main thing is that the image of the Rooster warms your soul. And if you give away your work, find out the preferences of the recipient.
You will find more than 50 different patterns for embroidering roosters and cockerels in a special album
2017 is already upon us with snowballs. New Year's festivities will begin soon and naturally we are waiting for gifts. We are ready to tell all craftswomen how to sew a rooster out of fabric with their own hands. We are sewing this particular bird, since next year will be guarded by the Fire Rooster or Red Rooster, as follows from the Chinese calendar. Sewing will not be difficult for a beginning needlewoman; we have amazing fabric rooster patterns that will make a cute symbol of 2017.
The rooster is the bright leader in any yard, so our bird will be colorful. Therefore, the material for the toy will be appropriate. We recommend using the site for the “Crooster made of fabric” toy:
- fleece,
- brocade,
- colored cotton,
- any fabric that looks rich.
For stuffing, we take padding polyester (from an old jacket or pillow), ordinary cotton wool will also do. If you want to make the cockerel “stand confidently on its feet,” prepare an elastic wire for the frame inserted into the legs and body.
DIY fabric rooster patterns
Choose the pattern you like according to your taste. We will sew according to 1 piece provided, it is simple and does not take much time.
DIY fabric rooster pattern
To enhance the effect and create a more “LIVE” betta, resort to using colored faux fur or feathers. Glue them on the wings and tail, the effect is amazing. Here is the pattern for a rooster with fur inserts.

Do-it-yourself fabric rooster with fur pattern
If the patterns are small, you can enlarge them in Photoshop or any other image editor. Then print enlarged copies and create roosters in real size. According to my pattern, the rooster will be 25 cm tall, quite enough for a souvenir.
Instructions on how to sew a rooster with your own hands:
- Glue the paper pattern onto thick cardboard, then trace the details onto the fabric. We make allowances of 2 cm, more or less is not necessary. Do not forget that the wings and paws must be made of the same fabric for symmetry. The second steam room will be mirrored, this is normal.

- We check and cut out the blanks.
- We sew the parts of the toy from the inside out, leaving 4 cm holes for stuffing. If you are doing it with a frame, insert wire. We turn the workpiece inside out, stuff it with padding polyester (in my case) and sew it up. Please note that we do not stuff the rooster's eye pads; they look more aesthetically thin.

- If you want to make the wings move, then do not sew them on, but fasten them with large buttons (from a coat).
- We don’t stuff the legs, then the cockerel will “sit” with its legs dangling. If the rooster is standing with a frame, form the desired position by bending the wire.

- The eyes - I made them from 4 buttons of different diameters - large on the bottom, small on top. As an option, eyes are drawn with gel pens. You can use a bright piece of fabric and sew or hot glue the eyes.

An extraordinary symbol of 2017 - step-by-step production of a cockerel from fabric - fur
No less magical is the second option for making a cockerel with your own hands from fabric-fur on a wire frame.
A set of materials will be needed as in the first case, only the fabric will be different. The manufacturing process is similar to a fabric cockerel, only it will be connected in a different sequence.
So, let's start making a rooster step by step:
- Having repeated the first steps from the above, we begin to connect the blanks. First, we sew the breast, abdomen and body from the inside out, and then turn it onto the face.
- We sew both halves and wings. Don't forget to leave a gap under the padding polyester.
- Insert a thick wire (I used copper 10) into the finished body, leaving the ends for the tail and wings. Choose your size.
- We stuff the future symbol of 2017 and sew it together, leaving the wings empty, you can only fill them a little. We sew the body with the wings.
- Sew on the beak in two parts and the beard.;
- We make the tail from strips of fabric, sew them on one side on the front part.
- We thread the tail onto the frame along the way, making it fluffy.
- We simply create the paws by tightening a wire blank.
- I wrote options above about creating eyes. After which the toy will be ready.

Mink cockerel
Felt cockerel patterns
When you want a bright bird, sew it from pieces of felt, additionally stitching along the indicated lines. Such a gift will look interesting and will be remembered for a long time.

Felt rooster pattern

Ready-made felt cockerels - for inspiration
When the New Year is knocking on the door and there is less and less time left, we urgently need ideas that can be easily brought to life literally in one evening. It is believed that in order for the coming year to be rich and happy, its symbol must be present in the house - in 2017 it is the Red Rooster. If you don’t have time or don’t have enough skills, then this craft will come to the rescue.
These fabric roosters look so simple but so terribly cute. And most importantly, depending on the fabric and small details, they become completely different and unlike each other.
You will need:
- dense fabric - flannel, calico;
- pieces of felt for scallops, beaks and tails;
- buttons, rhinestones and other sew-on trinkets;
- padding polyester
Sew a simple cockerel in 5 minutes
For one chicken you need a piece of fabric measuring 21 x 11 cm. The triangle is folded like this:

All seams, naturally, must be on the wrong side; the last side seam is sewn up by hand after stuffing the toy with padding polyester. Don't forget to put the comb, beak and tail of the future cockerel inside the seam.

Show your imagination in decorating the sewn cockerels - maybe you will give them the features of the people you are going to present them to?
By the way, such cockerels can be used as a bag for candy if you sew a lock into the side! Your friends and their children will definitely be delighted with this gift!


