Pansy flower from satin ribbons. Pansies kanzashi: how to make a flower on a hairpin with your own hands. from tapes: master class. Photo step by step and description of the stages
Who doesn't want an original hair clip to stand out in the crowd? It is especially nice when it is made by hand. For example, pansies.
Kanzashi technique
What is this style? These are jewelry and hairpins made of fabric. This technique came to us from the land of the rising sun - Japan. They were always decorated with various combs and hairpins that were worn with kimonos. Using the kanzashi technique, you can also create various birds and even butterflies. However, the most common form of kanzashi is flowers, and therefore the master class will be held on this example.
True kanzashi are created exclusively with the help of natural silk. However, this is very wasteful. And therefore, satin ribbons are a simpler, as well as affordable option. They are easy to cut, melt easily, and hold their shape well. However, for kanzashi, you can also use any non-shrinking fabrics. You can call organza, nylon, as well as tulle or crepe satin.
 Pansies kanzashi: pstep by step master class
First you need to prepare the materials for creating this wonderful decoration. Namely: tweezers, a lighter or a candle with matches, necessarily - scissors, glue, golden or beige silk cord, satin ribbons in three shades: black, purple and yellow.
There will also be photos below.
First of all, you need to cut out 2 5x5 squares from yellow fabric. You will also need three black 3x3 squares and three purple 5x5 squares.
A yellow square of satin ribbons is immediately taken, then folded so that a triangle is obtained, the side ends of the corners are bent down so that a neat fold forms in the middle, then the fabric is folded again, bending the side corners to bend them to the center.

Having done this procedure, you will need to clamp the base of the resulting petal with tweezers. And with scissors you need to cut off the extra piece. Then you need to trim the resulting sidewalls, solder them, as well as the base with a lighter.
To create a flower, you need to make two similar petals.
At the same time, you need to put a small black triangle on a large purple triangle. Further, as they did with the yellow triangle, you need to bend the side corners several times so that you end up with a fan. To make the petal as natural as possible, it should be slightly trimmed with your finger.
Just as they did with the yellow petal, the excess must be cut off, and then it is worth melting the edges with a candle or a lighter.

Similarly, three purple-black petals should be formed.
After harvesting three petals, you should create a core for the flower. It is necessary to tie a knot in the middle of the prepared lace, which will be the middle of the flower.
After that, you need to assemble the flower into a single whole. First you need to place the resulting core between the purple-black petals, then you need to carefully glue the yellow ones.
The flower is ready. You can create several colors in this way, and then the hairpin will become even more unique.
 Narrow kanzashi petal
In addition to round kanzashi petals, there is also a narrow one. How to create it will be described below.
The materials for creation are the same as for the creation of pansies. You can take a ribbon of a different color, for example, green and orange.
Then you should create 5x5 squares. It is possible more if the size of the tape allows, it does not matter.
You need to create seven orange squares and five green ones.
To create squares, you can resort to two methods: the first method is to fold the tip of the satin fabric ninety degrees, and then cut it off evenly, then attach the finished square to a piece of fabric and also cut it off, the second method is to make a stencil of the desired size, then wind it on it tape several times, then remove the tape and cut.

The squares are folded into an even triangle, and then into a triangle. The fold should be on top. The right corner should be applied to the left, then again, from right to left.
The fold points should be aligned, and unnecessary ends should be cut off. Then burn with a lighter or a candle, carefully fastening the edges. It is advisable to do this in the following way: drive a petal over a burning lighter or a candle with tweezers. It should be fired near the very bottom of the fire, then the fabric will melt, and not catch fire. The bottom edges should also be cut and melted. Then, according to the same principle, you need to fold the remaining green petals.
The orange square, again, needs to be folded into a triangle, then fold the edges again, the fold will turn out on top on the sides. The side corners need to be pulled back, checking that everything is evenly folded. Also, the side edges should be cut and melted, with the bottom edge you need to do the same. Then the edges must be burned and glued together.
Then the orange blanks are sewn together, while the green ones are glued one by one with glue, gathering in the form of a Christmas tree. Then the green petals are glued between two orange ones. In the middle of the flower itself, you can glue a bead.
Video on the topic of the article
Ribbon embroidery master class pansies video and photo
Ribbon embroidery master class pansies video and photo
Bright and delicate pansies embroidered with satin ribbons can not only decorate your clothes, but also help you diversify some details of your interior decor, making it more stylish and sophisticated. Therefore, now we will present to your attention a small master class with which you can decorate small sofa cushions by embroidering a charming flower arrangement on them. 


Pillowcase with delicate pansies
Before starting our training master class, let's prepare all the necessary materials and tools that can be useful to us when creating ribbon embroidery:
- a plain pillowcase for a decorative pillow or fabric to create it (we used white material) hoop;
- pencil;
- scissors;
- lighter or matches;
- needle with a wide eye;
- grassy green, lilac, pink, light and dark yellow satin ribbons rich bright yellow ribbons;
- green and purple threads.
In order for our embroidery to turn out to be more accurate and symmetrical, we need a small scheme. Therefore, before proceeding to decorate the pillowcase, let's first make a schematic sketch on the fabric. Since the scheme directly depends on the size of the future pillow, we recommend that you transfer our drawing to the pillowcase yourself. To make it easier for you to “orient yourself”, you can look at the photo of the finished work. 
When the scheme of the heart we have chosen is redrawn onto the fabric, we can begin work.
First of all, using the usual
, we will have to embroider twigs. 
The photo below shows that we only embroidered 4 branches, but you can do more if you wish. 
In addition, depending on the size of the pillowcase, you can independently make your twigs longer and thicker.
Also pay special attention to the fact that in this scheme redrawn on the fabric, we marked with dots the places where the pansies will then “bloom”. 
As you probably already noticed, we will make 3 flowers on each side of our heart. So, pansies will consist of ribbons of different colors: pink and yellow, lilac and yellow, lilac and pink.
For the first flower, we will cut 2 pieces from different ribbons (7cm and 10cm). 
Attention! Do not forget to treat their tips with a lighter, as otherwise they may “crumble”.
Then you will need to make the bottom of the flower. Take a 7 cm ribbon and, folding it at a right angle, fix it with a pin as shown in this photo. 
After that, using a basting stitch, sew the ribbon: first diagonally from one corner, then along the very edge and again diagonally.
Now prepare a 10 cm tape for work: mentally divide it into 3 equal parts, bend the sides down and fix with pins.
Sew the ribbon as shown in the photo. 
After that, all the fragments stitched by you will need to be carefully pulled together and hemmed. 
As a result, you got 2 parts of one flower, one of which consists of 3 petals, and the second of two.
Next, you will need to combine them into one. To do this, you will need to impose a three-petal part on a two-petal one and sew them together. 
We remind you that you will need 6 of these flowers in total. The scheme of actions for the manufacture of the remaining pansies remains the same, you just need to change the color scheme.
After the pansies are ready, you will need to place them in the right places and fix them with pins. 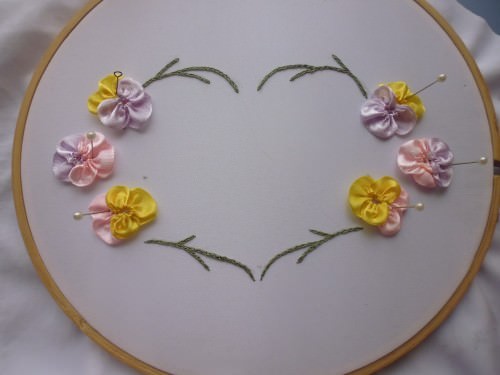
Next, you will need a bright yellow 4mm tape, with which you will make a colonial knot to replace the core for each flower.
First bring the ribbon to the front side in the very center of the flower and place the needle directly on the ribbon. Then pick up the tape with a needle “moving” away from you. 
Take the ribbon with the fingers of your left hand and put it behind the point of the needle so that it lies in a figure eight. Then gently pull up the resulting knot and stick the needle as close as possible to the exit point of the ribbon. 
After you return the needle to the wrong side, you will see a small colonial knot that will replace the core of the flower embroidered with ribbons. 
All the pansies that decorate your heart, you will need to supplement with such cores. 
In order for our embroidery with ribbons to look more believable and realistic, we need to additionally decorate each flower. To do this, you will need purple threads, with which you will sew straight stitches in the direction from the core to the petals. Thanks to this, the pansies will become much more beautiful and, in addition, they will be sewn on stronger. 

At this stage, our small master class can be considered almost complete, because we only have to embroider the leaves. To create them, we will take a grassy green ribbon (7 mm) and, using a single buttonhole stitch, we will make the required number of leaves. 

Since we did not get a very large embroidery, we made 3 leaves near each flower, but you can easily increase or vice versa reduce the number of leaves. 
In addition, you can additionally decorate the leaves and embroider a few stitches on them in the form of a regular “chicken foot”. 
Our ribbon embroidery is ready.
As a result, we got such a wonderful pillowcase for a small decorative pillow.
In order to learn how to embroider beautiful and delicate pansies with satin ribbons, you can also watch a short training video.
Video: We embroider pansies smooth with ribbons
Please note that in our master class, we first made two-petal and three-petal parts, and only then, after joining them together, we sewed them to the fabric. In this video, the master sews each petal separately, while making the upper petals small and the lower one larger and more voluminous.
In addition, in this video clip, the center of the flower is decorated with a French knot, while we used colonial knots. Also, a striking distinguishing feature of this video is that the needlewoman painted the lower petal with black paint, thereby making it more similar to the original created by nature.
In the end, I would like to note that it does not matter at all which of the ways to create pansies you choose, because the main thing is that you like your work first of all. We, in turn, wish you creative success and more original, bright ideas!
Video: How to quickly make pansies from ribbons
Comments
related posts:
 Ribbon embroidery for beginners video tutorials and master class
Iridescent ribbons are perfect for new pansies on a vintage crochet handbag.
Since pansies bloom in early spring and summer, these fragrant little garden flowers with "smiling faces" and bright petals are harbingers of good weather. Wandering along the path dotted with pansies, watch them, pay attention to their color scheme, so that when creating these amazing flowers from ribbons, reproduce the color as accurately as possible. Do not ignore unusual colors - calm peach, lavender, rust or burgundy - use them along with traditional purple and yellow.
In the "language of flowers", which came to us from the Victorian era, pansies are a symbol of thoughtfulness. Wrap the pansies in a decorative napkin, tie a ribbon around the stems, and give them to the person you care about the most.
Pansies look amazing in a tiny clear vase paired with a few flowers made using the U-gauge technique. Individually, pansies can be used as lovely flower brooches, or can be combined into an arrangement and inserted into a frame Mix colors for a two-tone effect. Before cutting the ribbon, determine which color is best for the outer petals. For life-size pansies, use 3 cm wide ribbons. The leaves of the flower resemble the shape of a sail. which is 3 cm wide and 12.5 cm long,
1. The creation of each flower went through two phases using the fused U-gathering technique. First, two back petals are made, and then three front ones. For the back petals, cut a piece of ribbon 16 cm long and 3 cm wide. 2. Remove the wire from the side where the ribbon gathers and fold it in the middle (8 cm).
3. Stitch with two U-bends, leaving a 3 mm allowance on each raw edge. Gather the tape tightly as you sew, when all of it is gathered, fasten.
4. Attach these petals to the bead circle around the edge of the gathering. Postpone.
5. Cut the ribbon 30 cm long and 3 cm wide for the front petals.
6. Remove the wire from the edge of the gathering. Divide the tape into three parts from left to right into lengths of 8.10 and 8 cm.
7. Stitch with three U-bends, leaving a 3 mm allowance on each raw edge.
8. Gather the ribbon tightly after each petal, and when finished, fasten the thread. Connect those two edges by making the last stitch over the first. The center should be tight enough. Another option: rewind the thread through the center of the flower, grabbing the folds of the tape at the very edge of the center and pulling the thread at the same time.
9. Decorate the center of the front leaves with a bead, one or two stamens, or embroider French knots with a 4 mm wide silk ribbon.
10. Position the front petals so that they are just below the rear petals on the bead. Sew them on.
11. Cut off the excess bead and glue the tape to the back of the flower.
12. If you decide to plant pansies on the stems, make a hook at the end of wire #32. Sew or glue the bead to it before attaching the tape.
13. Bend the raw edges of the tape that will cover the bead, make a hole in the center and stick the stem into it. Glue or sew ribbon to the base of the flower.
14. Wrap the stems with wrapping tape, biased silk ribbon, or pearl cotton thread, or sew bias tape into tubes if you want to make a bouquet of pansies.
Publication date: October 12, 2010
We create in the technique of kanzashi: pansies from satin ribbons
Pansies from ribbons
The petals of these flowers have a different color. They can be blue, maroon, speckled yellow and other interesting combinations. This tutorial will show you the classic way to make purple and yellow pansies. be sure that the craft will turn out very beautiful and bright. Such a flower can be used both for a hairpin and a headband, or simply in a bouquet that can be presented for any occasion. For work, we need the following materials:
First of all, we need to cut the purple and yellow ribbon into squares, five by five centimeters in size. In the first color, it is necessary to cut eleven blanks, and in the second, only two. Scorch the edges of these elements with the fire of a lighter.
We form pansies from rounded kanzashi petals. Fold the square piece into a triangular shape, and then bend one end to the left, folding it like an accordion. Perform similar manipulations with the other edge of the triangular element.
After you have formed a rounded petal, cut off the excess fabric with scissors, holding the workpiece with tweezers. Next, singe the product again with a lighter to fasten it more securely. If necessary, then cut off the protruding part of the satin from the wrong side of the workpiece. As always, do not forget to scorch any movement with a flame. For those who did not have time to understand how certain manipulations are done, we suggest watching a video lesson that will be shown in our article.
You must, in the same way as described above, form eleven purple petals and two yellow ones. Now heat up the glue and start assembling the pansies. First, glue 2 yellow elements by attaching another one of the same, but only purple. We made the base of the kanzashi flower.
Next, grease the edges of the petals and apply the rest of the blanks to them one by one, doing this clockwise. Adjust the shape of kanzashi pansies yourself to make the bud look neat and beautiful.
After you have glued all the components of the kanzashi flower, cut out a small felt circle so that it fits the forget-me-not in diameter, and then glue it with a glue gun.
Pre-cooked stamens need to be bent in half so that there are four things at the top. Twist them at the bottom and secure with a felt strip smeared with glue. Threads that remain sticking out - cut off. Glue the stamens in the center of the pansies so that they look at the yellow petals.
Cut out another circle of felt, but only four centimeters in diameter and stick it on the wrong side of this flower. You also need a strip of felt, which is attached to the base of the product. To decorate your craft, you can apply glitter paint to the edges of the petals. It looks very bright and elegant. The video lessons below will show in detail how experienced needlewomen make pansies using the kanzashi technique.
Video: MK creating pansies from ribbons
If you have a daughter and you love to do all sorts of hairstyles for her, then you usually need a lot of elastic bands and hairpins. You can decorate a festive hairstyle with the help of simple products using the kanzashi technique.
Tools and materials
Prepare all the necessary tools and materials
- black ribbon 3 cm wide;
- silk cord;
- lighter;
- ribbons of yellow and purple flowers 5 cm wide;
- tweezers;
- glue.
Tie a double knot with silk cord. Now glue three double black and purple petals around its perimeter. Get a simple flower of a small size. Glue two yellow petals below the two-color petals.
Kanzashi "Pansies"
Kanzashi "Pansies" for little princesses
Video tutorials on creating kanzashi "Pansies"
First you need to learn how to make fan-shaped petals. To do this, cut the tape into 5 by 5 cm squares. Fold this segment diagonally and you will have a triangle. Now fold this triangle into a fan shape. Using tweezers, pinch it, stepping back from the edge of 1 cm, and cut off all the excess. Now burn the edges with a lighter. Thus, you need to make 2 yellow petals. Fold the purple ribbon into three triangles and overlap them with black triangles. Form a fan out of them. Cut off all excess, and then melt with a lighter. You will get a double petal. How to do this, you can see in the photo.
This MK for making pansies from satin ribbons is the easiest. If desired, you can make more complex flowers. For this, the petals are made in exactly the same way as in the first case. At the same time, you need to glue not 3 petals, but 5. Choose the appropriate color combinations for certain clothes. This master class is more complex, but involves the use of fan petals. How to make them is shown in the video. This is one of the simplest techniques for obtaining voluminous petals.
Pansies from ribbons: master class, description, photo
Many craftswomen who are engaged in home interior design or creating interesting items of clothing like pansies from ribbons. A master class that would consistently tell about the process of this type of work is simply necessary. After all, it is almost impossible to independently guess how the stitches and seams are made, how the ribbon is folded, and how the flowers themselves and their bouquets are formed.
What types of tapes are suitable for work
When faced with the need to choose the material for embroidery, you can really get confused. Today, the assortment of specialized stores is so wide that, having entered one of them, it is impossible to leave without a purchase.
In fact, you can choose almost any material to make ribbon pansies (the workshop below illustrates working with satin ribbons). Here, preference is given to those materials that suit the craftswoman in color, texture and width. You can buy tape from:
Each of these materials contains synthetic fibers, which is very good for a future product. Artificial materials do not shed, do not stretch, do not deform, that is, the work done will be saved for a long time.
Media Width Value
The most commonly used tapes are 3, 5, 7, 12, 15 millimeters in size. For example, a 7 mm wide ribbon was used to embroider Pansies with ribbons (a master class is given below). Material of this size is perfectly threaded into the eye of an embroidery needle, and also does not cause problems when draping.
But to create flowers for the purpose of subsequent attachment to the canvas, it is better to choose a wider material. By the way, ribbons can be combined: wide ones can be used for large petals, narrower ones - for smaller ones or for leaves.
Finding two-color ribbons can be considered real luck. Gradient coloring is great for creating flowers like pansies from ribbons. The master classes in this article are built on the use of just such materials. Most often, flowers are made using ribbon embroidery techniques.
Pansies from ribbons: a master class. Photo step by step and description of the stages
To create such a flower, it is not at all necessary to be an ace of embroidery skill. Using the simplest stitches and basic techniques, you can make pansies from ribbons with your own hands. The master class is quite simple:
- On the canvas of the base, the middle of the future flower and the top of each petal are marked.
- Fasten the tape in the center, leaving a knot on the wrong side.
- Lay the ribbon so that it forms a loose stitch, and then stick the needle at the point indicated as the top of the petal. In this case, the resulting stitch should be pierced.
- Very carefully, the tape is pulled to the wrong side, making sure that an even roller is obtained on the front. The tape is pulled until the roller forms an acute angle.
This technique is used to embroider all the petals of pansies. First, they make those that are conventionally directed at 10, 12 and 2 o'clock (taking the classic arrangement of numbers on the dial as a guide). Then they return to those that look at 11 and 1 o'clock. Later, the rest of the petals, stem and buds are embroidered.
The middle of these flowers is done using a "French knot". The principle of its formation is shown in the photo.
Textile ribbon flower
If it was not possible to buy such material, which is shown in the photo, do not be upset. You can choose two shades of the same color to make ribbon pansies. The master class includes a simple algorithm that will remain unchanged, only you will need to use different ribbons to create petals of the first and second levels.
For work, you should prepare:
Where to begin?
Each such flower is attached to a dense fabric. If it is part of any composition, you can perform it directly on a large canvas. However, you should start forming flowers on separate rectangles when independent pansies from ribbons are required. The master class (photo can be found below) offers just such an option.
First of all, you should cut off a piece of tape from which large petals of the second level will be made. As a rule, in fresh flowers, they have a darker color than the middle. The tape is folded at an angle (in the photo on the left) and stitched along the line marked with a dotted line. The finished fragment is fixed on the base fabric.
Next, a longer tape is cut off and folded into a rectangle with two corners. The folds are fastened with pins and stitched along the dotted line (the line goes along the dark side). The second petal of the first layer is performed in a similar way, but the tape is folded so that the line falls on the light side.
They make the middle: a bright yellow ribbon is tied in a knot and placed in such a way that it can be seen between the petals. Then fix the rest of the details.
Other secrets of flowers from ribbons
The flower is ready, it can be attached with a glue gun or thread to almost any base.
An alternative way is shown in the photo.
The darkened centers are obtained by banal staining of finished products with a marker. However, this is true only for panels and paintings. To avoid color shifting when washing decorated clothes, it is better to dye flowers with special fabric dyes.
Many craftswomen who are engaged in home interior design or creating interesting items of clothing like pansies from ribbons. A master class that would consistently tell about the process of this type of work is simply necessary. After all, it is almost impossible to independently guess how the stitches and seams are made, how the ribbon is folded, and how the flowers themselves and their bouquets are formed.
What types of tapes are suitable for work
When faced with the need to choose the material for embroidery, you can really get confused. Today, the assortment of specialized stores is so wide that, having entered one of them, it is impossible to leave without a purchase.
In fact, you can choose almost any material to make pansies from ribbons (the master class offered below illustrates working with Here, preference is given to those materials that suit the craftswoman in color, texture and width. You can buy a ribbon from:
- Atlas.
- Silks.
- Kapron.
- Organza.
Each of these materials contains synthetic fibers, which is very good for a future product. Artificial materials do not shed, do not stretch, do not deform, that is, the work done will be saved for a long time.
Media Width Value
The most commonly used tapes are 3, 5, 7, 12, 15 millimeters in size. For example, a 7 mm wide ribbon was used to embroider Pansies with ribbons (a master class is given below). Material of this size is perfectly threaded into the eye of an embroidery needle, and also does not cause problems when draping.
But to create flowers for the purpose of subsequent attachment to the canvas, it is better to choose a wider material. By the way, ribbons can be combined: wide ones can be used for large petals, narrower ones - for smaller ones or for leaves.
Finding two-color ribbons can be considered real luck. Gradient coloring is great for creating flowers like pansies from ribbons. The master classes in this article are built on the use of just such materials. Most often, flowers are performed using techniques
from tapes: master class. Photo step by step and description of the stages
To create such a flower, it is not at all necessary to be an ace of embroidery skill. Using the simplest stitches and basic techniques, you can make pansies from ribbons with your own hands. The master class is quite simple:

This technique is used to embroider all the petals of pansies.

First, they make those that are conventionally directed at 10, 12 and 2 o'clock (taking the classic arrangement of numbers on the dial as a guide).

Then they return to those that look at 11 and 1 o'clock. Later, the rest of the petals, stem and buds are embroidered.

The middle of these flowers is done using a "French knot". The principle of its formation is shown in the photo.

Textile ribbon flower
If it was not possible to buy such material, which is shown in the photo, do not be upset. You can choose two shades of the same color to make ribbon pansies. The master class includes a simple algorithm that will remain unchanged, only you will need to use different ribbons to create petals of the first and second levels.
For work, you should prepare:
- Sharp scissors.
- Needle for (with a wide and long eye).
- The tapes themselves.
- Pins for fixing parts.
- Thick fabric for the base.
- Ruler and pencil.
Where to begin?
Each such flower is attached to a dense fabric. If it is part of any composition, you can perform it directly on a large canvas. However, you should start forming flowers on separate rectangles when independent pansies from ribbons are required. The master class (photo can be found below) offers just such an option.

First of all, you should cut off a piece of tape from which large petals of the second level will be made. As a rule, in fresh flowers, they have a darker color than the middle. The tape is folded at an angle (in the photo on the left) and stitched along the line marked with a dotted line. The finished fragment is fixed on the base fabric.
Next, a longer tape is cut off and folded into a rectangle with two corners. The folds are fastened with pins and stitched along the dotted line (the line goes along the dark side). The second petal of the first layer is performed in a similar way, but the tape is folded so that the line falls on the light side.
They make the middle: a bright yellow ribbon is tied in a knot and placed in such a way that it can be seen between the petals. Then fix the rest of the details.
Other secrets of flowers from ribbons
The flower is ready, it can be attached with a glue gun or thread to almost any base.
An alternative way is shown in the photo.

The darkened centers are obtained by banal staining of finished products with a marker. However, this is true only for panels and paintings. To avoid color shifting when washing decorated clothes, it is better to dye flowers with special fabric dyes.
Those who do not want to part with these beautiful flowers even in winter are invited to get acquainted with a training master class for beginners, in which we will talk about how to create real pansies from ordinary ribbons.


Before you begin, you must prepare everything you need to create pansies:
- Scissors;
- Tweezers;
- Lighter, matches or candle;
- Glue;
- Cream, gold or beige cord of silk threads;
- Satin ribbons in black, bright yellow and purple.
In order to make pansies, we will need to pre-cut 2 squares from a yellow satin strip, the size of which will be 5x5. In addition, we need 3 black squares (3x3) and the same number of purple squares (5x5).
Let's start the master class.
First you need to take the yellow square and fold it so that a triangle comes out:
 Then you need to bend the side corners down so that a neat fold forms in the middle:
After that, the element must be turned over and once again bend the side corners:
 Now the corners can be bent to the center:
 Having done all this, we will have to clamp the base of this petal with tweezers and cut off the extra piece with scissors:
After that, trim the sides and solder them and the base with a lighter:
 To create a flower from ribbons, you will need 2 of these petals.
We will need to fold these pieces so that they form neat triangles. At the same time, put the smaller one from the black satin ribbon on the larger purple element:
In order for the petal to look more natural, its middle will need to be slightly “trampled” with your finger:
 Holding this part of the future flower with tweezers, you have to melt its edges a little with a lighter:
In the same way, form 3 more black and purple petals:
Now that this part is done, you can make the core for the pansies. To do this, simply tie a knot in the middle of the cord, which will later become the core.


