Crochet beach tunic patterns for beginners. Crocheted tunics with patterns and descriptions: summer, beach, children's, openwork, for overweight people. Crochet openwork blouse patterns and description
The tunic is good at any time of the year - not only in the summer to wear over a swimsuit, but also in the autumn - it will perfectly protect you from the cold. The size of a tunic can often be larger than necessary in order to feel like wearing a blanket.
The best models are those with long sleeves - they can be worn in the cold season. By the way, instead of buying such a product, you can crochet it for free. In addition to the fact that it will be exclusive, thanks to your own design, you will be able to choose the color and material yourself. Next you will find wonderful video lessons, not a single master class, new knitted fashion patterns, simple patterns and detailed descriptions!
Crochet tunics patterns and descriptions for women
Let's start with pink simple tunic
for women. This is the most common - loin crochet tunic(boho - pattern). This is exactly the technique we will use today. Plus, it's perfect for beginners craftswomen - it is easy to crochet in the round. Size approx 46/48
, but you can always adjust it to suit you. 

Crochet beach tunic patterns and descriptions for beginners
Our next master class suggests crocheting a beach tunic. This clothing option will be very light, almost airy, but nevertheless warm, so you can wear it for a walk in the evening.
So let's start with the description. If it is easy for you to understand the diagram, skip this point. Knit sleeves, back and front from top to bottom. 160 V.P. into the ring S.S.

Sirloin crochet is very simple , as we have already said, this is a great way for a beginner to improve their knitting skills. With this pattern you can easily make a tunic for overweight women, for girls, and also for the beach. Loin tops, T-shirts, and sweaters look very good.
Crochet openwork blouse patterns and description
Openwork tunic with lacing
. It is made from beautiful pistachio yarn. It's best to take cotton. We start the knitting process with borders, which is knitted in the transverse direction. All strips are S.B.N. On the border 1 R.: the main pattern (its repeat: 4 V.P., 3 S.S.N. under the arch, 2 V.P., 3 S.S.N., 1 V.P., 1 C .S.N., 1 V.P.). In all rows, including purl rows, make the pattern as in the front rows. 


Crochet tunic from motifs
We invite you to review and choose what you like. tunic models
. The photo below has excellent patterns for creating such a wardrobe element. Of course, such a thing can be knitted with knitting needles, but crocheting is much more convenient! You can find on the Internet in sections about knitting a lot of different patterns for obese women, crocheted tunic bird of paradise in boho style crochet master class and various others. There are many simple schemes, and there are many more complex ones. You will definitely find something suitable for yourself! 


Crochet tops, T-shirts, sweaters, tunics with descriptions and patterns
Knitted items go with almost everything
. They can be combined both with each other and with other elements of your clothing. Of course, you won’t wear a knitted dress to a business reception or to work, but for a romantic date it’s perfect! Beautiful knitted skirts go well with tops, crop tops, tank tops or T-shirts.

Crochet summer tunic
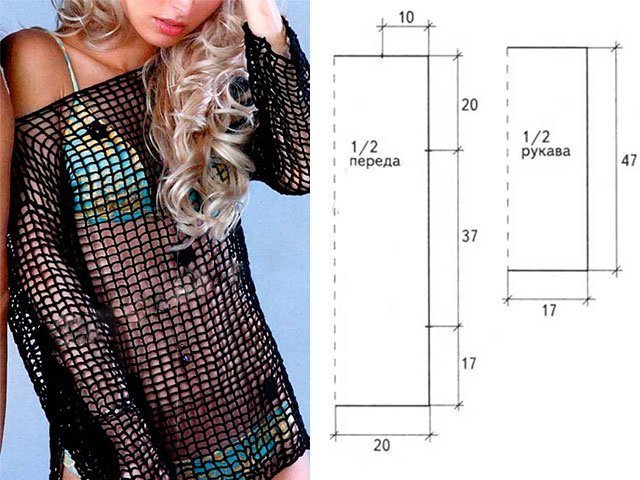
The mesh summer tunic is crocheted with black threads using a very simple pattern. This may require yarn black
(or white) colors. This yarn needs about 350 grams, as well as a hook No. 2.5. Tie the back and front the same way.
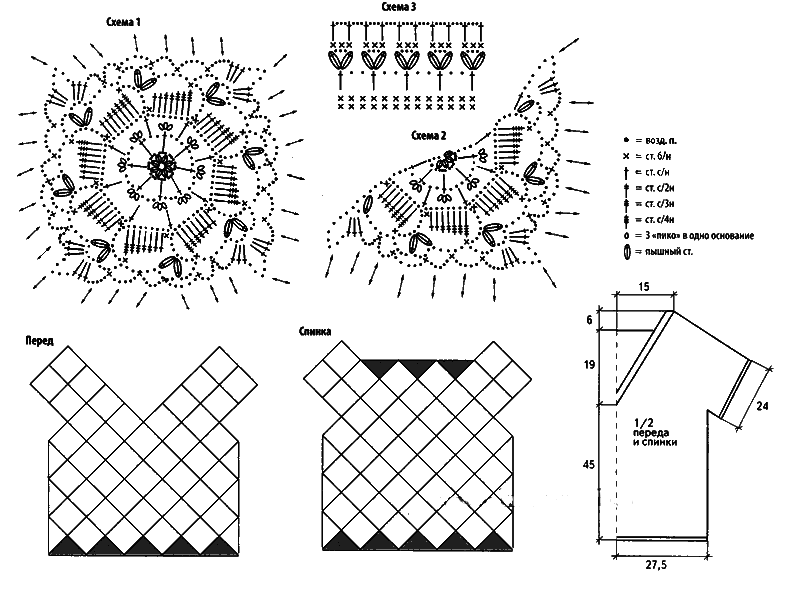
A chain of V.P. is being recruited. 41 cm long. Based on the pattern and diagram 1 - knit the fabric. To assemble the tunic correctly
: make shoulder and side seams + 18 colors (according to C/X 2) and sew them on the jumper. This step is done at will; you don’t have to decorate with anything at all. Or arrange it in a checkerboard pattern. Along the perimeter - S.B.N. 

Crochet tunic for girls
Little girls they really want to be like their mothers and older sisters. If you have a wonderful crochet tunic, why can your daughter have the same one? Today we will provide a detailed description of crocheting a tunic for a 10-year-old girl. This openwork summer blouse is crocheted with size 1.25 and light-colored threads. The hook in this type of knitting is much smaller than in the previous ones. This is due to the fact that the openwork technique requires that all the loops and posts be very well made, and be the same in width and length. In order for the future thing to be beautiful, it should be done carefully and slowly.
Here you will need two openwork patterns
, which are executed exactly according to the diagrams attached below. We start our work from the top of the back. To do this you will need to dial 92 V.P. + three P. for lifting, one R. – S.S.N. We continue with openwork pattern 1. To make even armholes at 15 centimeters, we remove 9 P once. Then we continue the process straight. After 27 cm, leave 40 P. in the center. This needs to be done for the neck, so we will continue to perform the drawing separately. After 32 centimeters, the work can be completed, the loops can be closed, and the thread can be cut. 
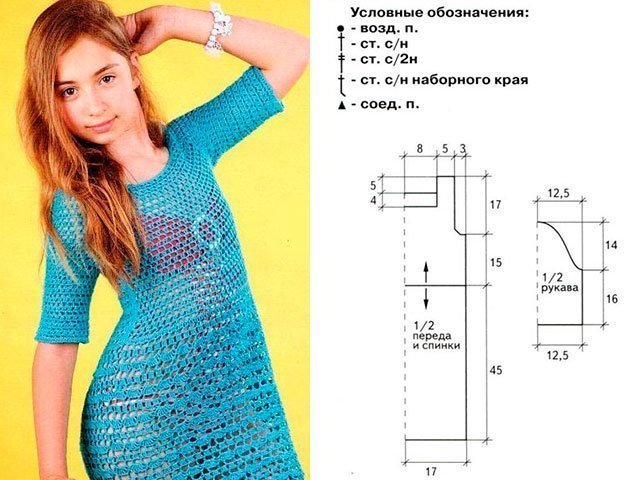
For the top of the front
We follow all the steps as in the point above, but do not forget that the neckline should be much wider and larger. Therefore, each side must be made separately, starting from 23 cm in height. Also close the work after 32 cm.
Finally we come to the openwork pattern - it is needed to make the hem. Make the side seams, knit in a circle along the bottom edge with the second openwork pattern. After 5 R. - 1 R. S.B.N. 
Mittens , in our opinion, is the most difficult thing in this work, because there are two of them! 70 V.P., 1 R.S.S.S., openwork pattern number one. After 16 cm - leave 9 P on both sides, then 10 times 1 P., 3 times 2 P. At a height of 14 centimeters - close. To assemble the tunic together - shoulder seams, sew in the sleeves. Along the perimeter of the neck - 1 R.S.B.N.
Crochet tunic: video
Mommy's channel: crochet video Brings to your attention a master class on knitting a tunic.
Over time, each knitter “fills” her hand, her products become of the same density. This depends on the tension of the working thread, the position of the hands when knitting, and the method of holding the hook. Therefore, at first it may happen that the armhole for the sleeve will be slightly wider or narrower than the sleeve itself. Or the sleeves may be different in width or length. This applies to all paired parts, for example two shelves.
There is no need to despair and give up knitting, you just need to start with the simplest patterns. Very soon you will have your own knitting style and everything will become much easier.
Even if this is your first job, it doesn't matter take only high quality yarn. Don't think that you are just training.
Dull threads of different thicknesses and lengths will give any product a miserable look. You will not get the pleasure from work that the knitting process brings, when a series of stitches and loops are woven into a beautiful pattern. In addition, the yarn should be light, otherwise the result may not be a tunic, but chain mail.
The hook should fit comfortably in your hand. The hook should be sharp enough to fit through the loop without any problems, but not to injure your hand.
Always knit samples to have an idea of the size of the future product. Different yarns have different characteristics that affect the final result.
Photo
Before starting the master class, look at ready-made options for tunics for the beach.


Summer simple option
 Part No. 1
To complete the first part, you need to measure the chest circumference under your arms, adding a few extra centimeters so that the future product does not hinder movement and is easy to put on.
Then you need to knit a chain of the required number of air loops (v.p.). In order to understand how many v.p. will be needed for the middle part of the tunic, you need to knit a sample st. 1 s/n size 10x10 cm and count how many v.p. in the first row, then calculate the required number of ch.
So, you need to type a chain from the calculated number of vp. Make three v.p. lifting, turn the work over.
Knit the second row in stitches, for example, with one crochet. Next, select a simple rapport (pattern element) and measure it with the number of columns of your part. Those. if the rapport is a multiple of 8, then the number of columns must also be a multiple of 8. In a word, the pattern should end on the last column of the part. This is important for the accuracy of the future tunic.
To simplify, you can knit the entire piece using st. 1 s/n. The elegance of such a detail can be given by the use of several compatible colors or subsequent decoration with beads, beads or related motifs (flowers, leaves, etc.).
The height of part No. 1 should be about 5-8 cm. It will not completely encircle the chest, so there is no need to make darts.
Part No. 2
 Performed in two copies (back and front). In order to control the knitting process, you need to make a pattern of the part according to your wishes in length and size. Knitting needs to start from the top.
You should dial the chain of v.p. to the required length. + three v.p. rise, turn the work over and knit a st in each loop. 1 s/n. or Art. 2 s/n. (whatever you prefer). Continue knitting as well. From time to time the work must be applied to the pattern in order to make additions of art. with double crochets on the sides (two double crochets are knitted into the last and first stitch of the previous row). The frequency of such additions will depend on the thickness of the threads and hook. The pattern will help you decide on it.
Don't forget that for a crocheted beach tunic you need two of these pieces.
On the left is a similar model with an openwork pattern.
Part No. 3
The third detail is the straps of the tunic; they can be anything you want. The easiest way is to type chains of several VPs. 3-4 cm long and knit st. with yarn overs, bringing the length of the strap to the desired size. Also tie the second strap.
Assembling a crocheted beach tunic
Before assembly the parts must be moistened and dried by laying them out on a clean, dry cloth. Carefully sew the back and front of part No. 2, then sew them to part No. 1. Sew on the straps. After this, the hem of the tunic can be tied with an openwork border. And all the sloppy edges of Art. 1 s/n.
Other styles: diagrams and descriptions
Below are patterns that even beginners can knit.
This white beach tunic has a simple but beautiful pattern. It is quite voluminous, so you don’t have to knit complex details.
First you need to create a pattern for the future product. You can find a similar model, for example, in Burda magazine. In fact, in the process of creating this model, difficulties may arise for a beginning knitter only when combining the sleeve and armhole. To avoid problems, pay special attention to the pattern.
How to crochet a beach tunic for beginners: stages of work
Before you start working, you need to knit a pattern sample measuring 10x10 cm. Firstly, you will get the opportunity to practice on a small product, and secondly, you will understand how many loops you need to cast on for the back. Immediately below the description you will find a diagram.
All details of this model are knitted from top to bottom. The neckline and sleeve cuffs are tied with st. 1 s/n.
To form armholes you need to do the following:
- do not knit a certain number of loops to the end;
- turn the work over and continue knitting a new row;
- without tying as many loops at its end as required according to the pattern. If you need to repeat this procedure several times.
Thus, the number of loops gradually decreases, smoothly forming armholes for the sleeves.
To form the neck of the product It is necessary to knit the front of the product to the location of the intended neckline, turn the work over and knit from the outside to the end of the row. In the next row, again without finishing a few stitches, turn the work over and knit to the end.
Continue shaping the neckline according to the pattern. After that, simply finish the work by cutting and securing the thread. Next you need to insert a new thread into the loop that follows the first, already knitted part of the neck. And repeat the same process. 
Crochet a pink beach tunic (pattern below)
 This beautiful tunic, consisting of only two pieces, is knitted very simply, despite the fact that the description is given in German.
- Luftmasche– air loop (v.p.);
- Stäbchen- double crochet;
- Kettmasche– connecting loop;
- festival M– single crochet;
- Trager– straps;
- R- row.
note that knitting begins with strap No. 2. For the back, you should cast a chain of 6 chain stitches. + 3 v.p. rise and knit 6 rows, after finishing the 6th row you need to knit a chain of 30 vp. + 3 v.p. for lifting, and then knit according to the pattern. Knit the second strap and sew it to the fabric. Do the same in front of the product.
Lightly moisten both parts and lay them out to dry on a clean cloth, then sew them together. If necessary, tie the edges of the product with st. b/n.
By the way, the length can be varied at will.

Options for . More than 20 modifications!
A review of beautiful hair clips, headbands, headbands and ribbons.
Many people do not know which method of biorevitalization to choose - injection or hardware. Read all the pros and cons on
Tunics are a universal wardrobe item. They can be worn to the beach or on a date, paired with jeans or used as a dress. You can knit a tunic that will become the highlight of your look yourself - using a crochet hook or knitting needles.
With the arrival of summer, all fashionistas want shine in beautiful outfits. An important attribute of both beach and everyday fashion is not only a beautiful swimsuit or short shorts, but also tunic.
There is a motley variety of such goods in markets and shops, but it will be a pleasant experience knit a tunic with your own hands. In this article we will look at various options and patterns for knitting a tunic.
Crochet beach tunic: photos, diagrams, description
If you have never held a hook in your hands and don’t know which side to start knitting from, don’t despair, everything is fine. you can learn. Over time, you will get good at it and will be able to knit beautiful products for yourself and your children.
But at first you shouldn’t take on very complex works with intricate patterns, it’s better to practice in advance on simpler jobs. In order to correctly knit the product, you must thoroughly study knitting pattern. It will be better if you have a detailed description and approximate appearance of the finished product before your eyes.
Crochet tunic
The most important thing to understand is that even if you pick up a hook for the first time, you should not buy one for it. cheap yarn. Because, if you get a passable outfit, then different thickness or color of threads, which are common in inexpensive yarn, can ruin all the hard work you put in.
Also an important nuance will be the correctly selected hook– it should fit well in the hand, not be too small and sharp enough. Choose a tool so that you it was convenient to hold it, and check the sharpness - the hook should pass through the loops well, but not injure your hands.
The simplest crochet tunic pattern consists of three parts. The first part is in the chest area, so it is important to correctly measure the chest circumference and add a couple of centimeters so that the future product does not hamper your movements. For convenience, knit one line and measure yourself to understand approximately how many loops you will need to knit part No. 1.
 Beach tunic pattern
 First row you will knit air loops. After this, you will need to unfold the work and start making the second row. Initially, choose a pattern, because from the second row you will already begin knitting with the selected elements.

 Sequence of actions when performing an air loop
 For your first job, you can simplify knitting a tunic - do not make darts. To do this, the first part will need to be knitted with a length of no more than 8 cm
Second detail starts from the middle of the chest and ends where you determine your length. Start knitting above. In order to complete the work as accurately as possible and bring all measurements into line, it would be best to do pattern. In this case, while knitting, from time to time you will need to apply your work to the pattern and check the accuracy of the measurements.

 Pattern for making a tunic
 To start the second part you do 2-3 air loops, three lifting air loops and then, if desired, knit one or two double crochets. Thus, you will knit a beach tunic to the bottom of the product, but it is important to understand that you are making this detail in two copies - this will be the front and back.

 Crochet loop
 Part No. 3 There will be directly the straps of the product. It all depends on your desire and imagination - you select the desired width, length and pattern of the straps. The simplest option would be about 3 centimeters wide, where there will be air loops first, and then double crochet loops.

 Types of straps
 Your beach tunic is almost ready. Now in front of you are four separately linked products and you need to sew them into one beautiful summer tunic. First, slightly moisten the knitted parts and lay them out on a flat surface, after which they will take the desired shape.
After the products have dried, you need sew back and front.
Make sure that the front and back of the tunic had the same length, unless you initially intended for it to be a little longer at the back. When the second part is ready, sew it to the first, and then sew on the straps.
Your beach tunic anyway will have a great view, because you will choose your favorite color, a beautiful pattern for it and put your work and a piece of your soul into the product.
Video: Master class on crocheting a beach tunic
Crochet tunic for obese women patterns
Beautiful knitted items looks equally elegant on women of any age and body type. For curvy women There are many options for patterns and patterns for knitting tunics. The only difference in knitting a tunic for large women is the amount of yarn used.
A very beautiful outfit for obese women would be a crocheted tunic with a pattern called "A pineapple". This tunic will look modern, but at the same time look beautiful and elegant on ladies with curvy figures.
 Tunic in the "Pineapple" pattern
 The advantages of this product are:
- Good combination with trousers or skirt
- Stylish and bright look
- The product does not shrink or stretch when washed
- Great outfit for hot weather
- Price
It is the cost of the product that can become an important criterion in order to buy yarn and practice knitting at home. Ready-made knitted products, and even handmade ones, cost incredible amounts of money.
Pineapple pattern is one of the most beautiful knitted patterns that can be used not only for knitting a tunic, but also skirts and light cardigans.

 Pattern "Pineapple"
 In order to knit the product you will need 500 g yarn and hook with number 2.
A tunic with this pattern is knitted in the round and starts from the neckline. In order to do this part, you need to first 199 loops. From the first loops you will find this a very complicated and long process, but over time all your movements will become automatic.
After two hundred loops knit three rows of chains seven loops each. Further on the diagram you see how to knit the remaining five rows. You will knit the back and front with these patterns.

 Crochet chain of loops
 After this you need to do the sleeves. You also need to knit the sleeves in the round - knit 22 loops and connect the edges of the sleeve at the level of the notch. The number of loops is determined depending on the desired sleeve length.
Tunic with "Pineapple" pattern undoubtedly, it will catch the eye not only of people who understand fashion trends, but also of everyone around, since the beauty of the pattern cannot but attract attention to your outfit.
Video: Crochet Pineapple pattern
Knitted beach tunic: photos, diagrams, description
An equally beautiful and stylish outfit can be obtained if you use not crocheted, but knitted. Many people remember from childhood how grandmothers and mothers took yarn in the evening in front of the TV and knitted blouses, sweaters and warm socks. You can knit for yourself beautiful tunic for a holiday at sea. A detailed description and diagram are provided below.

 Knitting pattern for a tunic
 It will be very beautiful to combine several colors in a beach tunic– it would be good to use blue, mint and white colors. Blue and mint will look good against the backdrop of the sea breeze, and white will highlight tanned skin.
For such a tunic you will need 150 g yarn of three colors and knitting needles from the fourth to the sixth number. It will look very symbolic wavy pattern for a beach tunic.
 Wavy knitting patterns
 Number of rows It will be different for each craftswoman - it all depends on the desired length. It is important to make a pattern in advance in order to be guided by the measurements and the number of loops in the row. Knit all odd rows facial loops, even - purl.
 Knit stitch with knitting needles
  Two ways to make a purl loop
 Back and front It is necessary to knit in separate parts, after completion, sew the two parts into the finished product. A prerequisite will be color stripe control– make sure that the stripes on the back and front are at the same level, otherwise the offset patterns will not look entirely successful in the finished form.


 Tunic pattern with knitting needles
 If you have never picked up knitting needles before, you can do simpler pattern, which will not require line level comparison. A trendy beach tunic with a wavy pattern can be knitted after several workouts on simpler items.

 Ready-made tunic knitted with knitting needles
 Knitted tunic for obese women
Regardless of your body type, you can choose a beautiful pattern for tunic a curvaceous woman. In order to knit such a blouse you will need 600 g yarn and knitting needles with numbers four and five.
It is advisable to make the tunic a little looser and buy it for its manufacture acrylic yarn. Thus, the flowing thread will make your silhouette more slender. To add lightness and freedom of movement, you can make slits on the sides.
To get started you need make a pattern the desired product is a prerequisite for the tunic to be the correct size and shape.
An excellent solution for a pattern would be garter stitch or pearl pattern and satin stitch. You can see the patterns in the diagrams. Even if you knit a tunic with knitting needles, it is better to secure the neckline, sleeves and bottom with crochet.
 Garter stitch
 Knitting "Stitch" with knitting needles
 Before you start knitting The thread must be folded in half. Initially, the product will consist of two parts - front and back.
On the back we start knitting with a pearl pattern. We knit six rows with them 86 loops each. After this, we continue knitting in satin stitch and knit with this pattern approximately 12-15 centimeters and four rows in garter stitch.

 Knitted pearl pattern
 At approximately this level we should have space for the sleeves - this part tie with four loops at both sides. Then we look at the diagram and alternate patterns, as shown in the figure.
We also start from the front with 86 loops and six rows, which need to be knitted with a pearl pattern and continue stockinette stitch, alternating with pearl pattern and garter stitch. The number of rows can be seen in more detail in the diagram.

 Tunic diagram
 After you have made two parts of the future product, you need pin details onto the pattern, moisten a little and wait for them to dry completely. Thanks to this, the product will be evenly stretched and there will be no blown or overly compressed loops on your tunic.
In many tunics, for simplicity and convenience, the back is made simple plain pattern. In this case, the back and front will be in the same style - contain three patterns, which will have a positive effect on the beauty and sophistication of the tunic.
After the parts have dried, it is necessary sew them into one product. If you knit this tunic according to the suggested pattern, then, undoubtedly, you will get a very beautiful product that can be worn both to work and meeting with friends.
Other options for tunics knitted with knitting needles:

 Elegant two-tone tunic
The weather is starting to look nice with warm days, which means summer is coming. A favorite activity during this season is visiting the beaches. Every girl thinks about what to wear to the beach and still look chic. A good choice would be a crochet beach tunic. It can be either a thing purely for going to the beach, or it can look great on a walk in combination with jeans, a skirt or shorts.
Crocheted tunics are very popular; you can easily make them yourself, since they are created using simple patterns without any special curves or cutouts. Let's look at a few knitted tunics and their patterns.
White Cape
A light tunic in light shades, crocheted and with contrasting trim, will be an excellent choice for going to the beach, or for walking in jeans or shorts. Creating such a piece of clothing will not be difficult even for beginners, because it is knitted from 2 rectangles.
We will need:
- 400 grams of cotton yarn of your favorite color;
- 100 grams of cotton yarn in a contrasting color;
- hook.
First we knit the back part with threads of the main color. We cast on a chain of 142 loops and knit in single crochet columns. Now we knit the pattern according to the pattern shown below:

When the height of the product reaches 47 centimeters, close the middle four centimeters to cut out the neck. Now we knit each of the parts separately using the same method. When the product is 68 centimeters, you need to finish knitting. We knit the front part using exactly the same method.
Now we tie each of the parts using threads of a contrasting color. Sew the side seams, leaving 21 centimeters for the armholes at the top and 18 centimeters for the cutouts at the bottom of the tunic.
Using yarn of a contrasting color, twist two cords for the shoulder line and one for the waist. We take yarn three times larger than the required size. Now you need to thread the laces through the shoulder seams and tie them, leaving the ends free. The waist cord is needed as a belt.
Mesh model
A mesh tunic for the beach looks very unusual. It will show all the beauty of your figure, without hiding the beauty of your swimsuit. This tunic with a mesh pattern can be worn not only when going to the beach, but will also look beautiful on a turtleneck or dress.

It’s easy to knit such a thing with a hook for the summer using a master class, and it takes little time, because it consists of 2 rectangles.
To create it, it is better to choose light cotton yarn so that the tunic for going to the beach is thin and light. We select a design with a large mesh pattern and begin manufacturing the product.

First, using the selected pattern, we knit a test fragment and use it to calculate the required number of loops. Now we make a set of loops and knit two rectangles using a mesh pattern. Their size is identical to the half-circumference of the hips with the addition of two centimeters to make wearing more free.
To get light flowing rectangle sleeves, you need to knit a wider size. If you want, you can use yarn of a contrasting color when tying the edges. Leaving space for the armholes, neckline and seams on the shoulders, we sew the sides of the rectangles. There you have it, a cute mesh summer tunic.
Knitting "sun"
An unusual and cute tunic made from sun motifs will be the most favorite thing in your wardrobe for a trip to the beach. It can be worn simply with a swimsuit or with a long white T-shirt. In this case, you will get a spectacular minidress for going to a party.

The upper part of the tunic is knitted with mesh, and the motifs are tied together in the same way. We choose the color of the yarn to your taste, reflecting your wonderful, bright and truly summer mood.
And we will knit using the following schematic image:


T-shirt tunic
A fashionable crocheted T-shirt tunic will look amazing with a contrasting swimsuit or top. The type of knitting will resemble large lace. And a large number of holes will provide air ventilation, so it will not be hot in it even on the hottest day. Below is a detailed description.
To create a crocheted T-shirt tunic for the beach, you will need cotton yarn, a crochet hook, and a matching T-shirt. We will use the T-shirt as a pattern, we begin to knit our tunic, only making the new product longer than the original piece of clothing.
We knit the front and back parts with the same pattern using cotton yarn. First, we knit from the bottom to the line of the center of the abdomen, using the first pattern. Now we make an insert from a lace strip of a floral pattern according to the second pattern. We will knit again with the first pattern until we reach the beginning of the neckline. Using the third pattern, we make the straps of the T-shirt using a pattern.
Using this method, using your imagination and a little knitting skills, you can create a fashionable and unusual tunic-shirt for the summer beach season using a crochet hook.
Video on the topic of the article
In conclusion, there are several videos on how to create gorgeous crocheted tunics for the summer; all that remains is to study, get inspired and create a masterpiece for your summer wardrobe.
An easy-to-knit summer tunic made from bamboo yarn is suitable for hot weather on the beach, in the city, or as a top under a jacket. Can be worn with a lace on the hips or simply loose. Description and calculations for knitting are made for sizes 44-46
Materials for knitting the top: Alize Bamboo Fine yarn (100g-440m) composition: 100% bamboo - 200g; hook No. 3 and 2.5.
Accepted formulations: 1 rappot pattern in height (vertical) = 2 rows of knitting; 1 rapport in width (horizontal) = 1 fan = 5 air. loops of the chain.
Knitting the front: cast on a chain of 111 chain stitches with crochet number 3 and knit the fabric according to a pattern of 22 repeats of the pattern in width - and 5 repeats in height (10 rows). Then crochet No. 2.5 another 19 repeats in height. Then, in 4 rows, decrease 2 repeats of the pattern on each side. At a height of 31 repeats, divide the fabric into 2 parts, leave 6 middle repeats of the pattern unknitted, then knit the right and left parts separately. On the inside of each part, in 4 rows, decrease 2 repeats of the pattern for cutting the neckline, continue knitting. At a knitting height of 31 repeats, break the thread on each side.
Knitting the back: cast on a chain of 111 chain stitches with crochet number 3 and knit a fabric of 22 repeats of the pattern in width - and 5 repeats in height (10 rows). Then crochet No. 2.5 another 16 repeats in height. Then divide the fabric into 2 parts, do not knit the middle 2 repeats of the pattern, knit the right and left parts separately. At a knitting height of 26 repeats on each side, subtract 2 repeats of the pattern (horizontal) in 4 rows. At a knitting height of 28 repeats (vertical), make a cutout for the neckline. To do this, do not knit the outer 3 horizontal repeats on each inner side. Then, to round the neckline, subtract 1 horizontal repeat of the pattern in 2 rows. At a height of 31 rapport (vertical), break the thread.
Sew side and shoulder seams. Tie the bottom with 1 row of fans (row 2 of the pattern according to the diagram).
Tie the armhole cutouts with two rows of single crochets. Tie the neckline with two rows of single crochets, the neckline on the back - 1 row of single crochets, 1 row of double crochets. Tie the neckline and back at the same time, while simultaneously forming 2 laces on each side of the edge of the back neckline.
Crochet a lace about 2 m long and pull it into the holes of the pattern.
Summer crochet top is ready! 


