DIY Christmas cards (photo). DIY children's Christmas card. DIY Christmas card
Handmade gifts will give a storm of unforgettable emotions. It is not necessary to buy expensive ones, the main thing is to invest your soul and love in them. Christmas cards can be called "magic" gifts.
Christmas cards with an angel are the personification of warmth, tenderness and purity. Creativity is very multifaceted, so you can use completely unpredictable materials in your crafts.
To create such a wonderful present you will need:
- 3 coffee filters;
- white cardboard triangle 9 cm high;
- mugs with a diameter of 2.5 cm;
- white thread;
- glue;
- gold thin ribbon;
- toothpick.
Below you can see the stages of creating a Christmas card with an angel:

- Glue a toothpick to the back of the triangle. A quarter of it should be visible.
- Put coffee filters on the triangle.
- Stick two circles on a toothpick. It must be within them. These bonded balls are the head of an angel.
- Put a coffee filter on top.
- Tie a thread around the neck of an angel.
- Fold the third filter in half and tie in the middle. Attach the resulting wings to the back of the angel.
- The head of an angel can be decorated with a gold ribbon. It will serve as a pretty headband. If desired, you can draw the face of a cute angel.
This craft will fit very well into the atmosphere of Christmas. The angel is a symbol of purity, peace and goodness. Everyone will be happy with such an unusual handmade gift.
Christmas card in English
Christmas is a truly magical holiday. Sitting at the festive table, everyone wishes each other all the very best. Of course, I want to send congratulations to those who are not currently in the circle of friends or family. Then there is a desire to send a greeting card.
You can write a Christmas card in English.
Here are some congratulatory phrases:
- May this Christmas be bright and cheerful! - May this Christmas be bright and cheerful!
- May this season of joy open doors to new opportunities!
Merry Christmas! - May this winter open doors to new opportunities for you! Merry Christmas! - My best wishes for a healthy and happy! - My best wishes for health and happiness!
A Christmas card written in English is a very unusual gift. The main thing is that the person you want to give it to knows English. Otherwise, such a present will not be entirely appropriate. Often such presents are sent as a gift to their friends from other countries. Congratulatory notes must be written correctly, so if you yourself do not know English well, then you should not take risks.
In the technique of quilling
Using the quilling technique, you can create a very unusual Christmas card for the competition. At first glance, it may seem that doing such a job is quite difficult, but it is not. It is enough to try to create at least one postcard using the quilling technique to see how easy it is to make such a beautiful and unusual craft with your own hands.
To create a gift, you will need materials such as:
- cardboard;
- strips for quilling;
- scissors;
- toothpick;
- glue.
In order to make a Christmas quilling card, you must follow the following steps:
- Take a thin strip of paper and fasten the tip into the slot of a toothpick.
- The toothpick should be taken in the right hand, and the tape in the left.
- The toothpick is rotated clockwise. The spiral is held from above and below.
- The end must be fixed with glue.
A tight spiral is the basis of quilling.
- Put a little glue on the end of the tape and attach it to the spiral.
- The spiral needs to be untwisted a little so that it becomes "free".
- Next, you need to make an element such as an "arrow". To do this, click on three sides of the spiral to form a triangle.
- For a Christmas card, you will need 6 arrows.
- It is necessary to make such an element as a "heart". Fold the tape in half. Screw the right end counterclockwise and the left end clockwise. For a postcard you will need 6 "hearts".
- Next, you need to make the element "eye". Pinch the coil on both sides and then release.
- You will need 6 "eyes" and 12 pieces of "tight spiral" of blue paper.
- For the basis of this postcard, black cardboard is best suited.
- Fold a sheet of cardboard in half.
- Glue a tight spiral in the center.
- Around it is necessary to attach "arrows".
- Glue hearts between the "arrows".
- Add an element such as "eye".
- Trim the edge of the card with curly scissors.
- Glue the inscription "Merry Christmas".
If desired, you can add the craft "snow". It can be done with white gouache.
Scrapbooking technique
Scrapbooking is a very unusual technique for creating holiday cards. It allows you to create an unusual and original craft with your own hands. Even a child can use this technique, as it is quite simple.
To create a Snowy Winter postcard, you will need two types of napkins from which paper will be made.
Here are the steps to create a Christmas card:
- In the foreground, you need to place a postcard with bullfinches.
- Attach a label to write on.
- Attach a button with the image of Santa Claus to the front side.
The postcard is ready. You can give it to your dear and beloved person. Scrapbooking allows you to create wonderful DIY works in a short time. This saves both time and money. Such small presents will delight everyone with their simplicity and accessibility.
Volumetric Christmas card
Volumetric crafts are very popular lately. They look intricate and unusual. It seems that it is very difficult to create a three-dimensional postcard, but it is not. It is enough to carefully follow the instructions, and there will be no problems with creating voluminous postcards.
In order to make a volumetric postcard with a Christmas tree, you will need:
- scissors;
- glue;
- cardboard for the base of the postcard;
- green cardboard for the Christmas tree;
- sequins, beads and a hole punch;
- fluff and cotton.
It is important to follow the following steps:
- Cut 5 strips from green cardstock. They should be of different lengths and widths. They must be folded with an accordion.
- Cut out cardstock and fold it up. Glue a large strip to the bottom of the fold, stick the strips further, closer to the top - less and less.
- Cut out snowflakes and glue them to the base and Christmas tree.
The gift is ready. This postcard will be a pleasant surprise. Such a sign of attention will cause very pleasant emotions.
Do not forget to please your family and friends with small surprises. A handmade gift is considered to be quite budgetary, but at the same time very pleasant, and most importantly, with all my heart. Such a present will leave very good memories of yourself.
Photo Ideas

Christmas is a big holiday, on which it is customary to give cards with a Christmas theme. They almost do not differ from New Year's cards, except that instead of Santa Claus and the Snow Maiden, stars, wreaths and angels can be depicted. In this article, we will show you how to make simple and original postcards with your own hands.
Christmas tree made of tinsel
A Christmas tree made of tinsel is a children's craft. It is easy to perform and at the same time it turns out beautiful and unlike other crafts. In order to make it, you will need:
- a sheet of plain paper;
- a sheet of paper for the base;
- a sheet of one-color paper;
- scissors and glue;
- bright Christmas tree tinsel.
Making crafts:

Your DIY Christmas card is ready!
Volumetric Christmas tree
For this craft you will need:
- a sheet of paper or cardboard for the base;
- colored paper;
- glue and scissors.
Making crafts:

DIY Christmas card is ready!
Volumetric snowman
In order to make a card with a snowman you will need:
- two identical sheets of paper;
- scalpel or nail scissors with sharp thin ends;
- paints.
Step-by-step instructions for crafts:
- In the center of one of the prepared sheets, you need to draw the outline of a snowman.
- Then you need to cut the snowman along the contour with a scalpel or scissors, so that some of its parts remain attached to the sheet and the snowman stays inside the postcard.
- After that, we glue the sheet with the snowman to the second sheet, after which we bend the craft in half (when opening, a three-dimensional snowman should appear).
- The card needs to be decorated. You can draw a forest, snow, Christmas trees, etc.
DIY craft for Christmas is ready! Write your wishes and feel free to give it to the person for whom it is intended!
Original Christmas card
 For manufacturing you will need:
- cardboard;
- white and colored paper;
- glue, scissors;
- satin ribbon 0.5 cm wide.
Instructions for making:
- From thick cardboard we cut off half for the base.
- Cut out a large star from the remaining cardboard and place (try on) it on the base. The cut element should not go beyond the borders of the base.
- Then we cut out a candle, a Christmas tree or a snowflake from white paper to choose from.
- From a satin ribbon, you need to tie a small bow. It will serve as a decoration for our craft.
- After that, it is necessary to glue the colored paper on the cardboard base so that 0.5 cm remains on each side of the edge.
- After that, we glue a star on the base, glue a cut-out candle, a Christmas tree or a snowflake on the star, and place a satin ribbon bow on one of the tops of the star.
Your Christmas present is ready!
christmas tree
To make crafts you will need:
- thick paper (colored or with drawings);
- pencil;
- PVA glue;
- decorations (glitters, sequins, beads, etc.).
Making a Christmas present:

Your Christmas present is ready!
Gift for Christmas from circles "Santa Claus"
For this easy-to-make postcard, you will need:
- colored cardboard;
- scissors;
- glue;
- White paper;
- colored paper.
The order of the craft:
- We cut out nine circles with a diameter of two centimeters from white paper (this will serve as Santa Claus's beard), one circle for a pompom per hat with a diameter of one and a half centimeters and a strip 7.5 cm long for a rim on a hat.
- From red paper, it is necessary to cut out a semicircle with a diameter of 7.5 cm for Santa Claus's hat and a circle 1 cm in diameter for Santa Claus's nose.
- From pink paper, we also cut out a semicircle with a diameter of 7.5 cm for the face of Santa Claus, and for the eyes - small circles of black paper with a diameter of 0.4 cm.
- After that, we glue the prepared face to the cardboard base, stick a hat over the face, and a pompom and a rim on the hat. Add eyes, beard and nose to the face element.
Merry Christmas card is ready!
Craft from cereals "Christmas night"
Required:
- rice white and brown;
- millet;
- dark blue or black cardboard;
- glue.
Making a postcard for Christmas:

Craft "Christmas Night" is ready!
How to draw Christmas?
In order to draw Christmas, it is enough to depict the symbols of this holiday in the picture, for example: Christmas socks that hang on the fireplace; christmas wreaths, angels or bells. With these drawings, you can decorate a postcard or present the drawing itself as a gift card. It remains only to write wishes, and the gift for Christmas is ready!
As an example, a voluminous postcard for these celebrations can be made using such a currently very popular technique as scrapbooking.
And here is this option:
And you can build a postcard like this using the quilling technique:

And you can also work on such options for bulk postcards:


I won’t tell you how to do it, but which ones are not very difficult to do, I want to show you.
Here are a few that aren't very difficult.


This is for loved ones

And if the upper ones can still be somehow repeated, then the lower 2 works are aerobatics! Take my word for it, I know how it is done and what is needed for this.


In general, there are several ways, but they all boil down to what, in essence, to make an application, that is, take and cut out a beautiful and intricate pattern and New Year's patterns, and then take them and stick them.
Now it is very fashionable to make gifts with your own hands, including postcards. Yes, indeed, such a postcard will be doubly pleased to receive. There are many options for making them. Here's a very pretty one, but it's a little tricky to make:
And here's an easier option:
You can make the whole postcard voluminous by cutting and bending the base. Such a postcard will be able to confidently stand on the table. Here is the layout of the cardboard base sheet. The places of folds are marked in white, the lines that need to be cut are marked in black.

Having done these manipulations, get such a basis for the postcard.


You can make some details on the postcard voluminous. Here, for example, is how to make Christmas trees and balls on a postcard.

You can make a postcard that looks ordinary on the outside, but three-dimensional elements are revealed inside. Here is a step-by-step photo-master class for making such a postcard.
A three-dimensional postcard for the New Year or Christmas can be made in the form of a folding one, with an application or a surprise from the inside.
Inside the card, a whole drawing or a small stand is cut out, on which you can stick an application, as on a card with a Christmas tree:

It is not difficult to make a card with a snowflake with your own hands. To do this, you need to fold paper or cardboard in half and cut out a beautiful snowflake. To make the snowflake symmetrical, you need a ready-made template that you can draw in advance or take on the Internet (redraw, reprint). This technique is called kirigami, an image inside a postcard that becomes three-dimensional when it is opened and unfolded:

Volumetric card with a snowman:

Volumetric postcard with a Christmas tree:


Such postcards are not difficult to make with your own hands and give to loved ones for the New Year. A handmade gift is the most extraordinary.

Quilling technique and voluminous postcard:
This year, my daughter and I are preparing handmade cards and gifts for grandparents. I will share with you some simple ideas, why simple, because the child cannot stand the laborious process, but wants to do everything with me
DIY Christmas gifts
Puchkova Maria Vladimirovna,teacher of fine arts and MHC MOU "Gymnasium No. 19" Saransk Republic of Mordovia
Master - class: "Execution of the postcard" Night of Christmas "in the technique of" Isothread ".
Description: this master class is intended for children from 10 years old, teachers of fine arts, teachers of additional education, educators, parents.
Purpose: decorative postcard in the technique of "Isothread" will be a welcome gift for Christmas. Isothreading is a very effective technique that can convey a piece of the warmth of the author of the work.
Target: Making a postcard using the Isothread technique.
Tasks: introduce a new type of artistic activity; to form the ability to use the acquired knowledge in visual and labor activities, to develop skills to freely use techniques, materials, tools to create the image of a Christmas tree;
develop fine motor skills of hands, imagination; cultivate perseverance, attentiveness, diligence.
Materials: 2 sheets of cardboard (black and blue), a sheet of paper (blue), a simple sharpened pencil, metallic threads, viscose embroidery threads, a needle and an awl, decorative elements, beads, braid (gold, silver), glue (adhesive tape), organza (green and lilac), braid, ruler, scissors.

Master class progress:
Safety rules when working with a needle and scissors.
Needles
1. Store needles in a pillow or needle bed, wrapping them with thread.
2. Do not throw a broken needle, but put it in a box specially designated for this.
3. Know the number of needles taken for work. At the end of the work, check their presence.
4. During operation, stick the needles into the pad, do not take it into the mouth, do not stick it into clothes, soft objects, walls, curtains. do not leave a needle in the product.
5. Do not sew with a rusty needle. It leaves stains and can break.
Scissors
1. Store scissors in a specific place - in a stand or work box.
2. Put the scissors with closed blades from the worker; when passing, hold them by closed blades.
3. Work with well-adjusted and sharpened scissors.
4. Do not leave scissors with open blades.
5. Monitor the movement and position of the blades during operation.
6. Use scissors only for their intended purpose.
Glue
1. Do not open the adhesive with your teeth.
2. Apply glue with a brush or glue stick.
3. When working with glue, use a napkin.
4. Avoid getting glue on clothes, hands and face; in case of contact, rinse thoroughly with water.
Snowflakes are circling quietly and smoothly outside the window, the light of a Christmas tree garland is reflected in the dark windows, and the most amazing holiday of the New Year and Christmas awaits us ahead, and during this period, both children and adults want to believe in a miracle, that a fairy tale is somewhere nearby. A greeting card is able to convey to everyone who received it a wonderful feeling of magic, wonder and childhood. The image of the Christmas tree on the postcard is not only the imagination of the artist, but a very real world that brings a joyful mood of the holiday with it to the house.
And how nice it was to receive a Christmas card with angels and an ornate inscription with kind warm wishes?! Less and less often we send greeting cards to each other by mail. But still, before the New Year, and then before Christmas, we rush to choose the most colorful, brightest postcards and write with pleasure words that we would not say at a meeting.
Let's delight loved ones with our own work?!
Let's make a postcard "The Night Before Christmas" using the Isothread technique.
Choose by color and texture cardboard sheet, determine the size (13.8 * 19.8).
We carry out the sketch pencil on the wrong side of the product. Almost all the details of the composition will be the same in shape (spirals) - the only difference is the size. Along the contour of the parts at a distance of 2-3 mm, we make punctures with an awl or a needle.
The reverse side looks like this:

Front side:

Today we offer you, as the main method, to stop at thread filling the spiral.
On a separate sheet of cardboard (to master this technique, in order to avoid mistakes in work), you can perform this exercise (especially important for those who are not familiar with the technique). The algorithm of actions is as follows. On the wrong side of the cardboard we draw a spiral, mark points at a distance of 2-3 mm from each other, make punctures.

Work begins from the starting point of the curl, the stitch length is selected from 3 to 5 punctures (depending on the size of the spiral). The filling of the spiral is done by advancing towards the end point in the same direction all the time. We fix the thread with tape on the wrong side.


Important: From the wrong side of the product we perform short stitches, from the front - long!
We connect the points with stitches: 1-4, 4-5 (short stitch on the wrong side), 5-2,2-3 (short stitch on the wrong side), 3-6,6-7 (short stitch on the wrong side), 7-4,4-5 (short stitch on the wrong side), 5-8,8-9 (short stitch on the wrong side), 9-6,6-7 (short stitch inside out), 7-10,10-11(short stitch inside out), 11-8,8-9(short stitch inside out), 9-12,12-13(short stitch inside out), 13-10.
We fill the silhouettes with threads. On postcards, we begin to embroider the figure of an angel with white thread.

Then we fill in the silhouette of a spruce with green threads.

Snowdrifts are made with metallized blue threads. Please note: spirals are embroidered "to meet each other."

As the work progresses, the embroidery looks like this:

Wings of an angel, a halo, the radiance of a star are performed with metallic threads.

The trunk of a spruce, the hands of an angel are performed with one large stitch. Angel's palms - "knot". To do this, we make several turns of thread on the needle and, holding the thread with your finger, carefully make a puncture. The more turns, the larger the knot.

The star can be glued or sewn on.

Decorate sequins and beads.
The base of the postcard is ready!

We carry out a "frame" for embroidery. We carry out a drawing on a sheet of blue cardboard (length 28 cm, width 20 cm). We divide the sheet in half. On the right, we outline the silhouette of the window, in the lower corner, the curls are decorations.

We make punctures, embroider with metallic threads, fasten the snowflake with a thread. Cut out the silhouette of the window.


We duplicate the cover of the postcard on a blue sheet of paper. We cut out the silhouette of the window, connect the cardboard and a sheet of paper with glue or tape. On the right half of the postcard (in a turn) we place embroidery.


But that's not all!
Above the window we place a strip of adhesive tape.

We fix 2 organza sheets (14 cm * 20 cm), form folds. We glue a strip of paper to match the cardboard.

Tie a ribbon bow. Glue the tape as a curtain.


Embroidery options are as follows:
(works of students of the Municipal Educational Institution "Gymnasium No. 19" Saransk)
Christmas bells. The ringing of bells at Christmas time came to us from winter pagan holidays. When the Earth was cold, it was believed that the sun died and the evil spirit was very strong. To exorcise the evil spirit, it was necessary to make a lot of noise. The Christmas tradition of ringing bells, singing and shouting at the same time has survived to this day. Church bells ring out at Christmas time in churches all over the world. But not to drive out evil spirits. Thus, people welcome the coming of Christ.

Christmas angel. Since time immemorial, it has been customary to decorate your home and Christmas tree with angel figurines for the Christmas holiday. We believe that angels have supernatural powers and can bring happiness to a home.
DIY Christmas card- a pleasant surprise for a loved one. You can make it together with your children, using the simplest and most accessible materials and needlework techniques, and present them to your family and friends, congratulating them on this warm family holiday. And to decorate the house, you can do it, it can be winter coniferous wreaths and New Year's boots, and be sure to bake fragrant homemade cookies on the table.
DIY Christmas card
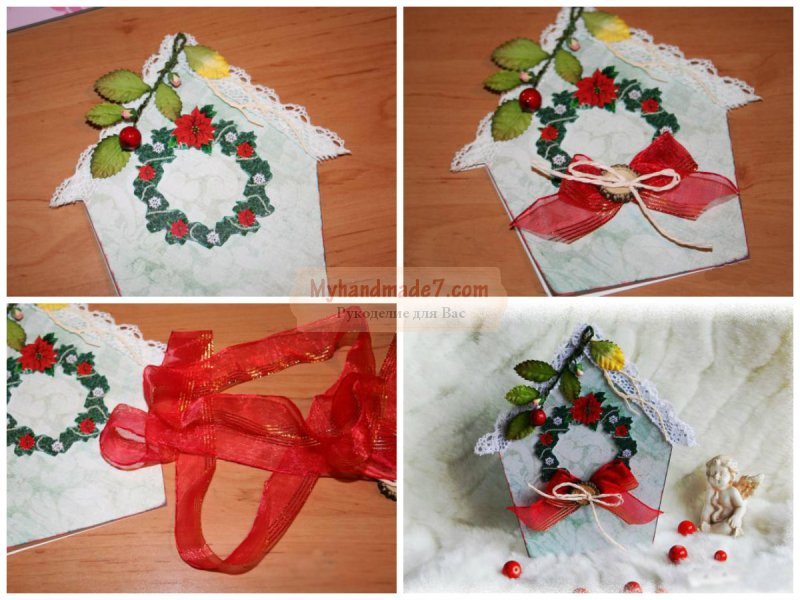
DIY Christmas card for the competition, made in the scrapbooking technique, a real work of art. The main part of such a craft, despite its simplicity, is the right paper for the base, scrapbooking involves the use of special paper - with an interesting pattern, print or embossing. Such paper is quite dense, therefore the basis of the “book” is durable, even if it is decorated with massive volumetric decorative elements.
We will have a simple rectangular postcard, and in the shape of a house, like a gingerbread house, you can choose the appropriate color for it - chocolate paper, or you can choose any pattern of your choice, in our case, this is a delicate green shade.

You can print the shape of the house with a template or draw a contour on paper with a pencil, the contour is very simple, so everyone can handle the template. As they say, special artistic skills are not required here. You can print the template immediately on thick scrap cardboard, and then you simply cut out the base along the contour. By the way, if you did not find special bright colored cardboard in the stores of your city, then you can find suitable drawing templates on the Internet and print them on white thick paper, you can also use whatman paper.
On sheet A4, you need to transfer the template and cut it along the contour, then gently bend it in the middle so that the fold line is obtained without creases. To do this, you must first draw along the intended fold line (attach a ruler to it) with a thin blunt object. Thus, the fold line will turn out to be even and neat.

When you bend the workpiece, you can trim it with scissors if necessary, if the two halves turned out to be a little asymmetrical. To make your own Christmas card, you will probably need decorative elements, we will decorate our "gingerbread" with lace and ribbons, and in the center we will glue a New Year's spruce wreath.
The wreath can also be printed on thick paper, you can decorate it with small multi-colored buttons or sequins. The paper wreath should be given volume, for this it is glued to the base of the postcard on double-sided foam tape. Place it in the middle of the postcard.
Along the edges of the "roof" now you need to glue thin white ribbons of lace, and on top of the wreath - a bow folded from a satin ribbon. You can use additional elements to decorate the "gingerbread" greeting card.
DIY Christmas card to school
In the quilling technique, you can get a festive handmade christmas card for children, neat and beautiful. Children can make it especially for their grandmother, wishing her a Merry Christmas and a Happy New Year. For quilling, we will also use paper, but this time it will be plain colored paper, dyed on both sides, you will not need any special templates.
To make postcards beautiful, festive, you can use special punchers "borders" that help shape the edges of the base of the postcard, make it carved, openwork. You can also use curly scissors, with their help the edges can be made wavy. But even if you don’t have any hole punchers or curly scissors on hand, you shouldn’t leave the base itself rectangular, it will look more aesthetically pleasing if you round off the corners with nail scissors.

Even the simplest postcard can be made unique if you choose the right paper for the base, if possible, choose thick cardboard embossed in neutral shades so that the color of the base does not distract attention from the decorative elements.
Our DIY Christmas card to school using the quilling technique, it will be decorated with cute bells and spruce branches, of course, made of paper stripes. For bells, you should take wide strips, and for twigs - thin ones. You can additionally decorate with decorative snowflakes, stars and sparkles.

Our tips will help you choose an original idea for creativity. you can surprise your friends and relatives who live in other cities, and this year wish them a Merry Christmas not just on social networks or by phone, but by sending them a handmade greeting card by mail, but in this case, do it, avoiding bulky elements on the front bar.
The quillig technique will help you decorate with your children and, for example, you can make a miniature Christmas tree with “droplet” branches. Spirals twisted using the quilling technique can also be used for children's applications in kindergarten.


