Prefabricated cardboard models. How to assemble a Cardboard with your own hands: drawings, dimensions The electronic component is a powerful smartphone
Hello friends! When you make toys and other interesting things out of cardboard, there are always scraps that are no longer suitable for creating something of the same scale, but it’s a pity to throw them away. We have accumulated such scraps from a wagon and a small cart, and we are already anxiously looking at this wealth, with which something definitely needs to be done. :) As Newton once did, one of the ideas was suggested to us by an apple. It turns out that it is possible to do interesting cardboard crafts, like 3D apples that can serve as toys, trendy interior decor and even something else...
As you can see, our voluminous cardboard fruits are made of many glued layers. This is a very interesting technique, besides, it is also quite popular now. On the Internet you can find a lot of different designer gizmos made with its use: decorative vases, armchairs and other pieces of furniture, chandeliers and lamps, sculptures, etc.
We also wanted to try to work in this direction. As a result, 3D apples were created, and these apples are not simple, but with a surprise! I wanted to add functionality, so we got a big apple that opens and is hollow inside, and a mini-apple was formed from the core of the first one.

Intrigued? Then watch and read carefully, now I will show you step by step how to make unusual cardboard fruits with your own hands. And at the end you will find another cardboard surprise. :)
Master class: 3D cardboard apples
Materials and tools:
- A4 office paper (for printing templates);
- corrugated cardboard with a thickness of about 3 mm;
- microcorrugated cardboard (optional);
- stationery knife;
- scissors;
- double sided tape;
- glue Moment Crystal;
- pin or awl;
- pencil.
A set of 3D apple detail templates can be downloaded here:
Have you noticed that not much is required to make our fruits from cardboard? Indeed, these crafts are unpretentious. And the whole manufacturing process comes down almost only to cutting circles. True, there is one BUT here: those who are more or less familiar with the cutting technique (whether it be cutting out of paper or cardboard) are well aware that the circle is one of the most difficult elements. Cutting a perfectly even circle requires high precision movements and hardness of the hand.
However, the good news is that even without the necessary skill, by making a couple of cardboard apples with your own hands, you will acquire this skill. And subsequently you will be able to cut out elements of any complexity from both cardboard and paper at a decent level.
So let's get started. We print out the detail templates on plain office paper and cut them out with scissors, leaving a small allowance along the contour.
We select corrugated cardboard scraps of a suitable size. Haven't stockpiled scraps yet? So you will have them soon. :) In the meantime, take any cardboard (or box) that you can find in the house.

On the wrong side of the template in the very center, glue a small piece of double-sided tape. It will help fix the template on the cardboard.

Glue the template to the wrong side of the cardboard.
Part Templates 1, 2, 3, 4 And 5 (numbering is from the bottom layer of the apple to the top) to save space and time for processing, they are made in the form of concentric circles.

You need to use these templates as follows: first, cut out the part along the outer circumference, then transfer the template to another cardboard (or to the free part of the same cardboard sheet) and cut out the next part. So we repeat until the smallest circle is cut out (this is a detail 1 ).
On the cut out parts, we immediately put down the numbers with a pencil, so as not to get confused later.

A few words about how to cut circles out of cardboard. Corrugated cardboard is a rather thick and dense material, moreover, it has a heterogeneous structure. Therefore, cutting it with long continuous movements, like paper, will not work here (well, or you need to have remarkable strength in your hands). But you can do this: first, with short pressing movements, walk along the entire contour, cutting through the cardboard only to the middle or a little more, and then with long movements of the knife around the circumference, turning the cardboard blank in the opposite direction, cut through the remaining layers.
Important:make sure that the blade of the clerical knife is always strictly perpendicular to the surface of the table and does not fall in one direction or another, and periodically break off dull segments of the blade.
As a result, the circles will turn out to be even and neat. Of course, small roughnesses may remain on the wrong side, but on the front edges they will be almost perfect, and this is what we need.

Details 6 — 24 cut with a hole in the center. At the same time, the middle ones will also come in handy for us - they will be used to make a mini-apple.

Cut out the top layers (details 25 — 30 ), as well as the tail 3D apples. In parts 28 and 29, it is necessary to make cuts for the tail.
The tail of an apple can be cut out of the same corrugated cardboard (in one copy), but in this case one of its sides (wrong side) will be less presentable.
In order to avoid this drawback, this part can be made two-layer. At the same time, microcorrugated cardboard should be used to maintain proportions. In the photo you can see just such an option. Two pieces of corrugated cardboard were stacked on top of each other and fastened with pieces of masking tape, then 2 parts of the tail were cut out according to the template.
By the way, in the MK for making cardboard photo frames, I showed a way to make a replacement for microcorrugated cardboard. It applies here too.

In addition, cut out the top layer and tail for a mini-apple. The middle parts will also go to the top. 23 And 24 cut earlier.
The hole in the center of the top layer is quite small (only 9 mm), it is problematic to carefully cut it with a knife. It is more convenient to do it with a punch, for example, from the BISON set.

And now the “secret” part is the one thanks to which our cardboard apple will gain a wonderful ability to open and close. Let's deal with the details of the castle, in short. :)
The castle is assembled from parts 18 — 20 , and 20/1 And 20/2 . Arrange the templates on the cardboard as shown in the photo. Here, the visible stripes (formed at the points of gluing of the waves of the corrugation with a flat layer of cardboard) are arranged horizontally. The position of the numbers on the parts 18, 19 And 20 relative to the strips should be the same.
Why exactly? Firstly, it is better if the arcs of the holes run across the waves of the corrugated layer. And secondly, it is desirable that the cut pattern on adjacent layers match when the apple is assembled and closed with a lock - it will be more aesthetic.

For details 20 there are blue marks, they indicate the places of gluing parts 20/1 . It is necessary with a pin (or any other sharp instrument) to make punctures through and through in the corners of the marks. Below I will explain what to do next.
Cut out the details. Don't forget to sign them.

Well, all the details of our voluminous cardboard crafts are prepared. You can start gluing.
One by one, starting from the bottom layer of the apple, we glue the parts 1 — 17 . Be sure to combine the drawings of the sections of the parts. And, of course, carefully center the layers.
The front sides of all these parts in the assembled product should look down (in the photo they look up).

Details 18 And 19 glue together with Moment glue so that their front sides in the assembled product look up. Narrow fragments of parts also need to be smeared with glue (it is convenient to do this with a toothpick).
The slots should be positioned so that the top half of the apple rotates clockwise when closed. Feel free to take a look at this photo:

On the front side of part 20, first glue the parts 20/1 , and above - 20/2 . The bonding points will be clearly visible thanks to the exit holes of the previously made through holes.

This is how our cardboard castle will function.

Before gluing parts of the castle, glue the upper layers of the apple (details 30 — 21 ). Then glue the part of the lock with slots on the bottom half of the apple, and the part with the protrusions on the top.
Again, do not forget to combine the drawings of the sections of the parts.

We connect the halves of an apple from cardboard with a lock. From above, we insert a glued tail into the slots (if it was made, like ours, from two parts). It can be glued or not glued. It all depends on how you plan to use such an apple.

From the middle of the parts of a large apple we glue a mini-apple.

So what did we do anyway? Maybe this apple is a cardboard version of a kinder surprise, in which you can hide small toys or sweets for a child? Or is it such a box stylized as an apple, in which you can store all the necessary little things, both for children and adults?

Or maybe you will find some other use for this 3D apple? Share your ideas in the comments.
With us, when we looked at the ready-made apples, the thought appeared that it would be nice to have a suitable cardboard vase for cardboard fruits. No sooner said than done. And here is the promised surprise. :)
How to make a vase out of cardboard
To make a cardboard vase, we also need templates:
In general, the manufacturing process is similar to that described above.
Cut out templates for details 1 And 2 I recommend placing it as shown in the photo. Here the strips on the cardboard are arranged vertically.

The template for part 3 is glued from two halves.

Details 4 And 5 should be two layers. Both layers are cut simultaneously from two pieces of cardboard, folded with the right sides to each other and fastened with masking tape (or double-sided tape can be used).
The template on the cardboard must be positioned so that the strips are located vertically on the parts.

Cut out all the details.

We glue the parts 1, 2 And 3 , combining the slots and cut patterns (you can navigate by the stripes on the wrong sides).

We glue the parts 4 And 5 and insert them into each other.

From above, on the spikes of the legs, we put the cardboard vase itself. You can not stick it, then the vase will be collapsible. What if you need not a vase, but a fruit tray made of cardboard? :)

And if the holes in the center are not cut out (or the cut out middles are inserted back), then this will already be a real doll table. Wow, so much in one bottle! :)
But back to our cardboard vase. We put 3D apples in it - and voila! How do you like the composition?

These are interesting crafts that can be made from scraps of cardboard (well, or not only from scraps).
I hope the master class turned out to be useful for you, prompted answers to some questions. If at some point you need to make fruit crafts, make apples out of cardboard - you won’t lose! :)
All the very best to you! And see you soon in KARTONKINO!
Yours Inna Pyshkina.
For the development of creative abilities
Grade: 4
Received Baseboxx 3D as a gift, the whole family assembled a large figure of the Bulldog. My daughter is still 12 and it is difficult for her to assemble a bulky figure alone. The cardboard is dense, strong, does not break. It bends easily at the folds. All parts fit exactly. We had no problems with assembly. It took a long time to collect: the work is painstaking. We got carried away, I really wanted to see the result.
There is a benefit from such a toy: it develops spatial thinking, dexterity, fine motor skills, it is useful for the mind. However, once collected, you can't take it apart again. So it stands like a sculpture in the corner.
Grade: 5
The most pleasant thing about assembling polygonal models is overflowing emotions. There is an immersion in childhood, complete relaxation. It's not that difficult to assemble, the main thing is to follow the instructions. All details are prepared in advance - cut out, numbered, fold lines are marked. The glue does not have a sharp unpleasant odor. In case of accidental contact with the skin, nothing terrible happens.
In a few hours, ordinary cardboard turns into a fashionable modern piece of furniture in the Art Nouveau or Futurist style. The most complex variations take 5-6 hours. The weight of the finished work does not exceed 500 grams. In case of an accidental fall or inaccurate mechanical impact, the finished work does not break or wrinkle. The cardboard is all matte, high quality. With a long stay of finished models on the wall when exposed to sunlight, it does not fade. Color solutions in different models are different, white, blue, red, bronze, gray, black and pink are presented.
The designer will be more interested in adults and teenagers. Children under 14 can be bored and difficult. Baseboxx is a great gift idea. Everyone I presented this to was delighted. And tightly hooked on cardboard construction.
Grade: 5
I ordered a 3D cardboard constructor on the Baseboxx website. I chose between the golden bulldog Julien and the fox. As a result, I bought the head of the elephant Volodya, which was then hung on the wall. Assembly difficulty - 5 out of 5.
Came a set of cut parts. Weighs 250 gr. The fold lines have already been prepared, everything is painted, marked, it remains only to bend and glue along the lines. Gluing points are marked with the same numbers. The lesson captivated not only the child, but also the father. We collected the head of an elephant for 2 evenings in a row, about 6 hours, forgetting about gadgets and TV. Bicolor elephant, matte cardboard. The head is gray and the tusks are white. Head length with trunk 35 cm.
The kit already has glue, with a convenient dispenser, you do not need to buy anything extra. There is also a hook to hang your head on the wall. It looks good, but not enough to hang it in the common room. Still, this is a children's toy and you should not place special hopes on it in terms of interior decoration.
Grade: 4
This set, rather, is intended for children no older than 12-13 years. Not all participants of our holiday collected the snowman, the designer became interesting only for a few people. Includes instructions, cut snowman parts and glue. The children folded the cardboard along the lines and glued the figures according to the numbers on them. They did this for about an hour, then everyone got tired and the whole thing was abandoned. The son already completed the figure alone later.
The snowman turned out quite attractive. It stands in his nursery, pleases the eye. My son didn't want this set again. Apparently, he is not a fan of designers of this kind. It can be purchased for a children's holiday to keep the children busy. For a while, he will definitely captivate the children's company.
Grade: 5
When I ordered this constructor, I thought that the assembly would be as simple as possible, because everything is already prepared: the elements are cut and numbered, there are fold lines. I had a snowman model with difficulty level 4. But when I saw the details and instructions, I realized that this constructor was more for me than for my 10-year-old son. In the end, they did the assembly together.
The set has everything you need. The instructions are clear and understood quickly. Only everything is somehow finely written, it took a long time to peer. High quality cardboard, strong enough. The fold lines are made in such a way that the fold turns out exactly along them, it is quite difficult to “smear” it. The texture of the cardboard is such that the glue is quickly absorbed and does not drain. Glue is in a tube with a dispenser. It should be enough for the entire model, but if it is used incorrectly somewhere, it will turn out to be back to back. Glues quickly, but not instantly, within a few minutes you can still glue the parts.
For everything, my son and I spent almost 5 hours. An incredibly interesting activity, my back was tired, of course, but there was such excitement to do everything at once that we could not quit. As a result, we got a snowman, very cool and unusual, but also a lot of fun.
Grade: 5
It was such a designer that I cut out of magazines with scissors in childhood, then folded along the dotted fold line and glued the necessary details. This Baseboxx 3D made of cardboard differs only in that there is no need to cut anything yourself. All the details have already been cut out, it remains to fold along the fold lines and glue all the details. Cardboard is thick and good quality. I ordered the head of the fox Alice. She is so beautiful!! Sat 2 pm after work and calmed the nerves.
Great hobby. You can collect a bunch of different shapes. The site presents a completely different three-dimensional figures, some of them can be just toys, some can become an original interior decoration. Such voluminous figures, mainly, are the heads of wild animals, there is a special wall mount. Other pieces can just stand, they can be played with. But keep in mind that they are still made of cardboard.
Grade: 5
As soon as I figured out what Baseboxx is, I immediately realized that this is what I need. I have long wanted to distract children from computer games, and this is a good option. Of all the proposed designers, I chose Maleficent masks, because there are two children. They sent a branded box by mail, inside 2 sets of cardboard, instructions and glue. I explained to the children how to collect, and they enthusiastically set to work.
By itself, this is done elementarily, the fold lines are already marked on the cardboard, there are cuts in the right places, it remains only to bend it as it should and partially glue it. This is also simplified to the point of impossibility: the parts that need to be glued together have the same numbers on them. Everything was easy for the children, and it delighted them.
The masks were glued together in an hour, then they played - portrayed the villains, ran after each other, took pictures. The computer was not even mentioned that day. But there is also a side effect: having played enough, the children began to ask for new "toys", they had to order another constructor. This time I chose bulldogs, they are more difficult to collect, and you can play endlessly, not like with masks. I hope it will take the kids for a long time.
Grade: 4
Baseboxx 3D is a cardboard mask and figures constructor. They turn out to be large, in a peculiar technique, when they look like puzzles. In short, cool. I took it for my son, he is 11 years old, but the age is required from 14. My son thinks well. By the end of the day, the dinosaur figure was assembled. It is quite heavy, voluminous and large in size. Looks interesting, attracts attention. But I like that my son was engaged in creativity.
Entertaining and beautifulGrade: 5
We recently made our 2nd figurine from Buzzbox, the 1st was a wolf mask, in which my son went to Halloween. She lasted the whole evening and made a splash. Now I ordered a deer head to hang on the wall. You could, of course, just buy something like that, but a thing made by yourself is always perceived better. The differentiation of sets according to the complexity of the assembly and the time spent is very conditional. The main thing here is to adapt and everything will go faster, you can gather with the whole family, then you can also get pleasure from communication.
They deliver kits in flat boxes containing glue, instructions, but, in general, they are not needed, and the leaves with fragments of the figure themselves will not be needed. It is not necessary to cut out the parts, they are simply removed from the cardboard, on the reverse side of each part there are dotted and straight bending lines, straight lines for bending, dotted lines for gluing - a pattern familiar from kindergarten, so that children under 14 years old can also make a figure. In its manufacture, only patience and accuracy are required, the cardboard is quite dense, and if it is not possible to bend clearly along the lines at an even angle, then you can first draw along the line with the blunt end of the scissors and bend along the ruler, if you bend somehow, then the figure will turn out to be askew.
Grade: 5
Baseboxx 3D cardboard construction kit is modern, interesting and of high quality. It arouses interest not only among children, but also among parents. I ordered the head of Petrovich's deer. I prepared a place for her on the wall in the living room in advance. While my husband and son were collecting the head, I was preparing a frame for it on the wall.
The kit consists of cut and lined parts for assembly, glue and instructions. Everything is intuitive, there are numbers on the details that you just need to connect. The complexity of this set is 5 out of 5. A 14-year-old teenager coped with the help of his father.
Such creativity develops the child, develops perseverance, attentiveness, accuracy and spatial thinking. And how much pride in his eyes after the assembly is completed! Now he always admires the head of a deer hung on the wall, as if he had just returned from hunting.
Now he asks to buy him a unicorn. I think that this fun will become his hobby. Fortunately, the choice is large, there is where to turn around.
Grade: 5
The kits arrived carefully packaged. Each weighs approximately 300 grams. They are quite large and look great as a gift. She gave a snowman and a deer to her son and husband, and took a fox for herself. I had particular difficulties with the ears, and my husband with the horns. The pieces are very small and hard to glue. I didn’t have enough glue, I had to take the usual PVA, which I found in the house and glue it on.
I collected my fox head 3 nights in a row, took about 2 hours a day. The son collected the snowman for 4 days, and glued it almost constantly with breaks for food and movies. I think his character was the most difficult.
The deer and the fox were proudly hung on the wall in the bedroom. They look great, even changed the interior. We brag to our guests. The snowman was placed under the Christmas tree, standing unsteadily. The cardboard is high quality, dense, the colors are matte, bright and attractive. The figures look original, voluminous and stylish.
Grade: 5
I got the figure "Bulldog Marseille". The packaging looks good and the price is right. My son and I opened it and marveled: the cardboard feels so unusual, dense, smooth. There is an instruction inside, everything seems to be easy, but it wasn’t there. The son sat down at the toy and collected it gradually, without hurrying. The next day the sculpture was ready. I put the Bulldog in my room, she even decorated it. Everyone is interested in what kind of sculptor you have created this. Turned out great stuff!
Eco-friendly and interesting designer!Grade: 5
When we got the parts, they are quite large, with perforation, they thought that the son would assemble in an hour. No, I've been messing around all day. And then I was very happy with what happened. But most of all I am satisfied. The teenager did not work with a computer, but did everything with his own hands. Developing designer brain and motor skills.
The designers are so diverse that sometimes you come across completely new and hitherto unfamiliar options. For example, 3D-constructors made of foam board.
Let's understand, firstly, what is foam board. This is a sheet material, quite rigid and at the same time very light. It consists of a layer of foamed polystyrene or white polyurethane, which is glued on both sides with thin cardboard. This material is afraid of water, but it makes excellent light and durable crafts.
Do-it-yourself attraction
With the help of volume, you can assemble various architectural structures: St. Basil's Cathedral, the Eiffel Tower, the Taj Mahal, the Sydney Opera House, a touching Dutch windmill and much more. You can choose an architect's set, which includes several famous buildings at once.
Assembling some world-famous landmark is not so difficult - foam board designers include numbered figured parts with a double-sided pattern. You just need to connect them together according to the scheme.
This painstaking task will give your growing child self-confidence - of course, he himself will assemble a model of the world-famous structure!
Constructors Smart paper
We offer modeling enthusiasts big and small a lot of architectural structures and plots on medieval themes - in cardboard execution, of course.
Castles and ships
Such sets, of course, will interest the boys. You can assemble a real ship or a harsh knight's castle... Or you can choose a piece of a knight's castle and stage an assault on it by the knights included in the set. Such sets are offered by the Russian company Smart Paper. They are good because, by purchasing and collecting new ones, you can expand the playing area and opportunities for role-playing games. The connections of parts in models made of paper and cardboard are thought out and calculated with such precision that, if properly assembled, they can be played with like with ordinary toys. All the grooves of the parts snap into place with a "click", so you don't have to worry about the reliability of the design. Doors and windows open, and the models are detailed inside and out.
The company "Labyrinth" also did not ignore the theme of medieval castles. The manufacturer offers several paper models of the architecture of the Middle Ages: a knight's castle for boys, and several beautiful castles for princesses and fairies - of course, for girls.
European medieval life
Well, for those who prefer more peaceful plots, "Smart Paper" offers the plot of a medieval city: a town hall, a burgher's house, a tavern, a mill and a bakery - all this is an integral part of the life of European cities and towns in the Middle Ages and Modern times. All prefabricated toys from this manufacturer are developed based on and based on photographs of the original. Collecting either a house, or a mill, or a stable, you can gradually create a whole cardboard medieval city at home.
Russian hut
Of course, Russian manufacturers could not ignore our domestic history. The Russian hut from "Smart Paper" - bright gingerbread, or more realistic - made of wood, and even with heroes - can also be a good basis for story games.
The manufacturer Clever Paper offers a variety of architectural structures and plots on medieval themes to big and small modeling enthusiasts - in cardboard execution, of course.
They are good because, by buying and assembling new models, you can expand the playing area and opportunities for role-playing games.
The connections of parts in models made of paper and cardboard are thought out and calculated with such precision that, if properly assembled, they can be played with like with ordinary toys. All the grooves of the parts snap into place with a "click", so you don't have to worry about the reliability of the design. Doors and windows open, and the models are detailed inside and out.
Having your own virtual reality module has been a dream of many since childhood, and progress has already come close to creating such devices. In 2014, Google developers presented the world with a stunning invention that uses the capabilities of ordinary Android smartphones. Right at the conference, any participant could assemble a virtual reality helmet out of cardboard and a few simple parts and appreciate the delights of three-dimensional graphics and atmospheric video with the ability to view in all 360 degrees.
Virtual reality on the cheap
Google Cardboard did not become a technological breakthrough, virtual reality helmets have existed for quite a long time, moreover, many are familiar with children's devices for viewing three-dimensional images. The ability of smartphones to navigate in space now, too, few people can be surprised, no, the public was surprised by something else. The simplicity and accessibility of the design is what really deserves attention, besides, the developers have managed to release many applications by now that use this device to immerse themselves in virtual reality.
The developers of Google Cardboard opened all the technical documentation for the device, refusing to trade their invention, and manufacturers immediately picked up the idea. At the moment, there are many different models made of plastic, cardboard and even leather products. For under $20, you can purchase cardboard kits like the ones that were first introduced at the June 2014 Developers Conference. Also, instructions and diagrams are available to anyone, and it will not be difficult to assemble a Cardboard with your own hands.

materials
The prices for a cardboard box are, of course, quite significant, but before you make a Cardboard with your own hands, you should know where to find or purchase other materials. We will need:

Electronic component - powerful smartphone
Let's now analyze all the components point by point, starting with models of suitable smartphones. Anyone can find the drawings invented by the developers for assembling Google Cardboard with their own hands. The sizes of phones suitable for such versions of 2.0 glasses are limited to a width of up to 83 mm and a diagonal of up to 6 inches. For other sizes, you will have to think through your own design, choosing the distances to the lenses empirically or look for an option from finished products in the store. Additional requirements 3D-glasses impose on the screen of the device. Remember, you will not just look at the phone screen from a very close distance, but you will get a magnification through the lenses. Of course, the better the screen, the less discomfort. At the moment, it is possible to use smartphones based on and above (from 4 iPhones) or Windows Phone 7.0 and above, but initially the entire system was conceived specifically for Android 4.1. Download any VR application and test your smartphone for compatibility by rotating it and watching the picture.

Housing material
It is not difficult to choose cardboard for the base of our glasses; a large pizza box has suitable parameters. Also, cardboard can be purchased at needlework stores or disassemble some ownerless box from household appliances. Too thick cardboard will be inconvenient to cut and bend, while thin, most likely, will not hold the lenses and the smartphone in a rigidly fixed position on the head.
Optics
Lenses are perhaps the most difficult, but they are the most important material for 3D glasses. Google recommends using lenses for Cardboard with a focal length of 45 mm, respectively, the dimensions of the virtual reality glasses themselves on the site are designed only for lenses with such a focal length. Thus, the desire to use other lenses, or perhaps a system of two or more lenses per eyepiece, will inevitably lead to a readjustment of the distance to the eyes and screen, thus changing the whole design. If you feel confident enough, it's worth experimenting, but it's much easier to order lenses.

Fasteners
As an attachment to the head, you can use a fabric elastic band or a Velcro strap. Stationery gum for the case is easy to find, and even easier to replace. After assembling the entire structure, it is only needed to hold the shape. You can simply glue the 3D glasses at all joints after adjusting the lenses with glue or tape. Two Velcro 15x20 mm will be needed to fix the closed cover with the inserted smartphone. In the absence of such, there are many options for fixing the cardboard cover, the main thing is to make sure that the smartphone does not fall out during the use of 3D glasses.
Additional controls
Magnets are needed to make an optional 3D headset control button on the case, and are only suitable for smartphone models with a built-in magnetometer. When creating a helmet for testing, you should not spend effort and money looking for suitable magnets. Such a button can be attached to virtual reality glasses separately after the device has been fully tested, or not installed at all. For long-term 3D glasses, you will need a neodymium magnet ring and a magnetic ceramic disc, both no larger than 3x20mm. You can also cut holes and control your smartphone with your fingers.

An NFC sticker is glued to the inside of the glasses, which allows the smartphone to automatically launch the necessary applications. You can probably find it in communication stores or in online stores, it is also not mandatory, and you can put it on somehow later.
Toolkit and safety precautions
The tool for work will need the simplest:
- Google Cardboard template. The drawings are in the article.
- A sharp knife, a durable clerical knife will do. Cardboard must be cut clearly along the lines of the template, especially the grooves and holes, so scissors will not do it here.
- Tape or glue.
- Rigid line.
Google claims that scissors are enough for the job, do not flatter yourself, thin slots and fixing grooves are much more convenient to cut with a blade.

The design turns out to be reinforced with stiffeners from the inside, so there is not much difference whether to cut a single pattern from a long piece of cardboard or assemble it from 2-3 parts, connecting them with adhesive tape. When cutting with a knife, be careful not to scratch the surface of the table or floor, take a special board for this purpose, for example, a cutting board from the kitchen. Particular care must be taken when cutting out holes for lenses, so that subsequently the lenses lie in the same plane perpendicular to the gaze.
Device Assembly
Assemble according to the drawings, strengthen the frame with adhesive tape and carefully monitor the location of the lenses. In a fixed position, the cardboard will firmly press the lenses so that they do not move relative to each other. Next, you need to glue the Velcro as fasteners along the edges of the top side and on the inside of the lid, and also install the magnets in their place. At this stage, you can already try on 3D glasses to your head in order to determine the places of possible rubbing of the skin. When watching a movie for a long time, for example, these points can be very annoying, so you can additionally lay them with thin strips of foam rubber.

Is the sheepskin worth the candle?
3D glasses are ready, it remains to fix them on your head with an elastic band or a strap of your choice, insert a smartphone with a 3D application and enjoy virtual reality. In terms of the cost of the received device, there are many offers of ready-made kits priced under $10. You can save only if all the details are at hand or are easily accessible. If you order spare parts, taking into account various shipping costs and lead times, it turns out to be somewhat more expensive than buying a complete set. Naturally, if your dog bites the 3D glasses for sitting in VR instead of feeding or walking the animal, you can easily assemble new ones using the instructions above and the rest of the parts. In the meantime, you are looking for cardboard to replace the damaged one, in order to restore the Cardboard with your own hands, you can walk and feed the dog.

Device Capabilities
At the moment, there is already a tangible number of applications optimized for Google Cardboard and several films. Paired with headphones, virtual reality glasses may well replace a good 3D cinema, and games, according to users, despite their primitiveness, can add a strong sense of presence and atmosphere. For craftsmen and lovers of various technical tasks, it can be noted that it is possible to connect Cardboard glasses to a computer to use the virtual reality module in games. This is where the real immersion is.
On the eve of the celebration of a person dear to the heart, I want to make a gift that would impress and leave pleasant memories. We offer to make voluminous postcards with your own hands, they are also called pop-up postcards. What are these wonderful postcards? At first glance, these are ordinary postcards, opening which, suddenly a three-dimensional figure or a whole composition appears in front of you! Such postcards will not leave anyone indifferent! Especially if they are copyrighted and keep the warmth of your hands!
Do-it-yourself cards with flowers inside
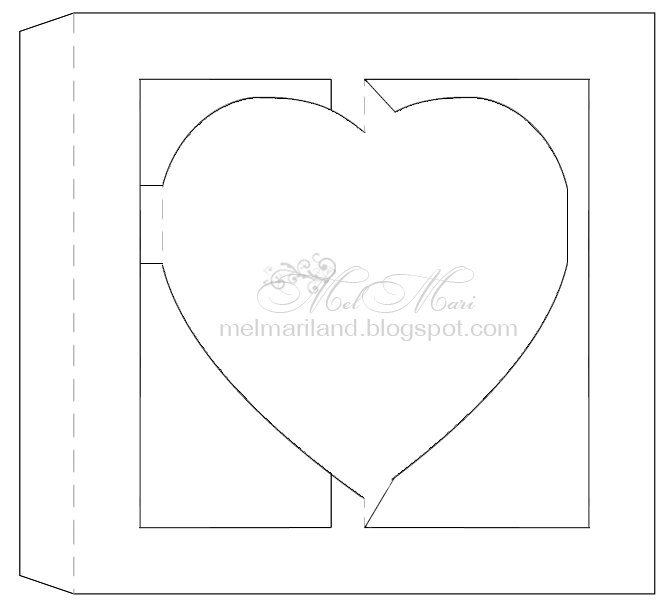
Even a child can make a heart-shaped card with a three-dimensional flower inside:

YOU WILL USE
We do both simple and complex creation technologies.

A lush flower for the inside or outside of a postcard can be made from colored or even plain paper, painted with watercolors or pastel crayons. You can cut flowers according to this pattern:

We print out the flower template, paint it with paints. We fold in accordance with the marked fold lines and glue the resulting flower onto the base of the card.

Undoubtedly, such a lush and bright postcard with flowers inside, made by hand, will surely please the recipient.

How to make it tells in his master class TheJulianaHappy:
The option with gentle, pastel colors, flowers looks very nice. Stamens for flowers are not difficult to make!

The original master class is in English, so for your convenience we offer a short translation of the process of creating this flower card.

Materials and tools are standard: colored paper, cardboard, scissors, glue, plastic to simulate glass in the window.
We take thick colored paper, fold it in half. In one half we cut out a square window.

We make a frame from colored paper of a different color. Glass for the window can be made from a protective film for the phone or transparent plastic. Glue the resulting window frame to the base of the postcard. You can do without "glass" at all.


Glue into the hole
We glue a flower pot out of cardboard, glue it in the middle of the postcard on the fold line. We glue the sides of the resulting pot so that when the postcard is closed, the pot folds up.


Next, cut out green stems and all kinds of bright flowers from colored paper: crocuses, hyacinths, daffodils and tulips. Perhaps your bouquet will not be spring, but summer, which means that cornflowers, chamomile, pansies, etc. will appear.


Glue the flowers into the pot
The height of the flowers should be such that they do not stick out of the postcard, but are visible through the window!


The window can be decorated with a cozy curtain.

Master class original
By the same principle, you can make a postcard with flowers from felt or colored cotton pads. Additionally, insert a concise but warm congratulation along with the flowers!

In addition to flowers, balloons, stars, bows can peek out from the card.

How to make a panoramic flower card along with a greeting envelope shows in his master class TheWorkshop:
We take thick paper - the basis for our postcard. Create a rectangle in the center of the card fold line. The width of the rectangle is 3 cm, the length is 7 cm.

We make cuts along the pink lines with a clerical knife. Then we fold the resulting rectangle inside the postcard. We attach the base of the postcard to another sheet, b O larger than the original base.

Then we make a floral design: a flower pot, the flowers themselves, fluttering butterflies and grass. We combine all this and glue it on the front of our postcard.


Masterclass original.
Using the same technique, you can make an original vase postcard. You can also make flowers in such vases with your own hands from paper or other improvised means.


We bring to your attention a master class on making a very delicate voluminous postcard, which will not only congratulate the recipient, but also fit perfectly into the interior, for example, of a children's room.

First, we make a frame-box. To do this, take thick blue paper and cut out a template for the box from it. We fold the edges of the template 4 times 5 mm on each side, thereby forming a frame. We glue the resulting frames.

On top of them we glue colored or scrap paper in a color suitable for your composition.

Next, we will prepare the elements of the future composition. We glue the balloon from paper circles. We fold the circles on the floor and glue them together. Waxed cord is glued to the base of the basket and directly to the mugs that form a ball.

We cut out the clouds from scrap paper, and the sun from yellow paper. Paste the elements of the composition into the frame. We glue the balloon as follows: we glue the base of the balloon on bulk adhesive tape, and the balloon itself on glue. We glue the clouds according to the same principle: one for glue, the second for voluminous adhesive tape.

We make green grass from a simple napkin. First we cut it, then we glue it. On the right side of the box we glue a tree made with a scrapbooking hole punch. The final touch - in the free places we glue the serpentine, butterflies and a congratulatory inscription! Glue a ribbon with embroidery or lace on the bottom of the box. The original voluminous postcard is ready!

Masterclass original.
3D postcards in the Kirigami technique
Kirigami is the art of cutting and folding paper figures and cards. This is the main difference between Kirigami and other paper folding techniques and is emphasized in the name: "kiru" - cut, "kami" - paper. The founder of this direction is the Japanese architect Masahiro Chatani.

For manufacturing, sheets of paper or thin cardboard are used, which are cut and folded. Unlike traditional 3D postcards, these paper models are usually cut and folded from a single sheet of paper. Most often, three-dimensional models of architecture buildings, geometric patterns and various everyday objects, etc. are developed.

It is better to start with a simple do-it-yourself voluminous birthday card. For example, using thick paper in two contrasting colors, you can make a birthday card-cake:

To make it, use this template:

Using various templates, you can make cake cards more complicated:


How to make a kirigami cake tells in his master class OksanaHnativ:
Using this technique, you can cut out various congratulatory inscriptions. The cake can be decorated and painted to your liking.

To create it, take this template:

White embossed paper will also make a spectacular postcard:

By combining two mirror parts of the “cake” cut from different sheets, you can make a whole voluminous cake in a postcard!


Use the following template:

There are a lot of options for creating volumetric postcards! Cut and fold your paper masterpieces!
Volumetric postcards in the technique of scrapbooking
Scrapbooking is the art of decorating photo albums, but its techniques are also very popular when creating postcards.
Using the elements of Kirigami, using the Scrapbooking technique, you can also make a voluminous postcard with your own hands. We cut out and fold from scrap paper "steps" for "pop-up" candles on the second half of the postcard. We glue the candles and stick the resulting blank on the base of the postcard.

You can make a simple but original greeting card from scrap or colored paper. We cut out the flame of the candle and decorate it with sparkles, then glue it on 2-sided tape. Glue the second part of the candle with glue. The congratulation itself can be tied or glued to an elegant satin ribbon. Simple and original!

From paper of a different texture, the postcard will look completely different)

By overlaying each element of the card on top of each other, again using double-sided tape, you can create such a voluminous bright cake!

Consider Tatyana Sadomskaya's master class on how easy it is to make a voluminous most delicate postcard using the Scrapbooking technique using ready-made pictures.

To create such a postcard, Tatyana used:
- ScrapBerry’s “Favorite Pet” scrapbook set
- scissors
- thick cardboard
It is better to use scrap paper with a lot of miniatures that can be cut from a single sheet, as well as colored stamp prints and chipboards.
Before creating a postcard, you need to decide on its plot in order to choose the color of the base of the postcard and its "characters". In this case, paper with a calm beige print is taken as the basis, the components of the plot are cut out of it: kittens, a puppy, flowers, a crown on a pillow.

Before starting this work, do not forget to decide what will be in the foreground and what will be behind it!
In our case, we put a larger kitten in the foreground, this will enhance the feeling that he is closer than kittens with a dog.

We make the necessary cuts. It turns out such a design with "steps". On the resulting "steps" we glue leaves of arbitrary size. These leaves imitate a wooden fence.

Next, gradually glue our elements, starting from near to far. We start from the foreground and glue the kitten. We glue it on beer cardboard, because it gives additional volume and casts a shadow. By the same principle, several other elements can be glued, for example, balls and flowers. When the inside is ready, glue it to the base of the postcard.

Outside, we also decorate the card with an elegant floral print.

For more elegance, we decorate the elements of the card with sparkles (we use glitter).
Masterclass original.
Check out this amazing 3D cake card for inspiration:

Volumetric postcards-dioramas
We present to your attention a master class on making a 3D postcard - a small three-dimensional scene. On such a stage, everyone can arrange various bizarre figurines and decorations)

To make a postcard, we take 4 sheets of thick cardboard, in this case we take cardboard of four shades of orange. You can also choose the colors of your choice.

On sheets of cardboard with a pencil, draw the outline of the frames and cut them out. We make the outline of the frame 1 cm wide.

From the remaining fragments of paper we cut out two strips, each of which is 10 by 4 cm in size. We line each one into 4 parts of 1 cm each. We cut off all the corners of the resulting strips. We fold the strips along the lines so that we get a paper zigzag. These zigzag pieces will support the diorama fragments. Glue the zigzags to the frame on both sides.

We glue the second frame clearly along the line on the other side of the zigzag.


The top of the zigzag should cover one side of the frame. The same must be done with the opposite side. Thus, the first scene of the diorama is ready!

By the same principle, we make the rest of the frames of the diorama.
It's better to pre-decorate each of the frames (especially the last one) than to try to squeeze the decor into the finished card.
The back wall does not have to be solid, you can make a transparent diorama without a back wall.

Decorate not only the "wall" of the diorama, but every frame. Use more voluminous decorations such as beads, bows, feathers, ribbons, etc. This will make the card look more voluminous and this will enhance the 3D effect!

Masterclass original.
You can come up with absolutely any plot! Create your own little theatre!
For example, waiting Assol!

Or a balloon in fluffy clouds.

Bright glade with lupins and butterflies!

Birdhouse with birds and flowers:

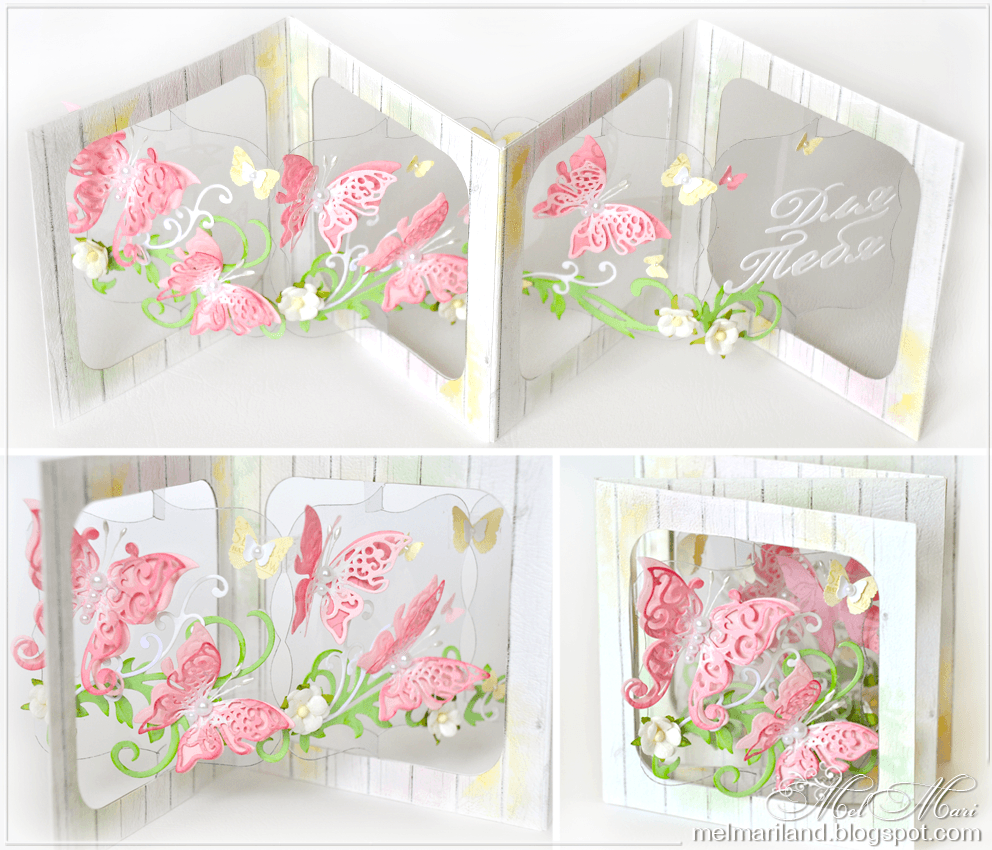
Postcard-accordion (schemes and templates)
Another type of voluminous postcards is an accordion postcard.
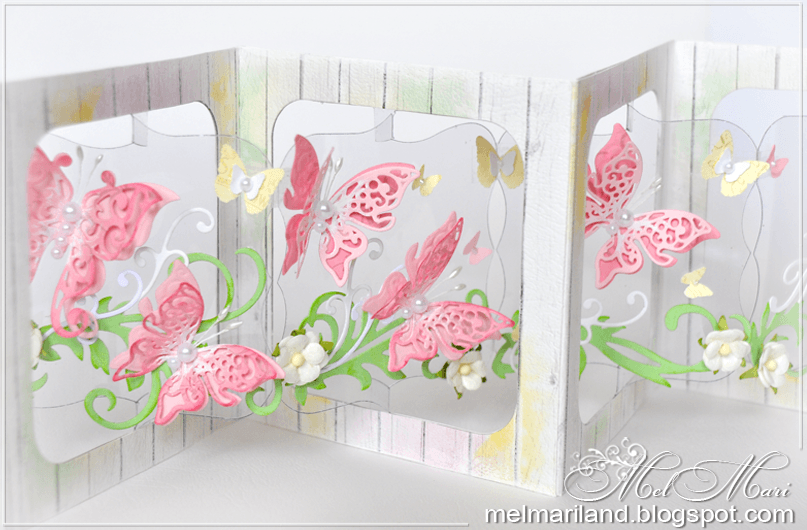
To create such a postcard, you will need: thick scrap paper for the base frame, a scrap-cutting knife or a clerical knife, transparent plastic for the internal parts, stamens, semi-pearls, etc. materials for decoration.
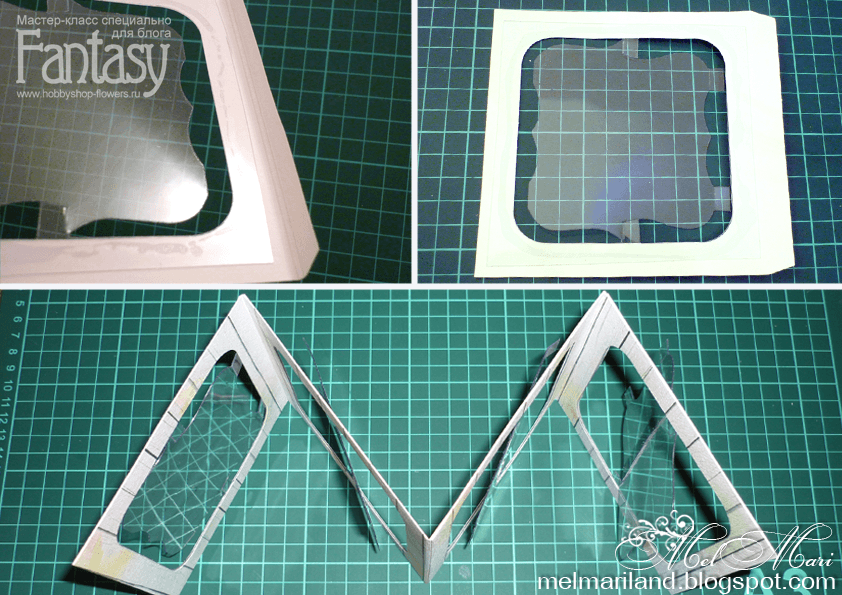
We take a template and make blanks for a postcard. From thick scrap paper we cut out 8 blanks for the base frame and 4 from transparent plastic.

Thick paper...

...and transparent plastic
We glue the plastic blanks to the paper base. In order for the card to fold, we make a double creasing of about 2 mm on the outer folds. We connect the resulting 4 parts - glue them with glue or use 2-sided tape. Glue the remaining 4 frames on the opposite side.


Now you can start the most creative part of creating a postcard - decorating it! We glue fluttering butterflies and twisted greenery to the plastic. Postcard is ready!

Master class original
Various templates for making the bases of such postcards, see below:


Using imagination, you can create all sorts of options for such folding cards. For example, with a predominance of children's topics. The number of components may vary.


Birds, flowers, butterflies - they always look very light and airy on postcards!


Postcards for all occasions
We have already seen that handmade postcards are more original than those that you can just buy.
YOU'LL LIKE IT!
Let's give, and sometimes for no reason at all! 🙂


