Hairpins and elastic bands from narrow ribbons. Do-it-yourself elastic bands from satin ribbons: a master class with photos and videos
In order for the curls to be in order, and the hairstyle to look neat, they use not only hairpins, but also hair clips that you can do yourself. The process of making an original jewelry is fascinating and does not take much time.
How to make hairpins
DIY hair clips are easy to learn how to make. Beginners should start with simple compositions and elements, for example, with ordinary rubber bands. With the help of glue, they are decorated with beads, ribbons, rhinestones and small beautiful elements.
At home, as a rule, they manage with improvised means. So, the original hairpin can be made from large beads and satin braid. The finished workpiece will need to be attached to a special base so that it stays on the strands. Ornaments are also fixed on a hoop or various clips.
Necessary materials
Hair clips are made both from improvised components and from components presented in stores.
As the main devices you need to have:
- glue gun and regular glue;
- tweezers;
- small rounded pliers;
- round nose pliers;
- various needles;
- Crochet hook;
- centimeter.
Hairpin base
Depending on the craft being created, it is necessary to choose a basis for it, which are as follows:
- With an automatic closing mechanism that can handle a large volume of hair. The decor of such a decoration requires a large composition that could hide a large structure.
- Click-clack, in the form of invisible, fixing small strands.
- Studs made of high-strength metal, which are decorated with a regular bead or fabric weave.
- Hoop or wreath.
- Metal base from an old hair clip.
- Special blanks with frames, frames and platforms.
Step-by-step instructions for creating flowers for kanzashi
Do-it-yourself hair clips are made using the Kazanshi technique as follows:

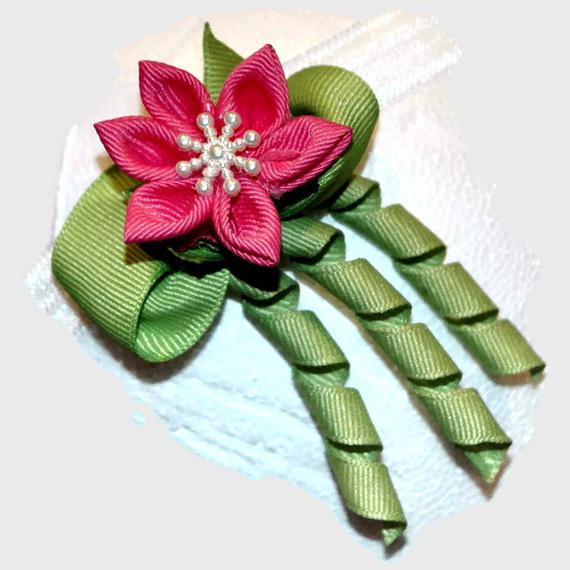
Lily from satin ribbons for beginners
Necessary materials:
- satin ribbon 5 cm wide;
- fabric glue;
- sticky web;
- wire;
- iron;
- candle.
Step-by-step execution technology:
- To make leaves 7 cm long, you need to cut the tape into 14 cm pieces.
- Fold the braid in half and inside one of the halves for the entire width, put a wire with a cobweb. Put the metal part in the center of the petal.
- Cover with the other half and iron with an iron so that the parts of the tape stick together.
- Shape the leaves. Trim the ends according to the pattern prepared in advance.
- To process the edges of the petals and give them a waviness, it is necessary to singe them in parts with a candle, while stretching them with your hands.
- Make a rounded base for crafts from the same tape as the main product.
- Glue the leaves to the base in two rows of 3 pieces, or more.
- Due to the fact that the petals are on a wire, it is easy to give them the desired configuration.
Master class: Rose kanzashi
The technique for making the original rose using the kanzashi technique:

Do-it-yourself kanzashi forget-me-nots
Step by step gentle forget-me-not kanzashi:

Daisies from ribbons and beads
You will need the following materials:
- white satin ribbon 0.5 cm;
- felt with a diameter of 2.5 cm;
- yellow beads;
- glue;
- fixtures.
Manufacturing method:
- Cut the braid into 24 pieces of 8 cm.
- Fold each piece in half with the wrong side inward and form a crease in the center with your fingers.
- Put one edge of the strip on the other and fuse over the candle.
- Glue the first tier of 8 petals face up to the felt base.
- Glue the second row on top between the first leaves in the amount of 8 pieces, shifting the blanks to the center.
- The last layer of 8 pcs. glue under the bottom of the chamomile.
- Put glue in the middle and spread it around. Sprinkle yellow beads on top and leave for a few minutes. Shake off the rest.
- With the help of tweezers, correct the shape, rounding it.
- Pour some more glue and pour more beads. Turn the product over, while the excess beads will fly off. Set aside for 5 minutes, then shape the middle into a circle.
Kanzashi hairpin from three types of petals
Do-it-yourself technology:

Bow for a schoolgirl: popular options
Options for bows for schoolgirls:
To design a two-color bow you will need:
- two multi-colored satin ribbons of different widths;
- thin shreds of one of the selected color;
- threads.
Implementation step by step:
- From a wide braid it is worth forming a three-layer base. To do this, you need to select the diameter and evenly wind three turns of the tape, fasten the middle with a thread.
- The upper bow is made of two layers, located one on top of the other. Fasten the ends of the ribbons in the middle, and tie two layers together.
- The finished product will consist of a three-layer base, a two-tier blank and two thin hanging strips.
- To form, lay all the layers one on top of the other and tie tightly with a ribbon in the middle.
- The decoration can be attached to the hair with the help of an invisibility or hairpin.
How to make satin ribbon hairpins
Execution step by step:
- Cut into 6.5 cm pieces. 1.1 m of black ribbon with a light dot and 1.5 m of white with dark polka dots.

- For one inflorescence, you need to create 8 black petals and 11 white ones.
- To form a leaf, bend the braid in the middle at an angle.

- Bend again, you get an even triangle.
- To fix, singe the base of the petal with a lighter.
- From the bottom of one end, make a fold, after the second.

- There should be a lot of details.
- It is desirable to collect decoration on a circle of felt.

- The first tier is dark, the next two are light.
- Take another felt circle, make 2 cuts on it and attach the elastic band with glue and a fabric strip.

- Glue the base and the flower.
Leather hairpin: flowers
Leather flowers can be made in the same way as fabric flowers, by cutting out the petals and treating their cuts with a flame. It is desirable to collect leather leaves with a special needle with a triangular section. By piercing the material, it will not cause parts to break.
To make a leather rose, you need to divide a rectangular piece into two parts with a longitudinal wavy cut in the middle. Each of the created flaps is a finished pattern. The wavy edge must be treated with fire, which will increase its volume. Then fold the resulting pattern into a tight tube and fasten with invisible stitches from the side of the straight cut.
Denim flower
Step-by-step technology of denim colors:

Hairpins with foamiran flowers
Hair clips are made with their own hands from foamiran, which can be seen in the example of making a rose:

Decor hair clips
The decorative component of the hairpin can be decorated with various materials:
- fabrics;
- feathers;
- wooden elements;
- skin;
- plastic;
- beads;
- buttons;
- stones;
- ribbons;
- cones;
- metal parts.
Centers for jewelry made of beads, beads and rhinestones
To make the center of the beads, you need to drop a little glue into the center and sprinkle beads on top in an even layer, shake off the excess. On the created beaded hill, apply more adhesive and, if necessary, add glass beads. Leave for a few minutes and flatten the shape with your hands or a toothpick.
For the middle of the beads, you need to tighten 6 pcs with a thread. elements of the same size, and attach another one in the center. For the base, make a small felt circle and glue the prepared blank to it. Rhinestones can be sewn onto a round fabric base, or glued with glue.
Bead and wire decor
To make a feminine wreath of beads you will need:

Work order:

Using a similar technique, you can decorate any hairpin with beads. Hairpins and scallops are well suited as a frame. Such elegant homemade jewelry is chosen by many as wedding accessories.
DIY hair clips are stylish jewelry that will help emphasize individuality and exclusivity. When making original jewelry with your own hands, the main thing is not to be afraid to experiment and apply a variety of ideas. Then the new thing will turn out unique and attractive.
Article formatting: Vladimir the Great
Video on the topic: DIY hair clips (kanzashi)
DIY kanzashi:
DIY hairpin bow:
Homemade accessories are a guarantee of originality and exclusivity, because even according to one instruction, different needlewomen get different products.
In this master class, we will tell and show how to make do-it-yourself hairpins from satin ribbons with kanzashi flowers. The main thing that is required for manufacturing is accuracy and patience. If this is your first time with this technique, take plenty of materials to practice and choose the most successful elements.
Materials for making hairpins with flowers
To make flowers, prepare a satin ribbon:
- 24 thin cuts of red or brown, 0.5 cm wide and 6 cm long;
- 24 thin orange cuts 0.5 by 5.5 cm;
- 24 thin slices of lemon color 0.5 by 5 cm;
- 24 thin ivory cuts 0.5 cm by 4.5 cm;
- 11 squares of lemon shade with a side length of 2.5 cm;
- 8 lemon slices 2.5 cm wide and 10 cm long.
Also needed:
- 5 strips of golden brocade 1 cm wide and 5 cm long;
- round base of yellow or white felt 4 cm in diameter;
- wide hug-water lily of golden texture;
- ruby half-bead of bright color 0.6 cm in diameter;
- hot knife (soldering iron or wood burner).
Step by step assembly instructions
Prepare pieces of satin ribbon 0.5 cm in different colors and sizes, focusing on the list of accessories. Working with a delicate satin involves processing a cut edge; for this, use a lit candle or lighter. Singe the fabric as quickly and carefully as possible so as not to spoil the wax and not melt too much.
The selected shades look harmonious together and give a beautiful smooth transition from dark to light in the finished flower.

Close each strip in the form of a drop. Leave the front side outside, and the wrong side inside, singe the combined ends with a lighter and squeeze with your fingers. Since cuts of different lengths are initially used, the size of the droplets will gradually decrease.

Start nesting each smaller piece into the larger one. Collect a multi-layered droplet. Once again, heat the satin with a flame and squeeze to hold all the components together. The resulting drop of satin ribbons will become a petal for a flower - the main decoration of the hairpin.

Make 24 drops for one flower. Accordingly, for a pair of hairpins, it is necessary to prepare 48 pieces.

Cut out a round felt base. Use yellow felt that matches the color of the ribbon or white. Glue the first row of drops around the circumference, consisting of 8 pieces.


Turn the blank with the back side towards you and stick the remaining drops, shifting them into the gaps between the petals of the top layer.

The lower part of the flower will consist of three layers, modeled from 24 four-layer droplets.

To create the top layer, use 2.5 cm lemon squares. Sing all sections in the same way. From the prepared parts, model the sharp kanzashi petals. To do this, in the first step, bend the squares diagonally.

Then bend again. When working with the tape, it is convenient to use tweezers. Clamping the resulting triangular blanks in a forced position, close their ends. Scorch again to seal the ends.

The resulting petals have an oblong shape resembling a boat. From below, cut off the excess part of the tape so that the boats become flat.

From 11 prepared squares, make the same petals. Glue them into a flower. Glue a wide water lily hugger in the center and insert a ruby into it.

Unravel 1 cm wide pieces of golden brocade almost completely to get a fluffy fringe. Leave a few threads at the base intact, for reliability, also burn the unraveled edge so that the fringe does not fall apart.

Distribute five golden pieces evenly around the circumference, dropping glue into the center.

Glue an elegant flower on top, modeled from sharp lemon petals.

To make an imitation of leaves, prepare lemon-colored strips 2.5 cm wide and 10 cm long. Bend across the center, clearly aligning the singed opposite ends of the satin ribbon. Next, place the workpiece on the towel, heat up the knife blade or soldering iron and swipe diagonally. The result will be two parts, one of which will be made in the form of a bag. It is this part that you will use for further work. Press down on top with your fingers.

Glue the leaves to the bottom of the flower so that only the sharp tips peek out. Dock the ends of the diamond-shaped blanks in the center.

To make a pair of beautiful kanzashi-style satin hair clips, make two identical flowers with your own hands. The size of the finished product is 10 cm. On the reverse side, you can stick a steel crocodile clip or a yellow rubber band to make an accessory for creating fashionable hairstyles.

If you need a bezel, take a look at, and here they are waiting for you with a different design.
Svetlana Sorokina prepared a master class for readers of the online magazine Women's Hobbies. Photo of the author. All MK in kanzashi.
Hello dear readers! Today I have prepared another master class for you, because I see that many people are interested in DIY satin ribbon hairpins. And it's great that a person wants to learn something and do it on their own. This master class on making ribbon hairpins will teach you how to make a beautiful hairpin with your own hands, even for a beginner who is just learning the kanzashi technique.
Most recently, I published on my blog and on my YouTube channel my master class on making. This master class will be based on the previous one, since the hairpin will be based on a rose from a satin ribbon.
I did not completely repeat myself in this video kanzashi lesson, so who missed the previous lesson, follow the link above and see the sequence and technique for making a rose from ribbons. As usual, first I will give a little theory and a photo, and at the end there will be my master class on making kanzashi hairpins.
I made this hairpin from ribbons especially for one very fair girl, I hope that she will like it and wear it with pleasure.
If you are making a hairpin for a gift, then try to make it in a good mood. The object that you hold in your hands is transferred to your energy. So, my dears, start creating with joy in your heart) and God help you!
If you make a gift with love, then it will certainly please the person to whom it will later belong.
This was such a small parting word to you before starting work).
Today we need the following materials and tools:
- Tape 5 cm wide - white
- Tape 5 cm wide - yellow
- Tape 5 cm wide - green
- Organza ribbon 2.5 cm wide - green
- Tweezers
- glue gun
- White threads
- Needle
- Two soft cloths
- Candle
- Hairpin - duck or clip
- White felt (to be more precise, two circles of felt with a diameter of 6.5 cm)

You can take ribbons in other colors. Maybe you need a white and pink hairpin under a dress, for example, or red and white. I do by order, white-yellow color was ordered. It is on this color that today I will show you the stages of making a hairpin.
First of all, we cut a white ribbon, we need 10 pieces of 10 cm each. That is, white ribbons 5 cm wide, you will need only one meter for this hairpin.
In the same segments of 10 cm each, we cut a yellow ribbon. We need 9 yellow segments.

We burn all 19 pieces of tape on the lower flame of a candle on both sides.
Now we need to make the first layer of the rose, which will consist of seven white petals.
Then the second layer of the rose will consist of five yellow petals. The third layer is of three white petals, and the fourth middle of the rose is of four yellow petals.
 I remind you who have not seen my previous video tutorial on making roses from satin ribbons, be sure to watch it, because in this video tutorial, which you will find below this article, I did not repeat all the steps. The link to the last lesson I gave above.
When all the layers of the rose are ready, we begin to collect it. Warm up the glue gun. We take the first layer of 7 white petals, apply glue to the bottom of the petals, apply the second layer of yellow rose petals.

Then we apply glue, apply the third layer and the fourth core of the rose.
The next step is to make rose leaves. We will have two varieties of leaves, the usual ones from a green satin ribbon.
I told in detail how to do them both in the article and in the previous video, see the link above. The second type of leaves from a green organza ribbon.
Leaves from organza ribbon give the rose a peculiar zest. We will need two such leaves, at least two seemed enough to me. You may want to attach three as well, you need to look at your rose, how the leaves will fit.
Since we got a large rose, we need leaves for it of the appropriate size. We need 5 leaves from a green satin ribbon.
Therefore, cut the tape into 5 pieces of 7 cm each. From the resulting segments, carefully cut out the leaf, like a leaf from a rose.
We burn it on a candle, making scars on a leaf, then we take two rags, put a leaf on one with the wrong side up, light a candle.

We heat the tip of the knife over the candle, quickly wipe the blade on the second soft cloth and draw veins on the sheet, slightly pressing on the knife. You need to draw with the blunt side of the knife, not the cutting one, otherwise you will just cut your leaf.
Now we will make green leaves from 2.5 cm organza ribbon. To do this, cut two pieces of ribbon 19 cm long each.
Fold each piece of ribbon in half and cut diagonally. Using tweezers on a candle, solder the cut edges of the sheet and then turn the leaf inside out.

Now we first glue five sheets of green satin ribbon to the rose. Then glue two sheets of organza ribbon.
We cut out two circles with a diagonal of 6.5 cm from felt. Coat one circle with hot glue and glue it to the rose. We fasten the second circle with glue to the clamp, now we connect the two circles with hot glue.
You can clearly see all the steps that I have prescribed in my video master class. No wonder they say, it's better to see once ...).
The last photos are not of very good quality, but I think that everything is clear and understandable. The fact is that right in the course of how I was filming a master class on making hairpins from ribbons, I didn’t take a photo at the right moments and I had to photograph them already from my video tutorial).
I know that video editing masters will laugh), but I don’t know how to cut a photo from a video in a special program, I had to do it as I know).

As you can see, making hairpins from satin ribbons with your own hands is not such a difficult task, but very, very pleasant. Try it, you will surely succeed. Especially nice to do out for someone.
You know, the funny thing is, I have already made so many different hair ornaments, but not one for myself))), because I like to make them for others. It's so nice to see a joyful smile on your face, even if for a short moment, but the person will become a little happier))).
Satin ribbon hairpins video
And now look at my MK for making rose hairpins from ribbons. If you have any questions, write them in the comments, I will answer you and help you as much as I can).
God bless you!
With respect and love, Elena Kurbatova.
DIY crafts made from various materials are a simple and inexpensive way to realize yourself creatively and spend time with benefit. This also applies to mothers who want to improve or improve their relationship with their children. After all, joint creativity brings us very close, and our beloved daughters and sons develop creative thinking, small habits and work habits, and this is so important in education. You can learn to knit together, sculpt from clay or plasticine, sew and embroider, do scrapbooking, quilling, carve wood figurines and much more. One of the simplest products that can be made while co-creating with your daughter are hairpins made of rep or satin ribbons, which she can wear herself or give to her friends.
Preparation
First you need to collect all the materials. It is also better to choose them together with your child in a sewing accessories or creative materials store. To do this, we take our favorite rapeseed ribbons and satin, beautiful buttons and beads, ready-made flowers. By color and pattern, it is better to choose those that can be combined together. In addition, we need a base: small metal hairpins, preferably empty. But for the future, you can take empty headbands and elastic bands.
You also need to stock up on glue, threads of suitable colors for the future, put scissors and a ruler, a needle bar and a trash box on a table covered with oilcloth for creativity. It should be remembered that from the earliest years the child must be taught to be clean and tidy. To do this, you need to set an example for him by the fact that in the process of creativity all the garbage is immediately thrown into the prepared box, and not scattered on the table. The result of the work will be much neater if the work surface is not cluttered with foreign objects. Now we are ready for joint creativity, and we will learn how to make hairpins from ribbons further. Let's get started!
Option one: to the celebration

This simple solution is suitable for women of all ages, from the youngest to the mature. So, our do-it-yourself ribbon hairpin will be made with a large flower bought in a craft store. To begin with, we will make a base, which we will use in other products. To do this, we take a simple small “crocodile” hairpin and a rep ribbon of a suitable width, open the “teeth” with one hand and begin to glue the ribbon first from the inside, and then from the two outer ones, as shown in the picture. Glue should not be spared, but you don’t need to fill the entire space with it, otherwise the material will be saturated and become too hard, and you will be smeared. We wipe off the excess with an unnecessary cloth or a piece of newspaper. We leave to dry.

During this time, you need to pick up an artificial leaf and flower to each other. They should match in size and look natural. Now we just have to glue them to the previously made base, and our simple but elegant do-it-yourself ribbon hairpin is made!
Option number 2: small jewelry for babies
As in the previous example, we need to make the basics with grosgrain ribbons. It is better to make several pieces of different colors at once so that you can match them to your princess's outfits. It will look very nice from satin ribbons, while you can make the flower both small and large.

It will consist of two levels of 5 and 4 petals, and we will decorate the center with a shiny bead. So, to make a flower, we take 9 identical squares from the tape, fold them first diagonally, and then in half. It is better to work with tweezers, because the details are quite small. So, first we cut the corner, then the base, and singe. From the side of the corner, it is better to hem with a thin needle for strength. Now we string 5 petals on a thread first and sew them into the first level of the flower, and then 4 for the second. Our do-it-yourself kanzashi ribbon hairpin is almost done, all that remains is to sew both levels to each other, decorate the center with a bead and glue the finished flower to the base. Ready!
Option 3: an idea with a twist

In the previous paragraph, we made using the technique of satin ribbons. Hairpins from them, no doubt, are very cute, but you can make them even more interesting. To do this, we need a wide and thin green and wide pink rep ribbons. From the latter, we make a flower using the previously described technique or a simpler one. It will consist of six simple petals with sharp edges, fastened in the center. To decorate the seams, you can make a snowflake from white beads or pick up a beautiful bead, everything is up to your imagination. So, the first part is ready.
Stage two

Now we fold a figure-eight from a wide green ribbon, carefully burn the edges with a lit match and sew in the center, pull it together quite a bit so that the bow turns out to be larger than a flower, but not much. In general, when making any jewelry from ribbons or fabric, you need to learn how to combine colors, patterns and sizes of blanks. To do this, you can use special schemes and tables, look for ideas in stores. So, further from a thin green rep ribbon we cut off 3 short pieces, 8-10 cm long. Using scissors or a metal ruler, we make curls on them, preferably the same. This will be the highlight of our future hairpins.
Stage three
So, we sew these curls from the bottom of the green bow, and on top we fasten with glue (since we can no longer hide the seams with decor) a pink kanzashi flower. As a result, we just have to stick this charm on the base, which we will also pre-wrap with a green rep ribbon, as on curls. This must be done very carefully so that the blanks are not stained with glue, because the decoration should look like it was bought in a store, only even better. That's all, so we learned how to make a hairpin from ribbons using the kanzashi technique with a small but very cute twist.
Option number 4: bow
The best embellishments for girls' garments or accessories are not only ruffles, lace and flowers. A mandatory attribute is a bow, in the form of which our next do-it-yourself ribbon hairpin will be. It is suitable for both everyday wear and festive - it will depend on the combination of colors we have chosen. For our hairpin, you will need three types of rep ribbons: wide white and pink and thin with small polka dots of similar shades. Both bows will be made from the first and in structure will be two crossed eights. Therefore, we make 4 segments 20 cm long, mark the center on each and fold the side edges to it. Now singe the edges, stitch in the middle and tighten. So, our bows are almost ready.
Terminating a process

Next, we put on top of each other two previously prepared “eights” of identical colors and again sew the centers with a neat seam. So that later our seams would not be visible, we need a short piece of a thin pink ribbon, with which we will decorate the center of the hairpin at the very end. So, now we add up what happened: put white and pink bows on top of each other, sew or glue (the first option is preferable, since such a product will be stronger). Now we cut out two strips of 5 cm from a thin ribbon with polka dots, remove small triangles at their edges and singe with a lighter or a match so that they do not crumble. Everything, it remains only to assemble the product. We put the last blank on the double bow, stitch it, and wrap the center with a thin pink ribbon and tie it behind. Now we glue everything onto the finished base, and our wonderful hairpin for the girl is ready!
adminTo turn an ordinary hairstyle into a solemn one, just add accessories. Hair hoops, hairpins, elastic bands change styling and emphasize the chosen style of clothing. A well-chosen accessory can enhance the image or fail it. Therefore, it is important to carefully select jewelry. If we talk about hairpins, then there are a large number of them on sale. Elastic bands and hairpins made of satin or rep ribbons are especially relevant.

But, finding a 100% suitable accessory is quite difficult. It remains to make a hairpin yourself. Moreover, for its manufacture you will need inexpensive materials. And the creative process is interesting and exciting. How to make hairpins from ribbons with your own hands?
DIY ribbon hairpins for beginners
Many girls are afraid to take on the manufacture of hair jewelry, because they are sure of failure. Others think that the process takes a lot of time, plus you have to buy half the goods in needlework stores. In fact, everything is much simpler. At the initial stage, you will need 2-3 shades of ribbon and beads. From improvised materials, prepare scissors, thread with a needle, a candle.
Do-it-yourself ribbon hairpin options for beginners:

Poppy hairpin. Take a wide satin ribbon of bright red color. Then cut it into squares of different sizes. These will be the flower petals. The number of blanks depends on how lush poppy you plan to make. Next, each petal is burned with a candle from all sides. This action is performed for two reasons: the ribbon is prevented from blooming, the blanks are given an uneven shape, similar to a petal. Next, take the blanks and put them on top of each other. Your task is to fold the petals in such a way that they look like a flower. Next, sew the blanks in the center with a needle. To mask the middle, take black beads and sew to the center of the poppy. It remains to glue the automatic mechanism or “clothespin” on the reverse side.
It will take even less effort to create a second hair clip. Take a ribbon and cut a piece 15–20 cm long. The splendor and size of the flower depend on this indicator. Adjust the length yourself. Next, fold the material in half along the long side. Take a needle and thread and start stitching the braid, forming frequent folds. You will get a workpiece that looks like a caterpillar. If you want to strengthen the folds, then tighten the thread. Then fix the position, lay the last stitch. The edges of the braid, treat with fire. Next, take one end of the workpiece. This will be the center of the flower. Now twist the prepared tape around it. You will get a circle that looks like a flower due to the folds. Fix the position of the hairpin by attaching a circle of felt to the back side. Glue a “crab” or a mechanism from a machine hairpin to it. Place a beautiful bead in the middle.
If there is not enough time to make a hairpin, then take a satin ribbon and weave it into a braid. Secure your hair with an elastic band. Tie a ribbon on top in the form of a beautiful bow.
Kanzashi hairpins
The Japanese technique of creating hair ornaments has gained particular popularity. Looking at the kanzashi hairpins, it seems that it is impossible to repeat after the needlewomen. Products consist of many elements or one lush flower. To master the kanzashi technique, start by creating the petals. Once you have mastered the basics, you can move on to creating a hairpin. To do this, you will need to perform the following steps:

Take a satin ribbon and cut into squares, rectangles. To correctly determine the number of petals, draw a sketch of the future flower on paper.
Then fold the ribbon diagonally. Get a triangle. Connect the corners of the workpiece and burn with a lighter. So you fix the part and prevent the petal from dispersing. If you want to make a petal of two flowers, then prepare smaller blanks and put them in the main form.
Combine the blanks into a single composition. If this is a round flower, then cut out the base from cardboard and tape it with the main shade. Then glue the petals onto the workpiece, observing the natural pattern. The first row - the largest petals, near the center - small ones. Glue a rhinestone, beads in the middle, lay out the stamen with beads. Experienced needlewomen use a special socket into which they put a black bead. At the final stage, attach the mechanism from the old hairpin.

According to the technique of making blanks and collecting the overall composition, kanzashi is compared with modular origami. Since hairpins in the form of flowers decorated with beads and rhinestones are made with this method, kanzashi jewelry looks feminine and elegant.
DIY ribbon bows
Making such hairpins will appeal to beginners. Bows give the image of coquettishness, romance. To create, you will need the remains of ribbons in three shades. To make DIY ribbon bows, follow these steps:

Take some cardboard and cut out a rectangle. Next, take the main color and wrap the workpiece three times. Polka dot colors are suitable for bows. For the bottom base, use a wide ribbon.
Then remove the cardboard part and sew the material in the center. After that, straighten the bows in different directions. Burn the ends with a lighter or candle.
Next, take a narrow ribbon of a different shade and cut out two blanks. Attach them to the bow to adjust the length. The size of the workpiece should be smaller than the base of the hairpin.
If necessary, trim the ends and burn the pieces. Next, attach to the center of the bow and sew a cross to the cross.
At the last step, take a transparent ribbon and make a bow, as described in the first paragraph. Process the sections of the braid and sew to the center. It turns out an elegant bow, consisting of three layers. Fill in the middle by gluing a bead.
To attach an elastic band or a hairpin, prepare a base of cardboard covered with tape. Next, glue the mechanism or make a loop for it.
DIY hairpins from rep ribbons
Such products flaunt on the heads of young fashionistas. There are few mothers who aspire to girls. But, taking care of them is not easy. Curls are confused, do not obey, do not lend themselves to styling. Hair accessories in such a situation save. DIY hairpins made of rep ribbons are bright and original.

The order of work is as follows:
Cut off a piece of ribbon. Burn the end so that the hairpin does not bloom.
Next, glue the tape to the clip. Start fixing the tape with the "tails" of the clip. These are the details we click on to open the barrette. Tape is glued on all sides except one. This part will not be visible, as it will be hidden behind the hair.
To give the hairpin extra mass and strength, weight the jewelry. Cut out a piece of foam equal in size to the tape. Then stick the blank under the clip part, which will be visible. Position the foam on the inside.
Then prepare three pieces of rep tape. Fold the first and second blanks in a circle and glue the ends together. Then press the sides together. It turns out two bows. Tie the third piece in the middle with a knot.
Next, add the details to the composition. Place the bows diagonally. Lay out the braid with the knot on top, placing it in the center. This will be the outside of the part. Next, tuck the ends of the segment, cut off the extra pieces. Glue the blanks, burn all the cuts. The result is two bows, with a knot in the middle.

Next, glue the resulting decoration to the clip. The size of the clip depends on the clip used. Make paired hair clips in different colors to give your daughter jewelry to match any outfit. Rep ribbons are interesting in that decorations of various shapes are made from braid. Kanzashi technique and satin ribbons are used to create flower arrangements. Hairpins are made from rep braid in the form of a candy on a stick, a snowman, a Christmas tree, an elephant, a ladybug. Therefore, such jewelry is popular among little fashionistas.
Try making your own hair clips. Connect your daughter or niece to this process. Handmade jewelry conveys individuality and stands out with an unusual design.
April 18, 2014


