Mk topiary from funtik. Do-it-yourself topiary: a miracle from delicate organza
Topiary - a tree of happiness, has recently become a popular gift and interior decoration. A small beautiful tree, according to popular belief, brings happiness and prosperity. In addition, as a decorative detail, it can play the role of an interesting interior element.
Topiary can be made with your own hands, while having plain materials. A wide variety of materials are perfect for its manufacture: organza, ribbons, dried flowers and leaves, coffee beans, artificial flowers, fruits and berries.
I love making organza topiary, and have created it more than once in different variations. I definitely use a special, floral organza. It can be purchased at a florist or gift wrap shop.
Take advantage of the master class presented at the “Dream House” on creating a pretty do-it-yourself topiary from organza and textile flowers, and make sure that this work is within your power.
Materials for organza topiary
To create a beautiful do-it-yourself topiary, you will need the following:
- floral organza (I used yellow organza) - width 70cm, length 3-4m;
- textile flowers;
- foam ball base (I use a ball with a diameter of 10 cm);
- toothpicks;
- trunk;
- plastic or ceramic pot;
- gypsum;
- a piece of foam;
- sisal;
- various decor - inserts, butterflies, birds, etc .;
- stapler with brackets;
- glue and heat gun.
Instructions for making topiary with your own hands
The creation of an organza topiary begins with the manufacture of the so-called "trims", otherwise they are also called "pounds". To do this, you need to cut the organza into identical squares measuring 7x7cm. You can also use squares with sides of 6.5 cm, but personally I like the size of the square with sides equal to 7 cm.
After the whole organza is cut into squares, two squares should be taken.

Put one square on top of another.

Fold in half into a triangle.

Do-it-yourself topiary step by step photo
And in half again. Secure at the bottom with a stapler. This is how the "cut" looks like from above.

Now the toothpicks should be broken in half.

And on the tip of the "trimming" apply glue and glue a toothpick.

There will be a lot of such trimmings. It takes me more than 100 “trimmings” for one topiary.

I use ready-made foam balls to make a tree, but various children's plastic balls can also be used as a base.
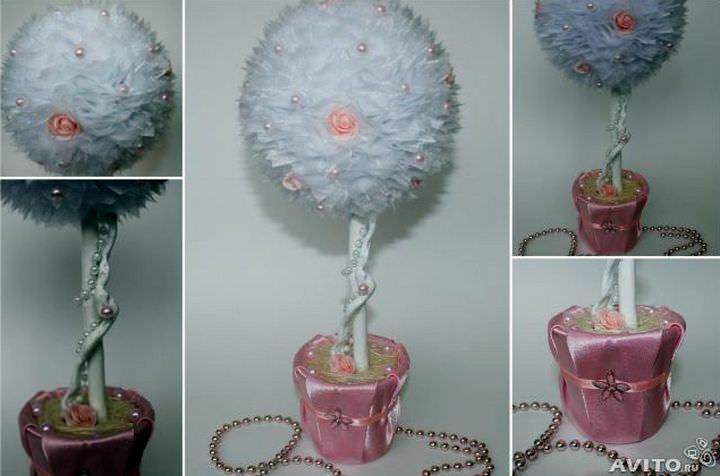
Textile flowers are recommended to be steamed before use. To do this, I use and gently steam each flower with the help of steam. For my topiary, I use chamomile.

Flowers must be stuck into the ball base.

How to make a do-it-yourself topiary
Now take trimmings and stick them around each flower.

Filling also gaps between colors.

When the whole crown is ready, you need to dilute the plaster. Gypsum is diluted with water to the consistency of sour cream.

How to make an organza topiary
Put the trunk with the crown in the pot and fix the trunk with a piece of foam or a piece of a sandwich panel. This is necessary so that during operation the trunk is securely held in the pot.

Fill the pot with gypsum mixture. Immediately insert the decor on a stick here (if any). I had a watering can with matching organza and flowers, it turned out very beautiful.

Interior decor - topiary in a pot

I glued two ladybugs on the pot, one more on the watering can and on the trunk.

Organza topiary with textile daisies is ready. It turned out to be a very pretty tree in my opinion.

fold the square diagonally diagonally

now by plane

on the reverse side drip glue on the corner

apply a toothpick

again in half, holding the toothpick with wet fingers. True, now I fold everything completely as it should be, slightly open the corner, drip glue and put in a toothpick.

by etoille : How do I make filler (pounds) in bouquets.
Because you always want to make it simpler, prettier, and also cheaper, then you have to invent it. For example, how to adapt organza trimmings, wire fragments. ..
And so successfully my last notion came out that I decided to put it here as well, maybe pay attention.
We cut the organza along the oblique so that there is no waste, into strips or petals. They brought me such an organza ... a lot of drawing, little transparent ..., and by and large, this is not organza at all. But it turned out to be interesting.
(gray lines are cutting lines)

we take a thin wire for one pound, bend it in half, wrap it around a small upper (I specially took a piece brighter) blue leaf. We make a few more twists, again we twist the blue leaf ... and so 4 leaves. Everything, there is one pound. But for fluffiness, I twisted two pounds on a hairpin made of fluorine wire.

PS. it is necessary to cut along the oblique so that the fabric does not crumble, and it is not necessary to burn.
I hope that it will be useful to someone.
by Utenok: Girls, it turned out that there are many options for attaching the assembly and "pounds".
I offer my own, although .... "When you come up with a new hieroglyph, you must remember that it has most likely already been invented"
1. It all starts with a square folded diagonally, the corners can be moved

2. I fold the “pounds” as follows:


3. I fix with a stapler

4. On one "pound" I drop a drop of hot glue

5. We take a skewer, put it in glue and press it on top with another “pound”


6. Fingers are not burned, as a result we get such a “pound” for the filler

If fluffy “pounds” are not needed, then you can attach one at a time to a skewer (toothpick, wire).
I use this technique when working with mica, and with organza, and with a rigid mesh.
P.S. Staples in the composition are not visible, checked
fromEzhka : I was asked
maybe it will be useful for someone else


the mesh is fluffed equally from all sides, stretched diagonally and tied up, and then bent and tied up again. Apply glue to the skewer, insert it into the mesh and press it well (it springs) so that the mesh is glued.
When you need long fluffies, I fluff the mesh more on two sides, and on the other two, a little bit so that there is no "hedgehog" later, the rest of the fasteners are the same


here are both options
How do we deal with waste?


three options, only I tie it not with a braid, but with the same threads. And small threads can be glued into a pot-grass

fromOlgucha : I will show here step by step what I did, maybe it will be useful to someone.
First I cut 12x12 squares and pierced them in the middle with a hat

then strung one square on a skewer and smeared the skewer with glue

clamped, pressing the edges of the square to the top

this is what the pound turned out to be

and so one by one

well here is the end result

For my taste, it turned out to be very magnificent, I think the squares should be made 10x10, maybe even less.
Topiary - a tree of happiness, a beautiful accessory or a symbolic gift? Who cares, the main thing is that there are a lot of variations of the purpose of such a tree. Beautiful topiary can be made from fungi with your own hands. But what it is, it is worth explaining in more detail.
Funtiki are small organza details that can be assembled into a single composition. In the photo you can see what they are. The name is funny, and it will not be difficult to make them.

Funtiki are made like this:
- Cut into small squares. It is undesirable for the side to be more than 7 cm. For an ordinary organza, the edges can crumble, but a floral organza will not cause such trouble. Therefore, almost every master class advises taking it.
- Fold the workpiece with your own hands diagonally, slightly shifting the corners.
- And then the fabric needs to be folded so that an accordion is gradually obtained. To do this, mentally divide the square into four parts.
- Such a pounder is fixed with an ordinary pin.
- You can fasten two blanks with a stapler or just a thread.

These are the buttocks with trimming that can decorate the topiary. You will have to make a lot of them if you want a lush tree. A video or photo master class, it happens, explains how quickly you can make many such blanks-pounds at once.
How to make an organza funky (video master class)
Topiary from organza: materials and tools for MK
Using the example of one beautiful tree, you can show a universal organza topiary master class.
So, from the materials you will need:
- Organza itself - 2.5 meters (fabric width - 70 cm);
- Styrofoam ball-blank, the diameter of which is 7 cm;
- Hot glue and glue gun;
- Flowerpot;
- stapler;
- Mounting foam;
- Scissors;
- Decorative snag, wire or pencil;
- Satin ribbon;
- Decorative pieces (eg sisal, lagurus, corrugated cardboard, etc.).

Some decorative details can be made with your own hands, while others can be taken ready-made - the same butterflies, ladybugs, artificial flowers, wedding brooches, etc.
Topiary "Heart" from organza (video master class)
Organza topiary master class
In this case, the master class begins with the manufacture of the barrel. Why is it better to take a snag? Because the shape of the trunk will not need to be done by hand, you will have a ready-made natural component that needs a little decoration.
How to decorate a snag with your own hands - mini MK:
- The snag is wrapped with a satin ribbon, its end is fixed with hot glue;
- You can also wrap a snag with white twine;
- An openwork braid can also become a decor for a topiary trunk with organza pieces.
View examples of work in the photo and video, which trunk decor will seem more convincing to you, repeat that one.

- You need to insert a snag into the foam ball, tightly and evenly, fix it with hot glue;
- Now start decorating the flowerpot, insert it with a snag and fill it with mounting foam, but not to the edges of the lawn (the foam usually increases in size);
- The flowerpot can stand like this for the night, and in the morning you will see that the foam has grown, and evenly cut off the excess;
- Then the master class gradually moves on to working with fabric, the organza needs to be cut into small squares;
- From each square you need to get a pound already familiar to you, put the blanks in one place;
- On hot glue on a foam ball, each pound is glued in turn.
Get a crown of small flowers. The organza topiary is already at the finish line of its manufacture - but there is still an important stage at which you will have to decorate the tree with your own hands.

Again, how to do this, look at the photo examples, the video tutorial will also help. But there are tips specifically for this organza topiary.
Topiary with an organza ballerina (master class)
How to make an organza topiary: tree decor
Organza topiary can be decorated with the same delicate elements, airy in structure. This, for example, sisal, tulle. And you can balance the craft with a heavier decor: for example, it can be polymer clay flowers, or a scattering of flowers from their cold porcelain.
Topiary decor ideas with organza funky:
- With your own hands, make a pearl string on a tree trunk or flowerpot. To do this, take the beads under the mother-of-pearl, and make a snake out of them, glued on hot glue.
- The top layer of mounting foam can be covered with sisal. Almost every MK offers just such a solution, although you can, of course, make a scattering of colored salt around the trunk in a flowerpot, and put a heart out of beads, etc. there.
- The topiary pot itself with organza funnels can be tied with a satin ribbon in the color of the crown. You can tie a flowerpot and lace ribbon.
- Also, an organza topiary can become a tree of photo confessions. Do-it-yourself do-it-yourself sun napkin from ten photos, on which the topiary pot with organza funnels will become.
- With your own hands, you can stick rhinestones on the crown, which will beautifully shimmer in the sun.

The standard master class suggests using not mounting foam, but gypsum or alabaster. The question of choice, with which it is more convenient for you to work, then take it. Also, organza topiary can be used as an object for a photo, for example, if you are doing a winter photo shoot. A snow-white do-it-yourself topiary will be very much on topic.
Topiary from wide organza ribbons (video master class)
It is impossible to single out one master class that covers several technologies for making a tree of happiness at once. Draw creativity from everyone and create your lucky topiary that will bring you good luck.
Topiary from organza (photo)


Organza topiary is easy to make with your own hands, despite the laboriousness.
Topiary is a decorative tree that symbolizes home comfort and peace in the house. It is also called the tree of happiness. If you make an organza topiary with your own hands and present it on the occasion of some important event, it will remind you of all the pleasant moments associated with the memorable date, and will let you feel the warmth of the soul of the master who created such an unusual gift. For the manufacture of happiness trees, a variety of materials are used (paper, fabric, polymer clay flowers, buttons, beads, ribbons, and much more). Topiary made of organza and flowers is usually decorated with decor in the form of butterflies, ladybugs, dragonflies.
Topiaries - trees of happiness, so different and unique, consist of the same elements:
- basics;
- stands;
- trunk;
- colors.
Topiary base
 The basis for the crown (most often a ball). Usually, foam balls are used for topiary. In needlework stores, such blanks of different diameters are sold.
You can also use plastic balls or make a papier-mâché base. From the foam ball, you can cut the base of a different shape. Heart-shaped topiary is very popular as a wedding gift. At the bottom of the base of any material, you need to leave a hole for attaching the barrel.
Stand
The size of the topiary stand is selected so that the crown of the tree is larger than the diameter of the stand. With this ratio, the composition will be proportional and light.
The choice of container for the stand depends on the imagination and capabilities of the master. Flower pots, baskets, and old cups can also go into business.
Having decided on the style of the future tree of happiness, the master can decorate the stand by choosing fabric or lace. Another option is to varnish or paint the pot. In some cases, beads, glass beads or beads will be appropriate.

Trunk
The main requirement for the trunk is strength. Trunks made of natural materials look very good. Slightly curved branches or snags will make the topiary original and unique. Before use, the bark is removed from the future trunk, then the surface is covered with varnish or paint.
Often a thick wire is used for the barrel. To make the tree stable, the pieces of wire are twisted together. Of course, then you need to decorate the base. The wire harness is lubricated with glue, wrapped with a cloth, ribbons or cord.
Flowers
The main element of decorating the basis of the tree of happiness is flowers. Organza flowers can be made in three ways.
 A ribbon of the desired size is cut out of organza and folded in such a way that a lush flower is obtained. The bud in the lower part is fixed with a thread. From organza, blanks are cut into round patterns of two or three sizes. They are stacked, sewn together, and a beautiful bead is sewn into the center.
 Organza is cut into squares 5 * 5 or 7 * 7 cm in size. Each blank is folded diagonally, while the corners should be slightly shifted. The workpiece is folded with an accordion, the lower corner is fixed with a stapler or sewn. If you connect several of these cones, you get a lush flower.
To decorate the topiary, you can also use ready-made flowers, which can be purchased in specialized stores. Textile daisies, bells or poppies will enliven the composition, give the tree of happiness a summer mood.
When choosing materials for making wood, you need to consider the overall style of the composition. It must be solid, all the components of the topiary must correspond to each other.
Organza large topiary
Topiary made of light organza will transform the interior, bring bright colors to the usual home environment. The peculiarity of this MK is that it tells how to make a fairly large tree 1 meter high. You will need a foam ball (about 20 cm in diameter), for such a ball you will need 6 meters of floral organza 0.7 m wide. Organza is taken in two colors: light brown and snow-white. To decorate the tree, you will need white beads, as well as some brown beads. A satin ribbon in matching colors will come in handy. The tree trunk is made of aluminum wire. Of the tools you need a stapler, scissors, a small glue gun.
- The organza is cut into squares of 8x8 cm and formed from each fungi - the components of the crown of the future tree.
- Bend the square diagonally, slightly shifting the corners.
- The vertices of the triangle are tucked to the middle.
- The workpiece is folded in half in the opposite direction from the previous fold.
- Each blank is fastened with a stapler, the lower corner of the pound is cut. This will make it easier to glue the element to the base.

- The satin ribbon is cut into pieces of 10 cm, folded in half and fixed with a stapler.
- The foam ball is pasted over with blanks, while alternating white and light brown elements. Glue is applied to the lower corner of the funnel, pressed to the base, held until the glue cools.
- Satin ribbon blanks are placed between the organza cones.
- White and dark brown beads are glued to the crown of the tree.
- A thick wire is wrapped with a satin ribbon, alternating contrasting colors. So two trunks are prepared.
- The base ball is cut in the lower part and both trunks are installed.
- A gypsum mixture is poured into a 5-liter flower pot, having previously placed pieces of polystyrene on the bottom of the container.
- The tree is inserted into the solution and the liquid gypsum is completely dry.
- Decorate the surface of the frozen solution with sisal, which is selected to match the crown of the tree. Sisal is glued with polymer glue, beads are attached on top. A large bow is tied from satin ribbons at the top of the trunk.
Tree with a heart-shaped crown
Before starting work, it is advisable to draw a sketch of the future tree. Instructions for creating an organza topiary will be given by a master class in which a heart-shaped cardboard blank is used as a base, and a suitable branch is used for a tree trunk.
 To work, you need to prepare:
- cardboard for making the base;
- a suitable container in which the tree will “grow”, for example, a flower pot;
- gypsum or alabaster, water;
- a branch or small snag, painted with acrylic paint;
- organza, it is better to take floristic, about 2 meters;
- satin ribbons;
- beads corresponding to the chosen color scheme;
- paper napkins, old newspapers;
- pieces of foam, you can take pieces of polyurethane foam.
From the tools you will need scissors, a stapler and a small glue gun.
The order of work is this.

Conclusion
Topiary is an exciting hobby for creative people with good taste, who are ready to do quite painstaking work for the sake of an amazing result. It is not difficult to make a topiary with your own hands, and an interior item that has come out of the hands of a master can give the appropriate mood to the environment.
Surprising with a gift in our time is not easy, but still possible. Try to make a do-it-yourself topiary for a loved one. The materials for its creation can be different, often light and elegant organza is chosen. The "tree of happiness" from it looks very elegant.
What materials will be required
The manufacture of any topiary begins with the selection of materials and tools. You will need:
- organza 4 m long and 0.7 m wide;
- fabric flowers;
- toothpicks;
- adhesive thermal gun;
- base ball;
- stapler;
- stick or wire for the trunk;
- decor;
- pot;
- sisal;
- gypsum;
- Styrofoam.
Options for making organza topiary
Organza topiaries can have different shapes and look completely different. However, they all include the following main elements:
- stand;
- crown base;
- trunk.

A beautiful topiary will turn out if you correctly decorate it. Organza goes well with satin ribbons and beads, which can be planted on glue. You can decorate with artificial flowers, varnish, paints. A ball is most often taken as the basis. It can be made from any material, but must be durable. Usually used balls made of papier-mâché, plastic, foam, paper. For a romantic date, for example, Valentine's Day, you can make a heart topiary. The base for it is cut out of foam.
As a stand can be used:
- baskets;
- pots;
- vases;
- glasses;
- cups.
The main thing is that the diameter of the crown should be approximately the same as the diameter of the stand, otherwise the structure will look heavy.
There are different options for making a trunk for a “tree of happiness”. The most popular materials for this are branches, wire, sushi sticks. The wire is twisted several times, and then decorated with cords or ribbons. The branches are varnished, after removing the bark.

Organza flowers for decorating a topiary can be made in several ways.
- Templates are made in the form of flowers from cardboard. Organza blanks are cut out on them. It remains only to burn the edges of the resulting blanks.
- A long ribbon is taken, one of its edges is burned over a candle flame. Next, roll the ribbon in the shape of a flower, and fix its lower part with a thread.
- Flowers are made using fungi. To do this, the organza is cut into squares, they are folded diagonally, shifting the corners, and then folded into an accordion or fan. The workpiece is fastened with a stapler or thread.
Topiary made of organza and artificial roses looks romantic. Suitable flowers made of foamiran. In this case, the pot is painted the color of roses, the organza acts as an additional decorative element, and otherwise the manufacturing technology of the “tree of happiness” is standard. Leaves can also be made from organza, and the ball can be additionally decorated with gold ribbons and bows, attaching them to glue. The place between the walls of the pot and the trunk is decorated with beautiful stones, they are also fixed with glue. Leaves can be sprinkled with glitter and fixed with varnish.

The most difficult thing is to make a topiary decorated with organza and silk flowers, made in the technique of guilloche - burning on the fabric. But the result will definitely exceed all expectations. To make this topiary, you will need a burner with the ability to control the temperature. In addition, you will need special glass, without which it will not work. In order not to cut yourself, it is recommended to seal the edges of the glass with adhesive tape. Burning is carried out using a pre-prepared stencil.
Instructions for making organza topiary
The master class on creating an organza topiary is simple.
- First, a base is taken in the form of a ball or other figure made of plastic, paper or foam.
- Pounds are made - squares with a side of 7 cm are cut. They are folded diagonally, shifting the corners.
- Next, an accordion is made from the blanks. You can fix the resulting form with a stapler.
- You can decorate the pot as your fantasy tells you. A good option is decoupage using beautiful napkins.
- The trunk of the topiary, which can be a stick decorated with yarn, is fixed on plaster in a pot.
- The inside of the pot is decorated with artificial grass.
- The crown is decorated. In order for the pounds to keep well on the base ball, it is sheathed with a cloth. Organza flowers can be planted on glue or sewn on. Leaves are attached in the same way.

If you don’t have the time or desire to make organza flowers yourself, you can buy ready-made ones at a flower shop. You can attach the composition to the pot not only with gypsum, but also with mounting foam. The original design of the trunk will be its decoration with colored laces.
Organza flowers look good paired with crepe paper, coffee beans and satin ribbons. Topiary can even be made from organza and pasta - it all depends on your imagination!
To create a marine-style topiary, the corresponding paraphernalia glued between the flowers will help - starfish, shells, anchors.
The tree of happiness looks interesting and original, combining organza and nuts - both whole and their parts. You can take pistachios, walnuts, hazelnuts. In this case, organza can act as a frame, and the fruits themselves are painted in beautiful colors.
An excellent option is a money tree. In this case, in addition to organza, coins and fake banknotes are used as decorative materials.
How to make an organza topiary (video)
Any organza topiary is worthy of attention. It will look good in the office, on the bookshelf, and on the dining table. The product is easy to care for - just blow off the dust with a cold stream of air using a hair dryer. It is also important not to put the topiary in direct sunlight so that the colors do not fade, and to avoid getting moisture on it. Subject to these simple conditions, the “tree of happiness” created by the master with love will delight the eye for many years.


