New do-it-yourself lantern from a can. "Magic lantern from a jar with your own hands." Other manufacturing methods
Often children under a certain age do not want the lights to be turned off when they go to bed. They are more comfortable and calmer when the light is on or a small flashlight. However, this is not very good, not only because excess electricity is consumed, but also because babies develop dependence on the included light - without it they cannot.
Fortunately, there is an interesting solution to this problem, in which the light is turned off, but a small “illumination” remains.
We are talking about beautiful decorative lanterns that can be made from "improvised materials"; when the light is off, they will sparkle like in a fairy tale.
We'll show you two ways to do this. flashlight. Find a free moment and try with us!
How to make a flashlight with glow sticks
Many specialized stores sell glow-in-the-dark luminescent sticks.
Luminous bracelets made from the same elements are also on sale; they are used on different holidays.
These sticks are about 20 cm long and 0.5 cm in diameter. They have plastic connectors about 2 cm long.
They come in different colors: red, yellow, green, pink, purple, orange, blue. Sometimes several colors are combined in one stick, this makes the illumination even more original.
To make a flashlight choose your favorite colors, preferably more than two.
materials
- Glass jars and vials (whatever you want)
- Latex gloves
- Scissors
- old tulle
Step 1

Find a few glass jars, such as from under, olives and other products.
Step 2
Cut off a piece of old tulle, its length should be greater than the height of the jar. Put it inside the jar so that it touches the glass.
Step 3

Put on gloves to protect your hands and cut the wand to extract the glowing paint.
Step 4

Shake the glowing paint stick inside the can so so that its spots form on the tulle and on the glass. They will glow in the dark.
Step 5
Since it is intended to receive a beautiful multi-colored flashlight, cut the stick of a different color and do the same as in the previous step.
Step 6
Close the jar well with a lid and shake it.
Step 7

Turn off the lights and enjoy the wonderful illumination.
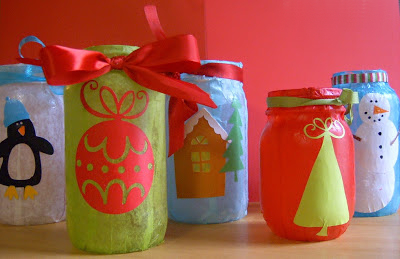
How to make a flashlight with glow paint
For such a flashlight, you need glowing fluorescent paint, which can be bought at an artist's store.
This is a paint based on phosphor - a phosphorescent pigment capable of accumulating light energy with a long afterglow period.
Depending on the pigment used, it may glow greenish, blue, yellow or pink.
As in the previous case, we suggest mixing two or three colors, then the flashlight will be more beautiful.
materials
- Glass jars or vials
- Fluorescent paint
- tassel
- Water for paints (as needed)
Step 1

Mix fluorescent paint with a little water in a clean container so that the paint particles dissolve little by little.
Use a brush and gloves for protection.
Step 2
Wash and dry the jars well.
Step 3

Using a brush, apply paint to the inside of the can, draw lots of dots there. The more dots there are, the better this flashlight will glow in the dark.
This process will take some time, but you will love the result.
Step 4

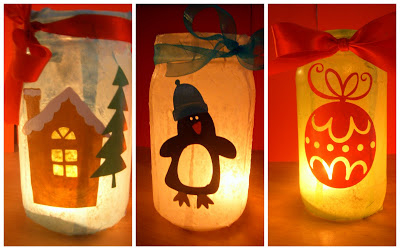
Hold this flashlight for a few minutes next to a light bulb., then it will glow brighter when you turn off the light.
Although the flashlight will not be very noticeable during the day, you will love how it glows in the dark.

Interesting idea, isn't it? As you can see, making such flashlights is not difficult, and the result is impressive.
It just takes a little time and creativity . You can make flashlights with them, they will really like this activity.
At the same time, everyone should be wearing gloves, and it is better to wear old clothes so that possible splashes of luminous paint do not cause much damage.
In this master class, we invite you to make an original flashlight based on the fairy tale about Peter Pan. The result of the work will be a beautiful lamp in which the Tinker Bell fairy will sit. How exactly to do it, and what you need for this, see the step-by-step instructions.
materials
To make a magic lantern from a jar, prepare:
- glass jar with a lid;
- tracing paper;
- PVA glue;
- brush;
- ruler;
- pencil;
- scissors;
- colored paper;
- thick black paper;
- decorative key;
- twine of golden color;
- wire;
- light source, preferably LED;
- dry glitter;
- scissors.

Step 1. Take a suitable glass jar for this project. Small barrel-shaped products look best. Wash it thoroughly, be sure to remove the label. Dry the container well and then degrease its outer surface with alcohol.
Step 2. Take a tracing paper, flatten it. To implement the idea, you need exactly tracing paper. This is a thin translucent paper, through which the shadow of a fairy fairy will be visible.
Step 3. Mix the glue with a few drops of water and apply with a brush to the surface of the jar. Wrap the jar in tracing paper. Press it down carefully. Leave the remaining paper creases. They will look spectacular.


Leave the workpiece to dry completely. 4-5 hours will be enough.

Step 4. Transfer the contour image of a fairy to a sheet of thick black paper. Cut it out and glue it on the inside of the jar. Leave the product to dry.


Step 5. Decorate the jar at the neck to make it look more spectacular. In this case, a golden-colored rope, golden-colored wire, as well as a small decorative key were used.


Step 6. Take colored plain or corrugated paper. Cut out a strip 30 cm long and 6 cm wide from it. Draw the outlines of the petals on it with a pencil and cut them out as well. Fold the strip, simultaneously lubricating the paper base of the flower with PVA glue. At the end of the process, use scissors to bend the petals in the right direction.

Step 7. Glue the finished flower to the neck of the jar.

Step 8. Decorate the jar with dry glitter. Lubricate it in the upper part with PVA glue and then sprinkle with glitter. Don't put too much on it.

Step 9. Place a small, battery-operated LED light source inside the jar. It can be a small spotlight, a miniature tablet flashlight, etc.
Paper lanterns have become a traditional attribute of New Year's decor not only in Europe and Asia, but also on the American continent.
Their history originates in China, where they also served as decorations for festive processions dedicated to the Chinese New Year.
Lesson number 1: Flashlight on the braid
They will decorate any room. They can be hung on a Christmas tree, made into an openwork garland, or used as a cover for a miniature electric candle.

- Take a rectangular sheet of colored paper and cut a strip about 1 cm wide along one of its narrow sides. Set this strip aside for later use.
- Fold the rest of the paper in half lengthwise so that the right side is inside.
- Measure 2 cm from the edge of the resulting rectangle, along the long side opposite the fold line. Draw a line parallel to the edge with a pencil.
- Cut the fringe along the other edge of the rectangle, along the fold line, without stepping over the pencil line.
- Unfold the rectangle and fold it in half again along the fold line, only in the opposite direction (turn it right side out).
- Roll the sheet into a tube and fasten the top and bottom with tape. Glue a “pen” to the top rim from a strip of paper cut off from the sheet at the beginning of work.
Another option is to make small holes in the rims and thread the lace through them. By moving the top bezel along the cord, you can adjust the curve of the center section of the flashlight.
Attention! Paper can only be attached to garlands with LED - bulbs that do not heat up when burning!
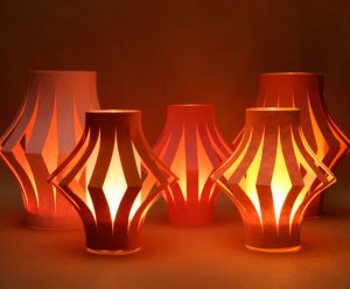
Master class number 2: Diamond-shaped lanterns made of tissue paper

Light and graceful - that's what you can say about these flashlights. It may take a little longer to do them than others, but the result is worth it. They will look especially impressive if you put a small candle on batteries inside.
1. Lay two sheets of tissue paper on top of each other and fold them in half lengthwise. Iron the fold. 
2. Next, unfold the paper and gather it, without separating the sheets, into an accordion of folds about 1.5 cm deep 
3. To make a smaller flashlight, cut the edges of the accordion at an equal distance from the center. Then unfold the paper and flip it over so that the raised side of the center line is facing the table.
4. Take a needle with a dense thread threaded into it. Gather one side of the sheet again into an accordion and pull the thread through the paper. Tie the ends together to form a vicious circle.
Instruction number 3: Round lanterns from strips of paper
They look like Christmas balls and can be of any size: from very small to huge. A definite plus is that they are quite easy and quick to make.

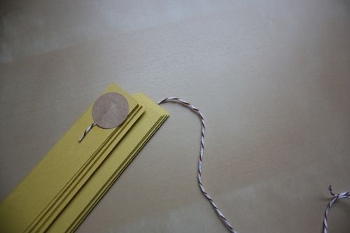
1. Cut 15 strips of paper 1 cm wide

2. Make holes at both ends of all strips along the hole, stepping back about 3 mm from the edge

3. Stack the strips so that the holes match up, and insert a rivet into each end (you can buy these at a craft store)

You can tie a hanging loop to the top rivet, and a tassel made of paper, beads or threads to the bottom rivet. In addition, excellent garlands are obtained from such lanterns!

Option number 4: Flashlight from paper or cardboard circles
This type of lantern is also perfect for decorating the interior and for the Christmas tree. If you make them from thick multi-colored paper, you get a toy for children. And if you decorate them with various decorative elements or draw something on the finished product, you get an absolutely unique thing.
1. Cut out 10 identical circles from thin cardboard

2. Fold all circles in half, right side inward

3. Glue the circles in pairs, side by side, until the circle is complete

4. Before gluing the last two halves, insert a straightened paper clip into the center of the sphere and fix it with a drop of hot melt adhesive. Bend the outer end of the paper clip with a crochet hook - for it you will hang a flashlight

5. Decorate the flashlight with ribbons, tassels, or other decorative items.

Lesson number 5: Flashlight "Drop"

This is another kind of flashlight assembled from the same parts, but in this case you will need a template.
As in the previous case, you need to cut, fold and glue a certain number of parts around. The ones in the photo consist of 16 "drops".

As a component of such decoration, you can use almost any figure, including openwork. Other options for Christmas lanterns of this type:

 |
 |
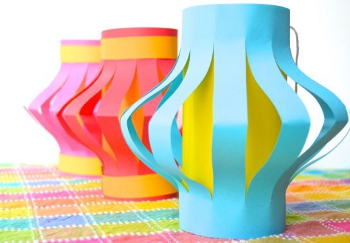
Master class number 6: Indian lantern

This elementary decoration in manufacturing looks rather unusual and pleasant. Choose beautiful colors, decorate ready-made lanterns, let your imagination run wild!
The flashlight consists of two sheets of paper in contrasting colors.
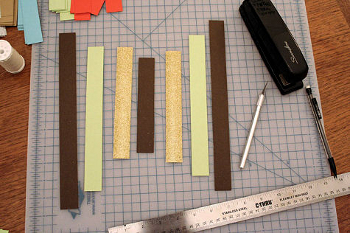
Outer layer (fringe):
- Take a sheet measuring 12.5x25cm and make a fold about 5cm wide on both short sides. Smooth out the fold line and unfold the paper.
- Using a ruler and a paper cutter, make parallel cuts at 1cm intervals between the two fold lines.
Inner layer (tube):
- Take a sheet measuring 15x19cm and stick a strip of double-sided tape along each of the 15cm edges.
- Roll the sheet into a tube and glue the two sides overlapping so that they overlap by about 5 cm.

Part connection:
- Attach a strip of double-sided tape to the short sides of the outer layer of paper.
- Glue one of the edges along the top edge of the tube, then, without wrinkling the fringe, glue the bottom edge.
- Make holes on opposite sides of the tube at the top of the flashlight and thread a ribbon or fishing line through them for hanging.
Step-by-Step Instruction No. 7: Flashlight from strips of paper and a tube

Another project of two or more sheets of paper in contrasting colors.
1. Glue a tube from a shorter sheet.
2. Apply a strip of double-sided tape along the top and bottom edges of the tube.

3. Cut long, thin strips from paper in a contrasting color.
4. Start gluing the strips one at a time, slightly overlapping, strictly parallel to the tube or slightly at an angle.

This is how the strips glued at different angles look like.

5. Mask the gluing points with a horizontal strip of paper or tape glued to hot glue or double-sided tape.
6. Attach a hanging loop to the top of the flashlight. Its ends can be glued under a horizontal tape or fixed on the inner walls of the tube.

Master class number 8 "Glowing flashlight"
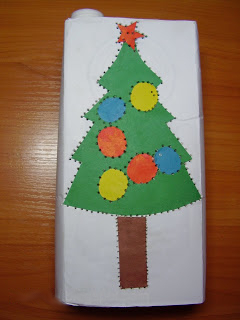
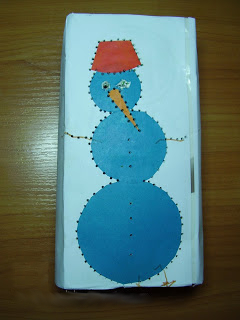
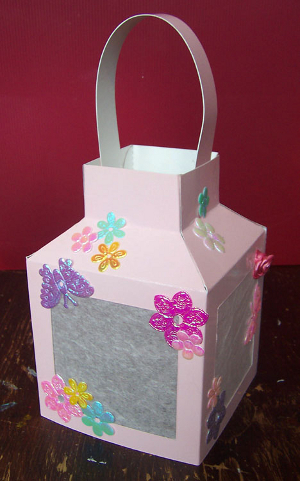
A cardboard box of juice or milk is a wonderful material for making a New Year's lantern. The easiest way to make this New Year's toy with your own hands is as follows:
1. Take a box of juice or milk, cut off the bottom of it, glue it with white paper.
2. Make an application on the New Year theme on both sides of the package.
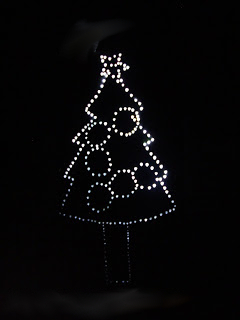
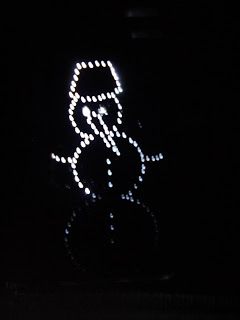
3. And now the adult must prick holes along the contour of the drawing with an awl. If you put such a box on a flashlight or LED candle, the picture will glow in the dark. Link >>>>
Attention! If you are using a regular candle, be sure to place it in a glass jar for safety reasons.


Such a New Year's craft with your own hands can also be made from a regular paper bag.
or tin can.
Holes in a tin can have to be made with a sharp nail and a hammer. Useful advice: so that the tin does not warp when making holes in it, first pour water into it and freeze it in the refrigerator.
At the end, paint your New Year's lantern with spray paint and attach a wire handle to it.
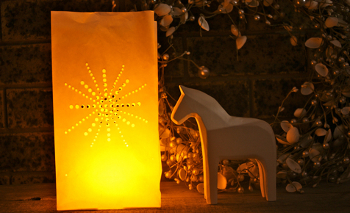
Holes in a paper lantern can be made not only round, but also, for example, in the shape of hearts or stars, as in the photo below.
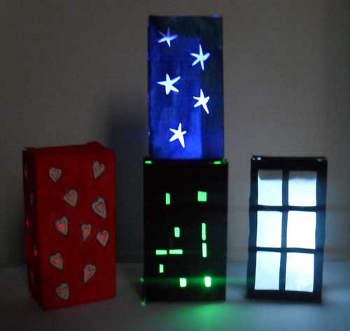
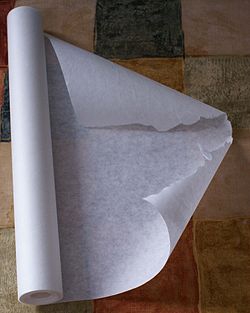
If the holes are large enough, then it is better to seal them on the back with special parchment paper. In another way, it is also called wax paper or baking paper.
Master class number 9 "Bird in a cage"

We invite you to make an original paper lantern in the form of a bird in a cage with your child. To make this Christmas decoration you will need:
- colored paper and cardboard
- awl
- scissors
- double sided tape or glue
- plastic cover

Work plan:
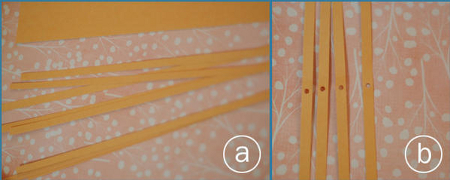
a. Cut colored paper into strips of the same length and width (for example, 1.5 cm - width, 30 cm - length). To make one lantern, you will need 4 strips of paper.
b. Make a small hole in the center of each strip with an awl.
c. Print the bird on thick paper. Cut it out. Make a small hole in the center of the back of the bird with an awl.
d. Pass a thread through it, tie the end of the thread with a knot. Make a second knot at a distance of about 4 cm from the bird.
e. Now you need to string paper strips onto a thread. Slide the strips along the thread to the top knot.
f. Tie another knot on top of the paper strips, on which you can put a bead for beauty.

g. Now take the plastic cover and put double sided tape around it.
h,i,j. Spread the strips apart and attach their ends symmetrically to the lid.
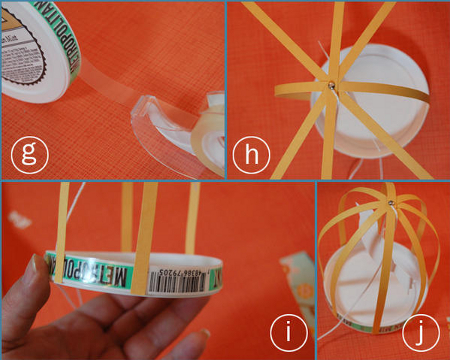
k. Cut a strip of colored paper and glue it around the lid. New Year's lantern is ready!

Master class number 10 "Amazing flashlight"
Cut out a lot of these blank shapes from paper.
 Their number should vary from ten to fifty at your discretion. The main thing is that they are all the same and neatly cut. Each cut piece should be folded in half.
  Let's start gluing the flashlight. To do this, all blanks are first carefully glued at points 1.
  Pay attention to the fact that the same side is glued together if the paper has only one color side. Then the blanks are glued on the other side at points 2.
  Then we connect the edges of the ovals together, stitching them with a needle or gluing them with double-sided tape.
  At the end of the work, you need to glue the two extreme edges. The flashlight is ready!

Other manufacturing methods
By connecting fantasy and imagination, you can easily figure out how else to make unique lanterns to decorate your home. For example, if you glue corrugated paper into cylinders, as in the case of classical technology, but do not make a second layer, but simply attach these forms to ribbons, and glue them along the bottom edge with light colored ribbons that will sway and flutter at the slightest movement. Such New Year's lanterns also look beautiful in a large garland.

If you want a candle to burn inside the product, then take two layers of paper for the base: plain paper for the top, and white parchment for the bottom, which will transmit light. Or use safe LED candles.
Another simple craft is a flashlight made of multi-colored stripes. To make it, you need to cut a lot of paper strips (their length and width should be the same, the longer the strip, the larger the flashlight will turn out). These strips must be folded, and holes should be pierced at both ends. Then take a beautiful cord and fasten it first on one side, and then thread it through the other hole and pull it well so that the strips bend in a semicircle. It remains only to straighten the flashlight so that the stripes form the shape of a ball.
You can also make a beautiful craft in the form of an openwork lantern that will decorate any holiday table for the New Year at the Christmas tree, and for a birthday, and for other holidays.

- To make such a romantic decor element, you will need special cutting templates. If you are trying to make such a craft for the first time, then at first it is better to take a blank drawing in which there will be a minimum number of gaps, since cutting this part can take a lot of time and require some skills.
- The selected template must be printed and carefully cut along the contours.
- Choose glasses, goblets, jars or other transparent objects that will serve as the basis for the wrap (they should be able to put candles in them). Measure their height and width. You need to cut out the templates so that the containers can be completely wrapped.
- Try on the templates again and trim if necessary.
- If you want to make colored lanterns, then under the openwork patterns you will need to attach sheets of colored parchment (you also need to cut them to the size of the dishes). They are attached with adhesive tape.
- Then you can attach openwork patterns, also carefully attaching them with tape.
Light candles and enjoy the romantic atmosphere of a New Year's fairy tale.

Choose any way you like to make lanterns and create small crafts that will decorate your home in an original way for any holiday.
Video lesson: How to cut a New Year's paper lantern?
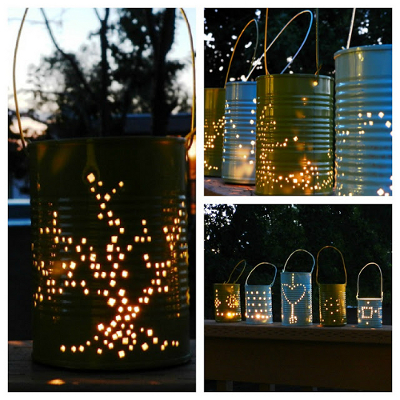
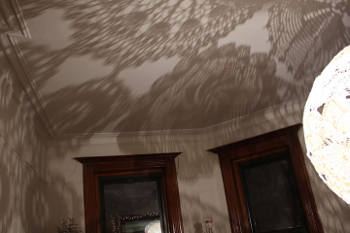
Do you want to decorate the exterior of a summer house or a personal plot? Make lanterns with your own hands and fill the atmosphere with romance and comfort. In summer, lanterns will help illuminate the gazebo, and in winter they will create fabulous shadows in the snow. With your own hands, you can make an inexpensive source of light for gatherings in the yard and surprise friends and family with ingenuity.

To make lanterns you will need:
- several tin cans;
- wire;
- cans of paint;
- nail;
- hammer.
1. Remove labels from cans. This can be done with alcohol or acetone. If neither is available, then hot water and a sponge for washing dishes will help. Soak the jars in boiling water, and then simply rub the rough side of the sponge.

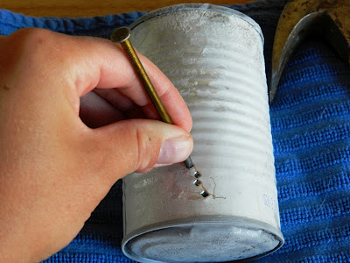
2. Now pour water into jars and carefully place in the freezer in an upright position. We are waiting for the water to harden and turn into ice, after that we take out the cans and proceed to the next stage of work.
3. Using a nail and a hammer, we knock out holes. In the upper part of the jar, make holes for the handle, and then all over the surface of the jar. The pattern can be chaotic or premeditated, for example, stars, hearts, flowers. Make holes in all jars.
4. Let the water melt completely and the jars dry. You can wipe them with a towel so as not to wait a long time.
5. If the bottom of the jar is deformed due to frozen water, then carefully level it with a hammer.

6. We cut thirty centimeters from the wire and make a handle for a flashlight out of it. We fix by clamping at the edges of the holes for the handle. We make such handles on all flashlights.
7. Now we take a can of paint and decorate the jar and handle of the future flashlight.
8. Insert a candle inside each jar.
Lanterns or candlesticks for the street are ready. In summer they can be made colored, in autumn - warm pastel colors or bright orange, and in winter - pale blue, silver or lilac. If it's a theme night jar lanterns will be a godsend for creating fashionable design. You can use them not only for the street, but also indoors. Homemade flashlights - will be a great lamp when the lights are turned off.
Option 1.
The easiest way to make a New Year's paper lantern is as follows.
Cut colored paper or old postcards into strips of the same width (eg 2cm) but different lengths. You should get one central shortest strip, the remaining strips should be paired, each pair a few centimeters longer than the previous one.
Lay the strips together in the correct sequence, lining them up at one end, then staple or glue them together. After that, align the strips from the opposite end and also fasten them with a stapler or glue. The flashlight is ready!
Option 2.

One of the most popular Christmas decorations is Christmas lanterns. It is very easy to make them, and thanks to the spectacular shape, the lanterns will become a real decoration of the Christmas tree.
We fold a sheet of colored paper of a rectangular shape along in half. From the fold line we make parallel cuts at an equal distance from each other (the cuts should end without reaching the edges of the sheet 2 centimeters). We unfold a sheet of paper and fold it into a tube, glue the ends of the sheet. Now, simultaneously from below and from above, we squeeze this tube a little - we get a flashlight.

But that is not all. For a flashlight, you can make a core. To do this, we glue a tube from thicker paper, but of a smaller diameter. We connect the two parts together (we place the core inside the flashlight) using glue or a stapler. The flashlight is ready.
Paper lanterns can be used in a variety of ways. And just like a Christmas decoration. And as a decoration for a small vase or glass (only in this case, you don’t need to make a “core” for a flashlight). And several New Year's lanterns, suspended on a ribbon or serpentine, will turn into a multi-colored garland.

You can insert a candle inside the New Year's lantern. It is better to use safe LED candles. If you are using a regular candle, be sure to place it in a glass jar for safety reasons. See link >>>>
Option 3.
A cardboard box of juice or milk is a wonderful material for making a New Year's lantern. The easiest way to make this New Year's toy with your own hands is as follows:
1. Take a box of juice or milk, cut off the bottom of it, glue it with white paper.
2. Make an application on the New Year theme on both sides of the package.
3. And now the adult must prick holes along the contour of the drawing with an awl. If you put such a box on a flashlight or LED candle, the picture will glow in the dark. Link >>>>
Attention! If you are using a regular candle, be sure to place it in a glass jar for safety reasons.
Such a New Year's craft with your own hands can also be made from a regular paper bag.
or tin can.

Holes in a tin can have to be made with a sharp nail and a hammer. Useful advice: so that the tin does not warp when making holes in it, first pour water into it and freeze it in the refrigerator.
At the end, paint your New Year's lantern with spray paint and attach a wire handle to it. For a detailed New Year's master class, see the link >>>>

Holes in a paper lantern can be made not only round, but also, for example, in the shape of hearts or stars, as in the photo below.
If the holes are large enough, then it is better to seal them on the back with special parchment paper. In another way, it is also called wax paper or baking paper.
Since we are talking about paper lanterns with large windows, it's time to move on to the next section of our article.
Option 4.
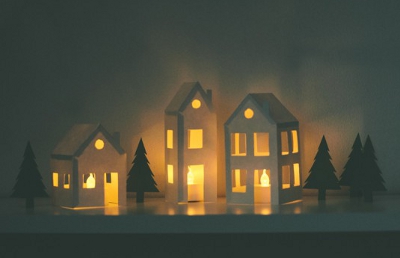
The house is a symbol of comfort, warmth, family hearth. That is why on frosty, winter days, a New Year's lantern in the form of a paper house will look most appropriate.
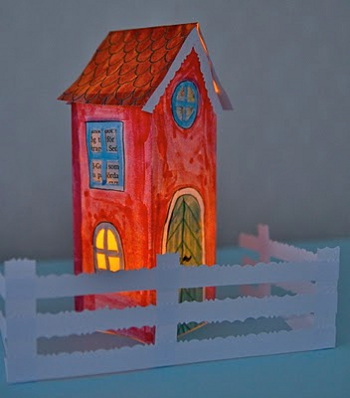
It is very easy to make a house out of juice or milk packaging. Just be sure to seal the windows with parchment (wax) paper. We already wrote about this a little higher.
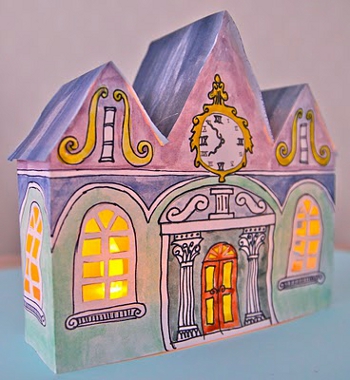
We suggest you use ready-made templates for making three magnificent paper houses as in the photo below.
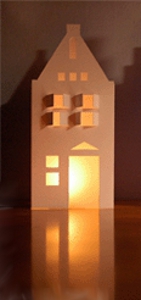
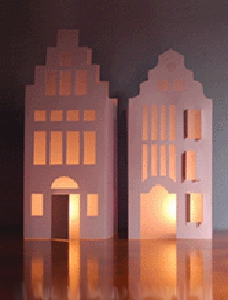
To make one house, you need to print the same template twice. Each house consists of two identical halves (front and back), connected to each other on the sides.
Cut out the templates, to do this, cut off everything that is marked in gray. Cut out windows. Seal them on the back with parchment paper. Connect the two parts of the house together. Place the house on a light source (LED or real candle). Attention! If you are using real candles, be sure to place them in a glass jar for safety reasons. For a detailed New Year's master class, see the link >>>>
If you like New Year's lanterns in the form of houses, then there are a few more templates especially for you.
Option 5.
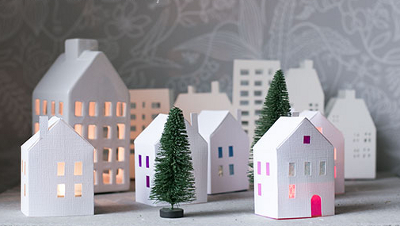
A New Year's lantern can be made not only in the form of a house. You can simply make holes in a homemade cardboard box and seal them with parchment. The lantern will be decorated with a New Year's applique.
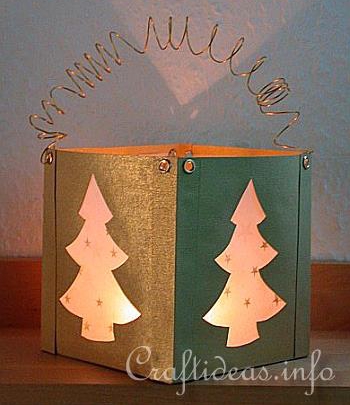
For detailed instructions on how to make Christmas tree lanterns as in the photo above, follow the links:
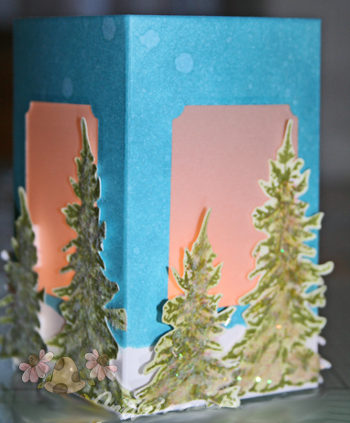
New Year's lanterns of such a shape look spectacular, as in the photo below. To make such a New Year's paper lantern with your own hands, use the ready-made template. Decorate the finished flashlight with store-bought stickers.
Option 6.
An interesting option is to glue a glass jar with corrugated paper. To do this, cut the paper into long strips, and then, using PVA glue, glue the jar over it. From ordinary colored paper, cut out some kind of New Year's picture and stick it on top of a layer of corrugated paper. Decorate the New Year's lantern with your own hands with a satin ribbon. Place a candle inside. The original Christmas decoration is ready!
You can also glue the glass container with pieces of corrugated paper of different colors. It will turn out very nice too!

Option 7.
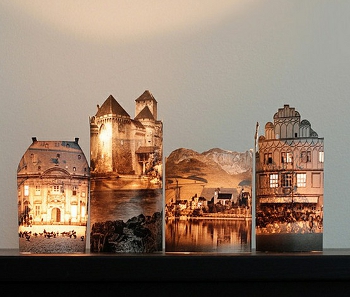
You can simply draw a castle on parchment paper with a black permanent marker and wrap it around a light source: a flashlight, an LED candle, or an ordinary candle in a glass jar.
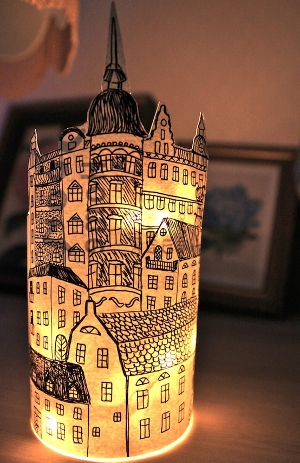
You can use a photograph of the castle, cut out along the contour. For detailed instructions on how to make such original lanterns, see.
Option 8.
And on parchment paper, you can stick the silhouettes of some images cut out of black paper. See link >>>>

Option 9.

To make these wonderful Christmas lanterns, you will need to cut colored paper into strips of the same length and width. The length and width of the strips depends on the size of the flashlight you want to make. To make one paper lantern, you will need an average of 14-16 strips of paper.

Fold the paper strips together in a pile and make a hole with an awl from one end and the other. Pass the thread through one of the holes, secure the end of the thread with tape, glue or a sticker.
Pass the thread through the second hole.

Pull the thread so that the strips of paper are bent. Tie the thread in a knot. The knot should be large enough so that it cannot slip through the holes in the paper strips.
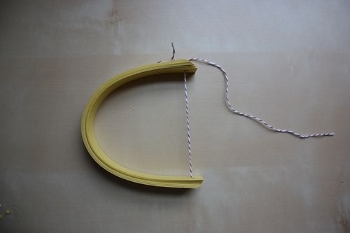
Flatten the strips so that they form a ball shape. The flashlight is ready. It remains to find a place where it would be possible to hang it.


Option 10.

We invite you to make an original paper lantern in the form of a bird in a cage with your child. To make this Christmas decoration you will need:
Colored paper and cardboard
- awl
- scissors
- double sided tape or glue
- plastic cover

Work plan:
a. Cut colored paper into strips of the same length and width (for example, 1.5 cm - width, 30 cm - length). To make one lantern, you will need 4 strips of paper.
b. Make a small hole in the center of each strip with an awl.

c. Print the bird on thick paper (download). Cut it out. Make a small hole in the center of the back of the bird with an awl.
d. Pass a thread through it, tie the end of the thread with a knot. Make a second knot at a distance of about 4 cm from the bird.
e. Now you need to string paper strips onto a thread. Slide the strips along the thread to the top knot.
f. Tie another knot on top of the paper strips, on which you can put a bead for beauty.
g. Now take the plastic cover and put double sided tape around it.
h,i,j. Spread the strips apart and attach their ends symmetrically to the lid.
k. Cut a strip of colored paper and glue it around the lid. New Year's lantern is ready!

Option 11.
A very original New Year's craft - a lamp made of lace.
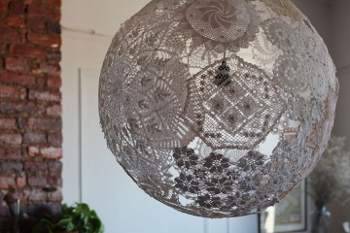
The technique of its manufacture is similar to the creation of balls from threads, only lace is used instead of yarn. How to make a ball of thread, see the link >>>>
To make a lace lamp, you need to find a large volume balloon, inflate it and hang it on a thread. Soak the lace thoroughly with wallpaper glue and stick it on the ball so that they intersect, overlap each other. Allow to dry thoroughly overnight, after which the balloon is pierced, deflated and removed. We insert a small light bulb into the resulting lampshade and hang it. That's all, a great DIY Christmas decoration for your home is ready! Read the detailed New Year's master class at the link


