Autumn crafts for kindergarten, photos of the best compositions. DIY autumn crafts for the garden and school
Parents of kids attending a preschool are aware that every holiday is necessarily accompanied by children's crafts for the kindergarten. Some may find this task to be a waste of time. But for the majority, this is still an entertaining and creative process, as well as an opportunity to spend time with a child with interest.
It is important to keep natural materials in stock in accordance with the season, and then any task for the manufacture of works will not be taken by surprise.

Reserves of natural material
When traveling to the sea, you can pick up small stones and shells. In walks in nature, stock up on beautiful leaves, cones and twigs. At the summer cottage, you can plant decorative pumpkins - this is a good raw material for products that is subject to long-term storage.

Leaves can be stored in a book. It is better to hold the cones in the oven and pour boiling water over them, destroying all the bugs. It’s also best not to throw away toilet paper or paper towel cartons, and save plastic bottles with caps. Designate a place for these items by placing everything neatly in the box.
Crafts for kindergarten - this is what the child must cook with his own hands. The degree of difficulty is determined based on the age category.

With skillful direction, the child will be able to create an application, drawing, and mold a plasticine product on his own. Taking into work natural materials in the form of leaves and cones.

DIY craft ideas for kindergarten below will tell you how best to use non-standard tools, such as pasta or plastic dishes.

Plastic bottles can already be classified as standard materials, the possibilities for working with them are endless. Use matches, napkins, and sushi sticks, they are all great tools.

Products in the autumn version can be performed as compositions or as independent works. Perky hedgehogs, old foresters or alien creatures in a flying saucer - all this can really be done by children's hands using raw materials given by nature.
Winter style products
In winter, we have associations for New Year's holidays, and we also do not forget about the day of the defenders of the fatherland.

On February 23, military items will be relevant. You can make greeting cards. Excellent products are made from fabric, but parents should take part in the creation, since it is necessary to cut.

The body is created from fabric, while the corners at the bottom should be stitched, this is necessary for stability. Next, fill the bag with padding polyester and tighten the thread.

It remains to create a face. The nose can be made from a beige bead. Eyes can be used ready-made or create an application. Embroider eyelashes, and build antennae from threads tied into a bundle. Give a tone with blush or lipstick.

Hands are made of fleece or cloth and glued. Alternatively, attach one handle to the cap. Ideas are endless, you can supplement the work with shoulder straps.

Works in the style of autumn
Products in the autumn style are distinguished by the fact that materials given by nature are used for manufacturing. Leaves, cones and acorns of this raw material are in abundance in autumn, which is perfect for crafts on a site in a kindergarten.
As a rule, competitions of works are arranged in the autumn period. The kid is able to create an application on his own with a little help from his parents.

For products from vegetables and fruits, a knife is used, so the work must be carried out strictly under supervision. Paints are often used in gardens. But you can also replace them with material, for example, autumn leaves will serve as stamps for creating a forest.
Note!


You can tell the kids how the birds need their help and make a feeder together.

This contributes not only to the development in creativity, but also brings up a sense of caring for animals.

In winter, the death of birds is very high, because because of the frost it is difficult for them to survive, so care will be taken when creating a feeder.

For the feeder you need: a tree, a box and plastic bottles. Wooden feeders are known for their durability. But not everyone can handle this material. Cardboard is easy to use, but it will not stand up in wet weather.

In this case, the cardboard feeder can be updated periodically, and the baby will like its decoration. Plastic is the most unpretentious material. Easy to work with and will hold up after rain. The work uses a mock knife, so the process is carried out under the guidance of adults.
Note!


Street layouts
You can build situations that convey the meaning of reality, such a game will help you learn the movement on the road, study the signs. Street markings can be drawn with paints on cardboard, houses can be built from boxes. Decorate the urban landscape with greenery and, most importantly, make road signs and traffic lights.
Road signs can be printed from the Internet. A sign stand can be made from a plastic bottle cap and a sushi stick, and fastened with plasticine.

It is easy to create houses from cardboard boxes or glue them from cardboard and paint the facade. Trees are created from cardboard or natural materials.

If you finely chop the green threads and sprinkle them on cardboard, pre-lubricated with glue, you get grass. The soil is easy to create with grits glued to the surface.


Note!

One side has a background color and the other side has three traffic light colors. Glue a thread between the halves and the circle is easily glued so that you can turn it to the hole of one side or another.

bottle craft
Wall panels, plot compositions and toys can be performed in various techniques. It is very easy to make crafts from plastic bottles for kindergarten.
You can make a penguin. This will require two plastic bottles, with the bottom cut to the required size. And the part is placed one inside the other. For convenience, several cuts can be made in the inside.

Using acrylic paints, paint the toy. We make a pom-pom from threads - to decorate the hat.

The scarf is made of braid or fleece, it will successfully hide the junction of the bottles. For the stability of the scarf, you can put it on glue or double-sided tape. Colored paper is used for wings and paws.

Photo crafts in kindergarten


Children like to do something creative, they just need to be shown what can be made from certain materials.
Here you will find many interesting crafts made from colored paper or natural materials that you can do with your children.
All crafts are not complicated at all and it will be a pleasure to make them.
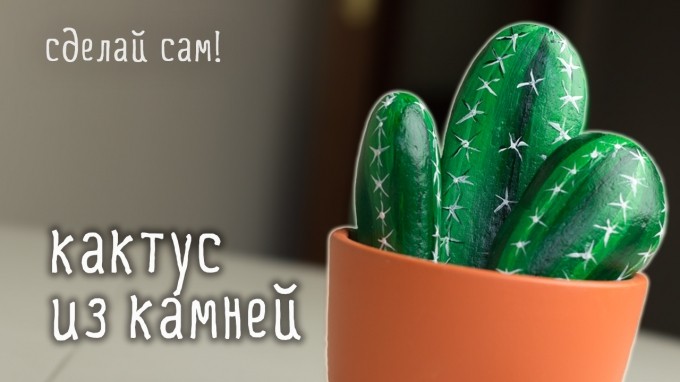
Crafts for kindergartens: coloring pebbles
If you have collected stones from the sea, do not throw them away. Arm yourself with acrylic paints or gouache and start painting them.
Such pebbles can be found in many places, then brought home or to the garden and painted in all the colors of the rainbow. You can also draw different characters - the possibilities are endless.


Crafts in kindergarten with their own hands from plastic covers
If you have plastic bottles lying around, do not throw them away. From them you can make a huge number of crafts.

Moreover, crafts can be not only from bottles, but from their caps. Here are some fun crafts you can do with your kids. Arm yourself with colored paper, colored cardboard, glue and various decorations.


Autumn crafts from cones to kindergarten
Cones are a natural material from which you can make many interesting crafts.

You can connect several cones, for example. This can be done in several ways: using threads, wire or elastic; using glue or just putting the cones on a stick.
Many other natural materials can be attached to the cones, such as various branches, acorns, and grains.
If the bud is hard, you can soak it in water and after a couple of days they will become soft, which will allow you to cut and pierce them (with an awl or nail) more easily.

Open cones can be used to make the body of a camel or turkey, and closed cones can be used for limbs (legs, arms).
* To begin with, you can make a bird - this is probably the simplest cone craft.

* The craft "camel", "deer" or "swan" will be a little more difficult. You will need to make a neck - use acorn caps, which should be strung on a bent wire. The head is made up of an acorn.

* Also try to make a lumberjack with the children. It is made using green and ripe cones. Use wire to attach arms and legs.

Attach the head of the woodsman to the body with glue.
Use the needles to make the mustache and use the pine cone scales to create the eyes.
What crafts to do in kindergarten: "Apple"
From colored paper, you can make an incredible number of bright crafts with children. One of them is a voluminous craft "apple".

Children will do this simple work with great interest.
For it you will need: colored paper, glue, cardboard (colored cardboard).
Prepare a template and cut out a certain number of parts on it.


Start gluing all the details.
Glue the blank on some rod (ice cream stick).


Make a ponytail by cutting out an additional piece of paper.


Crafts for children in kindergarten: "Cloud and bright rain"
This craft also uses colored paper and glue.

You will need:
colored paper
Scissors
1. First, cut out the outline of the cloud from white or blue paper.
2. Follow the pictures to see how to make a raindrop.

3. Putting everything together, the baby will get a very beautiful picture.


Paper crafts in kindergarten: "Autumn leaves"
From colored paper, you can make very beautiful leaves that take on the rich colors of autumn.

Look at the pictures to see how the leaves can be made. The craft is actually pretty simple and the kids will love working on it.


Autumn crafts for kindergarten: "Amanita mushrooms"
These beautiful mushrooms can be made from old egg packaging. Although fly agaric and poisonous mushrooms, they boast a very beautiful color, which you will convey in your crafts.


Crafts for the kindergarten site: "Bull"
But what a beautiful bull-calf can be made from an old plastic bottle or container.

You will need:
2 cardboard toilet paper cylinders
Plastic bottle (not rounded)
Follow the photo instructions to make a beautiful animal.


Crafts for kindergarten (photo): "Sheep"
If you don’t feel sorry for cotton swabs, then you can make such a beautiful and fluffy sheep with your children.

You will need:
White cardboard
Cotton buds
Scissors
Clothespins
black marker
pink highlighter
1. Prepare a sheet of cardboard and cut out two elliptical shapes from it - one part will serve as the body and the other as the head. Temporarily set aside the part for the torso.
2. Prepare cotton swabs and cut off the tops of them about 1.5 cm long.
3. Start gluing these tops to the torso.


4. Take two cotton tops and glue them on both sides of the lamb's head. For bangs, you can glue 3 tops of cotton buds on top.
5. Draw the eyes with a marker. You can also add some color part.


6. Prepare the ribbon and make a bow out of it. This bow needs to be fixed to the sheep's head.
7. Now glue the sheep's head to the body.
8. Take the lamb's body and attach clothespins to it - they will play the role of legs. If necessary, you can apply glue to these clothespins.

Crafts on the theme "Autumn": "Spider"
From natural materials, you can make such a beautiful craft. Using autumn leaves, chestnuts and thread, try making a spider web with your kids.

You can see from the picture how to do it. The craft is quite simple, but very interesting and original.


DIY autumn crafts: "Tree of leaves"

You will need:
Leaves (red, yellow, green)
* you can choose leaves of different shapes
* do not choose leaves that are too dry
Several thin branches and one thicker branch
* a large branch may be of an unusual shape, with knots
Rowan (optional)
Glue gun or superglue
Tree base container
Autumn gives us a lot of materials for creativity. These are leaves of various colors, and chestnuts, and dried flowers, and acorns, and a decorative miniature pumpkin.
But, before you start making souvenirs from them, you need to properly prepare them, namely, dry them and, if necessary, varnish or paint them.
If you make crafts from unprepared raw materials, then this will be a short-lived product.
As soon as the material dries on its own, the souvenir will lose its shape and will have to be thrown away. And besides this, half-baked leaves can simply rot or become moldy.
Therefore, let's start by drying our autumn finds.
Let's prepare the leaves for the herbarium as follows:
1 way:
Put them between the book sheets and put them back on the shelf, pressing the other books firmly on the side. After about a week and a half, the leaves will become suitable for crafts.
This method is the best, since the natural color of the leaves does not change and then they do not break for a long time.
2 way:
This method is good if you do not have the strength to endure a week and a half and want to quickly get to work. Place the sheet between two white sheets of paper and iron on the lowest setting.

In this case, the yellow and red leaves retain their color, but the green ones can darken and become an ugly, brown hue.
We dry chestnuts, acorns and decorative pumpkin.
1 way:
Dry outdoors in the shade. It will be necessary to wait quite a long time before these materials acquire the dryness we need.
Sometimes this process takes a month. This is especially true of decorative pumpkins, from which wonderful autumn DIY crafts come out.
You will see for yourself when the moment of readiness of the gifts of autumn comes. Acorns and chestnuts will become lighter, and the pumpkin will become like a rattle, as the cavity inside will dry out and shrink, and dry seeds will beat against the walls.
2 way:
We use the oven for this. It must be set to a temperature of up to 60C, and dried until tender, stirring occasionally.

The main thing is not to rush and do not set a high heat, as the fruits will simply boil and become completely unusable.
Drying dried flowers
There is only one way and it is long-playing. Flowers should be strung on a thread threaded through the stems and hung in a dry place, peduncles down.
Drying in a book or an iron will not work, so the shape will be lost and they will become flat. After the dried flowers are completely dry, they must be covered with a layer of hairspray. It will give them the right density and will not allow them to crumble at the slightest touch.
Well, now, let's move on to specific master classes and examples.
1. Panel of autumn leaves
We offer you a great DIY leaf panel idea. It is not difficult to make it, but the result is quite impressive.
It would be nice if you placed other autumn decor elements next to the finished leaf painting. For example, pumpkins, spikelets and other gizmos suitable in style. Then you will have a whole autumn ensemble.

What we need to work:
- 1. Dried maple leaves of yellow-red color.
- 2. Tree branch for the trunk
- 3. A piece of square plywood
- 4. Stain or dark varnish
- 5. Simple pencil
- 6. PVA glue
- 7. A bunch of dry spikelets
- 8. Wicker basket for pumpkins
- 9. A few Jack Be Little or Baby Boo pumpkins
If you do not have such pumpkins, then the basket can be filled with chestnuts and acorns. But next year it would not hurt to grow them, as they look very colorful and festive. Of course, if you have a piece of land.
See what a variety of varieties and how harmoniously they combine with each other:

Master class step by step:
1 step. Sand the board, paying special attention to the edges. They must be smooth.
2 step. Cover it with stain or varnish, preferably with a brownish tint. Apply the coating in several layers, trying to make the board not of a uniform color, but slightly “spotted”.
3 step. Freehand draw a large maple leaf.
4 step. Start gluing on the maple leaves. Start from the edges, gradually approaching the middle. The edges of the leaves should match the edges of the sketch as best as possible. The next row of leaves should overlap the previous one. Do not glue the ends, they should be “overhang” so that the effect of volume comes out.
5 step. Glue the selected branch in place of the stem.
Now hang a hand-made autumn panel over a cabinet and arrange other decorative elements around.
2. Topiary from a herbarium and other autumn materials

Topiary is an ornamental tree. In autumn, you can collect beautiful leaves and make such a wonderful and cozy element of decor.
Any leaves, dried flowers, acorns, spikelets will be used here. The main thing is to understand the essence and make the right foundation. And what to fill it with - fantasy will tell.
What we need to work:
- 1. Ceramic pot of soft color
- 2. Smooth tree branch for the trunk
- 3. 1 ball of foam rubber, polystyrene or special floral foam
- 4. Dry moss, sesame or a handful of beautiful pebbles, acorns, dry mountain ash
- 5. Glue gun
- 6. Gypsum dry
- 7. Decorative elements: herbarium, dried flowers, mountain ash, acorns, etc.
Master class step by step:
1 step. Let's start with the base. Take a styrofoam ball and put it on a branch that will serve as a trunk for you. Then remove it and drop glue from the gun into the hole formed. Reattach the ball and let dry.

2 step. Secure the stem in the pot. To do this, put a drop of glue on the free edge of the branch, attach it to the base of the pot.
Then, dilute the gypsum with water to the consistency of liquid sour cream and fill the container. Keep in mind that you will still need to decorate everything on top with moss or acorns, so leave a gap of about 3-4 cm from the top.

3 step. Now we insert leaves, dried flowers into the ball, sticking their stems inside. If you want to add acorns to the composition, then first put them on pieces of wire.
4 step. Now you just have to decorate the top of the pot so that the gypsum is not visible.
That's all. According to this simple scheme, you can make a variety of autumn crafts with your own hands, not only from leaves, but also from dry peas, nuts and other things. All of them will look just fine!
3. Roses from maple leaves

Looking at this elegant bouquet of roses, it would never occur to you that it is made from ordinary maple leaves!
But, nevertheless, it is so. It is enough just to learn how to fold them correctly and you will get a chic basis for many ideas.
Such roses can be included in various autumn topiaries, wreaths, compositions and panels. They look great in combination with any natural materials.

Well, let's get down to business.
What we need to work:
- 1. Maple leaves not dried
- 2. Thread or soft wire
- 3. Matte hairspray
Master class step by step:
1 step. We form the middle of the bud. To do this, fold the sheet as shown in the pictures below. Try to twist it as tightly and evenly as possible. First in half, and then sausage.

As a result, we should get something like this:

2 step. Now take the second sheet, fold it in half again and wrap the base around it.

The sharp edges of the maple leaves need to be carefully hidden inside, like this:

3 step. We continue to build up mass around the base, fitting more and more new leaves. If you want to end up with a bud, then twist it tighter, and if you ate a more lush rose, then loosen the twist a little.

4 step. When you see that a real rose has “bloomed” in your hands, you need to fix it with threads, as tight as possible.

5 step. We cut the edges with scissors and put the rose on a lining of leaves, preferably already dry. We cover the composition with varnish and admire!

Such roses from leaves stand for a long time, for the whole autumn season it will definitely be enough. You can make as many of these colors as you like. The more of them, the more chic this autumn composition looks, resembling a fabric motif in appearance.
4. Compositions from decorative pumpkins
Even if you do not grow this vegetable on your site, in the autumn you can freely buy them on the market and then dry them yourself. How to do this, we have already told above, so let's not waste time talking.
Let's get creative!
There will be no master classes in this block, we will just show you examples of such decor, and how to make them is quite clear from the photo.
Of course, there are more complex techniques, for example, carving or painting on dry lagenaria, but this topic is extensive and worthy of a separate article. Here we will consider only the simplest compositions that even a schoolboy can do.
1 option. Basket with a scattering of pumpkins. It couldn't be easier, but the view is spectacular!

Option 2. Candlesticks from mini pumpkins. To do this, you need to cut a hole large enough with a knife so that you can put a foil-based candle in it.

Or this option:

Incredibly simple, right?
3 option. Wreath on the door of pumpkins. Take any circle as a basis, for example, an embroidery hoop, and attach mini-pumpkins to it.
Pierce the tails with wire and screw it to the base, circle. As additional decorative elements, use berries, acorns, twigs and autumn leaves.
It will look something like this:

5. Chestnut Topiary

To create this spectacular do-it-yourself autumn craft, we will need the same materials for the base as for creating a decorative herbarium tree. And for decoration, you just need other elements.
For work we need:
1. Ceramic pot
2. Styrofoam ball
3. Gypsum dry
4. Glue gun
5. Tree branch for the trunk
6. Cones, chestnuts, acorns
7. Harsh thread or twine to form decorative balls
Master class step by step:
- 1. We form the base of the tree in the same way as in the case of the leaf topiary.
- 2. We fix the base in a pot with glue and plaster
- 3. We apply drops of hot glue to chestnuts, acorns and other elements and randomly attach them to the foam ball-crown.
- 4. A wreath on the chestnut door

Such a wreath of chestnuts on the front door will cheer up not only you, but also passers-by. It is very easy to make it. Follow all the steps given for making a pumpkin wreath.
Find some kind of dense base, then pierce the chestnuts and other elements through the reverse side, insert the wire, form a hook and use it to screw them to the circle.
Complement the chestnut composition with leaves, acorns, berries and other autumn decorative elements that this fertile time of the year gave.
6. Autumn garland "Leaves" from salt dough

This is a very spectacular autumn craft with your own hands. The big advantage of such a garland is that it is not seasonal and will decorate your home for many years.
After all, it is made not from natural materials, but from salt dough, which does not deteriorate for years. The only thing is that such products are fragile and must be handled with care so as not to break. But, even if this happened, they can always be glued together, but the joint will not be noticeable.
What we need to work:
1. 2 cups flour
2. 1 glass of salt
3. 0.5 cups of water
4. Gouache
5. Sewing pins with hook eye
6. Twine
7. Oven
8. White landscape paper, pencil
Master class step by step:
1 step. We draw patterns of leaves of various types on the landscape sheet, but approximately the same size. We cut them out.
2 step. Knead a stiff dough of flour, salt and water. If the dough turns out to be non-plastic, then liquid can be added drop by drop. Mix well the resulting material and roll it out on the board. The layer should be approximately 5-7 millimeters.
3 step. We lay out the templates on the rolled out dough and cut them along the contour with a knife.

As a result, we should get about as many blanks.

4 step. We make holes with pins and carefully fix the heads. On them we will hang our leaves. We squeeze out the veins with a knife.
5 step. We dry the dough in the oven at a temperature of 50-60C until completely dry.
6 step. We color the blanks from the dough with gouache, trying to make natural tones and transitions.

7 step. We string the garland on the twine, making a knot over each leaf so that they do not move.

So our autumn do-it-yourself craft is ready. You can hang it anywhere, it will be in place in any corner of the house, especially if you have some other autumn-style decor elements.
7. Vases and houses from an ordinary pumpkin
Autumn is the season for pumpkins. It costs mere pennies and finding a beautiful shape and coloring is not difficult.
And to make an element of autumn decor on its basis is as easy as shelling pears! There is no need for any step-by-step technologies and accessories.
All you need is pumpkins, a carving knife, a tablespoon to pick out the pulp and flowers to fill these colorful vases.
Look at our selection of photos of pumpkin vases. Looks very dignified and autumnal.


As you already understood, you only need to cut off the top and clean the core of the vegetable. Then fill the container with water.
And you can make houses out of pumpkins. To do this, you just need to cut holes in the right places. Where exactly they are located, you can see in the picture below. Kids love these things!

8. Wreath on the door made of natural materials
We have already given above an example of wreaths of pumpkins and chestnuts. How to make them - you already know. Here we just give a selection of the most spectacular, in our opinion, ideas.


9. Frame of acorns for a photo or a mirror
Decorating any base in this way is very simple. We think no explanation is needed here.
The only thing we can advise is that you should not glue acorns on a glue gun or PVA. Much better if you use plasticine.
Because, most likely, you will soon get tired of such decor and have to throw it away. And so, you can always dismantle the acorns and get a regular photo frame back into use.
This is how it will look like.

There are whole acorns on the photo frame, and only hats on the mirror. Thus, you can create a variety of autumn crafts with your own hands and decorate any surface: caskets, bread boxes, and more.
10. Bunch of acorns

This autumn craft will look best if you paint the “berries” in natural colors, and instead of grape leaves add a maple herbarium of various colors.
Also, a bunch of acorns is a wonderful element of any autumn wreath on the door or a large topiary. After all, it can be made not only desktop, but also in human growth!
Only instead of a foam ball, you need to take some large, plastic one. Grapes from acorns are made very simply, we will now tell you exactly how.
What we need to work:
1. Acorns without caps
2. Shilo
3. Wire
3. Glue gun
4. Acrylic paint
5. Autumn leaves for decoration
Master class step by step:
1 step. We pierce holes in the base of the acorn with an awl.
2 step. We break or cut the wire into pieces 7-10 cm long.
3 step. Dip the ends of the wire in a drop of glue from the gun and insert into the punctured holes.

4 step. We paint acorns in any color you want. The main thing is that it is combined with leaves that will complement the composition.
5 step. We collect acorns in a bunch, forming a wire rod on top. Then we attach leaves to it.
Now you can make any decoration based on this fall craft. Panel, wreath and more.
11. Autumn crafts from felt
Working with this fabric is a pleasure! The material does not crumble, perfectly holds its shape. And this means that any beginner can make an autumn craft from felt with his own hands and it will turn out no worse than the products of experienced craftswomen.
We offer you a selection of the best and simple decors in autumn style, and you already choose any of them! They are so simple that they do not need to describe in detail their step-by-step technology.

As you can see, on the basis of felt leaves, you can make both a wreath and a garland, like the one we already made from salt dough. Here are a couple more options for do-it-yourself autumn wreaths.

All you need to do is draw patterns, cut out the felt and decorate it according to our photos.
12. Pigtail of garlic and red pepper

How cozy it is when bundles of garlic, onions, red peppers hang in the kitchen! But if you hang them fresh, they will very soon lose their appearance or simply run out, because they will go to food.
Let's do something like this, but for the ages! Now we will look at how garlic and pepper are made, from which we will form a pretty braid for the kitchen.
For work we need:
1. White nylon tights or plastic bag (for garlic base)
2. Cotton wool or synthetic winterizer (for filling)
3. White harsh thread (for dressing and forming lobules)
4. Glue gun
5. Buckwheat or twine (to simulate garlic roots)
6. Fabric for sewing peppers or salt dough for modeling it
Master class step by step:
1 step. We form the body of garlic. To do this, we need to cut into squares or nylon tights or simple plastic bags. Garlic made of nylon looks, of course, more realistic.
But the package looks good too. But most importantly, this material is always at hand. So, cut out a square, about 7 by 7 cm in diameter.
2 step. We roll a ball out of cotton wool or synthetic winterizer, put it inside a flap of nylon and form a head of garlic. It looks like it is shown in the photo.

3 step. Then we begin to tie the head with a harsh thread, forming garlic cloves. First, divide in half, then into quarters, then into 8 parts.
Look at the photo, the process is clearly shown there.

4 step. In the place where the roots of real garlic are located, we drip a drop of glue and sprinkle this place with crushed buckwheat. If you want, you can replace it with twine, which needs to be unraveled and finely chopped.
5 step. We make a pigtail out of twine and attach the resulting garlic cloves to it.
6 step. Now it's time to do the pepper. You can sew it, but a pepper made from salt dough looks much better.
We have already given the recipe for kneading, in the subheading “Garlands of autumn leaves”. This is how the peppercorns should turn out in the end.

7 step. We make holes in the tails of the peppercorns (we will then thread the twine into them and with its help we will fix them on the pigtail with garlic). You can do this with an awl or any item at hand.
The main thing is to make them large enough so that you can thread the thread freely later. Otherwise, after drying, you will not be able to attach the finished product to the composition in any way.
And one more thing: if you make a hole, make sure that the edges of the legs remain more or less large. Otherwise, after you pull the thread, the thin walls may crack and the pepper will fall to the floor.
8 step. Dry in the oven, paint with acrylic paint, after drying, cover them with varnish. When the pepper shines, it looks more natural.
Dry at a low temperature, do not rush, because otherwise, your work may burst and you will have to sculpt everything again. Cracked peppers can no longer be painted the way you would like.
9. We fasten the pepper to the garlic and hang this autumn composition in the kitchen. You can make several of these links. You can make carrots from salt dough, and from brown tights you can make an onion bunch.
The principle of making bulbs is the same as garlic, only even simpler. Slices do not need to be formed.

Also, a bunch of mushrooms on the wall will look great, which you can also mold from dough and paint realistically.
This is the end of our long review. You saw many examples and any kind of autumn crafts with your own hands. We really hope that our master classes will be useful to you and you will definitely take something into service.
Every year, nature gives us a lot of natural materials suitable for creativity for free. The process of creating with your own hands develops the artistic taste, thinking, memory of the child, cultivates perseverance. But most importantly, you can have fun and usefully spend time with friends, delighting yourself and others with crafts.
Preparation of natural materials for their further use
Nature is the best artist, it creates such natural materials that turn into works of art in skillful hands!


plant materials
chestnuts
Chestnut fruits have a bright brown color and a shiny surface, so they make excellent DIY crafts from natural material. The shell of a fresh chestnut is thin, easily pierced with an awl. Chestnuts are a fertile material for working with young children themselves. You can make many different dolls,.


It is better to store in a cool place in boxes.
acorns
Oak fruits ripen in autumn, in September-October. collected in various shapes and sizes.


At the same time, their cups (pluses) on which they are held are also collected. Plushs are very often used separately from the acorn, as an independent natural material for various crafts.

Acorn cups and balls knitted from wool
How to knit even balls of wool, see the video Olga Skibina:

Acorn buns and Christmas bells


You can store them for a very long time, after washing and drying thoroughly. But why just keep stones when you can play with them with the whole family?)


For another way to apply an image to river or sea stones, see the video from You Can Do It Craft. You will be surprised how easy it is!
shells
You can collect shells on the banks of rivers, seas, lakes while relaxing with your children. Many of them are original in appearance, in shape - oval, comb-shaped, elongated, etc.
Boil them for a few minutes to free them from living organisms. Shells are washed with a small brush (you can use a toothbrush), after which they are dried, sorted by type and size. Stored at any temperature.
You can also clean the shells in a solution of whiteness and water at a rate of 1: 1. The top layer will disappear after a while, leaving the shell with a nice shiny top.
Animal figurines are made from large shells.


Small shells make wonderful applications, garlands:


Shells can be used not only as the main material, but also as an additional decor (bird wings, dog ears, flower petals, etc.)


Sand
Very affordable material that can be collected in any sandbox. It differs in structure. Rinse and dry thoroughly before use. And then you can use it as a decor in your work:


Rules for the storage of natural materials
Crafts made from natural materials with your own hands will be flawless if, after collecting, drying, pre-treatment, you properly store these natural gifts. To do this, you must adhere to certain rules.
- A dark, cool, and well-ventilated area is the best place to store natural materials.
- You can buy plastic containers for storing each type of material; use cardboard boxes from shoes, tea, sweets; take ordinary glass jars with a screw cap. For seeds, as well as for beads, it is better to have a container with many compartments.
- Dried flowers are fragile and break easily, so they are placed in a tight box or container. Petals are stored separately from flowers. Flowers with a stem can be stored in a vase.
- Prepared leaves are also brittle. You can store them in large books. Also, for safety, put them in signed candy boxes, grab a little tape so that they do not accidentally open.
- Seashells are placed in glass jars or plastic containers with a wide neck so that they do not crumble.
Additional tools for crafts made from natural materials
To create a beautiful craft from natural materials, you will need additional tools and materials.

It can be:
- colored paper;
- cardboard;
- skin scraps;
- scraps of fabric;
- bird feathers;
- Styrofoam;
- plasticine;
- wire;
- PVA glue, "Moment";
- gouache;
- stain;
- varnish etc.
Paper very often used as an addition to natural materials. Children, bending, gluing it, make the work much more interesting.
plasticine fasten separate parts of simple toys at the initial stage of work. It is not very durable, but as a supplement it is often used in kindergarten and elementary school.

From wire most often they make the frame of a toy, the connection of its parts. Copper wire diameter 0.29-0.35 mm - soft, flexible and durable - the most comfortable. And for the frame, a wire of a larger diameter is used - 1-1.5 mm.
Threads it is better to take thick, multi-colored ones (No. 10).
Glue it is better to take white PVA, BF, etc. However, in kindergarten it is better to use PVA glue.
They also use foil, pebbles, pits from cherries, and bristles.
Additional material is best stored in a small box with cells for each type of material.
The use of additional material depends on the idea, the skill of the children, the degree of development of the imagination! Offer your options, but rely more on children's intuition and desire.

It is also additionally necessary to have certain tools for making crafts from natural material:
- artistic scissors;
- awl;
- jigsaw;
- tweezers;
- pliers and wire cutters;
- sewing needles;
- brushes for glue and paints;
- cotton cloth for wiping off adhesive residue.
Scissors for children should be with blunt ends, small, with rings convenient for a child's hand.
Awl you need to take from a durable material with a handle length of about 6 cm, a diameter of about 2 cm, a stabbing part - 3.5 cm
Needle need a large sewing machine. It must be kept in a needle case with a thread threaded into it.
Attention! Only adults use pliers, pliers, drills!
To draw the contour of the part to be cut out, a simple pencil. For example, dresses, hats for a doll, etc. It is better to take a soft pencil (2M).
Tassels(soft for drawing, harder for glue). It is better to buy squirrel brushes (No. 4 and 6). For glue take brushes with hard bristles.
Stack- a tool necessary for surface treatment of clay or plasticine. The length of the stack for children is about 12 cm.
Crafts from natural material for kindergarten
Toddlers are very fond of turning chestnuts and plasticine into toys in their hands that they can play with. Crafts made from natural material for kindergarten are not very complicated, so any child can do it with the help of an adult. Sometimes they are made from fruits and vegetables, but most often they are applications from leaves and animals from cones and acorns.
Crafts from leaves and maple "helicopters"
The easiest and most accessible work even for kids is the application of leaves. If this is the first time you are making a composition with your child, offer him a picture that will serve as a template. Do not rush to do everything yourself. Invite the child to choose the leaves as desired, so that the work turns out to be similar to the sample. This will develop your child's creativity.
Application material:
- colorful leaves;
- thick sheet A-4;
- brushes for glue;
- PVA glue;
- scissors;
- sample.
To make a simple composition, you need even, dry leaves. Put them under a press or in a book. In two days the material is ready. Cut out suitable parts with scissors and lay them out on a piece of paper.
Now you can glue. First the background and bottom layers, and then the finer details. For example, if you want to make an elephant, then first make the body and head out of the leaves, and then glue the trunk, tail, legs. If there are not enough eyes, then they can be drawn with a marker or made from tree seeds.
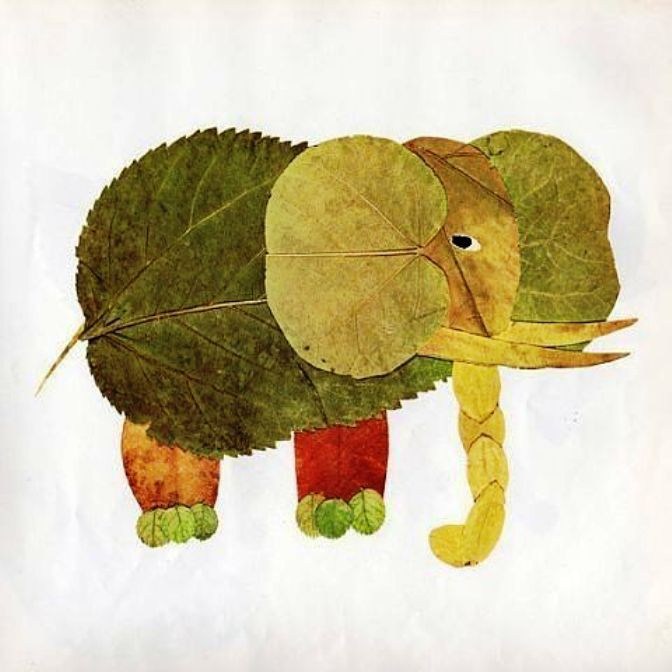
It is not necessary to do everything according to a template. You can come up with a picture yourself and create an original composition of leaves.


Use colored paper, felt-tip pens, paints as an addition, so your applications will be even more interesting.
Along with the leaves, “helicopters” from maple are also ideal as a basis for crafts made from natural material for a kindergarten. Just look at this miracle!

Fairy wings from maple seeds

Dragonflies from maple helicopters
Now you are convinced how beautiful and original leaf applications can be. Use these ideas for leisure activities with children.
Simple master classes on creating children's crafts from acorns and cones
At the end of summer, acorns begin to ripen, and they make wonderful crafts made from natural material for a kindergarten or school. They are well preserved, and on long autumn evenings, together with children, you can do a pleasant and useful thing that develops the fine motor skills of the baby's hands, imagination and perseverance.
The most common acorn crafts are animals and various little men. From toothpicks, matches, thin twigs, you can easily make legs, handles, horns and other small items. An adult needs to help the children poke holes in the acorns.
To attach small parts, you can use a glue gun, Super Moment glue, but only adults should do this. And it is safest for the guys to fasten the parts with the help of plasticine.

Fly agarics from acorns are even easier to make! To paint acorns, you need to remove the hats from them, and after the paint has dried, glue them in place.


Acorns are very beautiful on their own, and if they are also painted with acrylic paints or nail polish, then such crafts will decorate any home.

And from the hats painted with silver paint, you can make an original decoration for the Christmas tree. The process of creating such an eco-toy is quite simple: we closely glue acorn caps onto a foam ball (you can take an old Christmas ball). And sparkled new.

We found another video for you, where Niki Junior tells what a wonderful craft will turn out from leaves, cones, twigs and a plastic bottle. Look, you will learn a lot.
Categories
Click Class
Tell VK
Let's get down to it and consider from what it is generally possible to create a composition on the theme "Autumn".
The simplest thing is to rummage in the pantry or refrigerator and fish out a couple of beautiful vegetable fruits.
With a small amount of imagination, you can create an incredible variety of compositions from them.
For example, a family of eggplant penguins.

Girlfriends from beets, onions, pumpkins and cabbage. 
Funny farmers from corn.

Miss Charm from watermelon. 
This idea just blew my mind. What a beauty! But they just painted the apples with gold paint.

Such a panel can be created from any autumn berries: cranberries, rutabaga, mountain ash or rose hips. 
A teddy bear made of potatoes greets guests at the door of the pumpkin house. 
A fruit hedgehog will not please everyone for long, because they immediately eat it. 
Ladybug from mountain ash and black bird cherry. 
A couple of boiled corn minions. 
A real friendly family of onion heads. 
Now let's take a closer look at ideas from pumpkin and zucchini.
What can be done from zucchini
There were quite a lot of zucchini this year, so it’s not a pity to use a couple of pieces for crafts. Moreover, we have already prepared enough of it.
Here is a train carrying a wagon with gifts of autumn.

And this cutie just attracts the eye. 
A friendly onion family rides in a squash car.

The craft is worthy of a prize at any exhibition. it even felt folk motifs. 
A sports team of pepper frogs ride zucchini to the competition. 
The minions, beloved by everyone, began to be often found in crafts. 
And Miss Elegance generally strikes on the spot! 
Like this "man". 
Girls are happy to sculpt such a snail. 
after all, crafts can be decorated by everyone: beads, ribbons, natural or improvised material.
Unusual DIY pumpkin crafts
A lot has already been written about the pumpkin, so the selection will not be very large, but interesting.
Someone's family recreated a fragment of the famous fairy tale about the turnip.

I don’t know how they achieved such expressive eyes, but I just couldn’t help but show you this picture.

A gourd ship with a carrot anchor and a sail of leaves. 
Kittens look out of the basket. 
Another cute face for inspiration. 
Even just by drawing a face on a pumpkin, you can achieve originality and comedy. 
Pumpkin bird and stand made of natural materials are made very carefully and harmoniously.

How to insert bouquets into a pumpkin, I wrote a little earlier. The main thing is to pull out the pulp from the fruit, otherwise it will quickly ferment and smell. We also use seeds for crafts, below I will show how to do this. Inside the hollow pumpkin we insert a jar, a glass or a floral sponge so that the flowers stand longer. 
The pumpkin, like the apples above, can be dyed to make a golden carriage for the doll.

For me, no princess would refuse such a thing.
Autumn crafts from natural material
as soon as you go for a walk in a park or a forest, you can immediately collect a bunch of material for crafts. And sometimes you don’t need to go anywhere, everything at home is at hand.
From walnuts
I remember that my mother used to keep walnut shells especially for crafts. And not in vain. See how many of them you can sculpt.

Hedgehog with buckwheat needles. 
They must be peacocks. 
Plasticine and a shell will make a beautiful swan swimming in the lake.

The detailed description shows how to make a bird.
From branches
Of course, branches help to create whole compositions. We never cut them from a living tree. We collect only those that are already lying on the ground or dried up on the tree itself.
And now the composition with Baba Yaga in a mortar is made entirely of them.

Another composition of natural materials and a branch of birch.

This autumn clock also has a frame made of wood.

This photo shows a whole exposition of many materials. 
And now a small master class on how to make such a house from branches.

To begin with, we take a lot of plasticine. It can be replaced with foam or polyurethane foam. The main thing is that branches are well stuck into this material.
From plasticine we make a thick flat foundation. In which we stick branches around the perimeter. We determine where the passage and the door will be.

We completely cover the walls with branches.

We make a roof. We connect the ends of the "beams" with a clerical elastic band.
If necessary, you can use a glue gun. 
We make crossovers.

And cover the roof with leaves. 
A small craft made of twigs that imitate the web of a spider.

This masterpiece makes you look at yourself for a long time!

Hut on chicken legs from twigs and needles and Baba Yaga from a cone.

Nice nest for a family of birds.

The ideas are just inspiring!
Wreaths made from natural materials
But you can make autumn wreaths. Not even in the garden, but as a home decor. Not all the same to sculpt them before.

Idea with fresh and artificial flowers.


Such an original idea from twigs and dried flowers.

You can use a bundle or thin wire for the base. 
Wreaths came to us from Europe and have not yet lost their originality.
From seeds
Sunflower seeds make cute hedgehogs. They can be made the center of the appliqué or panel.

Or a whole composition with a pair of hedgehogs. By the way, it turned out very bright and positive.

But sunflowers made of corrugated paper with a center of real seeds.

From pumpkin seeds
If we use the pumpkin itself as a vase for a bouquet, we will send the seeds to crafts.

Seeds can be painted over with watercolor or gouache and dried. Then the child will be very interested in creating applications.

For this panel, I immediately give a tree template.

Cut it out and decorate it with multi-colored seeds.

This basket was made from pistachio shells, but seeds will also perfectly replace them.

bowls of abundance
These bowls are simply amazing. You can use any natural materials - cones, branches, berries. And you can take felt and artificial flowers and fruits. In general, there are a lot of ideas.

Or such an option.

Here is a detailed master class, where the whole process of its manufacture is very clear.
From mountain ash
Many details can be made from rowan leaves and fruits. Their bright colors often help to diversify and decorate the craft.

You can not particularly bother, but simply glue such an application from the herbarium.

With grits
Ideas are also created from leaves, blades of grass and cereals. For example, this panel is made using a variety of materials. Which are glued to PVA glue.

Lion cub surrounded by dried flowers. 
All cereals hold well on double-sided tape and glue.
From dried flowers and fresh flowers
Well, we can't do without them. Look at the beauty that parents and children create.

Another pond with swans!

Another hedgehog surrounded by fresh flowers. And now there are still quite a few blooms: asters, yarrow, septembers, etc.

A very neat house with a fence made of ice cream sticks and a roof made of twigs.

Basket with a hedgehog and roses from leaves.

Cute mushroom from a good fairy tale. 
More mushrooms. Made from paste and cotton. 
Candy box panel. It turns out a 3D effect.

Well, everyone will definitely recognize these heroes!

It is very convenient to attach the material to the burlap. You can use both thread and thin wire. 
Hedgehog again, today we have a lot of them.

The duck conquered everyone with its realism.

This portrait looks very nice.

A variant of crafts from a hat decorated with dried flowers, fruits and a ribbon.

Fragment from life. After the harvest.

The original idea was to make a roof from ears of corn! 
The imagination of some creative people is simply mesmerizing. It's great that they share their results with us.
From plastic spoons
This is not a natural material, but this idea may come in handy for someone.

The handles are cut off, and the spoons themselves are painted with gouache or acrylic. You can connect them with plasticine or hot glue.

They can decorate a lot of crafts.
Light cone compositions for kindergarten children
Cones are also very affordable material. And for many ideas, a large number of them is not necessary.
As a child, there were Soviet books with pictures describing step-by-step actions. Here are some of these simple master classes.


Such a simple lamb.

Immediately many variations with cones. 
From them you can also collect a basket of flowers.
By the way, if you want the bump to open, put it in water for a day. True, when it dries, it will close again. But such an experiment will definitely surprise a child.

Lumberjack idea.

Or such a forest dweller.

Composition of a hedgehog and a squirrel.

original deer.

And here is how to make such a dog.

More ideas with cones, chestnuts and acorns.

funny helicopter

Cute animals with fluffy faces. 
Glade with gifts of autumn from spruce branches.

From cones and candies.

Another piece from the story.

Glade with a hedgehog and her children.

And this handsome man has apples made of thread and PVA glue on his back.

Another hedgehog with prey.

It seems to me that it is the crafts from cones that are easiest for small children to do.
How to make autumn crafts from acorns
From chestnuts and acorns, it turns out, too, a lot of things can be done. They are not very frequent guests in our Urals. However, they also meet.

These similarities of animals can be made from acorns.

Do you love owls? Maybe this idea will inspire you.

Plasticine will help to fasten the elements.

Everyone will love this dog for sure.

Here are some more easily recognizable characters from fairy tales. 
They can be supplemented with everything: leaves, feathers, wire.

Pencil holder with smiling leaves. 
Lots of the same people.

Fairytale friends in red caps.

Butterflies and dragonflies are very easy to make.

Kind grandfathers with a finger. 
Another butterfly idea. 
From the same Soviet book, ideas of different animals and birds. 

This is already enough to make an independent craft, right?
Leaf Crafts New
Certainly. now you are waiting for a lot of ideas from the leaves. That's really what material is enough, so it's them.
For any crafts, it is better to take leaves that are still elastic, which do not break when folded.
How do you like such a luxurious owl?

This is a rear view.

Of course, again the idea of a topiary with a crown of leaves.

By applying different leaves, you can collect many animals and birds, for example, such an elephant. 
Make a lion's mane out of them. He reminded me a lot of Simba.

Or such a goldfish in the sea-ocean.

The parrot looks like a real one.

Hanging hedgehog from birch bark. 
Panel of roses from leaves and needles.

Another app idea.

Nice version of the panel in a frame.

Three owls on a branch.

Lion from hot Africa.

For a change, whole leaves can be dyed. Or draw beautiful patterns on them. Acrylic and stained glass paints are suitable.

Not only the lion's mane, but also the clown's hair can be trusted with autumn leaves.

This bird reminds me of a cockatoo.

For the smallest children, I offer a variant of such a simple bird.

Schoolchildren can try to repeat such a turkey.

Decorate a snail house.

Easy crafts from a couple of leaves. When you just need to take the child for half an hour.

A beautiful fluffy tail turned out to be a squirrel. 
Galchat from Prostokvashino.

Panel where Autumn swings on a swing.

Or embodied in the form of such a cheerful little girl.

The idea of a tree with twigs.

Another bouquet of leaves.

Application with hedgehogs.

To give volume, it is better to use the material in layers.
You can also decorate the jar and use it as a candlestick on an autumn evening. 
The idea of a panel with bunnies. 
A family of birds. I think it's chickens.

This photo shows the step-by-step steps for creating a peacock.

Original dancers and ballerinas in leaf costumes.

Watercolor landscape.

Maybe autumn looks like this.

Preschoolers will be interested in doing such crafts.

Template for a lion.

Template for a hedgehog. 
You can glue all the leaves on PVA glue. This is the safest type of glue that even the smallest children can use. It is completely non-toxic.

This is the finished hedgehog.

Another version of the king of beasts.

And you can make a card with a maple leaf.

To do this, an A4 sheet is folded in half. On the front side, a leaf shape is cut out. And on the inside you glue all the autumn leaves. Then cover with the first sheet and get a picture. 
Let's make such joyful daisies or sunflowers.

We will need:
- colored cardboard,
- leaves,
- paper towel roll,
- cotton wool or gauze,
- lollipop tube,
- glue.
Cut out two identical circles from colored cardboard. 4 cm in diameter. Draw a muzzle on one part. Glue the leaves and a lollipop stick to it on the wrong side. Glue the leaves with the outer side up. And we close the entire wrong side with the second round part.

Now we make a stand. We cut out a circle from cardboard that exceeds the diameter of the sleeve by 2 cm.
At the sleeve itself, we make cuts of 1 cm from one edge and bend them outward. Fill with cotton wool or gauze.

A student can make such a panel.

It is done with a toothbrush, paint and leaves.

We put a template on paper. We apply paint to the brush and drive along the bristles with a stick. In childhood, we drove the brush over a comb with large teeth. If you take a lot of water, drops will appear on the application. It is better to squeeze the brush a little. 
You can use several layers of different intensity and color.

Another beautiful autumn in human form.

Nice paper umbrella idea.

Options for creating insects and flowers.

You can depict the beauty of autumn in the form of Barbie.

Application with a goldfish.

May all wishes come true!
Paper ideas for school
You can make a lot of crafts out of paper. Moreover, this material is now sold in different formats. Paper can be corrugated, self-adhesive, velvet, metallic, etc.

You choose the material that fits the idea.

Offer your child this craft.

Let's take:
- toilet paper roll,
- PVA glue,
- stapler,
- markers.
You need to cut out this pattern. And roll along the line indicated by the dotted line. 


