Rooster made of felt with hands with patterns. Rooster pattern from fabric. Soft toy, cock tilde
The theme of our today's master class is a New Year's cockerel made of felt, which, of course, we will sew with our own hands, and in addition, we will provide you with a detailed pattern so that you can easily repeat all the steps and get a bright toy, a symbol of the coming year. In the last article, we talked about how to do it, but if that character was serious, then today's one is more like a cockerel from a children's fairy tale.
To sew a cockerel out of felt with your own hands, you will need:
felt of different colors in two versions: thick and thin (in our case, thick - red and yellow; thin - red, blue, green, yellow and orange);
sewing threads in red, blue, green, yellow and orange;
sewing needle;
scissors for cutting threads and cutting;
remnant or tailor's chalk for marking dark felt;
a simple pencil for marking light felt, if the crayon is not visible on it;
any non-lumpy filler (we have silicone);
two beads for the eyes or floss for embroidering black eyes;
paper pattern (for printing or redrawing from the monitor is given below).
For the felt cockerel pattern, as you probably guessed, the usual children's coloring for the smallest was used: a minimum of small details, clear contours. Perhaps you will like this idea, and you will take another coloring page to repeat the felt experience in it. It will be interesting - we promise!

For convenience, we numbered the parts of the pattern.

From one printout, cut out the numbered parts of the pattern. We leave the second one as it is: it will come in handy for checking stitched parts with a whole cockerel. Felt is quite plastic and can give a slight deformation in work, especially if sewn by hand. If you have the silhouette of a cockerel on hand, these errors are easy to avoid.
Open a felt cockerel for the New Year according to a pattern
We work with thick red felt. On it, we circle the parts of the pattern one by one, numbered as 1, 8, 9 and 13 (comb, paws and upper tail feather).
Pay attention to the photo below: on the details of the patterns, one of the sides is pointed with a red felt-tip pen. It is on this side that you need to extend the pattern, forming a seam allowance, and only then cut it out, taking into account this allowance. This rule is valid until the end of our master class.

A line of yellow felt. On a yellow thick felt, we circle the beak (detail 2), leaving an allowance for sewing it in. On a thin yellow felt we circle the second tail feather (detail 12), two parts in a mirror image. The seam allowance runs along the inside of the feather.

Tail feathers No. 10 and 11 on the pattern are not cut off from each other. We cut out such a double part (one part) from green felt, leaving a seam allowance on the lower cut.

And now we cut the pattern with parts 10 and 11 and cut out detail 11 from orange felt in 2 parts, in a mirror image. Seam allowance - along the bottom cut (see template).

We do not remove the green felt, but cut out part No. 5 from it, two parts in a mirror image. The allowance goes along the upper curly part, we align it on the felt. Green felt is no longer needed.

Red thin felt. From it we cut out 2 parts of the beard in a mirror image (detail No. 3). We do not leave allowances.

And now - two wings; also in mirror image two parts and also without allowances.


On a dark blue felt we circle parts 4 and 6, the head and abdomen. And that and that - on 2 parts. On the head, we straighten the part that goes under the beard - this will be a kind of allowance. And on the body we give an allowance in the area of \u200b\u200bthe wing and plumage.


Cockerel felt toy: design and assembly

We apply a wing on top of the body to our scheme, combining the cuts with the contour of the silhouette, and sweep both parts. Then - we sew along the wing with a buttonhole seam with red threads. We took two needles, threaded the thread for basting (contrasting) into one, and inserted sewing threads into the other to sew the cockerel toy.


We do the same with the second pair of parts. We do not cut the red thread, we leave a long tail.

We change the thread to blue, fold the details of the head and plumage in pairs, check their location with the pattern, and sweep, and then sew with a buttonhole.


The cockerel's tail is perhaps the most complex design in the entire toy. On the template, we add a sandwich of green and two yellow parts (orange ones are not needed yet, but they are in the photo).

We sew a sandwich from three parts: two yellow and green. The part that will not be covered with an orange feather is sewn with a yellow thread with a buttonhole stitch. The rest, for speed, is a “forward needle” seam. It will not be visible in the finished work.

We put an orange feather on one of the sides in the place allotted to it. We sew with an orange thread, slightly turning off the top layer of yellow felt, so as not to accidentally sew the second layer.

Please note: we sew with a buttonhole, while we only sew the meeting point of the yellow and orange feathers. The lower cut of the orange feather remains unprocessed.

We also sew an orange feather on the other side of the tail.

We still have a large red feather made of thick felt. We change the thread to yellow. We place the red feather between two layers of yellow felt. You can sew it in two ways: at one time, sewing through the entire sandwich, or or in two passes, grabbing only one yellow layer and the top of the red felt with a needle. We found the latter method to be convenient.

We return to the design of the head. If you do not plan to sink the eyes, it's time to sew them on. If you want to drown, then we will sew later, after stuffing the toy.
We check the location of the beard element on the head with the pattern and tack it with a contrasting thread. We do the same with the second pair of parts.

With a looped seam with a red thread, we sew the beard at the junction with the head on one part; when sewing on the second one, we do not cut the thread, but leave it long (although the bartack at the point where the needle stops will not be superfluous).

We fold both parts of the head with the wrong sides to each other and sweep them together.

We sew the beard over the edge with a buttonhole seam. We fasten the thread and cut it off. Change the thread in the needle to blue.

We insert the beak and stitch it through with a loop stitch, grabbing both layers of blue felt and carefully fixing a piece of yellow.

Now it's the scallop's turn. We put the perky scallop in the right place and stitch it. If you want to make a pendant toy, for example, to decorate a Christmas tree, you can also sew a looped ribbon with a comb. We continue to sew to the end of the blue felt.

According to the template, we apply one of the parts of the body to the formed head and tack it. We do the same with the second part.

We change the thread to green, sew the back seam of the plumage and sew both parts of the body to the plumage.

We sweep the tail!

We return the red thread to the needle and sew the wings from the plumage, through the tail (capturing only the upper part of the felt), after which we make a bartack and cut the thread.

We turn the cockerel over and thread the long tail of the red thread left earlier into the needle. We sew both wings with a buttonhole seam and proceed to sewing the tail from the second side.


We still have a hole. Let's go back to the head. Lightly stuff it with silicone or synthetic winterizer.

Let's add bead eyes. We tried to make white felt substrates for beads, but we didn’t like how it turned out. Without substrates, only beads, turned out to be much better.


At this stage, add the filler, evenly distributing it throughout the body. Then with a blue thread (so as not to change) we sew an open seam on the head; change the thread to green and sew the seam on the plumage. A do-it-yourself felt cockerel made according to our master class and the presented pattern is ready to join your holiday. Here is a photo of our handsome man.


Eva Casio especially for the site Master classes in needlework
The most beautiful Christmas decorations are those that are made by hand. Such creativity will help you to realize any fantasy and make the New Year's decor as original, unusual and very attractive as possible.
In modern stores on New Year's Eve, a person can find a huge assortment of Christmas decorations from a variety of materials: glass, plastic, wood, textiles, paper. But, more than half a century ago, it was quite difficult to find a beautiful decoration for the Christmas tree, and people I had to make them by hand.
It is worth noting that manual work is very often excelled in her craftsmanship and equated to works of art. Many needlewomen still prefer to bring something original to the decor of the room and the Christmas tree, made from the heart and with your own hands.
Following modern master classes, you can learn how to create toys of incredible beauty.
Eg, cotton jewelry - budget crafts. For work you will need:
- Roll of pharmacy cotton
- Paste
- Newspaper
- Wire
- Paints (acrylic)
- Salty dough
Vatu is necessary pre-paint in different colors. This is done using textile paints, which can be purchased at a household chemical store. The process of painting is very simple: dye in a saucepan with water, put cotton wool, bring to a boil. Vata is infused for several minutes, after which it is wrung out and dried.
Cooking paste is also very simple. It is more convenient to use than ordinary PVA glue, as it is more transparent and its texture is more watery. To weld a paste, you need boil a glass of water and dissolve two full tablespoons of starch in it with a hill. The cooled solution will become very sticky.
Salt dough will be needed in order to create realistic faces and muzzles for toys, as they imitate figurines of people and animals. Kneading this dough is easy: mix two parts flour with one part salt and add water by eye so that the texture reminds you of plasticine.
The dough is formed in the required figurine with notches and baked in the oven for half an hour at a temperature 110-120 degrees. After that, the dough must be painted with acrylic paints, draw all the details: eyes, lips, cheeks and cover with colorless nail polish.
Of wire needed make the foundation. All other elements will be attached to this base. The base should repeat the preferred figure, for example, a person. For volume the base is wrapped with newspaper layers soaked in a paste. The ends of the wire (handles and nights) should be first wrapped with cotton wool, wetting it with a paste. After that, the newspaper covered with a layer of cotton.
On the top of the wire should attach a face molded from salt dough (make a notch in it in advance). All details should be done very carefully, hands should be washed frequently, as paints will remain on them and spoil light shades. You can form pigtails, hats and other little things with the help of thin wooden sticks, which should always help you in your work.
Master class with photo:
Forming a wire base, wrapping the ends with cotton wool and the body with a newspaper 
 Wrapping the figurine with colored cotton, shaping the face
 Small parts for toys made of cotton wool
Beautiful Christmas toys made of cotton wool for the Christmas tree:

 "Girls" - toys for the Christmas tree
  Cotton Christmas tree decorations, varnished
  Colorful Christmas tree toys made of cotton wool
  DIY cotton toys
  Homemade toys from cotton wool for the Christmas tree
 Beautiful Christmas decorations made of colored paper with your own hands
colored paper- the simplest and budget material for creativity. Modern stores can offer a large selection of thin colored sheets, colored cardboard, kraft paper, paper with designs and patterns, colored foil, gold and silver paper.
The easiest decoration you can make is colorful chain. It looks quite festive and elegant, it can decorate not only the Christmas tree, but the whole room: walls, curtains, cornices, furniture. For product you will need:
- Lots of colored paper
- Scissors
Strips of the same width and length should be cut from the sheets, depending on what links you want to get in the chain: big or small. A strip of paper is folded into a ring, its ends stick to each other. After that, the next strip is threaded through the already formed paper ring and glued in the same way. The chain can be made to any length.

 A chain of colored paper for New Year's decor
 But the chain is far from the only paper decoration. From old postcards or colored cardboard you can make volumetric ball on the christmas tree. You will need exactly eight identical circles, which follow cut in one pattern. To do this, you can use the bottom of the cup, because it is convenient to circle.
After that Each ball is folded in half and then in half again. After that, four folded cut-out circles should be glued to one small one, which serves as the basis. The remaining four are also glued to the same base. Wait for the glue to dry completely and start unfold the edges of the glued halves.
It will help to fasten the edges together stapler, so it can be done superglue or with the help hot gun. You can leave the resulting ball as it turned out, or you can paint with acrylic paints to taste or draw patterns. To the ball on one side follows glue a loop so that it can be easily attached to the tree.
 How to make a ball on the Christmas tree with your own hands?
 Paper balls, ideas for creativity:

 Christmas tree ball from old postcards
 Newsprint ball for Christmas tree
 Paper ball on a Christmas tree made of cardboard for creativity
 Bright paper balls for the Christmas tree with your own hands
 DIY Christmas decorations from improvised materials
In fact, in the presence of imagination and a large number decorative elements(ribbons, beads, rhinestones, sequins, sequins, threads and much more), any material can be turned into an original, and most importantly, a beautiful Christmas tree toy.
From about November each year, most shops for creativity offer buyers Lots of ideas for Christmas decor: snowflakes, snow, silver, artificial berries and Christmas tree branches, miniature gifts, figurines and other little things.
Other ideas for creating Christmas decorations from scrap materials:
Christmas tree figurines from wine corksWine bottle corks can serve as an interesting material for creating Christmas toys. They can be collected throughout the year, and then make a stylish snowflake or figurine that will be held on a wire or with superglue.

 Figurine "soldier" on a Christmas tree from champagne corks
 Simple Christmas tree figurines from corks
 Bright New Year's toys from wine corks "Christmas trees"
  Christmas tree decorations made from wine corks
 One of the symbols of the New Year is a snowflake. She will be able to decorate not only your holiday tree, but also the walls of the house. You can make it from anything: paper, cardboard, plywood, buttons and even pasta!
Ideas for New Year's toys from improvised materials:

 Blue and white Christmas tree snowflake from wire buttons White Christmas tree snowflake from metal buttons
 Unusual snowflake on a Christmas tree made of pasta painted with gold paint
  An unusual idea for creating New Year's toys - iron bottle caps
 DIY Christmas toys made of felt: patterns
Felt is one of the most beloved and comfortable materials for creativity, including for creating Christmas decorations. With felt convenient to work, the store provide it in a large number of colors. You can always choose thin or thick (felt) felt to work with.
SECRET: If you couldn't find felt in stores, but want to create a beautiful Christmas decoration, you can use modern dishcloths. As a rule, they are sold in packs of three and their material is very similar to felt: it is just as dense and soft, it keeps its shape.
From this material you can make a completely different toys. It can be flat or three-dimensional figures, which, if desired, are decorated with embroidery, rhinestones, beads or sparkles. From felt, you can sew any figure, any fabulous new year character. The filler in such toys is ordinary cotton wool or scraps of felt.
New Year's toys for the Christmas tree, creativity ideas:

 Bright toys for the Christmas tree made of felt
 Felt bears - Christmas toys
 "Fir-trees" - New Year's decorations
 Stylish felt Christmas tree decorations
 Flat Christmas tree ornaments made of felt with embroidery
 Stylish red and white felt Christmas decorations
 Patterns will help to make a neat and proportional toy:
 Patterns of animals and children's toys
 Patterns for creating Christmas toys from felt
 New Year's patterns for creating felt toys
 Simple patterns for felt toys
 How to decorate felt Christmas toys:
- Small details of toys: eyes, mouths, mittens, horns, and so on, are also cut out of felt. They can be sewn to patterns with thread or glued with hot glue.
- Glitter, sequins and beads, which can also be sewn on with matching threads, will help to add sparkle and shimmer to toys.
- Sheathing along the edges of the toy and stitching pattern elements can be done in two ways: with a basting and buttonhole seam (the latter looks more aesthetically pleasing).
- Think in advance about the place where the loop is attached to the toy and sew it on the inside.

 Basting stitch
 Buttonhole stitch
DIY Christmas toy cockerel: pattern, photo
Special attention deserves a festive toy for the Christmas tree in the shape of a rooster. Rooster - symbol of 2017 and therefore his image should be present on New Year's Eve in every house in order to bring happiness and prosperity to the family.
You can make a toy out of wood, cut it out of plywood or cardboard, but best of all work with felt.
This material allows use many colors in crafts, beautifully process them with embroideries and sparkles. In addition, felt allows set any shape to the toy: Make a bird realistic or figurative.
You can cut out the figure of a rooster from felt arbitrarily or use a pattern.

 Pattern of a New Year's toy "rooster" from felt
 Ideas for creativity in creating New Year's toys:

 The original "cockerel" of felt on the Christmas tree
 Beautiful New Year's toy "rooster"
 Felt roosters on the Christmas tree
  Red rooster - Christmas toy
  Hen and cockerel made of felt for the Christmas tree
 Original toy made of felt for the Christmas tree - "Rooster"
 Children's Christmas toys with their own hands: for kindergarten
Often children in kindergarten are asked to bring handmade decoration from home to decorate the Christmas tree at the matinee. Modern parents are very resourceful and come up with simple but original toys for decorating the Christmas tree and the room for the New Year.
Ideas for creating New Year's toys in the kindergarten:
paper lantern- A classic Christmas decoration. Give it more holiday look you can use gold or silver paint, sparkles, brushes and many other decorative elements.

 How to make a lantern for the Christmas tree?
 How to make a three-dimensional star on a Christmas tree?You can make a voluminous star for the Christmas tree from two flat pieces of cardboard. You need to decorate this decoration to your liking: glue rhinestones, sparkles or pebbles. You can also smear the star with glue and sprinkle generously with golden sand. Golden sand is also successfully replaced by small broken glass from old Christmas tree decorations.
A paper heart made of colored paper can be easily made from colored cardboard using the quilling technique. It can be any color and size, decorated with ribbons, sparkles or snowflakes.
 Christmas decoration "heart" in quilling technique
 A Christmas decoration made of buttons will help surprise everyone. To do this, you will need to have buttons not only in different colors, but also in sizes. So you can form figurines out of them.
 Christmas decorations from buttons
 Bows will be a simple but elegant decoration for the Christmas tree. They can be made large or small with themed, bright or shiny ribbons.

 Bows - decorations for the Christmas tree
 DIY Christmas toys from light bulbs
Needlework fascinates people so much that they able to turn almost any available material into a beautiful Christmas tree toy. The most unusual things are used, for example, glass light bulbs. You need to use those that have already burned out and are no longer able to shine.
They can be very skillfully painted with acrylic paints, turning in funny snowmen. Also, with the help of glue, it is very easy to attach decorative elements from textiles, buttons, eyelets and much more.
In order to quickly paint light bulbs, you can use spray paint or car paint in a can.
Christmas decorations from old glass light bulbs, ideas for creativity:

 Light bulbs decorated with colored sequins
  Light bulbs "penguins" - toys for the Christmas tree
 Toy from an old light bulb "Bear in a hat"
 Christmas decorations from small light bulbs Colorful Christmas decorations from light bulbs
 Simple and spectacular Christmas decorations from old light bulbs
 Unusual snowmen on a Christmas tree from old light bulbs
 Do-it-yourself street Christmas decorations
Street toys for the Christmas tree, first of all, distinguished by their large size. Another feature of such jewelry is their simplicity, that is, they must be sufficient cheap and but at the same time beautiful. Often people make street toys with their own hands.
What can you make a street Christmas tree toy from:
- From the box. You can use absolutely any box: from shoes, from sweets, cookies, juice packaging. She should wrap in any pretty paper to simulate a gift. At the end of decoration tie the box with ribbon and tie a bow. You can also try to create an original design and make a pig, a nutcracker, a doll and so on out of the box.
- plastic spoons, or rather, their rounded part can serve as the basis for creating decorations for the Christmas tree. For example, they will make a snowflake, a Christmas tree, Santa Claus and other holiday symbols.
- If you know how to make buboes from yarn, you will also need this skill in creating New Year's decorations. With a large number of buboes, you can decorate any ball or box so that you get a Christmas tree toy.
- If you have accumulated a huge number of packages from Kinder Surprise, they can also serve as an idea for creating a Christmas tree toy. They can be glued together and get a snowflake, which is easy to decorate with foil or gilded paint in the future.
Toysto the street tree

 Decorating the box in an original way
  Santa Claus from plastic spoons
  Christmas toy made of fluffy pom-poms
 Snowflake from packages from Kinder Surprise
 DIY Christmas decorations from plastic bottles
Decorations made from plastic bottles can decorate a street tree or a Christmas tree at a matinee at school, kindergarten.
Ideas for decorating bottles as Christmas toys:
 New Year's bells from two glasses
  New Year's bells from two large bottles of Cola
 Bottle decoration for the New Year
 Original Christmas tree toy from the bottom of plastic bottles
 DIY Christmas toys made of fabric
Textile toys look very original. They are beautiful and always create a festive mood. The main thing is not to be lazy and decorate each product as originally as possible with lace, sequins, inserts from other fabrics, beads, ribbons.
Sewing fabric toys will help patterns:

 Patterns for textile toys for the Christmas tree
 Ideas for creativity, fabric toys:
 Colorful fabric toys for the Christmas tree
  Very delicate and beautiful do-it-yourself fabric toys
 DIY textile toys
 DIY fabric toys for the Christmas tree
  Original fabric toys
 DIY Christmas toys made of cardboard
Cardboard is an affordable and durable material. From it you can make beautiful Christmas decorations that are suitable for decorating both the Christmas tree and the entire room.
Christmas toys made of cardboard:

 Herringbone made of cardboard (folding two flat parts)
 Bright Christmas toys made of cardboard with decor
 Christmas tree toys made of thick cardboard with decor
 DIY Christmas balls balls
Threads can make very beautiful Christmas balls. You will need:
- Balloon
- Threads
- PVA glue
To make such a toy is very simple:
- Blow up the balloon. The ball should be of the same size as you want to see the Christmas tree toy.
- Tie the balloon so that it does not release air
- Dip the yarn into the glue and start wrapping the ball
- If it seems to you that there is not enough glue, you can moisten the wrapped ball with glue again.
- Leave the ball to dry completely.
- When the ball dries with a needle, burst the ball
- The ball will burst, but the thread frame will remain
- Attach a loop to the ball
- Decorate with sequins or rhinestones if desired.

 How to make a ball of thread?
 Christmas tree balls from threads
 DIY Christmas decorations for a big Christmas tree
It can be very difficult to decorate a large Christmas tree just because the small toys on it are simply not visible. Such a Christmas tree can be present at a matinee in the garden or at school, in the yard or in the square.
Ideas for toys for a big Christmas tree:
In the craft store, you can buy a foam base in the form of a ball. It can be decorated in any way, for example, with bright buttons.
 Large Christmas ball of buttons
 The same foam base can be pasted over with newsprint and, after complete drying, opened with glitter nail polish.

 Ball on a Christmas tree from a newspaper with sparkles
 From the fabric, you can sew a large mitten, which, if desired, can be easily decorated with New Year's symbols.

 Mitten - decoration for a large Christmas tree
 From cardboard or thin plywood sheets, you can make a cuckoo clock that will symbolize the New Year's time.

 Christmas tree toy
 The easiest way to decorate a large Christmas tree is to make candy out of any box by wrapping it in colored foil or craft paper.

 Candy - decor for a large Christmas tree
 Beautiful and original do-it-yourself Christmas decorations for the competition
Children on New Year's Eve often participate in various competitions where they present their crafts. Original ideas for creating Christmas toys will help you win the competition:
- Toys from a broken mirror (glass). This material can decorate glass balls or other figurines made of cardboard, plywood, paper.
- Volumetric Christmas tree toy made of felt (woolen fabric). To do this, the fabric is folded in several ways so that a pattern of folds is obtained.
- Fabric toys. Such decorative elements must be done very carefully, correctly selecting textiles and decorations.
- Beaded toys. Such an ornament can be completely woven from beads, or decorated with them.
- Plywood toys. You can buy the basis for such decorations in the store for creativity. They can be colored to your liking.

 Toys with a painting for the New Year Decorating toys with a broken mirror
  Volumetric toys made of felt or drape fabric
 Beautiful textile toys
 Beaded toys for the Christmas tree
 DIY Christmas toys from threads
Threads can become an original decor for Christmas toys. you can use figurines on any basis, for example, cardboard. Cut out your preferred shape and use yarn or canvas thread tightly wrap the decoration.
Lubricate the base with PVA glue so that the thread holds tightly and confidently.

 New Year's toy made of cardboard and canvas threads
 Christmas star made of cardboard, canvas thread and felt
 Do-it-yourself Christmas toys made of foam plastic
In shops for needlework and creativity are often sold foam bases of various shapes: balls, cones, cubes. Such figurines can be decorated to your liking with any material: ribbons, lace, paper, beads to get beautiful Christmas decorations.
Ideas for creativity. Foam based toys:
 Decorating a foam ball with needles and sequins
  gluing glitter onto a styrofoam ball
 Ready product
 DIY Christmas toys from disks
Make mono Christmas tree decorations from material such as CDs. Most likely, there are a lot of them in the house of a modern person, and most of them are either inoperative or not in demand.

 Fish - decoration from discs
  Flat disk ornaments decorated with threads
  Decoration for a big Christmas tree
 DIY Christmas decorations from salt dough
Children often work with salt dough. This classic way to mold a figure, including New Year's: Christmas tree, Santa Claus, Snow Maiden, deer, snowman and much more. The finished figure can be painted with paints, decorated with sparkles and varnished.
The recipe for kneading salt dough is very simple: two parts flour, one part salt and a little water on the eye so that the mass looks like plasticine. The dough is baked for half an hour at a temperature of 120 degrees.

 Salt dough stars
  Salt dough figurines for coloring
  Beautiful Christmas decorations made of puff pastry
 DIY Christmas decorations from cones
Natural buds can serve as an excellent the basis for creating beautiful Christmas decorations. In addition, cones are easy to find in the forest, in the park, on the street - they are free and always look natural.
You can transform any cone with the help of paints with gilding, sequins, ribbons and rhinestones. The larger the bump, the better and more spectacular your craft will look.
In the craft store you can find a huge number of ideas for needlework: snowflakes, artificial snow, silver.
 Cone decorated with beads and beads
  Cone decorated with ribbon Snowflakes from pasta
 DIY Christmas decorations from satin ribbons
Satin ribbon- very beautiful material with which you can make a Christmas toy. As a basis, you need to use foam ball. Its necessary cut on four sides, as if into slices.
wide ribbon cut into four pieces. Then with the help of a clerical or ordinary knife the tape is set in the cuts made very tight on all sides. Decorate the seams you can use rhinestones, a chain or other contrasting thin tape glued with superglue.

 Notching the ball and setting inside the satin ribbon
  Ready product
 Video: “Do-it-yourself unique Christmas decorations. Elena Epinatieva"
The rooster, which will become a symbol of 2017, can be made with your own hands as a cute present for the New Year. There are many options for making a bright Cockerel, but in this material we will share detailed instructions on how to make the symbol of the Year of the Rooster 2017 with our own hands from felt. The use of such a souvenir can be called universal: it can become, and if you sew a loop on it, then there will be a place for the cockerel on the festive tree. Also, you can attach a pin to the back of the product, and then the Felt Cockerel can be used as a handmade brooch.
Instructions on how to make a Rooster out of felt
Before starting work on a Felt Cockerel, you should make sure that you have all the necessary elements to create it, because when all the details are ready for use, the work goes much faster.
The material that will be required to make the symbol of 2017 of the Year of the Rooster with your own hands from felt:
Pieces of felt of different colors (white for the base, brown for the legs and beak, blue, green, orange for the feathers on the wings of the Cockerel and its tail, cream for the body of the bird);
The floss threads are the same colors as the pieces of felt;
Double-sided adhesive fabric for gluing applications (gossamer);
Small beads for the eye;
Scissors;
Iron.
Execution instructions:
1. On the Internet you can find a cockerel stencil, you need to print it out (you can draw the image of a cockerel yourself if you wish).
2. According to the printed stencil, you need to cut out a cockerel pattern from white felt. There should be two blanks. One of them is the back, for now it must be put aside.

3. All parts of the cockerel (tail, wings, beak, and so on) are first glued to the base with a cobweb (the base is the front of the white felt pattern), and then sewn along the contour with floss threads. This must be done so that the cockerel does not accidentally lose one of its parts, and also so that the product itself looks more voluminous.
4. Next, you need to put a double-sided adhesive fabric under a piece of brown felt and cut out the cockerel's paws. The part is superimposed on the base, and a heated iron is applied to it, which must be held for about 5 seconds so that the fabric sticks. Of course, you can’t hold the iron for more time, otherwise the fabric will simply burn out.
5. From a piece of cream felt, it is necessary to cut out the body of a rooster, it is advisable to make small indents from the edges, since at the time of stitching both parts, the final size of the product will decrease, and the rooster may lose its proportionality.
6. Similarly, it is necessary to cut out the cockerel's body from the cobweb, the size is the same.
7. Also, a head pattern must be made from white felt and cobwebs (all patterns must be at least 7 millimeters larger, otherwise other parts of the cockerel cannot be attached on top of them).
8. Next, again, using a hot iron, you need to glue the body and head of the cockerel to the white felt base.
9. Separate the wing and tail from the main pattern. The wing pattern must be done separately, using white felt and cobwebs.
10. Previously, the wing pattern must be placed on the main blank in order to aim exactly where it is best to attach the wing.
11. Next, the wing is glued with an iron.
12. From multi-colored felt and cobwebs, you need to cut out separately all the feathers of the bird's tail, the colors can be combined as you like, to whom you like what you like best. Each part is glued with an iron to the main workpiece.
13. Next, cut out a comb of a rooster from red felt and glue it.
14. A part of the winglet is cut out of orange felt, and also glued to the main blank.
15. Next, you need to cut out a beard from red felt, and a beak from orange felt, and also glue them to the main blank.
16. Next, very painstaking work begins, because each individual detail must be stitched along the contour of the product with threads of the appropriate color. You will often have to change the threads and insert them into the needle, therefore, there are many needles, you can immediately thread threads of different colors into them and calmly deal with the firmware. The contour is made with an intermittent or dotted seam, the execution scheme of which can be seen in the photo.

17. Sew on the beak with brown threads, making a small seam, going beyond the contour of the part, this will be a continuation of the beak for greater relief.
18. Next, you need to sew an eye with white threads, and around it with black threads make three strokes that will become the cockerel's cilia.
19. Next, with brown threads, you need to flash the paws of the bird, leaving strokes imitating claws.
20. When all the details are sewn along the contour, you can sew the two sides of the cockerel using a U-shaped seam. When stitching, you need to leave a small hole in order to fill the product with cotton wool or synthetic fluff from the inside. At the end of the work, this hole is also sewn with a U-shaped seam, the execution diagram of which can be seen in the photo.

New Year's crafts made of felt are always neat and beautiful handmade souvenirs for the holiday.
2017 according to the Eastern calendar will be the year of the Rooster, so it will be nice to put such a small gift.
Today we will offer you photo ideas for crafts made of felt in the form of a Cockerel or Hen, which are easy to make at home.
Such handmade gifts will turn out to be special, original, memorable and very beautiful, because felt is easy to process.
New Year's craft Hen made of felt hearts
Do you want to make souvenirs for the Year of the Rooster with your own hands? Try making a Felt Hen. All details can be cut in the shape of hearts and glued.
You will need:
Felt of different colors
synthetic winterizer or cotton wool
thread and needle
a small bead for the eye
beautiful ribbon
scissors
stencils of large and small hearts, they can be made from cardboard
fabric glue

How to sew a felt chicken:
1. Cut out two large hearts from light felt. Fold together and sew around the perimeter. A little without sewing to the end, stuff the hearts with padding polyester or cotton wool. Then sew to the end and cut the thread.
2. Cut out four small red hearts of different sizes for the wing, comb and beard and a few colored ones for the tail.
3. Glue the two red parts of the comb and sew it to the body.
4. Fold the third red heart in half and sew in the middle of the body so that one half remains unsewn and gives the product a three-dimensional look. This will be the wing.
5. Fold the fourth heart in half and sew it like a rooster's beard.
6. Roll up the yellow heart and sew on the beak.
7. Make an eye out of a bead.
8. Glue the remaining colored hearts one after another on the top of the heart, like a rooster's tail.
It remains to sew on a beautiful ribbon so that the Cockerel can be hung like a New Year's toy.
Such a souvenir made of felt will definitely bring good luck in the New Year!
Fridge magnet Rooster made of felt
With your own hands, you can originally make a Cockerel magnet on the refrigerator, for example, from felt fabric. This is a developing craft, making one is not difficult.
It is nice to make such a gift yourself and give it to someone as a small present. For example, it will please people born in the year of the Rooster, or on the New Year of the Rooster to close people, friends.
Materials you will need:
- white and red felt
- sequins flowers
- wooden beads
- ribbons
- shifty eye
- floss thread iris
- universal glue
- magnet
How to make a felt Rooster magnet:
1. Cut out all the necessary details from the fabric: beak, scallop, wings.

2. Sew a wing to one of the parts of the body.

3. Insert the scallop, beak and ribbons between the main parts.

4. Connect together with a chain stitch, stitching on both sides at the junction with the red elements.


5. Put beads on the ribbons and tie the ends with a knot. Fix with glue.
6. Glue the eye and sequins on the wing.

7. Glue a magnet on the back side. If the magnet is large, then you can hide it inside. Before doing this, check if it will hold through the felt.

Magnet Cockerel made of felt is ready!
And here are more options for refrigerator magnets in the form of a Rooster:


Felt chicken on a skewer for the New Year of the Rooster
A skewer with a Cockerel, this craft is also called a “felt lollipop”, can be placed in a flower pot, as well as decorate Easter cakes.

Will need:
- yellow, orange and green felt
- threads
- synthetic winterizer
- beads
- skewer

How to make chicken on a skewer:
1. Make paper patterns and cut out 2 body parts, a beak, a scallop and circles for decoration, as in the photo.

2. Place a padding polyester inside for volume and sew the details with a double orange thread, stringing small beads on each stitch.

3. Decorate the chicken with green circles, on one of which you need to sew black beads on both sides - eyes.
Felt Rooster crafts are also good because they can be left until Easter, and they will not lose their relevance for many years, and not just for the New Year 2017 of the Rooster.
Enjoy your creativity!
New 2017 is the year of the Red (Fiery) Rooster, and its figurine or image will become the most sought-after present. The needlewomen of the "Cross" have a good tradition: to prepare thoroughly for the New Year's holiday. And this year will be no exception. Many of us will make or are already making a rooster with our own hands, or even not one, but several at once! After all, it is imperative to please relatives and friends with a handmade symbol of the year, and yourself with an exciting process of creating this same symbol using various hand-made techniques.
Creating a kind of GUIDE TO MASTER CLASSES from the Internet is also a tradition of our needlework site, which was born a year ago. For you, dear craftswomen, we have selected a lot of only the best master classes on the net. Admire, look closely, discuss and choose the most colorful rooster! And then sew/tie/draw/blind/weave it. So, in what technique can you work on the eve of the New Year holiday?
If you don't have time to work, don't worry. The article contains links to craftswomen who sell finished work.
Cockerels made of paper and on paper
Making cards with the kids
If you are not a professional card maker, then before you start creating postcards, be sure to read our article "Learning to make New Year's cards with your own hands using the Scrapbooking technique". In it you will find not only a lot of ideas, but also get acquainted with the basic rules for creating postcards.
Any cockerel drawn by your child can be placed on a postcard. If it’s difficult for the kid to figure out how to draw a rooster with his own hands, then show him this step-by-step instruction:

And then, a matter of technology. Cut out the cockerel and make it the central part of the composition. For example, your postcard can be so simple, but cute. In your work, use New Year's paper and bright red ribbon, add snowflakes, twigs and other holiday paraphernalia. When you have a basic idea, the process of creating a postcard becomes much easier!

Photo from http://itsapatchworklife.blogspot.ru
If your child likes to color in black and white pictures, give him the opportunity. Print out the rooster postcard template on thick cardboard and let the kid get to work. Further, by cutting out the blank-ball, you can supplement the card with voluminous snowflakes, glue half-beads imitating New Year's balls, etc., etc. Unleash your imagination with your baby))

YOU WILL USE
You will find 8 more coloring templates, as well as 2 step-by-step instructions for drawing more realistic roosters in the archive, which you can download quickly and for free!
Take note of the idea with a cockerel on a stick, as on a postcard by Elena Yurchenko. Her cockerels are cut out of felt, but you can cut them out of paper.

Colored paper roosters
Colored paper appliqué can also be placed on a greeting card. But such an application itself can act as a postcard. To draw and carefully cut out all the details, the children will need the help of their parents, but they can stick it themselves.

Olga-15 offers to make funny paper cockerels in her master class.
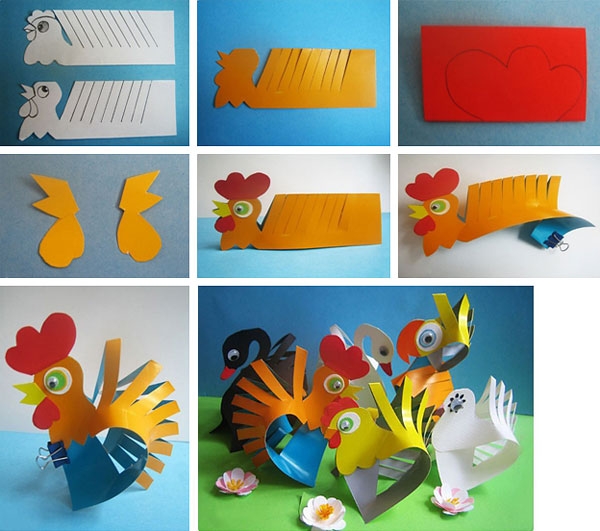
A Rooster blank is a rectangular sheet of flexible paper or thin cardboard folded in half lengthwise. Its size is 13.5 × 10 cm. We make 7-10 inclined cuts along the fold line (after about 1 cm). The angle of their inclination is 50-70 degrees, and the depth is ¾ of the height of the folded sheet.
Ekaterina Ivanova in her video tutorial shows how to make a red rooster using the Origami technique:
Roosters in quilling technique
A very interesting idea is to lay out only a luxurious rooster tail from quilling paper. It's not as confusing as laying out a whole cockerel, and it can turn out very effectively! Here is a rooster without a tail as a basis (how it looked in the original, see the photo below).

Print it on a color printer, and fantasize over the tail later. As an example - one such work (although the tail is modest here, but you will try, right?))

And if you are not afraid to make a whole rooster using the Quilling technique, then you can take this finished postcard as a basis:

Or this template:

A cheat sheet on the main elements of Quilling to help you:

Button appliqué
And here are absolutely stunning handsome roosters, lined with multi-colored buttons, half-beads, rhinestones and beads! As a basis, you can take the contours of cockerels from our archive (link just above).


Crochet Cockerels
Many needlewomen with a hook on “you” and will be happy to knit a cockerel from multi-colored threads. And "Cross" will help you decide on the model and offer several master classes on this type of needlework.

You can also buy cockerels knitted from Svetlana.


Roosters from felt
The fastest and most uncomplicated options for creating a symbol of 2017 are felt roosters. The material is easy to process, keeps the shape of the toy well, does not require seams. On the contrary, manual seams on the face of the product give it a special flavor and charm.


Photo from https://madeheart.com


Photo from the site http://ktototam.ru/
A figurine of a rooster neatly cut out of thick felt will be both a Christmas tree toy and a pendant.

Photo from the site http://ktototam.ru
And if you decorate felt cockerels with embroidery, flowers and other decorative elements, then it will turn out incredibly beautiful!

Photo from the site http://mmmcrafts.blogspot.ru

Roosters in Tilda style
Well, how can we do now in our life without the tilde-Rooster? The ToySew website has a master class on sewing this popular toy.

Master Vetic on her blog posted patterns of the Rooster and Hen Goroshkins based on the tilde pattern. An interesting couple will turn out if you make an effort and patience!

And for inspiration:

Cockerel Yurik from Orange Toys

A funny video clip about her tilde roosters was shot by Maria Fedorova (the link to the patterns is in the description of the video!):
Cockerel coffee toys
Aromatic or coffee toys compete with tildes in popularity. There are roosters in this technique.

The coffee cockerel can be like this:

Photo from the site http://zabavochka.com
You can easily sew it yourself using one of the patterns above. “Cross” talked about all the intricacies of creating coffee toys in this master class.
If you think that you can’t cope with such work yourself, contact the master. Julia Charikova has made enough branded coffee scented toys and put them up for sale at this address.

Fur interior toys
Oksana Svyatkovskaya will show her vision of a rooster and show how to sew it correctly according to ready-made patterns. Her Rooster is made of faux fur, but who's to say that it doesn't happen or that it's not good?)


In the workshop Everything for creativity (dljatvorchestva) there are a lot of blanks for painting and decoupage. Choose and create!

This is the beauty you can get:


If you do not want to make a souvenir in the form of a rooster, then you can decorate any wooden surface with the image of a rooster. There is just limitless scope for creativity! Here are just a few examples for inspiration:


Felted wool roosters
Other craftswomen make wool toys just like real ones! We love and are inspired! And if you really want to buy one of these beauties, then look for them at the Masters Fair (there is a link on each photo).


Elenia collected many different felted Roosters in one place and offered MK to create one of them. Turns out very cute!
Roosters embroidered with a cross, beads and ribbons
Perhaps you love embroidery more than other types of needlework. Then you can place the symbol of the year on a pillowcase, arrange it in the form of a panel, a picture in a frame or a brooch. The main thing is that the image of the Rooster warms your soul. And if you donate your work, find out the preferences of the recipient.
You will find more than 50 different patterns for embroidering roosters and cockerels in a special album


