Flat paper craft blueprint. What can be done from paper with your own hands easily, quickly and beautifully
Making various crafts for children with your own hands together with your child is an exciting activity that greatly contributes not only to the development of the child, but also to strengthening your relationship with him. Any child will be very happy if he has the opportunity to do something beautiful with his parents. Therefore, even in the busiest schedule, try to set aside a piece of time to devote it to activities with children. The sections of our article will provide useful recommendations on how to make DIY crafts from various materials, taking into account the age characteristics of children.
DIY paper crafts for children
The most commonly used material for applied art is, of course, paper. Moreover, it is worth paying attention not only to the usual color sets, but also to other types of it: corrugated, velvet, designer. You can create do-it-yourself crafts for children from paper, flat (applications), as well as voluminous, using various techniques. For example, having learned how to fold a flower using the origami technique, form a beautiful bouquet of tulips.


The easiest DIY crafts for beginners
For those who are just starting to teach their child the arts and crafts, we advise you to start with the simplest solutions, making easy crafts for children with your own hands. Perhaps you will like examples of caterpillars made of paper rings, an application of colorful fish, or funny mice on a piece of cheese.


DIY cardboard crafts for children
Cardboard is an easily accessible material that is well cut, bent, painted, it is often used in children's creative works. In addition to a set of cardboard purchased at the store, cardboard boxes, disposable tableware, cereal packaging, egg "honeycombs", and toilet paper sleeves are used. In our photo catalog you will see what kind of cardboard crafts do-it-yourself craftsmen make for children. For example, a stand for pencils, funny animals, boxes.


Craft "house" do it yourself
Cardboard houses are made at will of any size - it all depends on their purpose. Perhaps it will be a large structure with a child's height, a "dwelling" for dolls or a do-it-yourself craft "house" made as a New Year's decoration, gift wrapping. In any case, the manufacturing technology is the same, the differences will be in size and design. We have prepared some sketches on which you can make blanks. If you are making small structures, PVA glue and adhesive tape are enough to hold the parts together. When building a large house, it is better to use a heat gun for reliability. Do-it-yourself New Year's craft "house" is complemented by decor that imitates snow on the roof (cotton wool, foam balls), and gift wrapping must have at least one opening sash, for example, a door, a roof slope.


How to make DIY crafts from fabric
Wonderful do-it-yourself toys are sewn using fabric. Moreover, not only a solid cut, but various shreds, household napkins and even socks. Look at the photo, isn't it, a cute bunny came out of a sock? An older child will do it on his own, and the baby will have to help. Make the necessary cuts and seams, and instruct the child to fill the figure tightly, as well as draw a muzzle.
You can also sew crafts for children with your own hands, which will become not only a decoration, a toy, but also a useful little thing, for example, a large soft ottoman duck, the photo of which is in our catalog, a star pillow.


Children's DIY crafts from felt
Felt is a wonderful comfortable fabric that has a bright palette of colors. It allows you to sew a variety of DIY crafts for children, and then decorate the children's room with them. Household napkins will help replace the fabric (usually they are sold in a set of four colors). Such crafts-toys are sewn with their own hands without the help of a sewing machine, manually.
Children's crafts for the New Year do it yourself
On the eve of the New Year holidays, children's matinees, rooms are decorated everywhere, lush Christmas trees are dressed up. It is quite possible to make a lot of interesting symbolic additions on your own without spending money on purchases. These can be the most original balls for the Christmas tree, garlands, and other decorations that are quite within the power of a child to make.


DIY snowman craft
The snowman is a kind of symbol of winter and, of course, his presence for the New Year's interior will come in handy. The photos of our selection show options for how to make such crafts with your own hands in stages, using foam balls, socks, pompons. A larger figure, decorated with thread, balloons, glue, will suit the kindergarten matinee. Inflate five balloons of different sizes (two of the same size for the handles). Wrap each of them with a thread dipped in glue (PVA is quite suitable). When the blanks are completely dry, the balls need to burst, get it from the inside. Finished balls are fastened together. The do-it-yourself snowman craft is almost ready. It remains to draw eyes (beads, buttons), a mouth from a thread, a nose-carrot (sew from fabric). Traditionally, the head is complemented with a bucket, the neck is decorated with a scarf.


Santa Claus DIY craft
In the New Year's interior, Santa Claus is indispensable. The easiest way is to draw it from thick paper (cardboard). Use a ready-made template, or make a conical shape from a sheet, which you then “dress” using multi-colored paper, shaping your face, beard, and pens. Do-it-yourself similar children's crafts for the New Year are made using fabric (with us you will find examples of patterns), plastic bottles, and other improvised means.


DIY crafts for kindergarten
Various creative works for young children of kindergarten age should be distinguished by simpler techniques and materials. The child is just starting to learn how to make something beautiful on his own, so you need to choose the most simple, but interesting options.


DIY crafts for kindergarten children: applications
The most common way to teach children how to create pictures is through appliqué. Such DIY crafts for kindergarten (photos are presented below) can be designed not only using colored paper, they also take thick fabric, artificial leather, velvet paper, improvised materials (cotton pads, cereals, etc.), natural raw materials (leaves, seeds) . Children of older groups can start voluminous work, for example, make an application in an “aquarium” box with hanging representatives of the water world.


DIY crafts in the garden from natural material
Often, especially in autumn, exhibitions of works are held that demonstrate do-it-yourself crafts for kindergarten from natural components. Chestnuts, acorns, cones, sunflower seeds, pumpkins, colorful autumn foliage - all this provides great ground for the development of children's imagination. To make various figures, the compositions additionally use plasticine, which fastens the parts or forms the base. Pictures of DIY crafts using natural raw materials are presented by our photo selection. Feel free to try using them by making a chestnut caterpillar, a hedgehog, and other patterns.
DIY crafts for school
Schoolwork varies in complexity. If do-it-yourself crafts in elementary school have simple forms, then high school students who have enough skills are able to arrange more complex compositions, for example, a bouquet of roses from maple leaves, a cardboard town or a paper basket with asters.
Do-it-yourself crafts for school, the photos of which are posted below, involve the use of a large selection of raw materials, including all sorts of improvised means (plastic utensils, DVDs, matches, buttons).


Do-it-yourself crafts for schoolchildren with trimming technique
Facing is a rather entertaining creative process that is suitable for children of different ages. It allows you to create "fluffy" pictures that will decorate the room, as well as an original gift to relatives. Crafts in elementary school with their own hands have simplified options until the child acquires certain skills. For example, in this way you can only draw the outlines of the picture.
To make a magnificent appliqué, you will need corrugated paper, scissors, glue, a match or a toothpick with a blunt end, a sketch drawing on cardboard. Before making a craft with your own hands, we cut the paper into small squares (0.5 cm), which we sort by color. Lubricate the sketch with glue. We put the match in the center of the square, turn it (so that the corrugation is fixed on it), then glue the end to the sketch. Thus, we draw up the entire drawing, applying the necessary colors of the corrugated squares.


Learning how to create beauty yourself is the best way to develop the creative abilities of a child. Children's crafts with their own hands greatly develop the imagination, giving the joy of an interesting joint pastime with adults.
DIY crafts for children: a selection of 50 ideas with step-by-step examples updated: May 2, 2018 by: Kyiv Irina
Today we will learn how to interesting and original paper crafts with or for children.
And first, let's see what we need for this:
To create crafts, we will use different types of paper and cardboard:
napkins for decoupage on boxes;
newspaper for creating papier-mâché balloons;
old magazines for crafts with beads;
crepe and wrapping paper;
colored double-sided paper;
corrugated and plain cardboard;
paper plates, cardboard tubes, various boxes and much more.
For creativity, the child will need such basic materials and tools as scissors, glue, paints and felt-tip pens.
Does it happen to you that you collect a lot of small necessary items, but there is nowhere to put them? Let's make a fun pocket in which everything will fit and which can be hung in a conspicuous place.
Paper crafts for kids: USEFUL POCKET
What will be required:
colored paper
pencil
lace scissors glue
Work sequence:
Draw the outline of the muzzle of an animal, such as a bear.
Cut out two such shapes along the contour. Make details for the ears and nose, as shown in the photo.

Apply glue along the edge, connect the parts to make a pocket inside. Punch two holes.

Glue on the ears and nose. Draw a ribbon for hanging.

This pocket is perfect for storing small items: hairpins, combs or stationery.

Paper Craft for Kids: RACE RACE
Did you know that you can make unusual racing cars with your own hands? Let's create them and have a real race. I wonder what car number will win?
What will be required:
cardboard tubes of paint, felt-tip pens
colored paper, cardboard
glue scissors
Work sequence:
Color the tubes in bright colors.

Cut out parts for cars from colored and white paper (for wheels, it’s better to take black cardboard - then your “car” will stand firmly). Use a felt-tip pen to draw what you need.

Make a hole in the straw as shown in the picture (you can ask an adult to help).

Now glue all the details. Wait until it dries - and go ahead, play!

Paper crafts for kids: PAPIER-MACHE BALLOONS
Who doesn't dream of flying in a hot air balloon? Someday you will definitely do it. Now let's try to make an unusual balloon from an ordinary newspaper.
What will be required:
glue bead
needle spoke
cream paint
Work sequence:
Inflate the balloon, lubricate it with any cream. Prepare a newspaper for crafts - for this you need to tear it into small pieces. Wetting them in water, glue the ball so that there is no gap.

Now apply a layer of glue on the ball and glue it again with pieces of newspaper soaked in water - so you need to do 2-3 layers. You may need the help of an adult.

When the ball is completely dry (for this you will need to wait 1-2 days), pierce it with a needle - we don’t need it now - and cut the ball, as shown in the photo.

Now color the ball with paints.

Now let's make a basket. To do this, the newspaper sheet was divided into 4 parts to make rectangular blanks. Then, starting from the bottom corner, roll the newspaper into a tube with a knitting needle, and glue the tip.

Take 5 tubes and put them side by side, and stretch the sixth tube across under the first, over the second, under the third, etc., alternating. The next tube must be weaved in reverse: what was below will be on top.

To secure our base, take one tube and weave it around, also passing it between the other tubes through one.

Now you can make the basket itself: to do this, bend all the ends up and start weaving them around in the same way as you did before. Weave 4 rows.

Unnecessary ends weave on top and glue, some you can just cut off. Color the basket with gouache.

Make holes at the bottom of the ball and secure the basket with a thread. The balloon is ready!

FUNNY ANIMALS
It turns out that you can quickly and easily make yourself a striped friend. And in order to be able to play with friends, let's find out how to make not only a tiger, but also other animals.
What will be required:
colored paper
glue scissors
Work sequence:
Take a sheet of colored paper and fold it as shown in the picture. Glue the ends to make a strip.

Bend the strip "accordion" in three places to get the letter "M".

Cut out blanks for the animal from colored paper.

Glue the blanks to the base. Ready! You have a tiger.

HOME THEATER
But what if you arrange a real theater in your home? It will be possible to invite adults to the performance and show them some kind of fairy tale, for example, "Gingerbread Man". I think they will definitely appreciate your skill!
What will be required:
colored paper compasses scissors glue
markers stick
Work sequence:
Draw a blank on a sheet of colored paper, as shown in the photo.

Cut out the blank and glue.

Cut out the base for the animal from colored paper
Glue the pieces to the base. Look who we got

Take your favorite animal fairy tale as a base and make all the characters out of paper. If sticks are glued to the blanks, it will be possible to show a performance from behind a screen, as in a puppet theater.
Paper crafts for kids: FUNNY CATERRORS AND SPIDERS
Have you ever seen a real spider? And the caterpillar? Let's make funny animals with furry legs out of a cardboard egg box. They will look like the real thing!
What will be required:
egg carton
glue scissors
colored paper
wire
Work sequence:
Cut out blanks from a cardboard box: three cells for caterpillars, one for bugs and spiders.

Color the blanks with gouache.

Prepare details for animals: cut out eyes from colored paper, make legs from fluffy wire.
Make holes in the blanks and stick the legs. Then glue on the eyes.

Try to make them exactly the same.

AMAZING MASQUERADE
You can celebrate your birthday in an unusual way by throwing a masquerade. Invite your friends and have everyone make an animal mask for themselves. It will be fun!
What will be required:
cardboard plates
colored cardboard and paper
scissors
Work sequence:
Color the plate blue.

Cut out the ears and color them too.

Prepare parts for a bunny from colored paper.
Cut out holes for the eyes and glue the pieces as shown.


PAPER BEADS
What girl doesn't love jewelry? Let's try to make beads from old magazines. You will get bright ones that you can wear with your favorite dress or give to your mother.
Work sequence:
Cut out the details from the magazine sheet: strips about 1 cm wide and elongated triangles.

Wind the blanks on the knitting needle - these will be paper beads. Glue the tip well.

Make as many beads as you need for the entire decoration. Take a needle and thread and carefully thread all the beads onto the thread.

This is how easy it is to make unusual ones: original multi-colored beads, bright bracelets. You can even give them to someone: what girl would refuse such beauty?!
Paper Crafts for Kids: PRINCESS DECORATIONS
All girls dream of becoming real princesses. What is a princess without a crown? Let's make it from a regular cardboard roll.
What will be required:
cardboard tubes of paint
colored paper
scissors
Work sequence:
Cut out the crown. You can do a few things.

Color the blanks in different colors.

Decorate crowns. To do this, you can use beads, ribbons and laces.
Make holes on the sides and thread the elastic so that the crown can be put on.

You can make a decoration for a real princess from an ordinary hoop: use colored paper to turn it into a beautiful diadem.
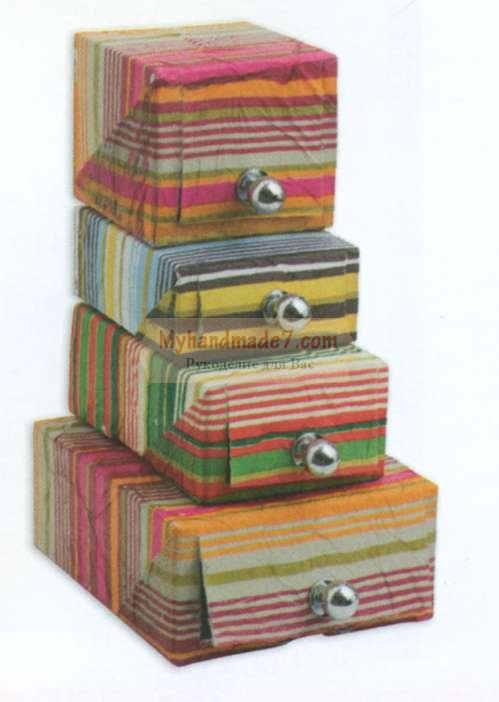
Paper craft for kids: TOY LOCKER
Probably, like all children, you have a lot. Sometimes there are so many of them that it becomes difficult to neatly fold. Let's make a beautiful storage cabinet for small toys.
What will be required:
boxes of different sizes
white gouache
patterned napkins
stationery knife
tassel pen
Work sequence:
Paint the boxes white so that the pictures and text on them do not show through.

Glue the box on all sides with a napkin. To do this, put it on the box, pressing along the edges, and with a brush, apply a thick layer of glue on top so that it sticks.

Cut out the doors with a clerical knife - here you will need the help of an adult. Glue the handles with superglue and fasten the boxes together to make a cabinet.
All! Our dresser is ready. Now you can put your toys there. Mom will be delighted when she sees what order you have!
CREATIVE BOX
Do you like to draw? Or maybe you like to carve or craft something? This is cool! Let's make a creative bag-box where you can put everything you need for creativity.
What will be required:
shoe box
wrapping
colored paper
adhesive lanyard
Work sequence:
Tape the box and lid on all sides. If it's hard for you, ask one of the adults about it.

Make blanks inside the box. At the bottom of a sheet of colored paper folded in half, make an incision to the middle, as shown in the photo. Cut two pieces of the same length as the width of the box from top to middle.

Insert the blanks into each other and place them in the box - these will be the compartments of our bag.
Make holes on the sides of the box: they should be at such a level that the box can be closed with a lid. Make the handles of the same length from the cord so that the box is comfortable to take in your hand.

HANDMADE PHOTO ALBUMS
Where did you last go on holiday? Maybe it was a trip with your parents to the sea or a vacation in the village with your grandmother? You must have some memorable photos. Let's make a suitcase-shaped photo album for them.
What will be required:
colored paper and cardboard
hole punch scissors lace
Work sequence:
For the cover of the photo album, take a sheet of colored cardboard and fold it in half.

For pages, take sheets of double-sided paper of different colors and also fold in half.

Now connect the cover and pages together: for this, fold everything together and make holes on the side with a hole punch. Tie the sheets with a rope or cord.

Cut out the details for the suitcase from colored cardboard and glue them to the photo album.


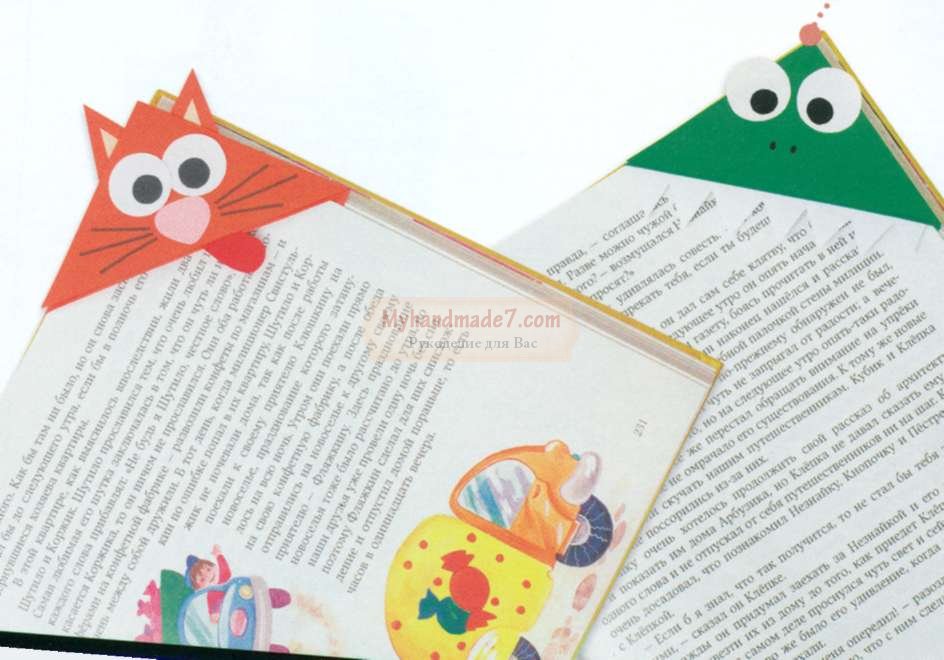
Paper Crafts for Kids: FUNNY BOOKMARKS
What is your favorite book? Or maybe several? It's great that you love to read. Let's make an interesting bookmark for the book.
What will be required:
colored paper
Work sequence:
Use a ruler to draw three squares on a sheet of colored paper, as shown in the photo. The triangles that are filled in are not needed.

Cut out the piece.

And it, as shown in the photo: first bend it to the inner corner, then another on top of it. Glue them together. Cut out the details from colored paper.

It turned out great, right? Now it will be easy to find the place in the book where you finished reading. You can also make a bookmark in the form of another animal, such as a dinosaur with sharp teeth.
CARDBOARD BAG
Do you know how you can make a bright bag out of an ordinary box? Very simple! Let's dream up and make a handbag that you can take with you outside in sunny weather.
What will be required:
cereal box
colored paper
glue scissors
Work sequence:
Color the box with gouache.

Cut out a bag with handles from the box. This may require the help of an adult.

Cut out a strip and a circle from colored paper - this will be the core of the flower. Fold the strip with an accordion and glue the ends. To keep the flower, stick it on a small square. Glue the core on top.

For butterflies, cut out blanks from 1 colored paper. To make the figure voluminous, you need to make 5-6 identical parts. Glue them together in the middle. Glue all the pieces to the box.

DIY Paper Crafts: Pencil Stand
Do you want to give a gift to a friend, but don't know what to choose? Don't be upset, I have an idea! Make an original stationery stand out of an ordinary cardboard box. Your friend will definitely love this gift!
What will be required:
boxes
the same width
white and colored paper, cardboard
adhesive tape
Work sequence:
Build a ship out of boxes: cut off the lids and cut them to height. Make the bow of the ship and pipes out of cardboard.

Tape each piece with colored paper inside and out.

Cut out and glue the windows, lifebuoy, steering wheel, anchor.

Glue the boxes together and glue them to the base, cut along the contour.

PUZZLE APPLICATION
Do you have unnecessary puzzles in which a lot of details are already lost? I have an idea how they can be applied. Let's make an amazingly colorful application with autumn leaves.
What will be required:
unnecessary puzzles crepe paper
paint glue
Work sequence:
Color the puzzles in the colors of bright autumn leaves: yellow, orange, red.

Cut out a brown rectangle from crepe paper - this will be a tree trunk - and make green grass.

Glue the brown blank in the form of a trunk: for this, somewhere you need to compress the paper in layers, and straighten it somewhere.
Make a crown of a tree from the prepared puzzle pieces. Also glue several layers of grass to make it voluminous.


Paper crafts for kids: 3D PICTURE
Do you want to make a large application? It's quite easy! You will get a real picture that you can give to your grandparents.
What will be required:
candy box
corrugated cardboard
double tape adhesive
Work sequence:
Cut out the necessary details for the picture from corrugated cardboard.

Glue the first layer of applique on the bottom of the box - what will be in the background.
Paste other details on top.

What a beauty! It turned out to be a real big picture. In this way, you can make a city where there are cottages and high-rise buildings, or an underwater world with shells, algae and fish.

BOUQUET IN A POSTCARD
Do you want to give your mom unusual flowers? Let's make a card-bouquet of colored paper. Trust me, she'll love it.
What will be required:
double-sided colored paper
scissors ribbon
Work sequence:
Draw a blank on a sheet of colored paper, as shown in the figure.

Cut out the blank and separately a triangle.
Glue a small triangle on the bottom, and fold the large part as shown in the picture.

Draw, and then cut out flowers of different sizes and colors. Make leaves for the bouquet.

Glue flowers inside our postcard in the form of a bouquet, tie a ribbon at the bottom.


3D POSTCARD
Surely you watched the cartoon in 3D and noticed how the characters come to life with a three-dimensional image. It turns out that making objects three-dimensional is quite simple. Let's try to make a postcard with a 3D effect.
What will be required:
colored cardboard, double-sided colored paper
scissors ribbon
Work sequence:
Take two sheets folded in half: one is cardboard, the other is colored paper.
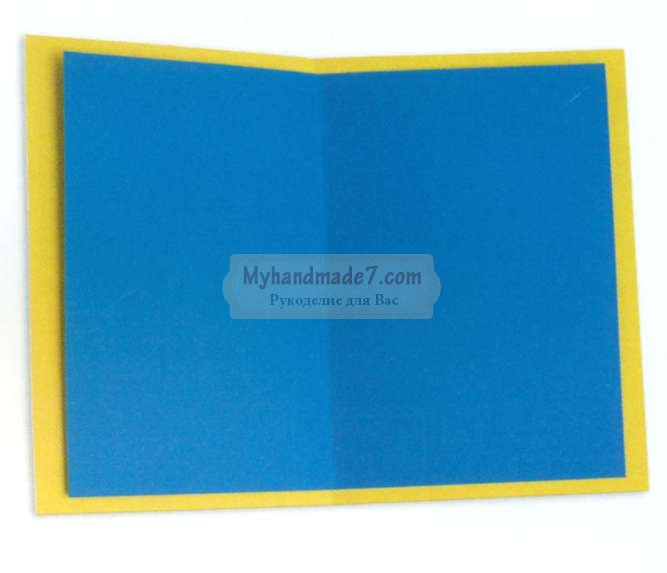
On a sheet of colored paper, make cuts on the fold side, as shown in the photo. You should get 3 even squares of different sizes.

Now what you cut, push forward and inward. You should get a ladder, as if from boxes.
Glue the blank onto a sheet of colored cardboard. Decorate the boxes: glue colored paper and ribbons.

By this principle, you can make a card with balloons

CARD WITH PALM
Do you want to make another unusual postcard? You don’t need anything special for this: just a sheet of colored paper and cardboard, scissors, glue and your wonderful pens.
What will be required:
colored cardboard and paper
Work sequence:
Circle your palm on a piece of cardboard.

Cut out the piece with scissors. You will need two of these items.
Cut out a strip of colored paper and fold it like an accordion.

Glue one end of the accordion to one "hand" and the other to the other. Cut out from colored paper or write a congratulation with felt-tip pens.

ENVELOPE
Do you know how to decorate a small gift? You don't have to be an adult to do this, and you don't need any special equipment. Repeat after me and you will definitely succeed!
What will be required:
colored paper glue
ribbon
Work sequence:
Draw 4 identical circles on a sheet of colored paper. This is easy to do if you take a mug, put it upside down and circle it.

Cut out the circles and fold them in half.

Glue the circles together as shown in the picture.

Bend the free halves of the circles so that one turns out on top of the other. Then pull the bottom from one side up.

SWEET GIFT
Have you ever seen a gift shaped like a candy? Maybe they gave you something similar? Let's make such a surprise, and you can "treat" someone to them.
What will be required:
cardboard tube
wrapping paper glue
scissors ribbon
Work sequence:
Cut out a square from the wrapping paper. In size, it should be larger than a cardboard tube.

Cover the tube with paper. Tie one end of the candy with a ribbon.

Put candy in a gift and tie the other end.
3D FIGURINES
Have you ever wanted to decorate your room in an unusual way? Let's make voluminous figurines-decorations from colored paper. They can be placed on a bedside table or hung on a string from a chandelier.
What will be required:
colored paper glue
scissors ribbon
Work sequence:
Draw a half of an apple on a piece of colored paper folded in half, as shown in the photo.

Cut out the blank and, using it as a template, make 5 such copies. Additionally, cut out the details for the apple.

Glue the blanks together, as shown in the photo.

Glue the rest of the details.

Fruits and vegetables can be anything!
Crafts from cardboard and paper: bright flowers
Do you want to grow bright flowers in your window? Let's make them out of cardboard tubes, but in such a way that no one guesses what material they are from.
What will be required:
cardboard tubes of paint
colored paper glue
scissors skewers
Work sequence:
Make cuts on both sides of the tube so that they do not reach the middle.

Color the tubes in different colors.

When the blanks are dry, straighten the petals, as shown in the photo.
Glue the centers cut out of colored paper.

Paste the skewer with colored paper, cut out the leaves.
Connect all the details. Poke a hole in the center of the flower with a skewer.
Such a flower can be put in a vase and presented to someone.

FRAME OF UNUSUAL FLOWERS
Do you have a boring monochrome frame at home? Let's make it a real masterpiece!
What will be required:
egg carton
glue scissors
Work sequence:
Cut out petal blanks from the cells of a cardboard box, as in the picture.

Color them the same color. You should have 15-18 such sets of different colors (depending on the size of the frame).

Glue the petals together in the middle, carefully press and let them dry.
Glue the flowers to the frame. You won’t be able to attach everything at once, so do it in stages and wait until everything dries.

The frame is ready. Now you can insert your favorite photo into it.
CUTE CACTUS
How do you like such a cute cactus? It is completely safe for children because the thorns are painted on it. Let's make such a cactus and put it on the windowsill.
What will be required:
markers
Work sequence:
Draw a cactus in a pot on cardboard.

Color the picture on both sides and make another one exactly the same.

Make cuts: on one cactus from the bottom to the middle, and on the second - from the top to the middle.

Insert the blanks into each other. The cactus is ready.
In the same way, you can make a rocket or a teddy bear.
COLORED LANTERNS
Your birthday is coming up and you want to decorate your room to make it festive and beautiful? Then let's make unusual colored lanterns.
What will be required:
toilet paper tubes
crepe paper
ribbons
glue scissors
Work sequence:
Cut out a square of crepe paper and glue one side of the tube.

Make blanks from crepe paper: cut out strips and make cuts on one side along the entire length.

Start taping the tube from the bottom. You should get a skirt, as in the photo.
Thus, glue the entire flashlight. Make holes on the top sides and thread a ribbon through them so that the craft can be hung.

Such lanterns can be not only decoration, but also a useful thing. For example, at a holiday you can arrange a game with prizes: hang lanterns on a rope and put something valuable in them by gluing the bottom. Each blindfolded guest must cut off a gift with scissors.

ROOM DECORATION
Would you like to have a bird? Of course, nothing compares to the real one, but still an unusual and beautiful bird can be made from ordinary colored paper. See how it's done.
What will be required:
double-sided colored paper
crepe paper scissors
ribbons
wire
Work sequence:
Draw bird silhouettes on a sheet of paper.

Cut them out. Make a few of these. They must be different colors.

Make wings out of crepe paper: to do this, cut out rectangles of different colors and fold them like an accordion.
Make cuts in the blanks of the birds and insert the wings there. Tie ribbons to the figures and hang them on a circle made of wire.
Unlike adults, children cannot sit still. They do not like boredom and longing. Every minute they try to keep themselves busy with something. Making children's crafts is a useful way to keep your little one busy.
With the help of adults, the child creates whole works of art that in adulthood will remind him of his childhood.
Paper- the most popular material for creative activities with young children. When creating crafts, the child learns to handle scissors. Working with glue for the first time will seem difficult for a child, but over time this skill will improve.
At the same time, fine motor skills of the fingers develop. The process of making crafts forms patience, diligence, perseverance. Children 3-4 years old perform all paper work under the supervision of an adult.
Craft "Hares"
 You need to start with the manufacture of light crafts. Most children 3-4 years old already know how to cut simple shapes out of paper with scissors.
For creating crafts, the child should cut out several strips of the same width. If it will be difficult for him, then first draw the contours of the strips using a ruler.
The hare's head is a strip of paper glued into a ring. Ears - glued two strips to the head. For the paws, take a wide strip and make small cuts at both ends. Slightly bend and glue the head on the body. We draw eyes. To complete the composition, the rabbits can be placed on the grass - green paper.
Gallery: crafts for children 3-4 years old (25 photos)


Crafts "Caterpillar" and "Bird"
 Many different animals can be made from strips of paper. Here, for example, is a caterpillar. Caterpillar made from strips of paper of the same width. The color of the paper can be both monophonic and different. The blanks are also glued into a circle (ringlet).
Next, the rings are glued together, and a paper caterpillar is obtained. Eyes, horns are cut out of paper and glued on the head. The insect is placed on a green piece of paper. Using a hole puncher, we make several holes on the leaf, so we get the “eaten” leaf by the caterpillar.

Craft " birdie» is made from strips of the same width, but different lengths. The strips are cut from different colored paper. Again, glue each blank into a ring.
Craft "Lion"
On orange Draw a circle on paper and cut it out. On it, the child draws the eyes, nose and mouth of the future lion. We cut multi-colored strips of different lengths. Glue them along the edge of the circle as often as possible. To get "curls" - a lion's mane, we twist the paper with a pencil. To complete, you can invite the child to cut out a few thin strips - these will be the mustache of a lion.
Paper applications for children 3-4 years old

Crafts with children 3-4 years old can be made in the form of applications.
Starting with simple and single crafts, ending with whole compositions. Consider the easiest applications to make.
Applications on ready-made templates
 This application is distinguished by its simplicity in manufacturing. And even the smallest child is able to create it. The help of an adult will consist in drawing the contours of a given object. For example, on cardboard we draw a large house with a roof, a window, a door.
The task of the child is to stick the cut-out blanks of various shapes into the voids. The picture-house can be completed by sticking arbitrary clouds, the sun, grass.
flower with wishes
To make this paper application, you will need the following tools and materials:
- base - a sheet of cardboard;
- regular and glitter glue;
- scissors;
- colored paper.
Progress:
- From colored paper, cut out the petals, stem and core of the flower.
- For the leaves of the flower, the palms of the child are used. On the reverse side of the green paper, trace the outline of the child's palms.
- Next, the child independently sticks the flower petals on the cardboard. Petals are glued only to the base, that is, to the core. Thus, each edge of the petal can be twisted with a pencil or lifted for beauty.
- Then the baby glues the stem, core and palm leaves.
- After the craft dries, lift each leaflet and write a wish under it.
Use glitter glue to decorate. Such a children's paper application will remind you of how small the baby's hands were.
Application "Fish"
 For work you will need:
- cardboard, colored paper;
- plate;
- ruler, scissors, pencil;
- glue.
Fish making process:
- Use a plate to draw a circle. Let the kid draw its outline.
- Next, it should be noted the sector, which will be somewhere around 1/6 of the entire circle.
- Mark a sector with a ruler and cut it out.
- Let the child glue the sector as a fish tail. But also let him cut out the eyes and glue them.
Fish can be decorated in different ways. For example, to create scales, we smear the whole fish with glue and sprinkle confetti on top.
Applications using various materials
 Making crafts from various materials is even more exciting class. For the manufacture of children's crafts, not only paper can be used, but also fabric, plasticine, threads, yarn, cereals, natural materials and others. From several materials, voluminous applications are obtained, similar to a picture. Consider the following options:

 Making children's crafts is useful in any age. At the age of 7–8 years, children already know how to use scissors and glue. Most of the work is done by themselves. Primary school children are well versed in various materials and are able to select them themselves.
For many years, paper crafts have been considered one of the most popular types of needlework. With an enviable frequency, new approaches to it and the most diverse branches of this direction appear - here are kirigami, and modern papercrafting and much more. Below we will talk about how to make paper crafts with your own hands using simple schemes.
With a little time for learning, even any child can handle the listed instructions without any problems.

The first thing to do is to prepare colored paper, any glue and small scissors. In addition, rhinestones and other materials can be useful for work in order to give the creation a complete look.

Simple paper crafts
Most often, all children from early childhood show a special interest in precisely such material as paper, and this must be used for their own good. To instill a love for this kind of creativity, mom and dad can go to the trick and captivate the child by creating toys by showing photos of hand-made paper crafts that they themselves liked the most.


You can literally cut out a cute bunny or, for example, a bird in just thirty minutes or even less, with which the child can later play or use them as a decor for a child's room.

How to make a cardboard bird
- Using the template, cut out the bird in shape, draw feathers, a key and a tail for it;
- Fold a sheet into an accordion in the shape of a square of any color;
- Make a hole and finally fix the wings of the bird in it.

If the child likes to make a bird, then you should not be limited to just one. By hanging a few paper birds on a simple wooden stick, you can turn them into an interesting craft to decorate the entrance, for example, to a children's room or a corridor.

Please note that absolutely all complex work in which something is required to be cut must necessarily be carried out either personally by adults at first, or under their control.

In order for the child to develop accuracy, it is necessary to ask him, after completing the work, to put all the tools in the prepared box.


How to make a three-dimensional picture using paper and cardboard?
The easiest paper crafts are applications that are taught to do in the elementary grades of the school.

Of course, a beautiful and at the same time still voluminous picture made by hand from bright colors can be an excellent gift for a sister or grandmother from a child. At the same time, it is not at all necessary to spend money on expensive colored paper, since today, according to the instructions, flowers can be made, in principle, from any napkins or even toilet paper.

If you decide to choose the second option and make your own crafts from the toilet paper at hand, then it is better to give preference to more expensive paper, on which there will be perforation. It can be painted over a little in the future.

With napkins, as practice shows, it is even easier to work and it is only important to ensure that you do not accidentally tear it during the work.

The sequence of actions should be as follows.
- First, you need to fold the napkin four times, securing it in the very middle with a stapler.
- Secondly, a circle is carefully cut out of the napkin and lifting each of its layers in turn, a rather lush flower is obtained.
- Thirdly, about 10 leaves must be cut out of the prepared dark green paper using a template.
- Fourthly, a basket should be cut out of brown paper and pasted on a thick cardboard sheet of any color.

It remains only to place flowers with leaves in the basket. If you want something original, then you can try to make a basket, for example, from corrugated paper or foil, which is used for baking.

Paper crafts for the new year
Classic snowflakes can be an excellent paper decoration for the new year. There are a huge number of different options for how to make beautiful paper snowflakes, most of which a child can easily do by repeating simple steps after their parents.

No less popular crafts are paper balls or a garland. To make them look more interesting and unusual, you can sprinkle the product a little with bright iridescent sparkles.


Balls will look interesting if you make them openwork. The easiest way to make such a ball with your own hands is to find its diagram, then carefully cut out the figure and glue it.

In conclusion, it is worth noting that any paper craft will look good if it was made with a soul.

DIY paper craft photo


Those who love paper products can use them in room decoration and interior design without spending a lot of money. Paper crafts can create unique and very stylish home interiors.
- unique furniture;
- attractive wall decorations;
- lighting fixtures;
- mirrors;
- picture frames;
- window curtains;
- decorative vases.
Paper is a material that has several uses, is easy to work with, environmentally friendly, cheap.

Paper home furnishings and wall decorations are reminiscent of origami-inspired artwork, thus adding incredible detail to modern interior design, decorating. Therefore, instead of destroying unnecessary paper, consider turning it into a piece of art and interior decoration.
You will be amazed at how plain paper can transform your space.

Design and craft ideas
Interior design ideas made from paper, such as wall decorations or lamps, have the ability to make a big difference in your interior. Various voluminous and fantastic 3D shapes for decorating walls, ceilings, stairs, home furniture can also be made of paper.

With a delicate, exclusive look, paper products add great accents on:
- chandeliers;
- desk lamp;
- frames and doors;
- window curtains;
- decorative vases.
Decorations can be in the form of:
- paper flowers;
- birds;
- butterflies.
They will give a romantic and interesting touch. Paper products produce a different effect in interior design, depending on the idea - it can be unusual, surprising or beautiful, impressive, stylish, modern or retro modern.

The design with paper flowers looks amazingly fabulous. They look like beautiful works of art that inspire paper recycling, eco-friendly interior design.
To do this, you can dilute this natural material with traditional brick, wood, producing paper structures on the walls and ceiling.

Change your wall, ceiling design every year to keep your decor always looking fresh, using paper for modern interior design, wall decor and unique ceiling designs. There are many ideas, places and objects where this trend can be used.
So if you're a craft enthusiast, why not try your hand at design finishing paper? For interior designers, artists, this universal means of art has become a common thing and they offer their work for your creativity.
But more importantly, don't forget that you're doing more than just decorating - you're helping to reduce waste and save the environment from littering.

Newspaper is a great material to work with
The newspaper is one element that becomes completely useless the very next day after release, and the endless promotional items in the form of newspapers in our mailboxes are even more depressing in their generosity.

Thus, we always use it as a garbage object of our house.
But did you know that this particular waste paper can be used as a wonderful component for making beautiful wall decorations or beautiful home decor items!
I wanted to pick up for you the most interesting products that you can easily make with your own hands, namely from newsprint, in order to combine business with pleasure - to improve the ecological situation on the planet, to create a beautiful product for your home. Check it out - it's very simple.

wall decor
- To make a step-by-step wall hanging, roll up some newspapers into a thin tube.
- Now glue these folded sticks on cardboard, let the glue soak well.
- After that, use scissors to cut out any chosen shape from these glued rolls of paper, such as a heart shape or a flower, or choose a doll shape.
- Make sure you cut out the large object identical to what will be the smaller size (it's best to make the shapes according to the template).
- Now take some beaded line and make 5 strings of different sizes by attaching their bases to the paper craft.
- Now choose the color in which the product will be made, come up with some interesting ornaments on top of the base to make the pendant more beautiful.

How to make a gift bag
Choosing handmade gift bags with elements of old newspapers will be the solution that will reveal your extraordinary bold personality. After all, it is not easy for our mentality to make a gift in a newspaper, like our grandparents in the pre-perestroika era. This solution not only leads us to a way to recycle things, but at the same time fulfills all the necessary transportation requirements that are usually required for packaging - that is, it is still a very good option.

Papier mache bowl
You can also make a basket or a giant dry storage bowl out of daily newspapers.
Beautiful decor
DIY vase
Roll them tightly like in this video, bend them according to the shape requirements. One of the great things about these newspapers is that the product will be amazingly flexible, so you can create some useful items by twisting them to your liking.

Furniture items
This product is made according to the quilling principle - wrap rolled sheets of newspaper around a pen or pencil using glue, and then dye them in your preferred color. The building material for the decorative vase is ready.

Rolling newspaper sheets into bundles is the best way to use newspaper for DIY crafts. With these tubes, you can create a modern flower vase by gluing strips horizontally or vertically, as well as more complex shapes like a mirror frame, photo or wall plates, etc.

Handmade vase
Although the process of recycling paper waste can be quite difficult, the end result is a wonderful material from which first-class postcards are made. Objects can be made from such paper. You can make this vase from any paper you like.
Walkthrough
- You will need 12 sheets of 25 × 25 cm. In the end, it is important to assemble the elements correctly. Always use three elements to combine.
- When you have formed a ball of 12 pieces, take out one block in one place.
- The released two tabs are folded and glued. Repeat the same procedure on the bottom side.
- If the stable base is not removed from the bottom, the vase may turn over, so the bottom hole is also necessary.
How to make tropical paper orchids
Tropical orchids are quite expensive, but you can make them out of paper if you love these flowers but don't want to spend your money.

Tools you will need:
- orchid pattern;
- desktop printer;
- scissors;
- glue;
- paper.
STEP 1
Print and cut out all the orchid petals that are indicated in the template in the selected color.
Then print, cut out the center of the orchid on the second colored paper, the sheet template on the green paper. Cut out two sets of petals, one center, two leaves for each flower.

STEP 2
Use the edge of the scissors to twist each petal and the center piece. Fold the leaves in half. Fold each petal back to form a bowl shape. Roll both sides on the leaves.

STEP 3
Attach each layer with hot glue. The largest of the three petal shapes is placed at the bottom with the curved petals up, following it, glue a two-piece petal in the center and the central part on top of the two layers of petals.

STEP 4
Attach the sheets by flipping the flower over and placing two sheets at the back.
STEP 5
To make a hair clip, bracelet, or gift wrap, glue a fastener to the back of the flower.

STEP 6
Attach the stem. For an orchid on a stem, bend the end of the wire at an angle. Cut out a small leaf shape, making a one-third cut down the center, and pass the corner of the wire into this crease. Glue the petal and wire to the back of the orchid.

STEP 7
You can use ready-made orchids not only in decor, but also in order to make a gift, a bouquet, wear them on a sweater or in your hair.
STEP 8
These orchids can be a great alternative to a wedding bouquet or decoration.

flower garlands
Get in the mood for playfulness with these easy-to-make 3D Paper Flowers.

You will need:
- glue gun;
- scissors;
- glue stick;
- decorative tape;
- colored paper.
STEP 1
Choose colors
Choose matching colors for a balanced color scheme. For a monochromatic approach, consider layered hues and shades of a single color. For a more multi-colored effect, mix together those shades that differ in contrast.
For a more feminine look, stick with muted colors and pastels mixed with neutrals like taupe, tan, or soft grey.
STEP 2
Fold in half
Use square sheets, as rosebuds are perfectly round. Rectangular papers should be cut to a square state. The first step in this process is to fold each piece of square paper in half.

STEP 3
Fold in a quarter
After everything has been evenly folded in half, fold it again into a quarter.

STEP 4
Turn a square into a circle
After folding the quarter, use scissors to round off the edge.

STEP 5
Expand the circle
Expand to open the form. If you managed to create a perfect sphere, it's time to move on to the next step; however, if the result is oblong or oval, it is better to repeat the previous step until a perfect circle is created.

STEP 6
Starting at the outer edge and working your way to the center, cut out solid circles in a spiral pattern.

STEP 7
Form the center of the flower
As you reach the end of the circle when cutting the spirals, leave an oval tab at the end about 2 cm in diameter. This is the part of each paper bud that will hold the spirals together with the glue.


