DIY stool covers. How to sew covers for stools for the kitchen. Homemade pattern of chair covers with a back for the kitchen
From year to year, lovers of home comfort are interested in the question: how to make the kitchen more stylish, how to decorate a chair or stool for the kitchen with original and practical covers? By designing your own covers and sewing them, you will achieve unprecedented results. Let's look into all the intricacies.
The art of hand-made, which has been rapidly developing in recent years, allows, using imagination, to use a variety of materials for sewing covers.
To create original masterpieces, the following are most often used:
- Cotton fabrics;
- Wool fabrics;
- Viscose and silk fabrics;
- Rough burlap;
- Leatherette (dermantine);
- Technical interlining;
- Stretch oilcloth;
- Decorative mesh, etc.
A well-chosen pattern can be successfully applied to any material, and hand-decorated chairs look exclusive.

Why the idea of decorating a chair or stool with your own hands is worth implementing:
- This is an ideal option to diversify your kitchen design;
- Opportunity to save on costs;
- It’s quite easy to sew covers with an original design yourself.
You don’t have to be a professional cutter - the pattern is simple and understandable even for a beginner, there are few seams, and the fabric consumption is small.
Different approaches to a chair with a back and a kitchen stool
Decorating your kitchen with homemade sewing is a worthy idea.
Before you start arranging your kitchen and start decorating chairs with removable parts, consider the technological difference:
- The stool has a universal seat (the same on all sides);
- Chairs with a backrest will require much more attention and diligence. The pattern will be a little more complicated (a special approach will be required in the places where the back is attached).
Let's look at the technology of cutting and sewing using a method from simple to more complex.

Homemade pattern of stool covers for the kitchen
Initially, you should be guided by three criteria:
- The shape of the seat that backless kitchen chairs have (round or square);
- Seat height (that is, its thickness);
- Design of the surrounding interior (ideally, hand-made covers fit organically into the surrounding picture).
Attention! The design approach to sewing covers depends on the first two criteria, and the color of the fabric depends on the third criterion.
How to decorate round seats
To prepare a drawing with your own hands, decide for yourself whether the pattern will consist of a single piece of fabric or whether you are more impressed by the “cap” or “sieve” type option (a flat round bottom, to the perimeter of which a narrow ribbon is sewn).
Sewing options:
- The one-piece fabric model is ideal for thin, flat seats;
- The prefabricated model is great for high seating.

The order of cutting and sewing when sewing a one-piece model:
- Lay the fabric on a large table or directly on the floor, straighten it out;
- Using chalk, draw a circle that actually matches the shape of the seat;
- Draw the first circle with a neat line at a distance of 8-12 cm from the first (you will get another circle);
- Trim the fabric along the outside line;
- Carefully process the edge (fold it so that there is room for an elastic band or lace);
- Sew it on the machine, not forgetting to leave ~1.5 cm for the elastic band (or 2 unsewed places for two laces - such covers are pulled together on both sides during use, and where one lace meets the other is tied with a bow).

Attention! These are the simplest technologies. Those who are ready to imagine and take risks will be rewarded for their courage: ties, ribbons, flounces, and decor can be placed along the trimmed edge.
The order of cutting and sewing the simplest prefabricated model:
- First, a circle pattern is made (shape exactly like the seat plus 1.5 for seam margin);
- Then fold the circle in four and with an elastic centimeter approximately measure the length of the semicircular line - the arc that was formed during folding (just remember that you need to measure along the stitching line, and not along the outer edge);
- A straight ribbon is cut out, the length is similar to the circumference along the stitching line;
- Do not forget, just as in the case of the circle, to leave 1-1.5 cm for the connecting seams.
- Sew both ends of the tape tightly on a typewriter;
- Treat the seam, press it, iron it with steam.

Now a special moment - stitching the circle and ribbon. Since the circle is unstable in any case (during operation, the fabric “floats” back and forth, because the longitudinal-transverse arrangement of the threads is affected), insure yourself against deformations.
Sewing a cover for a stool (video instructions)
You can protect yourself from deformation as follows:
- Apply markings to the circle at equal distances. For example, 8 divisions (we advise neat people to use chalk, and for beginners, use a contrasting thread - make marks in the form of large stitches so that they are not erased during work from numerous fittings);
- On the tape, do the same;
- Along the line of future stitching, sew on a machine with the largest stitch in a weak tension (or manually with a needle and thread, step approximately 4 mm);
- Pull the stitched seam or basting slightly;
- Treat the tightened seam as carefully as possible with hot steam.

Attention! Beginners may not be aware. It is impossible to perfectly “fit” the line of the circle and the tape. Therefore, there is a so-called fit (in general, it is used for joining figured parts - sleeves, trousers, etc.).
And finally, the finale is approaching - stitching together both parts:
- Do you remember the markings that you were recommended to make on the circle and tape (8 pieces)? Pin in these places or secure with stitches.
- Sew the circle and ribbon along the entire circle using a basting stitch.
- After basting, check again whether the alignment accuracy is high enough;
- Now feel free to sew on your sewing machine;
- Remove all temporary stitches and threads.

For covering you will need:
- Ribbons made of contrasting fabric;
- Braid;
- Ties;
- Decorative decorations.
Regarding round covers, you should remember: in order for the circle to stay on the seat, another effective way to “tame” flat fabric is to make tucks along the entire perimeter, directing them downwards, towards the fold under the seat. Self-decorated protections look more orderly than fabric that spontaneously creases when the elastic is pulled along the outer edge.

Upholstering square seats
In this case, designing and making cases with your own hands is much easier.
Again, as with the round shape, choose:
- One-piece pattern or prefabricated;
- The sewing methods are the same - sewing the top square with a side strip or one large square that fits the stool from top to bottom under the seat.
The DIY sewing process is similar to that described above. The main difference is that a square seat, when covered with side elements, requires a different approach: the most difficult part is at the corners of the square, where the seat fabric and the side elements meet. You'll have to try hard there. Make cuts at an angle of 45 degrees, then, with maximum care, hand baste the parts and stitch them on a machine.
Attention! If you do not have experience in such actions, it is better to make a pattern from a solid square with tucks in the corners. This drapery is adequate for a kitchen of any design, and technologically it is very simple.

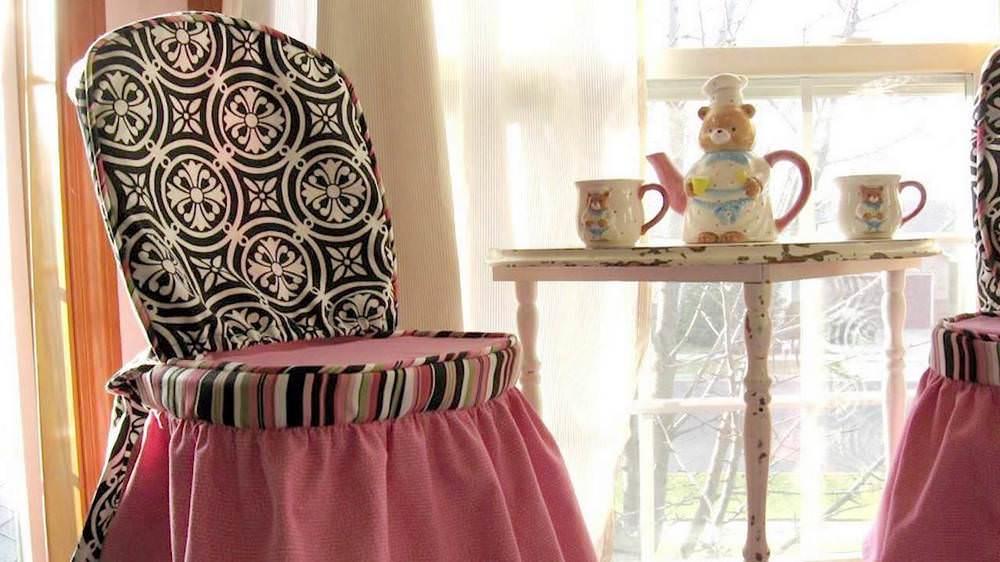
Homemade pattern of chair covers with a back for the kitchen
In principle, the approach to decorating chair covers is the same as in the case of stools:
- The seat shape is similar (round, square);
- Seat thickness (height) small or large.
The only difference is the more complex operations at the backrest attachment points. By the way, different models have different backrests. There are also those in which the seat seems to rise above the branching bend of the supporting element to which the back is attached. That is, the option made from a single piece of material will work quite well.
To those actions required by a stool without a back, the processing of two adjacent corners (those on which the back of the chair is located) is added. There is no way to bypass this labor-intensive moment, because a living person continually fidgets in his chair, moves, moves the covers in different directions.

With top seat plus side strip technology:
- You will have to cut out a strip without reaching the place where the back is fastened;
- Increase the section between the two backrest fastenings to the same width as the sewing strip on the rest of the perimeter of the seat.
With the “solid fabric with a fold under the seat” technology:
- Cut two corners diagonally, machine edge the edge or trim it with decorative edge tape;
- If a stool allows you to get by with 4 ties in the corners, then chairs with a back require adding 2 more of them. (since each cut corner produces two instead of one vertex of the square).
Sewing a cover for a chair with a back (video instructions)
So, you probably understand the general principles of sewing a cover for a stool or chair with a back. Watch different videos, magazines about fashion and sewing. Listen to the advice of your acquaintances, ask your friends about their experience in this matter. And only after that, go for it. Make your kitchen stunning!
Chair covers in the interior (photo gallery)


New covers for stools will not only update the interior of the kitchen, but also make hard seats comfortable. And how nice it is to show them to your loved ones later! You can sew such covers with your own hands. To do this, you need minimal knowledge about the operation of a sewing machine, a piece of suitable fabric, a desire to do handicrafts and a little patience. Shall we get started?
Soft, removable capes with ties
Such covers for stools are very practical: they can be removed and washed, which is important for the kitchen. Soft and beautiful handmade capes will immediately please your guests.
Prepare:
- textile;
- threads;
- scissors;
- ties (they can be sewn from the same fabric);
- soft centimeter or ruler;
- sewing machine
Measure the sides of the stool seat. Cut out a suitable square from the fabric, adding seam allowances (1-1.5 cm). For example, for a chair 35x35 cm you need a square with a side of 36-36.5 cm. Cut a square with a side of 35 cm from the foam rubber.
Important: To make it easier, you can simply turn the stool over and outline the seat with chalk.
Now cut out a strip, which then needs to be sewn to the base. The length of this strip is equal to the perimeter of the square plus the seam allowance. In our example, this is 35+35+35+35+1(1.5) = 141 (141.5) cm. The width of the strip is equal to the thickness of the foam rubber plus allowance for hem, ties and seam. With a foam thickness of 5 cm, the width of the strip will be 9-10 cm.
Stages of sewing a cover for a stool:
- Sew two sides of the strip, turning it into a ring.
- Fold the bottom side of the strip and stitch, leaving room for the ties.
- Connect the ring to the square base, placing them facing each other. Finish the edges.
- Pull the tie through.
- Insert foam rubber inside the cape.
- Place the cover on the stool, tying it to one of the legs using ties.
Important: Elastic bands are often used instead of ties.
The soft cover for the stool is ready! It can be decorated with hand-made applique or embroidery, as well as braid or wide satin ribbon.
Option of a soft cape with padding polyester

If you don’t have a suitable piece of foam rubber, feel free to replace it with padding polyester. These DIY cases will be slightly different from the previous ones.
The procedure for making a cape with padding polyester:
- For the same stool 35x35 cm, cut out 37x37 cm squares from padding polyester, main and lining fabric. You should get three identical squares.
- From the main fabric, cut a strip 142 cm long and 7 cm wide.
- Now you need to sew the padding polyester and lining fabric together. Lay the seams not only around the perimeter, but also in the middle, making strips at a distance of 8-10 cm. You should get a kind of “mattress”.
- Connect the “mattress” to the base of the cape. Here the seam is made only around the perimeter.
- Sew the strip to the base of the cape, folding them right sides together.
- Finish the edges. You can go over them with a zigzag or overlock, or you can simply process them with your own hands.
- Fold the second edge of the strip under, leaving room for the elastic and ties.
- Thread the elastic through.
The new cape is ready!
Long covers for stools

Ordinary kitchen stools can be turned into ottomans by sewing long capes for them. You will need a little more fabric, fringe and satin ribbons. Using all this, you can sew original covers with your own hands.
How to make long capes with ribbons:
- For a stool 35x35 cm, cut out a square with a side of 45 cm.
- From the remaining fabric, cut a strip 34 cm wide and 150 cm long.
- Now you need to measure 10 cm from the corners of the resulting square and sew them at right angles to the edge. This will form the base of the cape.
- Cut and finish the corners.
- Sew the strip in a circle and gather it a little at the edges to create beautiful ruffles.
- Sew the strip to the base.
- Sew an elastic band over the seam. You can do this using a regular seam, or you can use a zigzag stitch. Important: stretch the elastic as you work.
- Finish the bottom with fringe.
- Place the cover on the chair and tie it with a matching satin ribbon.
Stools with long capes turn into a real throne for princesses. It’s not a sin to place such beauty in the living room or bedroom, where simple chairs become elegant ottomans.
A few more ideas

If knitting needles or a hook come to life in your hands, knit unusual covers for stools from bright threads. You can knit in the round or in a solid rectangular fabric from the bottom up, or you can make a base from multi-colored squares. Children really like these squares. The main thing is to make sure that they all more or less match in color.
If you prefer sewing and have already become a good craftswoman, try sewing covers using the “biscuit” technique. Unusual small pillows will become the highlight of your kitchen. And some housewives “dress” chairs in old jeans. Fun and creative!
There is real scope for imagination here. Maybe you have some ideas too? Or have you already sewed chair covers using some other technique? Share your work!
Probably every home has such a piece of furniture as a stool. Most often it is just a wooden square or round seat on legs. With the help of original homemade stool covers, you can transform the most ordinary stool into a stylish piece of furniture.
Techniques for making covers can be very different:
- Made from fabric
- Crochet
- Knitted
- Patchwork technique
- Biscuit technique
It all depends on the wishes of the hostess and the chosen style in the apartment. Let's try to make several cases using different techniques.
We sew a soft cover for a stool from fabric with our own hands

The easiest way is to sew a cover for a stool with a square seat.
We will need materials:
- Main fabric
- Lining fabric
- Foam rubber
- Rubber
- Lace or fringe (optional)
Let's try to sew the simplest soft cover for a stool for the kitchen.
- To do this, you just need to turn it over and place it on the fabric. Outline the seat around the perimeter.
- Add 7 cm on each side and trim off excess fabric.
- We take any fabric for the lining, it will be from the inside out, so color and quality do not matter. We also outline the perimeter of the chair on foam rubber and fabric. We cut off the foam rubber. On the fabric you need to make seam allowances of 7 cm.
- We put the foam rubber on the wrong side of the lining fabric and cover it with additional fabric. We sew along the perimeter of the foam. To prevent the foam from moving when washing, you can run a couple of lines lengthwise and crosswise.
- Then we fold the lining fabric with the main fabric so that the foam is inside. We fold the edges of the double layer of fabric twice, 1.5 cm each, leaving an opening for the elastic.
- We stitch and thread the elastic, securing the ends with a pin.
- We put the finished cover on the chair, tightening the elastic until the cover fits as tightly as possible.
- We sew the ends of the elastic by hand.
- If desired, you can additionally sew a “skirt” around the perimeter: lace, a strip of fabric or fringe.
In the same way you can sew a cover for a round stool.
How to quickly and easily create a “blind” cover for a stool in a master class

To make such a stylish “cube” come out of an ordinary stool, you will need very little time, effort and a minimal set of materials:
- Textile
- Zipper length equal to the height of the stool.
- Threads
- Sewing supplies
So, let's start making.
- Measure the length and width of the seat, and the height of the chair.
- Cut out five pieces with a 2 cm seam allowance. If the seat is rectangular, the side pieces will be of different widths. On a square stool, all the sides will be the same.
- Stitch and topstitch all the side pieces face to face, leaving one side unstitched. Press the seams.
- Fold the bottom edge 2 times by 1.5 cm and stitch.
- Take a zipper of the appropriate length and sew it to the last side.
- Now stitch the last piece of the “seat” face to face, alternately folding each side of the rectangle with the sides.
- Sew the seams. The case is ready. Turn right side out, place on the stool and zip up.

It takes quite a long time to make such an appetizing case, but the result will please you.
We will need the following materials and tools:
- Fabric for base, lining and edging.
- Scraps of beautiful fabric for the top of the product
- Filler (holofiber or any other)
- Pins
- Scissors
- Threads and needles
- centimeter
- Chalk
- Sewing machine.
- For a chair measuring 30 by 30 cm, we need to make 16 square ottomans for the top of the cover and 16 pieces for the sides.
- Each ottoman will consist of two parts and occupy an area of about 8cm. We cut out the top ones from beautiful remnants of bright fabrics measuring 12.5 by 12.5 cm. We lay out the design. Let's see how the colors combine.
- We cut out the lower parts from any thick cotton fabric measuring 9.5 by 9.5 cm.
- Fold each bottom square in half and make a small cut in the middle, about 2cm.
- Place large and small squares face to face. We use pins to create a rise in the corners. Sew the sides, placing the fold towards the center.
- We turn all the ottomans out through the cut hole.
- We lay out future ottomans on the table according to the intended pattern.
- We sew all the squares together with an over-the-edge seam. It should look like a “blanket” without corner squares.
- Through the holes, carefully fill the ottomans with holofiber or other filler.
- We carefully sew each hole by hand.
We apply our ottomans to the lining fabric, outline them and cut them out.

- We secure the lining fabric with “biscuit” with pins.
- Place the outer squares face to face and sew.
- Cut out an edging strip 10 cm wide and 135 cm long. We apply the edging to the edge of the product face to face. We attach it.
- We bend the edging and sew it to the wrong side by hand. The cover is ready, put our “biscuit” on the stool and enjoy.
We crochet a cover for a stool with a round seat
We offer you a master class in photographs. All you need are many small balls of thread in different colors and a hook. By following the photo instructions, you can knit your cover onto a stool without any problems.
This is such a juicy stool.

The scheme is not at all complicated upon careful examination. Color options are selected depending on the availability of materials and the overall color scheme of the kitchen.
For example, here’s a more formal plain case in the photo.

Video on the topic of the article
We suggest viewing several links to videos dedicated to making covers for stools with your own hands.
Sometimes the owners get very tired of old chairs, and they want to update something in them. For this purpose, you can create a textile version of the covers.
With the help of covers it is easy to change the appearance of chairs and the entire accompanying interior. New paints of various colors will be added to it.

Chair covers will help make your kitchen feel cozy, chic and unique. Due to the richness of designs for the covers, they can also be used for the dining room, children's room, guest room, and hallway.

This design option for chairs can be successfully used to create a high-quality interior in a restaurant or cafe.

It makes it easier to organize a themed banquet or party. Because the covers give the chairs the necessary touch of solemnity and style.

But the decorative purpose of their use is not the only one, since covers can play a role in protecting the chair from various contaminants and subsequent rapid wear and tear.

Sometimes unexpected things happen that leave marks on chairs. Children are often not known for their neatness, and pets even more so.

The covers are very beneficial because they can be easily removed for cleaning or washing. If one of them completely deteriorates, a new one can be prepared to replace it.

What is the difference between covers and various covers for chairs?
They differ in purpose, texture and shape. There are quite strict options, beautiful, very simple or very unusual. For any chair you can choose a cover that suits it.

For example, the same children's chair used for feeding a baby can be decorated with a cover based on a bright print or pleasant embroidery.

A chair created on a wooden base can be decorated with a cape that matches the color. Even a fishing chair can be decorated in an unusual way.

Although designers believe that the easiest way to decorate is with a high back version. Covers can be casual or festive.

Purpose of application
Everyday versions are created for daily use. They will need to be washed frequently, which is why it is best to sew from thicker versions of the fabric.
They must have perfect functionality so that they are easy to put on or take off.

Holiday options will be rarely used, since they are needed only for special occasions. They can be decorated with a large number of decoration elements.

In this case, you can allow a creative approach to creating such a case with your own hands.


According to their shape, the covers are divided into groups
The designers decided to distinguish three groups of cases based on their shape. The one-piece version can cover the entire chair, even including the legs. This version is considered the most universal, since its functionality allows it to be used for different purposes.

With this option, you can provide an infusion into any interior and hide the imperfections of the chair.

However, they are quite difficult to sew, which is considered the main disadvantage of this choice. In addition, they will require much more fabric compared to other versions of the cover forms.

Covers to cover the backrest and seating area are usually suitable for domestic use. Separate covers for the back and seat can be provided.

Typically, the seat is more susceptible to various troubles than the backrest. Because of this, the seat cover will have to be washed more often than the back version.


This version is suitable for providing an informal setting in a summer kitchen or garden version of a gazebo. And it is also very good for a children's room.

Chair back covers. In principle, they are indirectly classified as covers, since for the most part they are used during various celebrations.

They are fairly easy to create and don't require too much fabric. With their help, you can ensure high-quality celebration of the New Year or birthday, or any children's parties.

Which option to choose
You can buy covers, however, it is much more interesting to create them yourself. To sew one cover you will have to spend about 1-2 meters of fabric.

If you don’t have sewing skills, then you can turn to professionals who are ready to create a unique version of the case. They will be happy to create the required product after listening to the customer’s wishes.


Photos of DIY chair covers


