Making small boxes Making decorative boxes with your own hands: some interesting ideas (MK). We make a gift box with a lid: a master class with a diagram
We do not always have at hand a box of a completely specific size for specific needs. For example, it would be nice to carefully put small treasures into it, divide gloves, socks, hairpins, handkerchiefs into compartments, or arrange a gift. Therefore, knowledge is worth a lot!
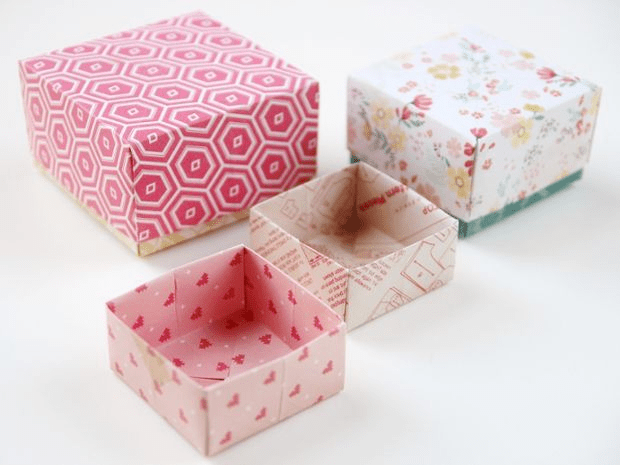
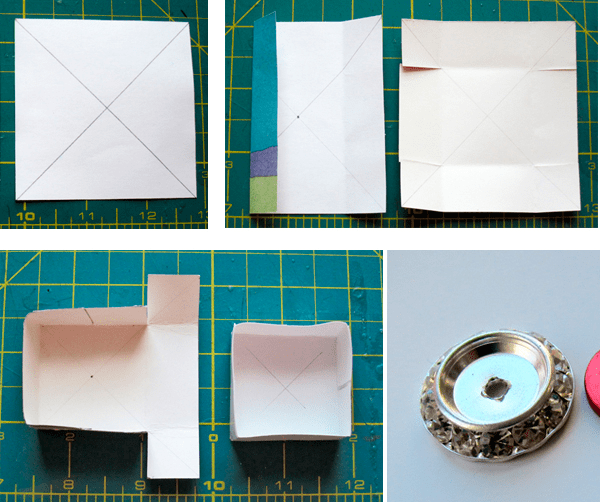
Take a square sheet of paper. Carefully fold it exactly diagonally in half. First on one side, then on the other. Expand the sheet.
Fold the sheet in half horizontally. Expand it again. To achieve the best results in solving the simple task of how to make a paper box, you need to fold the blank carefully, each time carefully aligning the edges from corner to corner.

Repeat the folding action, but vertically.

At this step of the lesson, from paper, you should get a sheet with crossed lines from the folds exactly in the center.

Fold all 4 corners in turn exactly to the center of the square, where the lines from the folds converge.

The top half of the resulting workpiece must be folded in half.

Repeat the same action, but with the bottom half.

Bend the halves and release two opposite corners, as shown in the illustration:

Rotate the fold sheet 90 degrees.

Fold the half of the workpiece from the top edge to the center.

Fold the bottom edge towards the center as in the previous step.

Until now, doing origami and describing the process, out of paper, looked rather far from the final result. But at this stage of the lesson, finally, the man-made box acquires "sides". To do this, slightly open the newly folded parts of the paper by 90 degrees.

Lift the open end while pressing the corners as shown in the illustration until you have another "side" of the box.

Lower the top corner so that it hits the exact center of the base of the paper product.

Repeat steps 13 and 14 on the other side.

This step is optional, but you can glue the raised corners on the bottom of the box if you like. Ready!

To make a lid for the box, you need to take a paper square 4 millimeters larger than the previous one and fold it in the same way. Then connect both parts, and you will have a full-fledged box with a lid on your hands. Now you know how to make a gift box. Of course, it will be stronger from cardboard. The presentable box should be colored. Bright or in restrained colors - it depends on the event.
Perhaps making a box will encourage you to learn how to make a paper vase or other equally interesting things. Do not forget to involve children in the manufacture of such gizmos. General classes are not only useful and interesting learning, but also unforgettable moments of communication.
Gift wrapping is a responsible business, because even the most desirable thing, carelessly wrapped in a newspaper or stuffed into a simple package, will not make the impression that the giver is counting on.
Of course, buying gift wrapping today is not a problem. The stores will offer a wide variety of options: boxes, bags, etc. But still, standard packaging will not be able to convey the range of feelings that you want to put into a gift.
Therefore, many are interested in how to make a gift box using improvised materials.
We decorate ready-made boxes
The easiest way is to decorate the finished box of a suitable size. This can be done in different ways. Colored paper, bows, decorative flowers, beads, sequins, pieces of lace, elegant braid, etc. are used for decoration.


How best to decorate the box, you will need to decide for yourself, depending on the occasion of the gift and the personality of the person being presented. It is clear that if a gift is made for a girl, more decorative elements can be used. And if this is a gift for a man, it is better to show restraint. If desired, you can use a photo of the person for whom the gift is intended to decorate the box.

When designing, it is advisable to emphasize on what occasion the gift is given. For example, if it is New Year's holidays, then use snowflakes, Christmas tree cones, tinsel, etc. in decoration.
simple box
It is far from always possible to find a ready-made box of the right size, so it is very easy to fold a box of paper or cardboard.

Even a child will make the simplest version of the box, for its manufacture you will need:
- cardboard (preferably colored);
- ruler;
- pencil;
- scissors;
- hole puncher;
- ribbon.
If there is no colored cardboard at hand, you can paste over the most ordinary white cardboard with colored paper.

First of all, you need to draw a template on a sheet of cardboard:
- in the center of the sheet you need to draw a square, this will be the bottom of our box;
- now on each side of the square we draw four more squares of the same size as the first one, we have a figure resembling a cross;
- now carefully round the top corners of the four squares (except the central one).


To make it even, you should use a template or compasses:
- the resulting template should be cut out and the side parts bent up;
- in the upper part of each side part, holes should be punched with a hole punch;
- thread the ribbon through the holes and tie it with a bow.


Such a homemade box can be decorated to your liking using rhinestones, beads, ribbon bows. But according to the described technology, it is worth making only a small box, since a large one will not keep its shape.
square box
To make a rectangular, or rather a square box of colored paper with your own hands, you will have to tinker. Here is a description of the work sequence:

- take a square sheet of thin cardboard or colored paper;

- draw two lines diagonally with a pencil;

- we bend one of the corners of the square so that the corner falls exactly at the point of intersection of the diagonal lines;

- the second time we bend the same edge of the cardboard square so that the edge of the fold falls on the diagonal line;

- we do the same with all other corners of the square;

- as a result, we have a sheet divided into small squares by fold lines;

- we outline the contour of the bottom in the center, consisting of four squares;

- now from two opposite corners of the case cuts to the intended bottom.
Now we begin to fold the box, the assembly scheme is as follows:
- fold the square from the wide (not cut) sides with corners to the center;

- then raise the sidewalls;

- we bend the paper from the wide side, forming the two remaining sides of the box;

- now we wrap the cut out parts of the square, finally forming the box.
If you need to make a lid for the resulting package, you need to make a slightly larger box in the same way. That is, at the first stage, make a square 3-5 mm larger than the first.

Having mastered this technique, you can learn how to make boxes of various shapes: in the form of a pyramid, cone, cylinder, etc.
book box
Today, instead of a material gift, the hero of the occasion is often given money; for a cash gift, a box made in the form of a book is very well suited. Let's see how it can be done:


- first of all, you need to make a rectangular box of the right size out of cardboard, it is important that the banknotes that you plan to give as a gift fit freely in it;


- now you should start assembling the "cover". To do this, cut out two rectangular sheets of cardboard along the length and width of 1 cm more than the manufactured box. You also need to cut out another strip, its length should be equal to the length of the sheets, and the width should be 0.5 cm more than the height of the box made;


- we take the material from which we will make the binding, it can be plain or colored paper, thick fabric (for example, denim) or artificial leather;


- lay out the blanks on the material by placing a narrow strip between two cardboard sheets. The gaps between the parts are 2 mm, a three-centimeter allowance is left at the edges;


- glue the cardboard to the material and cut out the blank along the marked lines, cutting off the corners;


- now you need to wrap the allowances and glue them to the cardboard, we got a kind of book binding;


- on one of the inner surfaces of the binding we glue the box made earlier;


- glue ribbons in the center of the upper and lower “lids”, with which our box will be closed.


Now it remains only to decorate the upper part of the overpayment of our box-book. It can be stolen with flowers and bows, beads and sparkles. The exclusive box is ready.
Of course, you will have to tinker with the manufacture of gift wrapping. Perhaps not everything will work out the first time, but with a little practice, it will be possible to make a unique package that cannot be found anywhere else.
Preparing for a solemn event, a person always carefully thinks over his image, style, demeanor and, of course, a gift. It happens that the turn comes to the last when there is practically no time left for its purchase and packaging. In this case, the invitee begins to rush about in search of a present, and when he is found, he puzzles over how to present it. If there is no time to go to specialized gift wrapping workshops or run to the nearest market to buy packaging, improvised materials and imagination will come to the rescue.
Learn how to make a box out of cardboard, and perhaps these methods will save you in an emergency. Also, these accessories can be used not only for gift wrapping, but also for storing various household trifles. There are several methods for making cardboard containers.
Material selection
Before you make a box out of cardboard, you need to decide on the material itself. You can take an already colored sheet or decorate it later. If you intend to store heavy objects, then you need to take a dense material.
The decoration of the made box can be paper applications, drawings, various stickers or fabric. It all depends on who and for what reason it is made.

How to make a rectangular box
Perhaps one of the simplest packaging options is a rectangular container. To make it, you will need a sheet of cardboard, a pencil, a ruler, sharp scissors and hard glue.
Lay the sheet in front of you and decide on the size of the bottom. Draw with a pencil and a ruler its borders. After the preliminary drawing is made, it is necessary to sketch the sides of the box. To do this, from each bottom border, draw a pair of perpendicular lines to the side. Remember that their length should be the same. On two of the future walls, draw a couple more segments parallel to the bottom border. It is with the help of these parts that the sides of the box will be fastened together.
Carefully cut the workpiece with scissors and bend evenly along all the drawn lines. After that, you can start assembling. Apply glue to the additional pieces coming from the walls and fix them by making a corner of the box. Let the glue dry and you can start decorating the container.

How to make a box (round container scheme)
A round container looks more original, but it is also somewhat more difficult to make it. You will need a sheet of cardboard, a pencil, a ruler, scissors and glue, as well as an ordinary school compass.
Lay the material in front of you and draw the required size of the bottom with a compass. Carefully cut the workpiece with scissors so that the borders are perfectly even. After that, you need to make the walls of the box. To do this, using mathematical formulas or a simple measurement, calculate the circumference.
Draw the resulting length on cardboard with a pencil and make a rectangle out of it. The width of the sketch you create should be one centimeter more than you need. Cut out the workpiece and, using scissors at the border, make small cuts with a depth of one centimeter. Next, you need to bend the created cuts and apply glue to them. After that, carefully place the bottom of the box on the glue and press firmly. Let the adhesive dry and start decorating.

triangular variant
There is a way to make a box without glue. In this case, it can be replaced with ordinary or double-sided tape. You will need cardboard, a ruler, scissors and a pencil.
Draw a triangular sketch on the selected material in such a way that all its sides are equal. After that, from each side, draw lines for future walls. Since you can make a box without glue, there is no need to draw additional segments, which usually attach one side to the other. Cut out a neatly created blank and bend along all available lines.
After that, bring the sides together so that an angle forms. Carefully stick a piece of tape on it. Do the same with all three sides. Next, you can start decorating the product.

Cubic packing
How to make a square box out of cardboard? There is nothing easier!
Prepare the necessary tools - a ruler, pencil, glue and scissors. Draw a square on the cardboard, then from each side - another square. Do the same for each side. As a result, you will get five identical squares, one of which is in the center and borders the rest. On two sides, create small segments that will be attached to adjacent walls. Cut out the workpiece and carefully glue the sides, after bending them along all lines.
Follow the same steps and create the same box, but the sides of the squares should be half a centimeter larger. Cut and glue it. Your box now has a lid. When closed, such a container looks like a cube.
simple box
We will tell you about how to make a box out of cardboard without any materials at hand. All you need is a sheet of thin cardboard and your own skilled hands.

Fold the sheet in such a way that you get two folds that will divide the base of the future gizmo into three parts. After that, bend each extreme part in half inward. Bend the corners on the received elements. As a result, you will get four identical corners on each side.
Straighten the resulting part, equaling its center. You will get a container that does not have corners. You need to make them yourself. To do this, gently press the sides of the box with your fingers. Then you can proceed to decorate the created packaging, but remember that thin cardboard is not able to withstand heavy objects.

Before you make a beautiful box, decide on its decor. Prepare the necessary decorations in advance. Think over everything to the smallest detail. Only after that you can start creating a form, drawing a picture or gluing applications.
If necessary, a suitable lid can be made for each box in the same way (remember that it should always be slightly larger than the main part of the product).
Select the cardboard material according to the purpose of the packaging. Make masterpieces with your own hands and delight your friends and relatives with them. Give them storage boxes and various gifts wrapped in them.
Good luck in this interesting work!
Content
You can pack a beautiful and original gift with your own hands. The very process of creation will bring you a lot of positive emotions, and you will also save money and give a piece of your soul and love. To create a square box with your own hands from cardboard, you will need quite a bit of effort, imagination, love, and some tools and materials:
- cardboard (thin and corrugated);
- PVA glue, glue gun, stationery glue;
- adhesive tape (double-sided and regular);
- scissors and stationery knife;
- ruler;
- a pen that no longer writes;
- all kinds of decor.
Ready template
Any cardboard box starts with a template. Without it, it will be difficult for you to create a beautiful and neat gift wrapping. We have prepared for you several box templates that can be used not only as packaging, but also as a box for storing jewelry, threads, needles and other small items. There are a huge number of variations of templates, you can come up with a design yourself. Our advice to you: first try to build a box from a newspaper or thick sheets of a magazine, and then take on the final version.

The template needs to be enlarged to the size you want to see the box. Then it needs to be printed and transferred to cardboard. The dotted lines are the folds. Use a non-writing pen or the thick edge of a pair of scissors to go over these lines and mark the folds so that the cardboard gives in easily and folds just the way you want it to. Making a square cardboard box with your own hands is as easy as shelling pears, especially if you use patterns that do not require the use of glue:
We offer a few more cardboard box templates that can be created without a single drop of glue.
It's all about the special "hooks" with which the structure holds and does not crumble. Well, now let's get to the decor.
A do-it-yourself square cardboard box (especially if the cardboard is thick) can be decorated in a variety of styles and using different techniques. It can be decoupage, thick cardboard will withstand this technique, it can be a composition made using the quilling technique, flowers from various materials. You can also use appliqués, ribbons, beads, stones, rhinestones and other decorations. Try to choose details in the same style so that the design does not look too rough and ugly. It is not necessary to completely decorate the box with decor, sometimes only kraft paper or the texture of the cardboard itself and the usual delicate satin ribbon are enough.
Don't forget to decorate the box inside too. From this will depend on its completed form. Inside the box, you can put a soft satin pillow, decorate the inside with foil, wallpaper, gift paper and other materials.
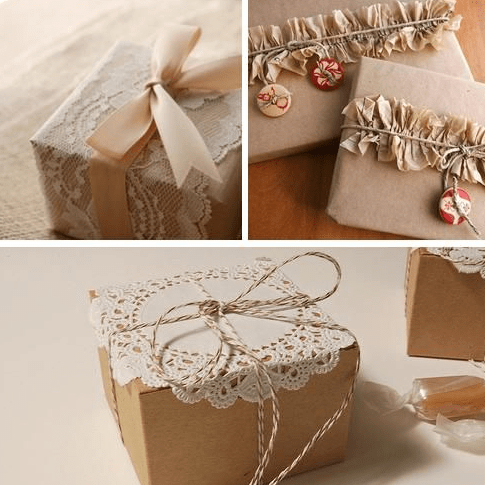
The lace material looks very beautiful in the design of the box - the packaging is obtained in such a rustic or rustic style.
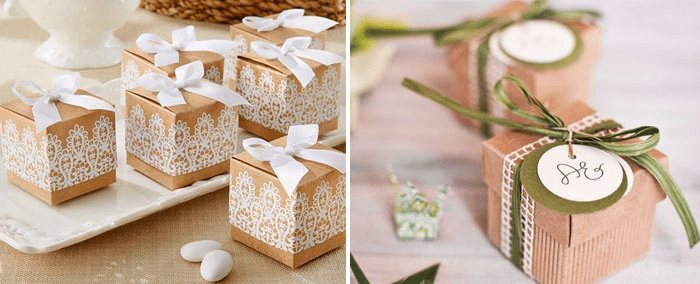
For decoration, you can also use burlap and thick wallpaper with an interesting print. Such boxes can be used to store things, small parts, jewelry. If you make partitions inside of cardboard, then this will turn out to be a real organizer for jewelry, buttons and other little things that can be presented as a gift.

Think about the hobby that the person to whom the gift is intended is fond of. Maybe he loves traveling and the box can be decorated with stamps, he loves flowers, then use a floral theme, he is a lover of cars and technology, then use some details characteristic of this hobby.
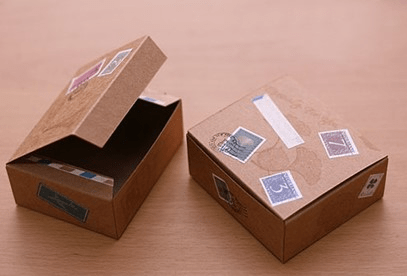
Even ordinary postage stamps can become an original design for a do-it-yourself cardboard box.

We create a template with our own hands
You can create a template for a square box with your own hands. To do this, on a sheet of basic material, you need to draw a square of the required size. Next, from each corner you need to draw straight lines as long as you want the height of the box. For the box, you also need to make a lid that will be literally 2 mm larger than the package itself.

Use double-sided tape, PVA glue, or a glue gun to attach the cardboard pattern pieces. You can also use thin multi-colored cardboard if your gift is not too heavy.
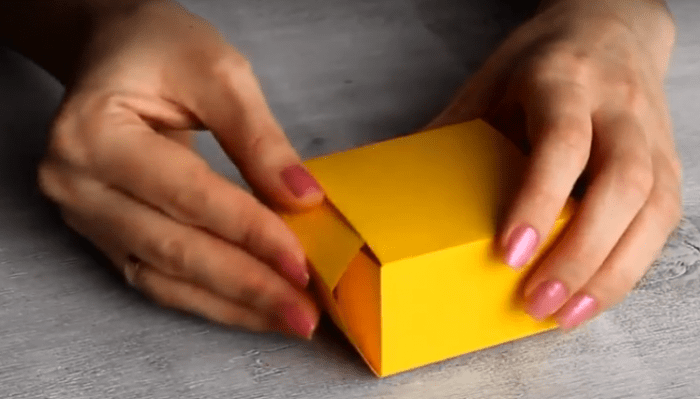
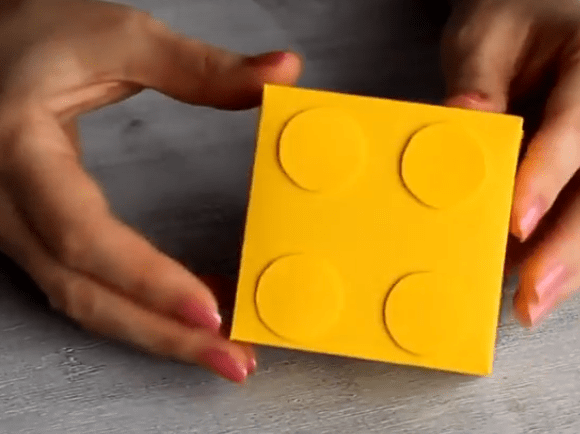
Cardboard box in the shape of a Lego piece
For this square box, we need a fairly thin cardboard, which should be colored on both sides. Such packaging will appeal to children, you can hide sweets, designer toys, small children's jewelry, collectible cars and other souvenirs in it.
First you need to create a template, print it and transfer it to colored cardboard. By the way, the template can be immediately printed on colored cardboard.

Next, with blunt scissors, you need to run through the places of the folds so that the cardboard bends beautifully. And then you can start creating interesting packaging. Use regular stationery glue to join the pieces.

Now you need to cut out four identical circles from the same cardboard from which you are making the box. By the way, the size of the box will depend on the size of your gift. You can even make a traditional design: a box in a box. It will be interesting for the child to open one box and find a new one in it.
Now you need to take a thick adhesive tape or thick double-sided tape, on which we will attach our rounds.

As a result, you should end up with such an interesting box in the form of a Lego constructor.
A box in a hurry
If you need to arrange some kind of gift very quickly, and there is no suitable packaging at hand, then you can quickly make it yourself. In this case, use thin cardboard - it is more convenient to work with it and the packaging is more accurate.
First you need to cut a square out of cardboard and draw straight lines from corners to corners.
Now carefully assemble your box and secure with glue. From a slightly larger sheet (about 5-6 mm), make a cover according to the same principle.
It remains only to decorate our packaging. If the gift is not too heavy, then you can attach a ribbon to the lid, for which you will hold the box and present the gift.
Love to make gifts with your own hands? Looking for new packaging ideas? Now you will learn how to make a cardboard box with your own hands. The schemes given in the text can be printed and used unchanged. If you like to bring something of your own, refine them as you wish.
Which form to choose
You may never have guessed how easy and quick it is to make a cardboard box with your own hands. Schemes and blanks are very different, respectively, and the final configuration of products is very different. It is often said that beautiful packaging is already half the gift. If you want to surprise with your souvenir, come up with an unusual box shape. At the same time, not even additionally decorated, but simply made from a colored sheet, the packaging will look impressive.
In the event that you do not want the attention to be diverted to the packaging, but it is needed simply for safety and ease of transportation, the usual shape in the form of a cube or parallelepiped will suffice. However, it is worth considering that you are preparing for the holiday, so it is good to add beautiful decor to the usual configuration. Any of the options can be used, and making a box according to a ready-made template is not difficult, even if you have never done it.
What will be required
You need to prepare the following so that you get a beautiful do-it-yourself cardboard box:
- Schemes, or, as they are also called, sweeps.
- Cardboard (white, colored, decorative).
- Printer or if you build a template yourself.
- Scissors or knife.
- Knitting needle, non-writing pen, or similar tool to draw invisible grooves along future fold lines.
- Glue or heat gun.
- Decorative elements (satin ribbons, stickers, bows, flowers).
As you can see, the work on creating beautiful packaging will not cause much trouble. Complex devices are not needed. If you do not have a thermal gun and a printer, you can do without them by using your own construction of a box scan with a pencil and a ruler and gluing with ordinary PVA or a quick-fix compound.

Manufacturing technology
Consider how a gift card is made of cardboard. The scheme of work will be as follows:
- Find a template that suits your configuration.
- Print it on a printer either immediately on a large cardboard format, if possible, or on paper sheets, which can then be glued together and transferred to a cardboard blank. It is most convenient, of course, to work with boxes whose scans fit on A3 or even A4 format. This is usually the maximum capacity of a standard home printer.
- So, in front of you is a packaging template obtained in any way. Cut it out of the sheet along the contour and make cuts in the right places where gluing will take place.
- Take the knitting needle or whatever tool you prepared and run it along all the lines where the folds will go. It is better to do this on the reverse side, and not on the front. In professional slang, this operation is called creasing, and in printing houses, of course, it is performed by a machine. Such grooves prevent the cardboard from creasing during folding, that is, bending. So do not neglect it, otherwise the box may turn out to be sloppy and deformed.
- Make folds along the appropriate guides.
- Glue a three-dimensional shape from a flat blank.
- Decorate the package with satin ribbon ties, a bow or something else.
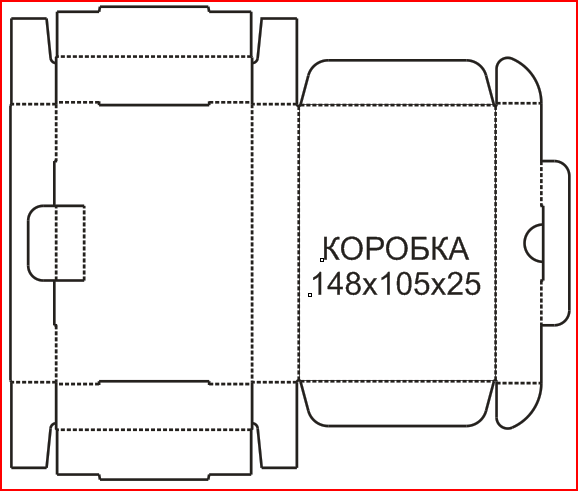
Do-it-yourself cardboard box: diagrams
The square pack is the most commonly used. The options are different, both solid and consisting of two parts - the base and the cover. It's easier to make boxes from one piece. Such packaging can be closed with ties or with the help of a cardboard "tongue" that goes into a slot in the opposite part of the box. Below is a simple cube-shaped package.

As you can see, the scan is based on a square. The top of the product looks like a "roof" when assembled. To fasten the four parts of the top, you can use a beautiful ribbon.
Do-it-yourself cardboard box: simple but unusual schemes
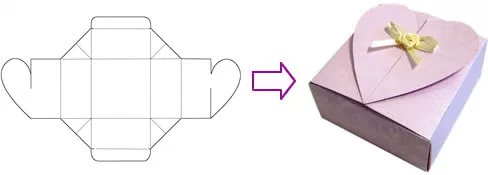
If you want to make a package with an unusual shape, use one of the following models. The first photo shows the simplest version. It is very easy to make as there are only four folds to make. At the top, the box is assembled due to the slot and the fastening element included in it.

If you have a triangular souvenir, use the following package. The development, although it looks quite complicated, the assembly is easy and fast. The main thing is to carefully draw the fold lines. The gluing elements are small, made in the form of triangles.

According to the following template, a beautiful do-it-yourself rounded cardboard box can be made. The diagram is also simple and clear. The most important thing is to evenly draw arcuate fold lines. It depends on how neatly the shape of the package is formed.

How to decorate the box
You have figured out the technology for creating the base, but just white packaging is not suitable for a gift. It should complement and decorate your souvenir. You can turn an ordinary box into a masterpiece of artistic craftsmanship in the following ways:
- Choose beautiful cardboard or thick paper (designer or for children's creativity). Sheets are metallized, mother-of-pearl with embossing, patterns and other decor options.
- Cut out the second unfolding of the box from thin packaging or other paper used in arts and crafts, and glue it on top of the base. This option is suitable when you need to make a box of very thick cardboard, which is not possible to find with a decorative surface.
- Apply drawings or patterns to the box with paints using a brush, stencils, using stickers, decoupage napkins.
- If you are proficient in computer graphic editors, you can come up with your own box design by adding any images to the selected outline before printing, including photorealistic ones, for example, even with the birthday boy himself. The one to whom you give such a gift will definitely be surprised. It should only be taken into account that if you are going to print on colored cardboard, all your pictures will acquire the appropriate shade, so you will either have to color-correct the workpiece, or not use colors that are unacceptable to change (portrait photos).
There are as many options for decorating a product as there are possible scan patterns. It's good to combine different ideas.
So, you saw how easy it is to make a cardboard box with your own hands. The diagrams above are easy to use to create beautiful packaging for a souvenir for any holiday. By scaling the templates, boxes of different sizes can be made identical in shape. Create, decorate, surprise your friends and relatives with your skill.


