How to make a gift alarm clock for the new year. New Year's craft "Alarm clock. How to make a beautiful Christmas foam clock
Do-it-yourself clock for the New Year.
New Year is one of the holidays with a particularly warm and sincere atmosphere. And it is created from many small things. A festive Christmas tree, colorful lights, beautifully wrapped gifts and, of course, various Christmas decorations.
For those who want to create a festive and warm atmosphere with their own hands, we will tell you how to make a beautiful New Year's clock that can decorate any home. Novice needlewomen can try to make a simple round-shaped foam clock, and those who have skills in this business can try to make a New Year's craft more like a cuckoo house.
New Year's clock stencil made of paper and dial for New Year's clock: print template
Template #1
 Template #2
 Template #3
 In principle, the New Year's clock can have a completely different shape. If you wish, you can make them look like an ordinary round alarm clock, or make a more massive product that can be placed on the wall.
But whatever shape your craft has, remember that in this case it is extremely important to pay attention to the decor. To make your watch really look like a Christmas decoration, be sure to decorate it with spruce branches, cotton wool, shiny snowflakes and sequins.
As for the dial, it can be both simple and complex. If you do not want to bother, then just draw a circle, put numbers on it and fix it on the base. If your goal is a more original craft, then decorate it with an interesting themed dial. You can see examples of holiday stencils for making New Year's watches a little higher.
How to make a beautiful Christmas clock out of the box?
If you want to make a New Year's craft as quickly as possible, then the finished box is exactly what you need. For these purposes, an ordinary rectangular box or, for example, a round one from a cake is perfect. If you give preference to this particular version of the craft, then you will only need to correctly fix the details among themselves and, of course, decorate them in an original way.
Cake box clock:


- First of all, wash the box and dry it well.
- Next, take the paper of the color you need and cut out the numbers for the dial from it.
- Gently smear them with glue and fix them on top of the box
- While they are drying, decorate the inside of the craft.

- Put colorful rain, small Christmas decorations or just cute animal figurines in it.

- Make plasticine blanks (they should be in the shape of cones) and wrap them in foil
- Connect the two parts of the box together, fix the cones on them and additionally decorate the craft with rain
Christmas clock from a gift box:

- So, take a rectangular box and fix the ribbons on its bottom, to which the bumps will subsequently be tied.


- At the next stage, using a stencil, cut out the festive dial and also fix it on the workpiece.


- Next, take two thin rectangular boxes and 2 pieces of triangular cardboard and make a roof for your watch.

- Decorate the craft at your discretion (you can use absolutely all New Year's tinsel or spruce branches)
How to make a beautiful Christmas clock out of cardboard?

 New Year's clock made of cardboard

 DIY decorations
 If you like to do everything with your own hands, then try to do it yourself and the very basis for the New Year's clock. For these purposes, any box made of thick cardboard is ideal. If you have never done it before, you can watch the master class posted a little higher. The picture shows a diagram, following which you can easily make a blank for an original craft.
But remember, even such a simple thing must be done as diligently as possible. And this means that you cannot afford to cut out the fold lines, as they say, by eye. If in the end you want to get the perfect blank, then you will first need to arm yourself with a ruler and a pencil, draw the cardboard correctly, and only after that proceed with cutting the lines.
When the box is ready, you will have to decorate it with New Year's tinsel. And don’t forget that for starters, you definitely need to mark a festive dial on it. In order for others to understand that the craft was made in honor of the New Year, give preference to dials on which Santa Claus, a Snowman or just beautiful snowflakes are drawn.
How to make a beautiful Christmas clock out of candy?

 New Year's clock from candies
 Recommendations for making a box
 If you want to make a New Year's clock from sweets, then you will have to make a round box of the right size with your own hands. To make your craft perfect, you will need to make sure that the side of the cardboard blank has the same length as the sweets you have chosen.
- To get started, cover the cardboard blank with corrugated paper, foil, or just beautiful packaging. Try to fix it on the base as well as possible, because it will depend on how well the candies will stick to it.
- Glue the dial on the top of the box and be sure to make arrows. They can be made from more contrasting paper or wood blanks painted in the desired color.
- When all this is ready, you can start fixing the candy on the box. Try to stack them in such a way that there is no more distance between them. If you have chosen sweets with jagged edges, then fill the resulting voids with rain.
- After all the candies are glued, you will have to decorate your New Year's clock with additional festive decor. At this stage, you can allow yourself to turn on all your imagination and, in addition to the standard New Year's decor, use, for example, beautiful buttons or original rivets.
How to make a beautiful Christmas clock from discs?


The easiest way to make a watch out of a disk is to simply take it, fix it on a string, and then use a marker to draw a dial on it. As a result, you will get a simple craft that can be used to decorate the Christmas tree.

If you want to surprise others with a more interesting decoration, then do not be lazy and make a more complex figure out of disks. After they are well fixed with each other, you just have to decorate them accordingly and attach arrows to them.


Another good option is to glue the disc with a ready-made festive dial. In order to make such a watch, you will need to print a stencil in the desired scale, cut it out and carefully stick it on the disk. Once everything dries well, you can attach a rope for which the decoration will be hung, and place it in any place convenient for you.
How to make a beautiful Christmas foam clock?
 Christmas foam clock
  Clock cut out of foam
  Figurines for decorating watches
 If you have been doing needlework for a long time, you probably know that polystyrene is a very malleable material. If desired, you can make a very beautiful New Year's clock from it. If you have time, then you can cut a round blank of the desired size from this material, and then deal with it in the same way as with a round box. You can cover it with decorative material, and then decorate it to your liking.
Also, if desired, the foam can be decorated with paints, and then decorated with shiny tinsel. Well, those needlewomen who are not afraid of painstaking work can try to cut a clock out of foam. And in order for your craft to turn out to be festive, it will need to be given an interesting shape or simply decorated with New Year's figurines made from the same foam. You can see how all this can be brought to life in the pictures posted above.
How to make a beautiful New Year's clock from salt dough?
 Preparation for the New Year's clock
 Salt dough Christmas clock
 If you like to do needlework with your children, then you will definitely enjoy making New Year's clocks from salt dough. There is nothing difficult in this process, as all you have to do is give the material the correct shape. But still remember that in order for your craft to turn out right, you need to take the most responsible approach to preparing the dough.
You must achieve such a consistency that it does not crumble and does not stick to your hands. Some needlewomen advise beginners to add a little vegetable oil to the dough, citing the fact that it will be easy to roll out. But as practice shows, such a dough eventually dries very poorly and quickly cracks after drying.
In view of this, it will be better if you prepare the dough according to the following recipe:
- Flour - 500 g
- Salt - 250 g
- Water - 250 ml
Yes, and remember that the cooked dough cannot be left to lie for a very long time, as this will necessarily affect the strength of the finished product. Therefore, it will be better if, after kneading, you immediately begin to create a festive masterpiece. There are two ways to make a New Year's clock. You can simply roll out the dough and then cut the clock into the shape you need.
You can also try laying out crafts from small parts and only then dry it in the oven. Remember that the dough needs to be dried, because this is the only way you can get a strong structure that will not be afraid of moisture. If you try to quickly bake your blanks, then inside they may not dry out and this will lead to the formation of cracks after drying.
New Year's crafts with a cuckoo clock do it yourself: photo
New Year's cuckoo clocks are made according to the same principle as those crafts with which we have already introduced you. In view of this, to begin with, you will need to prepare thick cardboard, glue or adhesive tape, holiday decor and paints for drawing, and you can safely start creating New Year's decorations.
So:

- First, cut out blanks, from which you will later make a house. When cutting, make sure that all parts have the correct dimensions. If at least one of the blanks is smaller or larger than necessary, then in the end you will not be able to assemble the structure.

- Having cut out all the necessary blanks, start connecting them together, first with glue, and then with tape. This will help ensure that the finished structure is as strong as possible.


- Having made a box, start making a blank that imitates a cuckoo's house. In this case, it is important to correctly calculate the size of the hole in which the bird will be visible. In order for it to look harmonious in it, it should be at least 1-2 cm higher and wider than it.

- At the final stage, make a cuckoo (it can be made of paper or plasticine) and fix it in the opening. Connect all parts of the clock together and decorate them the way you like. Idea #4

 Idea #5
 Video: Candy watch. What to give for the New Year?
Julia Kanteeva
New Year, without exaggeration, is the most beloved holiday in our country, which means that you don’t need to prepare for it with special responsibility. The most important tradition that has been going on since ancient times is making souvenirs with your own hands. I propose for consideration New Year's crafts"Alarm".The idea of creating this crafts arose not by chance, because the clock, along with the festive spruce, can also be considered a symbol New Year. The manufacturing technique was largely borrowed from Internet sources, but for my part I tried to bring in my own creative ideas.
For the manufacture of watches from sweets in the form i need an alarm clock:
Styrofoam
Sweets 35 pieces, it's about 350 g (I have coconut bars)
Two round balls for bells
Stationery knife
Printed dial
Blue satin ribbon for decoration
Double sided tape
glue gun
Glue stick
Scissors
simple pencil
Blue beads and stars for the dial, as well as Christmas decorations, a cone, a Christmas tree branch.

New Year's craft performed with children. The guys helped me to compose a composition of jewelry, decorate the dial, attach sweets to the main structure with glue. Our craft became a worthy decoration of the music hall and Christmas tree! We are great!
Related publications:
 To make a Christmas tree you will need: drawing paper A-3 format, yarn, I used green and blue, beads, braid bows.
 The long-awaited winter is here. This is a wonderful time of the year and a time of magic and miracles. Every day the children rejoice in the arrival of the New.
 In early December, we announced a competition for the best New Year crafts. The parents of my younger group actively participated. Here are some beautiful ones.
New Year's craft "Christmas Tree" The craft was made by a 4-year-old girl in 3 lessons. Lesson 1 - cutting out parts, preparing materials, Lesson 2.
 Not just a snowman, but the real spirit of winter. Russian winter transforms the world with its frosty breath. Everything becomes wonderful.
 Christmas tree beauty The kids love it! The lights on it shine, They want to give a fairy tale. The New Year is knocking on the window, Wait a little more.
 2018 is the year of the Dog. Every year, the guys and I make New Year's crafts, the symbol of the year, this year is no exception. Children are very fond of.
 The New Year holidays are approaching - it's time to decorate the Christmas tree and decorate the house. Perhaps we no longer believe in the good Santa Claus, we do not expect from.
Needlework master class: "Christmas tree toy - New Year's alarm clock" (sawdust)
Knyazeva Irina Anatolyevna, educator of Branch No. 1 of MBDOU No. 137 of PenzaThe master class is designed for children 7 years and older, their parents and teachers, for all creative people who are ready to create gifts and interior decorations with their own hands.
Purpose: for a gift, to decorate the Christmas tree.
Target: making Christmas toys with your own hands
Tasks: Develop the child's imagination, fantasy, fine motor skills, accuracy. To interest and involve parents in joint leisure activities with children.
watch
author: Galina Dyadina
On this watch all the time twelve,
And the arrows do not tick here -
They are painted with paint, I confess
They don't go, but the Christmas tree goes!

Technique: modeling
Rules for working with PVA glue
1. When working with glue, use a brush if necessary
2. Take the amount of glue that is required to complete the work at this stage
3. It is necessary to apply glue in an even thin layer
4. Try not to get glue on clothes, face and especially eyes
5. After work, close the adhesive tightly and remove
6. Wash your hands and work area with soap
Materials for sawdust dough:
small sawdust; PVA glue; vegetable oil; starch.

Materials and equipment for crafts:
Acrylic paints; sandpaper; glue "Titan"; floral glitter (silver and pink colors); brush; contours in 2 colors (crimson and silver); stack; file or cling film; PVA glue; rolling pin; eyes; foil; Christmas toy holder

Stages of work:
Sawdust dough recipe:2 glasses of sawdust;
0.5 glass of starch;
5 tablespoons of PVA glue;
0.5 cups of water;
1 teaspoon vegetable oil.
Sift small sawdust through a sieve.
Dissolve PVA glue in water. Mix starch and sawdust well, and slowly add water mixed with PVA glue. Then add oil while constantly stirring. The resulting dough is similar to shortbread.

If the dough turned out thick - add water with glue, if liquid - add sawdust. The consistency of the dough depends on the sawdust.
1. Modeling an alarm clock
Wrap the board with cling film or insert it into a transparent file (for better removal of the workpiece). Cover the dough from sawdust with a film and roll out 1 cm thick.

Crumple the foil into a cake, 4 cm in diameter and 1 cm thick.

Lubricate the foil cake with PVA glue and place it on the sawdust dough.

Roll the foil into the dough. Form a disk, 6 cm in diameter and 2 cm thick.

Insert pieces of wire into the place where the legs are attached.
We make legs.
In order to mold the legs, you first need to roll two balls with a diameter of 1.5 cm, then flatten them. Point the tips of the legs with your thumb and forefinger.

Lubricate the wire with PVA glue and put the legs on the wire.

With a brush lubricated with PVA glue, it is good to stick the legs to the disk.

Insert a piece of wire in place of the alarm clock.

With a brush moistened with water and PVA glue, smooth the edges of the toy.

Cover the sawdust dough with a film and roll it out to a thickness of 0.5 cm. Cut a circle from the dough with a stack, 4 cm in diameter

Glue the dial to the watch case.

Roll up a ball with a diameter of 0.5-0.7 cm. Glue the ball to the middle of the dial.


Roll out two sausages from the dough, 0.7 cm and 1 cm long.

Glue the hands to the dial.

We put it to dry for a day, on a heating radiator. After drying, you can simply draw arrows with a contour.
Let's call the alarm clock.
Roll the dough into a ball with a diameter of 2.5 cm. Press the ball lightly against the board, you get a hemisphere.

Lubricate the top of the alarm clock with PVA glue and put the hemisphere on the wire.

We let the work dry completely, as a rule, it takes 2 days.
Clean up with sandpaper.

Color with acrylic paints.


Glue the holder for Christmas decorations with Titan glue.

2. Decoration of the alarm clock.
Outline draw a pattern.

Draw a mouth with red paint.

Glue the eyes with titanium glue on the dial.

With PVA glue, draw a pattern on the bell.

Sprinkle glue with floral glitter.

On the side of the alarm clock, draw a picture with glue.

Sprinkle the pattern with floral glitter.

Draw a blush on the dial with glue and sprinkle with pink glitter.

Insert a satin ribbon into the hole. Tie a bow.

Here is such a New Year's toy turned out!
Let's take a closer look at the piece.
Every day the New Year is getting closer and closer. You can prepare well for the holiday with the help of DIY crafts. For manufacturing New Year's souvenirs It takes quite a bit of time, but the resulting festive mood will pay off handsomely.
Every year the number of all kinds of crafts is increasing and increasing. After all, the New Year is a source of inspiration not only for children, but also for adults.
You can create original gifts and souvenirs even from old things, transforming them beyond recognition, thereby giving them a new life. An ordinary clock - an alarm clock - can be not only a means of determining the time, but also become an interior decor item, as well as a wonderful decoration for the New Year's table and an excellent gift.
You can present such a gift to relatives, relatives and friends! New Year's clock sure to please the kids!
How to transform an old alarm clock and create your own with his help New Year's souvenir You will learn in my master class. A middle-aged child will also be able to independently cope with this craft, making an original New Year's gift with his own hands.
For work you will need:
- alarm clock,
- corrugated board,
- stationery knife,
- priming,
- paints,
- brush,
- a little synthetic winterizer or cotton wool,
- silver glitter or acrylic outline,
- structural paste (can be replaced with ordinary semolina mixed with PVA glue),
- PVA glue,
- glue moment,
- hot glue gun (optional - can be replaced with double-sided tape),
- Christmas tree decorations.
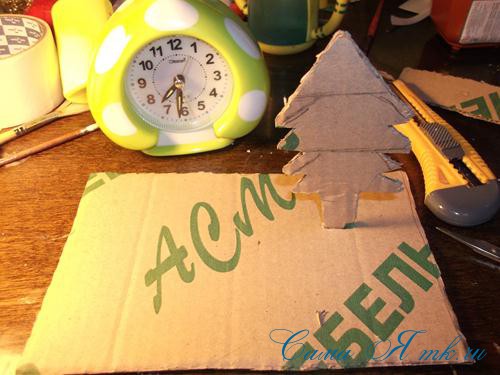
We start with the fact that we need a corrugated cardboard rectangle - the basis of the New Year's composition. From the same corrugated cardboard we cut out a Christmas tree.
We make a slot in the rectangle cross to cross, since the base of the Christmas tree will be cruciform, for better stability.
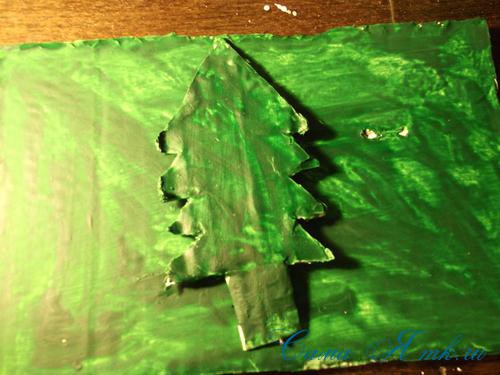
We primed, dried and covered with green paint. We are waiting for the paint to dry completely.
On the bottom of the leg of the Christmas tree, we make a small incision and insert a piece of corrugated cardboard, we get a cruciform trunk, which we will later insert into the slots on our base, having previously smeared everything with glue with a moment.

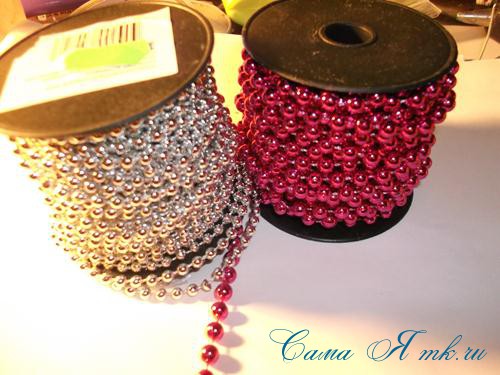
Before we set up the Christmas tree, we must decorate it. We glue our beads on it using hot glue or universal transparent glue of the moment. If necessary, wait for the glue to dry. The tree is now ready for installation.

We have come to the final design of our composition.
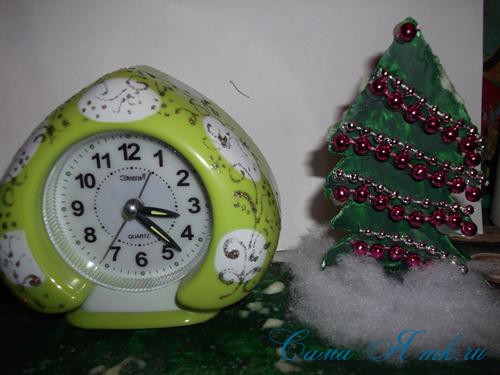
Lubricate a small area around the Christmas tree with PVA glue, while grabbing the trunk of the Christmas tree. We glue a synthetic winterizer on this place, having previously fluffed it. We got snow.
On the surface of our base, in some places we apply structural paste or semolina mixed with PVA glue, imitating snow. You can add frosty patterns with a multi-colored sequined outline (a silver sequined outline works well too).
We apply patterns to the watch using the same contour. We can glue the clock to the base of our composition with double-sided tape, or with hot glue.
Well, our gift is ready!
A very simple composition in its execution is ready to please those to whom we will present it. By the way, you can easily make a Christmas tree in any style that is convenient for you.
The main thing is to make sure that you are as satisfied as possible with your own work. After all, if you like the craft, then others will certainly like it. My task is to suggest an interesting idea and show my version of its implementation. Therefore, where you see fit, show as much imagination as possible and you will get magnificent crafts that you can be proud of.
Creative success to you!
I wanted to make such a New Year's alarm clock last year, but my hands did not reach. Therefore, this year I decided not to postpone until the last minute, and began to prepare for this wonderful winter holiday in advance.
I needed the following materials:
- dial printed on photo paper
- cardboard of two types: very thin, which easily takes a curved shape, and dense
- scissors
- pen or pencil
- hot glue gun
- corrugated paper
- stationery tape
- ruler
- sewing tape
- New Year's thin red tinsel (1 cm wide)
- small Christmas decorations (bow, Santa Claus, gifts)
- Konafetto sweets
Work progresss:
To make the watch face as beautiful as possible, I printed it on photo paper.
Now you can start gluing the base for the alarm clock. I take one circle and with the help of a thermal gun I apply glue along its edge, immediately gluing the sides of the base.
I cover the base with corrugated paper. To do this, I cut out two circles from it, slightly larger in size than the base itself, and glue them. Then I cut out a strip equal to the height of the base and glue it, thus hiding all the irregularities.
In the center to one of the sides of the base, I glue the dial.
Now you can start gluing candies. The height of the base is shorter than the length of the candy. They should protrude after gluing to the front side. The wrapper of Konafetto sweets is very thin, it can melt under the influence of hot hot melt adhesive. Therefore, you need to apply it only on top of the stationery tape. This is what happens after gluing all the candies.
It remains to glue the tinsel around the dial and decorate the alarm clock as desired. I glued a bow, Santa Claus and a gift in the lower right corner. I needed two more gifts for the top of the alarm clock.
To receive the best articles, subscribe to Alimero's pages at .


