How to sew a men's dressing gown pattern size 58. How to sew a home dressing gown without a pattern: different techniques and models. Ready-made patterns of bathrobes
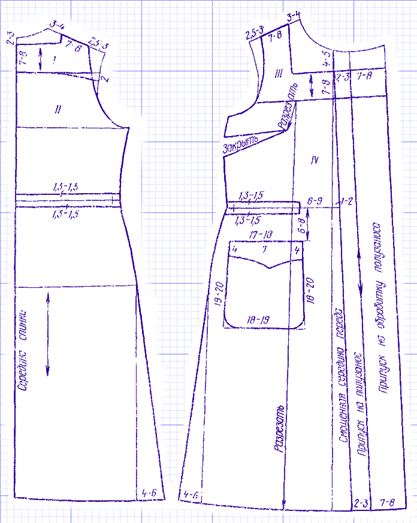
Simulate pattern of a men's wrap dressing gown we will be on the shoulder products. If you have a ready-made pattern for a men's shirt, we will model according to the pattern.

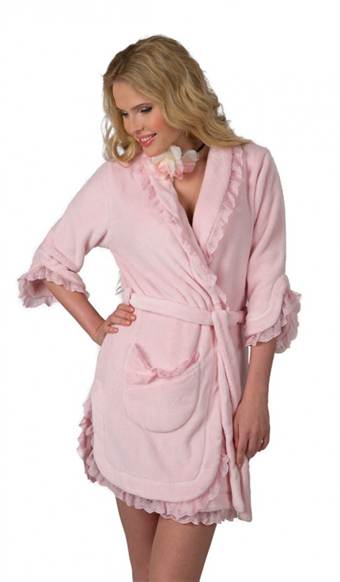
Dressing gown with a straight silhouette, ankle length, wide neckline, dropped shoulder, short sleeve with cuff, wrap placket, pocket, belt loops, waistband.

We remove the coquettes, we connect the coquette of the back with the back, the coquette of the shelf with the shelf, we remove the bar, we remove the fold of the back.

Width
A1 to the left and denote A.
We will also do it on the shelf, from A3 set aside 3 cm to the right and denote A4.
We increase the line of the shoulder by 2 cm on the back and shelf.
Armhole
We deepen the armhole and from G4 down we measure 3 cm. We draw a smooth line as in the figure by hand or according to the "droplet" pattern.
Length
We extend the product to the desired value according to the measure Di and denote H.
from point A4 draw a vertical line down and mark H2.
H And H2 connect with a straight line.
Waistline
We measure to measure dts, that is, A T = Dts and denote T.
From T draw a horizontal line to the right to the segment A4 H2 and denote T2.
Smell
From points A4 And H2 to the right we measure 10 cm and denote IN And H3 and connect these points with a straight line.
From A2 lower the diagonal to the waist line as in the figure and denote T3.
Smoothly round the corner.
If you think the rounding of the corner seems steep, then you can make it smoother and less protruding.

And since the volume along the chest line is greater than in the shirt and the neck too, then on the back along the middle seam we expand by 3 cm from the point A1 to the left and denote A.
In the drawing of the back and front, we lengthened the shoulder line by 2 cm and deepened the armhole by 3 cm. Now we measure the length of the armhole of the back and front in the drawing with a centimeter tape and also measure the sleeve sleeve. If the length of the armhole does not match the length of the armhole, then lower the height of the armhole by 1 cm and expand at points 1 and 2 to the desired value. And we draw the cuffs as shown in the figure and it will be a separate part from a different fabric, and the length of the sleeve remains the same.
Small details such as belt loops, cuffs, pocket, flap, leaflet, belt are designed in full size with all seam allowances.


The bar is 10 cm wide, and the length is measured on the shelf along its length and along the neck of the back as shown by the red line in the figure above.
Model 2.
Robe.
Here are the files of the second model.
Model 3.
The robe looks good on big women.
Here are the files of the third model, it says 103.
Files in wmf format. open everywhere. Download the desired height, and choose the size from the archive.
Each file has a special 10x10cm grid. this is the printout guide.
This model was developed especially for large sizes, so there are no small sizes yet.
A dressing gown for a girl can be sewn from terry cloth measuring 75 * 150 cm. If you weave narrower, you will get shorter sleeves. The edges are finished with a roll.
There are three options for a dressing gown: the dressing gown is made with a slight smell and the shelf is tied with bows (5a); there are no fasteners and the floor is held by a belt (5); the robe is tied on the sides with bows or fastened with buttons (5b).
A drawing of a dressing gown pattern of 32 - 34 sizes is given.
Terry women's dressing gown, size 44-48
From terry cloth measuring 180 X 130 cm you can sew a bathrobe with a hood. At the same time, the measure of the circumference of the hips should not exceed 110 cm, otherwise the dressing gown will not pass in width (the pattern is given precisely for these dimensions).
The design of the bathrobe is extremely simple and economical! not a single centimeter of fabric will go into flaps.
Fold the fabric across and mark the center center line. From it to the left and to the right, set aside 1/4 measurements of the circumference of the hips. Mark the length of the product, the length and width of the sleeve, how to do this can be seen in the drawing.
Cut the armholes and shoulder seams, cut out two squares measuring 17X17 cm - they will go to pockets or gussets if you want to make the sleeves looser.
Pay attention to the lines marked on the drawing with a length of 8 cm do not need to be cut - in this place the hood and the robe are connected.
Sew into the armhole. Then sew the shoulder seam and the sleeve seam at the same time - they continue each other. Sew the corners of the hood and sew the bottom of the hood to the neck.
The floors of the dressing gown and its bottom can be edged with braid or hemmed with a “zigzag”.
Warm bathrobe
It is better to sew a long, cozy dressing gown from soft, warm fabrics - flannels, bikes, velveteen, terry. The proposed models are developed on the same constructive basis, they can be sewn according to the pattern given for the 54th size, III growth in a reduced form, without allowances for seams. Dressing gowns of a direct silhouette with a big smell, an armhole of sleeves lowered.
- The neckline and hem of the dressing gown are trimmed with a placket with a line in four rows. The stitching also decorates armholes, sleeve hem, pockets and waistband,
- In this model, the shawl collar, sleeve cuffs, pockets and welt pocket leaflets are finished with a checkered stitch.
- It is possible to trim the dressing gown with an edging of a contrasting color, it is located along the neckline, on the floors of the gown, along the armhole line and at the bottom of the sleeves. From the same fabric. ribbons are made, tied with a bow and holding the floors of the dressing gown. There are pockets in the side seams. The width of the edging is 2 cm.
- You can use a smart braid to finish a dressing gown made of printed fabric. Gather the sleeve with an elastic band.
- Fabric consumption per bathrobe: 4.5 m with a width of 90 cm or 2.6 m with a width of 150 cm.
Children bathrobe
Size 28 (110-56)
For sewing the model you will need:
Blue terry cloth 1.10 m wide 140 cm, white terry cloth 0.60 m wide 140 cm.
Opening the robe:
From blue terry cloth:
A Back, one-piece with sleeves - one piece
with a fold
B Shelf, one-piece with a sleeve - two parts
From white terry cloth:
IN Inlay with a stand-up collar - two parts
G Stitched facing of the shelf - two parts
D Pocket - two parts
a) an inlay along the bottom of the back (made of white terry cloth) 47 cm long and 10 cm wide;
b) pocket lining (made of white terry cloth, 14.5 cm long, 4.5 cm wide);
c) facing the bottom of the sleeve (made of white terry cloth) 27.5 cm long, 8.5 cm wide;
d) a belt (made of blue terry cloth) 114 cm long and 8 cm wide, 4 cm in finished form.
Seam and hem allowances are 1.5 cm.
The procedure for sewing a bathrobe:
We will process the side seams and, without interrupting the stitching, the lower sections of the one-piece sleeves. Let's do the shoulder seams. Iron the seam allowances.
We will process the pocket with a pocket facing. With the front side, we sew the facing from the wrong side of the pocket. We wrap the cut of the pocket and take the facing from the front side of the pocket. Sew off the stitching carefully. We attach the pocket in the marked place to the shelves. We connect the inlay with a stand-up collar with the facings of the shelves and backs. With the resulting facing, we will process the cuts of the neck, sides and bottom of the shelf and back. We carefully stitch the facing at a distance of 0.5 cm.
Fold the belt part in half lengthwise and stitch three sides. We cut the seam allowances close to the line, at a distance of 0.5 cm. Turn the belt inside out, and process the seam by hand. The belt is carefully stitched to the edge at a distance of 0.5 cm.
And here is the pattern of a kimono robe for size 48-50. It sews very easily.
If you have any questions about sewing a kimono robe, please contact us, we are always happy to help.
I found in old notes a pattern that's so interestingdressing gown.It is better to choose a thin, hygroscopic fabric for a summer dressing gownfrom natural fibers - chintz, silk,and for winter - terry, flannel. It is desirable that the fabric be plain or a companion fabric. The width of the fabric should be 1m 40 cm. If there is none, but only a narrow one, then you will have to sew it. The seam will be in the middle of the robe.This robe is very convenient on trips - it takes up little space. And for the beach - a great find.
A novice seamstress can also sew such a bathrobe.Make a pattern, cut the fabric, adding seam allowances on all sides.
1. Cut lines for armholes (20 cm).
2. Finish the armholes with a piping or zigzag hem stitch.
3. Sew the belt.
4. Treat the edges of the robe with piping or lace.
5. Try on a bathrobe.
6. Mark the places for sewing the belt loops.
7. Sew on the belt loops.
Source: http://www.poradka.ru/publ/hand_make/shem_sami/shem_letnij_khalat_za_15_minut/6-1-0-12
A bathrobe is not only home wear, but also a style of a wrap dress that can be worn in a decent society.
Take a cotton fabric with a small amount of elastane and a bright pattern. Bright pattern is very fashionable this season. Draw a 130x120 cm rectangle. Cut it out and fold it in half. Cut off the corners to make an oval - this is the basis of the pattern. Take your back width measurement. In the center of the oval from the bottom, draw a line 1 meter long, put a mark and set aside the measurement halves from it in different directions. Make armholes along the width of the back, 20 cm long. The pattern is ready.
To keep the edge of the fabric from fraying, treat it with a cotton bias tape, which can be bought at any sewing store. Make a belt - simply cut a strip of fabric 2 meters long and fold it in half with the right side inside, sew and turn inside out. Attach a loop of bias tape at waist level and sew on a button. Dressing gown is ready!
Evening gown
If you sew a dressing gown from thin viscose jersey, you will get a decent outfit for the evening. The main thing is that the fabric is double-sided and there is no need to process the edge. The base of the dressing gown is cut, as well as in the first version. The only difference is the sleeves. Cut out two rectangles 30 cm long and 40 cm wide. Sew the side seams and attach the sleeves to the armholes. Sew on the machine. The dress is ready!


A summer dressing gown will never be superfluous. If you have not yet managed to use your vacation in the summer and you have everything ahead of you, and even those who have already plunged into work after a summer vacation, because not all warm days have passed this year. Such a bathrobe is easy to sew and you can always please yourself with a fresh little thing that is very convenient for any situation. Dressing gown pattern for size 44-48. Take the fabric in any color that suits you best. In terms of quality, it can be like cotton, satin, staple. You need 3.5 meters of fabric with a width of 80 cm. Treat the neck and all sections with an oblique trim, preferably of some other color, in contrast. The bottom can be decorated with a frill, to taste, or simply left with a straight cut. Such a dressing gown without fasteners of the type with a smell, the belt fixes on the waist line, one half through the loop.

Robe pattern
Download robe pattern for free from pattern.ru:
letnij-halatik.rar (downloads: 3971)
How to cut a bathrobe directly on the fabric

We sew a bathrobe, if you remember.
The dressing gown that we are going to sew, I usually draw directly on the fabric, without a side seam.
For the rest, the construction of the pattern is below:
1. Fold the fabric in half. The fold of the fabric will be the middle of the back.
2. We set aside half of our largest volume from the fold (that you have more chest or hips) plus an increase in the freedom of fitting 10-15 centimeters. We draw a line parallel to the fold. This is the middle front.
For example, the volume of the hips is 110 + 10 = 120. Set aside 60 cm from the fold.
3. Stepping back from the top edge of 1.5 cm (seam allowance), lay down the length of the front to the waist along the line of the middle of the front. We draw a waist line.
Extend it 12-15 centimeters beyond the mid-front line for a smell. Put a notch.
4. From the waistline, set aside the height of the side (cm 13-15, depending on height). Let the armhole be larger for convenience.
5. Divide the entire width of the pattern in half. To get the width of the shelf, add 2 cm to this number, to get the back, subtract 2 cm.
For example, the drawing is 60 cm. The width of the shelf is 30 + 2 = 32 cm, the back is 30−2 = 28 cm.
We postpone the width of the front panel from the line of the middle of the front, put a notch on the line of the height of the side.
6. Along the fold line, we postpone the length of the back to the waist from the waist line. We draw the line of the shoulder of the back.
7. Draw the neckline of the back. Depth 3-4 cm, width 9-10 cm. All this is set aside along and from the shoulder line of the back.
8. From the neckline we draw a shoulder 3-4 centimeters long, longer than our shoulder (let there be comfortable lowered shoulders). The bevel of the shoulder line is 3 cm.
9. Draw the armhole line for the back. It should start from the shoulder line at a right angle.
10. From the line of the middle of the front, set aside 9-10 cm along the line of the shoulder of the front. This is the neck width.
In my drawing, the shoulder line of the front and back are the same. I have the length of the back to the waist and the length of the front to the waist are almost equal. Yours may be different.
11. We connect with a smooth line the point of the width of the neck and the notch on the waist line, which we made 12-15 cm from the middle of the front.
The line is slightly rounded, almost straight. And then the cutout on the chest will be very large. In the video for subscribers, I will show you how to draw it correctly, according to the desired neckline.
12. From the serif on the waist line, draw a line just down, parallel to the fold. It's generally recommended to do a little flare so the smell stays straight and looks vertical, but I never flare to save fabric.
13. We draw a line of the front shoulder with a bevel of 4 cm.
14. We draw an armhole in front from the shoulder to the notch on the side height line.
The robe pattern drawing is ready.
To process the front, we will need two strips 10 cm wide, 150 cm long.
You will also need a strip 10 cm wide and 150 cm long for the belt.
If your largest girth is up to 110 cm, then they remain from the width. If more than 110 cm, then you have to take 20 cm more fabric.
I will give the ladies sleeve pattern in the next post. If urgent, the construction is the same as for the shirt
More on video:
Bathrobe from Olga Nikishicheva
Winter bathrobe
The figure shows a winter coat.
It is made of smooth fabric, trimmed with black smooth fabric.
One-piece dressing gown, with two welt pockets.
The sleeve is long with a cuff.
The back is one-piece, with two open tucks.
When sewing a dressing gown for a thin figure along the back line, make it cut-off, add wedges along the waist line.
Construction of a bathrobe pattern.
Draw the main pattern (see fig.). From point B, make an increase on the board and build a one-piece collar. When constructing a pocket from point T 1, set aside 6 cm down. From point a, draw a line 24 cm to the left and build a welt pocket. If you want to make the robe more fluffy along the bottom line, you need to increase the width from point H 1 to the left.
Sleeve.
A sleeve pattern drawing is built in the same way as a one-seam sleeve. The only difference is that at the sleeve of the robe, the width along the bottom line is reduced to 30 cm.
Cuff.
To build a cuff pattern, build a triangle in width equal to 30 cm and height - 8 cm. Further construction is given in the figure.
Cutting and sewing a bathrobe.
Fold the material in half and place the shelves, back, sleeves, cuffs and collar along the shared thread, circle along the contour, making allowances for the seams.
First, pockets are processed; make a landing of the contour of the sides, sew on the selection; landing on the shoulder contour of the back shoulder; sweep waist tucks of the shelf and back; sweep the robe along the line of the shoulder and side; fold in the right sleeve.
Making the first sample.
All seams should be overcast and ironed.

How to sew a robe? Construction of a pattern of a dressing gown with a smell.

Construction of a pattern of a bathrobe.
If you haven't built yourself a basic dress pattern yet, now is the time to do it!
And after we've spent time building the dress pattern, changing the dress pattern to the robe pattern is a breeze!
We outline the patterns of the back and front of the main dress. Let's draw the lines of the waist and hips. Also, do not forget to expand the back and front along the bottom towards the side cuts by 4-6 cm - to feel not only beautiful, but also free.
In the drawing of the shelves of the dressing gown from the middle of the front, we set aside to the right along the waist line 8-12 cm, along the bottom line 12-17 cm - an allowance for half-skid.
We will connect the marked points with a straight line - it is the edge of the half-skid.
Let's stand a one-piece collar.
Relief lines.
From the middle of the front of the robe pattern, set aside 8-10 cm along the waistline to the left, connect the marked point with the center of the shoulder tuck. We continue the line to the shoulder cut. From a point 8-10 cm to the left along the waistline, set aside a segment equal to 4 cm (a solution of a waist tuck). From its middle to the intersection with the bottom line, we restore the perpendicular. Set aside 2-3 cm horizontally to the left and right. Connect the left point 2-3 cm under the ruler with a point 8-10 cm.
The resulting broken line is one of the two relief lines of the robe.
From the point of intersection of the relief with the shoulder cut, set aside a segment equal to the opening of the shoulder tuck. We connect the marked point, under the ruler, with the center of the shoulder tuck. Set aside 3-5 cm from the center of the tuck down along the relief line, connect the marked point with a 4 cm point on the waist line, which, in turn, under the ruler, with the right point 2-3 cm on the bottom line.
The resulting broken line is the second line of the relief.
From the waist line, along the relief line, which is located closer to the side, we lay down 6-8 cm, along the side cut 14-16 cm. A smooth line connecting these points is the pocket entry line.
From the edge of the skid, we set aside the width of the selection: along the shoulder section 2-3 cm, along the bottom and along the waist 8-9 cm, we will connect the marked points under the ruler. The resulting broken line is the edge of the selection.
On the waist at the side cut and the relief line, we mark the control points.
We number the details, indicating the direction of the shared thread on them.
Based on the pattern of the sleeve for the robe, 3/4 of its length is marked: 48-50 cm + 12 cm - doubled cuff width + 5 cm for the hem: 50 + 12 + 5 = 67 cm.
If the lapel of the cuff of the sleeve and the collar are made of finishing fabric, then the length of the sleeve is calculated: 3/4 of its length + 6 cm (cuff width, + 1 cm per seam).

Open the robe.
We transfer the middle part of the shelf pattern to another sheet of paper and cut the entire pattern along the second relief line and along the pocket entry line.
Lay out the patterns on the fabric along the shared thread. We will give an allowance of 12-14 cm to the upper side part of the shelf - to the depth of the pocket. Mark the seam allowances. After that, cut out the details of the pattern.
To process the upper cut of the lower part of the side part, we cut out a facing with a width equal to the depth of the pocket.
The sequence of sewing a bathrobe.
We will lay snares along the contour lines of the patterns of the dressing gown, along the middle of the thigh, control points and the line of entry into the pocket, and mark the middle of the back with interlining snares.
Next, let's start sweeping the upper and lower side parts of the shelves along the pocket entry line. With the front sides inward, we sweep along the relief line cut to cut the side and middle parts of the robe shelf, combining the control points on them.
We sweep away the shoulder and waist tucks on the back, and then the shoulder sections, the sections of the lower collar, after which we sweep it into the sprout. Sweep side cuts, one sleeve, after which we will try on.
After trying on, let's see: check the departure of the collar of the robe, cut it if necessary, trim the selection (they can be with extensions that are sewn with a seam; the seam is ironed).
Pocket processing.
We spread the upper and lower parts along the line of the entrance to the pocket. We put the facing for processing the upper cut of the lower part with the front side on the front side of the part. We sweep the cut to the cut and stitch it with a seam 0.8-1 cm wide. Bend the facing to the wrong side, sweep the seam to form a piping from the bottom part 0.2 cm wide.
After that, lay a finishing line along it at a distance of 0.8-1 cm from the fold of the part.
We sweep the upper and lower side details of the dressing gown along the line of the entrance to the pocket. Stitch the bottom edges of the pocket burlap.
We sew the middle part of the pattern from the side along the lines of the relief, overcast the cuts and iron them towards the middle of the front. We will lay a finishing line along the relief (the width of the seam is the same as on the pocket).
Stitch and overcast shoulder and side sections.
We do the second fitting of the bathrobe.
After trying on, we sew the sleeves into the armholes; slices are processed.
We sew the bottom of the robe, sweep it out of the loops, sew on the buttons.
Bathrobes usually come with ties, so the next step is to sew the pre-prepared ties to the edge of the left shelf and to the right side cut along the waist line.

How to sew such a robe? Use the robe pattern above!
The basic pattern of a wraparound robe is suitable for modeling home clothes. By understanding how to sew a simple homemade dressing gown, you can create cozy things for the whole family, for adults and children.
Dressing gown - comfortable home clothing, freely and softly adjacent to the body. Bathrobes can be bath robes made of terry cloth or home made of warm or light fabric. A distinctive feature of the wrap dressing gown is the absence of fasteners (buttons or zippers). The edges of the robe overlap each other and are tied with a soft belt made of the same fabric as the robe itself.


Consider several models of bathrobes and understand the features of their sewing.
Tailoring Features
First, of course, measurements are made. To build a pattern of a bathrobe, you need to know the following measurements:
- back length to waist (Dst);
- shoulder length (Dp);
- semicircumference of the neck (Ssh);
- semi-girth of the chest (Сг);
- semicircumference of the waist (St);
- semicircumference of the hips (Sat);
- sleeve length (Dr);
- the length of the product from the neck to the desired length (Di).
The free cut of the robe is ensured by the absence of darts on the chest, so they are not taken into account in the drawings.
For beginnersHere is a simple pattern like this:

There are only five parts, plus a pocket that can be made as desired. This pattern can be taken as a sample and various styles can be modeled on its basis.
On average, it will take 4.5 meters (with a width of 90 cm) or 2.5 meters (with a width of 150 cm) of fabric to sew such a bathrobe. It is recommended to take a flannel or bike.
More complex robe pattern (sleeveless):

AD is the length of the product;
DC - semi-circumference of the hips with an increase of 7 cm;
AT - the length of the back to the waist with an increase of 1 cm;
Г4Н - side line;
AG - armhole depth with an increase of 3 cm;
G2G3 - armhole width (¼ SG + 2 cm);
P - point of construction of the shoulder (2 cm + Dp + 2 cm).
The front and back are almost mirror-like, but the front part has a lapel along the right edge, which must be taken into account when building. Increase in smell - 7 cm.
We note in advance that the pattern for size 56-58 is built according to the same principle as for size 42-48, however, it has its own characteristics associated with allowances for a free cut.
Below is a table of sizes for building a pattern for a full figure.

Sleeve pattern:

When constructing a drawing of a sleeve pattern, it is necessary to calculate the height of the okat (line OO1). To do this, you need to know the length of the armhole on the pattern of the robe.
OO1 \u003d 1/3 of the length of the armhole - 5 cm.
OP and OP1 - auxiliary lines, equal to ½ the length of the armhole.
From the fabric, cut out the following details and stitch along the seams:
- shelf - 2 parts;
- back - 1 piece with a fold;
- selection - 2 parts;
- sleeve - 2 parts;
- pocket - 2 parts.
Make allowances for the seams of 1.5 cm, and for the bottom of the robe and sleeves - 4 cm each.
One of the popular models is the kimono robe. It is also sewn with a smell, but has some features in tailoring and is distinguished by wide sleeves. Most often, these dressing gowns are sewn from light fabric - satin or silk.


A simple wraparound kimono with sleeves is sewn according to the following basic pattern:


The main feature of the kimono is the T-shaped pattern, i.e. the sleeves are sewn on the same line. You can make a pattern of one piece and sew on the sides from the edge of the sleeves to the bottom of the product. In front, it is necessary to determine the depth of the neck, make an appropriate cut, cut in front to the bottom, and then trim the edges with fabric or tape.


You can also sew a simple dressing gown with buttons. The pattern of a dressing gown with buttons differs from the pattern with a smell in the absence of a lapel and the depth of the neck. Such dressing gowns can be sewn according to the figure with darts on the chest.
The simplest scheme of a dressing gown with button fasteners:


By the same principle, a dressing gown is sewn with a zipper, but it is necessary to leave the same allowances along the edges for sewing in the fastener.


Children's option
The difference between a children's dressing gown and an adult one is in the selection of fabric and sewing technique.
Terry cloth is usually used to make the dressing gown very soft. For children, you can choose bright fabrics or with funny patterns.


Simple dressing gowns are sewn according to the principle of a kimono from one or two parts, so that extra seams do not rub children's skin. For example, according to this pattern:

This robe is suitable for both girls and boys, especially small, preschool age. They can be decorated with appliqués.

From an ordinary terry sheet measuring 180 by 130 cm, you can sew a dressing gown with a hood. There is only one condition - the measurement of the circumference of the hips should not exceed 110cm, otherwise the robe will not fit in width.
The design of the bathrobe is extremely simple and economical: not a single centimeter will go to the rags.

Fold the fabric across and mark the center center line. From it to the left and to the right, set aside ¼ measurements of the circumference of the hips. Mark the length of the product, the length and width of the sleeve, how to do this can be seen in the drawing. Cut the armholes and shoulder seams, cut out two squares measuring 17 by 17 cm - they will go to pockets or gussets if you want to make the sleeves looser. Please note: there is no need to make an incision along a 16 cm long line - the hood and the robe are connected here.
Sew into the armhole. Then stitch the shoulder seam and the sleeve seam at the same time - they continue each other. Sew the corners of the hood and sew the bottom of the hood to the neck. The floors of the dressing gown and the bottom can be edged with braid or hemmed on the machine with a zigzag seam.
The bathrobe can be made long, but then the sheets are not enough, you will have to use the usual terry cloth.
The armhole (the place where the sleeve is sewn to the “body”) is half the width of the sleeve. Naturally, where it says "armhole", you need to make an incision.
As in the designer - cut and folded. There will be no problems at all.

Information for those who like to dress beautifully and fashionably. I found an interesting website http://www.stock-center.ru, this is the official website of the Stock Center chain of stores, which have been leading the market for over ten years. Goods in stores for buyers with low and average earnings, but despite this, the models are very rare, high quality and beautiful. Here you can find branded clothes and at very low prices. Stylish ladies will not be disappointed by visiting the site, there are a lot of not only clothes, but also shoes and other goods. Shopping, as you know, is the best cure for depression, and if it doesn’t hit your pocket yet, then a great mood lift is guaranteed!
This cute cotton terry wrap robe with hood will be indispensable after a shower or sauna, and will also gently warm you on chilly evenings. We invite you to sew this wrap dressing gown according to our free pattern, which is very easy to build according to your own measurements.
Required measures:
To build a pattern of a bathrobe with a smell and a hood, you need to take the following measurements:
Back length to waist 38 cm
Shoulder length 13cm
Half neck 18 cm
Half bust 48 cm
Half waist 38cm
Half hips 48 cm
Robe sleeve length 60 cm
Robe length (measured along the back from the seventh cervical vertebra) - 90 cm
Pay attention to the pattern of the robe with a smell and a hood. There are no chest darts along the chest, since the increase in freedom of fitting allows them not to be done.
Construction of a bathrobe pattern
Rice. 1. Pattern of a bathrobe with a wrap and a hood
The pattern of a robe with a wrap and a hood is modeled in the same way as the one we gave earlier. The side and neckline of the front under the hood are built differently.
Build a pattern for the front and back of the wraparound robe and then move on to building an increase on the board.
Addition on board. From the line of the middle of the front, set aside 6 cm to the right and draw a vertical line to the waist line.
Extend the neckline by 7 cm as shown in Fig. 1, connect points 7.5 and 6 along the pattern with a slightly curved line.
Rice. 2. Pattern of a wrap robe: building a hood
Draw a rectangle 45 x 30 cm. From the lower right corner, lay up sequentially 11 cm, 17 cm, 17 cm. Divide the upper horizontal line in half.
From point 11 to the right, set aside the length of the neck of the back (measure according to the pattern), 3 cm for the tuck and the length of the neck of the front according to the pattern. On the pattern, connect the pending points as shown in Fig. 2.
Building a hood tuck. Divide the tuck solution in half and raise a perpendicular 15 cm long from the division point. Draw a tuck. Build the lines of the hood as shown in Fig.2.
ADVICE! In this dressing gown, the hood is cut double, however, if you want to save fabric, additionally cut out the hood trim 4 cm wide.
How to sew a wrap dressing gown
Sew a bathrobe with a smell should be the same as. Sew the details of the hoods along the outer (rounded) sides, fold into each other with the front sides, stitch along the upper straight side, turn it out, sweep it cleanly, iron it.
Then slip the hood into the neckline between the hem and the shelf (the hem is turned over to the hood), stitch, turn the hem to the wrong side and stitch along the side at a distance of 1 cm from the edge, sewing on the hood, sides and bottom of the dressing gown a trim that wraps around on both sides.
In addition, sew a belt for a dressing gown 2 m long and 4 cm wide in finished form. Your robe with wrap and hood is ready! Wear with pleasure!


