Do-it-yourself small crafts for March 8. Beautiful pasta beads. Frame manufacturing progress
International Women's Day is approaching on March 8, I want to express my love, respect and gratitude to my mother. The best way to please mom on this day is to give a good handmade gift from the heart. In this article, we have selected the best gift ideas for mom on March 8th.
You will need: colored paper, scissors, glue.
Master Class

creative indoor flower

You will need: pot, styrofoam, skewers, artificial grass, glue gun, candy bars, chewing gum, gift cards, etc…
Master Class

Creative indoor flower is ready!
coffee mug

You will need: mug, coffee beans, cotton pads, thick white thread, brown acrylic paint, superglue.

Master Class

coffee heart

You will need: coffee beans, paper, wire, thread, glue, cardboard, jute thread, sponge, iron can, brown paint, ice cream sticks, decoration elements - flowers, ribbons ...
Master Class

The coffee heart is ready!
Ship of money

You will need: 7 sheets of A4 format with the image of various banknotes (euro, dollars, hryvnia, rubles), white sheets of A4 format, silicate glue, scissors, glue gun, thick cotton threads, skewers 20-30 cm long, foam plastic, flat box on half as wide as the bottom of the ship.

Master Class
- Fold the boat from a sheet of paper, as shown in the photo.

- Carefully turn the boat inside out so as not to tear.
- Fold and iron the boat.
- Outline the boat on another sheet, then draw a dividing line and cut out 2 pieces.

- Coat them well with glue and glue them to the inside of the boat to make two-layer sides.
- Cut the money sheets into strips 1.5 cm wide.

- Tape the boat with money stripes.
- Thoroughly coat the entire boat with glue for strength and leave for 2 hours to dry completely.
- Fold the same bills side by side and glue them. Make 3 of these - out of five, out of three, and out of four bills. These will be the sails.

- Carefully thread the sails onto the skewers and fix the joints with glue so that they do not slip.
- Take the boat and glue 3 pieces of Styrofoam inside.
- Insert skewers into foam for front and rear yards. The front yard should be 1/3 longer than the back. Make sure the lines are even, then secure with a glue gun.
- Insert skewers with sails, placing them at the same distance. It is worth noting that the deck should be smaller than the stern.

- Fold the threads in 2-3 layers the length of the sail and additional centimeters for the ties.
- Tie the threads to the skewers as shown in the photo.
- Cut 2 bills diagonally and fold the edges 0.4 cm.
- Glue banknotes (sails) to the rail threads.

- Make the sails to the stern in this way: do not twist the bill into a tube much, bend the edge, then glue it.
- Fold 3 bills in half, shape them into flags, then glue.
- Cover the deck with banknotes.

- Make a ship stand out of a flat box.
- Glue the desired background onto the box.
- Glue the ship.
Vase from a bottle
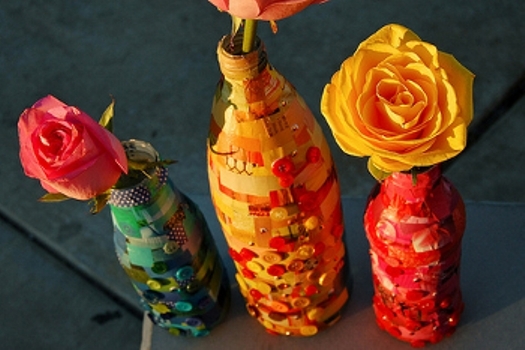
You will need: glass or plastic bottle, magazine, PVA glue, decoration elements (beads, buttons, sparkles ...).
Master Class


You will need: a transparent glass, a ball, scissors, felt-tip pens, a sheet of white paper, glue.
Master Class
- Cut the balloon in half along the wide side.
- Pull the ball over the glass so that the hole is centered and looking down.
- Draw a cute picture, cut it out and glue it on the glass.

You will need: tin can, wooden clothespins, flowers, water, hearts for decoration.
Master Class


You will need: a sheet of paper 100x15 cm or glue A4 sheets together, 2 thick sticks, felt-tip pens, adhesive tape.
Master Class

Bookmark "Critter"

You will need: cardboard template, scissors, glue, decoration elements felt-tip pens, paints, buttons, beads, sequins ...
Master Class

We present to your attention original and creative packaging for gifts! You can put candies, magnets, jewelry, money and other small gifts inside them.
Candy tulips

You will need: corrugated paper of your favorite colors for buds, green corrugated paper for leaves, Raffaello sweets, double-sided thin tape, green teip tape, satin ribbon, packaging material for the bouquet, scissors, wire, pliers, wooden stick, if desired, to create dew - transparent beads , glue gun, tweezers.
Master Class
- Prepare the wire by making the desired number of stems of the same length.

- Cut long strips of corrugated paper, cut the long strip of corrugated into 2 pieces, then cut into 4 pieces. You should get 8 strips, 6 of them will be needed for the tulip bud.
- Turn each strip around the center, bend in such a way that the front sides of the strip are directed in one direction.

- Make 6 blanks in the same way.
- Attach double-sided tape to the end of the wire.

- Attach the candy to the end of the wire.
- Collect the tulip bud in this way: take the first petal and attach it to the adhesive tape. Place the second and third petals near the candy and, holding with your fingers, fix with tape tape.

- Attach the remaining petals in the same way, forming a tulip bud and securing with tape.
- Trim excess crepe paper at an angle at the base of the bud.
- Wrap the stem with tape.

- Cut off a strip of green crepe paper.
- Cut into two almost equal parts.
- Fold each part 4 times and cut out the leaves.
- Pull each leaf out in a spiral using a wooden stick.

- Place a short leaf, and lower on a longer one. Secure each leaf with tape. Tulip is ready! Make the right amount of tulips in different colors.
- Collect tulips in a bouquet in this way: connect 2 tulips and pull them together with teip tape, then add one tulip one at a time, placing the colors in a checkerboard pattern.
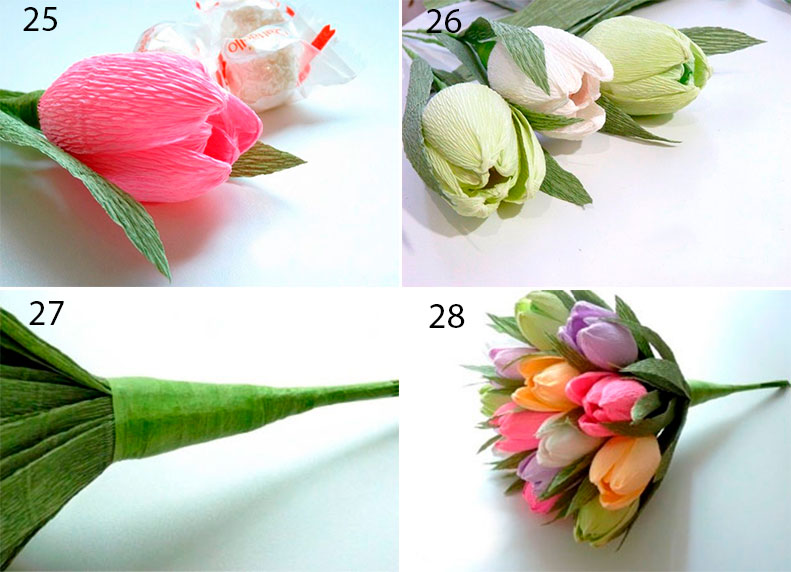
- Cut 20 leaves, and arrange them around the perimeter of the bouquet, fixing with teip tape.
- Wrap the bouquet in wrapping paper and tie with ribbon.

- Create dewdrops on the tulip buds by gluing clear beads using tweezers and hot glue.
Spectacular ribbon and bead bracelet

You will need: ribbon, beads, thread and needle.
Master Class


You will need: cardboard template, scissors, decoration elements felt-tip pens, paints, buttons, beads, sequins, ribbons ...
Master Class


You will need: a printed bag template (listed below) or a redrawn one, scissors, felt-tip pens, paints, buttons, beads, ribbons, sequins…
Master Class

paper shoes

You will need: a printed shoe template (it is listed below) or a redrawn one, scissors, glue, felt-tip pens, paints, buttons, beads, sequins ...
Master Class

paper cake

You will need: cardboard template, scissors, decoration elements felt-tip pens, paints, buttons, beads, sequins ...
Master Class

Foamiran head wreath

You will need: foamiran 0.5 cm thick (orange, yellow, cream, light green, dark green and red), scissors, toothpick, curly scissors, oil paint in autumn shades, sponge, sheet of paper, iron, floral wire, ruler, super glue, lighter, lilac clay (for blueberries) or beads, teip tape, foil, wire at least 2 mm thick and 60 cm long, tape or rope, mold (leaf shape).
Master Class
- Print or redraw the leaf templates, then cut them out.

- Circle the templates on foamiran with a toothpick, then cut them out.
- Make a sufficient number of multi-colored leaves, for example 60, remember, the more there are, the more magnificent and beautiful the wreath will look.

- Give some realism to some of the leaves by trimming the edges with curly scissors.
- Scratch a small part of the leaves with a toothpick.
- Tone the leaves in this way: apply a little oil paint on the sponge, blot the foamiran leaf, then remove the excess with a piece of paper.

- Combination of colors: protonate a yellow foamiran leaf with light green and brown paint. Also protonate some yellow leaves with orange, red and light green paint. Protonate red leaves with brown, green leaves with burgundy, brown and dark green.

- Heat the iron on the second mode, attach the sheet for 2 seconds, remove and press against the mold to make an impression of the sheet. Repeat this process with all sheets. Please note that this should be done quickly and very carefully, since foamiran is highly flammable. If you are new to this business, it is better to skip this paragraph and get on with your work.

- Cut the floral wire into 7 cm lengths and make a loop at the end.
- Glue floral wire onto each sheet from the front using super glue.

- Burn the edges of the leaf with fire using a lighter. The edges should be realistically curved. Repeat this process for all leaves. Do this carefully, I remind you that foamiran is highly flammable.

- Roll a blueberry-sized ball of purple clay. Blind 15 berries, put each blueberry on a wire with a loop greased with super glue. Make notches with the tips of scissors on the top of the blueberries and set aside to dry. Beads can be used as blueberries.

- Start assembling the wreath in this way: form small bouquets of leaves and berries, fasten them with teip tape.
- Cut out rose petals in the form of a drop from red foamiran. For one bud, 10-15 petals are required. The number of buds depends on your desire, you can make from 3 to 7.

- Tint the edges of the petals with brown oil paint.
- Make the petals thinner in this way: heat the petal on the iron for 2 seconds, then fold it into an accordion and grind the petal with your fingers. Open the petal and create an indentation and curl the edge of the petal outward. Repeat this process for all petals.

- Finish the edges of the petals with a lighter.
- Roll up a drop of foil, make a loop on the wire, apply super glue and put on a drop of foil.
- Glue 2 petals opposite each other, and form a bud by gluing the petals in a checkerboard pattern, opening the flower. Form the desired number of roses in the same way.
- Make the base for the wreath by cutting 60 cm of wire. Make loops at the ends.

- Cut the tape into pieces 15 cm long, fold the sticky side inside each piece and cut lengthwise into 2 halves.
- Open the tip of the tape, attach to the base 10 cm from the edge and wind the wire.
- Attach bouquets of leaves and berries, fixing with teip tape.

- Weave them in the order you like best.
- Do not forget to insert roses in the gaps between the leaves.
- Attach a string or ribbon to the ends of the wreath.
Book safe

You will need: book with a hard cover, pva glue, water, stationery knife, brush, simple pencil, ruler.

Master Class

Salt dough pendant

You will need: salt dough, glass, acrylic paints, sequins, brush, hanging ribbon, cocktail tube, dog's foot for printing on dough or your fingers, transparent glue, rolling pin.
Master Class

Papier-mâché cup

You will need: cardboard, scissors, newspaper sheets, adhesive tape, pva glue, brush, paints, transparent nail polish.
Master Class

The long and cold winter is over. Now the sky is getting higher, the air is cleaner, and after months of boring monochrome, finally, the first bright colors appear in nature. Spring has come and everyone desperately wants changes: at least - to buy a new thing in the wardrobe, the maximum - to plan a grand celebration for International Women's Day for all relatives and friends. Unfortunately, you won’t wear a new dress every day, and the main spring festival of flowers and women will still have to wait. Well, you can use the time to good use and prepare crafts for March 8 with your own hands for a child in kindergarten or at school, for a friend, beloved mother and grandmother. Bright and extraordinary products made of paper, napkins, fabrics, branches, cotton pads, threads will give the culprits bright emotions and bring the effect of novelty and a light spring mood into the house. Watch our master classes and create magic with your own hands!
Simple DIY crafts for March 8 in kindergarten (younger group)

Cheerful and bright flowers made of corrugated paper, combining Mexican colors and the shape of lush pom-poms, will be an excellent option for a simple DIY craft for March 8 in the younger group of kindergarten. Under the strict guidance of mothers, kids can easily cope with a simple product. And our step-by-step photo tutorial will help speed up and simplify the process. The very next morning you will be able to show off a simple but very beautiful craft for the holiday of March 8 in the younger group of your kindergarten.
Necessary materials for paper crafts by March 8 in the younger group of kindergarten
- corrugated paper of different colors 30x50 cm - 7 pcs.
- thin wire
- scissors
- paper clips - 7 pcs.

Master class with step-by-step photos on simple crafts for kindergarten on March 8

Do-it-yourself children's crafts for March 8 in the senior group of kindergarten

A wonderful holiday - International Women's Day - gives us another opportunity to show imagination and experiment with natural and improvised materials. We suggest you make a simple craft with your own hands by March 8 in the senior group of kindergarten. For its design, you need only a couple of simple gizmos, always available in home bins. But the finished children's craft for March 8 with their own hands will conquer everyone without exception.
Necessary materials for children's crafts in the senior group on March 8
- strong and thick wire
- yarn for knitting bright colors
- pliers
- scissors

A master class with a step-by-step photo on do-it-yourself crafts in kindergarten for International Women's Day

Paper crafts for the holiday of March 8 at school: a step-by-step master class with a photo

To create a bright and unique craft for the holiday of March 8 at school, it is not necessary to spend money on expensive auxiliary materials or learn new complex techniques. A beautiful product can be made even by a first-grader from ordinary colored paper. A multi-colored panel of primitive origami modules will decorate a school office, a children's room or a spring exhibition in a kindergarten. And following our step-by-step master class, you will prepare the perfect paper crafts for March 8 without much difficulty.
Necessary materials for paper crafts for March 8 at school
- colored or tinted paper
- thick cardboard base
- glue stationery
- scissors
Instructions with step-by-step photos of a simple paper craft for the holiday of March 8 at school

Do-it-yourself perfect spring crafts for March 8 for mom

Flowering plants are true magic. After all, just a couple of branches of hyacinths, mimosas or lilacs can improve the mood of a dear person on a sunny day on March 8th. If you have previously thought about how to independently combine a truly perfect flower arrangement, do not worry - we will be happy to help you. With our step-by-step master class, you will create the perfect spring craft for March 8 for your beloved mother with your own hands.
Necessary materials for the perfect DIY craft for mom on March 8
- variety of spring flowers
- floral sponge block
- small pruner

Master class step by step spring crafts for mom on International Women's Day

Craft-amulet for grandmother on March 8 from cotton pads, fabric and improvised materials

If you have not yet figured out what to give your grandmother on March 8, we recommend making crafts-amulet from fabric, cotton pads, lace and other improvised materials. This type of folk art retains a sacred beginning - rituals and traditions that are passed down from generation to generation. For a woman "in years" such a gift will be very valuable. Especially if creating it, you put a piece of your soul, love and gratitude.
How to make a craft-amulet for a grandmother on March 8 from cotton pads, fabrics and improvised materials, read on.
Materials for crafts-amulet from fabric to grandmother on March 8
- linen fabric 20x20 cm
- buckwheat
- different cuts of cotton fabric for shirts and other things
- cotton lace
- linen threads
- floss red
- copper fittings
- scissors

Master class on creating DIY crafts for International Women's Day for grandma

An interesting craft for March 8 for a girl with her own hands: a master class with step-by-step instructions

An unusual craft in the form of flowering branches will not only be an excellent gift for March 8 for mom, girl or girlfriend, but also complement the interior of the room with light freshness and stylish novelty. And if the branch is covered not with small flowers, but with marvelous butterflies, there will be no price for it at all. We invite you to use our next master class with step-by-step instructions to create the most interesting and unusual craft for March 8 for your girlfriend with your own hands.
Necessary materials for creating DIY crafts for March 8 for your girlfriend
- wooden stand or plate
- illustrations with butterflies
- branch
- scissors
- glue or glue gun
- glass cap
Master class on creating interesting crafts for your girlfriend for International Women's Day

Sometimes spring is in no hurry to please with bright colors and sun glare. In this case, do-it-yourself crafts for March 8 will be a joy. Children and adults, for mom, grandmother or girlfriend, to school or kindergarten. All of them are original and unusual in their own way. Even a simple craft made of paper, fabric or napkins can bring a lot of joy to a dear person and bring a little spring into the house.
Beautiful and cool crafts made for the holiday of March 8 with your own hands will be the best gift for both your beloved mother and grandmother. To create non-standard presents, children can use napkins, cotton pads, and paper. Original crafts for March 8 with your own hands can also be made from threads. Using the given video tutorials and photo instructions, it will not be difficult to create a truly non-standard present. It is possible to make simple crafts for kids from the preparatory or junior group of kindergarten, and for primary and secondary school students.
Simple DIY crafts for March 8 for the younger group of kindergarten
Properly made packaging will help to congratulate mom in an original way and give her simple, but very cute gifts. Such gift crafts for March 8 in kindergarten can be easily made even by the smallest children. The work does not require the special skills of the baby: beautiful paper crafts by March 8 are made quickly and simply. And inside the packages you can put any small gifts.

Materials for making simple crafts for March 8 for kindergarten
- wrapping paper;
- toilet paper tubes (or similar made of cardboard);
- gifts for filling (sweets, varnish, decorations);
- sequins or other sequins;
- tape, thread, scissors.
Instructions for making simple crafts for the holiday of March 8 for kindergarten

Do-it-yourself interesting crafts for children of the senior group of the kindergarten by March 8

You can please your mother with an interesting craft using a minimum of materials. For example, children can put small gifts for their mother in a small decorated jar and give them to her on March 8th. A simple craft on March 8 from a child will evoke positive emotions in mom, because he will try very hard, collecting an unusual present. The photo instructions below will tell you how to make crafts for March 8.
Materials for children's crafts in honor of March 8 for kindergarten
- green double-sided paper;
- small gifts;
- ribbon;
- jar;
- white felt-tip pen, scissors;
- black and brown cardboard.
A step-by-step master class on making crafts for the holiday of March 8 for children

Funny crafts for mom by March 8 with your own hands - step by step photo instructions

Many mothers use modern smartphones and cannot find a suitable case for their phone. Self-manufacturing of a cover will help to correct this situation and please your beloved mother. Mom will really, really like such bright crafts for March 8. After all, they are not only beautiful, but also really useful. Such soft cases will definitely come in handy to preserve the integrity of the phone, and mom herself will be pleased to receive an unusual little thing from her child. At the same time, even kids of 7-8 years old can make children's crafts for March 8 from fabric.
Materials for making cool crafts for mom for the holiday of March 8
- multi-colored felt;
- threads;
- buttons.
Step-by-step photo instructions for making crafts for the holiday of March 8 for mom

Beautiful crafts with step-by-step instructions - a gift for March 8 with your own hands

For many mothers, stylish jewelry is the best gift. Therefore, fashionable mothers can make very simple, but very beautiful necklaces. No special components or skills are required for operation. But the products obtained after painstaking work will certainly surprise and delight your beloved mother. A step-by-step master class on crafts for March 8 from improvised materials will help you assemble a non-standard cute decoration.
DIY materials for making beautiful crafts in honor of March 8
- thick cord for the base;
- multi-colored threads (preferably acrylic);
- transparent glue;
- scissors;
- jewelry clasp (if desired, you can do without it).
Do-it-yourself step-by-step instructions for making a beautiful craft for March 8
- Prepare all required materials and tools.

- Cut off the desired length of cord. If you couldn’t find the clasp, you should cut it to a length that will allow mom to put on the jewelry over her head.

- Fasten a thread of the same color of the winding on the rope: tying it in a knot and gluing the edge with glue.

- Carefully wind the thread of the first color around the cord.

- When dialing in enough winding length, tie a thread and fix the edge with glue.

- Carry out a similar work with threads of other colors. Perform winding from a thick thread of rhombuses, as shown in the photo.

- Fix the edge of the diamonds with a tight winding of the wire (it is additionally recommended to glue it). The edge of the cut wire must be carefully inserted into the cord.

- Prepare threads for fluffy tassels (determine the optimal length of jewelry).

- Make colorful brushes.

- Tie the brushes to the base of the decoration. It is important to attach them to the winding of the corresponding color.

- Install a jewelry lock or just tie knots in the rope.

- Additionally, it is recommended to coat the tips with glue to prevent them from slipping. You can also glue connector caps to them.

Bright paper crafts for March 8 - for primary and secondary school students

Every mom will love this craft that can be used to decorate the house. Therefore, a stylish feeder in light colors is ideal for placement in the bedroom, and for hanging in the hallway or corridor. Both primary school students and children from middle classes will be able to make such crafts for March 8 at school. For work, students can use both paper and fabric.
What materials are needed to make bright crafts by March 8 at school?
- cardboard box (for preparing the basis of crafts);
- cardboard;
- glue;
- colored paper or fabric;
- pencil.
Step-by-step master class for making paper crafts by March 8 at school
An unusual craft for your beloved grandmother by March 8 - video instructions for schoolchildren

Original topiary is considered a great gift for any holiday. They bring happiness, joy and health to the house. Therefore, by March 8, you can make a classic topiary with roses for your beloved grandmother, or just make a cool ball that can be hung in the room. At the heart of such a craft on March 8, a foam ball will be used for a grandmother. And the roses themselves can be easily made from cotton pads, and from simple napkins.
Video instructions for making unusual crafts from cotton pads for grandmother by March 8
Beautiful roses from cotton pads are quite easy to assemble, and even schoolchildren can do this task. Having carefully studied the proposed instructions and exactly repeated the preparation and assembly of the craft, you can be sure of obtaining the correct result. Crafts for March 8 are made from cotton pads quite quickly and simply, but the work must be done very carefully: this will prevent uneven gluing of flowers to the base.
Step-by-step video master class for making crafts from napkins for grandmother in honor of March 8
If it is not possible to use cotton pads to make a flower ball, you can replace them with ordinary napkins. Such work is more suitable for younger children, since it does not require special skills in working with materials. But it is especially important when making crafts for March 8 from napkins to observe safety conditions. It is better to work with a glue gun under adult supervision.
Bright and funny crafts made by children for mothers and grandmothers will be a wonderful gift for congratulating them on the 8th of March. You can collect crafts for March 8 with your own hands according to the proposed video and photo master classes from paper, threads, napkins and cotton pads. Simple instructions are suitable for the preparatory and younger groups of kindergarten. But for primary and secondary school students, we can offer the manufacture of unusual and original crafts according to more complex schemes.
Olesya S.
The case is moving towards March 8, and a competition for the best handicraft "Flowers with your own hands" has been announced in your garden. No problem. In this article, you will be offered several options for making flowers with your own hands. This lesson will be very interesting for your kids. In addition, in this lesson, color options will be offered, designed for different ages, starting from the smallest. It seems that your child will want to make such a flower not only for the competition in the kindergarten, but also for his beloved mother, grandmother, sister, etc. And what could be nicer than a gift made with your own hands.
And so we turn to some options for making flowers and their brief description.
To make flowers, depending on the option you choose, you will need one of the following tools and materials:
- colored paper;
- glue;
- scissors;
- plasticine;
- tapes;
- plastic bottles;
- cotton pads;
- juice tubes;
- paints, etc.
1. The first option is the manufacture of flowers from plasticine. This is a very simple craft that can be done very quickly even with the smallest child. Flagella are rolled from brown plasticine, from which a twig is formed. The branch is glued to a sheet of paper. Small circles are made from yellow plasticine and glued onto a branch, thereby forming flowers. Also, the inscription “From March 8” is made from plasticine and glued to the bottom of a piece of paper.
2. The second option is to make flowers from ribbons. Flowers from folded ribbons and petals, which are also made from ribbons, are glued onto a sheet of paper. A bow is glued to decorate the bouquet, and foam balls are used for flowers.

3. The next color option is proposed to be made from colored paper. A sheet of green colored paper is folded like an accordion and spread out in the form of a fan. Flowers, also made of colored paper, are glued onto it. It can be tulips, daisies, lilies of the valley. In general, any flowers for which you have enough imagination.

4. To make this color option, you will need a plate with corrugated edges, woolen thread and colored paper. The thread is wrapped around the edges of the plate, without going to the middle, in the form of a cobweb. Flowers cut out of paper are glued to the center of the plate.

5. This option consists in using the following materials for making flowers: tubes from juice, flowers from colored paper, part of the egg package painted green, flower leaves cut out from colored paper. The tubes are inserted into the egg packaging, the leaves and the flowers themselves are put on the tubes. The upper part of the tube is cut in a circle into small strips, thus forming pistils and stamens of flowers and thereby preventing the flowers from falling off the tube.

6. In this option, it is necessary to cut out a mug and flowers from colored paper, stick flowers in a mug and on a mug to decorate it.

7. This option also consists of using colored paper. The inscription “Since March 8”, as well as flowers and leaves, are cut out of colored paper. At the same time, when letters and flower petals are cut out, the paper must be folded in half and cut not completely. Then only one part of the letter and only half of the petal is glued to the paper, and the second part of the letter and petals are opened, thereby creating a three-dimensional picture.

8. This option for making flowers from colored paper is also suitable for the smallest, because. it is quite simple. A rectangle is cut out of colored paper and folded in half. A square is cut out and glued to the bottom edge of the rectangle bent in half, but not in the fold area and only on three sides. The top edge of the square is not glued. Then circles of various diameters and colors are cut out, as well as strips of paper, which are flower stalks. Flowers are formed and placed in a pocket formed by a glued square.

9. The next three options are also simple and involve the use of only colored paper, from which all the necessary elements are cut out (flower petals, flowers completely, stems and leaves, mugs, vases, etc.). Further, these elements are either glued onto a sheet of paper (photo 9, 11, 13, 15, 17, 18), or the composition is assembled from them (photo 10, 12, 14). When making a bouquet, as in photo 12, a sheet of green paper is taken, folded in half, folded into a tube and cut around the circle into thin strips from the side of the fold of the sheet and not completely. Making flowers as in photo 13 involves making flowers directly from improvised materials such as buttons, parts of flowers from artificial flowers available at home, candy cups.


10. This option for making flowers involves the use of plastic bottles. At the same time, the flower itself is cut from the bottom of the bottles, the neck serves as a stand, and the stem and leaves are cut directly from the rest of the bottle. The stem can also be made from a cocktail straw. To give a more colorful look to the flowers, watercolor paints are used.


11. A plastic cup is taken and decorated with colored paper. A flower is cut out of colored paper. A button is used for the center of the flower. The flower stem and leaves are cut out, which hang down the sides of the glass. The flower is placed in a glass and covered with what you have. It can be shavings, foam balls, etc.

12. A heart is cut out of thick paper and sewn around the edge with a thread. Flowers in the form of roses are made from cotton pads and are attached to paper or glued with a stapler. Stems are formed from green tissue by twisting the flagellum, petals are cut out and glued to the heart. A bow is made from the packing tape and the bouquet is decorated.

13. To make these flowers, you will need ribbons. Stems and leaves of flowers are formed from green ribbons by cutting out narrow strips, twisting them and folding them into a flagellum. The flowers themselves are made from yellow ribbons by winding them into a ball and sticking them. Some fluff up, some stay that way.

If you find an error, please highlight a piece of text and click Ctrl+Enter.
Summary: DIY crafts for mom on March 8. Beautiful paper crafts for March 8 in kindergarten. Crafts for March 8 to school.
Any mother or grandmother will be pleased to receive a handmade gift from a child on March 8. On our website you will find a wide variety of crafts for March 8 for children. A child of preschool and primary school age may need the help of an adult in making a gift for mom with their own hands. Kids need to prepare in advance all the materials necessary for creativity. Their participation in the manufacture of crafts for March 8 will be small for the time being. Children of older preschool age can already cut out the details of crafts from colored paper, glue simple designs, and fold simple paper crafts using the origami technique. Encourage your child to show imagination and independence in making crafts for March 8 with their own hands.
A hand-made postcard for March 8 can be either an independent gift or an addition to the main gift. In a special article, we talked about how to make original postcards for March 8 for mothers and grandmothers. See link. After reading this article, you will learn how to make simple and voluminous cards for your beloved women. Postcards decorated with flowers, postcards in the form of women's hats, handbags, dresses and cups of tea, origami postcards and much more.
It is impossible to imagine March 8 without flowers. And if dad gives mom a bouquet of live tulips or mimosa on March 8, then the child can please his beloved mom or grandmother with homemade paper flowers. How to make paper flowers, read our special article. Here you will find master classes on making flowers from plain and corrugated paper. Crafts of varying degrees of complexity, there are very simple crafts for March 8 for kids.

Do-it-yourself flowers for March 8 can be made not only from paper, but also from other materials: plastic bottles, buttons, yarn, natural material, plasticine, etc. See link.

An original gift for mom on March 8 will be homemade flowers that the child will give in a handmade vase. For information on how to make a vase with your own hands, see our special article. We will tell you how to make a vase from an ordinary glass bottle and corrugated paper, how to make a beautiful decoupage vase. You will learn how to make an original vase from threads or clothespins, and you will also have a master class on making a vase from natural materials (birch bark, tree branches).

A bouquet of homemade flowers can be complemented by a bright, colorful butterfly made by a child with their own hands from paper and beautiful beads. See link.

Any mother will be delighted with a stylish bracelet made by a child especially for her. We will teach you how to weave bracelets from beads, beads, threads, laces, paper. You will also learn how to make bracelets out of wooden popsicle sticks or plastic bottles, learn how to weave baubles. Read the article "Bracelets with your own hands" on our website.

A beautiful craft for March 8 - a homemade fan. This craft by March 8 will be interesting to do not only for girls, but also for boys. We will show you how to make a paper and wooden popsicle sticks fan. Also from the article "How to make a fan with your own hands" you will learn how to make an original fan from plastic disposable forks.


By the way, the handbag can be supplemented with a wallet made from a milk or juice bag. Read the instruction.

Paper shoes
To make an elegant paper shoe as in the photo below, you need to use a ready-made template. Print it out on thick paper and cut it out. The dotted line on the template marks the fold lines, the red line marks the places for gluing.

In the finished shoe, you can put a small souvenir or sweets in a bag. Buy sweets by weight, wrap them in organza fabric, tie the bag with a gold lace, braid or ribbon, and put it in a shoe.


Let your mom feel like a real queen at least once a year. To do this, take care of all the household chores on this day, clean the house in advance, prepare delicious dishes for the table. And you can also make and give mom a paper crown. We offer you two options to choose from.


