A gift for mom on March 8 plasticineography. The most beautiful souvenir ideas
Hello to everyone who came to my blog today! How is your mood? I hope it's fun and you're doing well. After all, another season of the year will soon come, and with it the spring holiday International Women's Day will come. And we will gladly congratulate all women on this day.
Let's present beautiful and original crafts to mothers and grandmothers, which will be made with care and love.
Of course, you can make a bunch and shower them on your favorite girls and sisters. And you can make chic bouquets of flowers or make original postcards and souvenirs. From this article you will learn this everything, so let's go ...
What can crafts be made from? Of course, from improvised materials that you always have at hand, let it be paper, cotton pads and a bunch of napkins. After all, the main thing is to come up with, and then bring the idea to reality.
I really liked this craft that you can give your mom - this is a flower. Moreover, it is made of paper, and look how magical it looks in this pot.
You will need corrugated paper, and it will need to be cut into small squares, they should all be the same.

And then glue it to the base using the trimming method. You can also make the base from a long ribbon of paper, twist it into a tube and glue it. After that, each piece of paper prepared for this case is twisted on a rod and glued to the base.

Make petals and take any flower pot, you can fill it with plaster or come up with something else.

Be creative and you will succeed.

Using this technique, you can make a different look.

If you want to find a more delicate option, then make the number 8 out of satin ribbons and you can even hang it on the wall. Here, of course, certain skills are needed to perform such beauty in the Kazan style.

Using the quilling technique, you can also build a real spring masterpiece, see for yourself.

Such a work looks amazingly cute and very original, even your teacher will be delighted to receive such a gift.

The most common children's souvenir is a postcard in the form of tulip flowers or some other.

I also liked this fridge magnet basket, how cool, don't you think?
Or here is a small multi-colored clearing of such a plan.

Of course, it was not without protrusions, my most favorite look, who needs a template, write, I will send it for free. So chic and not difficult at all, literally five minutes and your masterpiece in the form of an openwork figure eight will stand on the table and you won’t take your eyes off it.

There is an even easier option, from ordinary strips you can make such a wonderful bouquet, both a kindergarten child and a schoolboy can do it.

You can use the application, make a template for a vase or basket, decorate it with leaves and flowers.

Dads, remember they gave it when they were preparing for February 23, you can repay this idea here. How do you like it?

For the next great idea, you will need material, namely felt, a needle and thread and scissors. You can create such a magical and bright bouquet.

First, make just such a base, you can also use a satin ribbon for fixing.

Flowers cut out of felt, and the center will be a bead.

In principle, instead of a bead, you can use something else, multi-colored pebbles or sparkles.

I was also captivated by such a soft pink charm, and why go to the store when you can make a miracle yourself. It looks like an orchid, well, just cool!

Volumetric postcards made of paper and cardboard
On this day, all daughters and sons delight their mothers and grandmothers with glorious gifts, present them with postcards that they made themselves at labor lessons or in kindergarten. You can make these quickly and beautifully at the same time.
I suggest you make such a glorious greeting card from corrugated paper with the children, it will also look voluminous, take note. You can use this step-by-step master class in the senior, preparatory group or primary classes. Get a bouquet of roses or wildflowers.

We will need:
- cardboard
- corrugated paper
- satin tape
- openwork napkins for baking

Stages of work:
1. Take cardboard, preferably blue, light blue or green. Then glue a napkin to it below the center.

2. Cut strips of corrugated paper and attach it to a pencil or pen and start twisting, like this is shown in this photo.

3. And then pull it out, pull it off the pencil like an accordion.

4. Twist in a spiral to get something similar to an opened bud.

5. Unroll with your fingers, fluff the product.

6. Glue bright creations on a napkin.

7. Cut out leaves from green corrugated paper.

8. And decorate them with crafts.

9. Make a satin ribbon bow and tie a bouquet.

10. Pretty good and I would say it looks charming. Creative success! Do not forget to learn a poem on this topic.

You can also make such a creative product.

With preparations, you can make such beauty from an openwork napkin and cardboard - chamomile.

If you are looking for a simpler option, for example, for the smallest ones from 3-5 years old, for example, for the middle group of a kindergarten, then this hint may give you the right idea.

For the younger group, make a common huge plasticine craft, literally 10 minutes and you're done. See how great you can make balloons.

Or a violet.

For schoolchildren, you can make a product from threads, such as embroidery. The product itself does not use glue, the threads pass through the holes.

The idea of making the number 8 and using a music disc as a stand seemed to me quite interesting.

And here is what can be obtained from these materials.

The most beautiful souvenir ideas
First of all, I want to invite you to watch this video, how do you like this idea? Be sure to write your opinion at the bottom of this note after watching.
With the advent of spring, you can notice not only flowers, but also the arrival of birds and insects. Therefore, let's make a clearing with a bee, wow, and it all looks just great and very beautiful.
We will need:
- toilet paper roll
- double sided tape
- kinder surprise mold

Stages of work:
1. Take the sleeve and double-sided tape, wrap it around the entire diameter.

2. Then stick a sheet of paper on double-sided tape.

3. Wrap any excess paper inside.

4. Take sheets of green paper in different colors, fold them in half, and then cut them into strips, as if you were making a bookmark.

5. Using a stapler, wind the workpieces onto the prepared base and secure.

6. Seductive leaves or grass will turn out. The base of the sleeve must be wrapped with paper again to hide everything that is not needed.

7. Or do like this.

8. Then buy figurines for decoration in the store or make them yourself, butterflies, bugs, spiders, etc. Unleash your imagination and apply them in an original and scattered way on the grass.

9. After that, make a blank of wings for a butterfly, which will be made from a case from a kinder surprise.

10. Don't forget about the eyes and maybe a mouth that can be drawn with a marker. Here are the tones of spring charm that will decorate any house or apartment.


Use improvised materials, caps, tubes for a cocktail and you will surely come to an insight.

There are a great many options, I never cease to admire and be amazed at times.

You see, even an egg carton was used here. And of course, they used regular pasta to make another masterpiece.

As they say, who is good for what, and what did you come up with? Or are you still looking and don't know what to do?

Well, then you might be interested in making such a souvenir using ordinary disposable spoons, and tulips really came out, only unusual ones.

Undoubtedly, a basket or pot will emphasize the originality of this simple idea.

I saw this at school the other day.

By the way, and even from cotton buds and plasticine, you can make dandelions or daisies, to whom does this work remind you of which flower?

Well, here is a dandelion for sure.

And here most likely asters.
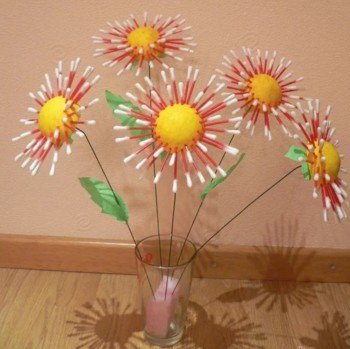

Or daisies.

Using paints and brushes, you can draw a plot and congratulations.

Skillful craftswomen can make a product from beads, it is certainly difficult, but for those who are fond of it, it will not be difficult.

For most, the palm postcard remains the most beloved. How simple, but you can even take it to a competition or an exhibition.

Making crafts for kindergarten with children
With the kids, first of all, you can make all kinds of drawings for this international day. Use something unusual, like drawing with crumpled paper or a cotton ball.

Well, for joint activities, you can make such a gift to mothers, grandmothers and place it near the group on booths with congratulations.

We will need:
- red paper napkins
- corrugated paper
- scissors
- stapler
- tassel
- cardboard

Stages of work:
1. Take an ordinary paper napkin, see diagrams from left to right. Fold it in half, then again, connect in the center with a stapler. Then cut out a shape resembling a circle. Make small cuts along the entire diameter, and then fluff the product.

2. Cut out the shape of a bouquet from cardboard and wrap it with gorfo paper, tie a bow.

3. Make leaves and let the kids stick the resulting flowers in any order.

4. Here is such a wonderful and magical creation turned out, well, it just looks amazing, like a real bunch of roses.

We give mothers on March 8 Flowers
In this note, I will not go deep into this topic, at the very beginning you already saw some ideas, now I will show you the simplest ones, and in the next issue there will be new items and very cool flower options for this women's day. So, do not miss a new note, add this one to your bookmarks so as not to lose it.
From pieces of paper for notes, you can make bags, look and then glue them in a circle, that's what happens.
By the way, you can give such a charm to your favorite teacher).

Nothing special, but looks great.

Or you can use this video:
Also use coloring books, because children love this business very much. Any mother will be pleased to receive such a drawing.

You can use pictures with animals, you can just use colors alone.


Or at the same time even arrange in the form of messages and wishes.

Choose any template you like, print it out and congratulate!

We will need:
- cotton pads
- scissors
- threads
- tassel
- gouache paint
- skewer or stick
- corrugated paper
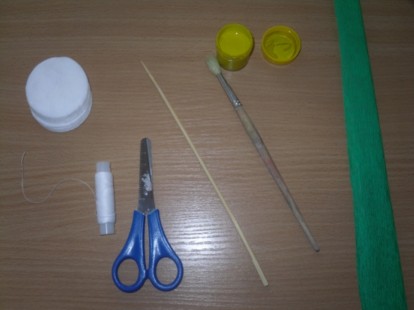
Stages of work:
1. Put cotton wool on the stick, you can glue it with glue.
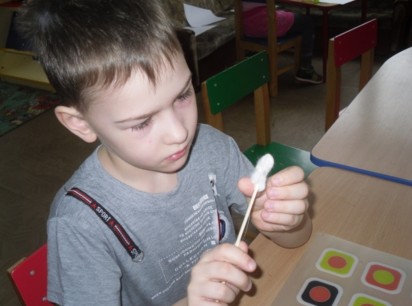
2. Then paint it yellow, and then wrap the cotton pad around the entire circumference of the stick, while using a thread so that it does not fall.

3. Decorate the stick with corrugated green paper, you will get a stem, cut out the leaf and also wind it on the stem.
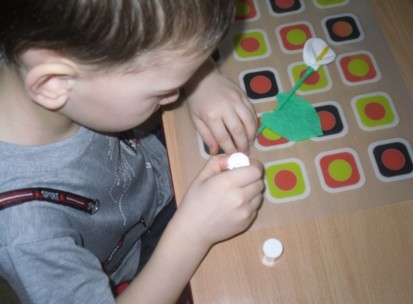
4. These flowers will turn out white and at the same time elegant, quite beautiful and cute, super!

Master class for elementary school students
I want to offer you an unusual craft, which will be made of yarn. You will also need a vase and your good mood, because you will get bright yellow and beloved flowers, called mimosa.
Next time in another note, you will find instructions in this paper mimosa.

Well, now let's make just such a branch of yarn threads. Here all the steps are shown at once, you just have to repeat.
Now let's create a box, or such a miracle can serve as a candy bowl or a vase, 3 in 1, and this can be done from cardboard, toothpicks and woolen threads.
1. Cut out a heart from cardboard and stick toothpicks into it. But first of all, first make holes on the cardboard with a needle and drop glue into them, and then stick toothpicks.


3. That's what happens over time, you can add beads or beads.

4. And of course, you can play with the shapes, make them round or square.

Well, how do you like this idea? If you don’t like it, then go to the next type of voluminous greeting card, so to speak 3d.
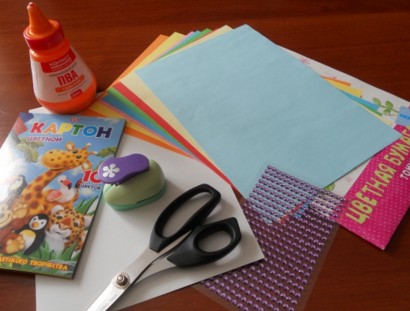
We will need:
- cardboard - 1 pc.
- colored paper
- PVA glue
- scissors
- designer punch
- rhinestones or scrapbooking kit
Stages of work:
1. Take a white sheet of cardboard and fold it in half, make two cuts in the center 5 cm wide, like this, as shown in this photo.
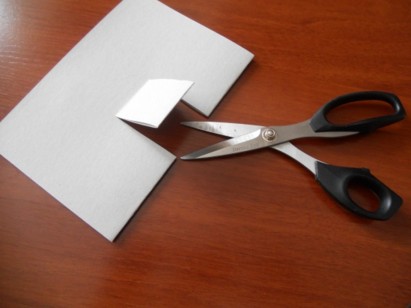
2. Now bend it with your hands to make it look like a ladder, this will be the base on which you stick the craft.

3. Draw a basket from colored paper and cut it out.


5. Determine the number of products yourself.

6. Now, using a special hole punch, make a decoration, for this, take a strip 2-3 cm thick.

7. Glue this decor on the sides, and the basket in the center.
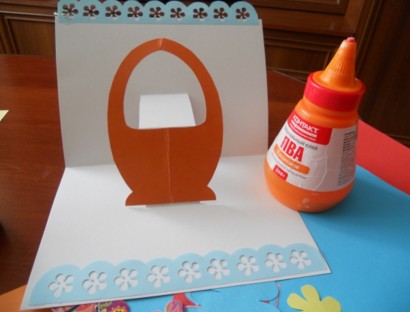
8. Then decorate with flowers and butterflies, as well as rhinestones or sparkles. In general, what you have on hand from jewelry.

You can use this template and make unusually expressive and pretty gerberas.
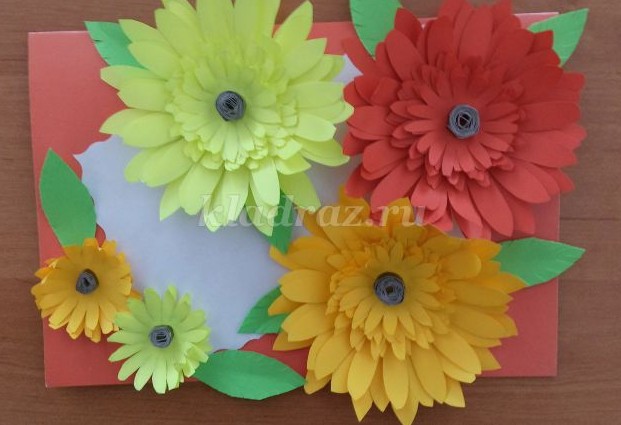
To do this, print the flowers, and then glue them one by one to make it quite magnificent and voluminous.

I also liked the work in the form of a fan with tulips on it.

Or this postcard.


Also, such a cute wire product can be a great option for schoolchildren.

Or fold such a souvenir from paper strips.

That's all for me. I wish you succeed in everything you have planned. Creative success, inspiration and all the best and positive! Bye-bye everyone!
Sincerely, Ekaterina Mantsurova
Chizhevskaya Elena Vladimirovna
We take colored cardboard and apply the contour of the vase with a felt-tip pen.

Then we roll out the ropes of yellow and brown colors. Pressing with fingers, we form strips, lay them out in the shape of a vase, alternating with each other.

Top vases decorate with decorative elements. To do this, roll out long flagella and twist them with a snail. We use plasticine in two colors- pink and lilac.

We lay out the decor, alternating lilac and pink colors. The vase is ready.

Let's move on to flower sculpting. From green plasticine pinch off small pieces, roll out long flagella - stems. We lay them out on cardboard in any shape.

In order to sculpt the petals, we will mix two plasticine colors- light lilac and dark
lilac. We roll up small balls, then flatten them with our fingers and give the shape of a petal. The petals are beautiful, with overflow colors.

Insert the middle of the yellow colors and it turns out this beauty.

Let's move on to leaf molding. They can be sculpted alone colors - green, and you can also do colored by mixing several colors. I made green and green-yellow. Having formed the leaves, you can apply a pattern on them with a stack.

The finished work can be issued by placing it on a white sheet of a larger format.
Look what a miracle happened! For beloved mother with a vase of flowers.

Related publications:
1. For work, we need: plasticine, a board, colored cardboard, a vase template, a pencil, beads. 2. We circle the vase according to the template. 3. Apply.
Teamwork Tasks To improve the ability of children to roll a spherical shape. Exercise in rolling plasticine in a circular motion.
Children's master class "Postcard for beloved mom" Materials: colored cardboard, curly scissors, colored paper, thread, hook, liquid glue.
How often do we ask ourselves the question: what to give to our beloved mother, grandmother or girlfriend on March 8 or a birthday? It's no secret that.
The favorite guest of all the guys at the New Year holidays is, of course, the Snow Maiden. Our Snow Maiden also turned out beautiful. We tried, and here we are.
This version of the postcard, made using the technique of plasticineography, is very simple, but at the same time, it looks quite believable and elegant. Mimosa twigs are perhaps the first modest flowers that bloom on their own at the very beginning of spring, and therefore such bouquets are often given to women on March 8th. Children in kindergarten or elementary school can also make a gift with their own hands in the form of plasticine mimosa on cardboard. Let's figure out step by step how to make such a wonderful and relevant gift. This simple craft with children can also be done for the birthday of someone close to you.
Materials for crafts with children by March 8
- white or colored cardboard;
- plasticine of yellow, brown, green, lilac colors;
- beads;
Postcard for March 8 in stages
1. Prepare the materials necessary for work. A piece of cardboard will become the base of the postcard; on the reverse side, you can initially write a few congratulatory words. Yellow is needed for mimosa inflorescences, brown for twigs, green for leaves. Lilac or any other shade is needed to form a vase. Beads can be used to decorate the vessel. So fantasize and experiment, choosing decor.
2. Pull the lilac plasticine into a thin long rope. This must be done by carefully kneading the mass in your hands.
3. Stack the tourniquet into separate segments, gradually increasing their length. Or you can navigate with the length of the parts already in the process.

4. Stick the strips on the cardboard in the form of a vase. Start with the shortest sausage, then glue longer sausages on top. Decorate the vase with beads. While the plasticine is still soft, small details stick well to it.

5. At the top of the picture, form sprawling branches with leaves. Make branches from thin brown sausages, and leaves from the same details, only green. Press down on top of the leaves with your fingers along the entire length so that they become flat.

6. With a stack, apply a lot of notches to each leaf.

7. From yellow plasticine, make small balls of approximately the same size - these will be thick mimosa inflorescences. Stick the inflorescences along the branches, completely filling the gaps.

A wonderful do-it-yourself craft for mom is ready. The card will make your loved one happy. Also, children can perform such crafts for grandmothers, older sisters or caregivers.
Plasticine can be a wonderful tool for creating gift children's crafts for International Women's Day. It can be used to make numerous, and even decorative panels. Crafts for March 8 from plasticine, made with your own hands in the walls or elementary grades of the school,
It will help the baby to turn an ordinary calendar day into a real holiday, painted with fruits.
We propose to create from plasticine not quite ordinary - a miniature composition that can be hung on a wall or placed on any flat surface. For its manufacture, in addition to plasticine, you will need: an unnecessary CD, a stack, glue and the simplest (round), but bright glue rhinestones. With them, our plasticine will look more festive and interesting.
Let's get started!
From a small piece of bright (for example, red) plasticine we form a thin sausage.

We make one edge a little narrower than the other.

Starting from the narrow edge, roll up the sausage like a snail shell.

Slightly flatten her curls. It turns out the base (central part) of the flower.

Now we tear off small pieces from plasticine, roll balls out of them and, flattening, turn them into petals. We make the petals expanding upwards.

We fashion several of these petals.

We attach the petals to our flower base, along its periphery.

We roll a stick of green plasticine.

We flatten it.

Trimming the edges with a stack, we give it the shape of a leaf.

With the sharp edge of the stack, draw veins on this sheet.

We attach the leaf to the flower.

We roll two identical balls from bright plasticine.

We flatten them, connecting one side.

We place our flower in the center of the CD, and the figure that turned out from the balls is on the side of the flower.

We take a small cap (for example, from a tube of cream) and put deep prints on it on each flattened ball.

It turns out eight.

We arm ourselves with glue and carefully glue glue rhinestones along the entire edge of the disk. We select them by color, taking into account the shade of the flower and the figure eight.


If such a craft is done on March 8 in or at a technology lesson, the child will be able to arrange a real surprise for one of his loved ones. And at home, he can make such a craft to congratulate, godmother or one of the relatives living separately.
Plasticine- this is the most understandable and beloved by all children material for creativity. And not only creativity, but also the creation of wonderful gifts. In this lesson, we suggest that you familiarize yourself with unusual ways to create a souvenir for International Women's Day, which will be a wonderful gift for mom, made by the hands of a child.
Figure eight with plasticine flowers - a gift for mom
It will not be difficult to make a wonderful gift for your mother, if you have the desire, colored cardboard, plasticine, as well as our modeling guide. For International Women's Day, it is customary to make all kinds of crafts and postcards with your own hands in kindergartens and schools. The above materials are the most popular and cheapest, they are the easiest to work with. While creating a gift to you can combine them. Cardboard will become the basis of the panel in the form of a figure eight, and plasticine will be used for decorative elements: flowers, leaves and other plant motifs.
You can copy exactly the same craft or dream up, taking into account the tips given. Younger students can be safely given the task of creating such a gift for mothers from plasticine, and kindergarten students will need help in cutting out the base.
To create a blooming eight were used:
- yellow cardboard;
- plasticine green, purple, yellow and orange;
- drawing tools: compasses and pencil;
- scissors;
- thin stick or toothpick.

How to make crafts by March 8 in stages
- It is better to make the background of the panel bright and light, if you use dark plasticine, if the plasticine is bright, then the background, on the contrary, should be contrasting. Prepare everything you need to work by following the list or changing colors as you see fit. Flowers can be white (daisies), yellow (daffodils) or red (asters).
- Draw on the cardboard the outlines of the number 8 - the central part of the future composition. You can do this with a circle. Cut out the figure eight along the outline, and also draw rings in the middle and cut them out so that the circles are hollow.

- To create a floral ornament, prepare small diamond-shaped details in green and purple. These blanks will be used for leaves and petals. Also make small grains of yellow plasticine.

- Stick green leaves on the figure eight rings. Arrange the parts in random order.

- To set the relief, to make the composition more expressive, press the toothpick on the central part of each leaf. After such an operation, a longitudinal vein will appear on them.

- Glue the first purple flower on the bottom. Glue a yellow grain in the center. Make a vein on each petal, and push the middle with the tip of a stick. Or initially use small beads as a core.

- Glue the same flowers around the entire perimeter of the figure eight rings. Arrange decorative details symmetrically.

- To fill in some voids, further decorate your gift, glue orange grains in random order to empty spaces. Then pierce each with a point.

Wonderful blooming gift for mom by March 8 ready. After freezing the panel in the refrigerator, pack it in a transparent file for reliability. Such a gift will make your beloved mother smile, he will remind her that the beautiful time of the year has come - spring, that she has her own child who created such beauty for her.
Postcard for March 8 from plasticine
For their beloved mother or grandmother, children must create gifts in kindergarten or school. A handmade postcard has already become traditional. Firstly, a beautiful drawing can be applied to the front of the paper (flowers are most often depicted), and secondly, a few warm words can be written on the reverse side. And if the child still does not know how to write, then the kindergarten teachers will help print the wish on paper. Flowers on a postcard you can draw plasticine. Then you get an unusual 3D image. Volumetric plasticine flowers look realistic, and the method of such drawing can be called.

- a sheet of cardboard (it is advisable to use small format paper that matches the size of a standard postcard);
- plasticine of several shades (green, red, yellow, orange and others);
- stack and a thin toothpick, felt-tip pen.
How to make a postcard from plasticine step by step
- Choose a color canvas for work so that the craft has a finished look. Ordinary gray cardboard will have to be covered with a thin layer of plasticine on top, if the bars used are too dense, then this will be difficult to do, especially for young children. A toothpick is a tool for drawing on plasticine.

- Break up the green pieces in your hands. Pull each soft piece into a thin sausage. Make several sausages of approximately the same length and thickness. Collect them in a bundle and glue at the base of the picture. These will be the stems and leaves for the future bouquet of plasticine flowers. Also knead bright pieces of red, yellow and orange (make several balls of each color).

- Press down on each ball with your fingers or a piece of cardboard, creating flat and round cakes. Collect flowers from several cakes. Glue the largest piece with the first layer, the middle cake with the second, and the smallest one with the top.

- With the sharp tip of the stack, start making small notches on the flower rings. First, design virtual petals on the protruding part of the bottom layer.

- Then walk on the middle cake and on the top. But first, make a recess in the very center of the flower with the back of the felt-tip pen.

- Fill the fovea with yellow plasticine. Then, with the tip of a toothpick, create a sponge effect - this will be the loose center of the flower.

- Prepare two or more flowers in a similar way, making out a festive bouquet for March 8th.

- From small green oblong sausages make leaves. Narrow one side of the sausage, make the other wide, pressing down with your fingers. Draw a pattern of leaves with a stack.

- Glue a few leaves to the stems at the base of the pattern. Now all that remains is to write “March 8” at the top. Make it from two bright cakes and a thin plasticine thread. Figure-eight rings can also be set using a felt-tip pen.

Wonderful congratulatory card for International Women's Day ready. This is a wonderful gift that looks elegant and unusual, but is very easy to make.
Blooming figure eight from plasticine - a gift for March 8
The silhouette of the number eight speaks for itself, and the delicate flowers that decorate the gift give a festive, spring mood. Mom will be the happiest if she receives such beauty from the hands of her beloved child. Create such plasticine panel it will be interesting even for teenagers, because when modeling, you can use sparkling rhinestones-pebbles. Then the work can be called jewelry. Teachers and educators can use this instruction in labor lessons or work with children in creative circles.

Prepare for sculpting a blooming figure eight:
- plasticine pink, pale pink and white;
- a stack and a toothpick;
- modeling board and some other flat, even object;
- match or wire;
- stones from old jewelry.
How to mold a figure eight from plasticine
- Pink plasticine will become the body of the eight itself. This material will be needed to work the most in quantity. Divide the prepared mass into two parts, but not equal to each other. We are faced with the task of creating two figure-eight circles, so the top part should be smaller than the bottom.

- Next, you need to make 2 even circles of the figure eight. First, roll up the balls. Then press each ball against the board with a second board or other suitable object. Press down on the plasticine until you get circles with a flat surface.

- Fasten the two parts of the panel. While the plasticine is soft and warm, it sticks together well, but when the craft hardens, it can fall apart, so mask the match or wire inside. To decorate the craft with flowers, prepare soft pink and white cakes, gradually reducing their size.

- With a toothpick, press on each cake, separating the flower petals from each other, make a few flowers from all the prepared cakes.

- Glue the flowers on the bottom circle: first, the largest blank, then the smaller ones. Glue the white balls last, also reducing their size. Thus, you will decorate the bottom of the panel.

- Do the same with the upper part, fasten the flowers first, finish with balls and grains.

- If you have old jewelry or half beads left over from old clothes, use them to decorate crafts. Glue the pebbles to the center of the flowers. It is advisable in this case to also reduce the size of the pebbles so as not to disturb the overall monotony. Beads can not be attached to white balls, but it is enough to pierce each of them with the tip of a toothpick, pushing it deep into the plasticine.

A gift for mom by March 8 is ready. It sparkles, looks gentle and fits the theme of the holiday. It is better to make such a souvenir from dense plasticine, a hardening mass for modeling, so that after work there is an opportunity to present your masterpiece to the addressee with warm words.
A gift for March 8 - a panel of plasticine
You can complete such a gift by March 8 in 1-2 hours. All details are made very easily - using bright pieces of plasticine of various colors and a toothpick. But there is one caveat - all parts must be strictly symmetrical. Looks like this panel Very beautiful. It can be small and fit in the palm of your hand, or you can make a whole postcard to, but then it will be even more difficult for you to work with plasticine, much more material will be used up. In general, only the idea of modeling a panel is shown here, and you can take the tips on board, and then make your own, completely different versions, with different colors and details.

To make crafts you need:
- cardboard (colored or junk);
- drawing tools and scissors;
- a set of plasticine (several different bright pieces);
- toothpick (needle);
- half bead or button for the middle.

Step by step description
1. Prepare the necessary materials listed above. Paper for creating crafts can be any color. On one side, a drawing will be applied using the plasticine method, and the second can become the basis for congratulations. It is better to make the ornament floral, using a bright background and additional petals of a different color. A toothpick will help to apply a simple relief on a soft surface.
2. Cut out the cardboard base. You can first draw a sketch with a compass and pencil, or simply make a symmetrical floral drawing. It can be a flower with two types of petals.

3. Apply the background (orange) evenly on the entire surface of the paper, make the convex petals a different color (white). Such a contrasting combination as a background will look very beautiful.

4. In the center of the composition, make a bright flower of blue petals (their shape may resemble droplets). Also add the prepared decoration (button or half-bead) to the central part. You yourself can choose the central part already in the process of work.

5. On the perimeter of the petals of the main flower, draw a pattern with the tip of a toothpick (just put small dots at an equal distance). Duplicate the petals with lighter (blue) plasticine.

6. Apply relief to small petals with the same toothpick, but with its side. Make additional details of the ornament - red berries on each blue petal, piercing each with the tip of a toothpick. Attach 3 small purple seeds to each central petal, also emboss their surface with a toothpick.

7. Glue yellow and red clay on white islands to get a beautiful ornament.

Here is such a beautiful and delicate panel for mom by March 8 turned out. The craft can also be made not only from plasticine, but also from polymer clay. Then the product can be baked in the oven, it will become hard. Experiment with floral ornaments, because plasticine makes very interesting compositions, and mom will be pleased to receive such a unique gift.

Here .
More interesting:


