Handmade owl from fabric. Do-it-yourself owl from fabric: a simple master class with patterns, templates and detailed explanations. Examples of various techniques
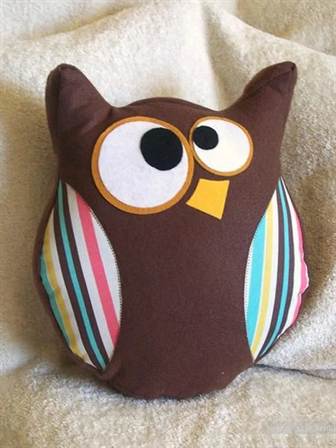
Original and cheerful pillows are a fashionable and stylish interior detail. Textile or made of fur, these pillow toys will appeal to both adults and children. Bunnies, cats, dogs - what kind of animals are created by skillful hands of craftswomen! Today we will figure out how to sew an owl pillow with our own hands using a simple pattern.
In our master class, the owl has a blue shirt-front. If you sew a pillow in a girl's crib, then you can make an owl in pink.
For needlework you need:
- cotton fabric of two colors;
- pieces of felt for eyes and beak;
- beads or black buttons for pupils;
- ribbon for decoration;
- lace;
- filler;
- needles, pins, scissors, thread, sewing machine.
Description
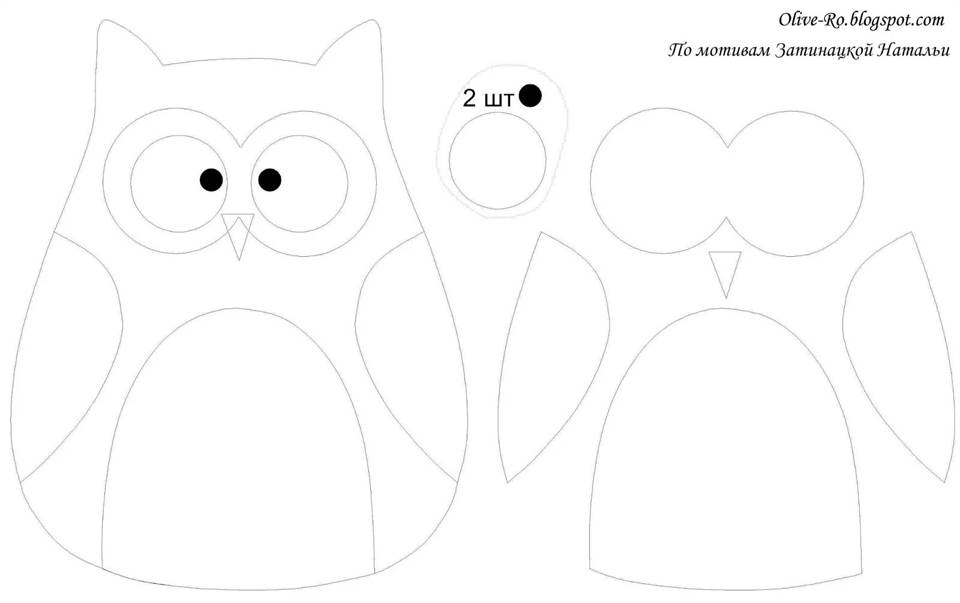
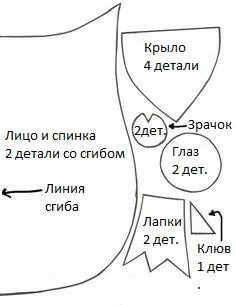
Print out a full-size pillow pattern.
 Cut out all the details of the toy from the fabric.
 For the bow, cut out a rectangular piece 8x16 cm and a square with a side of 45 mm.
We attach lace and a beak, performing a zigzag seam along the contour. Lace should lie in the center of the calf, between the wings.

We attach the wings and eyes with the same seam. Manually sew pupils - beads.
 We fold the two parts with the front sides inward, we cut them off with pins, we sew along the contour. At the same time, do not forget to leave an area for turning and stuffing.
 We make notches in convex areas so that the shirt-front with wings does not bulge after eversion.
We turn out the pillow, iron it. Then the main part, that is, the shirtfront, is filled with filler.
 Sew up the hole with hidden stitches.
Now let's decorate the owl. We fold a strip from a square blank for a bow (see photo) and iron it. We sew a rectangular blank with an allowance of 1 cm.
 We turn the bow inside out, pick it up in the center. We cover the place of assemblies with a strip.

Sew the decoration on the ear of the pillow toy.

From a narrow ribbon we make a bow and sew it on. If desired, you can also decorate the pillow with buttons.
Pillow "Owl": video master class
Felt owl

Sewing such a toy is very simple. Depending on the size, the craft can be a small owlet - a keychain or a comfortable sofa cushion. A bright owl made of felt with your own hands is made according to a pattern.

For work need to cook:
- felt of different colors;
- filler;
- fabric for finishing the tummy and wings;
- needles, pins, scissors.
Description
It is convenient to sew an owl, like many felt toys, using a “needle-forward” seam, in which the lengths of stitches and gaps are equal.

Using pattern templates, cut out all the elements from felt and fabric. Sew colored details on the felt wings. Hide the knot of thread between the felt and the fabric. For convenience, the fabric can be fixed with a pin before sewing.

We make out the muzzle of a felt owl. Referring to the pattern, we place and sew the details of the peephole. Please note that from the edge of the main part to the eye, as well as between the eyes, the distance should be about 5 mm.

As an alternative, you can choose to glue the peephole.
Then we sew the tummy, after fixing it with a pin.

We attach the claws, beak, dark details of the ears. Embroider a tail on the back side.
We fold the two main parts, insert the wings between them and fix with pins. We sew a seam along the circumference, leaving a small part not sewn up.
We fill the owl with synthetic winterizer or any other filler. Sewing up the hole.

We sew a side in a crib Owl: video MK
Educational search toy "Owl"

For creativity to us you need to prepare:
- fleece material of sand and light green color;
- brown and white felt - 3 mm thick;
- felt, black and yellow - thickness 1 mm;
- rep ribbon with a bright ornament;
- film file or any thick transparent film;
- quick-drying glue;
- short chain;
- filler - rice, beads;
- small toys - searchers;
- threads for embroidery;
- scissors, pencil, needles, adhesive tape.

Description
We make patterns of all the elements of the toy, drawing them on our own or printing them from the site.
The body with ears should be symmetrical.

We mark the abdomen and frill. To do this, you can use improvised items.
Try to keep the size of the waves of the frill the same.


Cut out the belly.

We mark two main details on the fabric - one with the abdomen, the other without it.

Cut out both pieces.

Cut out the frill pattern.

We mark it on the fabric and cut it out.

We put the main part on a transparent film.

We connect the parts with pins and sew along the contour of the window with a zigzag seam.


We cut off the excess film, leaving an allowance of 20-30 mm from the seam.

We fold the main parts right side out and fix with pins. Then, along the contour, we manually sew a seam “over the edge”. Such a seam looks good if it is done with threads that match the main part, but a little darker.

We make a loop from the tape.

We sew it along the edge of the product.

We do not sew up the top of the head and ears. We do not cut the thread.

We glue the frill along the edge of the window in the form of a decorative rim, closing the seam.


To fill the tummy of an owl, we use beads or rice.

We prepare small items that we will put in a toy, lay them out on paper and take pictures.

We fill a third of the height of the abdomen with filler. We put prepared searchers there.

Sew up the top of the owl, fasten and cut the thread.

Using improvised objects as templates, we cut out three circles of white, yellow and black for each eye. We also cut out the beak and eyebrows.


We connect the white circles, glue the beak from the wrong side.

We glue the details of the eye, eyebrows and beak.

We glue the general part on the front side of the owl.

We print out a photo of the search engines, laminate them with adhesive tape, laying a piece of cardboard or multi-colored paper Velcro for rigidity.


We pierce a hole in the corner.

We pass the chain through the hole and loop on the toy.

Owl - the searcher is ready!

Today we want to tell and show in a master class how to make a soft toy "Owl" out of socks with our own hands for a child, or together with a child. In addition, our soft owl will serve as a generator of good mood - we will fill it with anti-stress filler.
Tools and materials Time: 1.5 hours Difficulty: 4/10
- two socks: one bright color, the second - no difference;
- synthetic winterizer;
- pieces of fleece or felt in white and black for the eyes;
- floss threads in white and black;
- ordinary threads;
- anti-stress filler - polystyrene granules (or beads, rice and similar material);
- felt-tip pen;
- scissors;
- sewing needle.
Such handmade soft toys will be an exclusive gift for both a baby and an older child.
Step by step instructions with photos
So let's get started. How to sew such a wonderful owl from socks with your own hands?
Step 1: material selection
When choosing a material for making a soft toy (any, not just owls), follow these tips:
- it is better to use women's or children's socks, because. few men's socks are suitable in color and texture;
- socks should be made of well-stretched material (not 100% cotton) - it will be more convenient to form the desired shape of the toy;
- use bright colors with different patterns (striped, polka dots, flowers, etc., etc.), with a colored heel - then you can simulate a more interesting toy.
Step 2: cut the details
First sock: cut the colored sock into two parts, as shown in the photo below.

Second sock: we will need about 10 cm of its length - the part to the heel.
For eyes: two mugs of white felt (diameter 4 cm) and two mugs of black felt (diameter 2.5 cm).
For the beak: one triangular piece of orange felt or sock.
Step 3: anti-stress filler

- sew a seam “forward needle” along the edge of the sock - photo 1(the thinner the sock material, the farther from the edge you need to lay the seam - thin fabric frays more easily);
- fill 2/3 with polystyrene granules or beads, rice or other similar material - photo 2;
- tighten the seam to close the hole, tie a knot - photo 3;
- several times we sew in the center from top to bottom to get a flattened ball, we fix the thread - photo 4.

Step 4: sintepon filler
Use only synthetic winterizer or holofiber for stuffing toys - cotton wool and batting make the toy heavier, it does not hold its shape, it crumples when wet

- evenly stuff a quarter of a colored sock with a synthetic winterizer (photo 1), we try to do it not too tightly, evenly, consistently with small pieces of filler;
- insert an anti-stress pillow (make sure that the pillow is in the center of the base so that the toe is level) - photo 2;
- fill the remaining space with synthetic winterizer;
- we sew a “forward needle” seam along the edge of the sock, tighten the seam - photo 3 and 4.
This is the body of an owl we should get:

Step 5: Shaping the Head
The photo shows the lines along which we will form the head of an owl-toy. We outline the lines with a felt-tip pen on our workpiece.

The lines are arranged symmetrically on the sides of the workpiece - front and back, left and right.
The greater the distance between the lines, the wider the eyebrows and ears. If you want to give them a thinner shape, reduce the distance between the top and bottom lines.
Photo 1- the lines along which we will lay the seam.
Photo 2 and 3- the direction of movement of the needle. While sewing, do not tighten the thread, leave it as loose as possible. Only when the entire seam is laid, begin to tighten the seam and model the shape of the eyebrows. At the end, secure the thread with a knot.
Photo 4-eyebrows are ready.

The result of this stage of work:

Step 6: eyes and beak
We cut out two round parts with a diameter of 4 cm from white felt and two round parts with a diameter of 1.5 cm from black felt (can be replaced with black buttons on the leg).

- we sew white details to the body of an owl with floss threads with a buttonhole seam - photo 1;
- a piece of fabric for the beak is applied below the eyes - photo 2, we put a synthetic winterizer under it (such an amount that the beak is convex), we bend the edges of the part inward and sew it with a hidden seam - photo 3 and 4;

The symbol of wisdom and kindness is personified by an owl, with your own hands from fabric you can create cozy things with the figure of this bird. Owls are emotional birds, somewhat reminiscent of children, they are just as laid-back and funny. Why not put this mischievous bird in your house? We offer you three workshops on making textile owls.
History of textiles
Magnificent fabrics, which are sold in a wide range in specialized stores, are produced in large textile factories. But in the old days it was quite different. People did not have special equipment and still produced cloth. From time immemorial, man has been growing cotton and flax, gathering the finest silk threads, and shearing wool from animals. All these materials were only of natural origin and helped to protect themselves from heat or cold and give themselves an attractive appearance. The ancient Greeks and Romans were famous all over the world for their fabrics - fine linen and muslin. Due to the laborious process of weaving and processing, the price was too high. Only emperors and their entourage could afford to wear outfits from these materials. These fabrics are so durable that even after thousands of years, their fragments are found in the tombs of ancient kings.

China strictly guarded the secrets of sericulture, and there could be only one punishment for their distribution and sale. For a very long time, the Chinese had no competitors in the production of silk. But the eastern princess, who married an Indian prince, was so afraid that she would be left in another country without her favorite silk dresses, that she secretly took silkworm cocoons to another country. Since then, India has become the second power producing silk fabrics.

The development of sea trade routes inevitably spread fabrics around the world. Due to the high price, many countries began to abandon the goods and decided to produce materials themselves. Of course, their quality was worse than that of the original manufacturers, but the price dropped significantly. After the introduction of their own production, fabrics were no longer considered a luxury item, they entered the life of every person.

Scientific and technological progress has made it possible to create fabrics from synthetic fibers. Now the light industry is flourishing, but there is nothing better than the time-tested cotton, linen, wool and silk.
cozy pictures
So, back to the owls. A cozy picture with this cute bird can decorate a corner of a child's room. They say that the owl is able to give children perseverance and the ability to learn.
To create an applique, it is better to choose fabrics that do not crumble at the edges. Felt or denim (denim) is perfect for this.
If you have conceived a bright craft from beautiful shreds of cotton fabric, do not be upset. It just needs to be prepared in the right way:
- If the fabric is new, wash it well. This will protect your product from premature shrinkage and deformation.
- After washing, the fabric should be starched and ironed, it will become stiff enough so that it can be safely cut and glued to the base.
Choose the right picture. You can use one of the templates below.


Transfer the picture to thick paper and cut out the details. Circle the pattern on the prepared fabric and cut out the details of the future picture. Glue the details of the craft to the base of colored cardboard or fabric stretched over a stretcher. It is best to use PVA glue, when it dries, it does not leave marks on the fabric. The application with the owl is ready!


A useful element of decor
This master class will tell you how to sew a pillow in the shape of an owl. To get the job done, prepare:
- Beautiful fabrics with various patterns;
- Felt;
- Scissors, thread, tailor's chalk;
- pins;
- Filler (synthetic winterizer, holofiber).
To sew any product, a pattern is required. Choose your owl to your liking.

Transfer the pieces to the fabric and cut out the seam allowance.

The eyes and beak of a bird are best made from felt. Sew the resulting parts along the contour according to the pattern. Leave a small opening so they can be turned inside out and filled with stuffing. Gather the pillow together, decorate as you like. If you sew a small pocket to the belly of an owl, the pillow will turn into a convenient organizer.


soft friend
Children love soft toys. Sewn by the caring hands of your beloved mother, they will become not only the best friend, but also a talisman for your baby. The principle of making a soft toy in the form of an owl is no different from sewing a pillow:
- Choose the right fabric;
- Decide on a bird pattern;
- Transfer the pattern to the material and cut out the details;
- Sew the details of the toy according to the pattern, leaving a small hole;
- Turn each piece right side out through the hole, fill with padding polyester and carefully sew up the hole;
- Connect the parts of the toy together;
- Decorate the finished owl by adding decorative elements.
We offer you several patterns of a soft toy in the form of an owl.
Today, in any store in the country you can buy absolutely everything that your heart desires.
But not a single purchased item retains the warmth of the hands of the master who made it.
And, of course, a special warmth is stored in a handmade toy.
Today's master class is invited to create a magnificent and unique craft - an owl.
Making an owl with your own hands is very simple.
Such a toy can be sewn for a child and put in a crib, hang an ensemble of several owls from the ceiling above this crib, sit in the kitchen as an interior decoration. You can make an owl with your own hands in any style: realistic, as in nature, fabulous, funny, knitted, wooden, fragrant with herbs, cardboard, stone or even plastic bottles.
Textile owlets (from fabric)
The easiest way to make owls is from fabric. The fabric is publicly available, so making owls with your own hands will not be difficult. To complete this task, you will need a pattern, fabric and simple sewing skills. The fabric is chosen dense on a cotton basis, not very stretchy. It is recommended to use textiles with an interesting funny pattern, not just plain. Future owls are 40/40 cm in size. Additional consumables: a piece of felt and leather (black), synthetic winterizer, hidden zipper, fabric glue, pattern paper, pencil, scissors.

Manufacturing technique:
Paper is placed on the table and the shape of an owlet is drawn in free form, as in the figure. The form is free and very simple;

The finished pattern is cut out in shape and placed on the fabric, the first part is cut out. It is cut necessarily taking into account allowances (1 - 2 cm.). When the first part (front) is cut out, the second part (back) is cut;
Next, the eyes and nose are cut out of felt. They are sewn to the "front part" immediately. The sewing machine is set to embroider: the top feed is turned off and the sewing mode is changed to embroider. A zigzag stitch is used;
Eyelashes are carefully cut and glued by hand. They are made of black leather;

Both parts - front and back are sewn together from the bottom with a hidden zipper. The wrong position of the fabric is taken into account. First, the bottom edges are folded in 1 cm and processed with an overlock stitch. After that, one side of the zipper is sewn, and then the other;
Both parts are sewn along the edge from the wrong side into one piece. A do-it-yourself owl can now be turned right side out;

Paws are being made. They are drawn in free form on paper, and then cut on the fabric, taking into account allowances (0.5-1 cm).

The paws are sewn with a simple seam from the wrong side. At this stage, interlining can be glued if it is required to stiffen, and if the paws are not filled with padding polyester in the future. The lower edge of the parts is left unsewn for subsequent eversion on the front side. After that, the details can be turned out and sewn to the body of the owl, as shown in the figure. Optionally, they are stuffed with padding polyester, which gives additional volume. Next, the paws are turned down and the seam is laid again;

Exactly according to the above scheme, the second owlet is made, but with eyes wide open. The breast is made of felt. A leather bow is sewn on;
Both owlets are filled with padding polyester. All handmade owls are ready!

Owls made of cardboard
A unique toy can be made from corrugated cardboard. You can also decorate your home interior with it. Get very stylish!

Manufacturing technique:
Ordinary corrugated cardboard is used, from which simple boxes are made. A sheet of cardboard is taken and the upper smooth layer is removed (“torn off”);
Strips are cut (across the corrugated lines) for the body and, in the process of twisting, the layers are smeared with glue;
To make an owl with your own hands, two large eyes are made in the same way. Buttons are inserted into the pupils with glue;
On a flat cardboard, a shape for the wings, for the tail and wide eyebrows is drawn with a pencil. Then the resulting "patterns" are cut out and alternately glued to the figure of an owl;
A beak is carved out of any wooden stick, or any stick resembling a bird's beak is simply selected. The beak is inserted into the appropriate place and glued;
A second figurine of an owl is made in a pair;
Now it's the turn of homemade swings. To assemble them, you will need a simple steel wire and a thick jute thread. The thread is wrapped around the wire in several layers. After that, it can be bent into the shape of an owl swing;
Finally, owl figurines can be hoisted to their permanent place of residence.

Owls in origami technique
You can make an owl with your own hands from ordinary office paper. It's better if it's in color.

It is also easy to make such a composition. If you look closely, it is multi-layered. The main thing is to choose the right color scheme. First of all, the shape of the tree is cut out. A simple round shape of the tree crown is glued to it behind. Owls are cut out of paper. As an eye, you can use anything: buttons, strasses, felt. The resulting birds are glued to the overall composition. Next, you can cut out flowers, leaves, a raven and a birdhouse with an owlet inside. The resulting origami must be put on the base with glue to give it a vertical position. And you can also stick it on a postcard and make it a gift. It will be a great gift - handmade owls!
Examples of various techniques
Original owls made of polymer clay. Skills in working with polymer and modeling experience are required.

Amazing owlets made using the technique of overlaying a pattern on an ordinary river stone. A simple "paint on fabric" is used. The drawing is applied with an artistic brush. Drawing skills are required, as the drawing is done quickly due to the quick-drying properties of the paint, which, moreover, is not washed off yet.

Owl knitted. The technique is complex. Knitting skills and a detailed knot pattern are required.


