Crafts from natural materials forest of wonders. DIY crafts from natural material
Hello subscribers!
It's bad weather outside, maybe the sun is shining? It doesn't matter, because we have an unforgettable time of the year ahead of us. It will be in multi-colored colors and with many surprises, because autumn always presents us with its gifts. But, besides this, it also opens up its natural wealth to us. That is why in schools and kindergartens crafts are immediately made from natural materials, together with other components. It can be vegetables, as well as paper or plasticine, and more. other.
Children, well, just love all this creative work, because they get different funny toys that they can then play with.
In addition to all this, you can even take autumn leaves and fold them into masterpieces or bouquets and insert them into or make something. Well, that's not all, cool souvenirs come out of ordinary cones. So, if you're interested, take a moment and scroll through the entire note from beginning to end. I am sure you will find a lot of interesting ideas of what can be made from natural materials.
Well, if you have any thoughts on this topic, please share below the article and write your feedback and comments.
I would like to start this conversation with something that you do not even mean and cannot imagine that everything is much simpler than you think. It turns out that to make masterpieces, you can take the most ordinary sticks, twigs, or maybe you have pebbles or shells. In general, we always have all this at hand, so why not use it.
I propose to focus on products made of stones, which are always available in any area. If you were somewhere on vacation, you could bring these with you. It is advisable to take, of course, smooth pebbles. Take a log or plank and carefully glue the intended composition with a glue gun. Here you can make flowers for example. And to make the craft brighter and more aesthetic, paint it, for this use acrylic paints.

Quite popular is the product in the form of a hedgehog, take a look. In my opinion, there is still not enough mushroom or autumn leaves. So it's easy to fix, take colored paper and cut out the desired image.

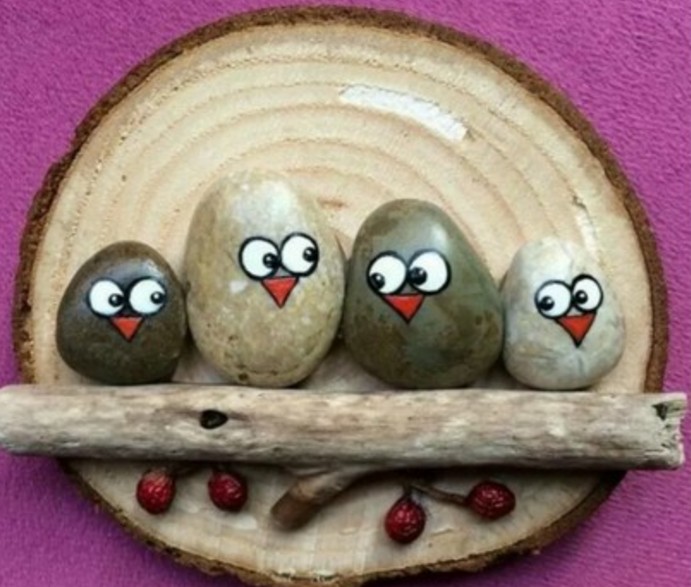
You can decorate the whole picture, make such a cheerful family in the form of birds on wood. As you can see, ordinary sticks are also involved here.
Oh, and by the way, do a still life.

For the smallest kids, take the following composition as a basis. Draw a maple leaf or some other on a piece of cardboard or A4 and then decorate it with multi-colored stones.

And if it's even simpler, then choose this minimalist picture. Which do not forget to decorate with multi-colored paints.

A bird's nest made of straw can be a great idea. You need to cut a circle out of cardboard.

And twist the flagellum from the straw.

And then twist a nest out of it along the diameter of the circle and fix the ends with threads.

In this way, wind in a spiral, so that in the end you get a bed in the form of a cup, glue the straw on the glue.


Then fill the souvenir with fluff or feathers and lay eggs, cones.

If you are a lover of pumpkin or sunflower seeds, then you can create something fantastically beautiful. Take a look at this photo. It was awesome! The author took and decorated a hedgehog, and his spines with ordinary seeds and painted autumn.


But here pumpkin seeds were used, by the way, you can come up with a lot of all kinds of masterpieces from them. In I have already shown you several of these works. Now I'll show you this one. Who knows, the seeds are painted with paints, gouache or acrylic, and then glued.

Here the artist did not use glue, but planted everything on plasticine. The tree trunk is made of buckwheat grains.


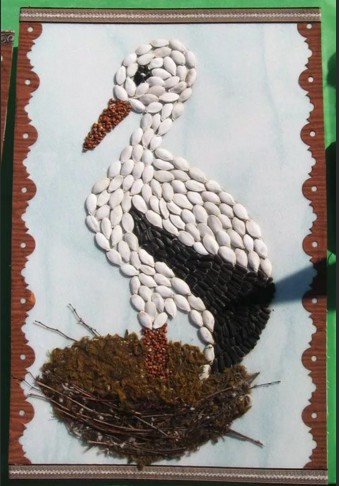
A stork is also made from pumpkin seeds, such a panel comes out, or hang it like a picture on the wall and admire.
I was shocked by another amazing and cool craft, I mean a chicken from which the author made different seeds. For this masterpiece, you need pumpkin and sunflower seeds, as well as plasticine.

1. From plasticine, mold the base, that is, the head and body of the bird.

2. Then start decorating the chicken by sticking the seeds one by one, as shown in the picture. First there will be wings.

3. And then the ponytail. It already looks funny.
Do everything carefully and take your time, it is from your efforts that success will await you.


5. Make a crest from red plasticine, and a yellow beak.


I also really liked such trees made of beans and watermelon seeds.

And you can also combine several types of natural material and get a picture. For example, how oats are also used here, and the rim is made from corn kernels.

And remember, in childhood, airplanes were allowed, so I also recommend making souvenirs from them. I mean maple.

This also includes crafts made from dry materials. Such a radiant sun.

Or a clearing and a woodsman.

Above all, use straw or acorns.

You will get not only paintings, but also little men and insects from chestnuts.

At school, I always remember that at labor lessons they made such cheldobeks.

Well, if you have a handful of pistachios lying around, or rather a peel, then imagine you can become a real decorator. Make this topiary.

Well, or a vase and insert dried or fresh flowers into it.

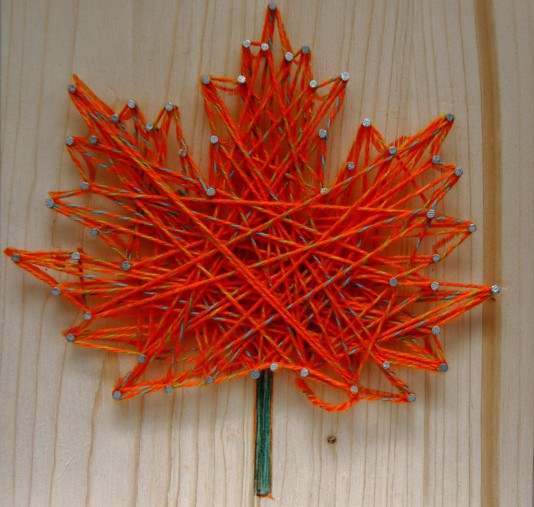
Well, in conclusion to this chapter, I want to impress you. I found one fun pattern that you can easily follow. All you need is a board, nails and woolen threads.
Circle the maple leaf on the plywood and drive in the carnations along the contour.

Walk along the contour with an orange thread.

Then begin to confuse in a chaotic manner, as if applying patterns, a spider's web. Great, did you do it?
I also like such a funny story in which the author took ordinary logs and laid out such birds.

These friends are somewhat like snowmen.

Crafts for elementary school "What autumn gave us"
Of course, to make compositions on this topic, it is enough to have everything you need at hand. This means you need natural material, and improvised means. Plus your desire, imagination and of course fantasy. If it’s really hard and inspiration doesn’t come, then take these ideas and create.
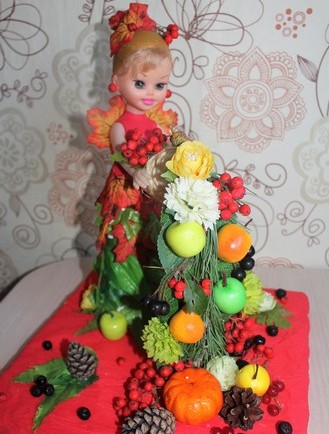
I suggest that the girls take their favorite doll and decorate her with such a golden outfit.

So it turns out you can go to the park and collect dry leaves and you are already a magician).


Brilliant, isn't it? Such a queen came out of an ordinary toy.

Do this work from physalis.

Or, for example, build an alarm clock or watch from twigs.

A sprig of mountain ash and cones will help you decorate.

Well, not in last place, probably the most popular will be crafts using seeds. I always see such creations at exhibitions in kindergarten and school competitions.


Everyone knows that autumn is rich, so make wonderful masterpieces.


By the way, decorate your class awesomely by making garlands of acorns, chestnuts and rowan berries.

Or here's an idea.

Make a gossamer and bring it to school.

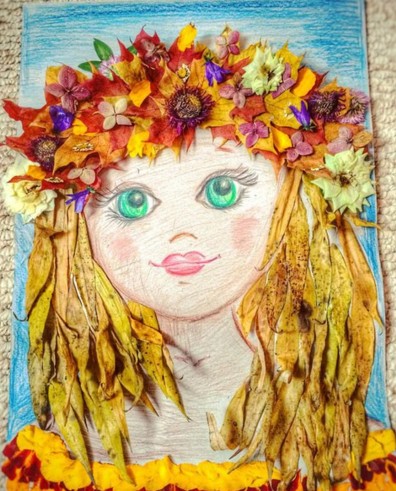
Probably the most enchanting will be such a charm, well, a direct symbol of this time of year in all its glory, this is the face of a girl. Take any flowers, plants and create.


You can make such a portrait. I think elementary school students and even preschoolers will cope with such work with a bang. Well, especially high school.


Such a gift looks superb, these are roses, but unusual, and from maple leaves.

You need to learn how to fold the leaves correctly, here is the sequence of actions. Watch this short tutorial:

On this topic, how to create such a bouquet, I found this video on the Internet on the YouTube channel. Maybe it will be useful for you too. Enjoy watching.
You can make a beautiful wreath.


Do not forget that it will not be difficult to build a lot of creations from spruce branches.


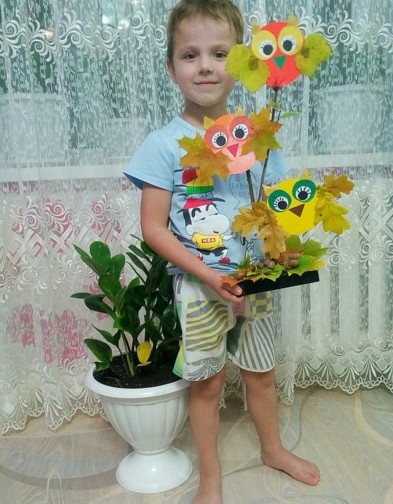
What a cute owl came out, you can't take your eyes off.

You can build an oak, look how wonderful it turned out.

Here's another idea, take note.

Autumn work in kindergarten from natural materials
I think the kids will like the work called the application. Cut the leaves into squares and stick on the landscape sheet in the form of any character.

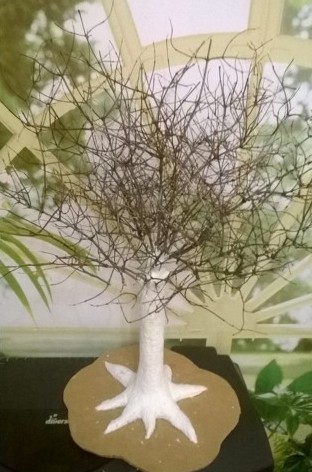
Also such an unusual tree can be a good idea. I would say magical, on the one hand it has winter, snow or hoarfrost, and on the other - foliage.

You will need to make a trunk out of plaster, like a stand, and stick the collected branches into it. Let your kid decorate it now as shown in the picture above. Make a snowball from cotton wool, and greens from dry grass and leaves, flowers.
Or you can make spiders or a hut on chicken legs with Baba Yaga. After all, children are very fond of fairy-tale characters.


And if you want to go in a non-traditional way and take shavings from simple or colored pencils as a basis and create such beauty.

Also create figures from walnuts in the form of a bear.

And here is such a little mouse.

Here are a couple more mice.

The panel with the use of rowan berries also looks great.

You can take the following option as a basis, make the leaves out of paper in the quilling style, and glue the mountain ash.

Here is such a funny kitten, well, it will obviously cheer everyone up.

I also want to invite preschoolers to make a smart owl.


It is easy to build the following from tree cuts.

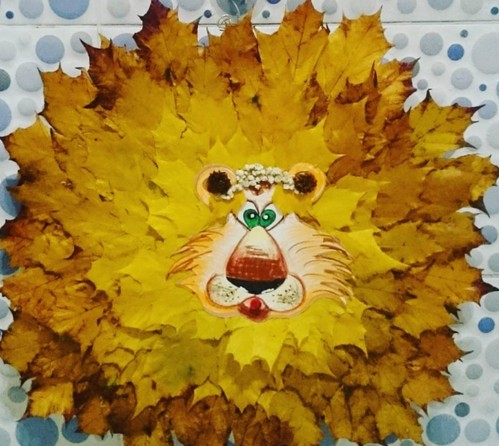
Or make a lion cub or a lion.


Also willingly stop at simple models that are carved as follows.

You can also draw, take dry leaves of trees as a basis in the form of stencils and simply dip them in paint to make prints.

Or this is how you can draw a picture with birches.


The next work, draw the image of a woman or girl, and offer the child to make hair.
Connect your imagination and build little animals or animals.

It is interesting to make a boat.

Or make a peacock or a firebird.

Toys and souvenirs from cones: fast and beautiful
Well, now I present to your attention all the most interesting of acorns, cones and probably plasticine. Because it is this component that will help to recreate new toys and souvenirs.
Before you is a picture that is made with the help of paints, a background and multi-colored cones are drawn, which are also painted with acrylics.

The next work, this is such a cute topiary, from all that was in the forest. Here are sprigs of Christmas trees, cones, berries, even acorns.

Love Masha and Misha from the cartoon, then you will like the next idea.

On this topic, I found for you the news of this year in this video from the YouTube channel. So don't miss out!
Well, a couple more ideas that you can translate into reality.
These can be birds, such as an owl or a swan, as well as a basket of cones.

It is easy to make an angel in the form of a doll, or a pendant.

They even make squirrels, but also, in addition to plasticine, felt fabric is used.


In addition to all this, you can also take any fruits and vegetables and arrange any composition using natural material.

Original crafts from leaves on the theme of Golden Autumn
If you have absolutely nothing to create from, then take and collect foliage in the parks and you won’t believe it, you can make such creations from it. Even kids 2-3 years old can handle it. Well, especially schoolchildren. I have one child in our house lives and studies in the third grade, so he painted the collected leaves like this.

And my son and I, who is already 5 years old, will almost be 6 soon, we will do such a miracle. Here is a butterfly, he chose the second one, and which one do you like better?

To be honest, I also really liked the hare and the fox. Look, even the bark has been adapted.


And what is this bird? Peacock, wow, and her tail is beautiful!

Well, the next composition in the form of an aquarium and fish can still be a great idea.


In addition to all this, you can easily and quickly create insects.

But probably the most beautiful and charming will be crafts in the form of maple leaves, they are folded in an unusual way, in the form of roses. Here is a tutorial on how to make this beauty. Repeat all the steps as shown in this picture.
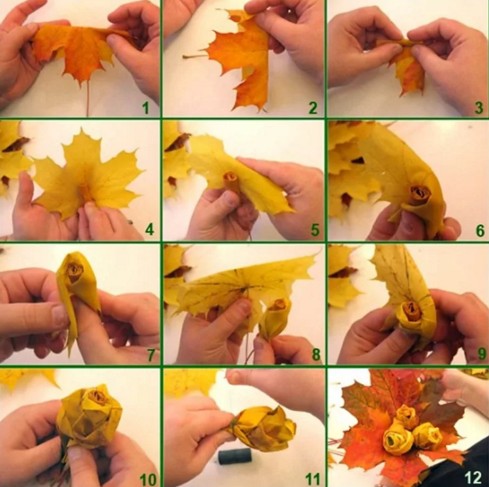
Here is what should come out in the end.

It is possible to make flowers of absolutely any kind of leaves. This video will help you, watch the master class.
In addition, take an ordinary vase and place dry branches in it and decorate with foliage.

And also any photo frame can be presented in an unusual way.

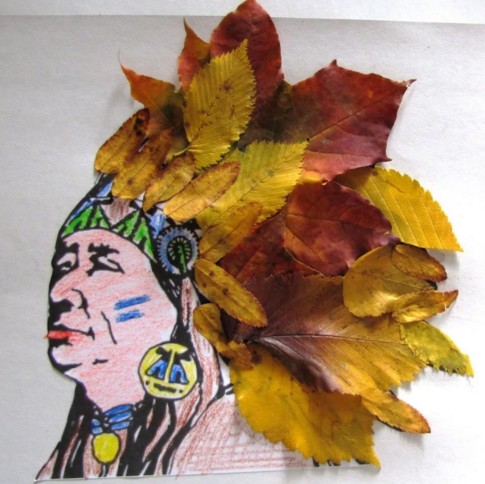
Well, make a leader for the boys who love the Indians.
And here are some more cool ideas on what you can think up and do from leaves. Here are the children's creations.


As you can see, there is nothing here. Turtle, snail, helicopter and even a mischievous parrot.


Or lay out the fabulous Petya cockerel.

In addition to all this, you can go in a non-traditional way and make paintings.

And if you do not have enough sun, then here is an idea for you.

To decorate the interior, and well, you can also bring a vase of maple leaves to an exhibition in a school or kindergarten. How to make it? You will need PVA glue and a balloon.
In short, you can look at these steps and build such a creation right today.

Or consider these stages of work.
1. Inflate a balloon, apply PVA on it with a brush and immediately apply the leaves.

2. Here's what should happen.

3. On top of the leaves, also apply glue without sparing.

4. Now let the blanks dry completely, and then pierce the ball with a needle. Now fill it with fruits and vegetables and quickly for the holiday.

I think that after reading and viewing this note, you no longer have questions about what can be made from natural material, I think I have found enough ideas. Just take it and do it.
All the very best and positive. Bye!
Best regards, Ekaterina
Natural material is the most accessible and interesting material for children's creativity. In the autumn period, all children's educational institutions make small and large masterpieces from cones, leaves, acorns, sticks, twigs, bark, flowers, fruits and seeds. In this section, the teacher can find many ideas for children's creativity.
Crafts from natural material
Contained in sections:Includes sections:
Showing posts 1-10 of 2082 .
All sections | Crafts from natural material
 gift from natural material"Bouquet for Mom" On the eve of March 8, pre-holiday fuss reigns in the kindergarten. Preparations are underway for the matinee, groups are being decorated, and, of course, gifts are being prepared for beloved and dear mothers and grandmothers. In addition to postcards, we decided to make a flower...
 All people know swans, They feed them, do not offend. A lot has been said about swans, especially about their snow-white plumage. People have always been attracted by these majestic and graceful birds. We made these wonderful birds with the guys from the middle group for the Open Day in our kindergarten ....
Crafts from natural material - Construction from natural material
Publication "Construction from natural ..."  Dear colleagues. Although it is already spring outside the window, but I wanted to present material on the autumn theme, I think it will be interesting. Children's creativity from natural material is characterized by the desire to create a real subject environment, not so much ...
 MAAM Pictures Library
 This work was done by the children as part of the Hedgehog project. Together with the teacher, they looked at photographs, pictures depicting hedgehogs, clarified knowledge about the features of the life of these funny forest animals. We watched videos and cartoons. Played with different toys...
 With my pupil Mokanov Karim, we are participating in the XVII All-Russian Children's Ecological Forum "Green Planet 2019" "Variety of Age-old Traditions" - a competition of scenery models for theatrical productions. Requirements for the design of the work: - a photograph of the layout is sent to ...
 We performed this craft with children for an environmental competition. I wanted the children to do the work themselves, without an adult. To complete the craft, we selected six shells. One large, then medium, two small ones for the hind legs and two even smaller ones for the front legs. Also...
Crafts from natural material - Master class on making crafts from natural material "On a sunny meadow"
 Goal: making crafts from natural materials. Objectives: To teach how to use natural materials to make crafts; Develop fine motor skills; Develop creativity, imagination, fantasy; Develop compositional and aesthetic feelings; ...
 Volume application "Grapes" from natural material. educator: Hajiyeva Umikhanum. Purpose: Development of creative abilities of educators and preschoolers. Tasks: - introduce the new concept of voluminous application - master the techniques of working with paper, natural material -...
 "Magic Forest of Animals" Abstract of a lesson on modeling from plasticine and natural material. Purpose: to create a positive motivation for learning activities, evoke an emotional response in children, arouse interest in natural materials, develop imagination, form a cognitive ...
 Vankaeva Natalya Borisovna "Tree of positive" Manual labor. Working with natural materials MKDOU "Kindergarten "Altn Bulg". Educator: Vankaeva Natalya Borisovna. In the fall, in the Viber group, I received a wonderful postcard "Tree of Positive". I decided to depict this picture with the help of ...
Wealth of material from nature
For work, everything that lies under your feet is useful - and it doesn’t matter bad or good. May come in handy: leaves and flowers, acorns with cups, cones, branches. You can bring a lot of nuts from home, beans, beans, peas, fruits, vegetables and much more are suitable for crafts.
And how do you like the idea of creating fluffies, but not from traditional cotton wool, but from poplar fluff or real feathers? Or an application of black and green tea? Or maybe you sharpened colored pencils and you have a lot of multi-colored shavings left. Excellent work is obtained from colored sand or colored salt and semolina.
Check out the ideas presented. Then it will be easy for you to explain to your child how to make a hedgehog, a sheep, a rooster and other funny toys from cones.
To make a cockerel, you will need:
- two cones;
- plasticine;
- 2 acorns;
- 2 small branches;
- awl.
From red or orange plasticine, he will fashion his comb and beard. The baby will also attach the legs of the bird to the right place with the help of this plastic mass, the beak will be made from yellow plasticine.

In almost the same way, you can make a sheep from a cone, but it must be unopened. You will also need 5 acorns, remove the “hat” from four, leave on the fifth. An animal's head is made from this acorn. Let the child mold and attach to it the eyes of a plasticine sheep, consisting of protein and a black pupil, draw a mouth with a felt-tip pen.
Her ears are made from two halves of a pistachio nut shell, attached to plasticine. With the help of it, you need to attach four legs of acorns to the cone. That's how quickly a sheep masters.

Crafts from cones may be different. This charming Lesovik is made from the same material. Please note that the bump is located upwards with a sharp edge. An acorn with a hat is glued to this neck, and 2 halves from a pistachio nut are glued to the bottom, attach small twigs instead of hands. The child will make facial features from plasticine.

A hedgehog made of cones is also mastered quite simply. From light plasticine you need to fashion his sharp muzzle, ears. Let the child stick the head of this animal to the cone, and also attach paws made of light plasticine to it. From the dark one, he rolls 3 balls - two smaller ones are the eyes, and a large one is the tip of the nose.

It is interesting and useful not only for children, but also for adults to make such crafts using natural materials for creativity. They can make a beautiful ball out of cones. It requires the following materials:
- foam ball;
- hot glue;
- sequins;
- decorative pin;
- ribbon.

How to decorate a flower pot and house with natural material?
This question is not difficult to answer if you use all the same natural materials. See how ordinary dry branches can decorate planters. In addition to them, you will need:
- secateurs;
- glue;
- the pot itself;
- wood varnish.

Dry tree branches will give many other creative ideas. See how interesting these natural materials can be used.

In the first case, almost identical branches were used. They need to be grouped by texture, glued together in the form of such squares, and then varnished. But do not throw away fine particles either, as these natural materials will help create a second panel. A concentrated salt solution is made for it, branches are lowered there for 20 minutes, then they need to be taken out and dried, and then glued to the frame.
You can paint the branches white, when they dry, put in a vase. It turns out a gentle, elegant and calm composition.

The next picture from natural material also deserves attention. It is made from:
- branches;
- dry rose hips;
- spruce and pine cones.
And if you make a wire base, bending it in the shape of a heart, then you will get such a panel on the wall. Nearby on the table, compositions of branches and cones will be appropriate. And if you lay out the sticks in the form of rays, lay flowers from yellow satin ribbons in a circle inside, then the sun will shine on the wall.

Such natural materials are also successfully used for decorating mirrors. See how to make a similar frame.

Household indoor items can also be made using chopsticks. With the help of them, a simple floor lamp is transformed beyond recognition, and craftsmen make durable tables using this technique.

How to make a picture from natural materials with children?

The child will be delighted if the parents create a panel with him, as a result it will turn out like this. The following materials were used for this work:
- seeds: pumpkin, pea, sunflower, millet, corn, beans;
- rosehip berries;
- immortelle flower;
- straw (inflorescences and stems);
- Pine cone;
- jug, salt dough animals;
- walnut shell;
- broom;
- coin (5 kopecks);
- pasta;
- candy;
- wooden spoon;
- artificial sunflower;
- branches;
- pouch;
- PVA glue;
- Brownie (it needs: a piece of material, bristles, threads, colored paper);
- burlap for the base;
- frame;
- cardboard.
To make a picture, first cut a rectangle of burlap to the size of the frame, glue it. It’s good if you first draw a plot on a piece of paper, marking the location of the various elements. Then, looking at this clue, you and the child will be able to correctly make the main picture from natural material.
Now trim the straw stalks so that they are the same length. Cut a rectangle out of cardboard, glue burlap on it. Lay and glue the stems horizontally on this blank, let them imitate a log house at home. You will make its roof from dried flowers.
If you don't have a thick straw, you can use wooden skewers or sticks. The latter are cut from even fragments of branches.
Cut a small rectangle out of cardboard and glue it to the wall of the house. Let the child draw the details of this window with a pencil or felt-tip pen.
The bag on the panel is made of burlap. A rectangle of the desired size is cut out of it, a narrow braid or thread must be tied on top of it.
The Brownie's head is made of bristles, which must be laid out in a circle in the picture. Face details are cut out of colored paper: eyes, nose, mouth. The hat is cut out, sewn from material, and the body is made from burlap.
Next to the Brownie, you need to glue a coin as a symbol of prosperity. On the left, attach dry grass to the PVA. She will replace the ears. Glue grains, candy and other details of the natural picture. From a round pasta we will form the sun, and corn grains will become its rays.
Making animals is not difficult. To do this, knead the dough by mixing 2 parts of salt and one flour, add water to make dough, as for dumplings. When the animals are ready, leave the figurines to dry completely.
Dough toys can be left in this form or coated with paints. This panel will become a source of pride for children, their parents and a talisman at home.
Such natural material in the fall, in the truest sense of the word, rolls underfoot. But from it you can make wonderful crafts for kindergarten or elementary school. Here are just a few examples.
Tell your child how to arrange the leaves so that they turn into funny figures.

If the kid does not know how to make a hedgehog, tell him.

First, let him cut it out of colored paper and glue its base onto the cardboard. Then you need to pick up leaves of similar size, paste over the back of the animal with them. His facial features can be drawn or cut out of colored paper.

And if you cut the leaves in a certain way, color them, then the result will be such interesting works.

See how original crafts made from natural materials can be.

For this, you need to collect leaves of various colors, dry them a little. Let the child crush the leaves with their hands over a deep box. After that, he will draw a tree on paper, cover the fate of the branches with glue. While it has not dried yet, you need to sprinkle the art with crumbs of leaves, slightly press them with your hands to the canvas so that they stick better.

Then you need to brush the leftovers back into the box to use them for another canvas. And this is ready.
Natural materials will help to make not only a flat tree in the picture, but also a three-dimensional one. For it you will need:
- 1 paper bag;
- leaves;
- glue;
- scissors.

Leaves need to be glued to them. If you want the tree to be unusual, make eyes out of acorn caps, and pupils out of dried rose hips. These elements can be glued or planted on the halves of toothpicks. The nose will be an acorn, and dried rowan berries strung on a thread will turn into beads.

Such children's crafts are also made from almost nothing.

First you need to paint the dried maple leaf with felt-tip pens, then put a clothespin on it. On the other hand, a mug of plasticine is attached to it. This is the figurine's head. You need to attach eyes for dolls to it, and make hair from maple seeds or others similar in shape.
Head decoration made of natural materials

The gifts of nature will also help in this. After all, you can even make a crown out of them. A strip of double-sided tape must be measured according to the volume of the child's head, remove the upper protective film, connect its ends. It remains to stick leaves on it, and you can put on a fairy tale in which the bearer of such a crown will be, for example, a forest king or prince.

In the same production, the girl who will play the role of the princess must definitely shine. Make a headdress for her also from natural materials.
Weaving a wreath of dandelions is not difficult. The technology for this is shown in the following figure.

Another flower is attached to a flower on a long stem, the stem of which is braided around the first one. Then, around the legs of these two yellow dandelions, the stem of the third flower is wrapped around. Thus, the whole wreath is assembled. When it is made to the size of the head, you need to connect its 2 opposite parts with a thread.
You can also here's how to make a wreath of different flowers, for example, from these, taking:
- garden roses;
- 1 branch of jasmine;
- berzelia;
- rice flowers;
- buttercup.
- floral tape;
- satin braid;
- scissors;
- thin wire;
- secateurs.
If you do not have the specified colors, replace them with others that are similar in texture, color. But be sure to use roses, because they are the main accent of the wreath.

Prune all plants, shortening their stems by 2-3 times. To prevent roses and other large flowers from breaking off, reinforce them with wire, hide it under the turns of the tape. Arrange the plants in front of you on the table so that everything is at hand.

Measure the satin ribbon to fit your head, leaving enough room to tie a wreath and just enough to let the ends hang down. Attach a piece of wire to the tape to help make the structure stronger.
Start applying flowers to this base, wrapping them with floral tape. Place each one below the previous one.

When the length is enough, tie the ribbon, twist the wire, securing the junction.
Such a wreath will decorate the girl's head on a holiday or will be a great addition to the bride's wedding attire.
What else you can make crafts from natural material, you will be told videos:
Autumn is a wonderful time! There is beauty on the street, golden leaves, autumn flowers, pot-bellied, plump pumpkins and squash, fragrant apples have ripened in the beds and gardens. There are a lot of mushrooms, chestnuts, spruce and pine cones in parks and forests. Harvested sunflower seeds, peas, beans. And all this enchanting and autumn-like fragrant beauty and generosity of nature can be used not only for its intended purpose, but also by making wonderful crafts from natural materials with your own hands.
Everything that autumn gives us can be used in creativity. Such crafts are always needed in kindergartens and schools. Teachers organize fairs and exhibitions where toddlers and older children can boast of what they and their parents or themselves have created from what nature has prepared for us.
Any ordinary cone, leaf, or even a pumpkin or acorn can be turned into an unusual creature endowed with character or a beautiful composition. One has only to put a little imagination and quite a bit of effort and time, as you can see the magical transformation and the birth of a small creation. Let's look at how you can create unique crafts from natural materials with your own hands from everything that is in the beds and in the forest to a school or a kindergarten group. Consider the processes in stages or just ideas for wonderful creations.
The beginning of autumn in kindergarten is marked by the start of any exhibitions and craft competitions. To do this, kids and their mothers collect leaves and acorns, cones and chestnuts and come up with interesting and intricate combinations, turning all this into amazing objects. Let's look at the ideas of crafts from natural materials with our own hands in the kindergarten, we will analyze one step by step.
Since autumn is the time for cobwebs and spiders, let's do this craft. Make it together with the baby, he will be delighted.
Let's prepare everything you need:
- thin and long branches of the same size - 4 pieces;
- white thin threads;
- a few autumn dried leaves;
- chestnut;
- some plasticine;
- legs from leaves - 8 pieces;
- hot glue (gun).
Let's start crafting:
- We fold the branches crosswise, wrap the middle tightly with threads or glue it with a gun with a hot ley.
- On the branches we wind a web of thin white thread according to the pattern, wrapping each branch tightly in turn.
- Now we make a spider. We glue eyes from plasticine on the muzzle, glue 4 legs from the roots of the leaves on the sides.
- We glue a sheet in the center, and a spider on it.
- Glue a few more leaves on the cobweb.
The autumn cobweb is ready.
hedgehogs in the meadow
Let's prepare the necessary material:
- cardboard base for crafts;
- cones;
- leaves;
- pine needles;
- plasticine;
- two potatoes.

And now we master:
- Glue the leaves onto the cardboard base.
- Glue cones around the perimeter.
- We make hedgehogs: we make a muzzle, sticking plasticine eyes and socks, we stick pine needles into the potatoes from above.
- We glue hedgehogs on plasticine in the middle of the composition.
- On the needles of each hedgehog, you can stick a fungus molded from plasticine or an apple.
And here is another version of a hedgehog from a plastic bottle and cones. To make it you need:
- plastic bottle and 2 additional caps;
- cones;
- foliage;
- rowan berries;
- glue;
- paint (brown).
Making a hedgehog:
- We paint the bottle brown and its cork black. We glue toothpicks painted black to the cork. These are mustaches.
- We make eyes from two white caps from plastic bottles.
- We glue the cones on the glue as hedgehog needles.
- You can stick rowan berries, leaves or something else on the cones.
- We will make a stand for the hedgehog by sticking the leaves on the cardboard. We put the hedgehog on a stand and bring it to the garden.

These wonderful crafts from natural materials can be made quickly and beautifully with your child with your own hands. The kid will definitely like the process, and the guys in the group and educators will appreciate the result.
We make from cones and chestnuts
Handicrafts made from natural materials, made from cones and chestnuts, are very interesting and unusual. From cones, you can make any figures of a man, magical creatures, animals. The same goes for chestnuts. In one composition, you can use several types of natural material, arranging them as you need as planned.

From chestnuts and cones you can make:
- Chelovechkov.
- Ants.
- caterpillars.
- snails.
- Mice and bear cubs.
In general, any living creatures, for which there is only enough imagination.
All animals can be glued to the base (for this, take cardboard or a lid from the box). Then fill the base with moss and dried leaves.
Seeds and grains
Do-it-yourself wonderful crafts on the theme of autumn from natural materials are obtained from cereals, grains and seeds. You can lay out panels from them, fill in the missing fragments in three-dimensional structures with them. Let's take a look at a few of these creations step by step.
From this material the child himself can also make. This activity is very pleasant and useful for developing imagination and fine motor skills of fingers.

As a basis, you need to take a dense sheet or cardboard, draw on it the outline of the future composition. Then coat the individual fragments with glue and stick the seeds. Cereals or grains. So you need to fill in turn all the elements of the picture.
Another version of the panel using seeds and grains. We put a drawing on cardboard and fill it with plasticine. To do this, we fill different fragments with small pieces of plasticine of different colors, as if rubbing it. And only then on the plasticine where necessary we glue the seeds, pressing them into the layer of plasticine. For these panels, you can use drawings of animals or insects, landscapes.
Without vegetables
A special place is occupied by crafts made from natural materials with their own hands, made from vegetables or using them. Usually, bouquets or any works of pumpkin look very bright and stylish, in autumn they look beautiful. This is a bright vegetable that allows you to unfold your imagination. He can turn into a mushroom, and into a forester, and into an owl, and into a flowerpot for a bouquet. Let's take a look at a few options step by step.

Pumpkin spider house
- We cut off the barrels from the round orange pumpkin and clean out all the seeds.
- We stick pins with round heads around the perimeter of the resulting window and pull a mesh of jute rope over them.
- We make a pouch. We glue 2 chestnuts, make eyes from plasticine for him and glue 8 paws from straws.
- We plant a spider on the glue near the cobweb.
- The pumpkin can be decorated with another small window with a cobweb or randomly stick autumn leaves on it.
Apple caterpillars
- One caterpillar needs several apples.
- We attach eyes and a nose to one apple, decorate it with a hat or a bow, put it on a toothpick and stick it tightly into another apple from above.
- We connect several apples with toothpicks.
- On the sides of the toothpick we stick the legs from the pieces of carrots, and at the back we put the tail on the toothpick - the tip of the carrot.

"Cornucopia of fruits and vegetables"
You can make a whole family of such caterpillars.
Potato hedgehogs
- We take a few potatoes and cut one half into a cone, this will be a muzzle.
- We make out the muzzle with eyes (they can be glued ready-made or made from plasticine or beads).
- We paint the nose with black paint.
- We stick toothpicks as needles. You can plant a small apple or leaf or fungus on the needles.
For such crafts, you can use zucchini, cabbage, carrots, apples. What can be done with all this rich harvest. The following are a few photos of do-it-yourself crafts made from natural materials for a kindergarten or school. You can try to make something similar or come up with variations.
We create masterpieces for the school competition
Many schools hold competitions and exhibitions at the beginning of each academic year. Often the task for such events is to create a composition, a bouquet of what can be found in the fall. First-graders are especially responsible for these competitions.

We offer several ideas for crafts made from natural materials, which you can simply quickly and beautifully make with your own hands in grades 1 and 2. They are pretty simple. Some first-graders and second-graders will cope without the help of their mothers, but for more difficult masterpieces, the help of parents is needed.
landscapes
They like to bring landscapes or scenes with the participation of any characters from cones, acorns, chestnuts, twigs and roots to school, and even to kindergarten. It is very interesting to make them yourself and imagine how ordinary twigs and cones come to life and begin to live a new, magical life.
Autumn bouquets
Classics of the genre - autumn bouquets of foliage, dried flowers, branches in beautiful variations and in an interesting design.
As a container for a bouquet, you can use a beautiful bright pumpkin and fill it with dried flowers, twigs and leaves. The pumpkin will need to be prepared:

- cut off the crown;
- clean out the seeds;
- Wipe the inside of the pumpkin with a paper towel.
Now you can fill it with a beautiful composition to your taste.
You can make roses from maple leaves. How to do it:
- For one rose, you need several (6-7) maple leaves.
- The first sheet is folded in half and tightly twisted into a tube.
- Next, fold the second sheet in half and wrap it around the first twisted sheet, but press it tightly only at the base, and leave the top free.
- We wrap the third sheet folded in half around the second, covering the joints.
- So we twist all the prepared leaves into a rose. We fix the thread at the base.

We make several of these buds and collect them in a beautiful bouquet. You can supplement it with other leaves or collect a whole basket of autumn roses.
Topiary
A very interesting kind of bouquet or tree that will be in a pot. Topiaries are made from a variety of materials. Let's see how to make it from natural material in the fall. Let's prepare everything you need:
- pot or small low vase. You can use any tin can by wrapping it tightly with jute rope or wrapping it in burlap;
- rather plump twig (for the trunk);
- a foam ball or a newspaper crumpled into a ball, wrapped in threads;
- any natural material: moss, leaves, chestnuts, cones, acorns, dried flowers;
- gypsum;
- hot glue gun.

Let's get to work:
- We put the ball on the barrel, fix it with glue.
- Dilute gypsum with water to the consistency of very thick sour cream.
- We put plaster in the pot and insert the trunk. Gypsum dries quickly, so you don't have to wait long for it to dry.
- We fill the pot around the trunk with moss and any material that is.
- We glue the ball with hot glue with leaves, dried flowers, cones, acorns and other natural material.
Topiary is ready. Here you can give free rein to your imagination and make very interesting compositions. These are the amazing things you can send to the competition of crafts made from natural materials with your own hands from grade 1 or even from older children.

We decorate the home
You can quickly and beautifully decorate a house or cottage in the fall with your own hands by creating simple crafts from natural materials.
autumn lanterns
On a dank and damp autumn evening, you really want to wrap yourself in a blanket, sit on a cozy soft sofa and dream. A suitable atmosphere will help to create candles or lanterns, which, by the way, can be made with your own hands using maple leaves or any other trees. Let's see how we can do this. First, let's prepare everything you need:
- autumn beautiful leaves, previously dried according to all the rules (more on this later in the article);
- transparent glass jars;
- PVA glue and a brush (you need to take it wider);
- decorative candles. You can use conventional or electronic batteries.

We begin the process of creating candlesticks:
- Gently coat the leaves with glue on one side.
- In a chaotic manner, stick them on the outer surface of the can. After all the leaves are glued to the jar, you need to smear them on top again with a thin layer of glue. Let dry well.
- The neck of the jar can be decorated with a tourniquet or decorative rope.
- Now we put a candle inside, light it and enjoy the comfort.
Autumn panel on the wall
We offer to disassemble 2 options for panels with which you can decorate a room in the fall. The first option is a picture of autumn leaves with a metallic sheen effect.
For the picture you need:
- the basis. It can be a small canvas or a base from a photo frame;
- a few autumn leaves (prepared and well dried;
- PVA glue;
- putty;
- black acrylic paint;
- gold or silver acrylic paint;
- wide brush and sponge.

Let's get to work:
- We apply a thin layer of putty on the base. Further, all work must be done quickly, until the putty has dried.
- On top of the putty, we lay the leaves smeared with PVA glue as desired. It is necessary to press them quite a bit into the putty layer.
- With a crumpled piece of paper or another piece of paper, we blot a layer of putty in some places, where the leaves are not placed, to give it structure.
- Now let it dry well. Since the layer of putty is small, the work will dry quickly.
- Now cover the work with black paint. Let's dry.
- Now we dip a dry sponge into gold or silver paint, remove the excess and lightly coat the whole work to highlight the relief and give the effect of a metallic sheen.

This panel will look like it is an imprint of leaves on a metal surface. The finished panel will adequately decorate your interior.
The second version of the panel is a picture of dried flowers and twigs
For her, we will prepare:
- several branches of different lengths and shapes;
- rope or thick thread for knitting;
- dried flowers, dried leaves;
- scissors.
Let's start painting:
- You need to choose what shape the panel will be. It can be square or triangular.
- We fold the branches into the desired shape. Tightly wrap the joints with thread, cut the ends of the thread and hide.
- Carefully wind the rope or thread over the entire width of the resulting frame, making a grid.
- We lay blades of grass, leaves and dried flowers in the resulting thread mesh.
- After everything is ready, the panel can be sprinkled with varnish.

Miracle in a jar
Crafts made from natural materials may well fit in a jar and you can do it yourself quickly and beautifully in order to decorate a house or cottage and bring a touch of autumn mood to the interior.
Here's how it's done. Let's prepare everything you need:
- transparent glass jar with a lid. The jar can be of any shape;
- beautiful branch. Its height should be equal to the height of the can;
- small dried leaves or artificial leaves made of paper, plastic or felt;
- glue (a heat gun is better).
Begin:
- We glue the leaves on the branch in any order and in any place.
- At the bottom of the jar, we fix the top of the branch with hot glue.
- Apply hot glue to the tip of the branch and carefully close the jar with a lid.
- Turn the jar upside down and put it on the lid.

house of acorns
With such an installation, you can decorate any room in the fall or give an autumn souvenir to your loved ones. All these crafts can, if desired, be sent to an exhibition or competition of autumn works in a school or garden.
This article contains the most interesting, easy-to-perform crafts made from natural materials that you can create with your own hands and tips on how to implement them. Based on the above photos, descriptions and master classes, you can create one of the described crafts or, with a little imagination and combining some tips and tricks, make something of your own, unique and inimitable like autumn itself.
Autumn time is rich in wonderful gifts of nature. Some of them delight us with culinary delights, because you can cook delicious dishes from a variety of vegetables and fruits, while others, in the form of multi-colored foliage, delight the eye with their bright colors. Usually, all this beauty almost instantly falls like a motley veil to the ground, which is why it quickly loses its attractiveness. Unfortunately, few people know what can be done from thereby extending his life. But crafts made from leaves, cones and chestnuts are not only funny figures and applications (although how can you imagine childhood without these cute little things?), But also an original and truly beautiful home decor.
+100 500 options and ideas
So, what can be done from natural material? It all depends on what the craft is for. In today's article, we will consider more than one option for beautiful products that you can create yourself using only available tools at hand. Many of them are children's crafts, for example, a variety of animals made from natural materials, toys, and even cartoon characters and computer games. But it can also be unusual trees, topiaries, unique panels and compositions that will delight and remind you of the wonderful autumn season in cold winter.
It is impossible to describe all those masterpieces that talented needleworkers create from natural materials. An autumn bouquet or a photo frame, an original vase or a decorative figurine, a Christmas toy or a picture - the imagination of talented craftsmen is simply limitless. Moreover, their creativity does not stop at soulless interior items, stretching much further. For example, for the design of a children's photo shoot using ordinary grass, leaves, grains and maple seeds. Have you ever imagined that such beauty can be made from natural material? Of course, not only adults will like the end result, but also the children themselves, who can be involved in all stages of creating a photo collage, from collecting plants to decorating their own pictures.

Transformation of flora into fauna
To begin with, we will tell you how a variety of animals are made from natural material. First of all, let's distinguish between the types of crafts. These can be applications that are created using leaves and small elements. Such material is usually glued to the base - a cardboard sheet, fabric or wooden board using a glue stick or PVA. Such a composition is flat and looks like a picture.
With the help of leaves and blades of grass, you can create a variety of representatives of the animal world, the main thing is to choose the right material for colors, size and texture. The craft will “come to life” if it is supplemented with a pattern, making the animals a muzzle, tail or even prey. Miniature details can also be created from natural material by trimming the leaves in some places to remove excess. It is better to glue the elements on a schematic representation of the animal, so it will be easier to maintain symmetry and pick up individual parts of the figure.

However, there is another type of crafts in the form of animals. This may be a bulk composition of natural material. Most often, nuts, acorns, cones and chestnuts are used. The torso and head are made of them, and matches, twigs, floristic wire or plasticine serve as legs, paws, neck. To make such crafts from natural materials quickly and beautifully, you can even use ready-made animal figurines, as long as they fit organically into the overall concept.

wayward tangle
The most popular hero and prototype of children's figures at kindergarten exhibitions is none other than a hedgehog. This prickly inhabitant of the forest is not in vain considered a symbol of autumn, because the attributes of this season are very “suitable” for him: nuts, mushrooms, apples and berries. A hedgehog made from natural material can be made from leaves, for example, like this in the photo below.

Its creation will not be difficult. The main thing is to pick up a lot of leaves of the same size and shape. Oblong leaves with sharp tips are best suited, from which needles for a prickly lump will be obtained. You can decorate a hedgehog with an apple and a mushroom of a different color, the muzzle, tummy and paws should also be slightly different from the fur coat of the animal. The final touches are the bean nose, mouth and eyes.
Below is another hedgehog made from plasticine and pumpkin seeds. This is a voluminous craft, miniature, but extremely cute. By placing the hedgehog on an impromptu stump and adding a green spruce twig and a bunch of red berries (mountain ash, hawthorn, wild rose) to it, you will complete the work and you will have a wonderful composition made of natural material.

Winged wonder
Another favorite of children and adults is the round-eyed owl. This bird can be made in a variety of ways: from a piece of bark, feathers, threads, leaves. We will demonstrate to our readers a wonderful and very simple craft. Such an owl made of natural material consists of a pine cone, several acorn caps, "helicopters" taken from an ash or maple tree, a hop cone and a couple of pieces of bark. In order to assemble the craft, you need to stock up on good glue - it can be "Moment", "Second" or silicone for a hot gun.

Such an owl is made from natural material very quickly:
- you need to prepare the details by selecting a lush cone, detaching the caps from the acorns and picking up small pieces of bark;
- the material must be cleaned of dirt and dried well so that the glue securely connects the parts of the owl;
- on the sides, the bark should be glued to the bump-body - these will be the wings;
- in the upper part, with the help of acorn caps, we form eyes, and above them we attach maple seeds - these are eyebrows;
- the final touch is a small bump that will become a beak.
In such a simple way, we get a wonderful bird from natural material, which will not be difficult to get in any city park.

Autumn landscape
Talking about crafts, it is impossible to ignore such a type of creativity as appliqué. A little higher, we have already talked about how you can lay out figures of animals and birds with the help of leaves, but what else can be made from natural material? An excellent craft would be a fantasy landscape in which one leaf will turn into a whole tree, and their combination will turn into a real dense forest. To compile such a composition, it is very important to choose the ideal material, because it will need to be glued to the paper as a whole, and when unfolded, all the flaws will be visible on the sheet. With the help of such an application, you can clearly demonstrate all the riot of colors of fading nature and organically place leaves taken from different trees.
Autumn vegetation also receives an unusual embodiment in the form of representatives of the underwater world. From miniature oblong and oval leaves, very believable flocks of nimble fish are obtained, more material can easily be turned into a pot-bellied crucian carp, and various blades of grass and thin twigs will make up the flora that grows on the seabed. Having issued the composition inside the cardboard box, you will get a wonderful "aquarium".

Simple but tasteful
There are crafts in our list that will not be so easy to make, because it will take a little more time than creating the usual products from leaves and fruits, but they are more durable, practical and useful. First of all, this applies to wall panels. The basis of the compositions we proposed is a plank, but it can be replaced with cardboard covered with fabric. It can be burlap, linen canvas. The purpose of the work is to create a certain plot, it can be a village house, a forest landscape, a river, an apiary, a shed with firewood or a small wagon. Based on the proposed photo, you can make excellent crafts from natural material in the garden, which will be useful not only as an exhibition item, but will also be an excellent decoration for the group.
To create elements of the composition, you will need to prepare different items:
- straight sticks;
- small branches resembling trees;
- pieces of bark for walls, roofs, mountains;
- small and neat leaves;
- dried flowers;
- nut shells;
- "log" of sticks.
You can add color variety with the help of pre-made figures of pumpkins and apples. With the help of paints, you will need to refine the picture by drawing patterns on buildings and other man-made elements (you can use a burner for the same purpose), landscape, sky. All parts are attached to the base with glue.

The collection of panels must begin, as in the case of the application, with the creation of a schematic image. This will help determine the placement of elements, their size and visual harmonization of the entire composition. On top of the craft, it would be better to open it with varnish - this will make it more resistant to external influences.
wish tree
The next in our review will be a tree made from natural material. This topic is relevant in several seasons, as it can be an autumn or winter craft. Additional materials in each case are used differently, although the basis is often the same - a beautiful branch. Only in the case of autumn crafts, it remains unprocessed, but from natural material it can be covered with a layer of white or silver acrylic paint.
As a decor for a tree, any materials they like are used - these are leaves and garlands of them, berries, nuts, fruits, miniature crafts, including paper. In this list, bumps should be noted separately - they are the basis for many interesting ideas.
Of those that grow on Christmas trees, you can easily create wonderful elves - real forest spirits. Figured oak leaves will become their wings, a bunch of dyed wool for felting or floral sisal will turn into luxurious hair, and wonderful caps can be made from felt or acorns. It will be a bit of a pity to take such crafts from natural material to the kindergarten - they turn out so funny.

Topiary from natural material
Recently, the topiary has been holding the palm among autumn crafts on merit. From natural material, you can make many options for small trees with a round crown. Traditionally, it is a ball decorated with flowers, shells, nuts, coffee beans or any other medium-sized items that can be compactly and neatly fixed to the base. The crown is mounted on a trunk planted in a small flower pot.
Autumn flowers are a separate topic for conversation. Nature, preparing for a long winter, pleases with a stunning abundance of chrysanthemums, oak, asters and dahlias. Their lush colorful corollas are perfectly combined with a variety of natural materials. A classic composition can be generously flavored with luxurious maple leaves, a crimson branch of wild grapes or a twig of yellow-green willow. Bushy plants with late elastic berries (rose hips, hawthorn, mountain ash) will be an excellent and especially relevant addition.
A bouquet of autumn leaves and flowers can be small, crowning one small vase, but a multi-tiered composition will look no less appropriate. When composing it, it is important to observe proportions, making each new “floor” a little smaller than the previous one.

Seasonal decor
Finally, we will share with readers the ideas of original autumn crafts with which you can decorate the house, make it a little more comfortable and warmer. The multi-colored foliage on the trees will not please for long, it will fall off with the first frost, but it is very easy to make the view from the window not so dull and gray. To do this, you just need to string small, but always beautiful leaves on long threads or fishing line in the form of garlands that decorate window openings.
Golden autumn can also be "brought" home in the form of elegant candlesticks or vases. To do this, a jar of an interesting shape or an ordinary transparent glass needs to be glued in a circle with colored leaves. Freshly harvested material will not lie beautifully on the vessel, first it will need to be dried a little so that the elasticity leaves the leaf and it becomes more pliable. You need to work with ordinary PVA, it will perfectly fix the decor on the glass, and after drying it will become transparent. In addition, this type of glue will not be afraid of the heat of a burning candle inside the glass.


