Building a dress pattern case for beginners. Designing for beginners: how to build a sheath dress. Why draw a base pattern is easy and simple
The pattern of almost any dress is built on the main pattern. By changing the style and adding some elements (undercuts, folds, embossed seams, cuts, etc.), you can cut out any dress model.
This guide refers to a size 46 dress. To build individual patterns, you should use the dimensions corresponding to the measurements taken from the person for whom it is planned to sew a dress.
In the process of constructing a pattern, it will be explained from which measurements a certain size is taken and how it is calculated.
Measurements that will be needed to build a pattern:
Basic grid
We start building a drawing from the base grid (calculated and constructed main lines): 
A 0 a 1 \u003d 51 cm. The length of this segment is calculated by the formula:
POg2(half bust 2) + Pg(increase in loose fit to the chest) = 46 cm + 5 cm = 51 cm.
The remaining horizontal segments in this figure are equal and parallel to A 0 a 1.
A 0 D = 23.2 cm = vprz(back armhole height) + Pspr(increase on the free fit of the armhole) + pdst(increase to the length of the back to the waist) = 20.7 cm + 2 + 0.5.
A 0 T \u003d Dst + Pdst \u003d 41.6 + 0.5 \u003d 42.1 cm.
TH=45cm= DOJ(skirt length).
TB=18.8cm= Dst(back length to waist): 2 - 2. = 41.6: 2 - 2
back drawing
The width of the back to the armhole is a rectangle A 0 aG 2 G.
A 0 a \u003d 18.8 cm \u003d ( Shs(back width) : 2) + Pshs(increase in back width) = 17.8 cm + 1 cm.
The width of the armhole is a rectangle aa 2 G 3 G 2.
Segment a 2 a 1 \u003d 20.2 cm \u003d (Shg(chest width) : 2) + ( Pog2(semi-bust 2) – Pog1) + Pshg(increase in chest width) = 16.7 + (46 - 44) + 1.5.
For control.
Segment aa 2 \u003d 12 cm \u003d A 0 a 1 - (A 0 a + a 1 a 2), measured from the drawing.
Segment aa 2 = ( Op(shoulder girth) + Pop(increase in shoulder girth)) : 3 = (29.1 + 6) : 3. = 11.7.
The width of the armhole may deviate from the control calculations by 0.2 - 0.4 cm, but cannot be less than them. In our case, it should not be less than 11.7.
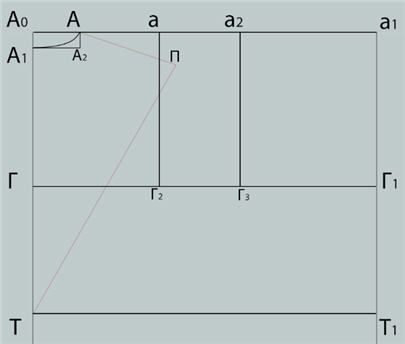
The neck of the back is formed by the A 1 A curve.
Segment A 0 A \u003d 7 cm \u003d Posh(semi-girth of the neck) : 3 + Pposh(increase to the half-girth of the neck) = 17.8: 3 + 1.
A 0 A 1 \u003d 2.3 cm \u003d A 0 A: 3. The curve A 1 A itself is drawn by hand, approximately as in the figure.
The construction of the shoulder point P.
Shoulder point P is formed by the intersection of two radii TP and AP.
tp=42.5cm= VPK(shoulder height oblique) + pdst(increase to the length of the back to the waist) = 42 + 0.5.
AP=15cm= Dpl(shoulder length) + 2 cm = 13 + 2 cm.
2 cm - this is an increase in the solution of the groove, for a stooped figure this value is 2.5 - 3.5 cm, for a kinky figure the groove is replaced by a fit and this size is 0.7 - 1 cm.)
The segment AP is an auxiliary straight line on which the undercut will be built.
Groove construction
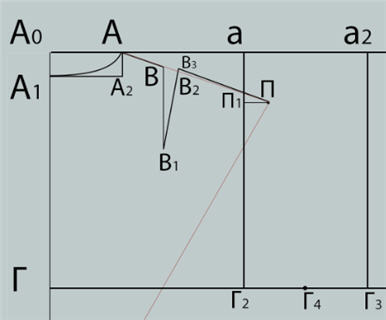
AB = 4.3 cm = Dpl : 3 = 13: 3.
The segment BB 1 is parallel to A 0 G. BB 1 \u003d 8 cm. This value is constant (from 7 cm to 9 cm) for standard figures.
BB 2 (groove solution) \u003d 1.5 cm \u003d 2 cm (increase for the groove solution) - 0.5 cm (increase for planting the shoulder seam).
B 1 B 3 \u003d B 1 B \u003d 8 cm. This segment passes through the point B 2, which is located on the segment AP.
Point G 4 divides the segment G 2 G 3 in half. The segment P 1 P is perpendicular to aG 2.

G 2 P 2 \u003d 7.8 \u003d P 1 G 2 (measured on the drawing): 3 + 2 (constant increase).
From point Г 2 we draw a bisector 1 with a length of 2.9 cm \u003d 0.2 * Г 2 Г 3 + 0.5 \u003d 0.2 * 12 + 0.5
G 2 G 5 \u003d G 2 G 3: 3 \u003d 4 cm.
The PG 4 curve is built by hand and must pass through P 2 and the end of the bisector.
Building a front drawing

Through the point G 5, parallel to A 0 H, we draw a segment G 6 H 2 - the line of the side seam.
For free-form products, with raglan sleeves and one-piece, the side seam can pass through the point G 4, and not G 5.
Neck construction
T 1 A 3 = 43.3 cm = dpt(front length to waist) + Pdpt(increase to the length of the front to the waist) =
= 42.8 + 0.5. If measure dpt more than Dst by 6 or more centimeters, then each of the points T 1, B 1, H 1 should be shifted down by an amount that is calculated by the formula - ( dpt – Dst) : 4.
For example, (46 - 40): 4 = 1.5, T 1 T 1' = B 1 B 1' = H 1 H 1' = 1.5 cm.
A 3 A 4 \u003d A 0 A \u003d 7 cm - we draw parallel A 0 a 1.
A 3 A 5 \u003d 8 cm \u003d A 3 A 4 + 1 \u003d 7 + 1.
Curve A 4 A 5 is drawn by hand, approximately as in the figure.
Building a groove in front
G 1 G 7 = 9.1 cm = CG(center of chest)
A 4 D 8 = 26.2 cm = Vg(Chest height), drawn from point A 4 through G 7.
Point A 6 is built by the intersection of the radii A 4 A 6 and G 8 A 6.
A 4 A 6 \u003d 6 cm \u003d 2 * ( Pog2 – Pog1) + 2(Increase to undercut).
The increase in undercut for size 38 is 0.5 cm, 40 - 0.8 cm, 42 = 1.1 cm, 44 - 1.5 cm, 46 - 2 cm, 48 - 2.5 cm, 50 - 3 cm.
Front Armhole Height
On the segment a 2 G 3 we mark an auxiliary point P 3.
G 3 P 3 \u003d G 2 P 1 (we measure in the drawing, in our case 17 cm).
G 3 P 4 \u003d G 3 P 3: 3 \u003d 17: 3 \u003d 5.7.
P 4 P 4 ' = 0.6 cm (constant value for all sizes).
Building a shoulder line
Point P 5 is built by the intersection of two radii P 4 'P 5 and A 6 P 5.
P 4 'P 5 \u003d P 4 'P 3 \u003d 12 cm.
A 6 P 5 = Dpl(shoulder length) = 13 cm.
Armhole construction
We draw a perpendicular 3 (1 cm) in the middle of the auxiliary segment P 5 P 4.
From the angle G 3 we draw a bisector 2 \u003d (2.4 cm), the length of which is calculated by the formula:
0.2 * G 2 G 3 \u003d 0.2 * 12 \u003d 2.4 cm, where 0.2 is a constant value.
The line of the armhole in front is formed by the curve P 5 G 6, which passes through the points P 4 and G 4, perpendicular 3 and the end of the bisector 2.
Calculation for a sleeve pattern
The segment O 1 O is drawn from the middle of the segment PP 5 parallel to A 0 H.
The length of the segment OO 1 is measured in the drawing.


The resulting pattern drawing for further use must be divided into two parts along the side seam line. The result should be two parts of the pattern - a back pattern and a front pattern.
All this is done on paper in full size. Then each of the patterns is cut out and transferred to the fabric. Already on the fabric, allowances for seams and processing are added.
So, I'm showing. Luckily, a men's shirt was found lying around, so she did everything like Ellochka Schukina - quickly and fearlessly, saying ho-ho :) I managed to keep the clasp, for ease of display. Naturally, she is on the male side, let this not bother anyone.
So the first picture is very nervous :) Everything is in creases from the wind (I have a photo studio on the balcony now), but it came together in the chest, the waist line is in place, and the freedom in the waist is quite satisfactory. I intentionally did not change anything in this place. It was interesting to see what the standard construction gives.
Back and side - sometimes worse, but this is fixable. Well, the shoulders look too big - I didn’t cut off the allowance, I wanted to first look at the depth of the armhole with the allowance. 

These creases in red are my eternal headache and the result of a kinky and asymmetric figure. I deliberately left an allowance for the side back, because I was ready for this effect. And now I'll show you how I fix it.
Initially, it was sewn not by combining the cuts as usual, but with an offset by the size of the allowance along the side of the back. 
The task is to align the side back. On the drawing, it would look like a side waist tuck is made only in front, and the back line is vertical from the armhole down. In this case, this distance is just equal to the 1st "norm" 
After drawing a new line of the side seam, the excess must be put somewhere. Let this be an extra tuck. 
Let's see what it gave us: 

Much better, I think. And for a blouse or a semi-adjacent dress, I would have stopped at this degree of freedom. But, just for the sake of experiment, I also tried to take the excess to the center - as if I were building with a tap. 

In the red circle - the result of the tuck without overstating the sides :) A good example, so to speak. The fit on the back suited and the side view became much better. There are little things left. If I was doing a real "thing", then, of course, I would do it with asymmetry in mind, and then everything would finally be fine.
But in general I liked it. Fast and believable enough.
Not a single animal was harmed during the shooting :) And this is for you to laugh - this is how a "tripod" performed by a woman who urgently needed it looks like :)) Fotik stood on top of a blue bowl and survived! 
Py.Sy. the basis, I repeat, is a dress, designed for sewing on sleeves. If you need a greater fit, then the chest tuck should be slightly increased already in the process of modeling. Oh yes, I also made the tucks on the back longer than expected. I always make them longer so that there is no bag on the back.
If you have just decided to start sewing clothes, the first thing you will have to get acquainted with is the rules for drawing up a pattern. But it is she who is needed to create a beautiful and stylish outfit according to the figure. Therefore, in this article we will talk about how to make a dress pattern.
Where does tailoring begin?
Before sewing any clothes, be it a children's summer sundress or a women's sheath dress, you need to decide on the model. In addition, we advise you to pay attention to the style of clothing: it will be a tight-fitting or loose dress. In particular, the definition of the style will help in the future to make an increase in the calculations.
Suppose you decide to sew a tight-fitting dress in size 48, choose a model, and then you should take a centimeter and take measurements from yourself or the person you are going to sew a suit for. How to do it? What to measure? And how to make a dress pattern using improvised materials?
To get started, in addition to the centimeter, take a piece of paper and a pen. Then put a centimeter to the shoulder line and lead it until you decide where exactly your clothes will end (i.e. how long the product will be).

Therefore, before you make a dress pattern yourself, measure and write down its estimated length. For example, the length of your dress, taking into account height, is 90 cm (this is approximately knee length). Next, you will need to make calculations, measurements and record the following data:
- back length (up to the waist);
- shoulder length;
- half-girth of your neck;
- half chest;
- half-girth over the chest;
- semicircumference of the hips;
- half waist;
- armhole depth.
How to correctly take key measurements?
In order to correctly perform all key measurements, you need to know from which and to which place it is necessary to take a centimeter. For example, the length of the back is measured starting from the seventh vertebra, and is carried out to the limit line of your waist. Shoulder height is measured by taking a centimeter from the top shoulder point to the point connecting the spine and your waist line. That is, it turns out an oblique line.
Before you make a dress pattern for your figure, measure the width of the shoulder. To do this, take a centimeter, attach one part of it to the highest point of the proposed shoulder seam (located at the very base of your neck) and lead the other part to its end point (where the shoulder ends and the arm begins). To measure the girth of the sleeve, you need to take the fullest part of your shoulder and wrap it in a centimeter. In this case, the measuring tape should close on the outer surface of your hand. Sleeve length is measured from the highest shoulder point. Then the centimeter is passed along the outer side of the arm, goes along the forearm and ends at the limit of the length that you need.

The half-girth of the neck is calculated taking into account its girth. To do this, wrap a centimeter around your neck and divide the resulting figure in half. All other measurements with a half-girth are carried out according to a similar principle.
For example, you might get the following measurements:
DS (back length) - 39 cm;
DP (shoulder length) - 14 cm;
PS (half-girth of the neck) - 19 cm;
PnG (half-girth above chest level) - 45 cm;
PG (semi-girth of the chest) - 49 cm;
PT (half circumference of the waist) - 38 cm;
PB (half circumference of the hips) - 51 cm;
GP (armhole depth) - 21.5 cm.
OG (chest girth) - 98 cm;
Pr (fitting increase) - 1.5 cm.
How to calculate back width?
Before you make a dress pattern with your own hands, calculate measurements. To do this, using formulas, we perform the corresponding calculations. So, when measuring the width of the back, it is necessary to pay attention to the protrusions of both shoulder blades, since the measurement is carried out from one shoulder blade to the other. Then we divide the resulting measurement by two. For example, the width of the back turned out to be 38 cm, therefore, after dividing this number in half, we get - 19 cm.
You can check the correctness of your calculations using the following formula: SH = OG / 8 + 5.5 cm. For example, OG (chest volume) is 110 cm, therefore, 110/8 + 5.5 = 19.25 cm. As can be seen from calculations, exhaust gas measurements showed a value of 19 cm, and calculated ones - 19.25 cm. This means that there is a need to double-check your measurements. If everything is correct, then to draw up a future pattern, we write down the first number, which will be correct.
How to make a dress pattern correctly: armhole width measurements
Armhole width can be calculated using the formula: ShP or ShPr \u003d D pzr (anterior-posterior diameter of your arm) + P spr (allowance leading to the widest part of the armhole). For example, if D pzr is 10 cm, and P spr is 5 cm, then Spr \u003d 10 + 5 \u003d 15 cm. This indicator can also be checked using a standard size grid.

How to measure the chest width for a pattern?
Chest width is measured in two passes. At the first stage, this value is obtained by measuring from one front corner of the armpit to the other, bypassing the protruding parts of your bust. Thus, you measure the width of your chest. At the second stage, it is necessary to measure the width of the front of the body based on the distance between the protruding parts of the mammary glands.
In addition, the chest width can be calculated using the following formula: ¼ OG - 4 cm. If our chest volume is 98 cm, then, substituting this value, we get the following: 20.5 cm. Recall that all these measurements and calculations will need to be performed before how to make a dress pattern (for beginners).
What to do after receiving the necessary measurements?
After you have received the required basic measurements, proceed to create the pattern itself. To do this, you will need tracing paper or any thin paper. Take a photo of the dress you plan to make and, looking at it, start putting your measurements on paper. But keep in mind that your pattern should consist of two parts - a back and a shelf (front). Therefore, carefully consider your sketch. Next, look for an approximate transfer of numbers to tracing paper.
So, put a large sheet of paper corresponding to the length of your future outfit (recall, we have it equal to 90 cm), make a small indent from the top (10-15 cm) and put an “A” point in the upper left corner. From it, draw a vertical line down and put a point "D" (its length should correspond to 90 cm). From point "A" draw a line horizontally (its length should be equal to ½ OG + 1.5 cm) and put a point "B". Draw a vertical line from it and set the point "C" (it should be parallel to the point "D"). Connect the dots and get the segment "SD".
Still do not know how to make a dress pattern for your figure, then we continue. From the point "A" we set aside the point "G" along the segment "AD", corresponding to the depth of the armhole + 0.5 cm. We repeat the same action on the other side. We set the point "G1". We connect and get the segment "GG1".
From the point "G" we measure the AL (width of the back), put a point at the end. Then we count from it ShPr (armhole width) + 0.5 cm and SHG (chest width) + 1 cm. Further, according to the measurements made earlier, we mark the lines of the waist and hips in the figure, draw the proposed neckline, outline the lines of the tucks.
Cut out the pattern and transfer to the fabric
After the pattern is ready, check the correctness of its compilation and carefully cut the paper along the contour. Then attach the paper to a piece of fabric (it is better to grab it with invisible ones) and circle it with white chalk. After that, along the obtained contours, cut out the detail of the product with scissors. It remains only to sew everything on a sewing machine.

How to make an increase in fitting the product?
Before you make a dress pattern, pay attention to its style. It will depend on him how many centimeters you will need to leave for an increase in fit. In total, there are four types of dresses:
- too tight cut;
- tight-fitting exclusively silhouette;
- semi-adjacent type;
- direct type.
For a dress that is too tight, an indent of 1.5 cm is suitable. For an adjacent silhouette - 3 cm. For a semi-adjacent one - 4-5 cm. And for a straight one - 6-7 cm.
Attention! When making an increase, do not forget to add extra centimeters to the girth of the bust and hips.
What does the term "base pattern" mean?
Often, lovers of cutting and sewing advise beginners to first make a pattern-the basis of the dress, and then make the product itself using it. What does it mean? The base pattern is a kind of pattern, according to which, according to experienced craftsmen, you can sew any outfit.
For example, any dress can be based on a standard sheath dress. And from this form, as they say, you can already dance further. For example, increase the sleeves, make the dress looser, add a slouch, increase or decrease the sleeves, change the neckline.

How to make a dress pattern for the summer?
Decided to learn how to make a summer dress pattern? First, choose a light, suitable material, take the necessary measurements, and then draw up a base pattern on paper, created exclusively according to your parameters.
After that, transfer the paper pattern to the fabric, cut out the pattern and sew. The dress is ready. By a similar principle, it is worth acting after the decision you have made on tailoring clothes for children. Before you make a dress pattern for a girl, pay attention to the photo of the model, take measurements and a base pattern.

Fabric and physique are two important indicators
Before creating a pattern, pay attention to your physique and the chosen fabric. For example, ladies with a thin physique can sew dresses from almost any fabric.
It is recommended to make a large increase - 10-20 cm. It is better for full girls to give preference to hard and poorly draped fabric. In this case, it is better to make the increase minimal, especially in the hips, since there is a possibility of giving more volume. If you are the owner of bright shapes of the breasts and buttocks, then knitwear will be the best material for your clothes. So, before you make a dress pattern, consider these points.
What should be remembered when creating a pattern?
The pattern will fully correspond to the parameters of your figure only if you follow our advice. For example, you need to finish drawing a tuck for the back (at waist level) exactly at chest level. The waist tuck is drawn with a preliminary indent of 4 cm from the marked chest line. The shoulder tuck ends at the line of your chest. The lower edge of the armhole also goes along the chest line.
Before you make a dress pattern, take measurements. When creating a base pattern, remember that the entire pattern fits inside a large rectangle. The height of this geometric figure must necessarily correspond to the length of your product. The width of the pattern itself on paper corresponds to the sum of the half-girth of the chest and a couple of centimeters. That is, we measured the girth of the chest, divided the resulting value in half and added up to 7 cm (this number will directly depend on the cut of the dress and the allowance).
The most important part of the pattern is the top. In order to draw armholes, darts and the neckline more conveniently, divide the upper part of the drawing conditionally into three parts: there will be an armhole in the middle, and darts, a line of shoulders and a neck on the sides.
In a word, do everything right, following our advice.
Undoubtedly, many people thought about such a task as how to independently build a pattern. For example, dresses, trousers, skirts for girls, sleeves, shorts, and the like. There is enough information about this on the websites. It is offered to make a pattern by an experienced cutter working in an atelier, he has his own methodology, developed for those who begin to understand this matter.
For beginners who decide to make the construction of trousers or a skirt, a dress, whether it is made for a girl or a woman, you need to have knowledge of what rules you need to make a pattern, you need to know the technology of sewing clothes. And also, you need to know many other small points that may seem completely insignificant at first glance. It should always be remembered that patience is the basis of success.
Of course, beginner dressmakers are concerned about questions - how to learn how to build patterns on your own? How can a beginner build a pattern simply and easily? What to draw a pattern on? What does a cutter's ruler look like? How to cut out a pattern? How to tailor this or that product?
The article will provide readers with tailor's advice, the basics of the business, there will be an opportunity to learn about what a tailor who has just begun to learn this business needs to know, about the procedure for making a pattern, how to make a pattern correctly, in what order to start cutting, sewing on their own. But also, there is an opportunity to draw useful advice on social networks on this topic by signing up for certain groups for beginner tailors. There are constantly new tips on building garments, people communicate and everyone will tell something of their own, which often not everyone knows.
The process of building clothes, and especially a dress for a girl, is creativity, the basis of which requires not only the ability to be able to do the work itself, sew with a sewing machine, it also needs the imagination of the future designer. Without imagination, it is difficult to form a basis for starting actions.
Here it is not enough to know how the pattern is made - the designer draws a sketch of the dress model for the girl that he plans to create, he will present all the trim elements that will be present, choose the color, type of fabric, its quality, the silhouette of the product itself. All this needs to be implemented step by step on paper, drawn. It is worth saying that drawing beautifully is not necessary for making a sketch.
In another case, it is possible to use ready-made solutions for building a product, which can be supplemented or changed. It often happens that beginner tailors put the pattern first. They carefully carry out calculations, make measurements, they do it all carefully. A beginner should understand that usually the result that is obtained for the first time is unsuccessful, and the reason for this is lack of experience. It is better for a beginner to try to cut out clothes by choosing cheap fabrics, first you need to take the production of clothes from cheap fabric as a basis so that funds are not wasted in the event of the first failures in the tailor's work.
Before you start building a product from expensive fabric, you need to gain more personal experience. to become more confident in the performance of work. All knowledge is acquired step by step, the basis of everything is patience and attentiveness. You need to acquire a pattern, study the profession. The teacher can only give part of the knowledge, sewing and cutting courses will help to understand everything in general terms, as well as articles on the Internet, but the rest will come with practice, as there are many points that cannot be understood until they pass through the hands of the student. Gradually, as you try to perform different jobs, mistakes in cutting and sewing will disappear.
Element: dress silhouette
 The element that itself represents the silhouette of the dress can be of several types:
- Adjoined.
- Semi-adjacent.
- Free.
When making the same dress size, child or adult, the beginner tailor must make three different patterns. When a dress is modeled by an experienced tailor, he will get by with one basic pattern that he has already tested, he will make changes to it with chalk on the fabric.
What tools are required to make a pattern?
In order to make a pattern, you will need some tools, if you choose from ordinary things, then you can use three tools:
- Pencil.
- Paper.
- Ruler.
But, if a person decides to seriously engage in the business of a cutter, then it would be more correct to buy tools that are designed specifically for a beginner cutter. The list of such tools is quite large:

What terms are used in pattern making?
In the process of self-constructing a pattern, the terms that are contained in the designers are practically not needed, only a few will come in handy: a shelf, an armhole, a back, an okat. If you use already made patterns that were found in magazines, then there are many unknown words. These terms are available on the Internet, but they should not be studied much, since in most cases they are explained in the drawing and are intuitively understandable to an ordinary person. There are also symbols to be aware of.
- The arrow and the inscription "DN", "Local" shows the direction of the fractional thread of the fabric, taking into account which the pattern is laid out on the fabric.
- “Fold fold” indicates that this part should be laid out during cutting along the fold, this is how, for example, the back is done.
- To prevent the parts from shifting one relative to the other during sewing, marks are placed, in this way the parts are broken into parts, and when sewing, these marks are combined, so displacement and stretching of the seams can be avoided.
- There are certain areas of clothing that need to be shrunk or stretched during sewing. There are instructions for certain areas, you need to know and study this separately.
- Professionals use patterns without allowances. For beginners, patterns come with allowances. The outlines of the pattern are indicated by a solid line, the line at the stitching point is applied as a dotted line.
 To build a skirt, 3 measurements are often enough: hips, waist, skirt length. To make a pattern of children's trousers and shorts, you need more marks. Sewing a dress involves applying a large number of marks, they must convey the position of the chest, shoulder, you need to calculate the volume of the armhole and other sizes. Each pattern is created in such a way that the fabric does not fit snugly against the body; for this, increases are used in sizes.
You should not blindly trust pattern magazines, you need to analyze everything. You should never be in a hurry. The work must be done in sequence. Especially it is necessary to carefully make children's outfits. All measurements must be taken according to the rules, professionals have the terms “first fitting”, “second fitting”. You should not assume that it is impossible to make a pattern, you need to calmly do everything according to the rules, understand all the moments, and everything will work out.
Sewing is easy! You yourself will soon see this when you put on a brand new wonderful and most importantly hand-sewn dress (or any other piece of clothing). What a pleasure you will experience when you hear the first sincere compliments from relatives and friends and proudly answer: “I sewed it myself.”
Some kind of “magic” - here in front of you is just a piece of fabric, and after a while, thanks to your creative aspiration, a bit of patience and desire, something completely different is gradually born, something that takes shape and meaning in your hands, something that you can try on, put on yourself , something that becomes not only a part of you, but also a real reason for pride.
Where do we start?
At first! And the beginning in our business is the construction of a basic pattern-the basis of a women's dress (jacket, blouse). Don't be scared, please, and don't panic, even if algebra and geometry were your least favorite subjects, you can handle it. It is much easier than it seems at first glance. Moreover, everything is described in great detail and you just need to perform the listed actions in order.

Scared? But in vain! We will not do this!
More precisely, we will, but not like this, much easier, you will not take an exam at a university on this topic. In order to create your own basis and work with it in the future, it is not necessary to resort to such complex calculations. Much can be simplified, and in some places even a little cheat. Just trust that it can be done much easier and faster! Everything will work out, you yourself will not notice how easy it is to do it!
Ready-made patterns: pros and cons
It is very important to understand that, although building the foundation may seem like the most tedious task of the entire, so to speak, technological chain, it is still necessary to do it! “Why?”, some will ask: “After all, now there are so many magazines with a huge variety of patterns, take it, I don’t want to.” Because you only do it once. and on the basis of a single pattern you can realize any fantasies because everything is built on this basis. You will not need more ready-made patterns, you can make them yourself very easily. Even if you take some magazine with any very original, ready-made pattern that interests you, you can easily “fit” it for yourself, because the patterns from magazines are designed for “typical figures” and, as practice shows, almost do not suit anyone perfect. Of course, because we are all different.
Having worked once in compiling a basic pattern, you will have, as it were, a “cast” of your own body, unique and unique. Moreover, you will understand what numbers come from and where they are applied and why it is like this here, and here like this .... You will understand everything. It's simple!
Realizing the importance of this action, we begin to build a basic pattern-the basis of a women's dress.
We build a pattern. Step One: Measures
We take a centimeter tape, a pencil, a notebook and ...
Taking measurements
- POG- Half bust.
We measure the circumference of the chest (OG) along the most convex part in a regular bra, or without it (if you do not wear it) and divide it in half.
- SWEAT- half waist
Waist(OT):2
- POB- half hips
Hip circumference (OB):2.
But there is one misconception about taking this measurement. You can not focus on the widest part of the hips. OB is measured along the convex part of the pubis, almost always coincides with the most convex part of the buttocks, but not always with the convexity of the hips. Often, even in thin girls, the hips expand below the measuring line. For example, correctly measured OB = 96cm, and 2-3 cm below - 98. This feature must be taken into account when expanding the pattern by the specified amount below the hip line, otherwise you will not like the fit.
- DC- back length
From the 7th cervical vertebra (you can slightly tilt your head forward, and it will become convex) to the waist line.
- ShS- back width
Approximately at the level of the middle of the shoulder blades from arm to arm (more precisely, from armpit to armpit). For size 46, for example, the average value is 35-36 cm.
- DP- shoulder length
Measured along the shoulder from the base of the neck to the end of the shoulder (to the shoulder joint)
- NEP- half neck
We measure the neck with a tape at the base and divide by 2.
- DR-the length of the sleeve
From the convex point of the shoulder (the end of the shoulder length line) to the hand through the elbow, slightly bending the arm.
- OR- arm circumference
The girth of the arm at armpit level is horizontal. (the width of the bottom of the sleeve is measured depending on which sleeve is the length and, accordingly, the width from the bottom)
- CG- the center of the chest (aka CB-center of the bust)
On the most convex points of the chest horizontally (from the nipple to the nipple, or along the bra)
- DI-length of the product
From the 7th cervical vertebra to the required length of the product.
There are more than 15 measurements and dozens of numerical values calculated using various formulas, which are considered to be necessary for constructing a base pattern. (approximately as in Fig. 1) But, believe me, you can do without them and get a no less accurately built base! Do not be surprised! Of course, we will apply a few simple formulas, but it will be easy! We will achieve the same result by going through a much more simplified, but no less productive way!
It is necessary to take into account allowances for "freedom of fit" depending on how tight-fitting we want to get. The base is still the base, we will make it with minimal allowances (3-4 cm, evenly distributed over all areas), and then you can add as much as you like and experiment.
— it is difficult for yourself to accurately measure your back, ask someone to help with this, because. even a small mistake will eventually lead to an incorrect construction and, as a result, rework.
— If you are going to wear a specific bra under your future dress, take measurements in it.
Relax, start, do not doubt anything and get a lot of fun)))
Step two: pattern drawing
You will need a ruler (50-60 cm is enough, you can take a meter one, but it is inconvenient to work with it if there is no large cutting table, and you have a tape for long measurements), pattern paper or just a large piece of paper or drawing paper, or unnecessary remnants of wallpaper. Of course, it is more convenient to build the first pattern on large-format “millimeter” paper, but if there is none, you can’t wait to start, just line the paper (or glued wallpaper) into horizontal and vertical lines of at least 5 cm. Then you can draw these patterns are “eyes closed”, but the first one is still better on graph paper, there is less chance of making mistakes.
We build a base pattern
For example, let's take a typical female figure of size 46. You, accordingly, substitute your measurements and make your own calculations according to this model.
Suppose:
POG - 48cm. (OG-96cm.)
POT - 37cm. (OT-74cm.)
POB-50cm. (OB-100cm.)
Let's start by drawing rectangle, inside which the pattern is formed (leave some space at the top).
Width equal to POG + the same increase in “freedom of fit” (take 4 cm, divide in half, because we only have halves of patterns). That is, POG + 2CM. It turns out 48+2= 50cm
Height equal to the length of our product, with an increase of 160-165 length 95cm.- is slightly above the knee.
Why do we draw a pattern based on OG and not OB? OB \u003d 100cm is more than 96 "How do we place our hips on the pattern?" - you ask. This is for ease of understanding and better visibility. The upper part of the pattern is a large (with an emphasis on “o”) part of the work, and it will be clearer if, as it were, we connect the front and back temporarily with the lower extreme points of the armholes. And then we will draw the expansion lines of our hips overlapping each other. And this will not add work to us at all and will not complicate the task! When you're done, you'll understand.

So we started building. We repeat, so that you do not get confused: do not take the OG, but your own, the length too. And we draw not in a notebook, but in full size.
We divide our drawing into 3 parts horizontally, with 2 lines as follows: draw a waist line and a hip line. We do not draw the line of the chest yet. When you get to it, you will understand what this little trick is. According to the construction rules, this line must first be calculated, and then checked by other calculations, and only then should it coincide with the armhole line. And if it doesn't match, that's it! Start from the beginning. Many at this stage lose their invaluable creative impulse, because they get confused in all these formulas. We want to create! So why this chain of calculations, if it is much easier to first calculate the armhole line and its extreme points (which are located in the finished product under the armpit).
chest line is carried out at a height equal to the depth of the armhole, which we will find out later, until we draw it.
Waistline
we carry it out by measuring our back length (DS) from above. We have 40 cm, and you have your measure, do not forget.
hip line
is deposited from the waist line at a distance equal to DC:2. 40:2=20CM. That is, if from above (and not from the waist line), then the DC + half of the DC is postponed. In our case: 40+40:2=40+20= 60cm

Now we draw a vertical line separating the details of the front and back.
The fact is that there is a rule according to which the front should be slightly wider than the back. We do not break this rule. We take our already calculated 50 cm in the drawing. We divide the drawing in half vertically and add 1 cm to the front shelf, and subtract 1 cm from the back. It turns out the difference in the width of the parts is 2 cm in the finished product, respectively-4.
96(OG)+4=100cm., 100:2=50cm. We have already calculated and drawn this.
50cm.:2=25cm. (We divide our pattern vertically in half)
25cm+1cm= 26cm. front width
25cm.-1cm.= 24cm back width
Attention! If your breast size is larger than the 3rd, that is, the cup of the “C” bra and larger, or the size is larger than the 52nd, then for this calculation you take not 1 cm, but 1.5-2 cm.

Draw a line back neck(the back is on the right). We do it like this:
First, we calculate the width of the neck and put dots on the top line of our drawing. POSH:3+0.5cm. It's very simple, take your POSH value, divide by 3 and add 0.5cm. We have POSH = 19. Therefore, 19:3+0.5=6.8cm. Let's round up a bit 7cm Do not round down, only round up, in multiples of 0.5, i.e. 6.5, 7, 7.5, etc.
Remember! Front neckline and back neckline are always the same! So at this stage, you can immediately put 2 points from the edges on the sides on the top line so that when we get to the front, we don’t have to return to this calculation.
The height of the edge of the neckline of the back is above the top line of our rectangle, which is why we left some space on top. And the extreme point rises to a distance equal to
POSH:10+0.8cm.
19:10+0.8=2.7cm.
Set aside 2 points: 7 cm horizontally to the left and raise it 2.7 cm. up is our extreme point of the neck both in width and height. (fig.5)
Draw a rounded line from this point to the far right corner of our rectangle.
Here is the first line of our pattern! Congratulations! We continue.
Now draw the shoulder line. First, we determine how much it should fall in height (we know the length).
On our drawing, we measure half the width of the back along the top line (this is half the pattern) + 0.5 cm.
ATTENTION! Those 0.5cm are part of our fit freedom gain! Remember? 2cm? So, it's time to explain where we will put them: 0.5 cm each. in the armholes and 0.5 cm. into the side seams, where they will fall automatically, because when building our rectangle, we have already taken them into account.
Advice: if you take a larger value than 4, as now, then they should be distributed as follows: preferably no more than 1 cm in the armholes, the rest in the side seams equally. This is for a "classic" dress, built on the basis of a base pattern, all these numbers can change dramatically depending on the style.
So, we have 35 AL (and you may have a different value). 35:2+0.5=18. At this distance from the edge, measure down 2.5 cm. This is the average slope for normal shoulders, can be from 1cm. up to 4 cm. if the shoulders are high - 1 cm, the more sloping the shoulders, the greater the slope, but not more than 4 cm. Practice shows that more than 90% of women have 2.5 - "what the doctor ordered." If we calculate for a long, long time with all the many measurements, then we will know for sure, just take 2.5 cm (Fig. 5).
We draw a line from the extreme point of the neck through the resulting point to a length equal to the length of our shoulder + 1.6cm.
These are 1.6cm. - the size of the undercut and it is always the same.
DP+1.6.cm.
12+1.6=13.6cm.

The shoulder tuck of the back is at a distance of 4 cm. from the edge of the neck
Its depth is always 6 cm.
The size of this tuck is 1.6cm.
The first line (6 cm) is drawn perpendicularly downwards, the second is already 1.6 cm to the point. further down the shoulder
The second line will rise slightly on the shoulder line, because it should also be equal to 6 cm. If we finish drawing it on the shoulder line, when sewing it will be shorter and the two lines of this tuck will not join. Remember! It is important! Because if you forget, then decide later that you shouldn’t start all over again and cut off the “extra” a little (what is not superfluous at all) and these few millimeters will subsequently play a cruel joke on you - the landing will not be as perfect as expected, but you don’t even remember about these millimetrics.

We draw the armhole of the back
At the same time we find the line of the chest.
The height of the back armhole is always POG: 4 + 7cm.
We consider: 48:4+7=19cm.
From the lower point of the shoulder line already drawn by us, we set aside 19cm vertically down.
Here she is! Our chest line! Draw it horizontally. (fig.7)
Now a little trick. Be careful! We will draw the armhole line of the back in an unusual, very simple but precise way. There is a vertical line from the bottom of the shoulder line to the chest line that we just calculated. We divide this line into 3 parts and put 2 points. We set aside 1 cm from the top to the right, put a new point instead of it (1 cm to the right), and the bottom is the point from which our armhole will begin to bend to the lowest point of our armhole (armpit). We draw a line as not in Fig. 7 through these points. By hand, pretty.
We can do a little check on the rounding of the bottom of the armhole.
(POG:4+2):10+1.5
(48:4+2):10+1.5=3.1cm.
Look at the picture where these 3.1 cm are. If it does not fit a little, just make your bend more or less. See how easy it is? You are great!

Front armhole.
We need to determine the length of the section of the drawing on which the armholes are located and measure the result obtained along the chest line to the left in order to quickly build an armhole in front. If it’s a little unclear right now, don’t worry, just follow the step-by-step instructions exactly, then it will become clear.
We take our POG and divide by 4, because on a correctly drawn up pattern-base of any size, the armholes occupy ¼ of the width. If you do not believe me, try on any base pattern. Do not forget about our increase in freedom of fit - now it is 1cm. Remember, we distributed 0.5 cm into the armholes? and now both count.
We set aside the resulting value to the left along the chest line from the vertical line that is at the level of the extreme point of the shoulder line of the back (see Fig. 8). Set aside 13 cm, look where they are and set aside what you got. We draw a line vertically upwards and this will be our front armhole line.
The height of the front armhole is 2 cm lower than the height of the back armhole. Always!
POG:4+5cm. (5 instead of 7, as on the back)
We put aside what happened up from the chest line along the line of the armhole in front.
And one more little trick:
From the obtained point, we set aside to the right horizontally a value equal to POG: 10 and draw another point.
Here! This is our extreme point of the front shoulder line!

And again we divide the resulting armhole line into 3 parts and again draw 2 points.
From the bottom, as in the armhole of the back, the line tends to the end lower point of the armhole. In our drawing, our armholes converge into one point and this greatly simplified our calculations.
Look at Figure 9. So we draw our armhole before. There will be no unnecessary calculations here, just look carefully, its uppermost part (blue) is almost straight, it bends quite a bit to the left. Where marked in yellow, the lines are even along almost their entire length, just the edges are rounded so that there are no corners. It remains only to beautifully “wrap” the green part. If there are doubts about the bending of this line, it is better to “cut” less, and then when trying on an extra couple of mm. cut off (otherwise, it will not work to glue, it is long and tedious to calculate this bend) Well, how? Did it work out beautifully? Of course it's beautiful! Let's move on, we are almost at the finish line.

Front neckline
We already have one point. Remember. Remembered? We have already defined neck width for the back, and as mentioned above, it is 7 cm.
The height of the edge of the neck is measured from the chest line and is equal to POG: 2 + 3.5 cm. (For girls whose breast size is less than 1, not 3.5, but 2.5)
48:2+3.5=27.5cm. from the chest line up!
It remains only to find out front neck depth, i.e. the depth of our cut. To do this, we draw an auxiliary lily at the level of the height point of the edge of the neck, which we just drew and from this line, we repeat, from this line(and not from the top border of our drawing) set aside a value equal to POSH:3+2. 19:3+2=8.3 cm. Round to 8.5cm. (with rounding of this value the same story as with the width of the neck). Less is impossible, because the result of the calculation is the minimum. More, as much as you want. It all depends on the model of the future product. You can make the neckline wider (even if it falls off the shoulder in a sexy and playful way) and deeper as you want, but this is later, this is for yourself. Now the base!
Smoothly, as in Fig. 10, we draw by hand our beautiful front neckline.

Breast tuck is drawn as follows:
We connect the upper point of the neck and the upper point of the armhole in front. If you feel like the top of your neckline is too high and the angle is too sharp, don't worry. It seems to you! Moreover, the larger the chest, the higher the extreme point will be.
Along the chest line, we measure from the edge to the right a value equal to half the measurement of the center of the chest (again, because the pattern is half) + 1cm. We get the point of the top of our chest tuck.
21:2+1=11.5cm.
We measure, mark and draw a line from this point vertically upwards to the shoulder line and this is the first line of our chest tuck. We measure with a ruler the segment from its top point to the top point of the neckline. It turns out 3.5 cm. (You get, most likely, a different figure)
Find out the size of our tuck. After all, we know that we will have to sew the front and back))) So the shoulder lines must match and, most importantly, be equal to our measurement - DP. Shoulder length is 12cm.
Subtract 3.5 cm. from 12cm. and we get, so to speak, the remainder of the shoulder length and postpone the result from the upper point of the armhole in front along the shoulder line to the left, and through this point we draw the second line of our tuck, which must necessarily be the same in length. (see as in Fig. 11).
It is forbidden! Never forget to compare the lengths of the darts. Wherever they are, no matter how fancy they are. Always remember that a tuck is a cutout, its edges must be sewn together, and they must always match in length!

So, without any sophisticated calculations, we built the most difficult part of our base pattern. Great job! Left a little.
Now waist and side folds
- we lower the waist line and the hip line in front by 1.5 cm as in the picture (Fig. 12). It's just accepted. This is a very small value - 1.5 cm, but if you compare two identical tight-fitting products in one of which these lines are slightly lowered in front with the one in which they are not, then the difference in fit accuracy will be very significant! Well, it's just so beautiful!
Why are cutouts needed at all? This question seems stupid at first glance, but by answering it you can understand a lot ... Of course, tucks are needed in order to remove excess pieces of fabric in certain places in order to achieve the most ideal fit to the body. It can be phrased similarly in other phrases. BUT! Now the key phrase is "in certain places." "And what?" - you ask: “shouldn’t the darts be in strictly defined places and have a certain length on the base pattern?”. AND THERE IS NO!!! Imagine the basics are different. They do not differ too much from each other, but even in the educational literature of various authors there are differences in the length of these same darts and a small range in the width of the back waist darts. All of them are correctly calculated and perfectly "sit", now you will understand what it's all about.
Waist tuck front can:
Have a peak at the point of the center of the chest (this is the point from which the front shoulder undercut begins)
And it can have a top on the same vertical line, but 1 cm. below or 2 cm, but not less than 4.
Its lower point can reach the line of the hips,
Or maybe not reach (but also, no higher than 4 cm.)
Can be equal in width to the back waist tuck
May be slightly wider or narrower (no more than 2 cm.)
For the waist tuck of the back, everything is the same, we will not repeat it, except for one moment:
It can be at a distance of 4 cm from the hip line, or maybe a little higher (up to 6 cm).
Those are the basics!
By the way, all this can be skillfully used, hiding flaws and emphasizing the dignity of the figure, but you can still write and write about this .... Although ... you can just create new models! A little more and you yourself can safely design whatever you want, and move all these tucks to the most unpredictable places!
So, if you want to learn how to sew competently, and of course you want it, otherwise why would you read this far. You should not, having seen a slightly different basis, say that it is wrong, or illiterately built, etc. Surely all of you like to "surf the Internet" and sooner or later you will see the difference. This is not surprising, it is surprising that many consider the basis on which they themselves studied to be the only true one. And now you know that there is, so to speak, where to turn around, even in the classic basic pattern, and the range of the “turn” is now known to you!
Let's return to our constructions.
In our base pattern, we:
Let's make the tucks and bends on the sides the same in width, that is, we will divide everything superfluous equally, the back waist tuck will be equal to the front waist tuck and equal to each side bend.
- Waist darts will start at the chest line and end at the hip line.
The darts of the back will be 4 cm short of the chest line and 4 cm short of the hip line.
Determine the width of the tucks and bends
First, you and I need to find out how much excess fabric we will cut off. Very simple. OG is greater than OT, therefore, the difference between these numerical values is the sum of all the “extra”. BUT! We add 2 cm to the OT, because even with allowances for freedom at waist level, you still need a little more free space.
OG-(OT+2)
92-(74+2)=16cm.
16 cm - this is the difference in the finished product, do not forget that we have halves! And, then we divide this difference by 2 and \u003d 8cm. - the sum of darts and bends on our pattern. We divide by 4, because on the halves of the pattern we have 2 tucks + 2 bends and we get 2cm.
We transfer to the drawing as follows:
The curves of the waist begin, not reaching the lower points of the armholes 2-3 cm and end 3-5 cm from the hip line.
The front waist tuck is located on a vertical straight shoulder tuck. We remember again - repetition is the mother of learning! We retreat from the edge a value equal to CH: 2 + 1 cm. = 11.5 cm.
The back waist tuck is located at a distance from the edge of the drawing, equal to WS: 4. We have 35:4=8.75cm. Now it is better not to round, but 8.7 or 8.8 is possible. Let's take 8.8cm. We draw, we look.

Now we bring these tucks into a “divine form”. Too many corners, don't you think? How will it look in the finished product? To put it bluntly, not much! You can write a lot about how to make undercuts ideal for landing, just remember one advice:
We sharpen the ends a little, round the corners!
This will be enough to get you started See Figure 13
It remains to expand the hips. Our OB \u003d 100 cm., POB \u003d 50 cm + 2 cm. for freedom of fit., divide by 2. And + at least 1 cm more. Because our beautiful legs are always in motion and nothing will be able to “stick” closely, it will be very uncomfortable (can be 2cm, if you want a little looser, you can also 3cm).
Remember that the width of our back is less than the width of the front!
For the back: 50 + 2 (allowance): 2 (half pattern) -1 (difference in width) +1 (just like that) = 26cm.
We measure on the line of the hips 26 cm from the edge to the left
For front: (50+2):2+1+1=28cm. right
We smoothly round off, drawing the continuation of the line of lateral deflections, mind you, it was not in vain that we did not bring the deflection to the very line of the hips! We knew that the OB is slightly wider than the OG, that is, the butt is larger than the chest. Now it is easier for us to round the hips beautifully.
You can also expand to the bottom by 1 cm. We will not.
Another important point: we raise both the front and back along the edges (tips) by 1 cm and smoothly, without corners, round off. Otherwise, the seam lines in the finished product will be as in Figure 13. to the right of the pattern.

That's what happened. Smarties!!!

On full-size paper, our pattern looks like this:

But here the shoulder tuck is moved to the side. It's elementary, look at this picture. This is very often done to hide it. It is transferred to the armhole, zipper or back seam (if any), especially if the fabric is stretch. In a knitted product, it is not needed at all, the desired shoulder length is simply measured.

Action three. Hooray!
Open a bottle of something tasty and celebrate this wonderful moment!


