Make a big heart with your own hands. Paper hearts: printable template. How to make a heart with your own hands for a wedding

The heart shape is widely used for making a wide variety of crafts. Greeting cards for newlyweds or lovers are often made in the form of hearts. If you want to tell your sincere feelings to your loved one, it is not necessary to buy expensive gifts. Master the origami technique and try to make paper hearts .
Paper heart-shaped ring
Cut out a square from pink or red colored paper. Fold it in half, and then unfold and divide one half into four equal strips. They can be drawn with a simple pencil, so that in the future it would be easier to fold the paper, and the finished one turned out to be even.


It turned out a paper ring in the shape of a heart, which you can give to your girlfriend or lover. Such a craft is easy to make not only from colored paper, but also from decorative paper or banknotes.
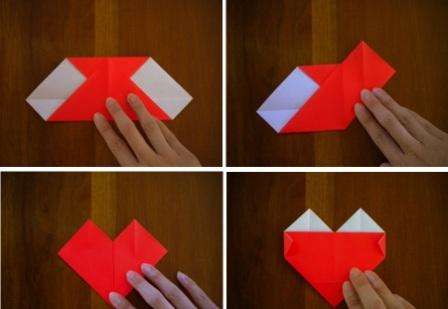
Origami paper heart


If you squeeze your fingers in the central part, and then press down, then on one side you should get a three-dimensional triangle.
Do the same on the other side.


It is not necessary to make complex crafts in the shape of a heart. Try also to make a simple heart from a rectangle with your own hands. To do this, you just need to fold the paper correctly.

The craft is done in a few minutes.

Heart-shaped paper envelope


Now fold the side edges as in the photo, and you will get a heart shape for the envelope. In the same technique, you can make a garland of paper hearts.
Woven paper heart for beginners


This craft can be done even with small children who will learn to alternate colors.
Do-it-yourself volumetric heart

Volumetric hearts can become a real decoration of the wedding table and serve as bonbonnieres.

Working with paper is very convenient, so even without special skills you can make an original craft in the shape of a heart. Experiment with different types of paper, because from silence, corrugated or office paper, you can get completely different handmade hearts.
Valentine's Day, popular among young people, is approaching, which means that on February 14 the red color and the shape of a heart will again be relevant. We offer three simple master classes, guided by which you can make voluminous paper hearts. Decorate the interior of your apartment, office with them, or just give them to loved ones and friends!
Simple voluminous paper hearts
Look how original this wall decor looks!
In order to make a decorative composition of hearts, prepare:
- sheets of colored paper (not necessarily only red);
- scissors;
- pencil;
- glue.
⇒ Step 1. On a piece of paper, draw hearts of different sizes. You can use a template to keep the heart shape neat and correct. Cut out each shape with scissors.

⇒ Step 2. Make a small incision in the upper part of the figure, slightly bend the edges inward. Apply a small amount of PVA glue to the edges.

⇒ Step 3. Grab the edges with glue with your fingers and press well against each other on the back of the heart.

⇒ Step 4. Hold the glued edges for a couple of minutes.

⇒ Step 5. Repeat steps 2-4 with the rest of the hearts.

Hearts can first be glued to a sheet of cardboard, and then hang the composition on the wall. Or mount directly to the wall using double-sided tape. If the convex shape of the heart makes it difficult to securely attach it to the wall, stick a piece of paper on the inside, like these:

Volumetric origami hearts
The origami technique offers a lot of options for how to make various figures, including three-dimensional hearts. We have chosen for you the cutest, roundest and smoothest. Such a three-dimensional shape is achieved by ... inflating the heart with air!

For work, you only need scissors and colored double-sided paper.
Detailed step by step instructions are shown in the photos below.
Fold a square sheet of paper in half, then in half again and unfold.

Bend the corners as shown in the photos. 

The final touch - inflate the heart through the hole below! 

Hearts in boxes
And how do you like these hearts, made in the form of a box? This technique can be used to make holiday wrapping for a small gift. However, even as an original craft, such hearts look very interesting, resembling pixel art.

Required materials and tools:
- thick paper (for gift wrapping - cardboard);
- scissors;
- ruler.
⇒ Step 1. Print or redraw the template on paper.


⇒ Step 2. Cut it out with scissors or a utility knife (X-Acto knife). Fold over the areas to be glued. To make it more convenient to bend thick paper, help yourself with a ruler.

Valentine's Day, popular among young people, is approaching, which means that on February 14 the red color and the shape of a heart will again be relevant. We offer three simple master classes, guided by which you can make voluminous paper hearts. Decorate the interior of your apartment, office with them, or just give them to loved ones and friends!
Simple voluminous paper hearts
Look how original this wall decor looks!
In order to make a decorative composition of hearts, prepare:
- sheets of colored paper (not necessarily only red);
- scissors;
- pencil;
- glue.
⇒ Step 1. On a piece of paper, draw hearts of different sizes. You can use a template to keep the heart shape neat and correct. Cut out each shape with scissors.
⇒ Step 2. Make a small incision in the upper part of the figure, slightly bend the edges inward. Apply a small amount of PVA glue to the edges.
⇒ Step 3. Grab the edges with glue with your fingers and press well against each other on the back of the heart.
⇒ Step 4. Hold the glued edges for a couple of minutes.
⇒ Step 5. Repeat steps 2-4 with the rest of the hearts.
Hearts can first be glued to a sheet of cardboard, and then hang the composition on the wall. Or mount directly to the wall using double-sided tape. If the convex shape of the heart makes it difficult to securely attach it to the wall, stick a piece of paper on the inside, like these:
Volumetric origami hearts
The origami technique offers a lot of options for how to make various figures, including three-dimensional hearts. We have chosen for you the cutest, roundest and smoothest. Such a three-dimensional shape is achieved by ... inflating the heart with air!
For work, you only need scissors and colored double-sided paper.
Detailed step by step instructions are shown in the photos below.
Fold a square sheet of paper in half, then in half again and unfold.
Bend the corners as shown in the photos.
The final touch - inflate the heart through the hole below!
Hearts in boxes
And how do you like these hearts, made in the form of a box? This technique can be used to make holiday wrapping for a small gift. However, even as an original craft, such hearts look very interesting, resembling pixel art.
Required materials and tools:
- thick paper (for gift wrapping - cardboard);
- scissors;
- ruler.
⇒ Step 1. Print or redraw the template on paper.
⇒ Step 2. Cut it out with scissors or a utility knife (X-Acto knife). Fold over the areas to be glued. To make it more convenient to bend thick paper, help yourself with a ruler.
Today, no one can be surprised by purchased gifts with holiday symbols for Valentine's Day. If a few decades ago such trinkets were perceived as a kind of curiosity, today the presentation of such a gift will look like a pitiful lazy attempt to fulfill a painful duty. Much nicer to receive as a gift cute heart, handmade made even from the most simple materials.

Such a heart can be made from a cardboard template and beads. decorate it with "the key to your heart."

And this heart is a collage of photos. They can decorate the head of the bed in which you want to spend a romantic night.

And these are lace hearts made of fabric. Remember ours on this topic?

And here is another photo collage. You can hang it by the fireplace.

Puff pastry heart. How can you not do it yet? Then catch.

Don't forget to poke holes and sprinkle glitter on the hearts.
There are a huge number of ways to make a heart-shaped holiday souvenir. A variety of materials are required, but those that are at hand are suitable. Paper, tinsel, fabric, foil, plasticine, ribbons, beads - everything can come in handy. But here, from coffee beans, a tree in the shape of a heart is a rather original version, and very symbolic. To create it you will need:
- the coffee beans themselves
- cosmetic discs,
- cardboard,
- yarn,
- glue (such as "Moment"),
- skewers (barbecue)
- glue gun,
- aluminum wire,
- leg-split,
- double sided tape,
- knife and scissors.
So, first, a heart of the size you need is drawn on paper, cut out, transferred to cardboard and cut out again, but in two copies. To make the trunk, you need to glue together four wooden kebab sticks. The barrel must be placed between the cardboard blanks and glued together with a glue gun. To give the heart volume and fill it evenly, you can use cotton pads. They must be cut as needed, lubricated with glue and glued alternately. It must be glued evenly, leaving no voids. As a result, a voluminous plump heart appears. The same is done on the other side. Moreover, you can prepare several hearts at the same time, because two such love symbols in one vessel will become the personification of the reciprocity of your feelings.
Further, to fix the hearts, you need to wrap them with floss thread or yarn. Thread color doesn't matter. But if they are too bright, then they can be painted with brown gouache. After that, the hearts should be left warm overnight until they are completely dry.
To make a curved barrel, you can take a simple aluminum wire and bend it to your liking. The wire is wrapped with tape and twine.
Next, coffee beans are glued to the heart, using glue or a glue gun for this. After that, the heart will remain planted in a pot with a solution of gypsum, brought to the consistency of thick sour cream, and left to harden. You can decorate a coffee tree in any way, relying on your own taste. The most common options are small satin ribbon bows on the trunk under the heart or in the corner of the product itself.

From small fleece hearts you can make a decoration or even a garland.

Cut out hearts from the fleece with curly scissors, sew them as in the picture and stuff them with cotton wool.

You can make decor, a keychain or even a brooch out of hearts.
Also popular is the way how to make a heart with your own hands using sewing. To do this, you can use fur, satin, plush and other soft fabrics, filling them with foam rubber or padding polyester. Fashionable hug pillows, soft toys in the form of live hearts, embroidered hearts… The list is endless. And if you tinker with a child, then at the same time, fine motor skills of fingers, perseverance, attentiveness, imagination, self-service skills, and speech will develop perfectly. After all, the same parts of the human brain are responsible for speech and for the work of small muscles.

The quilling technique will help you make a heart with your own hands for Valentine's Day.

A very beautiful heart can turn out.
You can make heart-lacing with your baby. You will first need to cut out a template from cardboard, according to which the child himself will later be able to trace and cut out hearts. Having cut the workpiece, along its contour, you need to make the same holes for lacing. The task for the baby will be to thread the thread into each hole so that a beautiful product comes out. He can choose the color of the threads himself. It will turn out a real game - lacing with your own hands.

The room can be decorated with voluminous hearts. They are made very simply: just cut out the heart, cut it a little in the middle, drop glue and wrap it inside.
A heart with woolen threads also looks funny. It is necessary to cut a heart out of cardboard, and then wrap it tightly with woolen threads, applying turns in different directions. It is also desirable that the coils lie as close to each other as possible, which will create a beautiful relief shape. You can also take a thinner thread, which will make the number of turns much larger, and the heart more accurate. If the kid gives such a handmade craft to his mother, then she will be just happy!
But such geometric hearts cannot be made without special templates. However, we will provide them to you.
Download the templates, fill the printer with colored paper and cut out your hearts. Good luck!

Isn't it true that such hearts look very unusual?

Gluing the pieces together is easy.

Don't forget to put your heart in the box.


Hearts can be multi-colored, but the traditional pink and red are best for February 14th.

If you have not yet figured out how to collect a heart, here is a detailed instruction.
How to make a heart with your own hands from paper, from balloons
But the easiest thing to do handmade paper heart. So a heart made of serpentine will turn out to be very unexpected. And it can be New Year's paper serpentine, attached with glue. If you form a heart out of a serpentine snake, and picturesquely let go of the end of the ribbon, not forgetting to fix its frills with glue, you will get a very nice picture, similar to the quilling technique. By the way, in this technique you can make a lot of panels with the image of the heart. By twisting and fastening ribbon hearts in a certain order, you can get quite bright patterns. And in the origami technique, there are generally a huge number of ways to fold a volumetric heart, valentine, bouquets with decor in the form of paper hearts. The most impressive version of the festive symbol of all lovers is origami in the shape of a heart from modules. Moreover, the size of the craft can be varied according to your taste and patience, because it just won’t work out on its own: you will need to put a lot of endurance and care in order to get a quality heart. You can also do DIY balloon heart, using either the technique of winding glue-soaked threads around a balloon or gluing decorative particles that together will create a mosaic.
![]()


And here is another paper heart. It comes with candy and a name sticker.

Put the “stuffing” into paper hearts and sew on a typewriter.

DIY heart video
It is always nice to give a loved one a heart. Even nicer if you learned how to make a heart out of paper and designed it yourself. A paper heart is made using various techniques, we will offer them to you below. Find the option that suits you.
simple origami heart
To design a heart using the origami method, you will need rectangular paper with any color.
The heart is ready. It can be used as a wish card or as an addition to a bouquet of flowers. Such a heart with paper flowers will look perfect. About how to make them.
Volumetric paper origami heart
Before you make a three-dimensional paper heart, take a standard set of origami materials.
We comply with the following instructions:

- We take a paper base. With the help of a pencil and a ruler, we draw a rectangle, the ratio of which to the paper will be two to one. Fold the paper diagonally. Expand the material, you should get two cross-shaped lines.
- We are working on one side. On the resulting crossed lines, fold the paper towards the center point. We do the same from the other end of the material.
- Now from the center of the material we make inversions of all elements to the edges. We open the formed valves and tuck one of the sides of the future heart.
- We flip the piece. We bend the corners and turn the heart over again. Received additional valves (eight pieces) are opened in turn. When they are open, carefully tuck them in.
Heart origami bookmark
You can make not just an origami paper heart, but a useful bookmark for books. Such a gift is sure to be appreciated by a book lover or someone who has to work in the book industry. Bookmarking origami in the form of a heart will make it possible not only to fix the desired section of the book, but also to decorate your favorite literature.
We offer you several production methods:
First way
For the first production, you will need a paper square of any color. Let's get to work:
 Scheme for making a bookmark in the shape of a heart
 - We bend the square in half and then fold the bottom edge. Expanding. In the center of the material, you should get a line to which we apply one edge of the square. We turn over the paper.
- We wrap the corners located below so that they connect with the central vertical. An angle is formed below. We turn the material over again.
- We press the corners to the top. The extreme point of the triangle should lie on the upper middle of the sheet. We turn over the workpiece again.
- At the top we bend the strip and you can see the triangles. We fix them. First we bend the small corners, and after them the two lower corners.
- We turn the resulting product over and wrap the side parts towards you.
Origami paper heart in the form of a bookmark is ready.
Second way
Now consider the second way how to make a book heart out of paper. For manufacturing, we again need a square.
We do the work based on the following instructions:
- cut the prepared square into two identical parts;
- fold one part along the length;
- we bend the resulting figure from right to left, unfold the bends;
- two corners located at the bottom are folded to the center to make an angle;
- turn over the product;
- fold the top edge a few centimeters and wrap the corners;
- turn the product over, you should get a heart.
An origami paper heart can sometimes have corners clinging to the pages. To prevent this from happening, we recommend fixing each corner with glue. This can also be done with the core of the craft, where the center line diverges.
heart-box
Almost any gift can be placed in a heart-shaped box. For example, sweets, jewelry, a toy or a watch. You can make a box in several ways:
Option one
Prepare for work:
- enough thick paper;
- glue;
- pencil;
- ruler;
- stationery knife or scissors;
- sample.
We have already prepared a template for this box for you.
You can do the main work:
- transfer the drawing to thick paper and cut it out;
- coat all joints with glue and glue;
- wait for it to dry completely (it depends on the type of substance used, if it is PVA, it is enough to wait half an hour).
The box is ready. The beauty of this design is that it can be made in any size.
Option two
Now we will tell you how to do the second method. You will need the same materials as in the previous master class.
Let's start making:
- draw a template on the base material;
- mark the lines where you need to make folds with a dotted line;
- draw the outline of the craft with a felt-tip pen with a color a few tones darker than the main material of manufacture;
- fold the product along the dotted lines and connect everything with glue.
The box is ready. When everything is dry, you can write a few kind words on the front side of the product, and put a pleasant surprise inside. For example, and a few sweets.
If you want to originally confess your feelings to your loved one, then the presentation of pleasant words in is what you need. We take red paper and consider how to make a heart envelope out of paper:
- Fold the corners into a triangle. We iron the folds. Expand the material and repeat the steps on the other side. We unfold the workpiece again.
- We take one corner and lead it towards the center. We turn over the sheet. We fold the lower part so that the lower part is even with the border of the top.
- We bend the left side of the craft. Make sure that the edges converge with the extreme point of the large angle. We repeat these steps, but on the other hand. You should now have something that looks like an angular heart.
- We turn the product inside out and carefully bend the corners located on the side. Then we bend the upper corners no more than one centimeter. We turn the product.
Now we will tell you how to make a winged paper heart. Such a craft will take its rightful place on the shelf at home or can be used as an original gift. Prepare a square-shaped paper with a size of twenty by twenty centimeters for work. The finished product will be half the size of the original paper.
How to make this craft:
- fold the main material in half, straighten it and repeat this action on the other side, you should get lines;
- we bend the top and bottom of the paper in such a way that the edges touch on the center line, turn the workpiece over;
- we apply the strip to the center, press the upper part back, and straighten and iron the corners;
- fold the triangular shapes at the end of the strip, turn the material over;
- mark the corners on the top of the heart.
The craft is ready. You can admire.
Ring with a heart
Of course, a finished paper ring will not last long if you wear it on your finger. But if you put it on as a decoration on a pen or pencil, then the service life can be long. Yes, and you can always replace the product, especially since it is done very quickly.
Let's get started:
- Take a colored paper square, draw it with a pencil with four lines. The first two lines should be 1/8 of the total size of the square. The third line should be 2/8 wide, and the distance from the third to the fourth line should be 1/8 of the total size of the square.
- Fold the sheet vertically. Expanding the material. Now you need to bend the first strip that was drawn earlier. Turn the paper over with the colored side facing you.
- We fold the triangle at the top. Now the blank resembles a future aircraft. We turn the corner in the opposite direction from us.
- Gently bend the border from the center of the product in opposite directions. The corners that stick out are lowered down. The elements of the “ears” should have remained at the top, we remove their tips.
- We turn off the part of the material that remains with a tube or accordion. We turn the product. We connect the resulting belt and fix it.
It turned out to be a lovely ring. Even if it is not a diamond, be sure to give it to your soulmate.
Bright modular hearts
Do you already feel like a pro in origami technique? Do you want to make a bright and unforgettable gift to your loved one? Try making a modular origami heart out of plain paper, it will bring a lot of joy.
To work, select the paper of the shade from which you want to make a craft. Glue and scissors.
What will be required of you:
- Make lots of paper modules. The more, the better, so as not to be distracted during the manufacturing process. By the way, get your kids involved. The construction process will not only go faster, but will also have a positive effect on the fine motor skills of the child's fingers.
- After the modules are made, you can start compiling an integral composition. This procedure is not simple. If you are doing this type of craft for the first time, we recommend drawing a heart on paper to adjust to the finished schematic image.
By connecting the modules you should get a heart. We suggest starting with flat models. When you understand the principle of connecting modules, you will have the opportunity to design a heart in any variation, even in volume.


