Templates for making Christmas decorations. Stencil for Christmas toys. Beautiful voluminous paper craft
Experts say that the process of making garlands for the New Year 2019 with your own hands brings people together, and the final crafts bring good luck to the house. Like it or not, but the most interesting handmade New Year's garlands will definitely decorate your home or an exhibition in a kindergarten / school.
The choice of options is incredibly large, you just need to decide how much this or that garland will correspond to the general idea and at home.

In this selection of photo workshops, we have provided the most interesting ideas and useful information, trying to approach the topic from the position of saving time and achieving maximum effect. Such garlands can be used both for decorating the Christmas tree and for decorating the New Year's interior.
 Photo: Garland of felt
  Photo
Photo DIY paper garlands
Variants of such garlands vary in the degree of complexity of execution, you can choose for every taste. Even the simplest version of making a paper garland will allow you to get an elegant, bright and spectacular decoration for your home and Christmas tree.


We offer, however, several and more complex options, because we will need more than one or two garlands to decorate the Christmas tree, as well as the general interior.


Asterisks
To make this garland, you do not need only double-sided colored paper in different colors.
Manufacturing:
- from colored paper we cut small squares, the size of which we choose as desired.

- We fold each square in half and cut it, we begin to fold the resulting strip in a certain way.

- we bend to the middle of the strip one corner from each edge, we get a triangle;


- bend the triangle in half with the solid side inward;

- we straighten the triangle, we have a line of height of the triangle;

- we bend the sharp corners of the triangle to the line of height at an angle, we have one more small triangle indicated below;

- we denote the resulting triangle with clear creases, also bending it in half, we also denote its height;

- we straighten the bent ends of the large triangle and bend it along the height of the small one;


- we make five such parts and insert one into the other with a small bent triangle up;

- we bend each new side to the first part;
- having connected all five blanks, we press the entire structure with our fingers to form clearer creases, then slightly dissolve and connect the ends of the sprocket;


- using a needle with a thick thread, we string all the stars in the middle, we get a bright, spectacular garland of a very simple design.


From napkins
We choose the size of the elements of the garland for the New Year 2019 and the degree of their "fluffiness" as we wish, as well as the combination of colors.

Prepare:
- paper napkins of different colors (two-layer serving ones can also be used);
- stapler;
- a needle with a thick thread - the basis of the garland.
DIY manufacturing:
- We fold the napkins in the form as they are, without unfolding, putting one on top of the other in the amount of two to three pieces and fold.


- We fix each stack with a stapler in the middle.

- We round the corners of the napkins with scissors, achieving a circle of the desired diameter.

- We bend each layer of napkins to the top and slightly compress, giving volume to the whole structure.


- We string all fluffy multi-colored pompoms from napkins on a prepared thread, a spectacular garland is ready.

Read also

From fans
A very easy way to create a colorful Christmas garland with your own hands in 2019. You can make elements for it in different sizes, you get an even more spectacular option. We offer two photos of the paper fan garland master class.


Prepare:
- colored paper;
- glue.

DIY manufacturing:
- We fold each sheet of colored double-sided paper with an accordion, for which we successively bend it twice in half, and divide the remaining size into three equal parts and bend it twice more.
- Then we straighten the sheet and along the formed creases, we collect the accordion in the usual way, carefully ironing the folds.

- We fold the resulting accordion in half and glue the inner surfaces, achieving a fan.


- We glue the fans, turning them relative to each other, as well as alternating colors according to the plan. The garland is ready, if the fans are small, then it will be an excellent decoration for the Christmas tree, and if large, then it is quite suitable for decorating the New Year's interior.


Garland of round fans
We make a fan, as described in the previous master class, then we glue four such segments into one round fan.
Another way could be to create a round fan from cut and glued multi-colored strips of paper.

From such round fans of various sizes and colors, you can make countless compositions for the New Year's garland 2019.

 Photo: The most interesting garland in 2019
 In addition, you can create multi-layer versions of garlands from round fans of different sizes, superimposing them two or three on top of each other.
Read also

Instead of a fan of a different size, in the center of the main element of the garland, you can glue the letters of New Year greetings or any symbol of the New Year cut out of paper.
balloon garland
A very interesting option for making DIY jewelry for the New Year 2019.
Prepare:
- any multi-colored threads;
- inflatable balls;
- PVA glue;
- Bowl.
 step by step photos
 Manufacturing:
- Threads can be used not only in different colors, but also in different thicknesses, each time, getting an unexpected result from carrying out the same actions.
- We inflate all the balls, the number of which should be equal to the planned number of balls of thread in the garland you are making.
- Pour PVA glue into a bowl, add a little water.
- We take one ball at a time, tie one end of the thread to the “pimpka” formed on the ball, leaving some segment of it for hanging.
- We wrap the entire ball with the selected threads, making arbitrary movements, but so that the thread does not come off.
- The density of the winding of the ball also depends on your idea for the execution of this craft; a rarely wound thick thread or thin packing rope looks incredibly elegant.
- After we wrapped the balls with threads, roll them in a bowl with PVA glue, let the excess glue drain and hang the balls (in any way) to dry for a day.
- After the balls are dry, pierce them, then carefully remove them.
- The resulting balloons from threads can be decorated with any shiny elements, smeared with glue.
- We use balls as elements for creating a New Year's garland, hanging them in any way.


pasta garland
Such an unusual handmade garland for the New Year 2019 can successfully compete with the traditional bead garland - fresh, original and bright!


Prepare:
- curly pasta;
- glue "moment";
- threads for hanging;
- a needle with a large eye;
- acrylic paints of different colors;
- acrylic lacquer;
- scissors;
- any glitter.
Manufacturing:
- We cut off the threads of the length you planned, thread each into a needle and string the pasta, according to the intended composition.

- Pasta can be placed both close to each other, and at some distance.

- We use glue to fix the pasta on the thread.

- The next step is to apply paint to each element of the garland.
- After the paint dries, we apply acrylic varnish and sprinkle with sparkles, use a garland for New Year's interior decor or for decorating a Christmas tree.

Garland of cones
Despite the fact that such a garland is, as they say, a “classic of the genre”, here you can also show your individuality and creative talent by creating your own unique version for the New Year 2019.


Prepare:
- cones of different sizes;
- White paint;
- sequins;
- sponge;
- gloves;
- rope - the basis for the garland;
- snowflakes or other decorative elements;
- hot glue.

DIY manufacturing:
- We paint over the tips of all the cones with white paint, wearing gloves and using a small sponge. If desired, immediately, before the paint is dry, sprinkle the bumps with sparkles.
- We dry all the prepared cones, then we make a garland out of them, using snowflakes or other decorative elements, which we glue to the prepared base rope.
Toilet paper garland
This master class shows the technique of making such a simple and effective garland, however, you can bring your own ideas. For example, before you start creating a garland with your own hands, you can paint all the liners with paint of different colors, and at the final stage cover with glue and apply sparkles.

Prepare:
- cardboard inserts from toilet paper;
- colored paper;
- scissors;
- pencil;
- stapler;
- glue.
Making a Christmas garland:
- We draw each insert into strips and cut them, not reaching the middle by 2 cm.
- We fold the cut insert in the form of a flashlight and fasten it with glue, glue a strip of colored paper.
- We connect all the elements of the garland obtained in this way with strips of colored paper, threading them into each element and folding into a ring, the garland is ready.
- It remains to decorate it at your discretion in order to get a brighter and more elegant New Year's garland.
pompom garland
Very interesting and unusual!
Prepare:
- knitting threads of several bright colors;
- cardboard;
- scissors;
- caps from plastic bottles;
- rope for a garland.
Manufacturing:
- We cut out two stencils for pompons from cardboard, put them together and wind the prepared yarn in layers.

- After winding several layers, carefully push the cardboard boxes apart and cut through the center of all the threads around the circumference.

- We lay a thread between the cardboard boxes and wrap a bunch of threads several times, tie.

- We take out the cardboard, connect the bundle of threads, bending in the center, fasten with threads.

- We fluff the resulting pom-pom and adjust its surface using scissors.
- We make a hole in the caps from plastic bottles in any way, thread the threads from the pompons, make a knot.


- We tie the finished "lanterns" to a rope for a garland, after which we decorate the Christmas tree or the interior.

garland of cocktail tubes
With these incredibly colorful cocktail straw balls, your ordinary electric garland will get a stylish, effective look. You can also make a New Year's garland 2019 from bright balls made in this master class alone.


Prepare:
- multi-colored cocktail tubes;
- wire or other material for screed;
- pliers;
- LED garland;
- scissors.
Manufacturing:
- From all cocktail tubes we cut off the tops with a corrugated part.
- We tie a bundle of cocktail tubes in the middle with a wire and thoroughly tighten it with pliers.
- We bend the tubes up, giving the shape of a ball.
- We string balls from tubes on a rope or fasten them to an LED garland, decorate your house for the New Year.
Fabric garland
The most interesting is always the simplest!
Prepare:
- any fabric that does not crumble when cut;
- large two-layer paper napkins for serving with New Year's motifs;
- paper;
- pencil;
- scissors;
- tassel;
- a needle with a bright thread that contrasts with the main color;
- rope for a garland.

ManufacturingGarlands their hands:
- With a pencil, draw stencils of flags, rectangular and triangular. On a rectangular stencil, we cut out a small triangle from the bottom, characteristic of a flag.
- We impose stencils on the fabric, folded in half so that we get double flags.
- We cut out New Year's motifs from napkins, remove all layers and coat the edges of the flags with PVA glue diluted in half with water.
- We impose motifs on the halves of the fabric and coat the entire surface of the napkin with the same composition.
- Then, the flags smeared with glue solution are dried with a hairdryer, and then, after complete drying, we iron the flags with an iron, as hot as possible, without steam. We iron through parchment paper.

We put all the flags on the prepared rope for the garland, connect the halves and sew them with bright threads with a wide basting seam, which in our case will be decorative. Other decorative elements can be placed between the flags, for example, large beads.
We hope you enjoyed our most interesting and unusual garlands for the New Year, which you can easily make with your own hands in 2019.
Garlands are used to decorate the house, they help create a festive mood, a holiday atmosphere. Therefore, when preparing the house for some kind of holiday (for example, for the new year, March 8, February 23, birthday and other holidays), take the time to create colorful paper garlands. And yes, they are very easy to make. You will see for yourself. Even a child with such a task is able to cope. And then you can hang and place the garlands created from paper anywhere: on the window, on cabinets, ceilings, or on the Christmas tree, if the upcoming holiday is the New Year.
1 way: how to make a paper garland
We create a rainbow from ribbons. You can hang it both horizontally and vertically. With a horizontal arrangement, it is even more desirable to attach some kind of weight to the end of the thread (for example, plasticine can be used as a weight).

1. Fold colored paper in half and cut the halves with scissors.
2. Cut strips from colored paper.

3. Fold the cut strips in the desired sequence, and prepare the threads (since you will need to sew a little further).
4. Sew all the strips together using a thread with a needle or a sewing machine.

Adviсe:
- to get a fluffy garland, you can twist the tape;
- you can replace cardboard or colored paper with wrapping paper, which is usually used for gift wrapping;
- if you don’t really want to sew, then you can take glue and use it to glue the thread to all the strips (it will take more time, and if you chose this method of attaching the thread and strips, then you need to take a thicker thread).
Method 2: how to make a paper garland
Making Christmas rings is one of the most popular ways to make garlands. It is simple and at the same time it turns out a very beautiful decoration that can be used both for the Christmas tree and for the home in general.

1. Take colored paper and measure the same width for future strips, which should then be cut out. Approximately the width should be 3.5 cm.
2. Using scissors, cut out the measured strips. Each strip has a length of 21 cm (that is, the width of a sheet of paper).

- A garland can be made from narrower and shorter strips, but in this case the rings themselves will be smaller.
3. Glue the strips by threading one into the other (see how it should look like in the picture below).

- You can close the circuit.
3 way: how to make a garland out of paper
We make unusual chains. To create them, we need colored paper, glue and scissors. This is also a pretty easy garland to make.
1. To make an unusual chain, we need to fold a piece of paper in half and draw some unusual shape on it. For example, you can draw what is shown in the picture below.

- In order not to spend a whole paper sheet on one link, you can cut it into two or four identical parts, from which you will then cut the links.
- Make a link template for convenience. When you begin to draw an unusual shape, you can immediately cut it out and put it aside, and later use it as a template when creating the next similar molds.

2. Cut out the shapes and start gluing them, making one link into another to form a chain.
- If you are trying to make a very long chain, then you will need to make many links. If a small chain, then, accordingly, few links are needed.
- To make the garland look more colorful - you need to use a variety of colors (that is, use paper of different colors to make links).
4 way: how to make a paper garland
This garland is perfect for decorating your home. You can use two or more colors to create it.

1. You need to make a blank first. Cut several strips of the same size with scissors. The strips shown in the picture are 17 cm long and 2 cm wide.
- It is advisable that you take into account the following ratio: strip width / strip length \u003d 1/8 + 1 centimeter spare.
2. Mark the center of the strip, bend it in half first and then straighten it back.
3. Bend the ends of the strip towards its middle, and then fold the strip in half.
4. Prepare a few of these blanks before you start collecting the garland.
See in the pictures how the blanks are folded together.

- Such a garland for home decoration can be placed on the wall. She looks very efficient. But its disadvantage is that it does not bend much, which means that it is unlikely that it will be possible to hang it on a Christmas tree.
5 way: how to make a garland out of paper
We create a garland that can be used for any holiday (New Year, Valentine's Day, March 8, and other holidays). 
We do not give a description of the creation of such a festive garland, since in the pictures below, you can easily understand this. This garland is made up of hearts. To create it, you will need a stapler, ruler, scissors, colored paper. 


You can complicate this version of creating a garland a little, and then such a wonderful product is formed.


6 way: how to make a paper garland
We make colorful garlands.

Here is such a wonderful and beautiful decoration for the house can be made from colored paper. It is ideal not only for the New Year, but also for other festive events.
You will need for colorful garlands: colored paper, glue (it can be replaced with tape or a stapler) and scissors.
1. The image below shows how to create blanks.
It is better that all the strips have the same width.

2. Fix the blanks using glue, tape or a stapler.
Using the same technology, you can build just such a garland. 
And how to do everything right - for this, watch the video on creating a New Year's garland.
7 way: how to make a garland out of paper
Quite so easy to make, but at the same time, an original garland that can be hung on a window or placed somewhere in the house.

How such a garland is created can be understood from the step-by-step instructions in the pictures below.


- A hole in the tree through which the thread passes can be made using a hole punch
8 way: how to make a paper garland
We create funny wrappers.

From ordinary candy bows, you can get a very beautiful tinsel.
1. Cut the wrapper into several equal parts.

- Parts can turn out to be 3, and 4 and 6 - a lot depends on the size of the wrapper itself. Parts can be 2 by 4 or 3 by 5.
- You can make a template for convenience, which in the future will help to create all parts of wrappers of the same size.
2. Start twisting each rectangle into a tube, but so that it does not turn around, do not let it go.

3. Take a needle with a thick thread on it, and start stringing the tubes on the thread one by one. The tinsel will turn out to be fluffy, because after you release the twisted tube, its edges will unfold.

4. To prevent the tubes from jumping off, you can make a knot at the end of the thread.
- After all the tubes have been strung on a thread, turn them in different directions.

9 way: how to make a garland out of paper
Making an origami garland.

1. We create blanks. We will need two strips of different colors for one step of the garland.
- The width of one strip is 3.5 cm, and the length is 21 cm (the length is equal to the width of a regular A4 sheet).

2. Start folding the strips in sequence, as shown in the image.

- The main goal is to create 2 long ribbons that will create a rainbow.
3. We connect the end of one tape to the other at an angle of 90 degrees.

4. Continue to fold the strips in sequence - horizontal across, and vertical down.
- If desired, the circuit can be closed.
10 way: how to make a paper garland

You will need: paper from different patterns and colors, glue, scissors, threads, some kind of template (or a pencil with a ruler for making it). See the pictures for how easy it is to make such a garland.

And don't forget to experiment with different shapes of paper elements!

Other examples of garlands that can be made from paper (see pictures below).


Watch a video on how to make a paper garland:
Successful crafts! Create amazing paper garlands!
It is possible that for the holiday you will also want to do the following crafts.
How to decorate your house before the holiday, bring solemnity and taste to its atmosphere? The easiest and most creative way is DIY paper garlands. Today there is nothing easier than making jewelry yourself. Even a young student can cope with this. On this page you will find a variety of schemes for making themed garlands, as well as interesting templates with which you can cut out an innumerable number of decorations for home and office.
Paper garlands "Ribbon Rainbow"

You can hang this garland both vertically and horizontally. In the latter case, it is better to attach a weight, such as plasticine, to the end of the thread.
1. Fold the colored paper in half and cut the halves.
2. Cut strips from colored paper.

3. Prepare the thread and fold your strips in the desired sequence.
4. Sew all the strips together using a sewing machine or thread with a needle.

* You can twist the ribbon to make the garland look "fluffy".
* Colored paper or cardboard can be replaced with wrapping paper, which is usually used to wrap gifts.
* If you don't want to stitch, you can try gluing a thread to each strip - this will take longer and it is desirable that the thread is thicker.
Standard garland "Snake"
Even the smallest children, who have barely learned to hold scissors in their hands, will cope with the preparation of "snakes". So, if you have kids, take them with “snakes”, and start more difficult work yourself.
Manufacturing technique: Cut out a large circle from paper and, stepping back a centimeter - another from the edge, start cutting off the tape (see photo) until you reach the center. If you nevertheless entrust this simple task to a child, it is better to draw in advance with a pencil the lines along which he should cut - this will make it easier for the child to work.

Garland "And they dry on a rope ..."
How do you like this idea: in the middle of the room there is a clothesline, on which old Santa and his faithful deer hung their holiday clothes to dry: red caps, mittens, boots with bells, big pants, a bag ... First you have to sew miniature clothes (you can, of course, get similar in toy stores, but it will be more expensive), and then secure them with small clothespins (you can use large ones, of course). If you don’t want to fool around for a long time, hang your mittens or colorful socks to “dry”. And you can mix both. You can simply cut out multi-colored boots from felt or paper and string them on a thread.

How to make a garland "Christmas rings"

This method of making a garland is one of the most popular. This is not only because it is quite simple, but also because it allows you to make beautiful paper decorations for the home, and in particular for the Christmas tree.
1. Prepare colored paper and measure the same width for the strips you will cut out.
2. Start cutting strips. The length of each will be equal to the width of a sheet of paper (i.e. 21 cm) and the width will be approximately 3.5 cm.

* You can make a garland from shorter and narrower strips, then the rings will be smaller.
3. Glue the strips by threading one through the other (see picture).

* You can close the circuit.
Garland "Volumetric stars"
Such stars easily spin from paper tapes one or two centimeters wide. Carefully study the photo-instruction and go!


Paper Christmas garlands "Unusual chains"
Prepare colored paper, scissors and glue. It is easy to make such a garland.
1. To make an unusual chain, you need to fold a piece of paper in half and draw, for example, one of the shapes shown in the picture.

* In order not to waste a whole sheet of paper on one link, you can cut it into 2 or 4 identical parts, from which you will cut the links later.
* For convenience, you can make a link template.

2. Cut out the shapes and start gluing them together to make a chain by threading one link through the other.
* The longer you want to make the chain, the more links you will need.
* You can use many different colors to make the garland even more colorful.
How to make a garland "Chain" for decorating a house out of paper
You can use 2 or more colors.

1. First you need to make a preparation. Cut several strips of the same size. In the picture, the strips are 2 cm wide and 17 cm long.
* It is advisable that you comply with the following condition: width / length of the strips = 1/8 + 1 cm spare.
2. Mark the center of the strip by folding it in half and straightening it.
3. Bend the ends of the strip to its middle and fold the strip in half again.
4. Prepare a few of these blanks to start assembling a garland. The picture shows how to fold the blanks together.

* This garland can be hung on the wall. Due to the fact that it does not bend much, it will be difficult to hang it on a Christmas tree, but it still looks spectacular.
Garland of hearts

The pictures show detailed instructions on how to assemble a garland cordially.


This version of the garland can be complicated, and you get such a beautiful product.

Garlands for the New Year "Colorful home decoration"

From colored paper, you can make such a colorful decoration for your home. It is suitable for the New Year, and for any children's holiday.
Prepare colored paper, scissors and glue (you can replace it with a stapler or tape).
The picture shows how to make blanks.
* It is desirable that the strips have the same width.

Use glue, a stapler, or tape to hold the pieces together.
Using the same technology, you can fold just such a garland. And you can learn how to do everything right from the video below the picture.

Volumetric New Year's garland

Here is a pretty simple but very original garland idea that can be hung on a window or just anywhere in the house.
The images show step-by-step instructions on how to make a garland.
* In the Christmas tree, the hole through which the thread is threaded is made with a hole punch.


Garland for the Christmas tree "Merry candy wrappers"

Very beautiful tinsel can be obtained from ordinary wrappers.
1. Cut the wrapper into several identical pieces.

* The pieces can be 2x4 or 3x5 in size, and depending on the size of the wrapper, there can be 3, 4 or 6 pieces.
* For convenience, you can make a template that will help make all parts of the tinsel the same size.
2. Start twisting each rectangle into a tube, but do not let go so that it does not unfold.

3. Prepare a dense thread with a needle and start stringing the tubes one by one. The edges of the tubes turn around - this is good, because. tinsel will turn out fluffy.

4. At the end of the thread, you can make a knot so that the tubes do not come off.
* After stringing all the tubes, turn them in different directions.

New Year's garlands made of paper using the "Origami" technique

1. We make blanks. For one step of the garland, you will need 2 strips of different shades.
* The length of one strip is 21 cm (which is the width of a regular A4 sheet), and the width is 3.5 cm.

2. Start folding the strips in sequence, as shown in the picture.

* The final goal is to make two long ribbons that will form a rainbow.
3. We connect the end of one tape to the other at an angle of 90 degrees.

4. Continue to fold the strips in sequence - vertical down, horizontal across.
* The circuit, if desired, can be closed.
Garlands for the New Year (a few examples)


Amazing paper garlands
Perhaps the simplest and most popular New Year's garlands that can be made at home, even with the involvement of a child, are paper garlands. For these purposes, it can be used in a variety of ways, ranging from ordinary colored sheets to lace napkins and multi-colored adhesive tapes.

Such decorations are even made in kindergartens and elementary grades, so anyone can handle them. So, you will need paper, scissors and glue. Sheets of paper are cut into strips of the same width (to make this easier, divide the paper with a ruler and pencil in advance).

The cut strips are glued into one common garland according to the principle of an ordinary chain, which consists of links. To get something more original, try playing with the shape of the links: make them square or even voluminous, although this will be a little more difficult. You can make it even easier: colored paper is cut into thin strips, and then they need to be sewn in the center with each other, usually a machine is used for this purpose, but you can also do it manually.

The stripes can be replaced with circles, triangles, or any other shapes that come to your mind. By the way, instead of paper, you can use bright felt, such products will turn out to be more durable. Such decorations, by the way, look very impressive in door or window openings in an upright position.
Exquisite snowflake garlands
One of the main symbols of the New Year is, of course, snowflakes. So why not use them to decorate your own home? Probably, each of us remembers from childhood how to cut beautiful and openwork snowflakes. The more cutouts, the more sophisticated the snowflake will turn out, by the way, especially for this, you can find a whole lot of schemes on the Internet that will help you make a lot of diverse figures.

Next, we connect each snowflake with a regular thread or silver rain, and then hang it from the ceiling. By the way, such decorations will look more beautiful if there are a lot of them, so it is better to make 5-10 such garlands, depending on the purpose and place of use.

Garlands made from natural materials
Why throw away tangerine or orange peels when they can easily be used as a handy material? We cut out cute figures from the peel, for example, hearts, stars, faces, snowmen and so on.

Then, using a needle, we string them onto a thread and our decoration is ready! By the way, it will not only transform your home, but also spread a pleasant citrus aroma throughout it. Instead of skin, you can use apples and ordinary spruce cones, sometimes they are dyed in some extraordinary color, or simply put on a thread in their natural form.
The easiest ways to make paper garlands
 To decorate your apartment with intricate and whimsical paper decorations, it does not take much time and effort. Paper garlands are light, durable, beautiful and affordable. We will tell you about the easiest ways to make garlands that will decorate your life and cheer you up.
- Templates. To facilitate the work, you can use blanks: simply print them out and cut them out of a simple landscape sheet of paper.
 These are the New Year's templates you can print and make your own garland.

2. Drawings. If you have basic artistic skills, you can fold a sheet of paper several times, and then draw on it the picture you need.

3. Snowflake garlands. Delicate lace decorations made of plain paper - it's easy! Use templates or make your own design.

 Use templates to make snowflakes or just turn on your imagination.

As you have already noticed, there are a lot of ideas, the main thing is to connect the desire to create and, of course, your imagination, which will help you create the most unusual and unique New Year's garlands!
2016-11-25Click Class
Tell VK
If we create a New Year's mood, then how can we do without decorating our home. Therefore, today we make garlands for the new year with our own hands. Previously, we have already mastered, and.
Now there are a lot of materials that are easy to change, these are different types of fabric, paper, clay, etc. A stretch on a Christmas tree or a window can also be made from cones, sweets, even food. yes, yes, there are craftswomen who create garlands of gingerbread and candied fruits.
In general, there are an incredible number of ideas, so the article turned out to be quite voluminous and long. But this is only to our advantage, so we will consider many options for inspiration!
So, the most accessible material for us is paper. Therefore, let's remember our childhood and go cut, glue and enjoy life. if you have children or younger brothers, sisters, then invite them to participate in this process. Because it's so interesting!
It is better to take paper of medium density and double-sided. Then the craft will look neater.
So, we will start with flashlights familiar from childhood.
We need two parts. One is 180*120 mm in size, and the second is 180*100 mm. We fold the one that is larger in half and make parallel cuts from the side of the fold without reaching the edge of 1 cm.
We make a tube from a smaller strip, gluing the edges, which have a size of 100 mm.
And now we wrap the resulting accordion around the tuba. We fix the points of contact with glue.

The figures connected together are also a very good idea for crafts, at the end of this section, I will give many templates and stencils for cutting.

Such cute penguins and snowmen can be made according to this pattern.

The links of the garland are connected with threads or wire.

Santa Claus diagram. 
Another idea is the links fastened together with glue. So, the simplest option of the rings. Everyone has done this sort of thing!

However, if fantasy and modern materials are applied to this idea, you will get a very stylish decoration.


Often garlands are created from separate elements and connected only by a thread, wire or cord.
Therefore, absolutely any elements of creativity can act in this capacity.
For example, here is a tutorial on how to create cute little stars. A large number of them will make an ornament.

Here is the idea of balls from stripes.
Another familiar idea from childhood flashlights. You need five strips of the same thickness. And they go along the length: 1 strip 5 cm, 2 strips 7 cm each and 2 strips 9 cm each. We fix the edges with glue or sew with threads.

You can use different colors and the simplest shapes: triangle, rhombuses, squares, cones, etc.

Little kids will love making this craft. To do this, take a long strip of colored or corrugated paper. Along its entire length, mark the strips at a distance of 1 cm from each other. And cut them without reaching the edge of 1 cm. It is important to alternate sides. One cut from the right side, the second from the left.

Now for some ideas for inspiration. For example, I liked these cute snowmen.


I was also surprised by the idea of people hanging Christmas trees upside down.

Or here's how interesting they decided to connect the details with the rope. Just tied with ribbons and that's it.
 The craftswoman decided to sew these snowflakes on a sewing machine.
Details can be not only flat, but also voluminous. For example, such 3D origami Christmas trees.

The kids will also love the idea of a candy garland. By the way, they can be made from real wrappers.

And this photo shows a step-by-step master class for creating the sweets themselves.

Quite an unusual idea with ballerina snowflakes. Of these, you can make decorations on the windows and on the Christmas tree. Attached are templates and workflow.


You can use not only paper familiar to us, but also newspapers.

Experiment with colors.

sometimes it turns out to create a whole. composition from the details of the garland.

by the way, it can be not only stretched as usual for us, but also hang vertically from the ceiling and look like children's mobiles. 
Here is a photo tutorial on how to make the simplest garland with only scissors and a circle of paper.

It is also interesting to make a stretch from the fans. You can combine them by colors, sizes and number of rows of elements.

Such a fan can be done like this. We take a sheet, mark on it stripes 1 cm thick across the entire width. Then we begin to fold them with an accordion. On the marked lines, we bend the sheet in different directions alternately.

The resulting accordion is folded in half. 
And we connect the two inner edges with double-sided tape.

And now we connect all the details into one whole.


And if you dream up and use new forms.


Look at the paper leaf garland idea. The main thing is to take winter color options: white, silver, blue, blue and red.


A similar decoration made of volumetric balls looks very stylish.


The photo shows the steps for folding such a blank.

From an ordinary idea, you can turn it into a magical one by simply adding more unusual solutions. For example, use circles of different colors.

Or sew a garland in five minutes from miniature triangles.

Figures hanging from the ceiling immediately create comfort.

Lots of snowman ideas.


Use golden hues in creating decorations, they will decorate any background.

The outlines of houses and tree branches are very memorable in winter. When you walk in the evening, the street sweats, and such a cozy and warm yellow light turns on in the windows.

What other ideas to take? Yes, let's take a look around. After all, there are a lot of winter symbols, for example, a hat.

Light bulbs from electric garlands.


Look at the night sky, there are so many distant stars, for some reason in winter they are associated with blue.


What do we expect from the New Year? Of course, gifts. Let's turn this into decoration.


Remember about unusual shapes? So, this instruction shows how to collapse a volumetric rhombus.

This cube is made according to this scheme.

Remember "snake"? It was definitely made by everyone and candy wrappers.

See how a garland of paper circles is sewn. 
Or circles can be folded in half and glue the adjacent side.

According to this scheme, the following garland is made.


As you can see, not only circles can be glued this way, but also squares, rhombuses.
It seemed unusual to me that volumetric cones are used in suspensions. You can also put sweets in there.

Look what a cute composition for decorating the wall.

Another idea with a snowman, snowflakes and stars.


Such a "snake" is created from corrugated paper. Along the entire length of the blue roll, cut off a strip 2 cm wide. Glue a red strip perpendicular to it. Here's what happens.


A few more ideas.


The use of postcards and photographs in the decoration has become unusual. 


We take different elements: boots, stripes, Christmas trees. All this will fit.


For Christmas trees, you can use different patterns.

For example, use this one. 
You can connect parts both vertically and horizontally.


You can decorate not only the apartment, but also the street.


And these snow balls can be made in five minutes.

For more serious premises, such as offices, it is better to take rectangular or triangular flags in pleasant colors.

Cupcake molds make a wonderful Christmas tree.


And how do you like a garland of such small voluminous stars? At the same time immediately and a master class.

From a paper strip folded many times, such figures can be cut out.

There is a wonderful idea to create jewelry from mittens and mittens.


To do this, use this template.

From this Christmas tree you can make a three-dimensional Christmas tree detail. To do this, translate the diagram and make cuts along straight lines. Then insert the parts into each other.

Now, as promised, there are a lot of patterns and stencils for cutting.


Garlands in kindergarten for the competition
Before the New Year, parents can receive a task from kindergarten and school. You need to make a craft for the competition. Often this idea is created in order to have something to decorate the Christmas tree. Well, we don’t mind, we’ll make a beautiful garland.
To do this, consider a few master classes.
So, the first idea, we make light bulbs.

To do this, we translate this scheme.


Using the ruler of the blunt side of the knife or scissors, we bend the sides of the petals. 
Where there is an allowance, we apply glue and form the part. Insert the thread into the places where the dots are drawn.
Now we make a light bulb holder from dark cardboard. Fold and glue the strip.

Glue it to the light bulb. We make a lot of such blanks and combine them into one big garland.

By the way, you can insert real lanterns inside.
The second idea for the competition is volumetric balls.


This tutorial shows each step of creating elements.


The idea with deer seemed rather unusual to me.

Elements are cut according to this stencil.

The pieces are connected to each other with stripes of a contrasting color.

This idea is quite complex. It will be difficult for kids to do it. However, this decoration looks just gorgeous.

For beauty, you can use the gradient effect. Sort colored paper by saturation. From dark to light.

We cut many strips of the same width, form an ornament and fasten it with a stapler and staples.

This option is also quite bold. We will use felt and clothespins. Nothing complicated, but very unusual.


From different shades of felt, we cut out elements of the Christmas tree and glue them on a clothespin. We connect them with a strong thick thread.


I think that for the sake of the competition you can do your best!
Master classes from felt with patterns
Felt is very popular with craftswomen. I devoted a separate crafts from this material.
So, there will be both complex and easy crafts. Choose your own difficulty level.
So, the first master class. Volumetric ornaments. You will need a square of thin felt, a ruler, scissors and glue. You need to connect the edges alternately from different sides of the square.

To decorate a children's room, make a garland of mischievous Christmas trees and snowmen.

Templates are shown below. All animals are made according to this scheme: parts of 2 pieces are cut out according to the template. A mouth, eyes and other details are embroidered on the front side.
The edges are sewn together, but one corner remains unsewn. We push the filler into it. And this hole is sealed.


These templates can be used independently.

For garlands, flat figures made of felt are also used. It lends itself easily to stitching on a sewing machine. Therefore, more often these soft parts are connected in this way. 

You can try to depict a garland in the form of leaves.

To do this, on a long strip of felt, you need to put off the ornament, which is shown in the lower diagram. 
Cut the workpiece and connect all the parts into one long stretch. 
Another master class on creating decorations for soft snowmen.

Recall that the garland can hang down from top to bottom.

Tilda dolls are popular in Europe. Especially in the Scandinavian countries. We can use this idea in home decoration.

Here is a master class on making a "sweet" garland. There are sweets and candy here. But you can’t eat them, they are made of fabric.


This is how candy is made.

And so we make a blank for a lollipop.


You can use real lollipop sticks.


Balls made of sisal, wadding or wool can also be wrapped in felt.

If you have only one shade, then it can be pasted over with a cloth or multi-colored paper.

Another decoration idea. And here we see clothespins again.

and here the figures alternate with pompons.

The diagrams for this craft are just below.


You can combine materials. Here's what the felt and cones look like together.

More decorating ideas.


Let's take a closer look at how such Christmas trees are made.


This, of course, is only a small part of the ideas. Experiment and create a new option for decor.
Decorations from plastic bottles and cups
This material is not very popular, but it is quite easy to use. Most often, plafonds for a garland are made from cups. It acquires a soft diffused light. And you can decorate them with eyes, hats and scarves.


Plastic bottles are often used to make snowflakes and other individual decorative elements. For example, rings like in this idea.

They can also be combined with lids. Holes for the thread in them can be made with a red-hot knitting needle or an awl.
Fabric flags
Flags can be different: square, triangular. Paper and soft. Glued or stitched. Today I will focus on the idea of fabric. Because there are as many as three ways to connect elements.
Fasten the parts with ribbon or bias tape. For this you need a sewing machine. Otherwise, it won't be accurate.


The second option is to sew pockets for the cord.


The third option is to simply make slots into which the thread is inserted.


Well, for inspiration, the idea with burlap. Looks just awesome.

You think now you understand that there are no boundaries for creativity at all.
Cone Decoration Ideas
Of course, bumps! What did we not do with them! One is worth it. And we can make a garland just to spit.

For beauty, the material can be spray-painted or dipped in gouache and acrylic paint.

Natural material looks harmonious with eco-friendly ideas. For example with dried berries or fruits.


This material will also feel good on the street. It won't get wet like paper if it snows.

For decoration, take Christmas tree branches. You can attach them to the ceiling curtain or to the eaves.


As you can see, everything is very beautiful and very affordable. It is not at all necessary to buy expensive jewelry when there are such ideas under your nose.
Master class of garlands with fringes
A fringe garland looks quite stylish. It can be done in several ways. Let's consider everything in detail in the photo instructions.

Option two, from threads.

From fabric strips.

Corrugated or crepe paper.

Fast, but very personal. Try it and you will have designer things!
Streamers-decorations on the windows (ideas)
Let's take a look at how you can decorate window openings. After all, this is not only gluing paper protrusions. You can make children's fabulous garlands, or you can make adults and elegant ones.


Idea from flat circles of different sizes. Much like falling snow.


Or replace the paper with pom-poms.

Or even cut snowflakes.

Suspensions with real Christmas balls look beautiful.


Again we use different forms and heroes.


Even if the garland is small, then distribute its center exactly in the center of the window. It will look symmetrical and self-sufficient.
How to make a garland of snowflakes, diagrams inside
Let's touch on the idea of snowflakes a little. This paraphernalia is very popular on New Year's holidays. After all, the beauty of snowflakes is fascinating, we all know that there is not a single identical beauty.

There are complex ideas, there are simple ones. It is important to understand who will make the craft - an adult or a child.


It is difficult to make many elements for a garland. You can make just a few elements and hang them on the chandelier, curtains for hours.

Mobiles are very similar to garlands, only they are arranged vertically instead of horizontally. Use this idea.
Garlands for the New Year from improvised means
What else can you make? yes from everything. From yarn we will make a stretch with hats. The main thing is to make them the same size. See how original this option looks.


From clothespins we make snowmen.

From the remains of wood and boards - houses. 
From lace and PVA glue, ceiling lamps for an electric garland.


From cardboard and Christmas tree buttons. You can alternate them with pompoms.


Pampushki can be made with a fork, I show in the picture.

Use candies and other sweets. By the end of the holiday, only candy wrappers will remain hanging.


And here is the garland of gingerbread.


The idea of citrus peel looks very modern. For flavor, you can add inflorescences of cloves or cinnamon sticks to them.


Love to knit? Then making a garland will not be difficult.

Crochet asterisk pattern.

Or create a knitted Christmas tree. The diagram is also attached.


Deer, snowflakes - this is all openwork knitting, which is easy to crochet.

Old CDs lying around? In crafts, do not throw them away!

We collected popsicle sticks, get them, put them into action.

Even from seemingly unnecessary remnants we make such beauty.

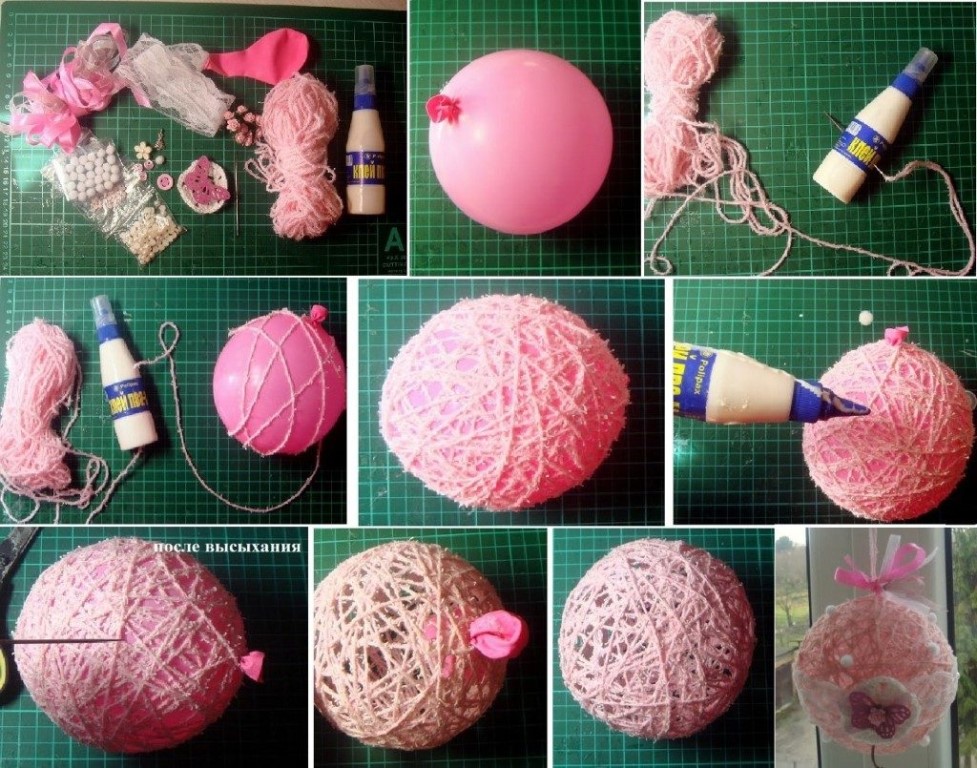
And here is a detailed master class for creating a garland of thread balls. This technique is very popular with craftswomen. Let's master it. By the way, PVA is the safest type of glue! Even children can work with it.


By the way, the kids will love this simple pasta idea.

Thank you for your attention! And I will be very glad if I could inspire you. I wish you success in your work and a good pre-holiday mood!
tweet
Tell VK
oneperfectdayblog.netChoose tartlets in classic Christmas colors: green, red and white. Such bright Christmas trees will appeal to both adults and children.
What do you need
- multi-colored paper tartlets (cupcake molds);
- glue;
- decorative sequins in the form of stars;
- twine or ribbon;
- scotch.
How to do
Fold the paper cutter in quarters to form a triangle.

Lubricate the corners of two triangles with glue. Lay three triangles on top of each other and glue them together to form a Christmas tree. In the same way, make as many Christmas trees as you need for your garland.
Decorate them with sequins. If you don't find star-shaped sequins, just cut them out of colored cardboard.
Then glue the Christmas trees to the twine or ribbon with adhesive tape at a small distance from each other. The garland is ready! Decorate with it or hang it on the wall.

 purlsoho.com
 It is very easy to make such a beautiful soft garland. The amount of material depends on the desired length of the decoration.
What do you need
- white and red strips of felt 2.5 cm wide;
- 2 needles;
- threads.
How to do
Lay the white strip of felt over the red one and pin them on both sides with needles. Then make longitudinal cuts in the middle of the strips at the same distance from each other.
 purlsoho.com
 If you want to make a very long garland, cut the felt gradually: make no more than five cuts at once, move on to weaving, and then repeat the procedure. Thanks to this scheme, the strips will not move out, and it will be much easier for you.
To braid a two-tone braid, thread the end of the strip through the first hole and pull tight so that the strips do not fall apart. Then thread the garland through all the other holes in the same way.
 purlsoho.com
 Trim and sew the strips to each other at the ends of the finished garland so that they do not stick out. By the way, you can combine any colors of your choice. For example, these:
 abigail.engineer
 thecheesethief.com
 These miniature stars look like glass, even though they are made from plain cellophane! This material is not as malleable as paper, but such an unusual garland is worth the work done.
What do you need
- cellophane;
- lined sheet of paper;
- scissors;
- thin needle;
- thin threads.
How to do
Cut the cellophane into strips. It is more convenient to do this by placing a lined sheet of paper under the cellophane. Please note that the length of the strips should be at least 30 times their width. In other words, if the width is 1 cm, then the length must be at least 30 cm.
Then make stars out of the stripes as shown in this video:
Carefully pierce the stars with a needle through which a long thread is threaded. The stars should be at a small distance from each other.
By the way, garlands of paper stars also look very nice. Therefore, choose the material to your taste.


 rhiannonbosse.com
 This option is suitable for those who want to diversify the usual old garland.
What do you need
- white paper cups;
- a sheet of plain paper;
- pencil;
- scissors;
- scrapbooking paper;
- glue or double-sided tape;
- stationery knife;
- electric garland.
How to do
First you need to make a "wrapper" for the cups. To do this, cut one glass in half, cut off the bottom and edges. Flatten it, put it on plain paper and make a template.

Lay the template on the reverse side of the scrapbooking paper and cut out as many wrappers as you have cups. By the way, you can choose any color of paper. Just try to match it in color with an electric garland.

Then wrap the cups in paper and glue the edges with glue or double-sided tape.

Make cross cuts in the bottom of each cup with a utility knife. Insert the light bulbs of the electric garland into the cuts. Unusual New Year's garland is ready!

 createcraftlove.com
 Another way to transform a boring electric garland.
What do you need
- decorative burlap of New Year's flowers;
- scissors;
- electric garland.
How to do
Cut the burlap into equal small strips. Tie them in turn with a knot between the electric bulbs.
 createcraftlove.com
 Very simple and beautiful!

 annfarnsworth.com
 This beautiful garland looks very impressive, and it is very simple to make it. If you do not have twine, you can use thick threads or yarn.
What do you need
- Balloons;
- petrolatum;
- ½ l of PVA glue;
- 2 tablespoons of corn starch;
- 2 tablespoons of warm water;
- twine;
- needle;
- electric garland.
How to do
Blow up balloons of the same size. Note: a garland of small balls will look prettier. Lubricate them with Vaseline. This is necessary so that the twine does not stick to the balls tightly.
Mix glue, starch and water. If the mixture is too thick, add a little more water. Just do not overdo it so that it is not very liquid.
Wet the twine in the resulting adhesive solution. Then wrap the rope around the balloons. The easiest way to do this is to hang the balls on a rail. Just do not forget in this case to put an oilcloth under them, where excess glue will drain. The density of the balls of the future garland depends on how much twine you wind.

Leave the balls to dry overnight. Then pierce each balloon with a needle to make it burst. First check whether the twine has become stiff enough and whether the finished ball will hold its shape. Remove the balloon carefully.

Then insert the bulbs of the electric garland into the balls of twine. If the balls turned out to be very dense, then you can make holes in them with scissors or a pen.

 stubbornlycrafty.com
 For such a garland, you need thick paper, such as cardstock. But thin cardboard is fine too.
What do you need
- thick paper (gray and several other colors to choose from);
- scissors;
- hole puncher;
- glue;
- twine.
How to do
Cut the gray paper into strips 3 x 10 cm in size. The parameters of the strips from the rest of the paper are 2.5 x 20 cm. The number of strips depends on the desired length of the garland.
Fold the gray stripes into octagons and make holes for the twine with a hole punch as shown in the photo. Then glue the edges of the octagons.
 stubbornlycrafty.com
 Now make the light bulbs. To do this, fold the long strip in half, only slightly running your fingers along the fold. Holding the strip by the tips, press it to the palm of your hand. When you release the paper, it will take the shape of a light bulb.
 stubbornlycrafty.com
 At the ends of the strip, exactly in the middle, make a hole for the twine with a hole punch. Thread the twine first through one hole on the gray octagon, then through the light bulb, and finally through the second hole in the octagon. Repeat these steps with all the other details and align the "bulbs" along the length of the twine.
 stubbornlycrafty.com
 acupofthuy.com
 Such beauty can become not only a New Year's decor, but also a decoration for a children's room.
What do you need
- A4 paper packaging;
- template (download);
- scissors;
- glue stick;
- Double-sided tape;
- threads.
How to do
Print and cut out the templates, circle them on sheets of paper as shown in the picture below. For the garland, you need 24 of the first and second parts of the lanterns and 126 stars. And to speed up the process, draw stars on sheets folded four times.
Cut out all the details.
 acupofthuy.com
 Take one part of the flashlight and grease one side with glue. Glue the same part to it. One flashlight should consist of six identical parts. Just do not glue the sides of the first and sixth parts until you have made a loop.
To do this, stick double-sided tape on the fold. Glue the thread from the bottom up, make a small loop at the top, then glue the thread from the top down and cut off the excess. Now you can glue the sides of the first and last parts.
Repeat the same with the rest of the flashlight parts. In total, you will get 8 flashlights.
 acupofthuy.com
 In the same way, make 21 volumetric stars. The difference will be only in gluing the thread. It must be stretched through three stars, making a loop on the topmost of them.
Now pull a thread through all the loops, forming just such a beautiful garland:
 acupofthuy.com
 linescross.com
 It is enough just to cut out the details according to the finished template and decorate them with sparkles.
What do you need
- thin cardboard;
- template (download);
- scissors;
- stationery glue;
- colored sequins;
- twine.
How to do
Print on thin card stock and cut out the templates along the solid lines. The number of parts needed depends on the desired length of the garland. Bend the blanks along the dotted lines.
 linescross.com
 After one, grease the triangles on the templates with glue and sprinkle with sparkles. When the glue dries, shake them off. You may need to repeat these steps one more time so that the triangles are completely covered in glitter.
 linescross.com
 Then glue the semicircular parts on the templates with glue and glue the figures. Pull the twine through the figurines. If you are afraid that you will not be able to do this, run the twine through each figure before gluing, and not after.
 thepartyteacher.com
 Such Christmas trees can be decorated with anything: sequins, sequins or buttons. Connect your fantasy!
What do you need
- green tissue paper;
- scissors;
- glue;
- yellow cardboard;
- red cardboard;
- twine.
How to do
Straighten the tissue paper. By the way, this can be done with an iron, setting it to the lowest temperature. Fold a long sheet in half crosswise and cut lengthwise into two parts. You will get two long strips folded in the middle. Make long cuts on them, leaving part of the fold intact. You will need as many of these details as you want to make Christmas trees for the garland.
 thepartyteacher.com
 Unfold the strip and twist it thinly. At the fold, make a loop and twist several times so that it does not fall apart. If desired, you can fix it with glue.
 thepartyteacher.com
 Tie the resulting Christmas trees to the twine. Then cut out stars from yellow cardboard, and circles from red cardboard and glue them. Try to fasten the stars so that the knots on the twine are not visible.
 shelterness.com
 And finally, an option for those who have absolutely no time to make something, but there is a great desire to update the New Year's decor.
What do you need
- beautiful Christmas balls;
- twine.
How to do
All you have to do is thread the twine through the loops of the Christmas balls, tying it in knots and place the balls at the same distance from each other.


