Do-it-yourself paper snowflakes, simple diagrams for step-by-step cutting of beautiful snowflakes. How to fold paper for a snowflake and cut paper snowflakes
How to fold paper for snowflakes and what is it for? This should be known in order for the snowflakes to turn out to be beautiful and regular in shape. The success of the whole work depends on how the paper is folded. There are several ways to properly fold paper to cut out snowflakes. In this article, each of them will be analyzed, starting from the simplest and ending with the most complex.

We analyze the options
The first option is the simplest. To begin with, a piece of paper needs to be folded five times. Four times in half, and the last fifth time diagonally. The ornament will be beautiful, but angular.
Very important! To make the snowflake smoother at the end of the work, you should immediately cut off all the extra parts.
After the simple method is mastered, you can move on to more beautiful and complex options.
Second option. Below is a diagram that shows an illustrative example of the correct folding of sheets of paper for a pentagonal product.

Third option. It's a little more difficult to fold a hexagonal snowflake.

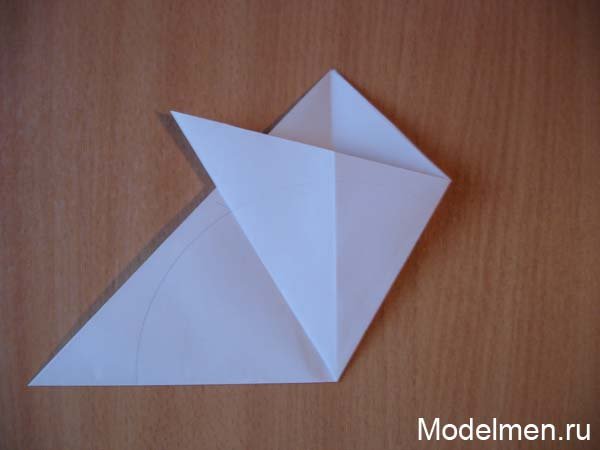
- Take a square sheet of paper and fold it diagonally. Then fold in half. Straighten the place of the last bend. Now you should take a compass and draw a circle. The maximum radius that will fit on the workpiece.
- Leaving the radius the same, put the compass needle on the edge of the circle where the leaf bends and make a notch. Do the same on both sides of the triangle.
- Bend the edge so that it is the same as the serif on the left.
- Turn the product over and similarly bend the edges on the right side

Fold in half, if the extra tails interfere, then cut off, and if not, draw a beautiful ornament on them. There is another option to fold the paper for the six-pointed fluff. Take the paper and fold it diagonally, then cut off the excess paper. Should be a square. Fold the second time diagonally. A triangle will come out, which needs to be stripped into three halves, fold one half, cut off the ends, fold the other half. Everything is clearly visible in the picture.
Seven-sided crystal
Before you start cutting out a heptagonal snowflake, it is important to understand how to properly fold sheets of paper for a heptagonal fluff.

To make a heptagonal snowflake, again you need to fold a square sheet of paper in half and divide the workpiece into seven cells. The easiest way to do this is with a protractor. For each sector, you need to make an angle of 25.7 degrees.

Bend the right corner of the leaf so that 3 left cells are open. Similarly, bend the right side, the degrees of the angle are preserved. Again, you need to take the right side of the leaf and cover one more cell. Next, you need to fold the snowflake's source material so that the left side of the triangle is at the bottom and the right side is at the top. The paper for the snowflake is ready, the product should turn out to be even, symmetrical and beautiful.

It is convenient to fold paper leaves for snowflakes according to these drawings:


It is not difficult to master the process of folding sheets of paper for a snowflake, but then all the decorations will turn out smoothly, quickly and correctly, without flaws.
Video on the topic of the article
Video on how to quickly and correctly fold paper for snowflakes.
How to properly and beautifully cut a snowflake
DIY paper snowflakes
Paper for cutting snowflakes, you can take office, colored paper for children's creativity, paper for origami.
It is convenient to cut out relatively large sections of the pattern with ordinary stationery scissors, for example, along the edge of a snowflake.
For cutting small details and complex patterns, it is better to use hairdressing scissors and nail scissors.
DIY snowflakes
So, paper and scissors are selected, now you can proceed to the first stage of making snowflakes - folding paper. To get a hexagonal blank from which a snowflake will subsequently be made, cut a square of the desired size from a sheet of paper.
How to get squares of different sizes from an A4 sheet
1. Fold a sheet of paper in an arbitrary way, but so that one part is larger than the other, and then cut along the marked line.
2. Fold most of the sheet along the bisector.
3. Cut off the excess paper - you get a square.

4. The blank for the big snowflake is ready.
5. Repeat steps 2-3 with the smaller part of the sheet remaining after step 1.
6. The result is a blank for the average snowflake.
7. With the trim remaining after step 6, repeat steps 2-3.

8. It turned out a blank for a small snowflake. Thus, from one sheet of A4 format, you can make blanks for three snowflakes of different sizes.
Piece sizes may vary slightly. They depend on how the original sheet was folded in step 1. In addition, a large snowflake can be obtained by cutting a square from a whole A4 sheet.
How to fold a hexagonal blank from a square
Now we need to fold a regular triangle from the square (in expanded form - a hexagon), from which a snowflake will be cut.
Method number 1
1. Fold the square in half.
2. Then fold the sheet "by eye" so that the angles indicated in diagram 3 are equal.
3. Turn the workpiece over to the other side.
4. The fold should go along the edge of the workpiece folded in step 2 of the layer, and the top edge should coincide with the left fold.
5. Cut off the excess paper evenly.

Method number 2
1. Fold the square diagonally.
2. Mark the middle of the leg of the resulting triangle (side).
3. Connect the top (right angle) of the triangle with the intended midpoint of the leg. Mark the fold line and again expand the workpiece to a triangle.

4. Now mark the middle of the base of the triangle.
5. Connect the middle of the leg with a point lying on the marking line obtained in step 3. The fold line should pass through the middle of the base of the triangle.
6. Connect the base of the triangle to the fold line obtained in step 5.
7. Cut off excess paper along the indicated line.

Advice
Choose the size of the hexagonal blank (large, small or medium) yourself based on the paper you use for cutting, the complexity of the snowflake, and your scissor skills.
Cut out the snowflake
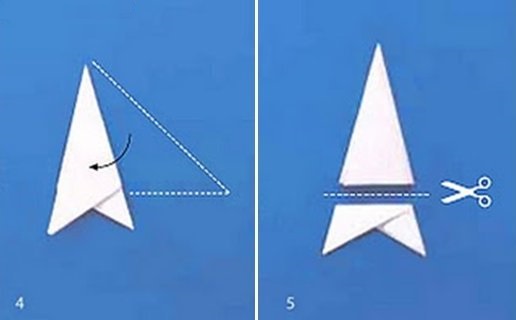
1. Fold the regular triangle (unfolded hexagon) obtained by one of the methods proposed above in half. Perform all actions very accurately so that later you do not cut through the layers of paper folded crookedly with scissors. Make sure that the top circled in a circle (see diagram) is in the center of the future snowflake.

2. Start cutting. In the diagrams, areas of paper that need to be removed are indicated in bright pink. First form the outer edge of the snowflake. To do this, cut out the pattern on the top side of the workpiece, as shown in the diagram.
3. Then cut out the pattern on both sides of the workpiece. The last to cut out small elements inside the workpiece and near an acute angle.

4. The snowflake is ready, it remains only to carefully unfold it.

We will cut out all the presented snowflakes according to this description, starting from point 2, when the regular triangle is already folded in half. The fact is that all snowflakes are cut out in the same way, only the pattern changes, so we did not repeat the description of the work many times, but limited ourselves to exact diagrams.
The process of making each snowflake consists of 3-5 sequential schemes, on which the removed sections of paper are marked in black. The last diagram, which shows a snowflake fully cut out but not yet unfolded, is also a template. You can “by eye” draw a pattern from it onto your workpiece or transfer it using tracing paper and carbon paper.
Advice
The snowflake should look like a graphic image with a well-read pattern, so follow all stages of work very carefully and accurately.
Snowflakes. Scheme


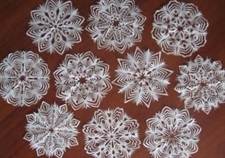
Such snowflakes will be beautiful New Year's interior decoration.
If you want to decorate your room before the New Year with beautiful paper snowflakes, first of all, you need to know how to fold and prepare the paper for this. Well, then, when you do everything right, all that remains is to pick up scissors and be guided by your inspiration and imagination. And the diagrams and instructions that we provide in this article will help you correctly fold paper for a snowflake.
How to prepare paper for a snowflake
Suppose you have a sheet of A4 office paper in front of you. How to make the right blank out of it in order to cut a snowflake? It's pretty simple. In addition, from an ordinary office sheet, you can make a blank for not one, but for as many as three snowflakes of different sizes. How to do this, you will understand if you carefully consider the attached diagram. First, fold it, but not in half, but so that you get two unequal parts, as shown in the figure. Then, bend each part at a right angle and cut off the excess. You have two paper squares of different sizes. Finally, when cutting off the smaller part, you will get another rectangle. If you do the same manipulations with him, then you will get another small square blank. It can also be used to make a small snowflake. As you can see, so far everything is very simple.
How to fold paper for a snowflake. Scheme
A classic snowflake has six rays. So, from a paper square, we need to make a hexagon first. Carefully consider the schemes that we offer you, and you will see that it is not simple, but very simple.
First, fold your square blank into a triangle. Like this.

Now you need to take two of its opposite corners and lay them on top of each other, at about a 60 degree angle. But don't worry, you won't need a protractor. high precision is not required here. The most important thing is to roughly outline the middle of the base of the triangle and from it already bend the corners to the opposite edge. If you did everything right - and we are sure that this is the way it is, then you will get such a paper figure.

Cut off the hanging corners - and you have a hexagonal blank. It is not necessary to unfold it at all, you can immediately start cutting a snowflake. Moreover, you will burn not even pre-cut the corners, but immediately start cutting a snowflake along the folds. For example - like this.

When you unfold it, you will get something like this picture. Just unroll very carefully.

How to fold paper for a snowflake with eight rays. Scheme
It's also very simple. We begin to fold our paper blank as we did in the previous version. In other words, first add like this.

Then we bend our triangle again and get:

We fold our future snowflake again.

And again we bend it - pay attention to exactly how this should be done.

We cut off all excess.

And we begin to cut the snowflake.

The end result is a snowflake with eight rays.

How to fold paper for snowflakes and what is it for? This should be known in order for the snowflakes to turn out to be beautiful and regular in shape. The success of the whole work depends on how the paper is folded. There are several ways to properly fold paper to cut out snowflakes. In this article, each of them will be analyzed, starting from the simplest and ending with the most complex.
We analyze the options
The first option is the simplest. To begin with, a piece of paper needs to be folded five times. Four times in half, and the last fifth time diagonally. The ornament will be beautiful, but angular.
Very important! To make the snowflake smoother at the end of the work, you should immediately cut off all the extra parts.
After the simple method is mastered, you can move on to more beautiful and complex options.
Second option. Below is a diagram that shows an illustrative example of the correct folding of sheets of paper for a pentagonal product.

Third option. It's a little more difficult to fold a hexagonal snowflake.

- Take a square sheet of paper and fold it diagonally. Then fold in half. Straighten the place of the last bend. Now you should take a compass and draw a circle. The maximum radius that will fit on the workpiece.
- Leaving the radius the same, put the compass needle on the edge of the circle where the leaf bends and make a notch. Do the same on both sides of the triangle.
- Bend the edge so that it is the same as the serif on the left.
- Turn the product over and similarly bend the edges on the right side
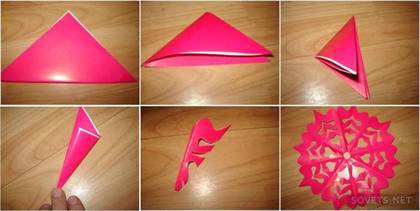
Fold in half, if the extra tails interfere, then cut off, and if not, draw a beautiful ornament on them. There is another option to fold the paper for the six-pointed fluff. Take the paper and fold it diagonally, then cut off the excess paper. Should be a square. Fold the second time diagonally. A triangle will come out, which needs to be stripped into three halves, fold one half, cut off the ends, fold the other half. Everything is clearly visible in the picture.
Seven-sided crystal
Before you start cutting out a heptagonal snowflake, it is important to understand how to properly fold sheets of paper for a heptagonal fluff.
To make a heptagonal snowflake, again you need to fold a square sheet of paper in half and divide the workpiece into seven cells. The easiest way to do this is with a protractor. For each sector, you need to make an angle of 25.7 degrees.
Bend the right corner of the leaf so that 3 left cells are open. Similarly, bend the right side, the degrees of the angle are preserved. Again, you need to take the right side of the leaf and cover one more cell. Next, you need to fold the snowflake's source material so that the left side of the triangle is at the bottom and the right side is at the top. The paper for the snowflake is ready, the product should turn out to be even, symmetrical and beautiful.

It is convenient to fold paper leaves for snowflakes according to these drawings:


It is not difficult to master the process of folding sheets of paper for a snowflake, but then all the decorations will turn out smoothly, quickly and correctly, without flaws.
Video on the topic of the article
Video on how to quickly and correctly fold paper for snowflakes.
Similar articles:
The arrival of guests is an opportunity for every hostess to show her skills and hospitality. In addition to original and unusual dishes, real craftswomen...
Decorating suburban areas with unusual and unique objects has recently gained extraordinary popularity. Crafts from bottles are...
On the eve of the New Year holidays, everyone wants that the house was extraordinarily beautiful, cozy and fabulous. Therefore, it's time to think about what you can do to achieve your desired goal. A good option for decorating a room before the New Year holidays is to decorate windows with unusual drawings, festive motifs that will bring pre-holiday mood and a New Year's fairy tale to the usual room decor.
And there is no need to think that all home decorations can only be purchased in a store, while spending quite an impressive amount of money. It would be much better, having united with the whole family, to make a variety of decorations for the house and the Christmas tree on their own. For such an activity, you can allocate a certain day, for example, when it is planned to install a New Year's beautiful spruce. And do not forget that this is the most exciting activity!
The easiest thing you can do with your own hands is to cut and attach snowflakes in different places. Everyone remembers how, as a child, they cut them out before the holidays in the garden. Today, becoming parents, you can spend time with your child with benefit and pleasure, cutting out beautiful snow-white snowflakes with your own hands from paper. Kids are always happy to take part in such events.
Teaching a child to cut a snowflake yourself is not at all difficult. To do this, prepare the necessary tools and paper. As a basis, you can take napkins, colored paper or just a white sheet from the album.
The thickness of the sheet does not really matter. But you need to know that the most delicate and airy snowflakes are obtained from thin sheets. And too thick paper will be difficult to cut.
You will also need a pencil and sharp scissors. After the pattern for the future snowflake is selected, the paper is folded, as shown in the photo. The more additions you make, the more interesting and openwork the snowflake will turn out.


The size of the future decoration depends on how large the sheet is initially selected. In this case, only the desire to have a large or small snowflake influences the choice.

When the drawing is applied to paper, we proceed to cutting. This process requires special care and accuracy. In no case should you cut off the edges of the paper at the folds, as the snowflake may simply fall apart.

Children really like this process. After all, in the end you will get beauty with your own hands, which is so nice to decorate a Christmas tree, windows or walls in a room.
It should be noted that, it would seem, such a simple activity as cutting snowflakes out of paper with your own hands is a great opportunity to develop a child’s imagination, a sense of beauty and artistic taste.
It is possible and necessary to develop the abilities of your child at home, but a variety of circles in the garden, school will only help to raise the level and hone the talents of the child.
In addition to simple paper cutting, a child can be interested in making volumetric models of snowflakes. These decorations are designed for older children and adults. But that doesn't make them any less interesting or beautiful.

All the same openwork paper snowflakes are taken as the basis, the pattern is transferred, for example, to polystyrene or polystyrene foam. With the help of a sharp knife, all the necessary elements are cut out, and as a result, unusually beautiful, voluminous snowflakes are obtained.

They can be left white, but if you connect the kids and paint them together with bright colors, then such decor elements will simply amaze with their unusual design. And the time spent creating them will bring all family members together. The result of your labors will be unique.

Do-it-yourself voluminous paper snowflakes
In this master class, we will make such a heart with a snowflake. It can be used as a bag for a small gift or just as a Christmas decoration with your own hands.

First you need to print this diagram.


We transfer the scheme to paper and cut it out.


The result is two identical blanks.


To fasten together, we make cuts - on one side from the top to half of the snowflake, on the other - from the bottom to half of the snowflake.

We collect the finished volumetric snowflake, threading each other.

Attach the handle.


Do-it-yourself voluminous paper snowflake is ready!

How to make a DIY 3-D snowflake
Modern technology has also reached such a seemingly simple task as creating a snowflake. As the name implies, 3-D snowflakes are a more complex, but very effective technique, due to which the made decor is distinguished by a special elegance of lines and rather unusual shapes.
What may be needed to make a snowflake with a 3D effect?
Prepare a square sheet of paper of the desired color, a pencil and a ruler, scissors or a sharp paper knife, glue. The work of making 3-D snowflakes is very painstaking and requires a lot of patience.
The first step is to draw a sheet of paper into squares. We need 6 identical squares. Then such a scheme is applied. It can be printed.

Fold the square in half diagonally, transfer the diagram as shown in the figure. Fold in half again.

The next step is cutting parallel lines. The incisions must be made in such a way that they are directed towards each other, but do not converge to the end.


We connect and glue the corners of the first small square.


Then turn over and glue the corners of the next square.

And so on in order, until all the corners are glued together.

To make the snowflake voluminous, you need to very carefully glue the corners of all the squares. As a result, six snowflakes are obtained, which, gluing together, form a three-dimensional 3-D figure.

We connect the corners of all the blanks to each other.


In order for the figure to keep its shape and not fall apart, you need to additionally glue the sides of the snowflake.

That's all, our 3-D paper snowflake is ready!

By inventing various patterns, painting the figure with paints and even decorating with beads, you can not only create a very beautiful New Year's decoration, but also help develop your child's imagination and sense of style.
Paper snowflakes - kirigami instructions
Snowflake kirigami is a fairly easy way to quickly and effortlessly make a lot of beautiful decorations. The highlight of this type of snowflake is the selection of paper. For snowflakes - kirigami you need bright colored paper.

It can be colored on one side only, but you can choose paper with rich colors on both sides.
We take an A4 sheet and fold it as shown in the photo.

Cut out a square, fold in half diagonally.

We fold two more times.


Then we print and transfer just such a scheme to the finished workpiece.


The next step is to cut patterns on the workpiece using nail scissors.


Carefully cut out the snowflake and unfold it.


Bend the resulting corners, as in the photo.


A snowflake can be decorated with stasas, beads, Christmas tinsel, and then it will become the central decoration of your New Year's home.
2 more do-it-yourself kirigami snowflake options:


The light, airy figure of a ballerina is very beautiful. If you combine two types of a beautiful snowflake and a ballerina figurine together, the effect can exceed all expectations.
It takes a lot of time to make this type of jewelry. But the work of cutting it out is quite simple, even a child can handle it. Not single figures look very impressive, but a whole garland of graceful ballerinas.
What you need to prepare for work:
- dancing ballerina figure template;
- thin white paper for a ballerina's tutu. Paper multilayer napkins are very well suited;
- thin white cardboard;
- scissors.

Choose a ballerina figurine template. In the Internet, you can find a large number of options. Simply copy the selected template into a text document, format and print. But it is much more interesting to draw a sketch yourself. Transfer the template to cardboard and cut it out.
It is very important that the cardboard is white on both sides, since the snowflake is voluminous and is clearly visible from any side. The size of the figurine is optional. There are no restrictions in this matter.


