Brooch with your own hands from ribbons. A do-it-yourself brooch made of beads or satin ribbons - do-it-yourself vintage! Quivering rose - a brooch made of satin ribbons in two ways A brooch made of lace and ribbons with your own hands
A brooch is perhaps one of the most elegant and feminine accessories. With this interesting decoration, you can transform any boring thing in your wardrobe. Brooches made of satin ribbons, which are currently at the peak of popularity, look very attractive, but it is sometimes very difficult to find a suitable brooch in a store, and really beautiful jewelry has a not very attractive cost, but it doesn’t matter, because with the help of this article you can make handmade satin ribbon brooch. And to do this is not difficult, but very interesting.
Stylish bow
If you have not worked with satin ribbons yet or are just a beginner in needlework, we recommend making a bow-shaped brooch first, it will be a very easy job, and the product will turn out to be very pretty.
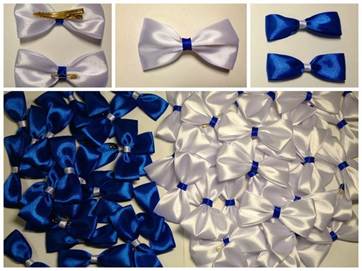
For work you will need: a pin, two satin ribbons, one and three centimeters wide, threads to match the color of the ribbons, a needle, scissors, matches.
First, take a ribbon three centimeters wide and cut six centimeters from it, and cut 1.5 centimeters from a ribbon one centimeter wide. Gently burn the threads around the edges with a lighter, otherwise they will crumble.
Now we form a bow, this is done very simply: bend a wider ribbon in half, thus defining the middle. Now lay it face down, and bend the ends to the middle, laying them one on top of the other. Fasten the base of the bow with small stitches, fasten the working thread. The bow will be more voluminous if the thread is tightened.
Now put a narrow ribbon on the seam, thereby hiding it and highlighting the middle. Carefully hide the thread on the back of the product. Finally, attach the bow to the pin, and our little brooch is ready. Such a bow can be immediately sewn to the bag, for example, thereby giving it an unusual accent, or attached to an uninteresting hairpin, a very nice decoration will come out.

cute decoration

Probably the most popular type of brooches made from satin ribbons are kanzashi style brooches. This technique came to us from Japan and immediately gained wild popularity. Basically, flower-shaped figures are created in this way. In Japan, such figures are very often decorated with hairpins or rims, but jewelry in the form of brooches is very popular.

You will need:
- scissors;
- Satin ribbon of white and green colors, 5 centimeters wide;
- Glue;
- Needle;
- Threads in the color of the ribbons;
- Beads for decoration;
- Stamens (you can buy them at a needlework store);
- Matches or lighter.
First we will work with the white ribbon. Cut it into squares of five centimeters, you should get 18 of them. Scorch the pieces along the edges so that they do not crumble. Now fold one of the squares diagonally and double again. If you succeeded, as in the photo below, then you did everything right.

Now collect the lower part of this element on a thread, it is very important not to skip a single layer. Now tighten the thread, fasten and carefully cut. Thus, make petals from all the squares you have prepared.

When all the petals are ready, they need to be glued to each other with an overlap, forming a flower. How to do this is shown in the photo.

You should get three semicircles, three remain. Now we take the stamens prepared in advance and form bunches of them, fixing them with glue. We glue the petals together and attach stamens to them, thus forming a bud. You should have one more petal with a stamen in stock.
Petal, which is on the left, bend to the middle and glue. Do the same with the petal on the right side. Glue a stamen to each last petal. Glue the remaining parts to the first two.

Now cut the ribbon 1.5 centimeters wide and dissolve one of its edges. Glue the whole edge with glue and wrap a bunch of stamens in it. Paste all the bundles with such stripes.

Glue the blank, which consists of five petals, in such a way as to make a flower. Place the bunches of stamens in the middle of the flowers, after smearing them with glue. We collect the rest of the flowers in this way.
Now we are starting to make leaves for our flowers and hence the green ribbon comes into play. Cut the leaves out of the ribbon by eye and singe the edges with a lighter, while quickly stretching, so you get not just flat leaves, but wavy ones. Fold the leaves in half and iron. We got a vein, iron obliquely to the middle. You need to make five such leaves.


Now cut a green ribbon two and a half centimeters wide, fold it in half, right side inward, make a cut of about 45 degrees and singe it with a lighter. Now turn it inside out and glue it into the flower.


You can also decorate the brooch with lace leaves. Now you need to glue the flowers with the bud.


It remains only to make the basis for our brooch, for this we take cardboard and cut out a piece of arbitrary shape from it, but suitable in size. We glue the ribbons to the wrong side, cut out the base, leaving a few millimeters near the cardboard. We glue the other part to the wrong side of the ribbon, singe the edges and solder the edges of the ribbon.
Original handmade kanzashi satin ribbon jewelry is a great souvenir and gift for any occasion. Any craftswoman can make this type of needlework her hobby. Making your own brooches from satin ribbons (this type of needlework is also known as "kanzashi") is a really exciting experience. A bow brooch made using the "kanzashi" technique can be made a worthy decoration for both festive and everyday clothes. It all depends on the color of the ribbons and the shape of the brooch. Such jewelry is equally well suited for the youngest fashionistas and women of more mature age.
On the Internet you can find so many MK and training videos on making such brooches from braid, taffeta and various beads that if you wish, you can make it at least reflective - these brooches and pendants are now so popular and they are made in such quantities that MK is probably for such a non-standard option will be found. And what you decorate with her - a coat, a dress or a hairstyle, as they say - is up to you.
In order to make a do-it-yourself brooch from fabric strips using the kanzashi technique, resembling a lush bow or an intricate exotic flower, you first need to think about the shape and color scheme of future work. The main thing is that the finished ribbon brooch should look like a bow, and the shape of this man-made bow can be anything. The number of ribbons can also vary, it all depends on the individual preferences of the craftswoman. Nevertheless, you need to keep in mind: the more multi-colored ribbons are used to make a brooch, the more magnificent and interesting in shape the finished product is. For festive wear, a lush ribbon brooch is suitable, and for everyday wear, a more modest bow.
For that to make a brooch in the form of a bow with your own hands, you will need:
Gallery: satin ribbon brooch (25 photos)


How to make a satin ribbon brooch: a general description of the process
 First stage of work over the manufacture of a brooch from satin ribbons - preparatory. At this stage, the craftswoman must think over the shape and color scheme of the finished product, draw a sketch, select the required number of ribbons of the desired colors and shades and fold them on the table according to her scheme. This will help to get the most complete picture of how the finished product should look like. It is better for beginner needlewomen to use ready-made sketches presented on the Internet and specialized literature. Experienced craftswomen can improvise.
Then the main stage of work begins. Work on assembling a brooch from multi-colored ribbons begins from the center of the product. Satin ribbons are folded into loops of various sizes and attached to the base. First, the center is completely filled, then the brooch gradually “grows”, acquiring the desired size and shape. To fix the tapes, it is most convenient to use a glue gun. Attention: if the craftswoman decided to use ordinary fabric glue in a tube, you need to be very careful not to get drops of glue on the fabric.
When sewing together multi-colored loops from ribbons, you need to try to the seams were almost invisible. A decorative stone can be placed in the center of the bow brooch, but this is not at all necessary, because the brooch made using the “kanzashi” technique is elegant in itself and does not need additional decoration.
Making elegant brooches in the style of "kanzashi"- a fairly simple type of needlework. However, in order to create a truly beautiful product, you need to gain experience and "fill your hand." Also, when working with satin ribbons, you need to keep in mind the following practical recommendations:

Making brooches using the "kanzashi" technique has recently been very popular. The popularity of this type of artistic creativity is explained by the fact that this technique is quite easy to perform, and at the same time makes it possible to make very effective jewelry. Even children of primary school age can make an elegant brooch in the form of a bow with their own hands. This type of needlework perfectly develops imagination and artistic taste. The main thing is patience and a desire to master the technique of working with ribbons.
An indispensable attribute of a woman is jewelry.
They are made of precious metals, with natural stones and without, from artificial materials. They are also factory-made and original do-it-yourself crafts. Today's master class is dedicated to creativity.
Modern stores represent a wide range of sewing accessories and their components. Hand made is popular in Russia.
DIY felt brooch
The technique for making such a brooch is simple. The materials used are not rare. Suitable for decorating clothes, handbags, interior, gift wrapping.
Materials and tools: baked milk color felt, green felt, threads (it is better to use floss), vintage copper button, decorative fastening pin, scissors, paper, pencil, needle.
The figure shows a template. Petals and a leaf are cut out on it for a future flower brooch. It is required to make 3 petals and 1 leaf. A pattern is made from paper.
The paper pattern is superimposed on the felt. 4 products are cut out of it. All differ in size.
Two large petals have a round core cut out. In the smallest petal, cross-shaped lines are cut in the center.
Decorative veins are sewn by hand with floss threads and a needle. The seam is simple. The larger the petal, the larger the line for the brooch with your own hands.
A decorative pin is sewn on a green leaf.
Petals are superimposed on top of the leaf in turn. The last one will be the smallest one. A vintage button is sewn on by hand. She also holds the whole product together.
Brooch - ready! Wear with pleasure!
DIY satin ribbon brooch
This is a beautiful large flower. She will not go unnoticed! A brooch can decorate a dress, headdress or your desktop computer to cheer you up.
Materials and tools: satin ribbons of two colors, scissors, candle, matches, tweezers, thread, needle.
A 10 cm long ribbon is cut off. The ends of the ribbon are melted by the candle fire. This will protect the fabric from shedding in the future.
The upper corner is wrapped with tweezers down. A needle from the lower corner of the triangle draws a bisector (the triangle is divided into two equal ones) and the fabric is pulled together with a thread.
The same manipulation is performed on the left side of the tape. You will get a small elegant bud.
A new bud is made from a new piece of tape 10 cm long. The left and right corners are bent down. A simple seam is laid along the bottom edge by hand. The thread is pulled together and a new larger bud is obtained. The previous petal is inserted inside the new one.
All subsequent petals are simply folded into a charming shape, resembling the natural shape of a rose flower. In total, you need to bend 13 petals from satin ribbons for a brooch with your own hands.
At the end of the work, satin leaves are sewn to the base of the rose.
The shape of a beautiful tea rose for a brooch can be made in the second way
A tape 12 cm long is used in the amount of 14 pieces. A piece of satin ribbon is first folded from both edges to the center.
Then - again from the edges and to the center.
The petal is fastened with a thread. And it flips. On the front side, the folds of the fabric should not be visible.
DIY beaded brooch
Brooch with an emphasis on antiquity. The uniqueness of the composition is in an unusual combination of natural malachite stone and artificial beads.
Materials and tools: malachite cabochon stone, dense fabric, beads of different colors and sizes, artificial leather, cardboard, decorative pin, instant-drying glue, threads, a simple and beaded needle, scissors, a pencil.
The stone is glued with glue to the fabric.
For the first row of beads, the largest beads are used. First, 2 beads are taken and sewn to the fabric near the stone itself. Then two again. So until the very end, until the beads form an oval near the natural stone.
The thread is pushed through the first row of beads again. The whole structure is stretched for reliability.
The second row of beads is sewn not outside the first, but inside. A different color of the small product is being used.
According to the same scheme: 2 beads each. At the end, be sure to tighten the second row of beads with a new thread.
The third row of beads is located outside the very first row. Here everything is done in a familiar technique.
At this stage, the excess fabric, on which the stone was glued and the beads sewn on, is cut off.
Reverse side layout. For this, blanks are needed. The resulting brooch is taken with your own hands and placed on the skin. An oval is traced over the skin with a pencil. It is cut further with scissors.
The same oval is made of cardboard with an allowance of 5 mm.
An oval made of cardboard is glued to the brooch. On it is a decorative pin. Next - holes are made in the leather oval for inserting a pin. And the leather oval is also glued.
After the glue has dried, it's time to decorate the brooch further. The edge is decorated with a familiar technique. This time the needle pierces the very first row of beads and exits at the leather edge. This is how a new row of frames is made.
The resulting bead is braided with new small beads. Sew on one bead after two. And then - five beads of a different color around each, as in the figure.
It turned out to be a wonderful brooch!
All products presented in a wide range in the sewing department are suitable not only for simple finishing of products, but also for the manufacture of unique accessories that can give a unique flavor to wardrobe items. In particular, you can make a brooch from beautiful satin ribbons quickly and easily with your own hands, which have long been included in the sets of fashionistas and confidently settled there.
Learning to make a beautiful do-it-yourself satin ribbon bow brooch
As a warm-up and to get a feel for the satin ribbons at work, try this simple accessory that only takes a little material and no more than five minutes.

For work you will need:
- basis for a brooch or pin;
- two ribbons of any colors with a width of 1 and 3 centimeters;
- threads in tone;
- needle;
- scissors;
- candle or lighter.
To start, cut 6 centimeters from the tape with a larger width, and 1.5 from the tape with a smaller one. Be sure to burn the ends of the ribbons so they don't fray.
Next, you need to get the bow itself. It is simply done in the following way. A wide ribbon is bent in half to determine the middle. Then it is placed face down, and the tips are tucked to the center, overlapping one another. The base of the bow is fastened with several stitches, which should run along the intended center. The thread is tightened and fixed. Keep in mind that the looser you tighten the thread, the flatter the bow will turn out.
With a narrow ribbon, focus on the center of the bow, and, thereby, mask the previous seam. Secure the ends of the ribbon with a thread at the back.
It remains only to attach the base for the brooch or a regular pin to the product - and a simple and unusual accessory is ready.
Using the method described above, you can make single-layer bows or add various elements to the accessory, thereby adding volume or the necessary color elements.
The bow can be used as an independent removable brooch or made in several copies and used as a set of jewelry. This decor looks great on clothes for children. Bows can be complemented by decorating the center with beads, rhinestones or buttons.
Brooch in kanzashi technique.First, let's figure out what "kanzashi" is. From the name it is clear that the history of this name is connected with Japan, and it means traditional women's jewelry for hairstyles.
The kanzashi technique is based on the manufacture of all kinds of objects from small fabric parts in the form of petals. Despite the fact that different shapes can be made using this technique, flowers are the main form.
Subsequently, elements made in the kanzashi style are attached to hairpins, elastic bands, hairpins, combs, headbands and other decorations. Brooches made in the style of kanzashi deserve special attention. Consider a simple master class for making the accessory shown in the photo.

Necessary materials:
- Scissors
- White satin ribbon up to 2.5 cm wide
- Pink satin ribbon 5 cm
- Brooch base or pin
- Needle and thread
- Candle or lighter
- Pink beads small
To make a stylish kanzashi flower brooch, first you need to prepare 10 squares from a wide ribbon. These will be the petals of our brooch. To prevent shedding, the cut is singeed over the fire. Next, the squares are folded diagonally to make triangles.
The thread is threaded into the needle and secured with a small knot at the end. On triangles on both sides, the cuts are combined and stitched. The seam should be even, with the same stitch sizes and distances between them, retreating from the edge of about 2 millimeters. The seam is carefully tightened to get a voluminous blank for the petal with beautiful uniform folds. Then the thread is fixed and cut off.
In exactly the same way, you need to get 10 beautiful petals from prepared satin squares.
To make the flower more voluminous, place the petals in two layers. To do this, we glue the first five elements in such a way that they form a circle, and the bases of the petals are located as tightly as possible. The remaining workpieces are glued crosswise on top.
From a white ribbon, 4 strips 11 centimeters long are prepared - this will be the base of the flower. The tape is folded in half so that the edges are aligned, but there is no central crease. The blanks are glued in pairs with a slight offset.
The base of the white ribbon is attached to the resulting flower from the wrong side, like leaves.
The brooch is almost ready, it remains only to sew on the clasp and decorate the core of the flower. To do this, glue is poured into the center and covered with beads. It is necessary to let the glue dry a little, then turn the brooch over and gently shake it to get rid of the loose beads.
Actually, a unique accessory is ready. If, instead of the basis for a brooch, you attach, for example, an elastic band, you will get a very cute decoration for a young fashionista. A kanzashi-style product can be used to decorate a room, for example, add it to a pillow, a lampshade, or make an unusual tie-back for curtains.
Video on the topic of the article
A selection of simple and useful lessons is presented below.
Ribbon flowers - yellow bouquet brooch. Master class with step by step photos
Once you dive into the world of flower making, you will then decide which flowers you most want to create. There is a technique for creating flowers from fabric. There is, however, a technique for creating flowers from ribbons. In principle, these two techniques are similar, but still slightly different. What is their difference you will learn from this master class, which the master offers you. In this master class, you are invited to make a brooch with yellow roses from satin ribbons.
What tapes and how many of them will be needed, you will learn about all this later. For now, I would like to point out from what tapes possible to create flowers. Almost all ribbons can be used to make flowers. First of all, this. They can be bought in ordinary stores, since, as a rule, the assortment of satin ribbons is huge.
They are generally very easy to work with. The second place among the materials for flower craftsmanship is occupied by silk ribbons. Silk ribbons look amazingly beautiful in colors, and not only. you all know perfectly well what is famous for its uniqueness and beauty at the same time. There are also organza ribbons. They are distinguished by their airiness and lightness.
They are a little more difficult to work with, but in the products they look amazing. Let's go back to the master class. First you need to decide what the author of the master class offers as materials for work:
Satin ribbon yellow-lemon color 5 centimeters wide.
Green satin ribbon 2.5 cm wide.
Cardboard, pencil, scissors, needle and thread.
Hot silicone glue.
Lighter.
Ribbon flowers - brooch yellow bouquet
At the very beginning of the process of creating a brooch, the master prepared a satin ribbon for work. To do this, she cut off a small piece of satin yellow ribbon.
Then I bent the tape at an angle of 90 degrees.

The master bent the edge of the ribbon and sewed it.

When bending in this way, it is necessary to stitch the edge of the tape.


In the photo, the master shows how to bend and sew the tape. First, she bent the tape 90 degrees.

Then she folded over again. And sewed along the edge of the tape.

There was some design.

The threads with which the edge of the tape was sewn were pulled off by the master.


Then she rolled up the structure tied with threads. And I sewed it on the inside with threads, pulling the bud at the same time.


In exactly the same way, the master made a rosebud. Taking a small piece of tape, she bent it, as indicated above, then sewed the edge of the tape with threads. Then she pulled the threads and formed a bud. It turned out the second flower - a rosebud.


In exactly the same way, the master created a rosebud, but already smaller than the previous and first one.


Then the master made a backing for the brooch. She cut out a circle from cardboard and soldered the cardboard between the two circles with satin ribbons.

Then the leaves were glued to the substrate using hot silicone glue. then yellow roses are glued in the same way.


Brooch - yellow bouquet is ready.
Ribbon flowers: yellow bouquet. Photo


