Fruits, vegetables, berries from beads. Scheme. Raspberry from beads. Master class with step by step photo
Master class on beadwork "Malinka-Vitaminka"
Astakhova Tatyana Nikolaevna, teacher of MDOU kindergarten No. 27 "Matryoshka", Serpukhov, Moscow regionThis master class will be interesting for teachers of additional education, educators, children from 7 years old and their parents, everyone who loves magical little beads and is ready to turn them into a great gift for themselves and their loved ones.
Dear Colleagues! I propose to weave with me a wonderful raspberry twig that will remind you of summer sunshine, berry aroma and will delight you with unique beauty all year round.
Useful properties of raspberries.
It is hardly possible to find people indifferent to raspberries. Everyone likes it because of its delicious taste and aroma. This berry is unique in its healing power. Basically, raspberries are used in the treatment of colds. Tea with raspberry jam effectively brings down the temperature, helps in the treatment of radiculitis, joint pain.
For various diseases of the kidneys, stomach and intestines, decoctions of raspberry leaves are used. The beneficial properties of raspberries are used in the treatment of high blood pressure and atherosclerosis. Women have long used raspberries to preserve the beauty, youth and health of the skin. With the help of raspberry face masks, you can achieve excellent results, since its berries, flowers and leaves contain vitamins P, B, A and E. For hair, masks and rinses with decoctions can be prepared. More often, raspberry hair masks are used for oily hair, a decoction of raspberry leaves will make dark hair color more saturated and bright. Vitamin compotes, jelly, jam, jam, jelly, marmalade, candy fillings, juices, syrups, kvass are prepared from raspberry berries. They are dried, candied and frozen. Raspberries are often used in diet food, especially for children.
Raspberry on a branch
Living vitamin.
Let's dry it out
Let him heal us in winter.
Purpose: decoration for a hat, an element for a wall panel, an interior decoration, as a gift.
Target: making raspberry sprigs from beads, familiarizing children with the origins of decorative and applied art.
Tasks:
1. To introduce the techniques of parallel volumetric and French weaving.
2. Develop fine motor skills, constructive thinking, artistic taste.
3. To form the skills of safe use of various materials (beads, wire, scissors).
4. Expand ideas about medicinal plants.
5. Cultivate perseverance, accuracy, interest in needlework.
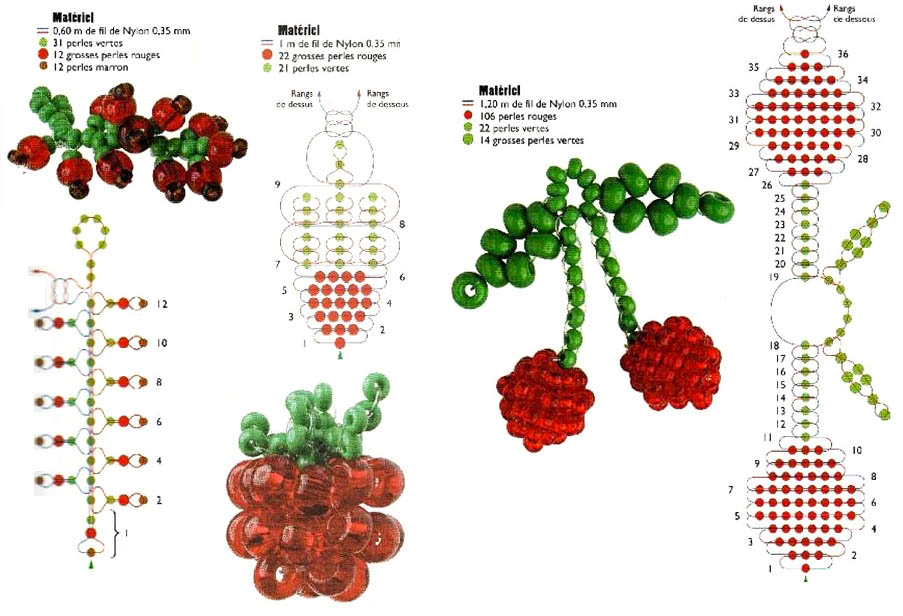
Material: wire 0.3-0.4 mm red and green; beads No. 8 raspberry shade, No. 10 rich green; threads or floral tape; wire for the base of the branch, scissors.

Work sequence:
1. Weave a berry. We measure the wire at 50 cm. We string 4 beads, place them in the middle, pass one end of the wire into 3 beads towards the other and tighten. This is the top of the berry.


2. We string 4 more beads and pull them up, placing them under the first bead.

3. Next, weave according to the scheme: 6-6-6-6-5-5, placing the rows to the right and left to make a cup.


4. Weave sepals. We cut off 30 cm of green wire, retreat from the edge of 5 cm, collect 5 beads. We move the last bead aside and pass into the penultimate bead in the opposite direction. We pull the last bead. We collect 2 more beads and go through the first, forming a loop. So weave 4 more leaves and twist the ends of the wire.


5. Connecting sepals with berries, form a twig and wrap with thread or ribbon. In order for the sepals to press well against the berry, pass the ends of the wire from the berry one row lower, and then twist.


6. leaflets we carry out the technique of French weaving.
We measure 70 cm of green wire 0.4 mm; we collect beads 2/3 of its length, tie knots at the ends. We count 26 beads, move them to the knot (this is the central axis) and make a loop under the beads (this is the stem of the leaf).


7. We move the beads from the skein and lay them parallel to the axis with 26 beads (you can not count them, just visually add one or more beads to each subsequent row). In our case, the second row will be 1 more bead, we wrap the central axis over the beads (where the knot is), placing the wire on top at an angle of 45 degrees, move more beads from the skein and return to the loop. We fix the row by wrapping it around the central axis under the beads at an angle of 90 degrees, laying the wire on top. Thus, we will have a leaf with a sharp end and round at the base.


8. Now we make cloves at the leaflet. To do this, we move the required number of beads to the base of the sheet, fix it on the previous row, counting 11 beads from above, leading the wire from bottom to top. We move the required number of beads and fix them at the base of the sheet. We do the same on the other side. In total, you need to make 3 cloves on each side of the sheet.


9. To shape the tip of the leaf, you need to untie the knot, turn the product over to the wrong side, fix the end of the wire by wrapping the central axis and shortly cut off the remaining end of the wire. Cut the loop at the base of the sheet and twist the ends of the wire.


10. Weave 2 large leaves and 4 smaller ones.

11. Connecting 3 sheets each and, wrapped with threads or tape, attach to a twig.
A beaded strawberry bush is a great way to decorate a wall shelf or kitchen table. This berry is always associated with summer and warmth. You can "grow" such a bush in just one evening. And it can also be a good option for children's crafts for school.
Beaded strawberries: master class
Before weaving strawberries from beads, you need to prepare the following materials:
- red and black beads for berries;
- green beads for leaves;
- white and yellow beads for inflorescences;
- wire;
- wire cutters.
Some use floral tape to wrap around the stems. Now consider detailed instructions on how to make strawberries from beads.
- The scheme of weaving strawberries from beads is simple, the technique is called "parallel weaving". The berry consists of five parts. The photo shows the stages of the formation of the first "petal".
- Then we begin to gradually add the second. Thus we weave the first four parts of the berry.
- Now take a small red paper ball. By placing it inside, we will give the berry volume and make its appearance more natural.
- We put it inside and begin to weave the last petal. In this case, you can collect a number of beads not by quantity, but as needed to achieve a beautiful shape.
- The first stage of the master class on weaving strawberries from beads is completed and the berry is ready.
- Now consider the scheme of weaving leaves from beads for strawberries. Everything is simple here. We string the first bead and make a loop. Then we collect the same amount on each end of the wire and connect them with the last bead.
- Thus, we form five parts of the leaflet.
- Two parts of a beaded strawberry bush are ready.
- Now we will weave an inflorescence. To work, you need to prepare beads of three colors: white, yellow and green.
- For the flower we use the technique of "French weaving". The photo shows the process of making petals. From yellow beads we form the middle.
- We will weave sepals from green beads. The manufacturing method is the same as when weaving a leaflet, we just string a smaller amount of beads.
- This is what our inflorescence looks like.
- The stem leaf consists of three parts. We will weave the first and last in the same way, and make the middle one a little higher. For the manufacture of this part of the bush, we use the familiar French technique.
- Beaded strawberries are ready! Now, if desired, you can decorate the wire with floral tape.


Many other crafts can be woven from beads: flowers,
July 17th, 2013  Elena Tsvetkova
A wonderful summer time pleases us with an abundance of colors, aromas and warm days. Time for an active lifestyle and everyday joy. Symbolic beaded crafts are capable of leaving a reminder for all seasons. They are also convenient and interesting for playing with children and decorating scrapbooks, caskets, children's jewelry and accessories ... But such a strawberry may settle on a table or shelf in a children's room.
Its characteristic feature, which distinguishes it from many other options for making strawberries from beads, is the presence of stuffing inside the berry.
We make the details of the berry using the technique of parallel weaving, and then we connect it. Do not forget to put stuffing in the process, then it will not work.
To successfully complete the composition with a berry, make one or two flowers and leaves.


Summer is the season for healthy fruits and vegetables. Recreate them in beaded miniatures. By hanging them on a chain, you will get an original bracelet or necklace, a set of earrings will come out of a pair of identical figures, and just free figures are very suitable for children's games.


Pineapple is presented in one of the diagrams above and there is another option when we weave it with “crosses” in a circle, as in the diagram below.


Do not deny yourself healthy meals in the summer. After all, it is in the summer that we store vitamins and other useful substances (it’s no secret that there is a lot of “chemistry” in the “winter” fruits and vegetables, which preserves their presentation) Prepare fresh juices, juices, vegetable cutlets - this is where the Vitek meat grinder comes in handy How to choose "your" model, read in the online store, because it is very important for each of us that the equipment is liked and meets all our needs and expectations.
CHERRY from rubber bands on a slingshot. Rubber band vegetables and fruits
April 26th, 2016 Sergey Sergey
Swimsuit Simple crochet - Crochet swimsuit - 1 part - knitting a bra. Barbie swimsuit made of rubber bands without a loom. Photo. Detailed master class - how to crochet a simple swimsuit. Swimsuit Simple crochet - Crochet swimsuit - 1 part - knitting a bra. Barbie swimsuit made of rubber bands without a loom. Clothes for barbie from elastic bands, how to weave a swimsuit from barbie elastic bands. Barbie swimsuit made of rubber bands without a loom. In order to learn how to knit well, we ...
August 12th, 2015 Anna Anna
Table of contents Description Snake from beads Owl from wire and beads Starfish from beads Crocodile weaving from beads Dragonfly from beads Horse from beads Bird from bicones Original frog from beads Dog from beads Little dragon from beads Volumetric beaded bear Spider from beads Bunny from beads Cow from beads Lizard Beadwork Conclusion Beading has become…
Beaded fruits in training workshops (diagrams and video)
Spring is here, and summer is just around the corner, which so swiftly pleases us with its warmth and bright colors. With the advent of warm bright colors, you want even more. So why not charge yourself with positive and mood right now, and our master class on making bright, cheerful beadwork will help you with this.
Beaded fruits will appeal to everyone: both adults and children.
Fruits and berries are woven from beads using the technique of volumetric parallel weaving. In creating your compositions, in addition to standard size beads, you can use large beads.
Finished products can also be used as jewelry, complementing them with earrings or a chain to wear as a pendant. They will be great accessories for your mobile phone and just a stylish little thing.
We suggest you make some summer products. So, according to convenient weaving patterns and video lessons, you can choose a lot of options for compositions of fruits and berries from beads, but these two examples are the most original and especially summer ones.
In our master class, we will tell you how to make currants from beads, strawberries or wild strawberries. For clarity, use our lesson, with which you will make fruit from beads. Available weaving patterns with interesting workshops with photo and video examples will help you make juicy fruits. 


Master class on weaving currants from beads
Currants can be made in two versions: red and black. 
Red currant beaded 
So to make such a beaded berry you will need:
- beads: red, brown, green, dark;
- large beads: red and green;
- small beads: pink and white.
- pin
- Well, and of course a thread and a needle.
According to the currant beading scheme (Fig. 1. 2), you need to start by fixing the needle at the end of the auxiliary bead. Add a large green bead, which you attach to the eye of the pin and guide the needle through the bead.
Then, also following the scheme, dial 7 green beads and one red and one dark. Move the beads to the pin. Thread the needle in the opposite direction: starting from a large bead and going into three green beads. In the same way, add five red beads and one pink. Then take 7 more green beads, a pink bead and dark beads, thread the needle again in the opposite direction (from the bead to the green bead). So you have already formed the central branch of the currant. Repeat the pattern a few more times and cut the thread.
Black currant 
In order to make a dark berry, take:
- just like for red, green beads;
- large green beads in the form of a leaf;
- several large dark beads.
Similarly, as for the first option, we fix the bead at the end of the thread, then add a bead in the form of a leaf and thread it in the opposite direction (through the leaf to the bead). We press the product to the pin.
Further, the beading scheme is completely repeated, as for the red berry, only with changes for the color scheme. Complete the composition with a set of 11 green beads, a small bead that you pass through a dark-colored bead. At the end, place a leaf-shaped bead - this is the center of the composition.
Beaded currant is ready.
In addition to currants, other berries will also look spectacular, such as cherries, raspberries, strawberries.
Do-it-yourself strawberries from beads
The material for creating this berry will be:
- beads of red, black, white, yellow and green;
- long beads (cutting) of green color;
- any material to create a voluminous berry;
- wire.
This weaving pattern is very simple and perfect for beginner craftswomen.
So, let's start the master class. Beaded strawberry consists of four red rhombuses, which are woven in a parallel weaving technique, sometimes black beads can be woven in random order. When all the rhombuses are ready, connect them together with wire.
In order for the berry to be voluminous, at the end of weaving we fill it with material. 
Guided by your imagination and idea of the finished look of your model, you can independently change its size (reduce or increase the size of the fragments). And also add flowers and leaves.
Making a flower is very simple, all you need to do is twist the loops on which you string white beads. Also make leaves and a cup for a flower from a green cabin. 
Bright red strawberry from beads is ready.
Handmade works are always a pleasure to give, and the process itself is unusually exciting.
Get even more ideas for inspiration from the videos that skillful craftsmen are happy to offer you, and also study beaded fruits, the weaving patterns of which are presented in our article.
On this master class of beading berries from beads is over, good luck in your endeavors and enjoy your work!
Patterns of weaving fruits and berries from beads


Video: Weave strawberries from beads
Comments
related posts:
 Lilies of the valley from beads and beads in training workshops (video)
 DIY beaded dragonfly in master classes (diagrams)


