Nail Gel: Proper Use and Reviews. How to apply gel polish at home
A large number of women use the services of a nail care master. Buy gel polish for nails, how to use this tool at home, the rules for applying and drying, you will learn in this article. In fact, you can do nails at home, the main thing is to want and acquire the necessary tools.
Auxiliary tools
Thanks to auxiliary elements, such as stickers and stencils, you can achieve amazing results. The disadvantage of homework was the instant destruction of the coating. But with the developed flexible gel - shellac, everything fell into place. In addition to covering the nail plate with gel polish at home, you can make extensions.
Shellac is very resistant and therefore remains on the nails for two weeks or more. You can apply it at home. The main thing is that the gel polish sits very well on the nails, conveys all the saturation of the color and gives a bright shine. It has a lot of advantages, the main thing is to apply this material correctly. 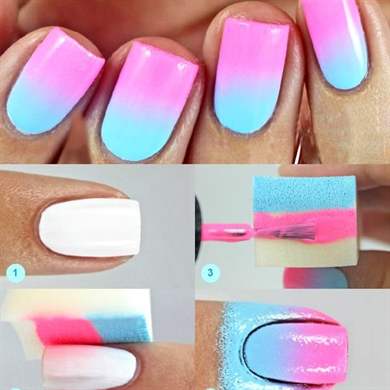


Necessary components for gel polish
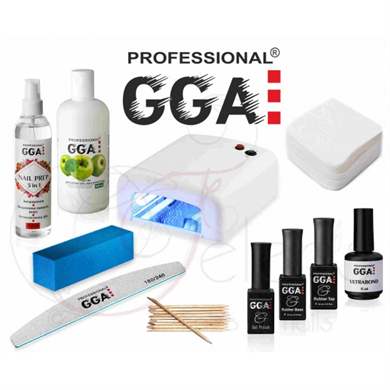
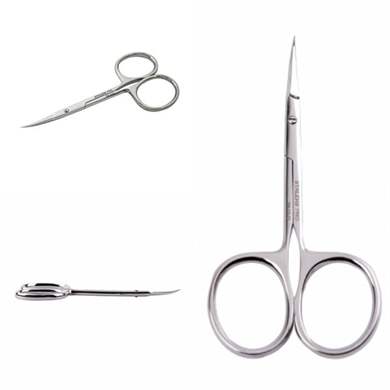
First you need to buy a base, gel polish itself, a top for fixing, a degreaser, an ultraviolet lamp, cuticle softener oil, the necessary wooden sticks, tweezers for trimming excess skin and cuticles. 

Step by step process

- Now you can move on to applying the base. Its layer must be very thin. In order for the nails to be worn for a long time, it is necessary to spread the gel over the entire area, and seal the cut of the nail with each application of a new layer. After application, place your hand in the lamp and dry for several minutes. The drying time depends on the power of the lamp, so you need to pay attention to this.
- To make nails well at home, you need a 36 free lamp. Although a layer of gel polish can dry in lamps with less power. But it is worth considering that powerful ultraviolet lamps make gel polish stronger and more durable. It can be purchased in regular and online stores. If you want to save money, you can find material much cheaper than on the shelves in cosmetics stores. To do this, you need to travel on the Internet.
- The next operation will be the application of the main shellac. Each layer must be applied very thinly and carefully to prevent gel polish from getting on the skin. If suddenly this happened, an orange stick will come to the aid of a beginner. Having corrected all the mistakes, you need to send the nails to the lamp, and wait until the layer dries.
Then we apply another layer, it can be made a little thicker, the main thing is not to overdo it. For safety, keep it under the lamp longer, about five minutes. - Now the nails are ready for the last fixing layer, after which the color will give a bright and beautiful shine, you can fix it several times, but within reason. Such layers should be dried for 3-4 minutes.
- After that, the case comes to an end, which is accompanied by the removal of the sticky layer using alcohol, degreaser or acetone. Don't forget to apply cuticle oil and rub. It will soften them and give a calming effect.
- If there are places where the gel polish is numb, usually this happens on the sides of the nail plate, yours must be removed immediately. This procedure is necessary to avoid premature detachment of the gel polish.
Removing shellac at home
To do this, you need: foil, cotton wool or its analogues, and a special gel polish remover.
First you need to dip a cotton swab into the product and put it on the nail plate and immediately wrap your finger in foil. Thanks to the foil, the agent does not evaporate and has a good effect on the material. After holding them like this for twenty minutes, you can begin to remove the remaining particles using a special wand. If it was not possible to remove the entire procedure at once, it is worth repeating, small pieces can be removed with a polishing file. 


Beautiful design options
A win-win option in this difficult choice will be the classic French manicure, which has been popular for many years. Also, the best idea would be a beautiful nail decoration with a variety of patterns, rhinestones and other interesting things. To understand how a moon manicure is done, every main thing will be able to perfectly apply their skills in practice. 


Today, making a beautiful manicure at home is not difficult even for a beginner. There are a lot of auxiliary tools for this, for example, such as stickers, stencils, etc. However, until recently, home manicure had one significant drawback - it was very short-lived. Everything changed with the advent of shellac (gel polish in a different way). It's a cross between regular nail polish and gel. The main advantage of shellac is that it lasts more than 2 weeks. At the same time, it can be used even at home. In addition, gel polish manicure has a very beautiful rich glossy shade.
So, the benefits of gel polish are obvious. It remains only to find out how to apply it at home what is needed for this, and how to remove it later .
What is necessary:
- base coat,
- Color gel polish,
- Top coat (fixer or top),
- degreaser,
- Ultraviolet lamp,
- Cuticle oil,
- saw blades,
- cuticle remover,
- Orange stick.
Progress
Step 1. Put your nails in order: give the desired shape, clean them, remove the cuticle. Next, polish the nail plate with a buff file. This is necessary for better adhesion of the coating to the nail. Pay special attention to the edges and base of the nail.
 Sand the nail plates with a buff file
 After that, wipe the nails with a cloth moistened with a degreaser beforehand. By the way, if this is not the case, then you can use alcohol or nail polish remover.

Step 2. Now start applying the base coat. Apply it in the thinnest possible layer. Paint the plate well from the outside and inside, this is necessary in order for the manicure to last longer. Then place your nails under an ultraviolet lamp for 1-2 minutes (if the lamp power is less than 36 W, then you need to dry longer).

When creating a manicure with gel polish at home, it is recommended to use a 36 W UV lamp. However, this coating can dry out even in less powerful lamps. (For example, I used a 3 W lamp, the coating is also fixed, however, I increased the polymerization time.)
 UV lamp for drying manicure gel polish 3 W
 A little later, I bought a 36W lamp, the difference is very noticeable. Drying time has been reduced, and the coating itself is much stronger. I ordered a 36 W lamp on Aliexpress for 750 rubles. Oddly enough, the old 3 W lamp was more expensive - 900 rubles, but it was bought in a Russian online store, like all other manicure products from this article. (shop - nailtishop). Last time I also order gel polishes on Ali, it also comes out much cheaper (within 70 - 100 rubles per bottle) and the quality isn't any worse. For comparison, the varnishes presented here were bought for 260 - 280 rubles (now they have become a little cheaper). On Ali, you can order files and orange sticks. To compare prices below, I published a screen with my order in Nailshop. I repeat, now varnishes in the Nailshop have become cheaper. For the sake of interest, go to Ali, compare prices.
 My order of tools and products for manicure with gel polish
  A 36 W lamp with a timer, ordered on Ali for 750 rubles.
Step 3. The next step is to apply colored gel polish. The first layer of shellac should be thin. It should be applied very carefully, without touching the skin. If the varnish gets on the skin, remove it with an orange stick. It is not necessary to paint over the inside of the nail with colored varnish. Then place your hand under a 36 W lamp for 4-5 minutes.

Step 4. Next, apply a second color layer. It may be slightly thicker than the first. The second layer will make the color more saturated and vibrant. After applying it, also polymerize the manicure under ultraviolet light for 5 minutes.

Step 5. Now cover your nails with a fixer. It is thanks to this top product that the nail polish lasts a long time and firmly + it will acquire a beautiful glossy shade. Carefully paint over the nail plate with it, “sealing” the manicure from the inside of the nail. It is advisable to apply two layers of top, drying each of them in a lamp, in which case the manicure will last a very long time. Dry each layer of top under the lamp for 2-3 minutes.


Step 6. The final step is to remove the sticky layer from the nails with a degreaser. If not, you can use alcohol or nail polish remover.
Step 7. As a final touch, pamper your fingers with cuticle oil. Apply it to the skin at the base of the nail and rub it in.

To make the gel manicure last longer, remove the excess gel polish protruding from the sides of the nail with a regular metal nail file.

How to remove gel polish at home
To remove shellac, you will need the following:

Separate the cotton pads into two halves, fold each of them in half and cut. Apply liquid to the resulting triangles, attach the discs to the nails and wrap tightly with foil. The foil is necessary so that the solution does not evaporate.

After about a quarter of an hour, remove all this uniform and remove the remnants of the gel polish with an orange stick.

If the coating does not come off well, repeat the procedure with the foil again. Minor residues of shellac can be removed with a polishing file.
Gel polish: design (manicure options with shellac)
We have studied the technology of applying and removing shellac J Now let's look at design options from gel polish. So, for example, the easiest option is to decorate your nails with rhinestones or stickers. A more intricate manicure will turn out if you supply it with, or.

 Manicure with water stickers (how to glue -)
  Gel polish without decor - a universal option and color
 Do not forget about the drawings. So, traditional or will look very advantageous. And you can try to draw flowers, hearts and other patterns on your nails.
I did some googling, and here are some interesting photos of the shellac design that I found:


Technologies of the nail industry have stepped far forward and today you can easily change not only the length, but also the shape of the nails.
For this, manicure masters use modeling gel for nail extension. It is used in the second phase of the extension procedure, when the nail is given shape and aesthetic appearance.
With its help, it is possible to realize the dream of many women about a beautiful and long manicure, which will please its mistress for at least three weeks.
Then a correction will be required, since with the growth of the nail plate, the gel itself grows.
Features of modeling compositions and their properties:
- elasticity and strength,
- ability to self-level,
- different shades - from transparent to pearly,
- the possibility of choosing different degrees of viscosity,
- easy to use
- safe
- resistant to external influences.
Modeling gel for nails - what is it and how to use it?
Means are represented by single-phase and three-phase compositions. Three-phase - this is a modeling, base and finish gel.
- Base gels are used at the first stage of creating an artificial nail for a strong bond with a natural plate. It has a liquid consistency, so it can be applied in a thin layer. The color of the product is soft pink, as close to natural as possible. No smell, dries quickly under the lamp.
- Modeling gel is used in the second stage, when the nails acquire the desired shape and length. The consistency of the product is thick or medium viscosity. You can also choose different shades - from transparent to pale pink.
- The finishing gel finishes the procedure, which fixes the previous layers, creates reliable protection against scratches and chips.
As for single-phase gels, they replace three-phase ones, as a result, the nails are thinner and more natural.
Modeling tools are equally good for building on both tips and forms.
RELATED VIDEO
First, let's figure out how the extension to the forms takes place.
You will need to treat the cuticle area and remove the pterygium, we process the nails with a 240 grit file. Degrease the surface of the nail plates and glue the forms. Cover nails with primer.
- Let's start building up - you need to create a foundation. To do this, we take the base gel - we apply it on the nail (not very thick) and on the forms, creating the outlines of the future nail. Dry for a couple of minutes in a UV lamp. Since the basis is set, we remove the paper forms. Some systems involve applying the base only to the natural nail (very thin layer), in which case the forms are not removed accordingly.
- We apply the modeling gel to the entire length of the nail, from the lunula to the free edge, with pulling movements. Dry for two minutes. Now you can start filing and grinding, bringing the nails to the ideal shape. We pass over the nails with a napkin with a clinser.
- We cover the nails with a finishing gel and dry. If you are going to paint your nails with gel polish, no finish is required.
VIDEO DESCRIPTION
If the extension is performed on tips, the work of the master begins with the preparation of the nail plate.
- Nails are filed, degreased, the most suitable tips are selected (preferably transparent).
- Glue, saw down, give the desired shape. We apply a primer on the natural part of the nail and an adhesion agent on the artificial part.
- Then you can start applying the base product - it is applied with a brush over the entire length of the nail, dried in a UV lamp.
- The next stage is the application of a modeling gel, it is applied with stretching semicircular movements from the cuticle to the free edge. Dry in a lamp.
- Second layer. To create a beautiful curve, the gel coating is started in the second zone - the agent is applied not from the cuticle, but with an indent of 3-4 mm and fixed under the lamp.
- For convenience, so that the gel does not spread and does not lose the desired shape, first work with all fingers, except for the thumbs (one hand is dried with the second work), then the gel is applied separately to them.
- Now it's time to trim the nails and file down all the bumps, buff the surface of the nails.
- The procedure is completed by applying a transparent gel to fix the result. After that, the master can apply ordinary varnish, decorate with rhinestones, and apply a drawing.
Colored gels are quite popular, which open up wide opportunities for creativity and the creation of an original design.
With their help, a French manicure is performed, both classic in white and in any other.
Translucent and dense compositions replace conventional varnishes, but at the same time they do not lose their luster and do not chip off for a long time.
Someone even chooses a black gel, which gives a rich shade, can be used both independently and combined with other colors. The options for implementing design ideas are endless.
It is no coincidence that competitions are regularly held among nail extension masters, where they compete in the mastery of modern technologies in the nail industry.
Brands of modeling gels
There are many manufacturers of modeling tools. One of them is the British brand Infinity.
Factory of modeling nail gels from Infiniti located in the USA.
The products have an amazing transparency, which allows them to be used for aquarium designs and create the effect of crystal nails.
The weighting agents included in the composition significantly reduce the amount of dust during sawing. They do not contain methacrylic acid, therefore they are completely safe for health.
Another popular remedy is Pro Tec Single Phase Gel.
It has a texture of medium viscosity, it lays down well in two layers. It is available in six tones, which allows you to choose the optimal shade for a specific skin type. Well removes defects and lengthens the nail plate.
 Modeling nail gel Bio Gel
 - IBD Builder Gel Natural is a popular tool for creating an elegant manicure. Does not harm the nail plate, provides a beautiful shine, protects against cracking.
- Irisk Smoothing Natural is a self-levelling gel that is affordable and comes in a variety of finishes.
- CNI Strong is a high viscosity product with a hypoallergenic formula that is safe for sensitive skin.
- EzFlow Edge it - translucent gels that strengthen the nail plate and protect it from brittleness.
- LadyVictoryAG-03 - well combined with other gel products, has a dense texture, self-levels, has no unpleasant odor. This is the best choice for french manicure. At the same time, its cost is more than democratic - an average of 260 rubles.
- OPI Axxium Sculpture Gel Clear is easy to use, allows you to create flexible and durable artificial nails. Suitable for French manicure.
Today buy modeling gel for nails won't be difficult.
It is presented in all specialized stores. The master only needs to make the right choice based on his quality requirements and financial capabilities.
A convenient, inexpensive and high-quality tool is Giorgio Capachini modeling nail gel. It is single-phase with an average degree of viscosity.
Perfect transparency ensures a beautiful result. It polymerizes in a lamp in two minutes.
The formula does not include acids, so the gel is safe for health. It is used for heavy-duty building, including for a pedicure.
Today, gel polish is becoming more and more popular, leaving behind it in the past. It perfectly replaces regular polish, but lasts much longer without losing color. With care, you can go from up to 3 weeks.
Irreplaceable thing
Gel polish is a special substance with different colored pigments, mainly used for the top coat of the nail. It must be polymerized in a UV lamp for about 2 minutes. If you apply the product in only one layer, then you will get a translucent color, and if in two - dense and saturated. The main thing is to know how to use gel polish, then it will not be difficult for you to quickly get a beautiful, neat manicure. Unlike its predecessors, this coating does not need to be mechanically cut off, it dissolves easily in a special liquid. To do this, you need to use an agent with acetone or a remover. Now you can look at any women's magazine for gel polish manicure ideas, they are impressive in variety and allow you to choose the most suitable option for your image and outfit.
Correct application
Improper preparation of nails or application of the material will affect the period during which the manicure will look beautiful. Technology is very important, so you need to know the basics of working with it.
First you need to carefully prepare the nails for the procedure, clean them with a preparer, degreaser and dehydrator for these needs.
To keep the coating for a long time and not crack, it is important to remove the greasy layer from the nails. A primer will help with this, but if it is not applied, then the varnish may crack. Such modern products do not contain alkali, which is why the natural nail does not suffer. Do not touch the already processed plate with your fingers. An obligatory step is the application of gel polish, only the base one, which will protect the nails from various coloring pigments and help to fasten the color layer to the nail plate.

Perfect coverage
When you work with gel polishes, it is necessary to apply all the components in smooth movements from top to bottom, this helps to obtain a perfectly smooth surface. The thinnest layer should be applied to the base product. Moisten a brush with it quite a bit and apply it on the nail plate, as if rubbing it into it. The main thing is to paint over the nail and its tip completely to avoid the problem of lifting the coating. If the end of the nail is poorly painted over, you can get a chipping of the colored layer in the future. Next, you need a special lamp for gel polish, send the nails into it for 2 minutes for polymerization.

Bright varnish
A manicure using colored gel polishes is slightly different, for example, bright shades must be applied in at least two layers.
How to use gel polish so that the manicure is flawless? It can be difficult to apply the first layer of dark varnish and completely paint over the nail, but the next layer of coating will cover all imperfections and even out the surface.
Manicurists advise applying 3 thin layers of material and do not forget to paint over the end of the nail. And again you need to send the nails into the lamp for 2 minutes
French manicure
To get a perfect French manicure without yellow spots, you need to keep your hands in the lamp for 1.5 minutes. For a snow-white “smile” line on the nails with a jacket, you can apply a white layer several times.
In the last stages, you need to take a fixing varnish and apply it to the nail, the layer should be slightly thicker than the color one. After the nail is covered with this varnish, it is necessary to send it back to polymerization in the lamp for 2 minutes. If the fixing agent is not completely dry, the nails will lose their shine. Take a special product without acetone and remove the sticky top layer, after which you will get nails with a beautiful glossy sheen.

Removal of gel polish
For those who do a manicure in a beauty salon, it is better to remove the varnish from your specialist or ask him for the name of the company of the product that was used in the manicure, then purchase a special remover.
How to use gel polish, in general terms, is clear. And how to learn to remove it very carefully? Let's try to figure it out. The advantage of carrying out this procedure at home is clear to everyone - you do not need to go anywhere and wait in line for your master.
For this procedure, you will need nail polish remover, but it must contain acetone. Also prepare cotton wool, plain foil, a nail file and a grinder.
Removal of gel polish is carried out in stages: first, soak a small piece of cotton wool in a liquid with acetone and apply to the nail plate. Then you need to wrap the top with foil and hold for about 15 minutes. Remove the foil from each finger in turn, removing the remaining gel polish on the nail with an orange stick. Remember: if the varnish does not come off the nail well, do not rush to pick it off, just wrap it in a piece of foil for a while. After the procedure for removing the coating, the nail may be rough, carefully polish it with a soft grinder. Then do a manicure, giving your nails your favorite shape and length.

Pros and cons of manicure with gel polish
Gel polish has its pros and cons. If we talk about the merits, then first of all these are perfectly even nails and the ease of the process of applying it. Such a coating dries quickly in a special lamp, and the nails look much more natural than extended ones. But the biggest plus is that it lasts for a long time, from one to three weeks. A well-studied gel nail polish technology will bring you some advantages.
The disadvantages include the high cost of the procedure for applying varnish from a specialist. It takes about 20 minutes to completely remove it.
There are also several contraindications to applying gel polish - an allergic reaction to the components of the product and weakened own nails. Sometimes it's worth letting your nails rest from gel polish. In addition, experts recommend removing it after two weeks, and not stubbornly maintaining such a manicure for a long time.
Proper storage
It is very important to store products properly. If you do not follow the rules, then the product can quickly thicken, and you will not be able to use gel polish in the future. To begin with, never put it near the included UV lamp and do not leave the bottle in direct sunlight (this is the same ultraviolet). After applying the gel polish to all nails, wipe the neck of the vial with a napkin, remove the remnants of the varnish and close the bottle tightly enough.

gel polish manicure ideas
A beautiful manicure depends on how to use gel polish and what color to choose. The most popular manicure is the nail polish. The palette of colors is so multifaceted that the tool can be matched to any outfit.
Gradient looks elegant where several colors, usually two or three, merge together. The implementation of this manicure is quite simple, but what an effect!
But the undisputed leader is the classic French manicure. And if you decorate the tip of the nail with colored varnish and add a little sparkle, you can go to any holiday. Experts advise French lovers to try to make it, which also looks quite elegant on the nails.
Nails are an important part of any girl's appearance. They show whether the lady takes care of herself, whether she is neat, what sense of style she has. Now getting a manicure is not a problem: there are salons on almost every corner. You can buy a manicure kit or, in extreme cases, make it yourself.
Any woman will find a design to her liking. Someone loves classic French manicure, someone prefers nails in pastel colors, someone, on the contrary, stands up for the brightness and saturation of colors.
Coating products
Before choosing a manicure design, it is important to decide on the tool that will be used for coloring. There are several of them.
varnish
This is a standard product that is sold in every cosmetic department. The price of varnish varies depending on the volume of the bottle and the manufacturer, but, in principle, you can buy it for 50 rubles. It does not last long: from three to five days. There are a huge number of varnishes on showcases: ordinary, healing, matte, magnetic, with additions in the form of shimmer and sparkles.
gel polish
This tool is the middle between standard varnish and extension gel. Hence the name came from. Gel polish was created to provide long-lasting coverage and a rich palette of colors. Outwardly, it is no different from ordinary varnish, but in fact, in order for the product to harden, you need to hold your hands for two to three minutes under a special ultraviolet lamp. The coating lasts about two or even three weeks. But gel polish also has disadvantages: the complexity of application and the cost of equipment.
Shellac
Externally, shellac is similar to ordinary varnish, but in order to create a manicure, you need to use several tools. One for the base, one for the degreaser, one for the color, and one for the top coat. Another difficulty is that each layer of shellac must be dried under the same ultraviolet lamp.
Colored nails: gel polish
Initially, the gel was created to strengthen and lengthen nails. Then it was completely transparent. Technologies are moving forward, and now there is a color. The product lasts for three weeks, is protected from peeling, environmentally friendly, does not cause allergies. It is currently the most popular nail polish. Let's talk about it in more detail.

Usage
So, you have purchased a colored gel for nails. How to use it? The answer to this question will please every girl with its simplicity. Coating nails with colored gel is carried out as painting with ordinary varnish.
Please note that the gel should be evenly distributed over the entire nail plate. It is better to apply it in a thin layer, in order to avoid unevenness, clearance, swelling and the appearance of air bubbles. Therefore, the question of how to apply colored gel on nails should no longer be intimidating.
Some girls compare the use of gel with extensions. In fact, they have something in common only in the result, and the application technique is completely different.

Cons of colored gels
Any tool, even the most wonderful and popular, has its drawbacks. This vice has not bypassed gels for nails. The main disadvantage is the weakening of the nail plate. This happens due to the fact that the tool is applied in too much quantity, which makes the nail less strong. Some women have to treat their nails for a long time after gel extensions. In addition, they may begin to break off and flake off.
How to apply
Before applying, treat the skin around the nails. You need to rub special oils into the cuticle to soften and moisturize it. After that, degrease the skin with a cleaner. Give your nails the desired shape by pushing back the cuticles with a nail file.
Color gel for nails should be applied using a special technique. This technique depends on the chosen color.
Dark tones are best applied in three very thin coats. It is important to ensure that each of the layers is absolutely even - otherwise, the so-called waves will appear on the nails, and the gel itself will not last long.
The number of layers required for application is usually indicated in the packaging instructions. The color gel for nail design needs to be dried for two minutes under an ultraviolet manicure lamp. The finishing agent is also dried under the lamp. But instead of it, you can use the usual transparent varnish. No technique is needed here - you just need to wait until the varnish dries on its own.

How to delete
In order to remove the coating, you do not need to saw off the entire length. The composition of the gels includes chemicals that allow you to remove it with the help of cosmetics. Acetone will do. They need to lubricate the cotton pad, attach it to the nail, and after the nail has been soaked with liquid, seal it in foil and wait about ten minutes. After that, it will become noticeable that the colored nail gel has split into many parts and each of them can be carefully removed.
This procedure is carried out if you urgently need to change the color of the coating, and then apply a new varnish.

Color gels
There are many companies that include colored nail gel in their range. Let's consider some of them.
Color gels for nail extension from OPI.
Judging by the reviews, they last at least two weeks, have a rich color palette in which every girl will find a shade to her taste. A small life hack: get a regular varnish that matches the color of the gel that you are going to use, and tint the places of an already grown nail with it. Thus, the life of the manicure is extended. And if the shade is pastel (milky, sand, lavender, pale pink), then the border between the coating and the new length is not at all striking.

COCO Color Gel is another color gel popular among ladies.
In the reviews, the girls report that the smell of the product is almost not felt. The consistency is excellent: not liquid, but not too thick, not runny. The instructions say that the gel should be kept under an ultraviolet lamp for only a minute.
It is very convenient that on top, on a jar, a strip is drawn showing the color of the product itself. A useful feature that saves a lot of time when searching for the right shade. The color palette of COCO Color Gel is truly rich: there are dark, heavy shades, light and summer, as well as pastels.
The girls report that the gel is applied easily, lasts for three weeks, and does not chip. As a little trick, you can mix colors to create interesting, unique shades. The gel is also suitable for a jacket - the white color does not look artificial, but on the contrary, it is close to the natural shade of the nail.


