How to make a homemade postcard for the new year. New Year's cards with your own hands. Ideas for New Year's cards
Even ten or fifteen years ago, almost all of us bought postcards to congratulate our relatives and friends on the holidays. Today, we are less and less likely to treat this as something significant and valuable: it is easier to call distant relatives, and give a gift to relatives without “loading” with extra waste paper.
However, postcards made with children can become not just a greeting card, but also a holiday decoration for your loved ones. They can be hung on a Christmas tree, put on a shelf along with other New Year's accessories. Here are some easy DIY postcard ideas.
Christmas tree made of threads
You will need:
Knitting;
hot glue;
pasta in the form of letters;
colored paper;
can of artificial snow.
Make the base of the postcard out of cardboard according to your desire (you can double or single, large or small). Cut out a triangle from another sheet of cardboard - this is the future tree, it should be slightly smaller than a postcard.
Take a triangle and wind the threads around it in any shape so as to hide the cardboard base of the Christmas tree. Threads can be plain (preferably green), or multi-colored.
Glue the finished Christmas tree with hot glue to the base of the postcard. Make sure the threads are not unraveling. Glue beads on top - decorations. Spray with artificial snow.
From pasta or other letters, fold the inscription of your congratulations. You can paint the letters in bright colors.
Serpentine can be cut out of self-adhesive or plain colored paper using a hole punch.

Application "Snowman"
A regular applique will be interesting if it is made from different materials. We took felt and shiny self-adhesive paper. You can use other materials: foil, velvet and corrugated paper, pieces of fabric of different textures.
Otherwise, this craft does not differ from the usual application: plot details are cut out and pasted. Here it is better to use PVA glue.

Postcard "Mittens"
You will need:
Knitting;
PVA glue;
sequins, confetti or colored paper;
gel pen.
On the cardboard - the basis of the postcard - draw the outlines of the mittens with a simple pencil. Then generously shade this pattern with PVA glue. It is desirable that the jar of glue has a sharp nose, then you can more accurately “draw” it.
Cut 15-25 pieces of about 5 cm from the thread. Connect them in a bundle so that the ends are at the same level. Then start finely crumbling them with scissors right above the “mittens” filled with glue. Thus, you need to cover the entire surface smeared with glue. Correct the drawing with a sharp object - a toothpick, etc. Let the mittens dry and shake off excess lint. Make sure there are no bald spots - places where the cardboard shows through.
Draw a rope on the mittens with a gel pen and write your congratulations.
Stick on sequins, confetti or colored paper details.
Outline the card with PVA glue along the contour and glue a knitting thread of a different color (or the color of mittens) onto it.
In this way, you can make “knitted” patterns not only of mittens, but also of other items: socks, hats, scarves, as well as decorate postcards, turning the details on them into fur, giving fluffiness to animals, snow, etc.

Postcard from beads
You will need:
PVA glue;
beads or beads;
green felt.
Draw two circles of different sizes on cardboard - these are future Christmas decorations. Shade them liberally with PVA glue. Gently pour in beads or beads so that the circles keep their shape and there are no empty spaces left in them.
Cut out a spruce branch from green felt and glue it on top.
Make Christmas balls "pendants" in the form of a string of beads.

Christmas tree from magazine sheets
A Christmas tree made from the multi-colored pages of a magazine will look original if you stick it on colored cardboard (we took velvet paper). Just cut magazine sheets of different widths and twist them into tubes, securing with PVA glue.
When the tree is glued, place a star or other decoration on top. You can also stick beads on the Christmas tree itself.

Tree of tangerines
Prepare tangerines in advance by cutting them into circles and drying them on a battery or in another way. This craft will be a good decoration for the kitchen.
You will need:
tangerines in circles;
hot glue or PVA;
flax seeds, sesame seeds, coriander;
sugar or gelatin.
Glue mugs of dry tangerines in the middle of the cardboard, creating a triangle.
Then, with PVA glue, outline them along the contour and draw the trunk. Sprinkle these places with coriander and flaxseed.
Sprinkle sesame seeds on top of tangerines. This can be done without glue. If the circles are very dry and the sesame seeds are not sticking to them, run a wet finger over them, then decorate with seeds and let dry.
Draw snowflakes around the Christmas tree with PVA glue and sprinkle them with either sugar (they will be white) or gelatin (they will be tinted).
On such a postcard, you can make a loop on top so that it can be hung in the kitchen.

Christmas tree made of pasta
You will need:
pasta of any shape;
hot glue;
colored paper;
golden paint.
Cut out a Christmas tree from cardboard. Glue pasta in the middle and cover them with gold paint. Then glue the beads on top of the pasta.
Decorate the ends of the branches with sequins. Make a star out of colored paper.
This postcard can also be hung on a Christmas tree, so a loop at the top would be useful.

Volumetric Christmas tree
You will need:
velvet paper or colored cardboard;
sequins, confetti, colored paper;
Fold the card base in half.
Fold the velvet paper or colored cardboard in half and cut out the Christmas tree.
Stick sequins, confetti or colored paper appliqués on the Christmas tree.
Glue the Christmas tree by the ends of the branches in the middle of the card so that it becomes voluminous when opened.

Bouquet with holly
As you know, the holly is a symbol of Christmas, so it, like the spruce, can be used in holiday decorations.
You will need:
green paper;
hot glue;
velvet paper;
toothpicks;
Take 30 toothpicks, connecting their ends with a "fan". Liberally grease with hot glue the place on the velvet paper where you will attach the bouquet. Quickly, before the glue has hardened, stick the “fan”, if necessary, grease with glue not only the base, but also on top of the toothpicks in the place where they are attached. It is important that all toothpicks hold firmly.
Then put glue on the hole in the bead and put it on a toothpick, creating a bouquet to your taste.
From green paper, cut out two holly leaves and stick them at the base of the bouquet so that all the glue is hidden. From paper of a different color, cut a bow and glue it to the holly.
If desired, you can make toothpicks of different lengths and then the bouquet will be more magnificent, because. the beads in it will be at different levels.

Postcard in the style of "quilling"
You will need:
colored paper;
PVA glue;
pasta letters.
Cut 4 long strips from green paper and twist their ends with a tube: bend one in one direction, the other in the other. Make several strips from colored paper, twist them also with a tube and glue the ends to make balls.
Lubricate the cardboard with PVA glue in the places where your ornament will be, and glue the twisted strips, creating a pattern.
Decorate the card with glittery paper snowflakes. Cut a ribbon out of red paper and stick it on the bottom. Glue your congratulations from pasta letters to a red ribbon.
Good afternoon, dear subscribers!
I continue to surprise you and today I want to provide a beautiful selection of New Year's cards that you can make with your own hands together with children. All it takes is desire and a little patience. Moreover, boys and girls will be delighted with such activities.
Any congratulations can be decorated with any New Year's decor, such as a Christmas tree or, as well as various winter characters, such as a Snowman, Snow Maiden, etc. It is also necessary to write on the back of any suitable one or stick it. Do not forget also about what you need to do for the New Year, as well as decorate your apartment with decorations.
Create a holiday atmosphere and present it to your friends and family. All you need is a good mood and a little patience and inspiration. You will get ideas in this article, especially since many postcards will be shown with master classes, so don't worry, you will get wonderful souvenirs.
By the way, such works can be brought to an exhibition or competition and take a prize. So, do it in good health and in large quantities. Well, let's get to work. Let's go, friends! Hold on, the selection will be hot).
By the way, if you have your own developments on this topic, then write your thoughts at the bottom under this note. I am happy to read and perhaps in future releases, I will create something like this and put it on the blog.
So, let's get started and I want to immediately present you a new masterpiece that struck me from the first minute. I never thought that such a great postcard can be easily and quickly made by yourself. Many thanks to the author, well, it turns out very nice and moreover, you can decorate it differently each time, the main thing is to use the winter theme. You will soon understand everything along the way.

You can do this work together with a child of any age category, make a blank or whatever you call it the base, and let all the heroes and objects be painted with your miracle and then glued. So, let's get down to business.

We will need:
- A4 paper or landscape sheet
- scrap paper, you can use color
- glue stick
- colored markers or pencils
- scissors
- ruler
Stages:
1. Take a white sheet of paper and on the right side make marks with a ruler from the edge in the amount of 2 cm. Draw a line as shown in the figure below. Then move the ruler to the left and make a mark of 11 cm.

2. So walk in several places so that it is convenient to draw a line after.

3. This is how the markup turned out, don't worry, soon everything will become clear what and why.

4. Trim the edge 2 cm wide with scissors.

5. And then cut along another long line so that two identical strips are obtained from one sheet.

6. Now divide one of the strips in half and bend, then from the resulting half, draw another fold in half.


8. Where there were vertical lines, fold.

9. It turned out not that similar to an accordion.

10. Now let's decorate. From scrap paper, cut out geometric shapes slightly smaller than the main blank.
If you do not have it available, then you can use the usual color instead.

Or you can take options from the Internet, for example, take these and print them out.


11. Glue carefully the scrap paper sheets and remove excess glue with a napkin, if any.

12. Now the strip that is already glued to the wide one, but moreover, this must be done in a special way.

13. So that the middle is not glued, it is in it that fairy-tale characters will be located.

14. I suggest you draw them with a simple pencil, and then color them by hand.

15. You can also make a Christmas tree template yourself, bend a sheet of paper and draw outlines, and then cut it out.

16. Don't forget to color all the elements. If you draw poorly, or do not want to do this, then you can print out ready-made templates.

Get them from here, or find them yourself on the Internet. Make a printout and give the kids to color, they will be delighted with such a task.
Idea! Moreover, it can be Santa Claus and the Snow Maiden, whatever you want.


17. Now we make a couple more blanks from scrap paper.

18. Fold them in such a way that the vertical lines are shown.

19. And then we apply it to the main product and glue it.

20. We got such stands for gluing Christmas trees.

21. Attach each Christmas tree and glue gently with glue.

22. Glue the snowman on the main page, where you see gifts, you can write a congratulation or

Now I want to teach you how to make a lighter souvenir in the form of a house. It is necessary to fold the leaf in half and cut out four squares or rectangles to make a window.

Now we open the blank and glue a sheet of colored or office paper on the inside, cut the edges with decorative scissors.

Take the paper thicker, you can take cardboard, but not too thick, cut out a suitable triangle from it. This will be the symbol of the Christmas tree. After wrap it with threads, fix the ends with glue.

It remains only to build a surprise, under the forest beauty, also make this masterpiece out of paper, you can use ribbons for a bow.

And that's what eventually turned out, insanely cute and cool, and most importantly, the kids are delighted. How do you like this idea?

Also glue the window outside and draw decorations.

Now I propose to turn to the origami technique, and perform another craft in the form of a green Christmas tree made of paper and cardboard. First, cut out 6 geometric shapes in the form of squares from colored paper. Dimensions are shown in the picture.

Fold the yellow sheet of cardboard in half, this will be the basis of the future postcard.

It is on it that you paste all the triangles, as if you are inserting each into each other. Start from the top, that is, from the smallest triangle. And the final stage - glue a star, decorate with rhinestones or sparkles. Good luck!

You can do something similar, you can still do it this way, the application is a little more complicated, but the postcard is even more voluminous.

You can even take ordinary coloring pages and easily make a congratulatory work out of them. This is a great option for the little ones.


You may also want to use the following stencil for a postcard, you will need to cut out a Christmas tree along the contour, and give the child the task of decorating with rhinestones.

Here is such an unusual version of working from circles:

I also give you such a sketch, in the form of a hint, a glorious work will also come out of it.

I took another photo from the magazine, maybe it will come in handy.


Here's what happened on the basis of all of the above.


Another creation from an old newspaper.


But this deer, and all the other heroes are smiling, and you?

Another peculiar and interesting craft, for which you will need two sheets, print a Christmas tree pattern on one, and glue it to the other by making the necessary cuts.


Light New Year's cards with a child of 3 years
The most common option is drawing with the help of children's hands, it looks beautiful and stylish. And besides, kids like it so much, they are ready to enjoy creative activities for hours, because they get to know the world. And we are with them.

You can draw with your fingers, and any New Year's image:

And then decorate with sparkles and cover with a shiny varnish.

Using a decorative stapler, cut out snowflakes and use them to create the composition you need.

Here are a couple more stencils for creativity.


Even the usual lacing for finger exercises can be adapted here, and it will be fun and useful.

And if you want, or maybe you are a lover of corrugated paper, or you have it lying around in your trunk, then use it too.
You need to fold the sheet in the form of an accordion, and fix the middle with a stapler. And then fluff and glue the ends or fix with staples.

Voila, abracadabra and glue to the cardboard base, where the bend is. Decorate with snowflakes and other rhinestones. And you can also stick a sticker.

The next option will not be easy, but not difficult either. You will need scrapbooking elements in the New Year theme.

It can also be flowers and leaves, for decoration.

Of course, your imagination and ingenuity are needed here, you can do something like this:

Postcard master class Pig for kindergarten and school children
Now, of course, let's move on to the most exciting moment, everyone knows that the coming year will be the year of the Boar, and therefore most of us, including children, will want to make a postcard in the form of a pig. I suggest turning to videos.
And the second MK will be in the form of a voluminous beauty, which, as you will see, you will certainly want to make.
Ideas for children's cards for the New Year
Next, we consider children's masterpieces that may prompt you to new thoughts. See and choose. Take this beautiful gift, what a charm came out of the footprint, cool idea. Such naughty snowmen.

Gorgeous Christmas tree, which is made in the form of appliqué and decorated with rhinestones and a star.

Use cotton pads, great isn't it? So simple, it's easier not to think of. Such cuties came out, and the bear cub even looks like Umka in some way.

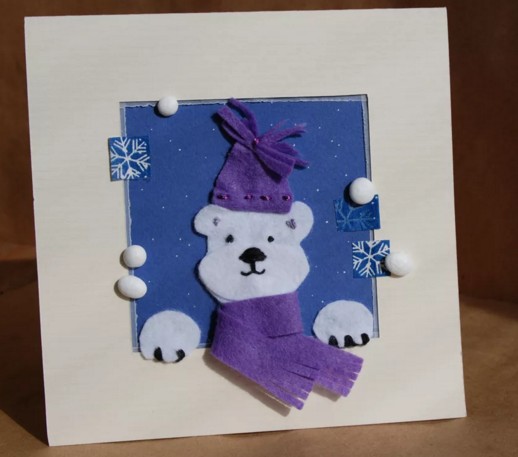
And if you like to work with felt and cotton, then take note of this beauty.


Here is such a winter postcard in the form of a little hand, and snowy friends are on it.

Here's another idea, looks amazing, how do you like it?


The next option is no less interesting, see how the Santa Claus hat is originally glued.

Here are a couple more Christmas trees, the first one is made of cardboard, and instead of a star there is a packing bow.

Painted paper napkins and, of course, bells also add beauty to this postcard.

This is also a super option, I think no one will refuse such a brilliant little thing.

If you like snowmen more, then here is another idea, moreover, the forest beauty is made in the style of quilling, and the main character too. You'll have to tinker a little, but the result will please.

If you are a needlewoman and know how to knit, then this may come in handy, the child will stick cotton pads, and you will do the rest).

In America, it is customary to give even in such a slipper.

Or a postcard on which a New Year's ball will be depicted, it can be drawn, or it can be glued from sesal fiber.

Then make a frame out of scrap paper.

Write an inscription and the souvenir will be ready. Give to the addressee.

This charm will not leave anyone indifferent, made of circles of multi-colored paper.

Scrapbooking style greeting cards
Recently, such works have become in great demand, such paper can be bought at any store or printed on your printer. That is, find a suitable picture on the Internet. At the beginning of the note, I already gave you the best practices, here are some more:


Now, let's get to work.
We will need:
- colored cardboard and paper
- scrap paper
- markers
- PVA glue
Stages:
First of all, cut out rectangles of different lengths from scrap paper, choose the size yourself.

Then twist each blank on a simple pencil or thick stick to make a tube. Glue.

Thus, you should get 12 tubes of different lengths. Which now have to be glued each to each other, starting from the longest and moving to the shortest.

Guess what will come out? Of course, the Christmas tree, which you glue on cardboard folded in half. Instead of an asterisk, use a button or something else that is available from improvised materials. Even a bow will do.


How to make a 3D New Year card
To answer this question, let's turn to the video, the author will tell and show it in an accessible way, and we will only have to listen carefully and repeat it. Moreover, such a miracle, well, everyone will like it very much. The creator of the film even calls the postcard 4 d, and the truth is that you have not seen this yet. This is a great idea, take note quickly.
The next option is no less interesting, this is a postcard that is made of paper circles, and a cool snowman came out.
We will need:
- paper
- cardboard
- scissors
- double sided tape
- Styrofoam

Fold the cardboard in half, but cut out three circles of different diameters from white paper. Draw blue stripes along the contour to make it look brighter and match the background of the workpiece.

The next step, take a piece of foam and glue double-sided tape on it, and then a circle on the workpiece.

Thus, you will get a circle on a circle, as if you are collecting a pyramid.

Now make a snowman, glue a red nose in the form of a carrot from cardboard, draw eyes and a mouth with a marker.

Decorate to your taste, you can write Happy New Year or the like.

Here are a couple more thoughts on the subject.


I was fascinated by this fluffy Christmas tree, which, for volume, the author glued on double-sided tape and foam.

You can take ready-made templates or do the work yourself.

On this note came to an end. I hope that all works are commendable and that you like them. After all, the authors tried, and now we can admire them and take them as a basis for our own masterpieces. Make postcards for the New Year and give them to relatives and friends, teachers, educators and everyone who is dear to you.
I wish you all a wonderful mood and a fabulous day! Bye.
Best regards, Ekaterina
It is customary to give gifts on New Year's Eve. Handmade gifts are of particular value - they give a holiday not only to the one who receives them, but also to the one who creates them. The easiest gift a child can make is a DIY Christmas card.
1. DIY Christmas cards ("Herringbone")
The Christmas tree is an indispensable attribute of the holiday. Therefore, postcards with her image will be especially appropriate. In addition, such postcards can be very easy to make.
Christmas tree applique can be made from plain or multi-colored strips of paper. Even a small child can make this New Year's craft with his own hands.
A more complicated option is the New Year's card "Christmas Tree" made of paper tubes.
It is very easy to make a Christmas tree application using purchased stickers. Even a two-year-old can do this craft for the New Year with their own hands.
Simple and effective - homemade New Year's cards "Herringbone" from ordinary buttons.
You can also embroider a Christmas tree with threads. Only in this case, the New Year's card should be made of high-density paper or cardboard. Pre-holes must be carefully done with an awl. The simplest version of the Christmas tree, see the photo below.
Link to instructions
For a more complex version of a New Year's card with a Christmas tree made of thread, see here. To make this New Year's craft with your own hands, you will also need sequins.
An original DIY New Year's card can be made from a fern leaf or any other plant similar to it. Just take the top part of the leaflet and stick it on the postcard. This will be a Christmas tree. You just have to decorate it with sequins or confetti made with a colored paper hole punch. Instead of confetti, you can stick multi-colored pieces of plasticine on the Christmas tree. This part of the work on making a homemade New Year's card will be possible even for a baby.
On this you can see more examples of New Year's cards with leaves.
2. Do-it-yourself voluminous New Year's cards "Herringbone"
We offer you several ways to make voluminous New Year's cards "Herringbone" with your own hands.
Option 1.
The technique for making volumetric Christmas trees is similar to the method for making Christmas balls. Only you do not need to glue them completely, instead stick the Christmas trees on the card.
Option 2.
A very beautiful DIY Christmas craft, accessible in terms of complexity to a preschooler, is a voluminous New Year's card "Herringbone". The Christmas tree is made of strips of rectangular paper folded like an accordion.
Here are two more voluminous postcards with a Christmas tree made from a triangular sheet of paper folded like an accordion. Simple and tasteful!Option 3.
Another voluminous New Year's card. Again, this New Year's craft for children is attractive not only in appearance, but also in ease of manufacture.
To make such a New Year's card with your own hands, print templates ( and ) on two sheets of cardboard or thick paper and use the detailed instructions from the photos below. It is better if the sheets of cardboard are of different colors.
At the end, decorate the Christmas tree to your liking. Volumetric New Year's card is ready!
Option 4.
Christmas tree origami. We suggest you make a voluminous New Year's card decorated with a paper Christmas tree made using the origami technique. To make the card look more elegant and festive, choose prettier paper for your Christmas tree. Well suited for this New Year's crafts with your own hands, special paper for scrapbooking. By the way, making such an origami Christmas tree is much easier than it seems at first glance. For detailed instructions on how to make an origami Christmas tree, see the link
3. Postcards for the New Year with your own hands ("Christmas balls")
Do-it-yourself Christmas cards with the image of Christmas balls look good. Christmas application "Christmas balls" can be made of bright paper and decorated with ribbons.
Christmas balls can be made not only from paper, but also from buttons.
Original volumetric New Year's cards with the image of Christmas balls offers to make a website
To make such a New Year's card with your own hands, print out the following template. See reference On each square, use a compass or an appropriately sized round-bottomed object to draw a circle. Cut out all the circles, then use the following instructions for making Christmas balls. See link Only you don't have to glue the balloon completely, stick it on the card instead.
Another New Year's decoration - a garland of flags, will look spectacular on a New Year's card. Flags can be made from paper or fabric, and then glued or sewn onto a postcard.
Even very young children can make a New Year's card with their own hands with the image of a multi-colored garland of fingerprints.
And from a handprint you can make a New Year's card with Santa Claus.
1. On any surface that does not absorb paint (for example, a regular baking sheet), make a rectangular frame (the size of your postcard) from adhesive tape or electrical tape.
2. Apply the paint evenly to the surface. Draw some picture on the New Year theme with a cotton swab.
3. Attach a sheet of paper. Do-it-yourself postcard for the New Year is ready!
4. Do-it-yourself voluminous New Year's cards
5. New Year crafts for children. New Year's application
Postcards decorated with New Year's appliqué made of rice grains are very tender.
6. Postcards for the New Year with your own hands. Christmas cards with snowflakes
Another idea for a DIY New Year's card is a card decorated with a snowflake cut out of paper.
If you have paper lace napkins at home, then you can cut snowflakes out of them.
7. New Year paper crafts. New Year cards made in the technique of iris folding
Original New Year's cards using the iris folding technique are offered by the Land of Masters website. The name of this technique - iris folding - can be translated as "rainbow folding". The drawing is filled with thin paper strips, which, superimposed on each other at a certain angle, create an interesting effect of a twisting spiral. For a detailed master class on making this New Year's paper craft, see the link
Here is another New Year's card made in this technique. Link instructions
8. Original postcards for the New Year with your own hands. New Year's do-it-yourself
We want to introduce you to another interesting technique for making New Year's cards with your own hands. The Christmas tree and Christmas ball in the photo below are made using this technique.
To make a Christmas tree card, you will need:
Red cardboard sheet
- a sheet of colored paper for origami (on the one hand - dark green,
on the other side - light green)
- scissors or a special knife for cutting paper
- glue
On a sheet of green origami paper, print out. Make cuts along the lines on it. Where the trunk of the Christmas tree is located, cut out a piece of paper completely. If you fold a sheet of paper in half before making cuts, then you can cut it out with scissors. In this case, even a preschooler will be able to make a postcard. If you want to do without a crease in the center of the postcard, then it is better to make cuts with a special knife for cutting paper. Now you just have to bend the corners back and stick your blank on the cardboard.
The card "New Year's ball" is made in the same way. A stencil for making this original New Year's card can be downloaded from the link
In the same technique, snowflakes from the section "Snowflakes with your own hands" are made. They can also decorate a postcard for the New Year.
And one more New Year's card with your own hands "Herringbone", made in this technique.
To make this postcard for the New Year, print it on a sheet of white cardboard. Glue a thin sheet of green paper on the back. Cut out the corners with a paper cutter and fold them over. Now cut and fold your Christmas card in half. If you want to write a New Year's greeting inside, then stick an additional sheet of green paper so that the letters do not shine through the holes. For a detailed New Year's master class on making this postcard, see.
Do you want to make a nice gift for your relatives, friends, acquaintances for the New Year? A beautiful postcard is always needed.
To pleasantly surprise the person you are preparing a card for, you can make a card with your own hands, decorate it as you like and give it as a gift.
There are many ways to make a beautiful postcard with your own hands, and there are some simple, but very beautiful and original ones here.
Choose what you like best. You can try to make one of the suggested options or borrow an idea to make something of your own.
In any case, any person will be pleased to receive such a gift.
New Year's cards handmade. Corrugated paper tree.

You will need:
- corrugated paper
- scissors
- decorations, optional

1. Fold a sheet of thick paper in half.
2. Mark the place where you will glue the corrugated paper, or simply draw the outline of the Christmas tree with a simple pencil.
3. From corrugated paper, cut out several rectangles of different sizes.
4. Glue each rectangle as shown in the image.
* If you wish, you can decorate the postcard with an asterisk (ready-made or cut out of paper), stickers, sparkles, etc.
How to make a voluminous postcard
A very beautiful DIY Christmas craft, accessible in terms of complexity to a preschooler, is a voluminous New Year's card "Herringbone". The Christmas tree is made of strips of rectangular paper folded like an accordion. But there is one nuance here. If you carefully examine the photo, you will see that the tiers near the Christmas tree are made of strips of paper of different widths: the widest at the bottom, the closer to the top, the narrower. In addition, the depth of the fold of the accordion is also different. The lower strips of paper are folded into an accordion with a large "step". The higher to the top, the smaller the bend depth.


Another voluminous New Year's card. Again, this New Year's craft for children is attractive not only in appearance, but also in ease of manufacture.

To make such a New Year's card with your own hands, print templates (template-1 and template-2) on two sheets of cardboard or thick paper and use the detailed instructions from the photos below. It is better if the sheets of cardboard are of different colors.


At the end, decorate the Christmas tree to your liking. Volumetric New Year's card is ready!

How to make DIY Christmas cards
New Year's card "Snowman"

From white paper, cut a wide strip with a curly edge. It will be a snow hill. Glue it to the bottom of the card. Attach white acrylic letters to the center of the pre-made snowmen.
Postcard "Congratulations to Santa Claus"

The basis for this postcard will be paper with a pattern. Cut out the elements of the face of Santa Claus from paper in different colors. Glue them. Tint Santa's cheeks with pink chalk. Glue the face to the heavy paper card. Glue the card onto the larger folded paper so that the pattern looks like a border on the right and bottom of the card. Write a congratulation.
Postcard "Christmas tree in retro style"

Sew the edges of the heavy paper Christmas tree on a sewing machine. Decorate the tree with snowflakes. For a simpler version of the card, glue the Christmas tree with an additional layer of thick paper to get a three-dimensional image.
Scrapbooking. New Year cards.

You will need:
- thick colored paper or colored cardboard
- scrap paper
- PVA glue
- pen, felt-tip pen (or other similar object)
- decorations

1. First you need to know exactly what size the tree will be, and, starting from this, cut several rectangles of different widths from scrap paper.
2. Using a pen or other cylindrical object, roll each rectangle into a tube (widthwise). Secure each tube with glue so that it does not unwind.

3. Glue the tubes together.


4. Prepare the base for the card and glue your pre-prepared Christmas tree to it.

5. Decorate to taste.

Children's New Year cards

You will need:
- colored cardboard (green and red)
- sequins or rhinestones
- wrapping
- black pen or marker
- scissors
- stapler
- decorations

1. We make a Christmas tree. Prepare green paper and cut it in half (crosswise).

2.
Make a blank by folding a thick sheet of paper (of any color) in half - this will be the basis of the postcard.
3.
From one half of green paper, make an accordion that will play the role of a Christmas tree. Fasten one end of the accordion and glue the Christmas tree to the base of the card.

4. Prepare wrapping paper and cut out a small rectangle from it, it will act as a stump.

5. Decorate to taste.

Beautiful New Year cards

You will need:
- thick colored paper or colored cardboard
- a clerical knife or a shaped hole punch (for cutting out an asterisk)
- needle
- a pencil and a ruler (to mark the places where the thread is threaded)
- sequins


Making New Year's cards. Origami Christmas trees.

You will need:
- colored paper (can be thick paper)
- colored cardboard (for the base of the postcard)
- button, ribbon and other decorations to taste.


Creative New Year cards. Christmas tree from ribbons.

You will need:
- colored cardboard
- scissors
- stickers (in this case in the form of stars)
- decorative ribbons, scrap paper or clippings from colorful magazines

1. Fold a piece of colored cardstock in half to make the card base.
2. Cut out a tree trunk from brown paper.
3. Glue the stem to the base (in the middle).

4. Start cutting your colorful paper strips into several pieces of varying lengths.
5. Glue all the pieces onto the trunk (top), starting from the bottom, with the longest piece.
6. Decorate the Christmas tree as you wish.
New Year's cards in quilling technique

You will need:
- colored cardboard
- paper strips for quilling (preferably several shades of green)
- scissors
- white crepe paper or napkin
- toothpicks (for winding paper strips)
So, let's start making a postcard:


How to make a New Year's card from round napkins

You will need:
- colored cardboard
- scissors
- round napkins (or double-sided colored paper)
- Double-sided tape
- decorations to taste

1. To make a Christmas tree, you need half a circle. To do this, fold the round napkin in half and cut it.
2. Fold a semicircle as shown in the image.
3. Using double-sided tape, glue the layers of the Christmas tree.
4. Glue the Christmas tree to the base of the card
5. Decorate the tree to your liking.
New Year's voluminous cards

You will need:
- colored cardboard
- scissors
- pencil and ruler
- decorations


1. Cut out triangles from colored cardboard - these will be your Christmas trees.
2. Prepare two sheets of thick paper. Fold both in half - one will serve as the base of the card, and the other as its inner part.
3. The diagram shows how to cut out “steps” from the sheet for the inside of the postcard, on which you will then need to stick Christmas trees.

4. After you have glued the Christmas trees, decorate them and the rest of the card to your liking.
New Year's greetings. Postcard from circles.

You will need:
- colored paper
- stationery knife
- colored cardboard

1. Take a sheet of A4 paper (plain or color). Draw a large circle on it with a compass.
2. Cut out the circle.
3. Fold the circle in half and make cuts in a checkerboard pattern (see picture). Cuts should be made in a circle - start at the fold line and move to a point a little further than the middle.

4. Expand the circle and glue the thread to the crown.
5. Glue the circle to colored cardboard folded in half (postcard base).
* You can glue small red circles to the thread so that they hang down from the top of the tree.
6. Decorate your postcard as you like.
Now you can not only give this postcard, but also decorate the New Year tree with it.
New Year's cards (master class)

You will need:
- colored cardboard
- buttons
- Red ribbon
- pencil or pen
1. Prepare the base for the postcard by folding colored cardboard in half.
2. Draw a circle on the base using a compass or pencil and any small round object.

3. Prepare the buttons and start gluing them carefully along the drawn circle.
4. Cut off a piece of red tape and stick it where you like.
Ready! Everything is very simple, but at the same time beautiful and neat.
Design of New Year's cards. Bright lanterns.

You will need:
- scrap paper (or plain thick paper)
- scissors
- paints (you can use watercolors)
- brush
- a set of markers
- simple pencil
1. Prepare the base for the postcard. Fold a thick sheet of paper in half.


2. With a simple pencil, draw a wavy line on one side of the card. Curls can be added.
3. Now draw the lanterns on the line.


4. Color the lanterns with paints or multi-colored markers.
5. Add an inscription, for example, "Happy New Year!".
Christmas cards with snowflakes
Another idea for a DIY New Year's card is a card decorated with a snowflake cut out of paper.

If you have paper lace napkins at home, then you can cut snowflakes out of them.

Postcard with New Year's embroidery.

Such a postcard will not leave indifferent even the most fastidious recipients. After all, here you invest your strength and soul not only to assemble the finished parts and give them a festive look, but also create these very details with your own hands. For embroidery, you can choose any pattern that matches the theme of the new year. It can be Santa Claus, a cheerful snowman, a festive tree, Christmas balls, a symbol of 2017 - the Fire Rooster and more.
To create such a New Year's craft, you will need: glue, scissors, embroidery, satin ribbons, and other decorative elements, if desired.
As in the first option, we first prepare the base of the postcard and give it the desired shape. Then we paste the embroidery and decorate the edges of the picture. This can be done in the following ways: use satin ribbon, half beads, rhinestones and sparkles. Such a postcard in itself is already a finished product and does not require special additions in the form of sparkles and sequins, but if it seems to you that they will only complement the overall look, then add. If the card is intended for a friend, sister or mother, you can use a satin ribbon bow, such a decor will give the product a great prettiness.
Postcard from colored threads
 Handmade card with a Christmas tree made of colored threads
 The forest beauty is the main symbol of the New Year. And in such an unusual incarnation, both adults and children will like it! To create a craft you will need:
- three sheets of cardboard or thick paper
- scissors
- PVA glue
- Double-sided tape
- dense threads of different colors
- colored pens
- ruler
- decorative beads
- paper snowflakes
- ribbon
Fold a sheet of colored cardboard or thick paper in half. It will serve as the basis for the postcard. Cut a rectangle out of paper of a different color, stick it closer to the top of the card. Cut out a triangle from the third sheet of cardboard. Wrap it with multi-colored threads, fixing them on the back of the tenderloin. Decorate the Christmas tree with shiny balls of multi-colored beads and glue the tree to the postcard. Decorate the craft with an elegant ribbon and do not forget to print and stick a congratulatory inscription.


Hello dear readers of my blog! So that today the New Year's mood reigned in your house, we will make New Year's greetings ourselves. And how to make a New Year's card with our own hands, we will now figure it out. Handmade postcards are of particular value to the recipient.
Stylish DIY New Year cards
Do-it-yourself postcards can be made by adults for adults
And here is a video that shows how to make a beautiful cardboard with a napkin and a pretty envelope
How to make a Christmas tree out of paper - take note
The main thing on New Year's greetings is a fluffy Christmas tree. When creating postcards for 2017, I suggest moving from a simple option to a complex one.
Making a simple craft:
- Take paper with different colors on both sides,
- Fold in half
- Cut out a semicircle
- We make a fan out of paper,
- Glue on colored cardboard
- We decorate the top with a bead.

Or here is such a variant of a voluminous Christmas tree made of paper
Corrugated paper
Let's try to make voluminous postcards.
 For manufacturing you will need:
- A dense colored sheet of A4 format or cardboard;
- Green corrugated paper;
- Scissors, pencil, glue or double-sided tape;
- For decoration (rhinestones, sequins, beads).
Step 1. Take the cardboard, bend it in half. Inside, write warm words of congratulations in advance. On the outside, draw the outline of the Christmas tree with thin lines.
Step 2 Cut the bottom strip from the corrugation, 1.5 centimeters high. Then cut them into different heights and lengths to match the silhouette of the Christmas tree.
Step 3. Glue the strips into place, starting from the bottom, slightly gathering them.
Step 4 Decorate the beauty with whatever you find. Make a garland out of beads, and lights out of rhinestones. Do this craft with your children, it will bring them great joy!
Button Beauty
Original crafts can be made from multi-colored buttons. Look how many options!
It is better to cook such simple congratulations with children, small buttons develop fine motor skills well, which means memory, creative thinking of children.

original version
Forest guest in scrapbooking style. What is scrapbooking? This is a type of needlework for creating postcards, photo albums, photo frames and other products, which are then decorated with various decorations. The craze began in England in the late 16th century.
For making postcards for 2017 you need to take paper for scrapbooking:
- Cut it into small rectangles of various widths.
- Using a pencil, roll them into a cylinder, smearing with glue inside.
- After winding the tubes, glue them to each other.
- Then assemble the structure in the form of a Christmas tree.
- Fold the cardboard in half, write your wishes inside. And glue the dried Christmas tree from the tubes on the outside of the craft.
- Then decorate it with beads, rhinestones, tinsel.
Especially valuable will be children's products, as a gift to your loved ones.

Where is Santa Claus?
Postcards to Santa Claus should be created together with the children, because they will write their wishes to him.
Try to cut out glasses, a beard, a mustache, then glue them onto colored cardboard. Only half an hour and cheerful Santa Claus flies with New Year's greetings!

Idea for children's crafts. Even a child can make such Santa Claus.
- We take burgundy cardboard
- Fold in half, cut corners
- From the corrugated sheet, which is put into boxes of chocolates, we cut out the edge of the cap
- Glue a cotton pad on the side
- We glue the tinted sheet where the eyebrows and eyes will be located
- From the album sheet we cut out mustaches, eyebrows
- We cut out a beard from a semicircle, making cuts in the form of a fringe
- Cut out the mouth and nose from red paper.
- We glue the eyes (sold specifically for crafts) or cut them out ourselves from blue paper.
- Cut out the Christmas tree, glue it inside the card.
And here is another example of a postcard with Santa Claus made from ice cream sticks.
How to make a postcard with a dog so that his ears rise
And here is another example of a funny homemade greeting card for the Year of the Dog. A moving and LIVE postcard with a DOG for the New Year 2018 made of paper! A postcard is made of colored cardboard, and if you pull the tongue, the dog's ears rise and its eyes open. I think you will like this card and give it to your loved ones this year!
Here is such an interesting postcard with a puppy. Pull the tongue - the puppy will raise his ears from his eyes and say hello.
For manufacturing, we will need: colored sheets of paper, glue, ruler, scissors, knife.

- We take white paper. Fold in half (size about 14 x 22 cm). This is the postcard itself. Now let's start decorating it.
- You will need a postcard template. You can download it Here. It needs to be printed.
- Cut out ears and tongue. We glue as in the photo.
- Glue a yellow semicircle to the blue substrate. We insert the glued tongue and ears into the cut.
- Glue the cut out yellow part to the blue one. There is a fold at the top.
- Cut out eyes from black and white paper and glue them on.
- On the reverse side, glue the body of the postcard.
- We write congratulations inside.
Balls - an indispensable attribute of the New Year
In the Year of the Rooster, the balloons on the cards should be as colorful as the plumage of the owner of the year.
1. Cut sheets of a glossy magazine into thin strips, stick on a sheet, cut out circles of different sizes, decorate a congratulation.
2. Christmas balls from buttons.


Instead of buttons, you can take multi-colored rhinestones.

Crafts with the palm of your hand
Your children will love to come up with such fantasy cards, because getting their hands dirty with paint is their favorite pastime! And then, add the missing details, and you get a cute Santa Claus or Snowman.


What is New Year without a snowman?
The scrapbooking master offers such an option for congratulations.
- From thick white paper, you need to cut 3 circles of different sizes.
- They need to be slightly shaded along the edges so that they do not merge. You can shade with gray shadows.
- Then, from colored sheets, you need to cut out pens, a scarf, a nose, eyes and buttons.
- It remains to glue all the parts of the Snowman on the basis of congratulations.
Crafts from improvised materials
Another idea for New Year's greetings. A very cute card will turn out, decorated with appliqué, framed with grains of rice. In the Year of the Rooster, this is especially true:
- Glue a sheet of blue color onto thick cardboard
- Glue the Christmas tree cut out according to the template
- Glue rice grains along the contour
- Glue rice snowflakes in the corners. Original, beautiful, simple!


