New Year's crafts for a kindergarten on a Christmas tree. How to make Christmas decorations with your own hands, for a competition, for kindergarten, for school. Christmas tree from a disposable plate: a master class for crafts in kindergarten
In addition, very beautiful New Year's crafts are obtained, which the baby performs step by step (photo) with his own hands in order to proudly bring them to kindergarten. In this selection of master classes, we offer only the simplest and most interesting options for crafts that can be done by both children from the older group on their own, and kids with the help of their parents.
Easy DIY crafts for the New Year 2019 in kindergarten
To create original New Year's crafts, you can use absolutely any material at hand, craftsmen offer the most unexpected ideas that are simply impossible not to use. We have chosen the most original master classes with step-by-step execution of crafts.

Panda from cotton buds
This cute craft will bring a lot of joy to the baby, there will be no limit to his childish surprise, because he was able to create such a toy with his own hands!

Prepare:
- cardboard of a size commensurate with your idea;
- scissors;
- cotton buds - a fairly large amount;
- black paint;
- tassel;
- black colored paper.

Manufacturing:
- We cut out a simple blank from cardboard, which is a connected geometric figure - a circle and an ellipse, the size of which you choose yourself.
- So we made a model of the panda's body in cardboard, now we will dress it in a fluffy fur coat, for which we cut a large number of blanks from cotton buds, cutting off the ends.

- We glue the contours of the circle and the ellipse alternately with glue, glue the first row of cotton tips from the sticks, placing them tightly to each other.

- We paste the second row on the first, each time reducing the diameter of the figure. We place the last central sticks vertically, achieving greater volume.


- Now we cut out paws, ears and eyes from cardboard, paint it black, draw eyes and glue everything in place. We paint on the nose and black spots on the fur coat, achieving a greater resemblance to the image of a panda.

- A spectacular and simple DIY Christmas craft for kindergarten for the New Year 2019 is ready, you can use it as a decoration.

Christmas ball
Such a craft is useful both for decorating a Christmas tree in a kindergarten, and as a bright element of interior decor, for example, they can be used to make a New Year's garland.

Prepare:
- colored cardboard, any three colors;
- scissors;
- ruler;
- pencil glue;
- paper;
- pen;
- thin ribbon.

Manufacturing:
- We draw a template on paper in the form of a circle with five petals, it is not difficult to make it, draw a circle, divide the circle into five parts, from the middle of each we restore a perpendicular from 2 to 3 cm, depending on the size of the template.
- Now we connect all three points with a smooth line: two on the circle and the height of the perpendicular. The result is five petals, however, the template can simply be downloaded from the Internet.
- Applying the template to colored paper, we make 4 parts of three colors, it turns out only 12.
- We turn over all the details and draw straight lines with scissors on the reverse side, attaching a ruler that connects every two points of the base of the petals.
- Then, we make bends on the front of each "flower" along the drawn lines.
- We take one of the details, in the middle we make a small puncture with nail scissors and insert the prepared thin braid.
- We fix the braid on the reverse side with a knot, we got a pendant for the future New Year's crafts.
At the part with the suspension, we glue the petals and glue five other similar multi-colored parts to them, which we then connect to each other by gluing the petals.


Crafts from plasticine in kindergarten
Working on such crafts brings great pleasure, no special preparation is required, only plasticine of different colors and an acute desire to create a miracle with your children. The degree of complexity of the crafts offered here is quite consistent with the kindergarten age of the child, especially if the work will be done together with dad or mom.

New Year's ice cream
Prepare:
- plasticine Play - Doh.


Manufacturing:
- From multi-colored plasticine balls we roll flagella of various lengths in the palms so that we get three pairs of multi-colored flagella.
- Now we take each pair in our hands and twist it, then bend it, giving it the shape of a circle. So we get three multi-colored circles of different diameters.
- We make the top of the ice cream from a small blank, achieving similarity with the original.
- We fashioned the ice cream itself, now we are preparing a waffle cup for it, for which we form a large ball from plasticine of any color and roll it into a round layer of medium thickness.
- We cut out a triangle with a rounded top from the resulting layer.
- Using a device for obtaining thin and even flagella, we prepare them in a rather long version, glue them onto the prepared workpiece so that a characteristic waffle relief is obtained.
- We cut off all unnecessary, from plasticine of the same color we make the inner filling of the cup, which resembles a carrot without a tail.
- We put the “carrot” on one edge of the blank for the cup and wrap it, we install multi-colored ice cream on top, the DIY craft is ready.
Christmas tree made of plasticine
Material:
- plasticine ordinary multi-colored.


Manufacturing:
- From green plasticine we sculpt a geometric figure - a cone of the size we need.
- We cut the prepared cone into 4 parts, we begin to prepare each part, kneading it from below, creating a kind of skirt. Further, from the resulting "skirt" we cut out triangles, the top of which reaches the middle of the workpiece.
- The number of cut triangles will determine the number of branches on our Christmas tree, for example, we cut out five triangles and get five branches on the workpiece. If you planned to make a large plasticine Christmas tree, then you can cut out more triangles.
- We give each branch a more elongated shape.
- We put the prepared details of the Christmas tree in their original position, we have already got a full-fledged crown of the tree.
- We sculpt a trunk from brown plasticine, install a Christmas tree on it and use a sharp knife to draw small branches and needles.
- We decorate the finished Christmas tree with multi-colored toys and garlands, which are very simply made from small multi-colored plasticine balls, which we also make with our own hands.

How to mold Santa Claus from plasticine
Prepare:
- plasticine red, white, pink.

Manufacturing:
- We sculpt three cones from red plasticine, two identical smaller ones, one large one, immediately cut off the top from it.
- We also form a ball commensurate with a large cone from red plasticine, connect these two figures, we have the body of our stylized Santa Claus in a fur coat.
- From above, we attach two small cones to the ball and insert a match, these will be the sleeves and the head mount.
- We roll out the flagellum from white plasticine, cut it into two parts, attach it in two places, below the “fur edge” and the belt.
- We also roll 4 small balls from white plasticine, two of different diameters, from which we make mittens, giving the balls the shape of rectangles, two wide and two narrow, connect and glue to the sleeves of Santa Claus.
- From pink plasticine we sculpt the head and nose, and from white mustache and eyebrows, we insert eyes from any material at hand.
- We sculpt a beard from white plasticine, put on a hat made of red plasticine and Santa Claus is ready, you can sculpt it in different sizes using this master class and the attached step-by-step photo.


Crafts from paper and cardboard
From this sector of children's crafts, it is especially difficult to make a selection of interesting master classes, since each one represents an attractive option for creativity. We offer two of them, the most popular and simple in execution.
Father Frost
This simple craft will come in handy as a decor element for the New Year's decoration of the kindergarten, and will also introduce the child to the basics of the fascinating section of needlework - origami.

Prepare:
- red colored paper, in the quantity you have planned, on the basis that one craft is obtained from one sheet. And the same number of sheets of white paper, as well as double-sided tape or glue.
Manufacturing:
- From all the prepared sheets, we cut out squares with a side of 10 cm, glue the white and red blanks and proceed to the manufacture of crafts.

- We fold each glued square blank in half in the form of a triangle to get one diagonal.

- We unfold the square, put it with one of the sharp corners, divided in half, down. We bend the lower sides to the diagonal, fix the bends.

- We unfold the workpiece and bend it so that both corners are connected, we fix it with a hall.

- We bend one corner almost to the very bottom border of the workpiece, make another small bend, get the rim of the cap, tuck the sides.

- We shade the upper white strip with a red marker and draw a nose, paint on the eyes with black, a simple craft for the New Year for the kindergarten is ready.

Snowmen from bushings
Prepare:
- toilet paper sleeves - 2 pcs.;
- glue;
- White paper;
- rhinestones - stickers;
- toothpicks;
- red plasticine;
- black colored paper;
- toy small bucket;
- red napkin.

Manufacturing:
- We coat the paper with glue and glue the bushings.
- Rhinestones - glue stickers on the places of the eyes and as decorative buttons.
- We roll out two small cones from plasticine, put them on toothpicks, pierce the other ends into the sleeve, in place of the nose.
- We finish the mouth with a marker or glue it from rhinestones.
- We cut out the handles of a snowman from black paper, having previously drawn them, it is very simple to do this. We glue our hands to the body and put a toy bucket on one of the snowmen, one cute snowman is ready.
- We make a hat for another snowman from a colored paper napkin, preferably red.
- We bend it on one side, as a cap lapel, glue it in this form to the top of the second sleeve. New Year's crafts for children are ready, you can decorate any horizontal surface with them.
New Year's toy in kindergarten
Decorating a Christmas tree in a kindergarten using exclusively children's crafts is just a great idea, and so popular that there is a real boom in just such a forest beauty decor. In addition, such a craft can be presented at an exhibition in a kindergarten.

Christmas ball pig
Prepare:
- ordinary Christmas ball;
- bright fabric for a hat;
- a small piece of white fleece;
- pale pink acrylic paint;
- tassel;
- sponge;
- ground white;
- black marker;
- polymer clay pink;
- braid for an eyelet;
- hot glue.

Manufacturing:
- We choose a regular ball, cover it with white soil with a sponge, holding the ball by the protruding upper part, in this area the primer and paint can not be applied.
- After the primer dries, apply acrylic paint, leave to dry.
- We are engaged in the manufacture of a hat, for which we cut out a rectangle 10 cm wide from the fabric, and its length should be equal to the circumference of your ball plus 1 cm per seam.
- We cut out a rectangle of the same length from fleece, 5 cm wide, fold it in half on the front side.
- We apply a white rectangle to the bottom of a rectangular blank of colored fabric, fasten it with needles and make a line on the machine.
- We bend the fleece down, fold the entire structure in half inside out, sew it on a typewriter, turn it inside out, put it on a toy, after inserting a long loop of braid into its eyelet.
- From above we assemble the “cap” of the pig into the assembly, tie the ribbon with a bow, fix the cap with glue in several places.
- We make a patch from polymer clay, make 2 holes in it, glue it in place, then peel it off and send it to the oven for heat treatment, as usual, then cool it and glue it with glue.
- With a brush with black paint or a marker, paint on the eyes and mouth. Such a cute DIY Christmas craft for kindergarten, made step by step (photo), will delight the kids in the year of the Pig.
Applications for the New Year 2019 in kindergarten
The most common and favorite type of needlework for children is applique, the choice of master classes here is simply huge, we have selected the simplest ones to perform, but spectacular in terms of results.
Snowflakes from plasticine and sequins
Prepare:
- colored cardboard;
- plasticine white;
- sequins in white, silver or blue.


Manufacturing:
- We cut out a card of the format you have planned from colored cardboard.
- We take small pieces of plasticine and roll out 4 long thin sausages from it in the palms of our hands, glue them onto cardboard, first with a cross, and then also with a cross, but turned relative to the first at an angle of 90 * C.
- We got the base of the snowflake, now, continuing to roll small sausages in our palms, we are working on each tip of the snowflake, gluing small branches to them.
- Then you need to rely on your imagination, achieving a fluffy beautiful snowflake, on which we tightly glue the sequins, filling the entire plasticine snowflake completely.
- The postcard-application to the kindergarten can be further decorated by filling in the empty spaces.


New Year card
Prepare:
- box for children's New Year's gifts;
- wool white, blue and gray;
- sequins and sequins;
- white felt;
- glue;
- paints.


Manufacturing:
- We cut out a double-sided card from the box for New Year's gifts, open it and create winter motifs at our discretion, for example, this can be done using our step-by-step description.
- We cut the felt to the size of the postcard, glue it to one of the sides, lay out a small fluffy skein of wool and form the face of the snow maiden from it. An almost round face, a embossed nose made of wool, we insert prepared beads into the recesses for the eyes, paint on cilia with black paint and red paint on the mouth.
- You can collect "hair" in a stylish ponytail, tying it with a beautiful ribbon.
- We decorate free places, add a little blue from blue wool. We form lumps from white wool, lightly coat them with glue and sprinkle with sparkles, glue them on felt.
- On the other hand, lay out the blue wool as the basis of the drawing - the blue night sky, glue everything in several places. On top of the blue wool, we form Christmas trees and the moon from white wool, and Santa Claus and deer from gray wool.
- We glue silver stars from foil, you can use sequins.
- We glue silver New Year's tinsel along the contour of the entire postcard (video); on the front side, the postcard can also be additionally decorated using glue and sparkles.
Original craft ideas
Having picked up the newest ideas for crafts, we provide them for your convenience in one section, the process is not complicated, but in any case, it is better to do them together with children, it will also give you pleasure.


Christmas gifts
Prepare:
- glasses and jars of different calibers or tops from plastic bottles;
- figurines of pigs are small;
- glue moment;
- cones;
- artificial flowers;
- a small piece of felt;
- postcards with a shiny surface;
- beads and shiny decorative elements.

Manufacturing:
- We cut out a circle with the diameter of the selected transparent container, leaving a little margin, which we will cut off later, glue two such parts.
- Glue a small circle of felt to the bottom of the container from the outside, with a diameter slightly smaller than the diameter of the bottom.
- A figurine of a pig, by the way, can be made in advance by yourself from polymer clay, glued to the base of postcards.
- Pour shiny decorative elements into the container, glue the edges of the glass or glass with glue and glue the base with the pig and the shiny filling.
- We glue a beautiful edging from a bright shiny braid from below.
- Now we decorate the top of our souvenir, glue the pre-decorated cones and artificial flowers, additionally decorate at our discretion.
- We are proud to bring such a New Year's craft, made by our own hands according to a step-by-step description with a photo, to kindergarten, to the delight of all children, in 2019.


Volumetric snowflake
Prepare:
- 5 sheets of A4 white paper;
- ruler;
- pencil;
- glue.


Manufacturing:
- On each sheet of paper, above and below, we mark the center with a pencil, without bending the paper.
- We wrap each side of the paper towards the middle so that it overlaps by 1 cm on both sides.
- We glue the sides to each other along the entire length, make clear creases of the resulting rectangle.
- Stepping back from the edge of 2 cm on both sides, we put marks on the bottom and top, apply a ruler and make longitudinal clear creases.
- We straighten the package and from three creases on each side we form two external creases and press one inward.
- We fold the resulting long bag in half across, unfold it, apply glue with a thin strip in the middle and glue both halves.
- We mark the middle from above by putting a dot. On the one hand, we measure 9.5 cm with a ruler, and on the other hand, 5.5 cm, draw two lines, connecting both points with the marked center. Cut off the corners along the lines.
- We make 4 more parts in this way, before cutting off the edges, we apply the first part as a template so that the edges turn out to be exactly the same.
- We apply glue to each finished part with a thin line in the center, and along the bottom line, glue all the parts, laying them on top of each other.
- When the details are dry, we unfold the entire structure and glue the two extreme sides, it turned out to be a completely magical three-dimensional snowflake.
If desired, it can be additionally decorated with sparkles.
The most important event in kindergarten for the new year is a festive matinee. Naturally, such an event cannot be imagined without a beautiful and fluffy Christmas tree. Educators, together with the children, try to approach the decoration of the Christmas tree on a creative level. Often in this case, homemade toys are used. A really Christmas toy that was made by hand for a kindergarten looks very interesting. Therefore, in this article we will talk about what toys for the New Year tree you can make with your own hands.
Simple toys for decorating the Christmas tree
Puff pastry snowman.
For the first toy, prepare puff pastry, which will have 2 colors: blue and white. You can color the dough with food coloring.

- First, mold the body of the snowman. Then add legs and arms to it. And to make facial features, use a toothpick.
- Send the finished snowman to the oven. However, before you send the snowman to dry, make a hole for the ribbon.
Simple toy pendants for the Christmas tree made of felt.
And now we will make a Christmas tree toy with our own hands from felt. It will also look very original.

Progress:
- First, prepare the felt, which will have different colors. Also take: threads, thin foam rubber and decorative elements.
- Next, we determine the shapes of future toys and prepare blanks.
- Let's immediately make the laces with which the toy will be hung on the Christmas tree.
- We cut out individual elements of the blanks from felt and sew them together with the help of a thread. Don't forget to sew a loop to the toy as well. 1
- After that, we decorate the finished toy. We use various decorative elements.


Plastic cup toys.
On the Internet, you can find many Christmas decorations that you can make yourself. But in this article you can find those toys that are very easy to make with small children. For example, if you have plastic cups, then with the help of some materials you can decorate them and make original bells out of them. Also for this case, unnecessary cups of yogurt are suitable.


Snowflakes for the Christmas tree from pasta.
Your family loves to eat pasta. You have a large amount of pasta stored at home, then choose the most beautiful pasta. Glue them together with glue. And when the glue dries, paint them with snow-white paint. Don't forget to make a loop and decorate the snowflakes with sparkles.

Toys for the Christmas tree from a burned-out light bulb.
A New Year's toy in kindergarten can look very original. And in order to make it with your own hands, it is not necessary to buy expensive materials. If there are burned out light bulbs at home, feel free to decorate them and use them as creative toys for the New Year's beauty in kindergarten.


Christmas decorations from buttons of different sizes.
Of course, many preschool children make crafts with their parents. And if you help your child, then you can get the most interesting ideas for Christmas toys. Just put buttons on a thin wire. Make a hole for the loop out of the wire. Insert the string there and the original craft will be ready.


Christmas tree bells. Craft for kindergarten.
Making these bells is extremely easy. Take a couple of unnecessary bottles and cut a half from them. Paint half of the bottle together with the bottom with golden paint. Use scissors to sharpen the edges of the bottle. Thread for hanging. And at the end, decorate the craft with golden tinsel.

By the way, you can do a lot of similar crafts. Just use other holiday colors in this case.
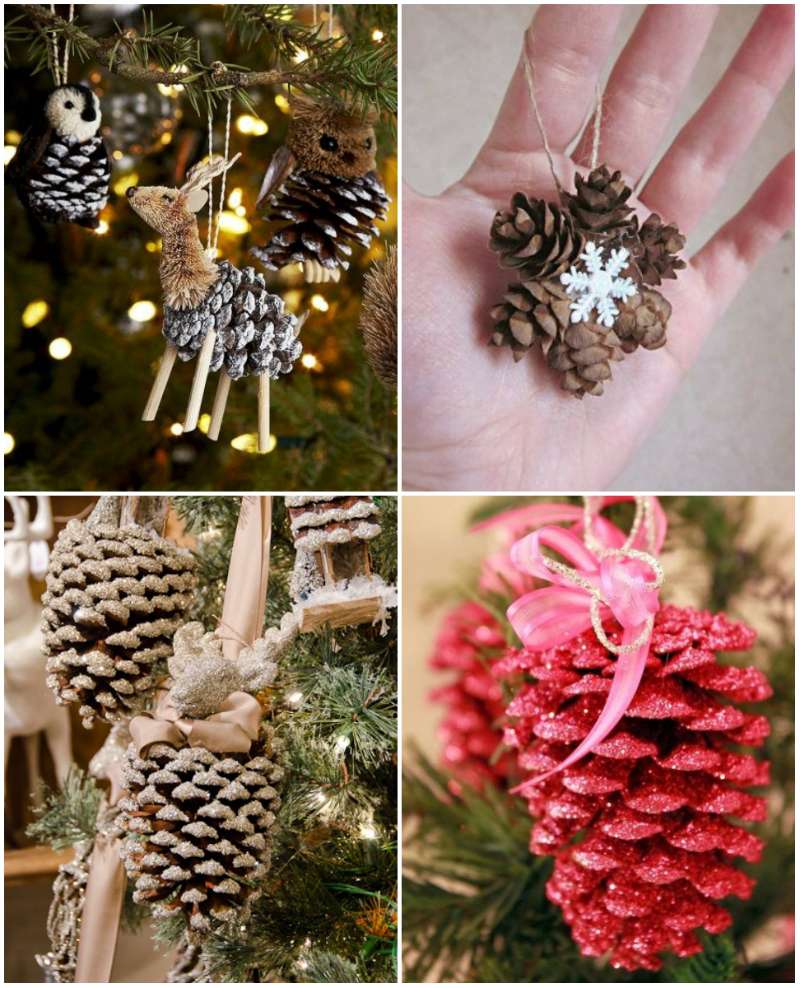
Pine nuts toy.
A do-it-yourself Christmas toy for kindergarten can be created not only from familiar materials. Many Christmas toys for decorating the Christmas tree can be created from natural materials. For the next craft, just take a few pine nuts. Glue them together with super glue. And as a pendant, use a pretty cord.

Christmas tree toys made of cones.
What Christmas tree can you imagine without cones. And in this part of the article we will tell you how to make New Year's toys from cones.
Of course, for such crafts you will need the cones themselves. Also, purchase a pack of soft pom-poms. Also, get your glue gun ready.
It is very easy to create a toy. Apply a drop of glue to the scale of the cone and glue the pompom. Such actions should be done with each scale.
For hanging, use a beautiful ribbon or a decorative cord. Glue it to the base of the cone as well.

It is very easy to make New Year's toys for a green beauty from cones. The next craft is also very simple in its execution. You just take a bump, paint it in a festive color. Glue a beautiful bow and rope to it. That's all, a wonderful and at the same time simple toy for decorating spruce is ready.

And here are some more examples of Christmas decorations that you can make for kindergarten.
Finally
In this article, you could find many interesting ideas for creating Christmas decorations. We hope that you will definitely like them. And you can make an original decoration for a festive Christmas tree in kindergarten with your own hands.
For those who, despite their inexperience in creative matters, decided to help the child with crafts, we offer ideas describing the process of making DIY crafts in the kindergarten on the theme “Winter” (photos and step-by-step instructions later in the article).
How nice it is to sit in warmth and comfort on a frosty winter evening, at home with children and make something of that kind. The snow-white landscape outside the window and the intricate openwork of ice floes on the glass inspire motives and plots for creativity. For those who are passionate about creativity and to some extent own this or that technique, it is quite easy to come up with a plot and bring it to life, and even together with the child, preparing for a thematic exhibition in kindergarten in the winter, New Year's period.

Christmas tree, Christmas tree - forest aroma
Winter for children is, first of all, the New Year! And what is the New Year without a smart Christmas tree? It will be very interesting to make a kid together with his mother and take his own forest beauty to the kindergarten, and even an unusual and very beautiful one. Here are some crafts in the kindergarten on the theme of "winter" with a Christmas tree that you can do with your own hands (step by step photos and descriptions are given below).
macaroni beauty
For crafts, you can use pasta so beloved by almost all children. Making such a beautiful Christmas tree from pasta is not only pleasant, but also useful. In children, when working with parts of this size, fine motor skills of the fingers develop, which has a beneficial effect on the overall development of the little one.
Let's see how to make this Italian pasta style Christmas tree. Let's prepare everything you need:
- Pasta. They can be of any shape, not only the one shown in the photo. Let the kid dig through the pasta and choose the right ones that he likes.
- The cone is the basis for the Christmas tree. It can be a plastic glass on a leg. A very convenient option, since, by unfastening the leg, you can use it as a stand. You can also use ready-made foam blanks, which are sold in needlework stores, or roll a cone of thick paper yourself.
- Glue. It is better if it is hot glue, as it sticks all the details instantly. But in this case, you need to do this procedure for an adult, and not trust it to a child in order to avoid a burn.
- Green paint and brushes. It is better to use acrylic, but gouache is also suitable.
- Any beads, bows, ribbons, rhinestones or just other shapes of pasta for a Christmas tree outfit.
Let's get creative:
- having prepared the base, the cone for the future Christmas tree, we begin to paste over it with pasta. You need to do this from the bottom up. We overlap the pasta of each subsequent row so that they cover the junction of the previous row with the base;

- or another option. Glue pasta in a spiral from bottom to top in one row. We glue the gaps with a spiral of tinsel;
- after the whole Christmas tree is covered with pasta needles, you need to color it. It can be either a green forest beauty, or a golden one or any other as desired. You need to paint over carefully, capturing all the gaps between the pasta. Better if there is a can of paint. But they need to cover the craft in the fresh air, since the paint in aerosols has a very unpleasant and pungent smell;

- leave the tree to dry;
- now dress up the beauty. On the crown, you can glue pasta in the shape of a star or a snowflake, having previously painted it in gold or red. And on the needles we glue any prepared decorations or other pasta, painted in different colors.
- thick paper or cardboard of any desired size for the base.
- green colored paper.
- scissors.
- PVA glue.
- white paper or cotton wool for snowdrifts.
- any decorative material for decorating Christmas trees. It can be small buttons, rhinestones, pompoms, beads and sequins.
- office white paper. It must be cut into even, identical strips. For a snowflake, it is fashionable to make strips 1 cm wide;
- scissors;
- ruler with circles of different diameters;
- toothpick for twisting elements;
- PVA glue for fastening elements;
- you can take a beautiful braid in order to make a loop for a snowflake and hang it on a Christmas tree or on a wall.
- cut into even strips of bulla paper;
- Now twist the elements. We twist all the strips the same way. We press one end to the toothpick and begin to tightly wind the entire strip;
- according to the scheme, we add all the elements into a snowflake and glue the joints;
- when the glue dries, you can attach a ribbon;
- such a snowflake can be sprinkled with glitter varnish so that it is elegant and shiny.
- two plastic bottles of the same size.
- glue (preferably a thermo-gun, it glues very quickly).
- acrylic paints and 2 brushes (wide and thin).
- some yarn for knitting.
- scraps of fabric.
- you can use any filler or weighting agent inside the penguin, or do without it, the penguin will be light, but still stable.


Step-by-step photos for this wonderful do-it-yourself winter garden craft are given below for more visual help.
Openwork tree made of paper
Here is another version of DIY crafts in the garden with the image of a Christmas tree (see photo below). These are miniature openwork Christmas trees on paper. They are very easy and quick to make with the baby. For one craft, you can make several of these beauties and stick them on the base, making the composition in the form of a winter forest and complement the picture with snowdrifts made of paper or cotton wool, snowflakes.

For work you need:
Let's start creating:


Photo: Christmas tree made of paper for a kindergarten on the theme of Winter
There is another technique that will allow you to make truly masterpieces of paper - quilling. Thanks to narrow, twisted strips of paper, you can lay out openwork, like lacy Christmas trees, snowflakes, any animals, landscapes.
The patterns in this technique are fascinating and do not leave anyone indifferent. If the child is explained the basics of quilling and the procedure, he himself will be able to make a snowflake or Christmas tree for kindergarten.
Snowflakes
The technique involves twisting very narrow strips of paper and gluing them onto a base sheet. But you can also make voluminous crafts from thick strips using quilling technology.
Let's take a step-by-step photo of the "Snowflake" craft in the kindergarten on the theme "winter" and make it with our own hands.
What will be needed:
Let's start crafting:


When the principle is clear, you can take on any image. Here are some more photos of quilling crafts to help and inspire.
I blinded him from what was
It is very entertaining and fun to make crafts with children from the unnecessary that is in the house. Kids are very happy when any used household items that are usually thrown away can be used in an unusual way and create a small miracle out of them. We offer several crafts in the kindergarten on the theme of "winter" with our own hands from improvised material, the photos and descriptions of which are given below.
Penguin from a plastic bottle
Be sure to make this wonderful penguin with the children, and maybe even a couple. If you don’t send him to the kindergarten for an exhibition, then such a cutie can be put at home under the Christmas tree along with Santa Claus and the Snow Maiden. It is done simply and quickly.

Let's prepare everything you need:
Let's start creating a penguin:
- It is necessary to cut the bottles as in the photo below, leaving one bottom from one bottle and the lower part a little higher from the other bottle.
- We glue 2 parts from the bottles. The bottom - this will be a hat, and the part that is higher is the body of a penguin.
- We paint the entire structure white and let it dry well.
- We outline the contour of the abdomen, the one that remains white. Let's go over it again with white paint, and paint the rest up to the cap (up to the top part) with black paint. We leave to dry.
- Now we paint the hat in any color and with any ornament. First, paint the hat in the main color, let it dry and draw the details.
- We draw a muzzle: 2 points of eyes and a triangular beak.
- We make a pom-pom from threads. We wind the threads on the fork more. On the one hand we tie the wound threads, on the other hand we cut. Got a pom-pom. Glue it on top.
- Cut a strip from the fabric. This is a scarf, we tie it on a penguin.

Easy to perform and effective crafts in the garden on the theme of "winter" turned out, and a detailed photo will help you make it with your own hands.
gardanda
Another wonderful craft in the garden, which you can do with your own hands from improvised material. This is a garland or Christmas decorations made from light bulbs that have already burned out. 
For her you need:
- burnt out light bulbs;
- acrylic paints;
- any shreds of fabric or felt;
- braid and rope for the base of the garland.
Let's get to work:
- First you need to think about which of each light bulb we will make. It can be snowmen, Santa Clauses, dogs, penguins and any other living creatures.
- We decorate the light bulbs for the selected character. You can refer to the photos provided.
- We complement the image with ears, scarves and caps made of fabric or felt. No special pattern is needed for these toys, just cut out a piece of a suitable shape and glue it on.
- Now we attach a braid to each toy light bulb and, if desired, collect it on a garland.


Healthy lifestyle in everything
Winter is not the time to sit at home, escaping the cold, infections and colds. Winter is the season for active outdoor play. Skiing, sledding, snowball fights, fortresses and snowmen - that's what you can't imagine this time of year without. Let's reflect this in the crafts in the kindergarten on the theme "winter", which we will do with our own hands (photos of such crafts below).

Funny and mischievous skiers can be made according to the patterns below. They need to be transferred to paper, cut out and decorated. Give them ski skewers in their hands and put (glue) them on skis from ice cream sticks.

You can make several of these skiers and hang them on a ribbon or put them on snowdrifts made of cotton wool. To do this, we take a lid from a cardboard box and glue cotton wool into it, and glue skiers on top. The craft can be supplemented with Christmas trees made of green paper twisted with a cone.

Here are a few more ideas for crafts in the garden on the theme of "winter":
- you can make a Christmas tree from palms cut out of green paper;
- and you can make a wreath of the same palms;
- snowman made of thread balls. To do this, you need to inflate 2 balloons and wrap them in polyethylene, wrap them with white threads soaked in PVA glue, let them dry and burst the balloons, pulling them out from the inside. We glue both balls one above the other, decorate with a cap and nose from an orange paper cone, tie a scarf to it;

- you can use twigs painted with white paint and make a wreath out of them, decorate with any beads, sequins, pendants that you have at home;
- crafts can be molded from plasticine. It could be a winter landscape. Sprinkle it with Styrofoam crumbs;

- another option for plasticine crafts is a panel. To do this, you need thick cardboard, we apply not a small drawing on it and decorate it not with paints, but with plasticine, rubbing the desired color into the necessary areas;
- very good and cozy crafts are made from threads. We do them like this. It is necessary to crumble woolen or acrylic threads of different colors into small crumbs (cut finely). Draw on paper with large details. It can be a Christmas tree and a snowman, for example. Now we coat each part individually with PVA glue and sprinkle with chopped threads of the desired color. So we do with each detail separately.

To visualize how to make crafts in the garden on the theme of "winter" with your own hands, watch the video below. The video shows a wonderful landscape of semolina. Such crafts can be done with the child according to this MK.
Another video of crafts for kindergarten on a winter theme:
According to child psychologists, there is no better way to the heart of a child than joint activities, and any. The joint production of handicrafts fills the heart of the child with special delight, dad and mom are sitting next to each other, not in a hurry and making something together with him.
In addition, very beautiful New Year's crafts are obtained, which the baby performs step by step (photo) with his own hands in order to proudly bring them to kindergarten. In this selection of master classes, we offer only the simplest and most interesting options for crafts that can be done by both children from the older group on their own, and kids with the help of their parents.
Easy DIY crafts for the New Year 2019 in kindergarten
To create original New Year's crafts, you can use absolutely any material at hand, craftsmen offer the most unexpected ideas that are simply impossible not to use. We have chosen the most original master classes with step-by-step execution of crafts.

Panda from cotton buds
This cute craft will bring a lot of joy to the baby, there will be no limit to his childish surprise, because he was able to create such a toy with his own hands!

Prepare:
- cardboard of a size commensurate with your idea;
- scissors;
- cotton buds - a fairly large amount;
- black paint;
- tassel;
- black colored paper.

Manufacturing:
- We cut out a simple blank from cardboard, which is a connected geometric figure - a circle and an ellipse, the size of which you choose yourself.
- So we made a model of the panda's body in cardboard, now we will dress it in a fluffy fur coat, for which we cut a large number of blanks from cotton buds, cutting off the ends.

- We glue the contours of the circle and the ellipse alternately with glue, glue the first row of cotton tips from the sticks, placing them tightly to each other.

- We paste the second row on the first, each time reducing the diameter of the figure. We place the last central sticks vertically, achieving greater volume.


- Now we cut out paws, ears and eyes from cardboard, paint it black, draw eyes and glue everything in place. We paint on the nose and black spots on the fur coat, achieving a greater resemblance to the image of a panda.

- A spectacular and simple DIY Christmas craft for kindergarten for the New Year 2019 is ready, you can use it as a decoration.

Christmas ball
Such a craft is useful both for decorating a Christmas tree in a kindergarten, and as a bright element of interior decor, for example, they can be used to make a New Year's garland.

Prepare:
- colored cardboard, any three colors;
- scissors;
- ruler;
- pencil glue;
- paper;
- pen;
- thin ribbon.

Manufacturing:
At the part with the suspension, we glue the petals and glue five other similar multi-colored parts to them, which we then connect to each other by gluing the petals.


Crafts from plasticine in kindergarten
Working on such crafts brings great pleasure, no special preparation is required, only plasticine of different colors and an acute desire to create a miracle with your children. The degree of complexity of the crafts offered here is quite consistent with the kindergarten age of the child, especially if the work will be done together with dad or mom.

New Year's ice cream
Prepare:
- Plasticine Play - Doh.


Manufacturing:
Christmas tree made of plasticine
Material:
- plasticine ordinary multi-colored.


Manufacturing:

How to mold Santa Claus from plasticine
Prepare:
- plasticine red, white, pink.

Manufacturing:


Crafts from paper and cardboard
From this sector of children's crafts, it is especially difficult to make a selection of interesting master classes, since each one represents an attractive option for creativity. We offer two of them, the most popular and simple in execution.
Father Frost
This simple craft will come in handy as a decor element for the New Year's decoration of a kindergarten, and will also introduce the child to the basics of the fascinating section of needlework - origami.

Prepare:
- red colored paper, in the quantity you have planned, on the basis that one craft is obtained from one sheet. And the same number of sheets of white paper, as well as double-sided tape or glue.
Do you know how to do handicrafts?
According to the master classes, I succeeded
Manufacturing:
- From all the prepared sheets, we cut out squares with a side of 10 cm, glue the white and red blanks and proceed to the manufacture of crafts.

- We fold each glued square blank in half in the form of a triangle to get one diagonal.

- We unfold the square, put it with one of the sharp corners, divided in half, down. We bend the lower sides to the diagonal, fix the bends.

- We unfold the workpiece and bend it so that both corners are connected, we fix it with a hall.

- We bend one corner almost to the very bottom border of the workpiece, make another small bend, get the rim of the cap, tuck the sides.

- We shade the upper white strip with a red marker and draw a nose, paint on the eyes with black, a simple craft for the New Year for the kindergarten is ready.

Snowmen from bushings
Prepare:
- toilet paper sleeves - 2 pcs.;
- glue;
- White paper;
- rhinestones - stickers;
- toothpicks;
- red plasticine;
- black colored paper;
- toy small bucket;
- red napkin.

Manufacturing:
New Year's toy in kindergarten
Decorating a Christmas tree in a kindergarten using exclusively children's crafts is just a great idea, and so popular that there is a real boom in just such a forest beauty decor. In addition, such a craft can be presented at an exhibition in a kindergarten.

Christmas ball pig
Prepare:
- ordinary Christmas ball;
- bright fabric for a hat;
- a small piece of white fleece;
- pale pink acrylic paint;
- tassel;
- sponge;
- ground white;
- black marker;
- polymer clay pink;
- braid for an eyelet;
- hot glue.

Manufacturing:
Applications for the New Year 2019 in kindergarten
The most common and favorite type of needlework for children is appliqués, the choice of master classes here is simply huge, we have selected the simplest ones to perform, but spectacular in terms of results.
Snowflakes from plasticine and sequins
Prepare:
- colored cardboard;
- plasticine white;
- sequins in white, silver or blue.


Manufacturing:


New Year card
Prepare:
- box for children's New Year's gifts;
- wool white, blue and gray;
- sequins and sequins;
- white felt;
- glue;
- paints.


Manufacturing:
Original craft ideas
Having picked up the newest ideas for crafts, we provide them for your convenience in one section, the process is not complicated, but in any case, it is better to do them together with children, it will also give you pleasure.


Christmas gifts
Prepare:
- glasses and jars of different calibers or tops from plastic bottles;
- figurines of pigs are small;
- glue moment;
- cones;
- artificial flowers;
- a small piece of felt;
- postcards with a shiny surface;
- beads and shiny decorative elements.

Manufacturing:


Volumetric snowflake
Prepare:
- 5 sheets of A4 white paper;
- ruler;
- pencil;
- glue.


Manufacturing:
If desired, it can be additionally decorated with sparkles.
With the approaching holiday of the New Year of the Pig, all kinds of toys and crafts depicting this animal will be relevant. Let's get acquainted, we have prepared a lot of crafts for you.

For example, you can make a cute pig out of the most ordinary cotton pads. Also useful are scissors, gouache, pieces of colored paper or unnecessary fabric, which are glued onto a cotton base creating your own unique little animal. Cotton pads can be pre-painted in the colors we need.

Crochet pig with diagrams and descriptions: we knit the symbol of the year 2019

If you are knitting, then you can make a cute pig as a New Year's toy. Such a pig will be a real candidate for victory in various children's competitions.

To do this, you need to take acrylic or silk threads.
Also for knitting you will need:
- hooks in sizes 1.2 and 1.8;
- needles;
- cotton wool or other filler.
When knitting, you must strictly adhere to the patterns.
Application Pig or Boar for children with their own hands

This craft is very simple, but will attract the attention of the child. In addition to colored paper, glue and scissors, we may need felt-tip pens or pencils.

The principle of operation is quite simple - we glue the cut-out details onto the sheet with the image of a pig. To make the applique more colorful, you can draw small patterns on the pig with felt-tip pens.
Drawing "Pig symbol of 2019"

For a competition in kindergarten, you can draw a pig as a symbol of the coming year. Any template you like can be printed on a printer or drawn by hand yourself. You can color in any way from paint to colored pencils.

How to sew a Piggy from felt for the New Year with your own hands? Patterns and patterns

Craft stores sell multi-colored felt. This is a wonderful fabric material from which you can sew beautiful crafts. We will also need threads, filler, ribbons and of course patterns.

The patterns are superimposed on the felt and the necessary parts-blanks are cut out. Next, the parts are connected and sewn together. Also, before the last stitches, do not forget to put filler inside. At the very end, all edges are sewn together and decorated with any improvised means: buttons, beads or other materials.


There is nothing easier than making a cute craft made from what every housewife has in the kitchen: flour, salt, water. You will also need paint and a brush.

First you need to mix together water, salt and flour to make a dense dough. Next, we form balls from it, which are slightly moistened with a brush and stick to each other in the form of a pig. Using improvised tools, we make recesses in the spout and send the product to dry. At the end of the craft, you can paint.
christmas tree

Another, though this time, an irreplaceable attribute of the New Year is the Christmas tree. I also want to tell you what cool Christmas tree crafts you can make.
Christmas tree from plasticine

For the New Year holidays, you can make plasticine Christmas trees with your child. To do this, we need only three colors: green, light green and brown. Green and light green plasticine will go to form branches, and brown for a pole.

It will not be superfluous if you “hang” multi-colored plasticine Christmas balls on the New Year tree.

We can even fold an unusual Christmas tree out of paper.

In the beginning, we take green paper of various shades, cut small squares out of it and form something like “flowers”. Next, cut out a semicircle of the same color and completely cover it with a thin layer of PVA. Without letting it dry, we glue the prepared flowers as close as possible to each other throughout the semicircle. At the end, we twist the semicircle and fix it in the form of a cone. The resulting cone can be attached to some plastic bottle, pre-painted brown and decorated with pompoms.

For this, plates of small and large sizes are useful. From each plate we form cones of various sizes and stick them on top of each other. At the end of the craft, you can decorate with rhinestones, sparkles or any other improvised means.
Decoration for the new year in the kindergarten "Christmas tree from tinsel"

The Christmas tree will turn out very elegant if it is made of tinsel. It is very easy to make and does not take much time. Cardboard is taken and twisted in the form of a cone. Further, around this cone, tinsel is glued in a spiral from the bottom up. Such a craft will be very strong and it will be possible to hang even sweets in the form of jewelry on it.
Crafts for the new year 2019 in the form of a Christmas tree-topiary
This Christmas craft for kindergarten can be a real holiday decoration. To do this, you can take a foam cone and thread the wire along the entire height. We bend the upper end of the wire into a spiral. Next, wrap the cone with foil and gently wrap thick green yarn over it. We put the craft in a homemade bucket, fix it with plasticine and close it with cotton wool.
Elegant Christmas tree made of corrugated paper

A very beautiful winter craft will turn out using corrugated paper.
To do this, we make a cone out of cardboard and wrap it with green corrugated paper. Next, you need to make a long segment from another piece of corrugation and cut a fringe on it. After that, completely glue the previously prepared cone with the resulting tape. At the very end, you can decorate our Christmas tree with paper balls, beads or other decorations.

What is New Year's without a Christmas tree? Moreover, a Christmas tree can be made from cones and other improvised means.

To do this, we need a cardboard cone around which we need to glue small cones with the back side. And the higher the tree, the smaller the cones. Then our tree can be decorated with sparkles, tinsel or even rain.

As a material for crafts for the New Year with your own hands, you can use organza. Crafts using this material can immediately claim victory in New Year's competitions or exhibitions.
We cut the green organza into strips, each of which is slightly wider and larger than the other. Next, we connect the ends and make a screed in the center. Then you can take a green cocktail tube on which we string our blanks. Below is the largest and further down. We strengthen the trunk of the Christmas tree in a plastic cup, for example, with plasticine. We decorate the organza with sequins or beads.

Foamiran is a soft foamy material with which you can make presentable crafts for the New Year in the kindergarten.
We need to take a strip of this material 3 cm wide and cut it under the fringe on one side. Further, this strip is attached with glue in a spiral around the paper cone, forming branches. As soon as the product dries, light home-made toys can be attached on top of the foamian.
Symbols of the New Year holidays: original ideas

The following symbols of the New Year are known to everyone. You can’t even imagine what a very beautiful original New Year’s craft can be made from. And so, let's get started.
Santa Claus from plasticine for an exhibition in a kindergarten

What is the New Year without such an important character as Santa Claus? It can be molded from plasticine using the technique of plasticineography.

To do this, take a cardboard circle of the desired size and put a thin layer of blue plasticine on top of it. Next, we begin to attach Santa Claus himself in parts: face, beard, hat, torso, arms, and so on. At the very end, with any convenient tool, you need to create a relief.

You can also make a voluminous soft toy of the main character of the New Year holidays. To do this, you can take a small sheet of thick cardboard and twist it into a tube. From the outside we attach a red fabric. Glue cotton wool in the form of a beard on top of the tube and form a face from any materials at hand.

Christmas snow globe

Each of us saw a snow globe in the store, which, if you shake it, you can see how a blizzard of snowflakes is spinning inside.
First, we take a glass jar of the desired shape with a lid and figures that can be attached to the inside of the lid using super glue or plasticine. When everything is prepared, pour a quarter of the glycerin into the jar and then distilled water almost to the brim. We mix the solution and then add sparkles and small white plastic that imitates snow.


To make a snowman, it is not necessary to buy anything special.

For example, you can take three ordinary lids and fasten them together in any way. On the inside, you can draw a face with paints. If desired, openwork ribbons, buttons or buttons can be attached to the craft.
Christmas tree decoration "Snowman" from papier-mâché

A papier-mâché snowman will look very impressive on a festive table or Christmas tree. It is easy to make and requires very little time and patience.
We take any starch and dilute it in water so that a solution with a volume of one glass is obtained. This will be our glue. We take a sheet of paper on which the outline of the future snowman is printed or drawn and placed in a transparent file. Then we dip the cotton wool into our adhesive solution, squeeze out the excess and put it on the file along the contour of the snowman. If desired, put a scarf, hat and other details on top of the resulting figure. At the end, dry on the battery and paint in the desired colors.

You can also get a New Year's candlestick from edible ingredients. To do this, knead a hard thick cake from flour with the addition of salt. Then we press a tea candle-tablet in the center and, having received its imprint, we take it back. The resulting shape can be encrusted with rhinestones, beads or other materials. Next, the product is dried. After a few days, the candlestick can be covered with lacquers and tinted with bright colors.

Toy for the New Year in kindergarten from threads

Recently, decorations for the New Year holidays from hollow filament balls have been especially popular. To do this, you can inflate a small rubber ball and randomly wrap it with nylon twine. We coat the twine with PVA and let it dry. Then we blow off the ball and get an unusual frame of threads. We can tint and decorate the resulting product to your liking.
Fancy snowflakes

In this list, we could not help but think of snowflakes. In the usual sense, many represent ordinary cut-out snowflakes glued to windows. We went further and bring to your attention the most unusual snowflakes that you can make with your own hands and surprise everyone.

You can also make snowflakes from plasticine. To get a beautiful and openwork snowflake, you will need several blue balls, which must be rolled into long thin sticks and twisted in the form of shell spirals. Then we wrap one of the spirals around the edges with others and add various decorative inserts from plasticine of other colors.

You can also get a snowflake with a glue gun. To do this, draw the desired snowflake on paper along the contour and leave it for a few minutes to allow the glue to dry. Then the surface of the pattern can be covered with acrylic varnish and sprinkled with silver sparkles on top. Allow time to re-dry.
Snowflake from pasta

The most interesting product before the New Year holidays will turn out even from pasta. It all depends on your imagination. To do this, for example, we take “shells” and collect five-pointed “flowers” from them. Then you can take the spirals, and finish the pattern as you wish.

Then we cover the resulting decoration with white paint and sprinkle with semolina, sugar or salt. At the very end, we can frame our snowflake with a white openwork ribbon.
"Funny snowflakes" from threads

If you want to make original Christmas decorations, then you can opt for yarn snowflakes. They are easy to perform and all you need is sleight of hand and a little patience.
At the very beginning, it is necessary to wrap the yarn tightly around the template, then the threads are cut off at the ends and tied into a knot. 8 beams of the same size are formed and are connected to each other in the center. The ends need to be fluffed. If desired, the snowflake can be decorated with any improvised means.

For the smallest, in kindergarten, I suggest drawing New Year's drawings or postcards. You can also glue beautiful applications. Be sure to include your children in the process. Every child wants to create such a New Year's miracle.
Postcard for the New Year "Christmas tree from braid"

A Christmas tree can also be made using an openwork ribbon. To do this, we take several pieces of tape of various sizes and begin to glue them onto a sheet of cardboard in the form of an accordion. The bottom one should also be the longest one. As the tree grows, the length of the glued ribbons also decreases. Thus, we will get a real three-dimensional Christmas tree with fluffy branches. At the end of the work, you can decorate the craft with buttons or bright beads.

In kindergarten for the exhibition, you can draw Santa Claus, as the most important character of the New Year holidays.

And in order to give the drawing a special atmosphere, it is necessary to moisten a sheet of paper with a sketch with water, apply watercolor paint, then remove excess cotton wool with a cotton pad and sprinkle with salt. This technique will allow the background to acquire "snow crystals". Next, paint as you wish.
Application "Snowman" from cotton pads

Applications do not have to be made from colored paper. Well-known cotton pads are also perfect.
For example, cotton pads can imitate snowballs of a snowman, snowdrifts, or snow-covered tree branches. The remaining parts of the application: snowflakes, houses, tables of trees, can be drawn or glued with colored paper.
New Year's card on a stand

A handmade postcard will be a wonderful craft and at the same time a gift. Such crafts are made in the form of a book, in which absolutely any items can be used for decoration.
The highlight can be voluminous paper figures inside the postcard itself.
Fabric jewelry

Many mothers love needle and fabric, so of course there are fabric crafts for the New Year on our list. There are a lot of them, everything depends on your imagination. We will describe some of the New Year's fabric crafts today.
Felt Christmas tree toys

Using felt and cotton wool, you can make real decorations for school competitions for the New Year, and at the same time they will not be inferior to store ones.

To do this, we cut out two identical halves of the future toy from felt, sew them together and stuff them with either cotton wool or padding polyester. Then you can decorate the toys with sparkles, beads or beads.
Snowman from threads

By the New Year, you can make a snowman out of threads, which in some way will resemble a Christmas tree toy.
For this we need:
- ordinary balloons,
- PVA glue,
- kapron or other dense threads,
- colored cardboard.
We inflate three balls according to the size of the lumps of the future snowman so that they differ in size from each other. Next, we wrap each ball randomly with threads dipped in PVA. After we dilute the glue with water in a ratio of 1: 1 and now completely cover the ball with this solution. We send to dry completely.
sock snowman

A very cute snowman will turn out from the most ordinary white socks.
Also for our crafts it will be necessary to prepare a multi-colored sock. At the very beginning, we take a white sock and cut off his heel to the ankle. We tighten the place of the cut with a thread, turn it inside out and fill it with any filler. When the sock is clogged to the top, we tie the second end.

At the colored sock, we also cut off the heel and the tip under the toes. Next, we take the middle from the cut off sock and pull it onto our bag and tightly tie its lower and upper edges with threads. Thus, we have a prototype of a snowman with three lumps. We put the tip of a colored sock on the head and tighten the top with a thread. So we get a hat.
Now you can start decorating the face and clothes with the help of small buttons. With due imagination, we can get a truly New Year's toy craft.

Reading what unusual beautiful crafts can be made for the New Year, many have already asked the most understandable question: “Why haven’t paper crafts for the New Year been described yet?” After all, it's easier than ever. Don't worry, we didn't forget, we just played your appetite.
"Volumetric snowflakes" made of paper

Snowflakes can be not only on the street, but also in the apartment itself and at the same time not melt. And if they are made voluminous, then they can become an additional decoration for the New Year holidays.

For such snowflakes, we need glue, scissors, threads and, of course, the colored paper itself.
The sequence of actions should be as follows:
- We cut the paper into squares, bend it diagonally and make cuts 1 cm wide with scissors.
- We unfold the paper and fold the resulting stripes and fix with glue from the center to the edges.
- And in order to achieve volume, we need to change the direction of the bulges.
- So we must glue six squares, which will need to be connected at the lower ends into one snowflake.
- We hook the snowflake by the thread and it is ready to decorate the Christmas tree.

The simplest, but in their own way unique snowflakes. They can be mastered even by a child from 3-4 years old under the supervision of adults.

The most ordinary paper is taken and cut into squares or circles. Next, the resulting figures are folded in half several times and any patterns are cut out with scissors. The more folding stages there were, the more original and complex our snowflake will turn out.

Such crafts can be glued both on windows and hung throughout the apartment by a thread.
Crafts to school from disposable tableware

Here's something you've definitely never heard of before. It turns out that from the simplest disposable dishes you can make a very beautiful and original New Year's craft.
Create Santa Claus from disposable plates

To school for the New Year, you can make Santa Claus from disposable plates, we will definitely need paint and cardboard in white and red. From it we will make Santa's clothes.
First, we cut off a fourth part from the plate - we will not need it. We paint over the bottom of the remaining part with flesh-colored paint - this will be the face. Using improvised means, we glue our character's eyes, mouth and nose. And we cut out and make a cap from cardboard.
Making a Snowman for 2019

To make a beautiful snowman from disposable tableware, we will also need: glue, paper, cotton balls and markers of various colors.
We turn the plate upside down and, starting from the edges and towards the center, glue it with cotton balls. We can color the paper in red and cut out a hat from it. The nose, eyes and mouth can also be drawn using markers.
Finally

Christmas is one of the most anticipated events in a child's life. And if you do DIY crafts with him, you will not only teach your child perseverance, but also hard work. And if the toy is made with due diligence, then it can win competitions and become one of the best crafts in the kindergarten or school.
Happy New Year))


