Origami chinese modular scheme. Crafts from origami modules: simple and complex lessons for children and adults. The workflow looks something like this
In the world of needlework, there are a lot of ideas, the implementation of which allows you to make simple crafts for the New Year or for another holiday to please yourself and your loved ones. Modular origami for beginners is a very interesting activity. A person can learn how to create small figures from modules quite quickly, it's easy. There are simple schemes on the Internet, the description of which will allow you to make a rooster out of paper, a temple, a flower, etc.
Using this technique, even from white paper, you can step by step create products of incredible beauty. New Year's pictures and patterns, a variety of animals - you can't count everything. For beginners, it is better to take something light, from a small number of modules, for example, from 20.
Modular origami for beginners is a very interesting activity
Step-by-step instruction:
- There is an option to purchase separate paper for modular origami in the stationery store. But for assembling a rooster, plain colored paper is also suitable, however, it is thinner. It is recommended to use yellow material.
- A square sheet of paper is folded in half. The resulting side strip should be folded and cut along the fold line.
- The paper is then folded in half to form a rectangle.
- It is important to ensure that the top and bottom edges match. The fold line should be ironed.
- After that, the sheet unfolds. The square is folded again, only this time on the other side.
- The paper is folded vertically, that is, from left to right.
- After the fold is made, the leaf unfolds. If everything was done correctly, then there should be a cross in the center of the sheet.
- The upper right corner is applied to the lower left corner. Then a fold is made. The action is repeated, but only on the other side.
- The right bottom side of the paper with the crease is folded towards the center. The resulting square is folded into a rhombus. In this method, triangular leaf shapes should not be obtained. If the figures of triangles were formed, this means that the needleworker did not follow the plan correctly.
- The corners of the figure must be collected towards the middle. The top corner is adjusted to itself. Next is the fold. Three other folds are folded back.
- The top corner of the square rises up along the fold line. The other two folds fold inward.
- The upper edges of the sheet are folded inward. You need to straighten them out.
- The outer edges of the resulting diamond are folded in the center. The right fold folds towards the left.
At the last stage, the figure is flipped, and the top corner of the bottom layer is folded to the top corner.
Gallery: modular origami (25 photos)


Modular origami for beginners: swan (video)
Herringbone using modular origami: step by step instructions
Such a three-dimensional creation, like a paper Christmas tree, can decorate pictures, stands or wooden decorative boards.
So, detailed technique:
- The Christmas tree should be made of green paper. You can use both colored and plain paper. If the choice fell on the usual one, then you should use paints so that the material acquires a green tint.
- Collect the Christmas tree should be from a square sheet. Fold lines are made in height, width and diagonals. The paper unfolds.
- Then the basic model of the figure is formed - a triangle. A fold line is outlined in the figure. The right side turns towards her.
- Next, use the fold line so that the right corner of the figure is centered on the base of the triangle.
- All corners are wrapped.
- Then you need to use scissors so that the Christmas tree then becomes voluminous. Three cuts should be made on the right and on the left side.
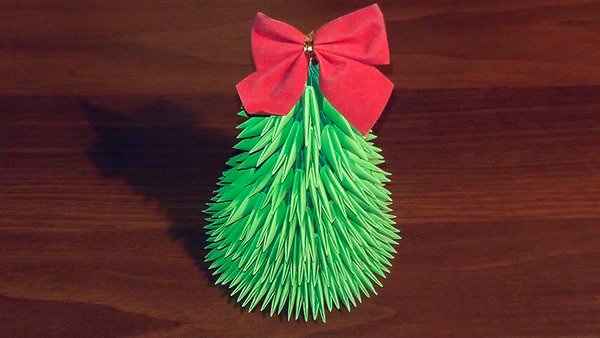
Such a three-dimensional creation, like a paper Christmas tree, can decorate pictures, stands or wooden decorative boards.
At the last stage, the resulting segments are bent to the sides.
Small human figurine: a simple description and diagram
For each detail of the little man, you can use paper of different colors, for example, make the top yellow and the pants blue. But to simplify the task, it is better to use a single-color material. A pencil is not needed to create a little man.
- So, the square material is bent in half, then the side corners of the figure are bent.
- A zipper fold should be made at the bottom of the sheet. The corner drops at the top. Then the figure is flipped.
- The corner is slightly bent. You do not need to bend it too much, just slightly outline the fold line.
- After that, you need to carefully flatten the "pockets" of the resulting figure, bending the resulting triangle.
- One half of the product is bent back.
- The corner is pulled up, part of the paper is pulled out. An elongated figure is an almost finished little man.
- After pulling the shape up, only the "nose" of the triangle should remain visible.
- The corner bends inward, and the man's head rises up.
- The remaining upper corners are bent inward on each side.
For each detail of the little man, you can use paper of different colors.
At the end, the arms and head of the little man should be glued to the body.
Tips for those who are engaged in modular origami
- By connecting several origami with a thread, you can decorate a room with this. Lots of ideas! For example, you can hang crafts on a nail by the door. It looks very nice, especially if the origami is multi-colored.
- A beginner who wants to improve his skill can experiment with different materials and colors.
- Thread origami through the thread must be very careful not to damage the paper.
- In such work, it is recommended to use thin paper designed specifically for modular origami. Why? It is thinner and easier to work with. Although people who fold paper very intensively can tear it, but if everything is done carefully, then the craft turns out to be very beautiful.
- Origami is a great gift. By the new year, you can make a Christmas tree, and by February 23 - a tank.
- There is an alternative material for creating modular origami - this is foil. From it, crafts are more durable, besides, they are shiny.
- In order to follow an environmental plan for preserving the environment, you can use not new, but recycled paper.
- If a person plans to donate origami, then the last step of its completion is recommended not to be done in advance, but before delivery. So the craft will not look "rumpled".
To create a beautiful craft, the main thing is to make smooth edges. That is why it is not recommended to use poor quality material. If the sheet is torn, then elegant origami will not work.
How to make modular origami in the shape of a heart?
- Take a sheet of square paper. The colored side is turned upside down. The top left corner folds towards the center. The edges should be evenly attached to each other.
- The action is repeated with a different angle. As a result, the material should have several fold lines. There is no need to unfold the leaf after this.
- The bottom of the material is folded towards the center.
- Then the leaf is completely straightened and turned over to the other side. If before that everything was done correctly, then a bulge should form in the center of the sheet.
- Next is a horizontal fold.
- The sheet is turned over again.
- The two edges of the paper are folded towards the center. The edges of the shape should touch.

In childhood, each of us collected paper crafts. Ships, airplanes, frogs are traditional paper toys. However, the hardy Japanese did not stop there. Origami is a whole culture, the art of paper plastics. In today's article I will introduce you to one of the types of this art - modular origami. For some reason, I wanted to remember summer today and I bring to your attention origami chamomile flowers. This very beautiful, pure flower will look great in a composition on your desktop. After all, warm rays of the sun blow from him, looking at him, you always want to go on vacation. At the moment, I will offer you camomile origami scheme - the easiest to work with. When you master this amount of work, you will definitely create another scheme, a heavier, but charming chamomile according to a different scheme.
Already from the name it is clear that these crafts are based on modules that, when inserted into each other, are assembled as a constructor. Therefore, the first thing we need to master is the creation of a module. To do this, we need a regular A4 sheet 1. Cut the sheet into 16 equal parts, as shown in the figure.
2. Take one sheet and bend it in half.

3. Once again in half and turn back. Flip the fold towards you

4. Follow the lines, fold the edges to the center.

5. Turn over and bend the lower lapels up. At the same time, we bend the remaining corners for a triangle.


6. Unbend, folding small triangles along the marked lines, and again bend the lapels up. Fold in half.

7. The module is ready.

8. On the one hand, it has a pocket that we will need during assembly.

Don't be put off by such a long description. In fact, the module itself is assembled elementarily and very quickly. It is worth figuring it out once, and then your hands will twist the modules by themselves. The next thing you need to know before proceeding with the assembly - the module has 2 sides: Short:

and long:

This is important, because during assembly we will connect the modules along the long or short side. And finally, we turn to the process of creation itself. I will show you one simple diagram from modular origami. Having mastered it, you will be able to take on more complex models. Chamomile scheme, the first and second rows will be assembled from 20 pink modules. When assembling, the module is placed on the short side, as shown in the picture.


We add the third row of 10 yellow modules, put the module on the long side. At this stage, be careful, the tails of neighboring modules are connected. That is, we get a connection in a checkerboard pattern.


After that, we turn our flower over and we will make the rest of the rows in modules on the short side.

Fourth row - 10 yellow modules.

Fifth row - we put 2 elements on each module. The assembly takes place in such a way that the free pocket is inside. Thus, we need 20 white modules.

The last sixth row will consist of 30 white modules. We put on 3 elements for 2 modules, again free pockets should be inside.


The flower itself is ready, it remains to make the stem and leaves. To do this, we need a regular straw and green tape.

We wrap the straw with electrical tape, make leaves from colored paper or from all the same electrical tape. Insert the stem into the center of the flower. To do this, squeeze the chamomile petals a little, and a hole for the straw is formed on the back side. It must be said that special fastening is not needed, the stalk will hold perfectly anyway.

Make a few more of these daisies and you will have a beautiful spring bouquet. This craft can also be a good gift for friends and family.


Modular origami: flowers
In general, there are many types of origami. We offer to try your hand at volume. To create such figures, a large number of identical elements are used - modules that are inserted into each other. The most commonly used is the triangular module. As a rule, it is folded from small pieces of paper, which are then inserted into each other. All leaflets for modules must be the same size. Most suitable is 1/16 or 1/32 of the landscape sheet. So, let's move on to creating modules:


As you can see, the module has two bottom corners and two pockets, thanks to which they can easily be inserted into each other. This is how origami flowers are created from triangular modules.

However, in addition to the triangular modules, you will need 1 kusudama module for the core of flowers from the modules.
- Fold a square piece of paper in half with the right side inward.

- Having unfolded it, we fold it in half again, but in the other direction.

- We unfold the workpiece, fold it inside out diagonally in half.

- We unfold the part again and fold it diagonally, but in the other direction.
- Having unfolded the workpiece, we turn it inside out towards us.

- Along the lines that were obtained by folding diagonally, we fold the square.
- Bending the edge of the square, flatten it in the middle.

- Turning the square over, we do the same with the 3rd edge, as well as 2 and 4.

- 1 edge of the part is bent 180 degrees. We see only its reverse side.

- We bend the edge so that the edge is along the fold line of the workpiece.

- We do the same with the 2nd rib.

- After that, the triangular edge between the bent ribs must be bent to the top of the module.

- In the same way, in pairs, we add 5 and 6, 3 and 4, 7 and 8 edges of the workpiece.

- We expand the entire workpiece.

- We work with the wrong side. We begin to fold and assemble the part, as shown in the photo.
- In the same way, add the other three corners of the workpiece.
- Our module is ready!

Modular origami flowers: master class
And now let's proceed directly to the assembly of the cornflower flower. To do this, you will need to make 10 blue, 10 green and 70 blue triangular modules and 1 blue kusudama module. The assembly diagram of the modular origami cornflower flowers is as follows:
1. 3 rows are assembled immediately:
- 1 row - 10 green modules;
- 2 row - 10 blue modules, worn with the long side out;
- 3rd row - 10 blue modules, worn outward with the short side.

We get a small flower.

2. Turn the flower over to the other side and add the 4th row of 10 blue modules.

3. In the 5th row, 20 blue pieces should be put on. This is done in such a way that each previous module has 2 modules. Loose pockets should be inside.

4. In the 6th row, 30 blue modules are used. For each previous 2 modules, 3 modules are put on: 1 module is located in the center, and 2 side ones so that the free pockets are inside.

5. The Kusudama module is inserted into the core of the flower.
6. We make a cornflower stem. To do this, cut out the upper part from the cocktail tube, we do not need it.

We wrap the tube with green paper and cut out the leaf.

7. Insert the stem into the lower central part of the flower. Ready!
So, knowing how to make a flower from modules, you can easily create a whole bouquet of cornflowers. It is best to place a bouquet in an origami vase from modules. It's a completely different story!

From the modules you can make a vase for flowers, and other figures, for example, a hare.
Master class Craft product Origami Chinese modular Modular origami "Lotus" Paper Glue
I have seen a similar lotus on the Internet more than once, but here, just like the scheme, there is nowhere (at least I didn’t find it). Many are looking for a scheme or a master class, I decided to help))) This is the lotus we will do today )) For him we need: white -271; pink - 1064; green - 780 The size of the modules is 1/32.

So, let's begin))


Thus, we collect 2 rows of 8 pieces in each row. We close the chain.

The third row is 16 pieces. We dress in this way (the photo shows a different color).

Fourth row 16 modules. We dress normally.

Carefully, holding the edges, turn the workpiece inside out.

Fifth row 32 pcs. We add the same as in the photo number 5, only with the reverse side.

Sixth, seventh and eighth rows of 32 pcs. in every row. We dress normally.

Ninth and tenth rows of 32 pcs. but we dress with the long side out. The ninth row is white, the tenth is pink.

Now we collect the upper six-leaf (that's what I call it). We collect 2 rows of 54 pcs. in each row. It is better to stick on glue.

Third row 1 white, 8 pink, 1 white, 8 pink, etc.

Fourth row 2 white, 7 pink, etc.

Fifth row 2 white, 6 pink. We dress in this way.

Sixth row 2 white, 5 pink, etc.

Seventh row 2 white, 4 pink.

In the eighth row 3 pink, in the ninth-2, in the tenth-1.

The eleventh row is 2 white, the twelfth row is 1 white. Our six-leaf is ready.

Now we make the bottom six-leaf. We collect 3 rows of 66 pieces.

Fourth row 1 white, 10 pink, etc.

Fifth row 2 white, 9 pink, etc.

Sixth row 2 white, 8 pink, etc.


We slightly raise the center of the upper six-leaf and carefully insert the crown of our flower into the hole.

This is what it looks like from the back side.

It is advisable to glue the junction with a thermal gun.

We glue the lower six-leaf, bend it in the shape of a lotus.

And here are our leaves. We collect 6 rows of 39 pcs. in every row.

Seventh row. We dress one module on one beam. Thus, 78 pieces come out in a row.

The next row, we already dress 12 modules in the usual way, skip 2 rays, dress 12, skip 2, etc.


Then 10,9,8,7, etc. Here are the leaves ready))

We connect all the details and voila))) Our lotus is ready)))

Here it is in red :)

THANK YOU SO MUCH to everyone who looked)) This is my first MK)) I hope I explained everything clearly))
Modular origami is more complicated than simple origami for children and requires attention, perseverance, spatial thinking and patience. However, modular origami is not difficult to fold. The main thing is to be careful! Flowers in modular origami take pride of place. Along with thematic figures for the holidays (for example, an Easter egg on a stand using the modular origami technique) are created from simple modules. It is a little more difficult to make bulk modules. For example, the primrose flower. It turns out he is beautiful and strict.
For work, we need the following materials:
- a square of origami paper with a side of 10 cm.
How to make a primrose flower in modular origami:

1. From origami paper, you need to fold the basic shape of a double square.
15 row-18 white, 2 pink, 16 row-17 white, 2 pink, 17 row-16 white, 2 pink,
18 row-15 white, 2 pink, 19 row-14 white, 2 pink,
20 row-13 white, 2 pink,
21 row-12 white, 2 pink, 22 row-11 white, 2 pink,
23 row-10 white, 2 pink, 24 row-9 white, 2 pink,
25 row-8 white, 2 pink, 26 row-7 white, 2 pink,
27 row-6 white, 2 pink, 28 row-5 white, 2 pink,
29 row-4 white, 2 pink, 30 row-3 white, 2 pink,
31 row - 2 white, 2 pink,
32 row-1 white, 2 pink, 33 row-2 pink, 34 row-1 pink
crafts from modular origami
big flower
Modules 1\32 sheet a4
1-14 rows-10 white modules, 15-18 rows-20 white, 19 row-19 white, 1 pink,
(we begin the formation of a flower by reducing the white modules)
20 row-18 white, 2 pink, 21 row-17 white, 2 pink, 22 row-16 white,
2 pink, 23 row-15 white, 2 pink, 24 row-14 white, 2 pink,
25 row-13 white, 2 pink, 26 row-12 white, 2 pink,
27 row-11 white, 2 pink, 28 row-10 white, 2 pink, 29 row-9 white, 2 pink,
30 row-8 white, 2 pink, 31 row-7 white, 2 pink,
32 row-6 white, 2 pink, 33 row-5 white, 2 pink,
34 row-4 white, 2 pink, 35 row-3 white, 2 pink, 36 row-2 white, 2 pink,
37 row-1 white, 2 pink, 38 row-2 pink, 39 row-1 pink

DIY modular origami
Petal
1 row-1 green
2 row-2 green
3 row-3 green
4 row-4 green
5 row-5 green make 2 parts and connect them
6 row-6 green
7 row-7 green
After connecting, we continue to collect the sheet
8 row-13 green modules
9 row-14 green
10 row-13 green
11 row-14 green
12 row-13 green
Reduce around the edges
13 row-12 green, 14 row-11 green, 15 row-10 green, 16 row-9 green,
17 row-8 green, 18 row-7 green, 19 row-6 green,
20 row-5 green, 21 row-4 green, 22 row-3 green, 23 row-2 green.
24 row-1 green

Core callas

For the stems, I took the wire and wrapped it with green strips of paper.
Modular origami cornflower
If you are seriously thinking about exploring a new type of creativity for yourself, then be sure to try your hand at modular origami. We learned how to make paper figures at a very young age, but at that time few people knew that it was possible to create beautiful figures from modules: for beginners, this type of art that came from the East may seem difficult. Therefore, in no case do not rush, because this is an art that involves calm and attentive work with your hands. Just look what masterpieces can be created using this technique:

If from one glance at three-dimensional figures made using the modular assembly technique, a lot of questions are born in your head about how to repeat such a masterpiece, then be patient and paper. Any animals, flowers, fruits and much more can be created by your hands only from paper modules.
Modular assembly lessons
How to fold the module for this technique is clearly seen in this diagram:

For example, using a detailed video tutorial, you can fold a very cute penguin:

But this is not the only master class. Origami crafts from modules, the schemes of which are very clear, will be your first step into the world of three-dimensional figures. For clarity of work, it will be useful for beginners to watch a video with detailed comments on each step of the work.
Crafts from origami modules: Swan
The first creation will be a small swan made of modules. So stock up on paper and get to work, following my instructions.
Materials:
- 69 white modules;
- 1 black module.
Progress:
We begin to collect the figure from the body of the swan. The first row will consist of 12 modules interconnected in a circle. The connection of the modules is clearly shown in the diagram:

In the second and third rows, we will also have 12 modules each.

We turn over our workpiece and start making the tail and wings from the 4th row. For the tail, we fix 2 modules in an arbitrary place.

In the 5th row, we complete the tail with 1 module, in which the short side of the element should be outward.

Now, symmetrically from the tail to the left and right, we begin the formation of wings.
For the wing, we again return to the 4th row and fix 4 modules to the left of the tail.

To narrow the wing, you need to reduce the number of modules in each subsequent row. Those. in the 5th row - 3 modules on top of the previous 4 elements, in 6 - 2 elements, in 7 - 1 element. In the 8th row we fix 1 module again. The right wing must be done in the same way.


We smoothly moved on to the final stage of creating a small swan. Now it remains for us to make the neck, and we again move on to the 4th row. We fix 2 elements on the remaining free modules.

In the 5th row, we add another module, to which we need to add 5 nested white elements.


For the beak, add 1 black module at the end of the neck. Thanks to the design of the neck, its bend can be changed at will
Here we have such a swan:

Now you can try to create more complex crafts, the triangular origami module is easy to make, and the figures made from these modules are really breathtaking and amaze with their beauty. MK below will convince you of this.

This paper folding technique is very easy to master. The main thing is to fill your hand in the manufacture of basic triangles, and then any figure is within your reach.
Flowers from modules
So, for example, flowers from origami modules will be a great way to create a summer mood during cold winter evenings.

By the way, creating such a flower is not difficult at all. For this we need 55 yellow and red modules.

The first row consists of 5 yellow modules (for fixing, it is best to grease the inner pockets of the modules with transparent glue).

We begin the formation of the petals. To do this, insert the yellow corners of the first row into the pockets of the red modules. Add 8 modules:

We close the petal with the ninth connecting corner:

Repeat this operation for 4 more petals:

So that our flower can be put in a vase, we make a stem using a cocktail tube and a strip of paper:

And glue to the base of the flower:


Most importantly, remember to be patient and focus on your work. Creating large volumetric figures from modules is not an easy task. But the result will meet all your expectations, inspiring you to new achievements.
In the meantime, you are training in the formation of modules for origami, I will prepare another MK, which will reveal modular origami from a new side for you.
Crafts from origami modules on video
Making an Easter egg:
Another egg for Easter:
Father Frost:
White dove:
Origami is a good way to keep yourself and your kids entertained in your spare time. Surely you and your child will enjoy both the process and the result.
What is origami and what is needed for it
Origami is a Japanese paper folding technique that results in various shapes, most often flat ones. Modular origami is a complicated, advanced version of the classic one, when a full-fledged three-dimensional composition is created from paper blanks. Crafts from modules are used as decor in the interior.
Classic origami involves the use of strictly one sheet of paper, without glue and scissors. Moreover, the paper must be special - it is called "kami", ordinary office paper is not suitable for serious crafts. Origami paper should not be too thick or, conversely, too thin. Specialty paper manufacturers have taken care of this, so the sheets hold their shape quite well, the folds remain in their original form and are easy to work with. Crafts from modules also involve the use of such sheets. It is interesting that in Japan itself they use ordinary Japanese paper made from rice, bamboo or wheat.
Who can do modular origami
Crafts from modules, or modular origami, as this technique is also called, is a great way to spend time with benefit and get moral and aesthetic pleasure. Origami with children is also an opportunity to have fun together. For children, this is the development of fine motor skills of hands, imagination and the opportunity to feel like a real artist, sculptor.

Crafts from the modules will be within the power of children from the age of three, and possibly even earlier, if the child has sufficiently developed attention and perseverance. But such an activity will appeal not only to children, because this is a whole art that can require a lot of time and effort. The creation of some crafts can take several days or even weeks, depending on the complexity and size of the future figure.
Why crafts from paper modules keep their shape and do not fall apart

As already mentioned, glue is not used in the work on creating origami. But why do the crafts not fall apart, but gather into figures and remain in this form? Everything is much simpler than it might immediately seem, one of the laws of physics operates here, namely the force of friction. Thanks to this, the workpieces hold each other tightly.
Some crafts from modules for beginners may not be easy to perform. There are complex figures that even need mathematical calculations. Therefore, it is better for beginners to turn to master classes and try to create products in someone else's likeness. And only when all the basic folds are mastered, you can start creating more complex crafts from the modules. For beginners, it will also be useful to learn how to read the basic signs in origami. They will definitely come in handy in the future.
Crafts from modules. Creation schemes. Where can you learn technology?
In origami courses you can find many talented people who are happy to share their skills and ideas. They also provide diagrams, photos and videos from which you can learn the art of origami. In big cities, you can find courses where children and their parents can be taught how to create some crafts from modules, the schemes of which will be provided. In some courses and seminars, they can teach you how to mathematically calculate what sizes and shapes the blanks should be in order to make your own unique complex figure.

DIY triangular module
The most common and simple to perform, but at the same time very beautiful are crafts from triangular modules.

Caskets, vases, garlands, toys - all this can be made from paper triangles. But, of course, these are not ordinary triangles, and there is still work to be done to create them. In such a case, the main thing is to be patient, because, as a rule, a lot of such blanks are required.
The size of the rectangles does not matter, as long as the aspect ratio is 1:1.5. Lay the paper out and fold it in half, joining opposite sides of the larger sides. Then bend in half, connecting the smaller sides, and then unbend. This is necessary in order to outline the middle of the workpiece. Fold the corners towards the middle. Flip the item. Fold the edges of the rectangles to the triangle you made earlier. Fold everything into a single triangle. Such a module has two pockets for connections with other modules.
Modular crafts for beginners

The easiest way for beginner origami masters is to create a small toy Christmas tree. You will need:
- a stick on which you will string modules;
- origami paper;
- stand.
The first tier in the first row of the Christmas tree consists of eight triangular modules closed in a ring. The second row is also made of eight blanks. In the second tier in the first, second and third row, use ten modules each, in the fourth - five (fasten the triangles through one). The third tier, from the first to the fourth rows - 12 modules, in the fifth - six. The fourth tier, from the first to the third row - 14 modules each, in the fourth - seven. On the fifth tier, make four rows of 16 blanks, and in the next two - half as much.
It remains to put all the tiers on a stick and attach it to the stand. The finished Christmas tree can be decorated with rhinestones, New Year's rain, self-adhesive paper.
Most modular figurines start from the bottom. Therefore, it is necessary to learn how to make a basic ring from blanks. It will be used both in simple figures for beginners, and in complex, more advanced models for true origami lovers.
How to make a paper swan
To create it, you will need 459 triangular blanks. It is necessary to collect triangles in a ring. Attach two more to one module, one in each pocket. Then make another such blank of three triangles and attach to the first.

So continue until the ring closes, in total it should take thirty modules.
In the next row, the modules are staggered to the previous row. In total, it is necessary to make five such rings, each of which should take thirty modules. The resulting ring must now be turned inside out. The shape of this figure should resemble the Roman Colosseum or a bowl.
Continue to mount the modules in a checkerboard pattern. In the seventh row, attach twenty-four blanks. From 24 triangles, make a swan neck by connecting the triangles in a row. Now make the wings. Mirror the modules, reducing their number in each row by one.
A wonderful craft came out of the modules. The swan will perfectly fit into any interior, and it can also be presented as a gift. Friends and family will definitely appreciate it.
How to make an origami vase
Start collecting modules in a ring, as in working on a swan. From the first to the third row, 28 blanks are used. In the third row, start adding triangles. Every three blanks, add another one, in total there should be 35 modules in a row. The fourth and fifth rows are simply assembled into rings without additions. In the seventh row, increase the number of modules by seven. Until the twentieth row, collect the rings. Then, up to the thirtieth, reduce the number of modules. In the 21st - 28, in the 22nd - 25, in the 23rd - 22. Then reduce one module at a time. Finally, you can grease the finished vase with PVA glue so that it does not fall apart.

You can put paper flowers in the finished vase, which can be made using the modular origami technique. Make a ring from triangular modules. In the second row, attach more blanks, but in a different color. The result is a simple, but very beautiful chrysanthemum. It remains only to glue the leg to the flower. It can also be made from triangles, or simply twist a thin roll of paper and glue it to a chrysanthemum bud.
If you like crafting, creating new things, then you will definitely like crafts from modules. A vase, a swan, a Christmas toy, a flower, an animal figurine - all this can be done using sheets of paper and your imagination.
Of the many areas of paper crafts, origami is the most popular. Creating paper figures by folding a sheet of paper gives unlimited scope for imagination and creativity. In addition to the classic, modular origami has recently become widespread.
The peculiarity of modular origami is that paper figures are assembled from separate modules. There are certain rules for their folding. By inserting modules one into another, real works of art are created. Modular origami captivates with its unusualness, the ability to create various works - from the simplest to entire artistic compositions.
Getting ready for work
Since modular origami is, first of all, a technique for assembling from modules, the most important thing to work with is:
- A4 paper.
From sheets of paper, you can pre-cut blanks to create modules. The sheet is divided into 16 or 32 parts - these are the standard dimensions of the modules. For large figures, the sheet is cut into 4 or 2 parts.
- Scissors, ruler, PVA glue.
- Schemes for assembling models.
In stores, you can find ready-made modular origami kits for beginners with step-by-step instructions for assembly rules. Also, to learn how to make modular origami out of colored paper, the lessons of special master classes will help a beginner or a child. In such classes, according to the schemes, it is considered how to make step by step, for example, animal figures or a Christmas tree.

Assembling the modules
For work, a triangular module is used.
Experienced craftsmen make many paper elements of different colors in advance. It turns out a kind of modular constructor, with which you can make an original craft. The advantage of this technique is that the modules are used more than once: a boring figure can be disassembled and a new original craft can be created.
In the finished triangular module, you should get two pockets and two corners that allow you to connect paper elements. To make a triangular module, prepare rectangular pieces of paper.

The rectangle is folded in half lengthwise, and the resulting part is folded in half across. This is how two main folds are formed to create a module.
The edges are bent towards the middle, the figure is turned over.
The bottom edge rises. The corners are bent through a large triangle.
The resulting lower part is unbent. Small triangles from below are folded along the formed lines, the edges rise.
Bend the resulting triangle in half.

It is these modules that help create voluminous, beautiful works. Any craft in this type of origami begins with the manufacture of a large number of modules. To create durable figurines, it is necessary to correctly connect the details of the craft.
Each scheme usually indicates on which side the finished elements are connected.
There are 3 generally accepted schemes for connecting parts in modular origami:
- You can connect 2 parts on the long side and add 1 on the short side.
- Connection only on the long side.
- The elements are connected only by short sides.
Models for beginners
Having learned how to create modules, a novice master can start creating a paper figure. The simplest modular origami for beginners is made from 20 modules.
For a cute chicken, you will need 4 red and 16 yellow parts. After assembling the figurine, glue the beak and eyes.
Among the large number of multi-colored works, a modular origami made of white paper stands out. White paper is a rather difficult material for crafts: it does not forgive negligence and slovenliness, all flaws and mistakes on a snow-white sheet are immediately noticeable.
Crafts from white sheets play on the contrast of light and shadow. More experienced craftsmen experiment with such products. From white paper, you can create not only a snowflake or a bunny, but also more serious works: the beauty of a dazzling white vase does not need additional bright colors.
If you wish, you can find modular origami diagrams for beginners from white paper. When working, special care should be taken. Any figure assembled using modules requires a lot of time and perseverance. By introducing children to this type of creativity, the fidget develops attentiveness, concentration, scrupulousness. Making blanks for their works (paper modules), the children develop fine motor skills.
Watermelon
When looking for modular origami diagrams for beginners, you can find a wide range of crafts - from an Easter egg to a magnificent red Chinese dragon. Crafts such as a vase and paper watermelon are easy to perform and look bright.

To create a piece of watermelon, you need to make 193 triangular parts:
- 114 red;
- 45 green;
- 17 whites;
- 17 black.
The first three rows are assembled from green elements: 14, 13 and again 14.
The fourth row will take 15 modules: 1 green, 13 white and 1 green module completes the row.
Fifth row: 1 green, 1 white, 13 red, again 1 white and 1 green.
From the sixth row, the details of the watermelon are reduced one by one on each side. Black elements alternate with red modules. Only 20 parts are assembled in height.
Hare
It will be interesting for children to make a cute hare with their mother.
For a bunny, 522 triangular parts are needed. You can do everything from white paper, then you get a little white snow hare. If desired, the bunny can make a multi-colored blouse. Then, when making elements, make 120 pieces in the color you want to see the hare's sweater or blouse.
Since there are a lot of details to prepare, connect dad to work. The preschooler still does not have enough perseverance to do monotonous work for a long time. Therefore, the main work on the manufacture of parts will have to be taken over by the parents.

We make the basis for crafts. The corners of 2 parts are inserted into the pockets of the third module. Then 2 more details are added in the same way. The last element closes the structure in a ring.
Collect three rows of the bunny's body. Each row has 24 parts, which are fixed in a checkerboard pattern.
Carefully, trying not to break up the assembled workpiece, turn the circle inside out so that it looks like a cup in shape. Then attach 24 colored parts to the body of the craft. Colored elements should protrude slightly above the white torso. When you've finished a color row, align it.
A sweater is formed from 4 color rows. Attach the white elements of the head to the top row of the sweater. Parts are attached to the outside with the short side.
The head is made alternately from 24 and 30 parts. The last row is reduced to the center, the head becomes like a ball.
Form the ears. Alternate rows of 5 and 6 elements. The last, 9th row - 4 details.
All work in this technique is based on creating volume through paper blanks. There are some crafts, for example, a swan, having mastered it, you can easily make a vase, a peacock or a three-headed dragon.
Swan
The main part of the modular swan resembles a bowl. The ability to create a swan will facilitate and speed up the process of assembling other models.
To create a handsome swan, 1502 elements are required. Such a craft can in itself be an original gift or decorate the interior of an apartment. It is better to start creating such a masterpiece after reading the instructions for assembling such figures.

Penguin
One of the simple figures that your child will like is a penguin.
The first row, which is the basis, is made of parts closed in a circle. The figure itself is made in the form of a cylinder.
For the model you need: purple or black parts (126 pieces), for the nose and paws 5 red elements, white blanks will need 40 pieces.
The more experience the master has, the more individual works he creates. Experienced craftsmen are no longer looking for ready-made schemes, they come up with and implement their creative fantasies.
To captivate the baby with this type of needlework, offer to collect crafts that are easy for the baby. Help the child with the most difficult moment for him - the manufacture of modules. For kids, there are quite a few schemes that explain step by step how to make, for example, a rose or a colorful fish.
Choose easy crafts for classes with your child, the manufacture of which does not take much time. If the creation of the figurine takes a lot of time, then divide the work into several parts. Keep in mind that it is difficult for a preschooler to sit in one place for more than 20-25 minutes.
To make it easier for the baby to work, do not make small modules. Let you make 16 blanks from an A4 sheet, not 32. It is more convenient for a preschooler to work with larger parts.
Children also enjoy collecting animal figurines. There are easy assembly schemes for cats and horses. Mom can try to assemble a dragonfly or a spider with a baby according to a ready-made scheme. So that the craft does not crumble when touched, you can fix it with glue, then it will please everyone around for a long time.
Conclusion
Acquaintance with modular origami for beginners, joint creativity of mother and child will only bring the family closer, improve the atmosphere in the house.
For a preschooler, parents are the main authorities in life, who, by their example, should teach the baby to bring things to the end, and not despair because of temporary setbacks.


