Postcard for dad on 23. Greeting card for kindergarten and elementary school. Funny postcards for Defender of the Fatherland Day with your own hands
Good day everyone! February 14 is followed by another holiday, which is celebrated in our country annually on February 23. Last time we talked about what, and also did with the children
Today we continue and will, together with the children, congratulate our defenders and make interesting and original cards for them.
This type of work for schoolchildren or kindergarteners is the most common. Because it is not so difficult to make such a miracle, you just need to listen to the instructions of the teacher and everything will work out.
So, if you have not yet decided to do this and give it as a gift, then perhaps you will stop at this option.
On this day, all mothers, daughters, grandmothers and indeed the entire female half of the population congratulates the male half on this celebration. It is so customary that the symbols of this holiday are state flags, military equipment and other vehicles, as well as stars on shoulder straps.
Therefore, all drawings or pictures are directly related to this. I propose to make the first option out of paper - this is a tie using the origami technique.

And I also really liked the idea with a dollar bill, or you can take our rubles and roll it up, like this, it looks pretty cool, and as they say, a small stash is at hand.

For the smallest craftsmen of the second junior group of the kindergarten, you can make work from plasticine.

Now we will make a postcard on which the car will be depicted. Such an adorable and fun creation you can make with older and preschool kids, or use in elementary grades.

Stages of work:
1. Prepare everything you need for work, these are paper, glue, scissors and pictures with cars.

2. Cut out the necessary details to complete the plot.

3. Then, to make the machine seem voluminous, make an incision, while folding a sheet of paper in half.
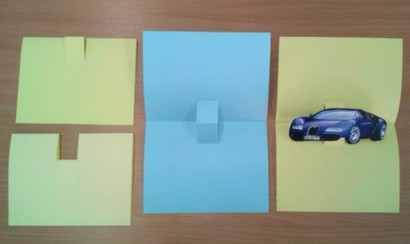
4. Here is such an interesting and cute story.
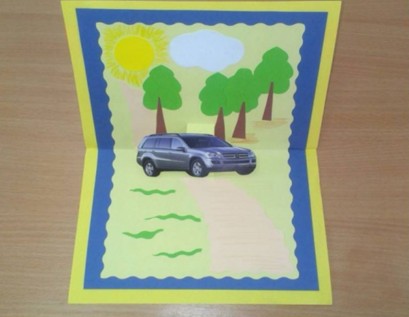
5. You can decorate the outside as you like, using various decorations and decors.

6. You can do it as an application, or simply draw with colored pencils or felt-tip pens.

Cool design in the technique of scrapbooking
I give you a few ideas that impressed me, you can take them as the basis of your work and create your own plot. See how bright you can make a star.

Miloi is very talentedly executed, even a flower is not at all superfluous here.

Wow, a message or a little surprise).

In general, it looks wonderful and not primitive.

So, do something for everyone!

And surprise, in general, act.

And I also offer you a step-by-step instruction that you can take for your creative work in the scrapbooking style, here:
Original ideas for greeting cards for schoolchildren on February 23 with templates
I want to make and decorate a postcard in a special way, I know that many are interested in options for bulk products, because they look great and amazing. Moreover, if there is a step-by-step instruction, then you and your children at school can do such a miracle.
Or you can create this creation at home, and then your son or daughter will give it to dad.
Stages of work:
1. First of all, you will need to find a double-sided cardboard, it is advisable to take blue or blue, this will be the background of the sea. Then fold the blue sheet in half and glue the base in the form of a boat to it.

2. Accordingly, in order to glue the base from the ship, you first need to make it, for this, find the image of the ship or ask me for a template, I will send it to you for free by mail. So print it on A4 sheet and cut out the desired image along the contours with a clerical knife.


4. Glue the white base gently to the blue base.

5. This is how it should work out for you.

6. Looks just fantastic beautiful and charming.

You can make a simple application from colored paper and from geometric shapes, for this, draw patterns, and glue the composition on them.


You can go another simple way, print this sample, and then color it or make an application.

I liked another type of postcard, I am happy to show it to you.
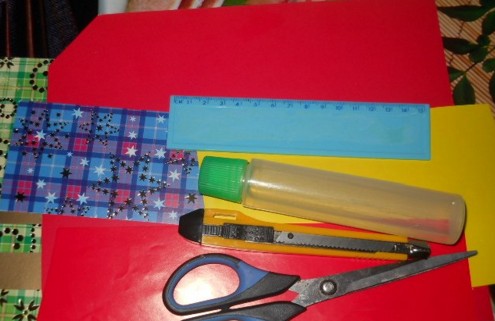
We will need:
- colored paper or cardboard
- scissors

Stages of work:
1. Draw the templates, as I showed you in this picture, it’s not difficult, even a beginner can do it. But what color to make for each workpiece, decide for yourself, this is a creative work that can be done in a labor lesson.

2. For the base, it is best to take colored cardboard or double-sided or plain. Fold the paper in half and cut out a circle on one side.

3. Now it remains to design the product. Find the right text or write your own by hand.

4. Glue the congratulations inside the card.


6. And the front side will look like this. It's like a ship is floating on the waves.

I also saw such a handsome boy yesterday, I suggest you build it too.
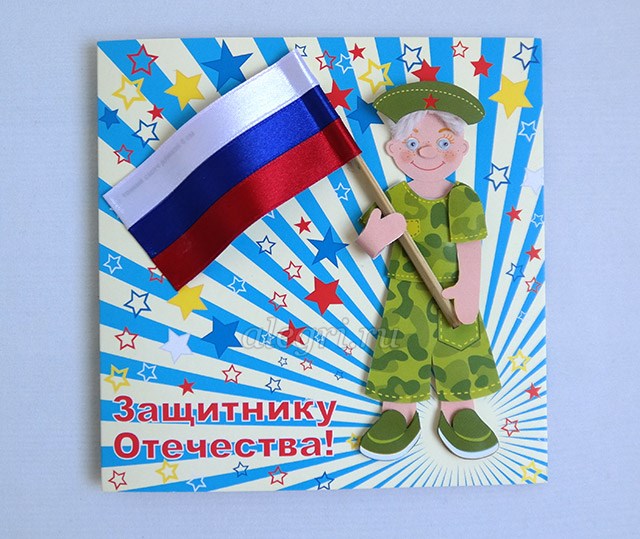
To create such a charm, cut the blanks with scissors.

Glue everything you have in mind on the background you want. The flag can be made from satin ribbons and a match, or use a cotton pad instead of a stick.

If you want a masterpiece in general, take a look here, a stylish and very cool idea for children of any age.

We make postcards with children in kindergarten from paper for dad and grandfather
An excellent option would be a rather unpretentious postcard with the image of a bear cub in military uniform. You need to make such a background on a piece of paper using a printer.

Cut out the stencils according to the pattern.

Then glue them to the background.

And on the back, write or print a congratulation.

Well, I also found such a simple idea for very small young talents.
We will need:
- multi-colored cardboard with embossing
- colored paper
- scissors
- ruler
Stages of work:
1. Print the stars on an A4 sheet, or make stencils, and then draw them on colored paper and cut them out.

2. Fold the embossed cardstock in half. Cut out two strips of colored paper and glue them overlapping. Also decorate with a star.
3. Such a very beautiful and cute result, write wishes on the other side.

Unusual gift in the style of quilling Tank
It will be really cool if you make a postcard and, in addition to everything, present a small souvenir in the form of

Those who are familiar with this technique will easily create any plot).

And for those who are not familiar yet, I found a video for you from which you will learn how to do this:
You can deviate from the topic and make it out of numbers, but in the same style.

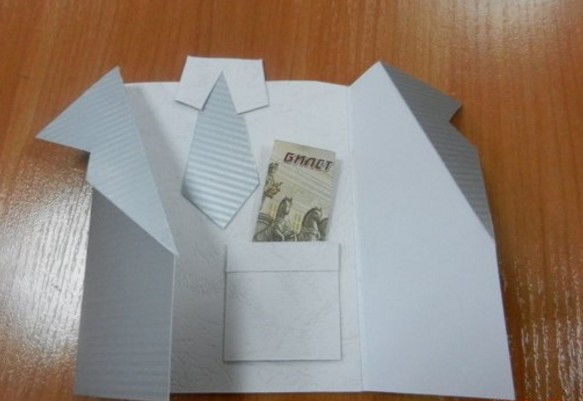
Master class on how to make a shirt with a jacket
The easiest option can be an origami souvenir, using colored double-sided paper or a white A4 sheet.

It turned out a small shirt with a tie.

In addition to everything, since this is a postcard, you will need to come up with a poem or congratulation and read it with expression.
Or you can go another way to make a blue or light blue sheet tie first, and decorate it with all sorts of stickers, sequins, rhinestones, etc.

And then glue it and you get the easiest gift option.

And if you want to do something more serious, then use this instruction.

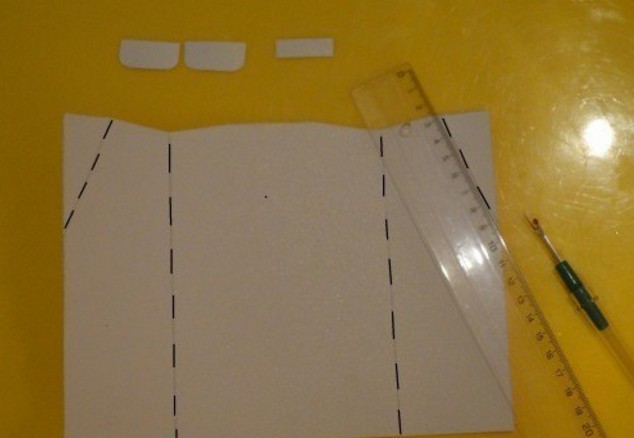
It is necessary, as shown in the figure, to make a product layout.
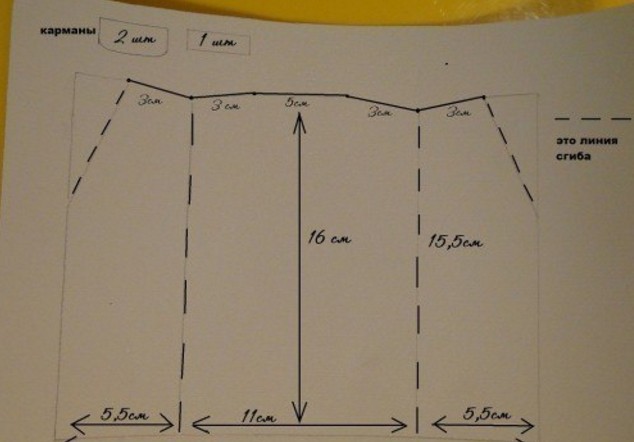
Then use the ruler to collapse along these lines. Of course, draw the lines with a pencil, not a felt-tip pen, a felt-tip pen is shown here so that you can see it better.
This is how the jacket looks like.

It remains to make a collar, make it according to the scheme.

Then cut and roll.

Finish by gluing on the right touches for completeness, this is a satin ribbon or paper tie and a poem.

You can also make a postcard with a little secret.

Take a piece of paper and make these marks as shown.

Plus there will be a vest.

The result can turn out for you, the main thing is to try to do this work with great love, and then, what could be more pleasant to give to grandfather or dad on the long-awaited day.

If you want to be original, you can put a bill or something else more impressive.
You can even stick a calendar.

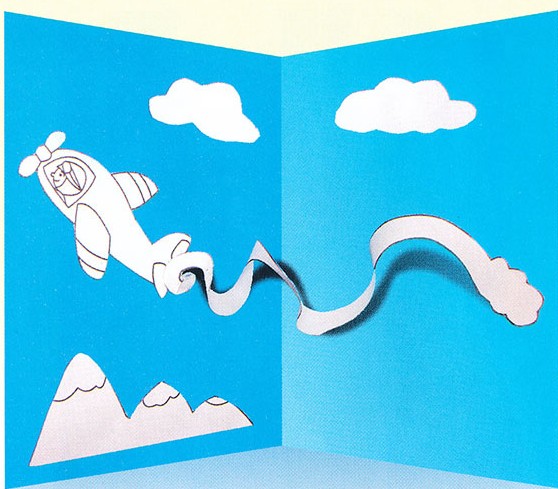
We create a three-dimensional postcard with children for the holiday of Defenders of the Fatherland
Such products are usually in great demand because they look spectacular and beautiful.

See how cool they designed a regular photo frame. Make a boat or steamer first.

A diagram of such a craft is presented here.

You can use another option, like this, you have to stick the desired images on a piece of paper.
And then color it with paints or felt-tip pens. Blanks can be downloaded and printed.

 By this principle, you can do other work.


Every boy or guy does not dream of a good set of tools, right? So let's give him a dream.

For the next work, you will need 2 pieces of paper. different colors, a pencil, a glue stick and a clerical knife, because the protrusion style will be applied.

It will turn out very stylish and tasteful.

You need to print the template on the printer, request it from me. And then connect the white base and blue images.

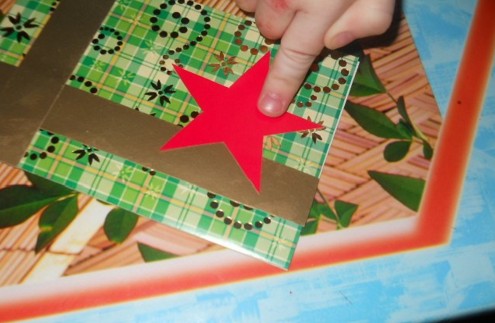
From corrugated paper or thick cardboard, carefully cut out the stars, 3-4 pieces and glue on the base.

That's all dear friends and subscribers. If you were interested, share this note on social networks or leave your feedback on this post. Good luck to all! And our defenders of good health, success in everything! Bye everyone!
Sincerely, Ekaterina Mantsurova
A funny idea is to make an imprint of dad's huge shoes, and inside the imprint of children's feet. The soles of the shoes must be dipped in paint and left an imprint on a piece of paper. “Followed in the footsteps”: everything is simple, but very touching. 

Handprints, toes and feet can be done with your mother, brother or grandmother.

A print can be taken as the basis of a drawing and turned into something more. For example, for a fisherman dad, you can make a postcard with a funny fish.
Postcard-star

A postcard for February 23 can be cut out of paper in the shape of a star. To do this, you can use colored paper, leftover wallpaper or scrapbooking paper. Draw two pieces of stars according to the template, cut them out, and then glue them together. When the glue is dry, poke a small hole in the corner and insert tape or coarse thread.
Postcard - shirt

This postcard looks amazing! There are a lot of options for the design of such a voluminous postcard.

The easiest is to fold a rectangular sheet of paper in half, cut off a strip of paper from the top of the back of the card. Then make two small incisions in front on the sides and bend to the center of the edge. Thus, you will get a shirt collar.

Of course, the kids will have to help a little with the design and prepare in advance the complex details.

Cut out a detail for a tie in advance, and take a couple of small buttons for a collar. You can fantasize as much as you like, add a jacket, business suit or military uniform to the shirt.

By the way, you can make a postcard for February 23 with your own hands using only the shape of the tie itself. You can color it, make an application on it and attach it to a tape with glue, and write the text and congratulations on the back.
master class: do-it-yourself volumetric postcard for February 23

Instead of a tie, you can try to make a pasta butterfly, which you will first need to paint with paints.
You will need:
- colored cardboard and paper
- farfalle pasta (bow-shaped pasta)
- dye
Master Class
- Color the pasta with different colors and let it dry on a piece of paper or newspaper.
- Take a piece of A4 paper and fold it in half. Stepping back from the edge of the folded sheet 2 cm, draw two lines.
- Make two cuts on the sides so that you get a rectangle. Unfold the sheet and fold it to form the collar of the shirt.
- Unfold the shirt, draw the sleeves and cut them out along the outline.
- Glue the silhouette of the shirt to a sheet of cardboard, and then decorate it with a beautiful pasta butterfly.
Postcard - tablet

Another idea for those who are older. Does your dad constantly spend time on the Internet and simply cannot live without a tablet? Give him a voluminous postcard for February 23, made by yourself in the form of a small tablet with your favorite photos. Here you can print the details of the templates: iPad tablet template, and find the icon images on the Internet.


