Craft Baba Yaga from natural. Craft from cones "Baba Yaga". Autumn crafts from cones and leaves: what can you think of
Who does not know Baba Yaga - the heroine of many Slavic fairy tales? A hunchbacked old woman is able to frighten children with her appearance alone. The description of the appearance of Baba Yaga is really memorable:
- a hooked nose is able to smell an uninvited guest at a distance,
- the bone leg allows the heroine to stand in the world of the dead,
- long shaggy and gray hair indicates that the mistress has lived in the forest for at least 300 years.
In autumn, children create wonderful crafts from natural materials. It can be hedgehogs, owls, spiders and other animals. Nuts and chestnuts are used in their pure form, and sometimes the main materials are supplemented with seeds and berries. And how to make Baba Yaga out of cones? Today we will show one of the options for making a popular fairy-tale character.
So, we are preparing for work:
- - Pine cones,
- - gnarled branches and branches,
- - ash seeds
- - plasticine for connecting craft parts,
- - autumn leaves to create a forest environment.

The big bump is the body of Baba Yaga, and the small one is the head. By the way, the shape of the cone is quite similar to the dress. Probably, forest dwellers only wear such clothes.

From multi-colored pieces of plasticine we will fashion eyes for crafts. Break off a branch about 0.5 cm from the branch to get a hooked nose. The work is quite doable.

After attaching the details to the pine cone, let's think about how to style Yaga's shaggy hair. There are two options here:
- fashion thin strips of white plasticine,
- attach a bunch of ash seeds to the top of the cone.

Baba Yaga's head is ready.

You can attach the part to the body, after decorating the big cone with autumn leaves (cut into thin strips).
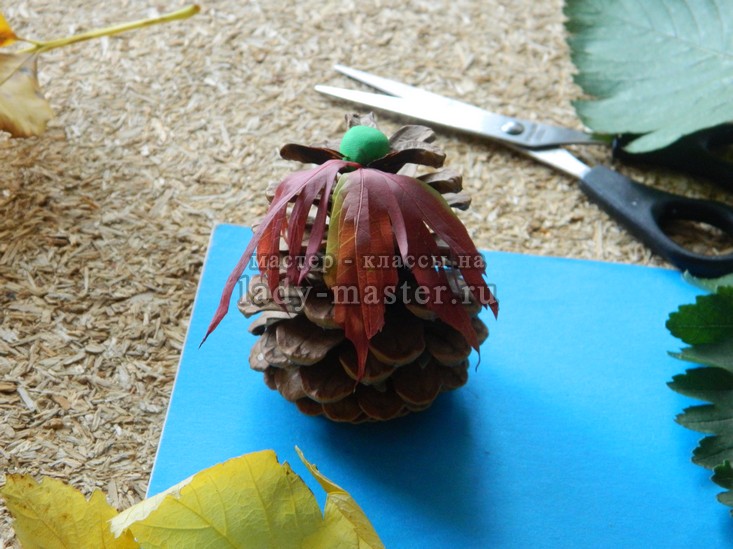
It looks like an old woman dressed in colorful rags.

We will make the hands of the sinister heroine from branches. Traditionally, we attach them to the body with plasticine.

By the way, it is difficult to imagine Baba Yaga without her magical paraphernalia. What is it about? About a mortar, a broom or a shovel, on which an old woman puts naughty children and sends them to the oven.

Baba Yaga is one of the brightest fairy tale characters in Russian folklore. Many cartoons and films portray her differently. This is an evil old woman who steals children and wants to eat them, but sometimes she shows pity for the hero, and in many films she is portrayed as funny and cheerful. Maybe that's why the kids still love her. She wants to eat someone, threatens, but she has not eaten anyone yet, she has not killed anyone. She can fly, but she can't catch up with anyone.
Baba Yaga's crafts are also all funny and not at all scary. Children are happy to convey the image of this hut resident on chicken legs in their drawings and applications. A broom is also molded from plasticine. A mandatory attribute of this fairy-tale heroine is a flying stupa.
Consider what crafts Baba Yaga can make from natural material, what needs to be collected in the park for this, what additional materials will be needed to connect the parts together.
Figurine of Baba Yaga
To make such a character, you need to have a fir cone, a small pine cone, sprigs of a Christmas tree, rowan berries for beads, a hemp rope for tying branches and making hair, twigs for a mortar.
The big bump is the torso. To easily install the head, you need to cut off a few upper scales from it. In the resulting hollow, a small pine cone is glued to the plasticine, turned with the blunt part forward, so that it is more convenient to stick small details.
The body and head of the grandmother are ready. One branch of the Christmas tree is cleared of needles, which are attached to the neck on plasticine. These will be the hands of a fairy-tale heroine. Hair is knitted from a rope as follows. Segments of the same length are cut, folded in half and tied from the side of the loops with a knot. Then they are glued to a small cone on top. The more segments, the more magnificent the old woman's hair.
Plasticine is used to make eyes, a mouth and a hooked nose. As a nose, you can use one curved pasta glued to the base.
Now let's take a closer look at how to make the main part of Baba Yaga's craft - a flying stupa.
How to make a stupa?
In fairy tales, the grandmother moves through the forest exclusively on a mortar, driving a broom. The stupa has the shape of a truncated cone. Therefore, in the manufacture of this transport, a plastic disposable cup is used. First, the plasticine softens and the outer part is completely coated so that the branches are firmly attached and do not slide on its surface.

They should not be thick, as the glass is deformed. To keep the sticks well, you need to tie them with a thread. It remains only to put Baba Yaga's craft inside.
Broom
The transport of the fairy tale character, which she also uses for flying, is a broom. Make it easy. To do this, you need to have one thick branch and several small and thin ones collected from the bushes. They are cut into small equal segments, assembled in a bundle with a thick stick in the middle, tied with a rope.

This attribute always finds its place in the crafts of Baba Yaga. Usually the broom is either attached to the hand of an old woman or to a mortar. You can still put a headscarf on her head, because earlier in Rus' all women wore these headdresses. In all films and fairy tales, she is also depicted in a scarf.
A hut on chicken legs
If you ask any child, the answer will be the same for everyone - in a hut on chicken legs. When making handicrafts of Baba Yaga with their own hands, many craftsmen try to build her forest dwelling nearby. This house is not easy, he himself is a fairy-tale character. He can run, jump, turn around, kick someone, sit down and refuse to obey his mistress.

Even a simple house made of branches is difficult to make, but here it still has to stand on two legs. How to do it? Let's try to explain in detail now.
How to make Baba Yaga's house?
In order for the structure to hold firmly on two pillars, you need to pick up either thick cuts of branches, or take two wooden spools of thread. The second option is preferable, since they have a base that expands downwards, which will securely hold the house.
If you still use saw cut branches, then you need to strengthen them with plasticine on the basis of the craft, making claws splayed in different directions. They will give stability to the structure.
The house itself is made from a flat foundation. It can be plywood or a piece of very durable cardboard. Above the ceiling is the same. Between these two planes, even branches of any tree are glued. You can fasten them with wire or tie them together with a rope.
Also, for strength, the walls of the house sit on a layer of plasticine, which is attached around the entire perimeter of the house from the inside and on the floor of the house and on the ceiling.
The roof can be made of cardboard by gluing a pyramid. On top of it, put a layer of autumn yellow leaves on the glue. Such a composition can be put up for a competition as an autumn craft of Baba Yaga.
Cone and walnut option
Even a kindergarten child can easily make such a craft of Baba Yaga from natural material. You will need one spruce cone for the body, a walnut for the head, several branches for the broom and hands, plasticine, hair thread (they can be made from straw or willow leaves). An old woman's handkerchief can be cut out of paper, or you can put on a fabric one.

The parts are fastened together with the help of plasticine, from which small parts of the face are also made - the nose, eyes. Next to Baba Yaga, you can make her best friend goblin to the exhibition. It is also created from a spruce cone by gluing a paper cone or a plasticine fly agaric mushroom hat onto the head. He has a stick in his hand.
You can also make a head from chestnut, and hands from ash seeds. The stupa can be pasted over with small scales of cones or tree bark. It is interesting to carve a house from a pumpkin. There are many options for using natural material for such crafts. After looking at the samples, you can safely create your own work by adding your own details. After all, you always want to do everything in your own way, not like others. Create and fantasize!
The character of Baba Yaga has been known to everyone since childhood, because this heroine is present in every Russian folk tale. Flying on a broomstick in a mortar, it scares everyone around, her friends are evil spirits from the forest, they like to do dirty tricks. And many children are very afraid of this grandmother. But in vain, because this is just a character in fairy tales. It has long been fashionable to use such interesting characters in the decor of your own home. In addition, children really like to have such dolls in their arsenal of toys. And so many craftswomen are happy to do crafts. Do-it-yourself Baba Yaga is very much appreciated among lovers of curiosities and, in general, everything that brings mysticism into our lives.
Such dolls can be made from any materials: natural, fabric, plastic, knitted - it is important to use imagination, and inspiration will come by itself.
Craft from cones
A lot of interesting crafts can be made using natural materials. Basically, such toys are made from cones, twigs, acorns and more.

To make an interesting Baba Yaga toy, you will need:
- a bump, it is desirable that there be a tail;
- light yarn for hair;
- a small piece of cloth;
- disposable plastic cup;
- branches;
- Super glue;
- tow rope;
- scissors, paper and marker.
The threads should be collected in several rows so that it turns out as indicated in the photo. After you need to fold the resulting in half, and tie in the middle, slightly moving away from the outskirts.

Made hair must be attached to the bump with glue. But the tail on the bump will be the nose of our Baba Yaga.
From the material it is necessary to cut a square, which we will use in the form of a scarf. After that, you need to put a hat on the doll's head so that the strings are in front. Then the head must be attached to a long cone, usually a spruce, which will serve as the body.
With the help of branches, hands should be made. Then cut out a mouth, eyes from paper and paint these details with a felt-tip pen. And it is also necessary to take more twigs from which you need to make a broom and attach it to the handles of our crafts.


Any Baba Yaga must be in a mortar, so you need to make it. To do this, we take a plastic cup, glue it with paper, prepare branches that should be slightly higher than the cup itself. Next, we glue the entire container with branches in a circle and get a stupa. Departing a little from the borders, you need to wrap the product with ropes, both from below and from above. We put our Baba in a mortar, and now the product is ready.
You can also make Baba Yaga from tights, from burlap, and at the same time, to maintain shape, it is possible to make dolls from a plastic bottle.
Stocking technique
Babu Yaga in hosiery is used to protect residential premises, in addition, she will serve as a very interesting decoration for the house.

This master class will help even beginner needlewomen to make such a kind Baba Yaga with their own hands. In addition, similar crafts can be done with children, which will not only please, but also teach the correct technique for working with various materials.
What you need to have to make such a doll:
- kapron fabric;
- synthetic material;
- some wire;
- small fabric materials;
- thick gray threads to make hair;
- eyes.
All products that are sewn in stocking technique use a coupler, it is possible to make a doll of different sizes.
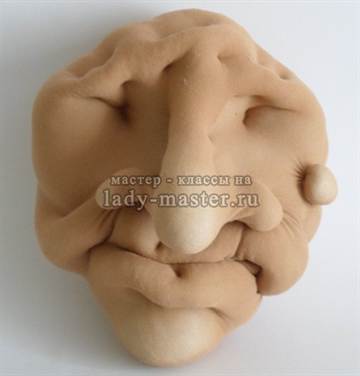
We start making our doll from the head. To do this, you need to take a synthetic winterizer and put it in one piece of fabric. And from a piece of wire to make a spout with nostrils. After this part must be wrapped with a padding polyester.


Next, the nose blank must be attached to the head with needles and threads. After we take nylon tights and fit them with the resulting head with a nose. Further, with the help of a synthetic winterizer, it is necessary to make cheeks, a chin. It is best to start the workflow with a spout. In this work, it is important to choose the right thread in color for the nylon material. We tighten the thread on the right side and head to the left. It is necessary to flash a certain number of times, after which we bring the needle diagonally from the bottom of the spout - this will help to make the nostrils.

When the nostrils are done, we move on to the formation of the nose itself. To do this, the needle must be inserted under the wing of the nose, but removed from the formed nostril. These parts should be stitched in turn to make it symmetrical. When the nose already has a clear outline, cut off the thread and start making cheeks. We take a needle and insert it into the cheek area from top to bottom. We do such stitches more than once in one place, this is necessary to give the desired shape. We leave the thread, and cut off near the base of the needle. And now we form the second cheek. We do the same as in the previous part. When a certain number of stitches are made, we tie long pieces of thread together - we perform a screed.


Now we make the mouth of our grandmother. The lower lip of Baba Yaga protrudes a little, and the second one falls into. To do this, you need to take the doll by the chin and work on the formation of the lower lip. When the bottom is finished, the workflow is done from the top. To make recesses for the eyes, it is necessary to pull out the needle in the region of the back of the head. Then we perform eyelids and wrinkles - everything is done with a screed.

Now you need to take not very large strips of nylon and then you need to wrap it around the eyes. This is done in order to form wrinkles. After the resulting eyes must be glued to the place that is prepared for the eye. Next, we take gray threads, of which we need to make the hair of our Baba Yaga. Many craftswomen use fur stripes or even artificial hair instead of threads.


To make handles, you need to use wire, which will be the main skeletal material, after which we wrap all the fingers and the arm as a whole with a synthetic winterizer - then we wrap it with tights and make ties, sew it together.
But the body can be made from a plastic bottle if Baba Yaga is small. In the event that the doll should turn out to be large, you need to take tights or stockings from nylon and fill it with padding polyester. And with the help of a thread and a needle, make a chest, a hump on the back. The legs are made in the same way as the torso, of course, without a plastic bottle. Sew and pull off each detail, as in the manufacture of dolls in the hosiery technique.
After that, you need to connect everything together and dress our Grandmother. Clothes can be sewn by yourself or taken from dolls. Do not forget about the headdress and broom, which is very important for Baba Yaga.
If you are looking for an original idea that could be offered to kindergarten students or younger students, opt for an option such as DIY Baba Yaga crafts.
Firstly, our old women are very charismatic! A dilemma is read in their stunned eyes: should Ivanushka the Fool be boiled or roasted? Secondly, these crafts are incredibly easy to make, but still leave room for creativity: each grandmother will need to be painted by hand. Thirdly, you will be able to organize a real exhibition in order to jointly decide who is the best fairy-tale artist in a group or class.
What do we need
To create a colorful do-it-yourself Baba Yaga craft we need the following things:
- Template - save it to your computer by clicking on this link
- Scissors
- Glue stick
- Colored pencils (slate and wax), felt-tip pens and paints.
What are we doing
We transfer the template to paper. On the first page of our template you will find a colored version of the old witch, and the second sheet is dedicated to coloring. We recommend that you glue the full color version and use it for demonstration purposes.
 Giving kids tools and ask to decorate the grandmother-sorceress. Someone will need more time for this, while someone, on the contrary, quickly manages tasks for drawing. Further follow the instructions:
- We cut out the sorceress Great practice for fine motor skills. We bend the feet and the side valve of our crafts with children with our own hands (it is best to do this by helping yourself with a ruler).
- We apply glue to the side strip and turn the flat sheet into a cone.
- Let's not forget also about Baba Yaga's vehicle: a panicle is useful for both flying and cleaning.
- That's what an abundance of evil spirits our pupils got - it's time to hold a beauty contest!
By the way, in the section of our site devoted to needlework, you will find many other original projects for little craftsmen.
Today, various do-it-yourself dolls and figurines are very popular. They can serve as an interior decoration or an excellent souvenir for connoisseurs of this type of art. Most often, craftswomen make amulets and fairy-tale characters. For example, Babu Yaga can be made from different materials. Moreover, there are techniques available for preschool children, but there is also a more complex execution of such figures.
On the Internet you can find many video tutorials on making various dolls. Baba Yaga is the most interesting character and textured in terms of execution. We bring to your attention several options for the manufacture of this figurine.
Baba Yaga do-it-yourself cones
The Baba Yaga made from natural materials looks quite original. For this we need:
Paper cup;
Twigs;
Pine and spruce cones;
piece of cloth;
Plasticine;
Knitting.
We glue the paper cup with twigs on the outside - this will be Baba Yaga's stupa. Then we will make a broom from a twig and several coniferous needles, we tie them to each other with a thread. Now let's start making the head. We take a bump with a tail, where the tail will be the nose. Between the scales of the cone we lay the threads for knitting (hair). Eyes must be drawn on paper and glued to the face.
We put on a scarf on the head, which we will make from a piece of matter. Hands are branches. Now we attach the head and arms to the body (fir cone) with the help of plasticine.
We seat our Baba Yaga from cones in a mortar, on the bottom of which we put paper. We glue the broom to the hand and our Baba Yaga in the mortar is ready. Photos of this craft can be easily found on the Internet.

Baba Yaga do-it-yourself hosiery
Baba Yaga, made in stocking technique, looks very naturalistic. Usually such dolls serve as interior decoration. There are collectors of such figurines who appreciate the exhibits made in this technique. To make it, you need to take:
- Nylon material;
- Sintepon;
- Pieces of fabric;
- Wire;
- Threads for knitting in gray;
- Eyes.
Description of work
We start with the head. To begin with, we make it from a synthetic winterizer (a ball of the desired size). Now, a nose blank is made from the wire, which is wrapped with padding polyester and attached securely to the head in the right place. Now we cover this blank with nylon (from tights or stockings), we form the chin and cheeks (protruding places).
Then we proceed to the screed. First we form the nose, then the cheeks and lips. Lastly, we tighten the area of \u200b\u200bthe eyes and forehead, forming wrinkles on it. For the screed, we select threads that match the color of the nylon, and a needle of the right size.
We decorate the eyes with pieces of nylon, thereby creating wrinkles around the eyes, glue them to the face. We make hair from knitting threads. You can watch the master class, which shows in detail the technique and schemes of the screed.

For hands, we make a wire frame, which we wrap with padding polyester, paying special attention to each finger. Now we cover this blank with nylon and sew the places between the fingers. For the torso and legs, you can take stockings and fill them with padding polyester. We form a hump on the body. The foot is formed and stitched. Now you need to put all the parts together.
Sew clothes for the doll from pieces of fabric and do not forget about the headdress, a burlap vest will look very good, you can make a broom out of twigs. The kapron doll is completely ready.

Baba Yaga from plastic bottles
We bring to your attention a description of the manufacture of a doll of large sizes, which will look very good in the local area. It can be any size you need. Why do we need:
- Plastic bottles of 1.5 and 5 liters.
- Mounting foam.
- Glue.
- Paints.
- Boots.
- Broom.
- Bandage.
We start making the frame of the doll from plastic bottles (torso and legs). The joints between the bottles are fixed with polyurethane foam. We wear boots on our feet. We put foam trimmings in the bag and form the head. Now the whole figure must be covered with mounting foam. On the head we cut out the face, to the body we give the necessary outlines of the figure and clothes.

We make hands with the help of stockings or tights made of nylon. We stuff them and attach them to the body.
The entire workpiece must be wrapped with a bandage and covered with a mixture of adhesives (PVA and tiled). After that, the figure needs to be painted and a hairstyle or just tie a scarf. A doll made of plastic bottles must be varnished. Give her a broom. The large figure is ready. Now it can be installed anywhere.

We have offered you several examples of making Baba Yaga from improvised materials, which will undoubtedly interest a creative person.
Video on the topic of the article


