Sweet candy tree with your own hands. Candy tree: the best ideas, photos and master classes
Helpful Hints
On New Year's Eve, you can surprise your friends and loved ones by giving them a beautiful handmade gift.
Since the Christmas tree is one of the main symbols of the New Year, it is ideal as a gift.
You can make just a beautiful Christmas tree, or you can decorate it with sweets, so you get not just a decoration, but a useful element of the New Year's sweet table.
On our website you will also find:
Here are some of the most interesting ways to make a DIY Christmas tree from candies:
Candy tree and champagne bottles

You will need:
Empty bottle of champagne or wine
Scissors
Lots of small sweets
Bright tape.
1. Glue a piece of tape to each candy.
2. Start sticking the candies to the bottle using tape, starting from the bottom and moving towards the neck of the bottle.
*Make sure that one end of the candy touches the end of the adjacent candy.
3. Glue each next row a little higher than the previous one so that the candies lean on each other - so the tree will be more magnificent.
4. There should not be more than 4 sweets on the very top of the head. You can also add a bow or stick an asterisk with tape.
5. Pull the ribbon down from the top of the tree.
Christmas tree made of sweets and tinsel (master class)

You will need:
Double-sided tape
regular tape
small candies
Cardboard and scissors (for making a cone)

1. Using simple adhesive tape, glue candies to the cone, leaving small gaps between the rows of candies for tinsel.
2. Glue double-sided tape in between the rows of candies and start sticking tinsel to it.
3. Glue 3-4 candies to the top of the cone and also wrap them with tinsel.
Do-it-yourself golden Christmas tree made of sweets (photo-instruction)

You will need:
Cardboard and scissors (to create a cone)
Double-sided tape or glue (PVA or hot)
Candies wrapped in golden foil (other candies are available if desired)
Beads on a string.
1. Cut out part of a circle from cardboard, twist it to make a cone, and fix the ends with glue.

2. Using double-sided tape or glue, start gluing (from bottom to top) golden candies to the cone. They should fit closely together to hide as many empty spaces as possible.


3. The gaps between the candies can be covered with beautiful beads on a thread or tinsel of a suitable color.

4. You can make a star, and, if necessary, paint it or cover it with foil. You can add a bow.

Do-it-yourself Christmas tree made of chocolates (master class)

You will need:
Thick cardboard and scissors (to create a cone)
Glue (PVA or hot) or tape
Scissors
Chocolate sweets (truffles) in a shiny wrapper.

1. Roll a cardboard cone and secure the ends. Cut off any excess so that the cone sits flat on the table.
2. Using tape or glue, start gluing the candies to the cone. Cover the entire surface of the cone with candy.

3. Start decorating the Christmas tree to your liking. You can use beads, tinsel, bows, ribbons, "rain", and you can attach an asterisk made of paper or foil to the crown.
How to make a soft candy Christmas tree

You will need:
Styrofoam cone
Many soft (jelly) candies of different colors
Toothpicks.

Attach the candies to the cone using toothpicks.

You don't have to use the whole toothpick - you can break it into two pieces.
Just stick one end of the toothpick into the candy and the other end into the cone and fill the tree with candy.
How to make a gift tree from candies with your own hands

You will need:
Several candies
Green cardboard
Scissors
Red ribbon
PVA glue.
Text instructions after the video.
1. Cut out a 25 cm x 5 cm strip of green cardboard.
2. Divide this strip into three parts, which will then need to be bent - make marks for future folds at 8 cm, 16 cm and 24 cm.
Also divide this strip lengthwise in half.
3. Bend the strip in half lengthwise, apply PVA glue to one half and glue both halves.
4. Using the marks made in step 2, fold the strip into a triangle. You have got a frame for the future packaging of sweets in the form of a green Christmas tree.
5. We make shelves for sweets inside the package:
5.1. Prepare a paper strip measuring 25 cm x 5 cm, and make marks on it every 2.5 cm (i.e. 2.5 cm, 5 cm, 7.5 cm, etc.).
5.2. Cut the strip in half lengthwise.
5.3. Cut one of the halves in half across at the 10 cm mark.
You will have 3 strips: 10 cm, 15 cm and 25 cm.
5.4. Fold each strip as shown in the image (zigzag) to get several triangles.
6. Insert your shelves inside the frame (Christmas tree): a long strip folds into shelves for the bottom row, a medium one for the middle and a small one folds into a triangle and is inserted into the top of the "Christmas tree".
7. Start inserting candies into the cells of your Christmas tree.
8. Take a ribbon 45 cm long and tie it to the Christmas tree.
If you wish, you can make a trunk for your Christmas tree out of brown cardboard. You can also put sweets in it (see video). It can be attached with double sided tape.
* You can decorate the Christmas tree as you like.
A simple candy tree (step by step photo)

You will need:
paper cone
corrugated paper
Candies
Decorations to taste (ribbon, beads, artificial flowers, Christmas decorations).


Christmas trees turn out very beautiful, stylish and of course very tasty! Making them is not difficult at all, but it will take patience, work And accuracy! The process can involve children– they will be delighted!
I have Christmas trees middle size - 35 cm in height not counting the spire. You can change the size of the Christmas tree, candies and decor as you wish, and I will only share two basic principles for making them. So let's get started...
You will need:

Main:
Whatman - 1 pc.
Simple pencil + eraser
Glue gun (or polymer glue)
For the ROYAL CHRISTMAS:
Sweets in a Golden wrapper "Autumn Waltz" - about 1.4 kg
Tip "Star" 10 cm high. (I have Fuchsia)
Gold acrylic spray paint (or can + brush)
Christmas tree beads 3 m long (I have Fuchsia)
For the GREEN Christmas tree:
Sweets in a green wrapper - about 900 gr.
Tip "Star" 10 cm high. (I have Purple)
Tinsel with medium pile 2 m long.
PROCESS:
THE BASIS:
1. Let's make paper base for the future Christmas tree - cone and bottom (for greater stability). We cut the standard drawing paper into 2 parts: we put aside one of them - we will no longer need it. On the rest of the drawing paper, draw with a ruler (or a compass if the Christmas tree is small) half a circle with a radius equal to the height of the Christmas tree. Those. I have a tree tall, so I took the radius 35 cm. Next, we cut out our blank and cut it in half - we will make 2 cones out of it at once. We glue the cut parts so that we get a cone. From below, you can fasten it with a stapler, for greater reliability. I use a hot gun because it's fast, simple and easy enough. If you use a polymer or some other glue, you will have to briefly squeeze the glued surfaces and wait until they grab.

2. We make a bottom for cones from scraps of whatman paper. To do this, we circle the circle of the resulting cone or draw a circle with a compass (measuring the radius of the cone). Then we draw another circle, retreating about 1.5 cm from the borders of the first circle. We cut out along a larger circle and cut these 1.5 cm with a thick fringe. We bend fringe and glue the bottom into the cone so that the bent fringe is inside cone.

Everything - our preparation is ready. Now choose your favorite Christmas tree and start making it.

ROYAL HERB:
1. Color the cone in Golden color using acrylic spray paint. The best thing to do is on the street, like on the balcony. Before spraying, the paint can must be carefully shake up. It is better to lay a newspaper under the cone so as not to stain everything around. Spray paint evenly onto the cone from a distance of about 15 cm (see instructions) and let dry up. If there is no aerosol, then you can apply gold acrylic paint, gouache, etc. with a brush. or decorate the cone with wrapping paper, fabric, ribbons, etc.

2. We begin to stick sweets on the cone in a circle using a glue gun. If the sweets are heavy, then tape, PVA glue, etc. they can’t do it here - you need a strong fast-acting glue.

3. We continue to stick candies on the cone in rows almost to the very end (I left about 5 cm for the spire).

4. Glue the tip on the top of the Christmas tree. Since I have a tip on a long stem, I glued it on top with another row of sweets.

5. The Christmas tree is almost ready, it remains only to dress it up. Gently glue Christmas beads on top of each row of sweets, close each row in a ring, pruning beads (i.e. do not lay out the beads in a spiral to be more accurate).

By the New Year, many of us are wondering how to surprise and please our loved ones on this wonderful holiday.
In order to make a bright, spectacular, and most importantly, delicious candy composition, you absolutely do not need to go to expensive floristry and design courses, because making this beauty is very easy and simple, and you don’t need to have a lot of free time and spend a fabulous amount of money. funds.
Candy tree
Do-it-yourself candy tree
 One of the options for making a Christmas tree from sweets can be to use the most ordinary bottle as the basis. To make a sweet Christmas tree, you can use an empty bottle, or you can use a bottle of delicious champagne or wine.
 So, using the most ordinary thin stationery tape, glue the candy in layers to the bottle. The thicker you glue, the richer and more magnificent the New Year's sweet beauty Christmas tree will turn out.
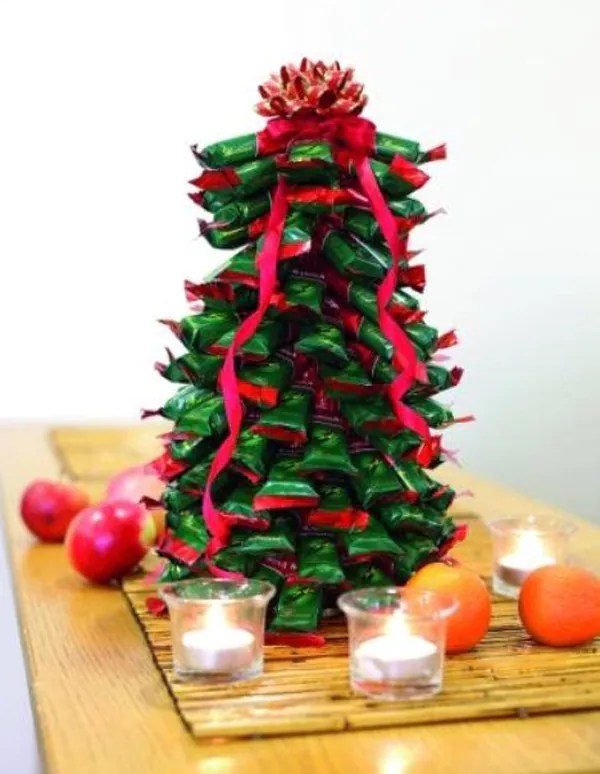
Candy tree
Do-it-yourself candy tree
 Another option for making Christmas trees from sweets can be to use a cardboard cone as a base. Use a sheet of thick cardboard, from which roll a neat cone (see photo).
Now glue the sweets layer by layer to the cardboard cone. You can use hot glue or double sided tape.
Decorate the finished Christmas tree with Christmas beads.
Christmas tree of sweets for decorating desserts and cakes
Do-it-yourself candy tree
 Every hostess will definitely prepare a delicious dessert for the New Year's table. And dessert, as everyone knows, should be not only tasty, but also beautiful. That is why we want to offer you the option of decorating a New Year's cake with small chocolate Christmas trees, which can be made from several chocolates and icing sugar.


Candy tree
 This option is suitable for those who want to present delicious sweets as a gift.
 From a sheet of thick green paper, cut out strips that fold, as shown in the photo. In the finished triangle, put sweets in beautiful wrappers. Fix the composition with a decorative ribbon or bow.
Candy tree
Do-it-yourself candy tree
 A wonderful and unusual way to serve sweets to the festive table.
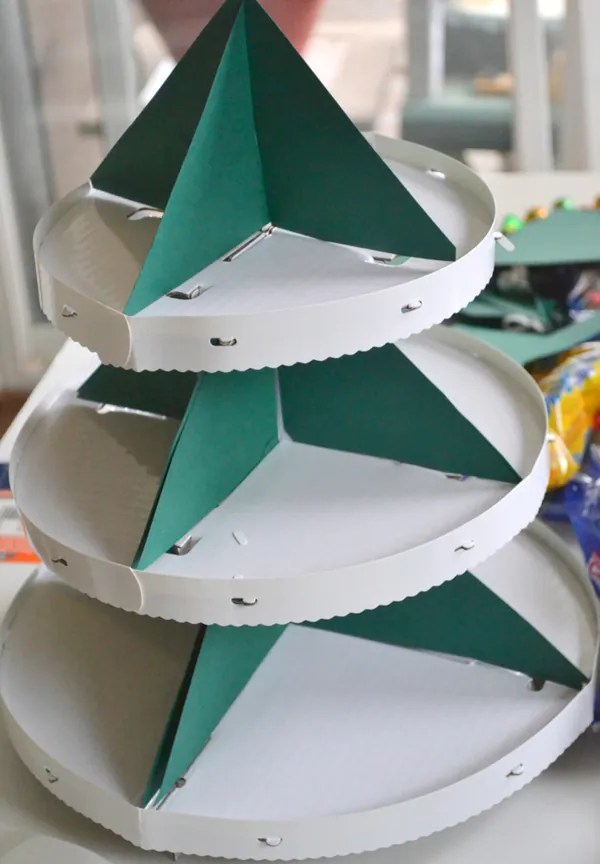

 From several cardboard round boxes, make a kind of three-tier stand. Dividers, in which cardboard triangular partitions will serve, in appearance resembling the branches of a Christmas tree.
 Pour beautiful sweets into the cardboard structure.
Mastering the production of beautiful compositions using sweets and various materials is not as difficult as it might seem at first glance. We invite you to learn from this article how to make a Christmas tree from candies with your own hands.
sweet story
Beautiful and sweet crafts made by craftsmen from sweets and various decorative materials (mainly from floristic corrugated paper) are made using the sweet design technique. This name comes from the English word sweet - sweet. The creation of such compositions is inextricably linked with the history of the appearance of sweets.
The first sweets appeared in Europe at the end of the 18th century. With the development of technological progress, confectioners realized that small sweets in beautiful packaging are sold better than large and unpackaged ones. This is how candy wrappers were invented. The French packed sweets in special boxes - bonbonnieres. They were made from precious metals. This tradition was adopted from the French by the Germans. Traditionally, by the beginning of the school year, their children received a huge bag decorated with various decorative materials as a gift. Such a bag was filled with sweets and school supplies. Sweets came to Russia at the beginning of the 20th century. The widespread cultivation of sugar beet made it possible to reduce the cost of the sugar production process. Accordingly, the price of sweets fell and began to be sold freely. The favorite delicacy of the children was lollipops, which they bought in large quantities.

To learn the basics of suite design, making a Christmas tree from sweets with your own hands is perfect. Such a forest beauty can be an excellent interior decoration or a gift to a loved one. Children will especially appreciate your work, but you can also make a beautiful composition for adults.
craft for children
We suggest you make a Christmas tree from sweets and tinsel. First you need to make the base of the Christmas tree. You can, of course, buy a ready-made foam cone in a craft store, or you can make it yourself. Moreover, it does not require financial and time costs. So, at the heart of the craft is a cone. To make it you will need:
- a sheet of cardboard;
- scissors;
- glue;
- compass.
Or just roll up a paper bag and trim the bottom edge with scissors.
When the base is ready, you can start the main work. To do it, take:
- conical base;
- Green tinsel;
- Double sided tape;
- Sweets in bright candy wrappers;
- stapler.
Using a stapler, fasten a circular row of green tinsel along the bottom edge onto the prepared cardboard cone.

The second row will consist of sweets. They need to be fixed with double sided tape.
You need to lay a strip of adhesive tape so that a row of sweets touches the bottom edge of the tinsel. This will make the foundation less visible.
Press the sweets tightly against the adhesive tape, and to keep them as secure as possible, glue the tails of the sweets additionally next to the transparent adhesive tape.

Lay the second row of tinsel, covering the candy tails. It also needs to be glued on double-sided tape.


At the top of the tree, fasten a few candies or other decorations, then glue the last row of tinsel.

It remains only to decorate the Christmas tree with serpentine and give it to your favorite sweet tooth.

If you are using heavier candy for this composition, use hot glue as a fixer.
Having mastered the technique of making this simple candy tree, you can create this craft:

The manufacturing process is exactly the same. You can use this method of attaching sweets.


Gift for adults
What could be better than sparkling champagne in a glass and delicious sweets to boot. And why not combine these two attributes of the holiday into a wonderful gift. We bring to your attention two beautiful workshops on creating a Christmas tree from sweets and a bottle of champagne using the sweet design technique.
Variant with tinsel
The process of making such a Christmas tree is similar to that described above. Only instead of a cardboard cone, sweets and tinsel need to be glued onto a bottle of shaman. Mounting is done with hot glue. You need to start gluing tinsel from the top of the bottle, and carefully hide the tail at the bottom, bringing it under the previous row.

Decorate the forest beauty and go on a holiday.

Organza balloon tree
A Christmas tree made from a bottle of champagne, decorated with organza and sweets, will become a magnificent decoration of the festive table. To make such a Christmas tree you will need:
- A bottle of champagne;
- A piece of floral organza;
- Glue gun;
- Scissors;
- stapler;
- Candies;
- Decorations.
First of all, you need to prepare organza pounds. They are done in the following way. The material is cut into squares of 10 by 10 cm and stacked on top of each other. Then the workpiece must be folded in half and again in half and fixed with a stapler.

The number of pounds for this Christmas tree depends on how fluffy you want it to be.

The top row can be masked with a green teip tape and decorate the top of the head with a large bow. Carefully pushing the pounds apart, glue the candies to the hot glue. Decorate the Christmas tree to your liking.

Video on the topic of the article
You can get acquainted with other options for making Christmas trees using the suite design technique by watching this video.
To understand how a do-it-yourself Christmas tree is made from sweets, a step-by-step photo from this material will help. Of course, for every modern person, it is the Christmas tree that is the symbol of the wonderful New Year holiday. Although, in pre-revolutionary Russia, Christmas trees were put up precisely for Christmas, as they continue to do now, for example, in Europe. But it is not so important when exactly the winter beauty will be placed at home, it is much more important that this attribute of the holiday must be present.
Usually a large green Christmas tree, natural or artificial, is placed in only one room. To decorate other rooms of the home, you can make Christmas trees from sweets. Look at the photos and videos in this article to see what a Christmas tree made of candy and tinsel might look like. Such crafts can be bought in stores today, but they cost much more than the sweets and tinsel themselves separately. Therefore, in order to save money and at the same time get the maximum effect, you can make a Christmas tree with your own hands.
Photo ideas and tips on how to make a Christmas tree from sweets and tinsel yourself


Step-by-step Christmas tree master class on a cone
For many centuries, the most important attribute of the New Year holiday has been the Christmas tree. There are many conflicting opinions and versions from where the tradition of putting an evergreen tree in the house and the custom of decorating the Christmas tree and the house on the eve of the New Year came from. And is it important at all, the main thing is that a smart Christmas tree creates a festive atmosphere, decorates the home, and this tradition is kind and beloved by everyone. She gives children some kind of magic, and adults, at least for a moment, returns to a carefree joyful childhood. Previously, it was customary to put a live spruce on New Year's Eve, but now the trends are changing and artificial spruces are becoming increasingly popular. Big or small, they will decorate the house no less worthy. A beautiful artificial Christmas tree is not difficult to make with your own hands from improvised materials. We propose to make a very interesting elegant Christmas tree from rain and sweets.


For such a Christmas tree made of sweets in any home there is a shelf, a niche, a table where it will complement the festive surroundings. A Christmas tree made of sweets can be presented as a New Year's gift to friends, relatives, work colleagues. In the end, it can be put on the New Year's table instead of a banal vase with sweets. Imagine how adults will appreciate the originality and how happy the children will be when they find their favorite sweets and unwrap them right on the Christmas tree.
Necessary materials:
- thick cardboard;
- stapler;
- double sided tape;
- hot glue;
- candies;
- New Year's rain;
- bows;
- beads.
Manufacturing process:
1. We turn the cone off the cardboard, cut off the excess paper so that the base is even, fix the cone with a stapler. For a cone, it is better to take not white cardboard, but colored one, so the gaps between the sweets will look more beautiful.

2. Glue a strip of double-sided tape along the base of the cone, and attach a New Year's rain on top.

3. Using hot glue, glue the candies to the cone. Candies for the Christmas tree are better to choose different ones with a bright wrapper.

4. The next layer is again raining, glued to the adhesive tape. The rain should be glued so that the tails of the wrapper are closed.

5. Next, glue a row of candies. The number of layers alternating with sweets can be more, it all depends on the height of the twisted cone.

6. We wrap the top of the cone with rain. The tip of the rain can be put inside the cone.

7. The candy tree is ready. For more elegance, it can be decorated with bows and New Year's beads. As you can see, it’s easy to do something interesting, the main thing is to turn on your imagination, but if your own can’t cope, on this site you will find many simple and interesting ideas, like. Happy New Year!

Christmas tree on a bottle of champagne (or wine)
A Christmas tree made of sweets and a bottle of champagne looks original and stylish. If the master class option that is given above in this material is suitable for decorating a children's room or as a gift for kids, then here's a candy tree, but based on champagne, it will be a great gift for adults. For work, you will need a bottle of wine or champagne, scotch tape and scissors, small brightly packaged sweets and ribbon.
In principle, the bottle can be taken not only full, but also empty. However, in the case of a full bottle of champagne, it will definitely turn out to combine two gifts in one, and this will be especially cool. First, as in the step-by-step master class above, you will need to glue a piece of adhesive tape to each candy. Now glue the bottle with tape and, starting from the very bottom, move to its neck. In order for the craft to end up looking beautiful, you should additionally ensure that the end of one candy is in good contact with the neighboring sweetness.

It is also very important to work carefully here and make each subsequent row only slightly higher than the previous row. That is, sweets should, as it were, lean on each other, which, as a result of the work, will make the Christmas tree a mouse. Having reached the top of the head, if everything was done correctly, four sweets will be enough to consolidate the effect of splendor and beauty.
Important! If a Christmas tree based on a bottle of champagne or wine is not made for yourself, but as a gift, then you must definitely warn the person about such a surprise. Because it happens, for example, that someone does not like sweets very much, but they will gladly remove all the sweets from the Christmas tree in order to get to a slightly alcoholic drink.
As you can clearly see from this article, a candy Christmas tree can be lush and beautiful. And after the holidays, you can still eat it. This is a great sweet gift not only for children, but also for adults. By the way, do not forget to choose sweets that are different in taste and filling to create a Christmas tree, so that later it would be more interesting to eat a sweet Christmas tree. Happy winter holidays, we wish you all the best!


