Stylish savings - decorating the wedding hall from paper: flowers, pompoms and other options. How to make paper pompoms with your own hands. Corrugated paper pom-poms step by step
Do not know how to decorate the interior for the holiday? Original paper balls will be an effective and inexpensive solution, especially since they are made very easily and quickly. The following master classes will tell you how to make bright and airy paper pompoms with your own hands, which are suitable for decorating a birthday, wedding, and any party.
Method 1

- corrugated paper;
- 2 sheets of thin cardboard;
- 2 markers of different colors;
- glue;
- scissors;
- needle with thread.
Fold a sheet of cardboard in half and draw a semicircle on one side. The diameter of the finished craft will depend on the size of the cardboard circle that will serve as the base. Cut out a circle from cardboard.

Cut the cardboard base circle in half.

From a stack of corrugated paper in width, you need to cut off the excess part.

On the second sheet of cardboard, draw vertical stripes with different felt-tip pens. The density of cells on the ball will depend on the number of these bands and their frequency. We will have 5 stripes, the blue ones should be smeared with glue and the first sheet of corrugated paper should be glued to them.

Then glue the green stripes with glue.

Glue the next sheet of paper.

Similarly, repeat the procedure with the rest of the sheets, alternating gluing the sheets to the blue and green stripes.


On the finished stack of sheets of corrugated paper, attach a cardboard semicircle and cut the paper along its contour.

Stick the cardboard on the last sheet of paper.

Make a hole with a needle from one edge of the craft and pass the thread through it. It is not worth stitching tightly, otherwise the ball will not open. Tighten the thread in the form of a loop so that you can hang the craft.

Expand the ball. Take the craft by both cardboard parts and gently spread them apart. Be careful not to tear the thin paper.

Glue the cardboard joints together and the ball will take shape.

Such balls can be made in different sizes, plain and multi-colored.
Method 2
Pompom with rounded edges

Required materials and tools:
- 8-9 sheets of plain or multi-colored corrugated paper;
- sharp scissors;
- thin wire;
- lace or skein of thick thread.
Cut the paper into equal rectangles or squares. The diameter of the finished product depends on the width of the sheet.

Gather the sheets together and fold them like an accordion. Fold width - 1.5-2 centimeters.

Finish the edges of the accordion. Depending on what shape you want to make the ball, its edges can be jagged, torn, sharp, it all depends on your imagination. Our ball will have rounded edges. To do this, you need to cut the corners of the accordion with scissors, giving them a rounded shape.

Take the wire and bend it in half.

Wrap the accordion in the center with wire and tighten. The edges of the wire should be twisted into a loop, for which you can later hang the craft.


Straighten the paper accordion. Carefully separate each sheet and straighten it first on one side, then on the other, forming a fluffy pom-pom.

Pompom with sharp edges
Please note that this is the same master class, but the pompom has pointed edges.


Method 3
Let's consider the option of creating a pompom from paper napkins, which can be used to decorate a gift box.

Required materials and tools:
- paper napkins 2 different colors;
- scissors;
- pen;
- needle with thread.
Take 4 napkins of the same color.

Put them together and bend three times as if you were planning to cut a snowflake.


Draw a semicircle along the edge of the folded napkin.

Cut off the excess.

Expand the craft, you get neat flowers. Cut similar ones from napkins of a different color.

To put all the blanks together, take a hole punch, fold the flowers in half and make a through hole.

Pull the thread through the hole and tie tightly.


Method 4

Required materials and tools:
- corrugated paper;
- wire;
- scissors;
- glue gun;
- foam ball;
- ribbon.

The paper needs to be cut into sheets measuring 12 by 24 centimeters. For one flower, you need to fold 4 sheets of paper together and bend them like an accordion. Pull the accordion in the middle with wire, and cut the edges in a semicircle.

Spread the petals. Stick the finished flower into a foam ball and fix with glue.

Depending on the size of the ball, make the number of colors that will cover it completely.
Method 5

Required materials and tools:
- corrugated paper of different colors;
- scissors;
- stapler;
- glue gun;
- foam ball;
- ribbon.
Wrap the ribbon around the ball and secure with hot glue. Do not cut the ends of the tape, with their help the finished product will be attached.
Cut the paper into strips measuring 10 by 25 centimeters. Fold each strip in half to make blanks 5 by 25 centimeters.

Wrap the workpiece around your finger and secure one of its edges with a stapler. Got a rose.


Make the required number of roses and glue them to the Styrofoam ball.

A ball with a diameter of 60 centimeters will require at least 300 buds.
Method 6

Required materials and tools:
- corrugated paper 3 colors;
- needle with thread;
- scissors;
- pen;
- ruler.
Fold all sheets of paper together and cut out 20-30 circles of the same diameter.


Sew them together in the center, after aligning all the workpieces.


Draw the top circle into sectors.

Carefully cut the workpiece along the lines strictly from the edges to the center.

Fluff up the pom-pom. If necessary, pull a long thread through the center of the product to hang the ball.

Particular attention should be paid to the decor of the celebration. Decorating a wedding with balloons and fabric is a thing of the past. And paper wedding decor is becoming more and more popular. And no wonder, because it is stylish and budget! What is paper decor? Where can paper decorations be used? Find out in the article!
Benefits of Paper Wedding Decor
Paper decor has a number of important advantages that make it so attractive to honeymooners all over the world:
- Paper decor is perfect for honeymooners looking to save some money.
- Paper decorations will make your wedding truly unique and unlike any other celebration.
- Paper decor is a great alternative to traditional decorations that are already pretty boring.
- Paper decorations are quickly made and easily attached to any element, be it a wall, ceiling or table.
- Paper decor makes the space lighter and more airy.
- Paper decorations will delight you at any time of the year, unlike flowers, they will not wither even on a hot summer day.


Wedding paper decor options


Favored by many, origami cranes can be used as elegant decorative elements. They can be used as banquet cards, or you can make garlands based on them and decorate a hall or a wedding arch with them.


Paper flags and turntables
Funny paper flags and pinwheels can be spectacular elements of wedding decor. In addition, they can be used as props for a photo shoot. Bright pictures are guaranteed!


paper fans
Paper fans can be used as the basis for a stand placed at the table of young people. Such a strong decoration will highlight the table of the young and make
Decorating a wedding with handmade accessories and decor elements helps to create a special atmosphere at the celebration. One of the most affordable ways to make your wedding decoration unique is with paper or fabric pompoms.
This is not only a way to save money and not damage the budget of a young family, but also an opportunity to show imagination, express your feelings.
DIY wedding decoration with paper pompoms
Pompoms are a budget option that allows you to make the holiday bright, stylish, original. For the manufacture of elements of such a decor, you do not need to spend significant amounts of money and make great efforts. The bride and groom can make this decoration on their own, and if they wish, ask friends and girlfriends for help.
Enough to stock up:
- colored corrugated or crepe paper;
- scissors;
- wire;
- narrow satin ribbons.
The manufacturing process is quite simple, but requires accuracy and attention. All operations are performed in a certain sequence.
Before you start decorating the hall or assembling garlands, you need to make as many blanks of different sizes as possible from paper of different colors.
When choosing paper colors for pompoms, it is important to remember that they must match the overall style of the wedding: for example, if, then the color of the pompoms can be diluted with white.
Getting started, you must:

- Give sheets of paper of the selected color to the desired size. To do this, some of them are left in A4 format, while others are cut off enough to get balls of a smaller diameter.
- Several sheets of the same size are folded "accordion".
- Having determined and marked the middle of each workpiece, fasten it with a metal wire.
- To give each pom-pom a special shape, the edges of the "accordion" are cut off, rounding them or making them, on the contrary, pointed.
You can proceed to the most important. All the "petals" of the future pom-pom must be carefully and carefully straightened. First, half of the accordion is moved apart, like a fan.
Then carefully separate each layer of paper from one another. If everything is done correctly, you will get a figure resembling a rattle. This hemisphere is on a peculiar leg. They also straighten the second half of the accordion.
Thus, the workpiece will turn into a real fluffy ball.

The size of the pom pom depends on the size of the corrugated paper sheet used. The largest can be made using the full width of the roll, while the smallest have a size chosen by the craftsman.
The peculiarity of the manufacture of large pompoms is that almost 2 runes of paper are spent on one fluffy ball.
 A large pompom can be made from a small amount of paper, but to make small paper balls of paper, you need two or even three times as much. This should be taken into account when starting work on creating blanks.
Creating a ball of the correct shape requires preliminary preparation of sheets in the form of a square, the length of which matches the diameter of the pom-pom. When making an accordion, you need to keep in mind that the size of the petal depends on the size of the step. And one more important point: pulling the middle of the accordion strip with wire or tape does not damage the integrity of the paper.
To create real masterpieces, folding sheets for a future accordion, use paper of different colors.
How to make fabric pompoms: step by step instructions
Decorating a wedding with pompoms is an opportunity to show imagination when creating decor elements using not only paper. Beautiful balls are obtained from threads or fabrics.. To make these pom poms you will need:

- thick cardboard;
- a pattern (plate or saucer) to draw an even circle;
- scissors;
- satin ribbons with a width of not more than 0.5 cm;
- tulle, organza or other lightweight fabrics.
Before you start working with the fabric, you need to cut out circles from cardboard, the diameter of which corresponds to the size of future pompoms. The number of these circles is twice the number of pompoms.
A plate or saucer is used as a pattern so that the pompoms are of different sizes.

Cut a hole in the middle of each circle. It is important to remember that the larger its diameter, the more magnificent the pompom will be, but its size will be smaller.
Ready-made cardboard "bagels" are folded in two, laying a satin ribbon between them. Now you can start working with the fabric. It is cut into strips and carefully wrapped around the base of cardboard until the fabric can no longer pass through a narrow hole in the middle of the workpiece. Carefully cut the fabric with scissors, inserting the tip between two rings of cardboard.

Tape the middle and remove the base. The tulle pom-pom turns into a bright fluffy ball before your eyes. To create unusual models, they take a fabric of the same texture, but several, successfully combined colors.

Ready-made fabric pom-poms decorate columns and backs of chairs, walls, arches, and for the young, the presidium (). Fabric pom-poms can be made from silk or satin, but these are heavy fabrics, and products from them look very attractive only if they have a small diameter.
Such pompoms are not collected in, but are used to decorate the presidium, walls or columns.
Light textile balls are hung under the ceiling or to chandeliers, and small pompoms made of heavy fabrics serve as table decorations - they are placed at the base of the columns, filled with a helium composition are attached to them.
This video will teach you how to make your own paper pom poms:
Attractive balls are made from nylon or other threads: rhinestones are glued to the surface of the finished products, from which light is reflected, making the pompoms sparkle under the ceiling of the banquet hall.
Fabric pompoms are very popular when decorating a wedding in nature. After all, such an ornament is not afraid of either wind or rain.
It is safe to say that among the many different decor elements that are used to decorate a wedding banquet, paper or fabric pompoms are not only very popular - they are the easiest way to save money and create unique decorations for the banquet hall.
Paper wedding decor is very relevant today. Paper flowers bloom on banquet tables and wedding arches, origami cranes flutter in photo booths, multi-colored garlands decorate the halls, and figurines of newlyweds on the cake are increasingly replacing paper flags and turntables. Such decor is always pleasing to the eye, and it is also very easy to manufacture, as you can see by studying our master classes.
1. Round fan turntables, as well as panels and garlands from them
A round paper decoration, which is conventionally called a fan turntable (although it does not spin), is very easy to make with your own hands. And it’s even easier to find a use for it: you can use turntables to decorate a photo zone, decorate an arch, and even as a cake topper.

So, we will need:
- Heavy paper
- Buttons with large holes
- Glue stick or glue gun
- Rope or string
- stapler
- Scissors
- wooden sticks
- Ruler and pencil
- Hole punch (optional)

Step-by-step instruction:
1. Cut the paper into strips and fold them like an accordion. The width of the strips and the pitch can be varied. Please note that the width of the strip is the radius of your future turntable. To make the step even, you can mark the paper with a ruler and a pencil.
2. Connect the edges of the strip with a stapler.
3. Bend the workpiece as shown in the picture, apply a little glue to the middle and glue a wooden stick into one of the folds to secure the shape. Adjust the length of the stick to the diameter. If the paper is stiff and holds its shape on its own, you can do without sticks.
4. Fasten the buttons in the middle (on both sides) and connect them with a string.
The spinner is ready!

To make the turntables hang vertically or tie them into a garland, make holes on the edge with a hole punch and thread a rope through them. Also, turntables can be connected to each other with wooden sticks using glue - you get a rigid panel.

It is not necessary to decorate the middle with buttons - you can leave it as it is, or, for example, stick small circles of colored paper there.

2. Paper heart garlands
A budget and cute idea is to make a garland from improvised materials. You can decorate the bride's room, the exit registration arch or the entrance to the restaurant with such garlands.

Materials and tools
- color glossy magazines
- scissors or a heart-shaped hole punch
- sewing machine
Step-by-step instruction
Cut out hearts from magazines. This can be done manually, according to a template, you can cut it without a template - then each heart will be unique. But the easiest way is to use a heart-shaped figured hole punch, you can buy it in scrapbooking stores.

Sew the hearts one by one 
The garland is ready!


Other examples of heart garlands. Hearts can be cut out of books with text - such garlands are suitable for a vintage wedding. You can cut them out of old notes, cards, or simply from beautiful colored paper.


3. Paper pom-poms
Airy, fluffy paper pompoms are a budget-friendly way to decorate a wedding. They are good because they are made quite simply and quickly, and they can also easily decorate a large area. Another plus of such decorations is that they can be used to create a certain color scheme in the decor. In the article you will find examples of using pompoms and a master class on making them from crepe or tissue paper.

Paper pom-poms are universal - they can decorate napkins, bonbonnieres, a restaurant hall, a bride's room, a wedding arch. They will give any element an elegant and festive look.
One of the most common and most effective ways to decorate with paper pom poms is to hang them from the ceiling at different heights. They will create a festive atmosphere and give a certain color accent to the interior. 


Pompoms can be used to make garlands.


They can be attached to the wall, make a pattern out of them. You can create a monogram from them with the initials of the young.

Large pompoms can simply be placed on a sofa, piano or on the floor.

Small pom-poms can be used to decorate napkins.

An example of decorating a wedding ceremony with paper pompoms.

If the wedding is celebrated in nature, you can decorate tree branches with pom-poms. They can also be made a bright accessory for a photo shoot.


Paper pom-poms can be used as artificial flowers and to decorate a graceful tree branch.

You can decorate your wedding car with them. This option is only suitable for spring and summer weddings. From rain and snow, fragile pompoms will quickly lose their shape.

The master class will tell you how to make paper pompoms yourself.
You will need:
- Crepe or tissue paper or thin wrapping paper
- Scissors
- Thin wire or thread
Step-by-step instruction:
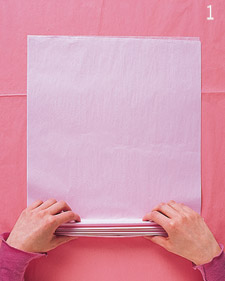
1. Cut the paper into A4 sheets (approximately 20*30 cm). For each pom-pom you will need 8 sheets of paper. You can choose larger or smaller sheet sizes. The width of the sheet will correspond to the diameter of the pompom.
Fold like an accordion with a fold width of about 1.5 cm.
2. Bend the workpiece in the middle, tie it tightly with wire or thread at the bend (i.e. in the middle). If you plan to hang a pom-pom, make a loop out of wire or thread.
Trim the edges of the workpiece on both sides. The picture shows two options - you can cut it in a semicircle or a triangle. The pompom will either have rounded edges or sharp edges.

3. Spread the paper and "fluff".
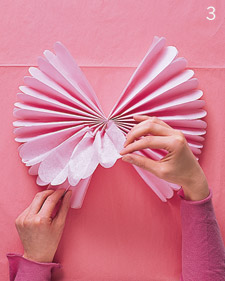
4. You will have such a cute pom-pom.


4. The simplest vertical garlands
How to make vertical paper garlands with your own hands, our master class will tell.

You will need:
colored paper,
- scissors,
- glue.

Step-by-step instruction:
1. We take a strip of colored paper and make cuts in increments of about 2 cm (we do not cut to the end, we leave a "reserve").
2. We cut the rectangle on the other side between the cuts already made, again not reaching the edge.
3. We get a blank for a garland. If it is not long enough, we make several more similar segments and glue them into one.
4. Stretch the resulting strip.

Vertical garlands are good when there are a lot of them. Hang them side by side, at a short distance. You can make multi-colored garlands or white ones, depending on the chosen wedding palette. Decor in the form of paper garlands is appropriate not only for a wedding, but also for other holidays, including children's. By the way, children will be happy to take part both in the manufacture of garlands and in decorating the room with them.

5. Paper flowers
An alternative to floral arrangements is flowers made of thick paper. They look very unusual and stylish. Making them is not a big deal. We will show you a detailed master class on how to make a stylized poppy out of paper. After that, you will learn how to make different paper flowers based on the same technique - from naive daffodils to elegant roses.

Materials and tools
- sheets of plain paper or cardboard for patterns, a pencil and an eraser
- thick colored paper in several colors
- scissors
- glue (it can be replaced with building double-sided tape or wire)
Step-by-step instruction
1. Make a pattern for the petals. The size of the petal can be any, depending on the size of the flower you want to get. Circle the pattern and cut out 6 petals.
2. Bend the petal with a fan (accordion) so that the lines converge towards the center.
3. At the base of the petal, make an incision in the center

4. To shape the petal, fold the two halves of the bottom of the petal together and glue them together. (see photo)
5. Glue 3 petals of the same size together.

6. Make another "flower" of 3 petals and put on the first "trefoil", glue them together

7. Getting to the core. Cut out 2 circles from yellow and black paper, cut evenly from the edges to the center, twist the ends inward.

8. Glue the core to the center of the flower.
9. Cut out a leaf, glue to a flower

The flower is ready.

Based on the same technique, you can make very delicate flowers in pastel colors.

The shape of the petals of these flowers is smooth and rounded.


Also, very elegant flowers in burgundy and purple are made in a similar technique.

The shape of the petals can be round or pointed.

The petals of these flowers are not corrugated. The assembly takes place not on glue, but on wire.


Giant flowers can be used as table decorations, for the decoration of the restaurant hall and exit registration, you can make a “bride bouquet” or decoration for a wedding arch.


An example of an exit registration arch made from paper flowers.


6. Turntables on a stick and without

You will need:
- colored cardboard sheet
- stick - for small turntables, sticks for canapés (sold in supermarkets) are suitable, for larger turntables, you can use sticks to support flowers (sold in flower shops and large construction supermarkets)
- button, bead, any decorative element
- scissors
Step-by-step instruction:
1. Cut a square out of cardboard

2. Cut it as shown in the picture

3. Bend in turn every second corner to the center and glue it

4. Glue a decorative element to the center of the spinner, glue a stick on the other side 
5. If you want the spinner to rotate instead of decorative, then instead of gluing a decorative element, attach the paper part to the stick using a pin with a pearl on the end.


7. Corrugated paper garlands

To make a garland you will need:
- several rolls of crepe paper in bright colors (available at office supply stores)
- scissors
- glue or glue gun
- base stick for a garland (it can be replaced with wire)
Step-by-step instruction:
1. Cut the paper into strips 10-15 cm wide

2. Fold each strip in half and cut it from the edges to the center, leaving 2 cm to the fold

3. If the length of the strip is not enough (it is less than the height of the arch), glue the end of one strip with the beginning of the other, so that the strips become twice as long

4. Now let's start building a structure that we can quickly install when decorating a wedding, and not attach one garland to the arch.
To do this, you need to attach the garlands to a stick (if the arch is in the form of a rectangle or to decorate the wall behind the newlyweds) or wire (if the arch is in the form of an arc).
Glue the ends of the garlands to the stick/wire in succession and let dry.
5. Now you can wrap all the garlands on a stick so that they do not get tangled during transportation. 
Look how beautiful the backdrop of these garlands looks!

Garlands of such rich colors will perfectly fit into the style of a Hawaiian wedding.


8. Paper flags and garlands of them
You can diversify your wedding photo session with the help of interesting signs, banners and flags with cute inscriptions. We have put together a collection of 44 examples of such accessories for wedding photography with different inscriptions and drawings.


The idea of decorating a wedding with paper decor comes to the newlyweds when they plan to achieve an elegant and romantic design, while saving on the decoration of the banquet hall. Using paper pompoms of different sizes to decorate the wedding, lanterns hovering under the ceiling, the newlyweds will be able to get a unique and extraordinary design for their celebration.
Advantages of paper decor at a wedding
In the process of preparing for the long-awaited celebration, the newlyweds pay special attention to the decor of the institution where the banquet will take place. The decorated hall creates a festive atmosphere, turning an ordinary room into a romantic and magical place. Modern trends in the wedding industry suggest decorating with paper. This material allows you to create extraordinary, luxurious and beautiful things. If you use paper decorations for wedding decor, you can be sure of an individual and unique design, which has a number of advantages:
- Paper is considered a budget material for creating holiday decorations.
- You can make such a design yourself even without prior preparation.
- With the help of voluminous decorations made of paper, it will be possible to hide the flaws of the room.
- If you are making flowers out of paper, then you don't have to worry that they will lose their appearance. This decor is made for any wedding, regardless of the time of year.
- The created design does not require special care.
- Paper décor details are perfectly matched to the color scheme and style of your wedding.
- The design looks airy and light.
Do-it-yourself paper decor options for a wedding
If you adhere to fashionable wedding trends and plan to arrange a celebration with a twist, then it is necessary to use paper pompoms, lanterns, garlands, origami cranes to decorate the hall. Such decorations are easy to make at home, without the help of professional florists and designers. As a result, you will have individual and stylish decorations, created by hand, especially for your celebration.

Pompoms and lanterns
To decorate the arch, chairs or walls of the banquet hall, a young couple uses lanterns. This design will be an excellent attribute for a wedding photo shoot. Lanterns can be connected into long luminous garlands and hung from the ceiling, creating the effect of a starry sky. If you plan to diversify a plain hall with bright decorations, then choose colorful lanterns that will not go unnoticed by guests.

Pompoms are a budget option for decorating a wedding. Fluffy and airy decorations will make the wedding celebration stylish and beautiful. With the help of pompoms, the newlyweds will be able to decorate the ceiling, arch, walls, columns of the banquet hall. Decorations can be placed singly or assembled into a large panel, which will become a decoration for the background of the newlyweds' table.
The color scheme of pompoms depends on the chosen shade of the wedding. You can combine turquoise with white or make the decor all red. After spending 5 minutes of free time, you will receive an original decoration for the upcoming celebration. For the manufacture of pompoms, corrugated, crepe or tissue paper is used. You also need to prepare scissors and wire. Step-by-step instructions will help you make an original and neat pompom:
- Take the paper and cut it into several A-4 pieces. As a result, you will get a pom-pom with a diameter of approximately 30 cm. If you plan to create a smaller decoration, then the paper must be cut into pieces of 20x20 cm.
- Then put the sheets of paper in front of you and fold them into an accordion. The fold of each side should be 2 cm.
- The resulting accordion must be fixed in the center with wire.
- If you want a pom-pom with round edges, then cut the folded ends of the accordion into a semi-circle.
- Then carefully straighten the edges of the accordion, forming a spherical pom-pom.
- If you plan to hang the finished decoration on the ceiling, then attach a satin ribbon of the desired length to the middle.

origami cranes
According to Japanese tradition, the presence of decor in the form of origami cranes at a wedding symbolizes well-being and a happy life for a new family. Therefore, newlyweds are recommended to create a similar decor from paper. Making decorations for a wedding using the origami technique, you are guaranteed to get a special design that will be positively appreciated by all the guests present. To create cranes, you will need a minimum of financial costs to purchase the necessary materials and some free time for creativity.
The made origami is assembled into a long garland and hung in the photo zone for guests or on the columns of the banquet hall. If the wedding is organized in nature, then cranes decorate the ceremony venue, arch, tent or place on the lower branches of trees. The newlyweds can also use the received garlands for a thematic wedding photo shoot.

invitation cards
To notify the guests about the upcoming celebration, the newlyweds must deliver wedding invitations. A postcard announcing the holiday must be made in the same style as the decorations of the banquet hall. If you prefer original versions of invitations, then you should use voluminous paper flowers, ribbons, beads in the decor. Having received such a card, the guests will be intrigued by the upcoming wedding.

Corrugated paper garlands
If your wedding is planned in an inexpensive banquet hall, then paper garlands will help diversify the interior. With the help of such decorations, nondescript arches, columns, windows are transformed according to the theme of the celebration. Corrugated paper lends itself easily to twisting, gluing and other manipulations, so you can make decorations yourself. To create your own design masterpiece for a wedding, follow these instructions:
- For one garland, you need to cut 10 circles, 5 butterflies, 20 hearts. The size, color and shape of these blanks depends on your imagination and preferences.
- Then take a long fishing line or ribbon and connect all the components into one garland.
- Decorate guest tables or walls of a banquet hall with a finished decoration.

Video tutorial on making paper flowers
Modern newlyweds are trying to replace the traditional decoration with fresh flowers with paper decor. Using such an extraordinary approach, young couples will be able to get unique wedding decorations. If you are planning to make your own decor for the upcoming celebration, then paper flowers for the wedding will be a great addition to the festive decoration. In the video, a specialist will show you step by step how to quickly create roses for the decor of a banquet hall. With the help of manufactured flowers, you can diversify an ordinary room with magnificent compositions.
Photo selection of paper decorations for the wedding


