What can you make a voluminous Christmas tree. Delicious Christmas tree made of sweets with your own hands. Glowing Christmas tree from garlands
Soon the New Year 2018 will knock on all doors, and the houses will be filled with the smell of tangerines, vanilla and chocolate cookies, and pine needles. However, they won’t feel the unique aroma emanating from the green beauty somewhere: the owners of these dwellings, after watching videos and photos on the topic “how to make a Christmas tree with their own hands”, decide to save nature - not to buy cut down trees. Instead, they will make a Christmas tree at home from such improvised means as ribbons, balls, cones, paper, cardboard, cotton pads, tinsel. Even decorations for such a beautiful craft can be homemade - children will make them in labor classes at school and kindergarten. What else and how can you create a unique Christmas tree? Simple master classes with step-by-step explanations will tell you about this.
How to make a Christmas tree with your own hands at home to school or kindergarten

Surely, you will want to help your child in making his best Christmas crafts. To do this, first find and mark for yourself the most unusual ideas for creating a fluffy Christmas tree. Study carefully the master classes and photos on how to make a Christmas tree with your own hands at home at school or kindergarten. Bookmark the pages you have marked or print detailed explanations on how to create the craft on the printer.
Examples of Christmas tree crafts with photos and videos

If you have long been nurturing the idea of making a homemade Christmas tree instead of buying another felled tree for the New Year, read how you can make a Christmas tree yourself at home - bring it to school, kindergarten or decorate your house with a green beauty. Pay attention to our selection of photos and videos - the materials will tell you what and how to make crafts from.


How to make a Christmas tree out of paper with your own hands in a kindergarten - DIY crafts master class at home
Preschool children are not yet too deftly able to handle scissors and carefully connect the details of crafts. As a rule, a teacher or parents help children of this age to make something original. Having learned from us everything about how you can make a wonderful Christmas tree out of paper with your own hands and take it to the kindergarten, having studied the master classes of crafts for creating a mini-Christmas tree at home , moms and dads will be able to explain to the children what needs to be done in order for the craft to come out neat and beautiful.

Examples of homemade Christmas trees made of paper and cardboard

Making paper crafts requires accuracy and patience. Learn how to make a Christmas tree out of paper with your own hands in a kindergarten - a crafts master class at home with photos will tell you all the steps step by step.


Paper Christmas tree toy for the Christmas tree - Master class with explanations on the photo

To create this mini-Christmas tree, a New Year's toy, you will need to carefully study the photo explanations of the master class.
- Fold the green square of paper in half twice and unfold it - you will see the fold lines.

- Start folding the figure, focusing on the fold lines.

- Consistently follow all the steps shown in the photo.


- Cut off the bottom part of the workpiece.

- Make symmetrical cuts on both sides of the workpiece - you will have a Christmas tree!

How to make a Christmas tree with your own hands at home to school for a competition - Master class with instructions
On the eve of the upcoming New Year, schoolchildren often make crafts for the holiday. At a certain time, all finished products are exhibited for demonstration to other students so that they can objectively name the best of the works. Of course, every child wants his craft to be recognized as the most original and beautiful. To do this, learn how to make a Christmas tree with your own hands at home to school for the competition - a master class with instructions will explain everything step by step.

Do-it-yourself felted wool Christmas tree - Master class with explanations

If you want to learn how to make felted crafts, read how you can make a Christmas tree from wool with your own hands at home and send it to school for a competition: a master class with instructions with a photo is attached.
- Having bought green wool for felting, wind a tight cone out of it.

- It is necessary to separate the wool from the skein by tearing it off, not cutting it off.

- Putting the cone on a wet sponge, start felting it. A pen with a needle attached to it can help.

- Constantly rotating the workpiece, moisten the future Christmas tree in warm soapy water and wring it out a little (be careful - otherwise the craft will lose its shape!)

- Put the craft on a wet bag and, rotating it, roll on - this way the Christmas tree will be stable.

- In the same way, make balls for the Christmas tree.


- Carefully sew the balls onto the Christmas tree.

- If desired, the Christmas tree can be decorated with a garland. Wrap diagonally around the craft, securing the “garland” of beads or beads with a few stitches.

- To decorate the Christmas tree, you can use bells, beads, jewelry, etc.

How to make a Christmas tree from cotton pads with your own hands at home: crafts master class
A good master with a rich imagination will always have the most unusual, creative crafts in the house, made from unexpected, unusual materials. Such a craftsman can happily teach you how to make a Christmas tree from cotton pads purchased at a regular supermarket with your own hands at home: a crafts master class and photos are attached.


Master class crafts "Herringbone" made from cotton pads

Learn how to make a Christmas tree from cotton pads with your own hands at home: a crafts master class will teach you how to make it step by step. The snow-white beauty will decorate any New Year's interior.
So, prepare first:
- Cotton pads;
- stapler;
- silicone adhesive;
- Cardboard;
- Scissors;
- beads;
- Green paint.
- Prepare each cotton pad as shown in the photo: fold it twice in half and secure with a stapler.

- For a Christmas tree 45 cm high, you will need more than three hundred prepared cotton pads.

- From a thick sheet of cardboard, glue the cone, cutting off everything superfluous at the bottom. Start gluing the prepared disks to the cone.

- Move from below, gradually attaching cotton pads in a circle.

- The cotton tree for the New Year 2018 is ready and waiting for its outfit.

- Glue beads to the center of some of the folded disks, and cover part of the “paws” with green paint.

How to make a Christmas tree from threads with your own hands at home: a master class in stages
As you already understood, crafts can be made from almost any materials and improvised means. The main thing here is not what the thing is made of, but the creative approach of the craftsman. Learn how to make a Christmas tree from threads with your own hands at home: a step-by-step master class, with the help of photos and explanations, will help you master this technique.

Craft "Christmas tree" from threads - Master class with photo

Read carefully how you can make an openwork Christmas tree with your own hands from simple threads - this is easy to do at home. A detailed master class will explain to you step by step how to work with materials, so that in the end you get a light, patterned Christmas tree.
- First prepare all the necessary materials (see photo).

- Make a cone out of paper by making cuts at the bottom. Through these cuts, you will wrap the Christmas tree with threads like a cobweb.

- Having diluted the PVA glue in a bowl to the state of liquid kefir, moisten the threads in it and wrap them around the workpiece. Threads can be of different colors.

- After finishing the winding, wait for the craft to dry. Gently pull out the cone from the inside - you will see a dense openwork Christmas tree. If you place a garland inside it, the tree will shine with New Year's lights.

- If there is no garland, decorate the craft as you wish.

How to make a Christmas tree with your own hands from tinsel: photo and video instructions
It is customary to decorate houses, carnival costumes and ready-made Christmas trees with tinsel. And is it possible to make them something? About, How to make a Christmas tree with your own hands from tinsel, they will tell you the photo and video instructions of the master classes posted on this page. You will only have to repeat the actions of the craftsmen.
Big green Christmas tree made of tinsel - photo with explanations

If you decide not to buy a cut Christmas tree for the New Year 2018, find out how you can make a fluffy Christmas tree with your own hands from tinsel: in the photo and video instructions you will find all the explanations regarding this creative work.

How to make a Christmas tree with your own hands from improvised means - Master class with photo
Surely, every housewife has countless ribbons, beads, ropes, pebbles, scraps of material, broken jewelry and a lot of such nonsense in wardrobes and chests of drawers. Throwing all this away can be very pitiful, so read how to make a Christmas tree with your own hands from improvised means - a master class with a photo of the finished craft will give you the best tips.


Christmas tree from ribbons for the New Year 2018 - Master class with instructions

If you already know roughly how you can make various beautiful Christmas trees with your own hands from improvised means, pay attention to this master class with step-by-step photos on making a green Christmas tree from satin ribbons.
For work you will need:
- Satin ribbons in three shades of green;
- Green cardboard;
- Glue,
- Scissors,
- Simple pencil;
- Thread,
- Burner;
- Glass,
- ruler made of metal;
- Compass,
- Silver and red beads.

- Using a burner and a metal ruler, prepare pieces of satin ribbon 10 cm long. Protecting the table, cover it with glass.

- You should end up with several tens of ten-centimeter pieces of ribbons of different colors.

- Make loops from the ribbons, again using the burner and a metal ruler.

- You should have three groups of loops of different shades of green.

- From green cardboard, make a cone blank by drawing it as seen in the photo.

- Using a compass, make more arcs, already smaller in diameter.

- Starting from the bottom, glue loops of ribbon in rows in a circle.

- At the top of the cone, the loops must be attached as tightly as possible to each other.

- Alternate loops of different shades of green.

- Start gluing beads to the ribbons.

- As a result, you should get such a green beauty.

What you can make a Christmas tree with your own hands: Christmas crafts from cones
Going for a walk in the forest, collect the cleanest, neatest cones and other natural materials there - you will need them to prepare for the New Year holidays. What you found will be what you can make a Christmas tree with your own hands: a New Year's craft made of cones will surprise your guests with the originality of its appearance.


Topiary tree made of cones: a master class with photos and instructions

When you find out what else you can make a Christmas tree from with your own hands, you will definitely want to make this New Year's topiary craft from cones.
- Before work, prepare all the materials and tools shown in the photo.

- Using heavy scissors, cut off their “leaves” from all the cones collected in the forest.

- Buy a ready-made cone or roll it out of thick cardboard. Starting from the bottom, move in a circle, attaching “petals” of cones to the base of the future spruce.

- The future Christmas tree itself will soon begin to resemble a huge cone.

- Having reached the top of the cone, form a neat top of the spruce.

- Now begin to cover the almost finished Christmas tree with glue and sprinkle with sparkles.

- If desired, cover the craft with gold paint.

- Such an unusual Christmas tree-topiary will perfectly fit into your New Year's interior.

What to make a Christmas tree for crafts for the New Year 2018 and how to decorate it

Photo and video examples of Christmas tree crafts for the New Year

From what home masters do not try to make a Christmas tree for crafts for the New Year 2018, how diligently they decorate it! Newspapers, magazines, packs of souvenir money, plastic bottles and cups, peas, pasta, socks, notebooks, tinsel, balloons and much more are also used. The photo shows how creatively the creators of the most creative Christmas trees approached the work.


How to make a Christmas tree with your own hands from plastic bottles - a master class with photos and videos
Sometimes we don’t even realize how much unique craft material we have at home! If you and your children often buy bottled water, kvass and lemonade, learn how to make a Christmas tree with your own hands from plastic bottles - a master class with photos and videos will help you with this.
Homemade Christmas tree from plastic bottles - Master class with photo

Having learned how to make an unusual light Christmas tree with your own hands from plastic lemonade bottles and having studied this master class with photos and videos, you can easily replace the best replacement for a tree cut down in the forest. Of course, before starting work, it is worth preparing everything you need in advance, namely:
- A large number of plastic bottles;
- Frame for spruce (from PVC pipe or wooden slats);
- wire;
- Three cans of green, and one can of silver paint;
- Stationery knife;
- Scissors;
- Drill or thin drill;
- electrical tape;
- Spruce stand.
- Assemble the frame for the tree. Attach plastic corners to a piece of PVC pipe. They will serve as the basis for the side paws of spruce. On top of the "legs" (they do not touch the floor!) And in the middle of the pipe, make holes by passing the wire through them. Secure it with pliers. Fasten the cut-off top from the plastic bottle between the "legs" - this way the construction will be stronger. Reinforce everything with duct tape.

- Cut off the bottom of the bottles.

- Cut the rest of the bottle into "noodles".


- Manually bend the strips away from the neck.

- Bend the strips up, cut off the necks of the bottles and paint the blanks with green and silver paints. You can do without paints, initially using multi-colored bottles.

- Start assembling the Christmas tree by stringing the blanks upside down onto the base. Screw the covers onto the lower legs. Drill holes in them and, with the help of a wire stretched through the hole, fix the structure.


- Secure the top of the spruce with wire.

- Place the tree in the stand. Decorate it with silver paint and tinsel.


Summary: How to make a Christmas tree with your own hands. Original Christmas trees made of cones and tinsel. Photos and templates of Christmas trees made of paper. Homemade origami Christmas tree. Candy tree.
Even kids can take part in preparing for the New Year and making New Year crafts with their own hands. For example, even a two-year-old can make a Christmas tree from an ordinary cone and plasticine. You just need to teach him to roll balls of different colors from plasticine and fix them on the cone. The base of the Christmas tree is a spool of thread wrapped in foil.
Here are more complex options for Christmas trees made from cones. In the first case, the bump was painted with acrylic paint in green and white. In the second version, the pine cone was decorated with beads.


From a large number of cones, you can make such a Christmas tree with your own hands. The basis for the Christmas tree is a cone made of thick paper or cardboard, which is then pasted over with cones on all sides with a glue gun. Decorate the finished Christmas tree with beads and large beads.

Another very simple homemade tinsel Christmas tree. You can make it in literally five minutes.

To do this, you need to make a cone out of cardboard and stick tinsel on it in a spiral.


Candy tree. DIY candy tree. How to make a candy tree
If, before wrapping a cardboard cone with tinsel, you can fix sweets on the future Christmas tree with adhesive tape, you will get a sweet Christmas tree made of sweets. For a detailed New Year's master class on how to make a Christmas tree from sweets, see the photo below or follow the link. When creating a Christmas tree from sweets, it is convenient to use double-sided tape.


A large number of Christmas trees can be made with your own hands from paper. Let's start with the simplest Christmas crafts.
DIY paper Christmas trees
DIY Christmas tree made of paper (option 1)

Print on thick paper or cardboard and cut out the blanks with scissors >>>> Bend each Christmas tree in half and glue them together. This Christmas tree is made according to the same principle as the Christmas ball from our previous article. See link >>>>

According to the same principle, openwork Christmas trees are made from the Country of Masters website.

Epson's Singapore site offers ready-made Christmas tree templates:


DIY Christmas tree toy (option 2)
If you have an unnecessary cardboard box, then you can make such a Christmas tree out of it using the same technology.

DIY Christmas tree toy (option 4)

And you can make a curly Christmas tree by pasting the base-cone of cardboard with strips of twisted paper.


DIY Christmas trees made of paper (option 10)
To make such a Christmas tree, you must first cut out circles of different diameters from paper. You will also need a wire and a stand, which will be successfully replaced by a half of a large "kinder surprise". The Christmas tree is easily assembled on a wire, and, most importantly, it is easily disassembled. See link >>>>

Origami tree from a magazine
This origami Christmas tree is very easy to make with your own hands. Small format magazines that can be found in any home are suitable as material.

Work plan:
The procedure described below must be done with each page in the magazine. If the cover is thick, you can simply peel it off (tear it off).
1. We bend the page, the upper right corner, at an angle of 45 degrees to ourselves.

2. Once again, fold the sheet in half diagonally.

3. We pass all fold lines with a fingernail or other object so that they do not open, especially thick pages.
4. The lower corner, which goes beyond the boundaries of the magazine, is turned up.

Thus, we add up all the pages in the advertising magazine.

The result is a cute origami Christmas tree.

Origami tree from a magazine
Another model of origami Christmas trees from for the New Year. Unlike the previous origami tree from a magazine, the pages here do not fold, but are figuratively cut out according to a template.

The manufacturing principle is very simple. It is necessary to prepare a half-Christmas tree template, circle it on one page and cut it out. Further, the cut page will itself be a template for other pages. You can cut several pages at once, but you should not cut a lot at once, as the cut line will turn out to be uneven (jammed) and the tree will not open well.

The tree itself turns out to be more one-sided; to achieve volume, you can fold and glue 2-3 magazines together. But trust me, she looks good.
Christmas tree origami from modules. Modular origami tree
Assembling a Christmas tree from triangular origami modules is not at all difficult. It consists of individual branches, so you can make Christmas trees of a wide variety of shapes and sizes. In addition, from such branches you can make New Year's compositions, make toys, snowflakes, stars. See the New Year's master class at the link >>>>

Christmas tree coloring on the wall
Large Christmas tree coloring on the wall. Separate parts of this New Year's beauty must be printed on 22 A4 sheets and pasted on the wall in the correct sequence. The advantage of this New Year's paper craft is that the Christmas tree is made in black and white, so the printer's ink consumption is small. In addition, this Christmas coloring book with many small details will captivate the child for a long time. Link >>>>

Do-it-yourself Christmas tree from napkins
A master class on making a very beautiful, unusual Christmas tree from napkins can be found at the link >>>>

How to make crepe paper Christmas trees
The Land of Masters website invites you to make two Christmas trees with your own hands from corrugated paper.
Option 1. Candles and the Christmas tree itself are made of corrugated tubes. Link >>>>

The closer the New Year, the more often the question sounds, how to make a Christmas tree with your own hands. Indeed, in addition to a live or artificial spruce, which is the main character in the New Year's interior, people's homes are decorated with crafts dear to the heart, including a Christmas tree craft. Christmas trees are made in kindergartens, at schools in labor lessons, at home. DIY Christmas trees find their rightful place in the workplace.
This article will talk about simple and affordable ideas on how to make a Christmas tree. Christmas tree made of paper, Christmas tree made of papier-mâché, Christmas tree made of polymer clay, Christmas tree made of natural materials, Christmas tree made of fabric, Christmas tree made of ribbons and ribbons, even a plywood Christmas tree! Which way of making a Christmas tree is closer to you? Choose any and get started!
7 ideas how to make a Christmas tree out of paper
This is the easiest way that even children can handle. To make a Christmas tree, as in the photo, you will need a long wooden stick or pencil, cardboard, a cube-shaped stand, pieces of multi-colored paper and a small piece of braid.
 Progress: cut out circles of different diameters from cardboard or thick green paper. We glue the figures cut out of colored paper. We make holes exactly in the center of the circles and begin to string them on a pencil, starting with the largest circles in diameter and ending with the smallest circle. We fix the pencil in a stand in the form of a cube. The stand can be made of thick cardboard. You can use another stand, as long as it is stable. If, nevertheless, the Christmas tree is unstable, weight the base with plasticine by sticking a pencil into it. Top with a star.
You can do the same corrugated paper tree. If there is no such paper, cut strips of colored paper of different widths. Fold each strip evenly into an accordion shape. Fasten them so that you get circles. String corrugated circles on a long stick or pencil, placing pieces of colored tape between them.
 Here are a few more ways to make a Christmas tree out of paper:
 In this case, spruce paws are more difficult to manufacture. Look at the photo. Otherwise, the principle of making a Christmas tree is the same. Balls are placed only between the paws of spruce. Balls can be made from synthetic winterizer or cotton wool.

 It is easy to make such a Christmas tree out of cardboard:
 And here is another way: a cone is made of thick paper, and multi-colored flags are glued to it. At the top we attach a small star. The Christmas tree is ready!

Here is something similar: 
Here's a Christmas tree craft you can do from paper decorative ribbons or from fabric tape
Watch the video on how interesting it is to make a Christmas tree out of paper:
Not at all difficult make a Christmas tree using boucle yarn or braid.

To make such a Christmas tree, you will need a small flower pot, glue, green boucle yarn or braid, ribbons, decorative elements, a cone made of foam or thick cardboard.
And now look at the photo of the master class on how to make a Christmas tree using yarn or braid:
 Take a flower pot and paint it white.
 We make a cone from foam or thick paper or cardboard. You can make a papier-mâché cone.

We glue the parts to each other. Let's dry.  We take booklet yarn or braid and ...
 start gluing it around the cone.
 We form the crown of the spruce to the very top and begin to decorate.
  This is how you can make a Christmas tree for the New Year:
  Here are some other Christmas trees:
How to sew a Christmas tree for the New Year
There are many ideas on how to sew a Christmas tree for the New Year. Here are a few ways to make it: 
To sew such a Christmas tree, you will need the following materials: green, yellow and brown decorative fabric, synthetic winterizer, multi-colored buttons, threads, shades of green, brown and yellow to give shades, a brush. The photo shows a sequential master class for making such a Christmas tree:


 You can sew a Christmas tree like this:
From fabric and synthetic winterizer and other improvised materials, you can make a Christmas tree like this:
 You can make a Christmas tree with your own hands according to the master class below.


 Here are more examples fabric Christmas trees:


A cute Christmas tree is obtained if it is performed in papier-mâché technique. This is when the desired figure is molded from pieces of paper, water and glue. In this case, this figure will be the Christmas tree itself. In the master class, you will understand how to make a papier-mâché Christmas tree. Here you will need a minimum of materials: paper, glue, a flower pot, green paint, decorative elements, clay or plasticine and small stones. 


How to make a polymer clay Christmas tree
You can make a polymer clay Christmas tree that does not need to be baked in the oven. To work, you will need a small bottle and a jar of yogurt, a decorative pot, self-hardening clay in green, yellow and brown, a wooden stick, decorative elements, gypsum, water and glue.


Guys, we put our soul into the site. Thanks for that
for discovering this beauty. Thanks for the inspiration and goosebumps.
Join us at Facebook And In contact with
There is very little time left before the New Year, and it would be time to think about holiday decorations for the house. You can buy ready-made options in the store, but it is much better to make original things with your own hands.
We are in website We believe that children should definitely be involved in this business, and we have collected great ideas for New Year's crafts.
sock snowman
From unnecessary socks you get such funny snowmen. You will need socks, rice for stuffing, some scraps and buttons. Cut off the toe at the sock, and on the other hand, tie it with a thread. Pour in the rice, giving it a round shape, pull the thread again and pour in more rice, forming a smaller ball. Sew on the eyes and nose, make a scrap scarf, sew on the buttons. And from the cut off part you get a great hat.
Christmas tree pendants
A cinnamon stick is taken as the basis, several artificial spruce branches and multi-colored buttons are attached to it with glue. Such Christmas trees will not only decorate the house, but also fill it with the warming aroma of cinnamon.
Cork deer
Bottle caps are great craft material. For example, you can make such a cute deer. You will need some corks, glue and various beads to decorate. This is not ashamed to hang on the Christmas tree.
stick crafts
From ordinary ice cream sticks, cute Christmas trees, snowmen and snowflakes are obtained. You need paint, glitter, buttons and a little imagination. Even the smallest children can cope with such crafts.
Christmas trees made of colored paper
These wonderful Christmas trees can be made by making a cone of green paper or cardboard and decorating it with various little things. Buttons, pebbles, beads and various paper figures will do.
potato drawings
Snowflakes from pasta
Fasten pasta of various shapes with glue and cover with silver paint, fasten the ribbon - an unusual New Year's snowflake is ready.
Snowmen from covers
Cover the metal bottle caps with white paint (it is better to take acrylic) and glue them together, as shown in the picture. Draw a face for the snowman and decorate with a scarf from a bright ribbon. If you glue a loop on top of it, then the snowman can be hung on a Christmas tree.
Crafts from cones
From the cones you can make different animals and any other characters. You will need paints, shreds, buttons and, of course, imagination and inspiration.
Christmas tree made of buttons
Pick up green buttons of different diameters and a few brown ones for the trunk and secure them with a thick thread. Decorate the crown with an asterisk.
painted balls
Place the pieces of wax crayons in a transparent Christmas ball, heat it with a hair dryer, constantly twisting it. Melting, the pencils will leave beautiful colored stains inside the ball.
Hello dear readers! On New Year's Eve, an incredible number of all kinds of New Year's decorations appear on store shelves: Christmas toys, tinsel, rain, bright garlands, crackers, artificial and live Christmas trees, etc. Speaking of Christmas trees, in our time, manufacturers offer consumers a really wide selection of Christmas trees: tall, small, tabletop, floor, lush, elegant, white, green, multi-colored ... which, in his opinion, will most successfully fit into the interior of a house or apartment. But today's article is not about factory-made, stamped Christmas trees, but exclusive Christmas trees made by hand!
Christmas trees with their own hands.
For the manufacture of a decorative Christmas tree, you can safely use almost any material: rhinestones, Christmas balls, threads, beads, wine corks, coffee and other grains, paper, buttons, wire, cones, tree leaves, feathers, pieces of fabric, ribbons, pasta and much more!
We have decided on the materials, but how to form the basis of the future Christmas tree? You can do it in the following ways:
- Pick up a cone-shaped bottle, on which to subsequently glue the necessary details.

2. Purchase a ready-made foam cone - they are sold in the "Everything for creativity and needlework" departments. 
3. Make from a sheet of paper. 
Let's take a closer look at the last point...
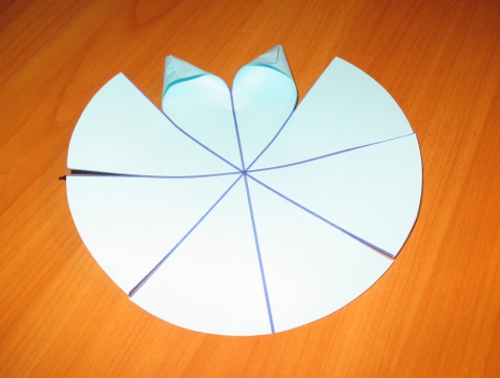
First way: we take a sheet of drawing paper, draw a circle, cut it out, then on this circle we mark a sector in the form of a triangle with a pencil, cut it off, and form a cone from the rest, gluing the side part with tape or glue. 
Second way: take whatman paper, draw a circle, measure the fourth part of the circle - a triangle (see photo), cut out this part and form a cone. 
So, having selected or made the most suitable cone, we proceed directly to the decorative part ...
DIY Christmas tree ideas.
Paper trees.
We select paper of a suitable shade, cut out and form a cone (described above), decorate with rhinestones, foil stars, beads, beads or ribbons.


DIY Christmas trees photo
Coffee trees.
We prepare a cone from thick paper, after which we successively fill in all the gaps on the cone with super-glue, as an addition, you can use rice grains, seeds, acorn caps, rhinestones, beads or beads.


DIY Christmas trees photo
Decorative Christmas trees made from pasta.
We select curly pasta, for example, bows, paint them in a suitable color from a spray can, and after the paint dries, we fix it on a cone (preferably dense foam) with moment glue. At the final stage, the Christmas tree can be supplemented with pasta in the form of stars or small decorative bows. 

Christmas trees from threads.
We form a cone from paper, take dense, woolen threads of a suitable shade, cover the surface of the cone with PVA glue, and wrap it tightly with threads. Such Christmas trees can be supplemented with bows, beads or rhinestones. 

Trees from wine corks.
We form a Christmas tree from wine corks, gluing the corks to each other with super glue.


DIY Christmas trees photo
DIY Christmas trees from buttons.
We prepare a large number of buttons, if you want the buttons to be the same in tone, pre-color them with a spray can. We form a cone from thick paper, and completely glue it with buttons, buttons can be glued in several layers.


Christmas tree made of cones.
We completely form the Christmas tree from cones ... starting to glue the cones to each other from the inner circle, at the end we install the resulting Christmas tree in a pot or fix it on an impromptu decorative leg made of branches.


Christmas tree decorated with glitter.
We form a cone from paper, cut finely rain and tinsel, mix thoroughly, cover the cone with PVA glue and completely sprinkle with chopped sparkles. At the end, cover the top of the Christmas tree with PVA glue so that the shiny elements do not crumble.

Christmas tree made of wire.
We take a cone made of foam and from top to bottom in the form of a spiral, cover it with a dense wire. The result is a very stylish Christmas tree-spring.


Feather tree.
We purchase small feathers in the “Everything for Creativity” departments, make a cone out of paper, and start from the bottom up, tightly joining each other to glue weightless feathers onto the transparent “Moment” glue.

Christmas tree made from dry leaves.
We take dry leaves or bay leaves harvested from autumn, and glue them to a previously created paper cone, it is better to form a “crown” from top to bottom, gluing the leaves under each other.


