How to decorate a pencil case with your own hands for school. Sew a school pencil case Cat, Owl and Hare - master classes. Beautiful do-it-yourself pencil case
Stationery and educational supply stores are full of various offers of school pencil cases. To understand among all this parade of colors and shapes sometimes becomes very difficult. However, after spending an hour or two of your time, you can make a pencil case yourself according to your own author's design. It can be decorated as you like, add additional elements that emphasize the individuality of the subject. This article will discuss how to make a pencil case for the school with your own hands.
Plastic bottle pencil case
To make a children's pencil case from a bottle, you will need:
- two bottles of the same size, preferably with denser plastic;
- glue (both hot glue and superglue are suitable);
- scissors;
- lightning.
To prepare a pencil case, you will need to use the bottom of the bottles. By connecting the two parts with a zipper, we get a single design.

Thus, in a few minutes, the original pencil case was ready. To give a finished look, it will be possible to decorate it with various elements based on your own taste.

Denim pencil case
Knowing the basic techniques of patchwork - and voila - a practical accessory is ready. Old jeans will help create a unique cosmetic bag that will find a place for any girl, or a pencil case that takes pride of place in a schoolbag.

To prepare a school pencil case from fabric with your own hands, you will need to stock up on the following:
- a pair of pieces of denim 26 cm X 12 cm;
- a couple of pieces of fabric and batting, as a lining;
- buttons, decorative beads and stripes;
- zipper 25 cm long;
- wax pencil, threads with needles.

The use of three layers of fabric will make the pencil case soft, reliable and dense. The pattern of the pencil case is extremely simple. To save time and make the seams durable and of high quality, it is recommended to use at least the most primitive sewing machine.

Paper pencil case
It's still better when pencils and pens are collected and neatly stacked than scattered inside a bag or briefcase. From the materials at hand, you can make an excellent pencil case for the school.

Necessary things:
- scrap paper;
- PVA glue;
- cardboard rolls (it would be better to take cartons from paper towels and toilet paper, because rolls of different diameters are needed);
- some foam;
- scissors, ruler, stationery knife.
A school pencil case is necessary for all schoolchildren, and especially for elementary school students. It should be comfortable, functional, and, of course, beautiful. A high-quality pencil case guarantees the storage and integrity of pencils, pens, and other writing objects.
In stores you can find a huge number of different pencil cases, not very comfortable. However, such models, even the most fashionable ones, will not bring the child as much pleasure as a hand-made accessory. Using various improvised materials, you can make beautiful and comfortable pencil cases for pencils, felt-tip pens, colored pens. You can not only take these home-made supplies with you to lessons, but also use them at home - then the colored pencils will be neatly laid out in one place.
Felt pencil case (simple model)
This model of the pencil case does not require special sewing skills - only accuracy and accuracy in marking and cuts for the cells into which the pencils will be inserted is enough.
The work will require:
- a rectangular piece of felt, the width of which should be greater than the length of the pencils;
- ruler;
- pen or marker;
- stationery knife;
- wooden or plastic board;
- lace.
Step-by-step manufacturing instructions are shown in the photo.

Leather case for pens
The proposed model is also very easy to manufacture. Middle school students can make such a pencil case on their own. Explain the manufacturing scheme to the children in advance or offer a paper template.
You will need:
- a fairly large piece of skin; if you do not have such a natural material, then you can replace it with artificial leather, thick felt;
- an awl or thick darning needle;
- scissors;
- ruler;
- marker or marker;
- rubber cord.

Progress
- On a sheet of paper, build a template, taking into account all the markings (the length of the handles, their required number).
- Cut out the template and transfer the pattern to the skin.
- Cut out the base of the pencil case from the leather.
- In the cut leather blank, make the required number of holes with an awl, insert the laces and tie the knots.

- To prevent the edges of the pencil case from opening, fasten them with two rubber bands.
The original pencil case is ready!

Fabric pencil case
Sewing a children's pencil case from improvised materials will not be difficult even for a beginner needlewoman. But the gratitude of your child will be boundless! Having become the owner of such a colorful and comfortable accessory, your baby will be proud that this loving and caring mother took care of the safety of his things.
The work will require:
- fabric of several colors;
- tailor's chalk (you can use a small bar of soap);
- tailor's needles (pins);
- pencil;
- tape (braid or Velcro);
- scissors;
- sewing machine.

Detailed instructions for making a fabric pencil case
- Prepare 3 pieces of fabric: for the front side, for the inside and for the pockets. The dimensions are calculated as follows:
- the height of the flaps for the outer and inner sides should be equal to the length of the pencil plus seam allowances. Approximately 21 cm.
- the width depends on the number of pencils in the set (usually 12 pieces). We leave 2.5 cm per cell for each pencil and 1 cm for seam allowances. It turns out 32 cm.
Thus, it is required to prepare 3 rectangles of fabric with sides of 32 by 21 cm.
- We fold the flap of fabric for the pockets in half, iron it and sweep it with the flap of the inside of the pencil case.
- Next, we make markings for the pockets, drawing parallel lines at a distance of 2.5 cm from each other.
- Carefully, trying not to move the edges, we sew according to the markup.
- Sew the braid to the inside of the pencil case. If desired, you can use Velcro or buttons - whichever is more convenient for you.
- Now we fold the outer and inner fabrics with the right sides inward, fasten with pins and, stepping back from the edge of 1 cm, sew. Be sure to leave a small unsewn space so that you can turn the workpiece inside out.

- We cut off the corners and turn the workpiece inside out.
- Now iron all the seams (you can even steam through wet gauze). Sew with a hidden seam the hole through which the base of the pencil case was turned inside out.
- To prevent the edges of the braid from blooming, hold them for a few seconds over the fire.
Insert pencils, tie with a ribbon and boldly send your student to the lesson.

Bright zipper case
A funny and unusual pencil case can be sewn from multi-colored zippers. Such a case for pencils and pens is not only convenient to use, but also quick to manufacture.
Take 7 pieces of multi-colored zippers and sew them together. Fix the ends on both sides in a bundle and fasten the thread. Multi-colored case is ready after half an hour of work! The amazing thing is that you can open it from any side.

On the Internet, you can find a huge number of models and options for making pencil cases for schoolchildren. But when choosing a specific model of school supplies, you should rely not only on your preferences, but also on the taste of the child. Therefore, before starting work, you should consult with the future owner about the color, model and size of the pencil case.
School years are a great time when a child gets to know the world, learns self-expression, interaction and endurance.
At school, everything matters for children: clothes, behavior, accessories. Schoolchildren are extremely sensitive to their appearance, and the objects they are surrounded by.
So that the child always remembers your care and feels your support, make a pencil case for him with your own hands. An exclusive item will be a source of pride for the child.
Of course, you will have to make an effort, show patience and imagination to make your pencil case look beautiful.
The paper version does not differ in durability, if you do not go for little tricks. With the help of tools, you can make an incredibly beautiful thing. Scheme for the manufacture of a pencil case from paper materials.
Necessary supply of tools and materials:
- Thick hard cardboard.
- Paper.
- Scotch.
- Glue.
- Printed pictures.
- Scissors.
- Ruler.
- Marking pencil.
| № | Manufacturing scheme | Description |
| 1 | Making a blank for a beautiful cover | We download any picture from the Internet and print it on paper. It can be your favorite cartoon characters, the image of nature, funny animals. You can even use your own photo, family photo or downloaded picture with the face of your child's idol |
| 2 | We are engaged in the manufacture of the case | On the cardboard we make a sketch of the box template. We take the length based on the size of pens and pencils, adding space for stock. You can make the pencil case longer by using the storage space for the sharpener and eraser. We determine the width at our discretion: from the number of pens and pencils needed. On the sides of the rectangle, add segments for the walls. Their height: 2-3 cm. Using the same template, we cut out the lid for the pencil case, but it should be made 2-4 mm wider on both sides so that the lid closes freely |
| 3 | Cut out the body and lid templates | You can use a utility knife if the cardboard is too thick. Cut exactly along the lines so that all sides are the same. It depends on whether the product will look like a purchased one. |
| 4 | Connecting the edges | We bend the walls exactly along the line, fasten them with adhesive tape so that they hold firmly. Do not spare the adhesive tape, fix the walls from all sides. We do the same for the lid. |
| 5 | Glue the finished cardboard pencil case with prepared pictures | Without cutting off individual strips, we circle the contours of the canister lid and the smelt from the inside of the drawing, leaving room for the bend. We stretch the paper, cutting off the corners in the places of bends. We fix on one side with tape. We stretch, we fix from the opposite side. So we do with the body. You can also glue the inside of the lid. So the thing will look very aesthetically pleasing. |
| 6 | Finished product processing | We bring it to perfection. We lay a beautiful velvet material. It can be fixed with glue. From above you can decorate the box with rhinestones |
A little trick: a drop of perfume left on the fabric inside the pencil case will always remind the child of you, causing pleasant associations.
If the baby is very attached to his father, who is often forced to be absent due to work, you can use his eau de toilette. Essential oils are also suitable: orange, lemon, jasmine, eucalyptus.
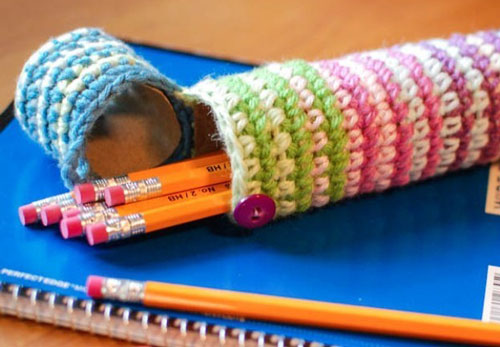
How beautiful to tie?
Knitting a product implies the presence of skills. This is an excellent option for an adult daughter who is learning to knit.
You will need:
- Buy beautiful threads.
- Find a knitting option on the Internet, or let knit in the usual way for beginners.
- Accurately determine the size of the fabric.
- Help dial the loops so that the size matches.
- Control the process so that the length of the material is sufficient for manufacturing.
- Once the fabric is tied, sew along the sides to form a pouch.
- Sew an elastic band or tie around the edge of the bag.
- Decorate it with stripes, buttons or ribbon.
Ideas for a fabric pencil case
You can make a beautiful pencil case from a simple fabric.
For example:
- A pencil case will look great in the form of a bag made of fabric, on which a pattern is embroidered with a cross or satin stitch.
Just make a double bottom so that pens and pencils do not damage the embroidery from the inside.
- In order not to use the shape of the bag, you can use the idea of \u200b\u200ba pencil case like a tool kit.
On oilcloth or thick fabric, stripes are made for each handle. It will open and close.
The top is lined with a beautiful soft fabric. The work is painstaking, but the thing will turn out to be original.
- Use small patches, like a patchwork quilt. Cut out many squares of 2 cm in each direction.
Stitch on the machine. Make bags with a double bottom. To prevent the handles from piercing the fabric, leather trim can be placed inside.
original design
You can decorate the finished product beautifully in many ways.

Ideas for the original design of a homemade pencil case:
- Use nail polish if the product is not made of fabric.
- Cover with velvet.
- Use buttons.
- Tape is suitable for a fabric surface.
- Spread the surface with glue, sprinkle with sequins, cover with adhesive tape on top so that the sequins do not fly around and remain on your hands.
- You can use metal rivets, spikes.
- Looks great pencil case made of denim.
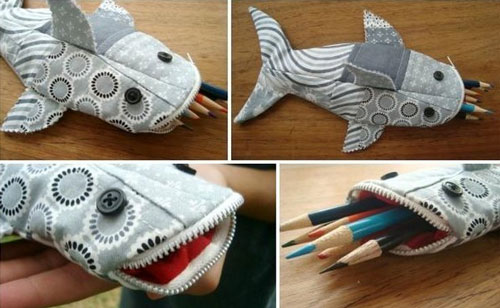
- You can attach a small or large soft toy. It looks very cute, and such a pencil case will definitely not be lost in a briefcase.
- Use a collage of photos of all classmates, teachers to design a pencil case.
This option is suitable for children who love school and their classmates. Not every child easily merges with the team.
Show your imagination and you can have a great time with your child, making an exclusive pencil case.
And do not be upset if a homemade thing quickly becomes unusable: you can make a new product together any day.
Moments spent with parents working together are remembered by children forever. Create memories, show by example that by showing imagination, you can make beautiful things.
Useful video
In such a pencil case, not only pens with pencils will fit, but also scissors with a square.
You will need:
2 types of fabric (for the outside and for the lining);
Zipper 25 cm long or a little more;
A pair of stationery clips;
pins;
Scissors;
Sewing machine and thread.
Work sequence:
1. Cut out 2 pieces of each type of fabric measuring 25x16 cm each.

2. Lay one of the lining pieces face up on your work surface. Lay the zipper face up on top. From above - a detail from the main fabric inside out. Pin with pins, grabbing all layers of fabric and zipper tape, as shown in the photo.

3. Sew.

4. Lay the second piece of lining face up on your work surface. Place the parts with a partially sewn-in zipper on top, as shown in the photo. Then - a detail from the main fabric inside out. Pin the two layers of fabric and the zipper tape between them with pins.

5. Lay out a line.

6. Straighten the details and iron.
7. Run stitches along the zipper.

8. Open the zipper. Fold and chop the parts as shown in the photo. Direct the zipper towards the lining, and the allowances towards the main parts, and secure with clips.

9. Sew along the perimeter, leaving a hole, as shown in the photo above.

10. Cut off the corners, retreating a couple of millimeters from the seam.

11. Turn out the pencil case. To turn the corners well, you can use a stick.

12. Sew up the remaining hole.

13. It remains to fill the lining inside - and you're done. Finally, you can put a name tag on the clasp.

Photo and source: thediydreamer.com
2. Fabric pencil case with lining and front closure: a master class

Due to the reinforcement with interlining and a zipper in the front, such a pencil case keeps its shape well. Another plus is its capacity. If you want a smaller pencil case, resize the details and use a shorter zipper.
You will need:
2 types of fabric, main and lining (you can also use a patch of a third color to finish the zipper);
Adhesive one-sided interlining;
Zipper length 30 cm or more;
Water-soluble glue (glue stick is suitable);
Scissors;
Sewing machine and thread.
Work sequence:
1. Cut out the details of the pencil case. You need 1 rectangle from the main fabric measuring 30x35 cm, 1 the same rectangle from the lining fabric, 1 the same from non-woven fabric. Also - two rectangles 2.5x7.5 cm.

2. Glue the part from the main fabric with interlining.

3. Fold both small rectangles in half, as shown in the photo, inside out, and secure the folds with an iron.

4. Open the zipper halfway. Glue the rectangles to the ends of the zipper as shown in the photo.


5. Lay the line along the folds of the rectangles, as shown in the photo. Tie at the beginning and end of the stitch.


6. Now glue the rectangles as shown in the photo and cut the zipper tails on both sides.


7. Fold the lining and main fabric pieces face to face and place the zipper between them as shown in the photo. Peel off with pins.


8. Lay a line, stepping back 0.5 cm from the edge.


9. Unscrew the parts, as shown in the photo, and secure with an iron.


10. Wrap the parts, forming a pencil case, fold as shown in the photo, and pin with pins.


11. Lay a line, stepping back from the edge of 0.5 cm, and turn the pencil case inside out.


12. Sew off the seams.


13. Fold the pencil case so that about 2.5 cm remains from the zipper on top, and fix the folds with an iron.

14 . Lay the lines on the sides, stepping back from the edge of 1.5-2 cm, then trim the edges with scissors.


15. Turn the pencil case inside out, straighten the corners well. Lay the side stitches as shown in the photo.
Tatyana Morozova
Universal dispenser cases.
These pencil cases we use very often both in the organization of GCD and in individual work and in didactic games. Filling pencil cases can be varied, in our case, these are geometric shapes.
For making pencil cases you will need(per child):
5 empty boxes of matches;
Glue stick;
Color self-adhesive film;
Scissors, colored cardboard (for geometric shapes);
Ruler.
1. Prepare empty matchboxes.
2. Using a glue stick, glue them together on the sides.

3. Measure the required amount of color film and cover the boxes with it.

4. On top of each part, stick an icon indicating the object that will be located in this particular "box"- in our case, a geometric figure (circle, square, triangle, rectangle, oval).

5. Fill in each cell with geometric shapes in accordance with the designation above (For example: 10 pieces each). The figures must be made in a different color on each side. Universal pencil case is ready.

Usage pencil case.
Didactic games for the formation of children's ability to navigate on a plane ("Decorate the carpet", "Treasure hunters", etc.)

Exercise in counting, composition of numbers from units, from two smaller numbers; in comparing sets.


