DIY Christmas crafts at 201. Gifts from your baby. Crafts from cotton balls: we make a New Year's wreath
November 8, 2018
Good afternoon dear readers. Today the article will be completely devoted to crafts on the theme of the new year 2019. Of course, you can not bother with crafts, but go and buy your favorite toy or figurine. But it will not be as dear to you as the one you made with your own hands.
Also, the article will be very useful for those who have small children who go to elementary school or kindergarten. Since on the eve of almost any holiday in these educational institutions they often ask the kids to make something at home, and preferably in the style of the approaching holiday. And then they also hold a competition for the best craft. And of course you want your child to take at least a prize.
And doing crafts on the New Year theme is doubly pleasant, as it evokes the New Year mood. The lack of which many adults complain. We do not have such complaints in our family. Since before the holiday, our house is transformed into a fabulous decorated house from handicrafts made by hand. These are snowflakes and paper garlands and much more. In general, the introduction was a little delayed, I suggest you get down to business right away.
before you decorate your house for the new year, you need to make all sorts of decorations there. And you can also save a lot of money on this business if you use old unnecessary rubbish for making, which is a pity to throw out and have nowhere to attach.
Required:
- Tinsel
- Glue gun
- wire
- Old CD discs 12 pcs.
- Drill with a thin drill bit or awl
- Pliers
Production stages:
From a cardboard sheet, cut out a template in the form of a pentagon with sides of 6.5 cm. We apply the template to the disk and put dots where the vertices are. These dots are for making holes in them.

We drill all the disks point by point, and then connect them with wire and pliers. The end should be a ball.

You should get something similar to this.
 Next, glue the tinsel on each disc. We glue along the contour of the disk with hot glue.
Here's what happens in the end. Such a craft and a story can also be used as a New Year's souvenir.
You can also build a beautiful wreath of cones. Although wreaths are not so popular in our country. Yet if you decorate the front door with such wreaths, it will look just amazing.
You will need the following:
- Some cones
- decorative elements
- Paint and varnish in cans
- glue gun
- Wreath base
Production stages:
As a basis, you can use foam insulation for pipes or a small hoop. You can also prepare the base of papier mache.

We paint the base in the color with cones and attach the cones to the base with hot glue.

At the end, you can open the craft with varnish to add shine and decorate with decorative elements.

The wreath of cones looks quite beautiful.
Snowman made of threads and balls.
Well, who else but the very first snowman is associated with winter and the new year. You can make it quite easily, it is only important to collect all the necessary materials.
Required:
- Balloons 5-6 pcs.
- Tube of PVA glue
- Skein of white thread
- Decor elements (ribbon scarf and hat)
Production process:
We inflate the balloons with air and make them of various sizes.
One needs the largest, the other is smaller, and the third is even smaller. And two more very small, but identical. After we wrap the balls with threads in different directions and coat each new layer with glue.
When the glue dries, we pierce the balls and pull them out of their resulting shapes.
It remains to assemble the snowman using the same glue. And in the future I use my creativity to add eyes, mouth and nose to the snowman.

And also attach hands. These will be two small balls. Here's what you can do with the materials presented.
Or here's another master class on how to make a beautiful snowman out of an ordinary sock.
You will need:
- Scissors
- Super glue
- Scotch wide
- Cotton or knitted sock
- Threads
- Several buttons
Production stages:
We cut the toe just a few centimeters from the heel line. We will use the part with the heel. We tightly tie the sock with a thread and turn it inside out. This will be the base of the snowman. We tie in the part where we cut it.


And fix in this position fig. Make a few turns, and then tie the thread into a knot. Cut off the excess ends with scissors.
 From a piece of fabric we make a scarf to mask the threads.
 From the second piece of the sock we make a cap by folding the part of the sock several times. Apply super glue to the buttons and attach them to the snowman's body.

In order to make a face for a snowman, I use multi-colored beads. Which I also attach with glue.
Santa Claus from a disposable plate
To create a beautiful and original case of frost, you will need the following set:
- Disposable paper plate
- Scissors
- Paints
- red pompom
- Paper
- red cardboard
- eyes for toys
Production stages:
We cut the disposable plate into two parts. Cut slightly above the middle. And paint the inside in beige.

From colored cardboard, cut out a large triangle larger than the plate.

From a sheet of white paper, cut out a strip 2 cm wide and two circles. Cut one of the circles into two parts. Next, we collect the craft according to the picture.

Christmas tree made of cardboard and thread
You can create small souvenirs in the form of a Christmas tree and give them to your guests who came with you to celebrate the New Year.
You will need to cut out their corrugated cardboard to cut out such a beautiful Christmas tree. About 15-20 cm in size.

Then wrap it with thread. We fix each turn with ordinary glue or you can use hot glue. Attach a magnet to the back. 
These beautiful Christmas trees can be created using this technology.

Snowflake made from ice cream sticks and buttons. It also turns out very beautiful and unusual.

To create such beauty, you will need at least 3-5, and at most 7-8 ice cream sticks. We connect them in such an asterisk. Then we decorate with buttons, which we also fasten with hot glue. At the end we fasten the rope and hang it on the Christmas tree.

You can try to glue a house and a snowman out of cardboard and glue them with cotton wool. And from a branch to make a small tree. You will get something similar to this picture.

Or try to make such a penguin from two bottoms from plastic bottles.

In the year of the pig, you can create such a funny pig. This beauty is made from socks and cotton wool. Watch the sequence and you will understand everything at once. In the same way, we made the snowman a little higher.

An excellent craft can be an ordinary Christmas tree ball only painted by you personally. Take a Christmas ball and apply plain paint on it, this will be the main background. And then color as you like. 
And if there are old glass balls left, you can wipe off all the paint from them and fill them with such rubber bands. It also turns out beautifully.

Or just decorate Christmas balls.

Have you ever seen Christmas balls with a photo inside. See how it can be done.

Beautiful stars that we decorate with beads or beads will also fit perfectly into the interior of any New Year's beauty. Or maybe such an asterisk will be a beautiful addition to your New Year's outfit.

And if you show imagination, then even ordinary walnuts can become beautiful New Year's crafts or Christmas tree decorations.


Or maybe you want to make such beautiful snowmen from old light bulbs.

And this master class will also come in handy. Since you can make not only snowmen. look, I think this idea of \u200b\u200bcreating crafts will be interesting to you.
Souvenirs from spruce and pine cones for the new year
Crafts made from natural material always turn out to be very beautiful and attractive. Let's start with the easy ones and work our way up to the hardest ones.

Creating a beautiful candlestick using cones and threads is very simple. You need to take not a large jar, a few cones, a natural thread and hot glue.
We tie a thread around the neck of the jar in several turns and make a beautiful bow. We glue the cones on hot glue to the thread. It turns out here is such a beauty.

We put the jar on a tray which is beautifully decorated with spruce branches and the craft is ready.

If you want to make it a little more beautiful, then you can decorate the neck of the jar with semolina, which from afar will look like snow.

It is necessary to pre-tint the semolina with chalk. Coat the neck of the jar with PVA glue and sprinkle the place that is in the glue with semolina. We tie a beautiful bow on the neck of the jar.

In the same way, you can decorate the cones. But for the cones, let's prepare something cooler. Sprinkle some glitter into the semolina. Now we coat the corner of the cone with glue and sprinkle with groats with sparkles.

You can do without semolina at all, take some golden sparkles. And then according to the familiar pattern. Glue then glitter.

Using white acrylic paint, you can make these bumps in the snow.

Add a couple of beads and a bow and you get a beautiful Christmas toy. Further, decorated cones can be combined on our candlestick.

Now I propose to make beautiful Christmas trees from large cones. You will need small pots, acrylic paints, small stars and hot glue.

We attach the cones to the pot, paint in white or green. And on top we attach a small star.

By the same principle, you can make a Christmas tree for more. We make a cone from cardboard. The height depends on the number of cones. We attach the cones to the cone with glue. We decorate with beautiful bows and beads.

Now the craft is a little more complicated. This technique is called topiary. With the approach of the new year, a bunch of craftsmen have appeared who perform crafts in this style.


Workshops and paper craft ideas for the new year
You can make a lot of crafts out of paper. And the most simple and a little more difficult. And as always, we will start with something simple, and then we will continue with more complex models.

The easiest thing you can do is just such a Christmas tree. It is enough to cut a circle out of colored cardboard, cut off a piece and roll it into a cone. Then decorate with stars or circles of colored paper.
And here is a box of chips that was pasted over with sweet souvenirs and it turned out to be a train.

Or here is a more difficult souvenir Santa Claus using the origami technique. How do you like this idea. If you learn how to do it, then you can offer it as a New Year's card.

You can also make such a bunny using the origami technique with the addition of an appliqué.

If you have the desire and time, you can cut and glue a beautiful wreath from paper handprints on the door or wall from the same paper. I think that you can make such a wreath using the prints of the whole family.

Try to make such an unusual Christmas ball out of colored cardboard. We cut several strips of the same length and width. Next, lay them out so that they all connect in the middle. Then we make a hole and put everything on a thread in the middle of a piece from a cocktail tube. There is a small bead at the top. Everything is simple and easy.


Have a huge amount of unnecessary newspapers accumulated at home? Then you can find a use for them. Let's make a voluminous New Year's ball for the Christmas tree from newspaper tubes. We make tubes and wind them layer by layer. Gluing each new layer. At the end, we paint with spray paints and now the Christmas tree toy is ready.

At the end of this chapter, I offer a video clip on how to make a cool paper snowman.
DIY felt toys ideas with patterns
Now the topic is for those who like to make their own hands from such a pleasant to the touch material as felt. Soft and voluminous toys have always been something unusual and pleasant for me.
You can build such a beautiful Christmas tree from cut out pieces of felt.

We cut the patches, and then collect them into a single composition.


Or try to take such a Christmas tree as a basis. Here you will have to tinker.


And if you want to make a bigger Christmas tree out of green felt and hang it on the wall. It remains to make beautiful toys for her and decorate.

You can make a Christmas tree toy. Here is an example and patterns for you.

And here is an idea for you to make toys for the Christmas tree. You can sew balls, crackers and bells.


Well, of course, what is the new year without Santa Claus. Video on how to sew Santa Claus from felt.
Beautiful work for the New Year's competition to school
I don’t know how in your school in ours so far such competitions are held every year. Well, at least in elementary grades, that's for sure. So you have to look for and make crafts in order to take part in the competition, and of course take at least second third place.
Here is a simple craft, but it looks completely different in the new year. But all you need is a beautiful jar, a small Christmas tree and a car.

We fix the Christmas tree on the roof of the car, add a little foam plastic crumbs and a ribbon on the lid.


At the end, we decorate with New Year's decor and your craft is ready.

For those who have coffee beans, here is an idea to make a Christmas tree from coffee beans. We fix the grains on a paper cone and decorate with decorative elements.

Or you can use candy instead of coffee beans.

And here is a tree made of ordinary buttons. Collect buttons of different diameters on a thread and the tree is ready.


And you can, of course, embroider Santa Claus.

A beaded Christmas tree will also look beautiful.


You can make a beautiful New Year's beauty from a plastic bottle. Just make sure you put it in a pot first. Pour gypsum into it and put a wooden stick as a trunk. We make a hole in the bottom of the bottle and put the bottle on the barrel. We fix the bottle to the pot with glue and decorate the Christmas tree with tinsel and toys.


Or take a foam ball and glue it with beads or beads. It also turns out to be very original.

How to make a garland for a Christmas tree with your own hands
Probably the most affordable and cheapest option is paper garlands. And the simplest is garlands of rings. Probably each of us in childhood glued such decorations from colored paper.

Or make such a rainbow out of colored cardboard.

Or here are some more paper garland ideas for you.


And if you spend a little more time to create a garland, you can make it very beautiful and original. I suggest you see what you can get if you try a little.
You can also use cotton wool.

Or buttons of different colors. It will also look nice.

And this option is for a street Christmas tree, since this garland is made of ice. We make colorful ice cubes. The main thing is not to forget to put the thread so that it freezes in the form.


Unusual crafts "Winter's Tale" in kindergarten for the exhibition
When in the kindergarten they give the task to do crafts with their own hands. This means that the child must do almost everything himself, and not mom or dad did it, but the child only took it. Therefore, I give the simplest thing that your cub can do practically by himself.
Here is an idea for you how to make Santa Claus from an asterisk. Here and cutting and coloring and appliqué.

Try to make a winter picture with cotton pads and sticks with your child.

Or this idea of creating a snowman from cotton buds and a foam ball.

From a bottle, wire, and rags, a fairy-tale character can turn out.


But of course, something more complicated is a house made of plastic ceiling tiles. The child, of course, will not cope on his own, but he will be able to help cut.

Or here's an example of what kind of houses you can make from all sorts of things.


Beautiful cards for the New Year for children Master class and templates
If you decide on a gift, then you will definitely need a postcard for the gift. And you can easily do it by following our tips. Here are just a few templates for you to print.


You can arrange a standard postcard book like this grandfather or a fairy-tale character.


And if you want, you can make a voluminous congratulations.

You can also design your postcard in the style of scrapbooking. Well, is it beautiful?

Here is a master class on creating beautiful New Year cards. Take a look and you might find something for yourself.
Do you want to do something that no one else will? Take this Christmas tree postcard into service.

Print out this template on your printer. The dotted line is the fold line.


And glue as in the photo. It remains to make everything beautiful and arrange. You can learn more about how to make such a postcard by going to.

So this collection of crafts for the new year has come to an end. Maybe there will be another one soon. Follow our blog and you will definitely find what you are looking for. Well, for today, all the best to you in the coming year.
Today in stores there is a huge selection of a wide variety of fashionable and stylish jewelry for every taste and budget. Some even change the Christmas style of the Christmas tree and the apartment as a whole every year.
However, despite all the variety and wonders of design, nothing can replace handmade toys and decorations. They will not only add variety to the “cold” decor from the store. The process itself will surely give a lot of positive emotions and vivid impressions, and a fabulous atmosphere will reign in your home long before New Year's Eve. It will be especially pleasant to look at the fruits of their labor for children. And adults will certainly appreciate your attempts to create a cozy festive atmosphere.
In order to do this, you need not so much - desire and imagination. As materials, you can use improvised means that are in any home: colored and wrapping paper, ribbons, beads, cones, buttons, and even old newspapers. And even if the ideas do not visit you at all, you can “call for help” the Internet.
New Year's crafts from CDs: we make decorations for the New Year from old CDs
Surely in every house there are old unnecessary disks that are a pity to throw away. They can be used on the eve of the New Year holidays, to create stylish and unusual toys that will look great on the Christmas tree.
Not much is needed for this - an old disk, cut into pieces, and the most ordinary toy, you can take an old and already boring one. After carefully smearing it with glue, attach the "fragments" of the disk to the surface in random order. Here, in general, and all. A stylish decoration that will perfectly “play” with light is ready.
However, from old CDs you can make not only a Christmas ball, but also much more.
New Year crafts from felt: we make felt decorations with our own hands for the New Year
Decorations and toys made of felt material look very impressive and unusual. You can buy such a fabric in any store for purely symbolic money, especially since more than a dozen interesting figures can be made from a couple of meters. Multi-colored material will give you a lot of possibilities, and the flight of fancy will be almost unlimited.

After a variety of figures are sewn, they can be hung around the apartment “one by one”, you can decorate the Christmas tree instead of toys, or you can assemble them into a festive garland. Either way, it will look great.
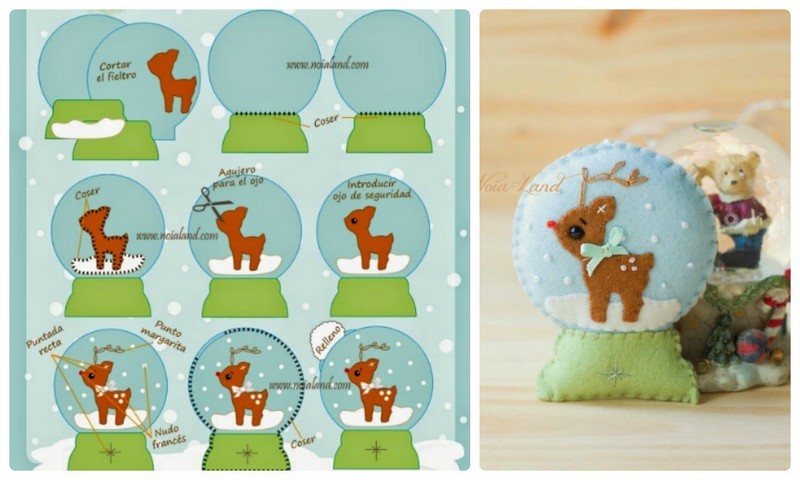
By the way, a small and neat Christmas tree, a star or an angel can become not only a decoration, but also an excellent “warm” souvenir for friends and relatives. They will certainly appreciate the effort and care you put in.
See more:
New Year's crafts from cardboard or postcards
In order to decorate the Christmas tree with unusual toys, you do not need to run around the shops in search of something that others do not have. It is enough to find thick cardboard at home (colorful magazine covers, old postcards or, in extreme cases, ordinary colored sheets from the set are suitable - the main thing is that they are double-sided), glue and scissors.
The first thing to do is cut out 8 circles of the same size (about the size of a regular glass neck, maybe a little more or less), and 2 more a little smaller. After that, the large circles are folded in half twice (to end up with a quarter). Preparations are ready. Four of them need to be glued on one small circle, four more on the other.

After that, the pockets are gently melted, and the two halves of the toy are glued together. It remains to attach a beautiful ribbon and you can hang the original cardboard ball on the Christmas tree. And if you cover it with varnish or sparkles, hardly anyone will guess where such a stylish toy came from.

Cardboard balloons are especially fun to make with kids. The technique is not too complicated, so they will be happy to take part in the manufacture of Christmas decorations, and then all the holidays they will be proud of their masterpieces that adorned the fluffy beauty.
See more ideas:
Christmas balls from threads
Thread balls are one of the most fashionable hand-made techniques today. Moreover, it is used not only to create New Year's, but also everyday decor. In any case, such compositions and toys will not only enliven your festive interior, but also make it unique.

To create a masterpiece, you will need threads (you can use leftover yarn, or you can buy multi-colored skeins in the store), PVA glue and balloons. The mechanism is simple. The ball is inflated to the desired size, after which it is wrapped with threads pre-soaked in glue. This should be done quite tightly, leaving only small gaps.

After the first stage is completed, the toy must be dried properly. As a rule, a day is enough for this. If during this time the thread ball has become hard, you can proceed to the final - piercing and removing the remnants of the balloon.

To decorate a thread ball, you can use any elements - beads, braid, rain, tinsel ... In general, a complete flight of fancy. The same applies to the "collection" of the finished composition. Thread balls suspended at different heights from the ceiling look very impressive.
See more Christmas ball ideas:
Festive wreaths
A New Year's wreath is a fashionable decoration that can be purchased at almost any store. However, it is much more pleasant to make a composition with your own hands, putting the warmth of your soul into it. The material can be anything. For example, cones.
Making a wreath of cones begins with a base, which can be wire, wicker, or something else that easily “forms” into a circle. Cones are attached to the base using liquid nails. You need to arrange them as close to each other as possible so that the wreath looks “lush”.

After the main part of the work is done, you can start decorating. For example, cover the cones with colored varnish and “dilute” them with small toys, rain or tinsel. Here, in general, and all. It remains to find a suitable place to place the New Year's masterpiece. He must not go unnoticed.
See more:
japanese kanzashi crafts
The novelty of the season in the field of decoration is decorations made using the Japanese kanzashi technique. They can be of any shape - a Christmas tree, a flower, snowflakes ... separately or in a group. By the way, this is a great option not only for Christmas decorations, but also for a gift, as well as elements of a festive costume.

In their homeland, Japan, they symbolize closeness to nature. In our country, they are more like a nice souvenir than something ideologically significant. In order to make something in the style of kanzashi, you need not so much - silk ribbons and a desire!
Festive headband with snowflakes in Japanese technique
Thanks to the Japanese, anyone can give joy to little and big princesses by making a wonderful headband that resembles a snowflake. It will not only complement the corresponding costume, but will certainly become the very missing highlight for any New Year's hairstyle.
So, in order to make such a wonderful accessory you will need:
- blanks from silver, blue and white ribbons (silver should be cut into squares 2 * 2 centimeters in size, white - 5 * 5 centimeters, blue - 2.5 * 2.5 centimeters, in total at least 42 squares of each color should be obtained);
- glue gun;
- white rim (if there is a rim of a different color, then it can be easily turned into white by braiding it with a ribbon);
- scissors;
- snowflake blank measuring 3 * 3 centimeters.
So, after all the materials and blanks are ready, you can begin work.
The first thing to do is 6 round petals from white squares. They should be the largest, as they will make up the "middle" of the future flower. Then - 12 triangular petals are also white, but they will turn out to be slightly smaller in size. Next, from 12 triangular blanks (white and blue), fold six petals consisting of two colors. And finally, the final touch of the preparatory stage - 42 small, silvery petals. The edges of each blank must be singeed with a lighter so that they do not fall apart in the future. Otherwise, it may be an unpleasant surprise for the one to whom the bezel is intended.

After the petals are finished, you can wrap the snowflake with white ribbon, attach it to the rim and, finally, collect the first petals in the "flower heart". Its base will consist of 6 large white petals that need to be glued together. They should never fall apart! After that, a white-blue composition of three more (two white petals along the edges and a two-color one in the center) can be attached to each petal. And finally, every detail should be complemented by a small silver petal, which is inserted right into the center of the glossy ones. The result should be a semblance of a "fluffy" flower.
The finished composition can be decorated with sparkles, beads or something else - at your discretion. The only thing that is not recommended is to cover it with varnish, this can ruin the appearance.

In this technique and from the same ribbons, you can make not only a rim, but also beautiful snowflakes. They will be an excellent alternative to traditional Christmas decorations and even a souvenir for relatives and friends, who will certainly appreciate your originality and warmth invested in such a gift.
We have more master classes in kanzashi crafts:
Help us become better: if you notice an error, highlight the fragment and click Ctrl+Enter.
Fantasy is limitless for the realization of creative ideas and the creation of a unique New Year's interior. The list of original crafts also includes an unusual jar of snow - it is not difficult to make it with your own hands. A ball with snow, in which, when shaken, snowflakes swirl and bizarre New Year's figurines float, for almost everyone - a distant childhood memory.
A master class for creating a do-it-yourself winter plot phantasmagoria in an ordinary glass jar is incredibly simple. Shall we try?
Decor materials
To create a New Year's jar of snow, we need a high and straight glass container with a twisting iron lid with a volume of about 1 liter, loose foam or artificial snow, minifigures that will live in a jar of snow. Our decor includes a green Christmas tree and a funny snowman with a sled.

To create a unique New Year's decor, the choice of miniature toys is quite wide. The main thing is to fit in the bank. Santa Claus and deer, Christmas tree, Snow Maiden, gnomes, forest animals in the snow, in a word, everything that is somehow connected with the New Year and Christmas holidays.

It is worth thinking about a platform-stand for figures in a jar of snow. This can be a do-it-yourself pedestal made from a piece of wood, foam or cardboard. White cotton or woolen balls of small size will come in handy. You can make them yourself or buy them at a craft store. You will also need a needle, fishing line, glue/tape.

Step-by-step algorithm of work
A stylized Christmas jar in a festive interior will be an excellent decoration for any room: living room, kitchen, nursery. Considering that you will make this miracle with your own hands, a festive atmosphere will appear in the house already during the creative process.

- We thread the fishing line into the needle and string cotton or woolen balls onto the fishing line. To fix them, we use a glue drop or a drop of nail polish (colorless) on one side of the middle of the ball.
- At the bottom of the jar we attach a platform for a mini-toy. Glue and double-sided tape will help with this.
- We install miniature figures on the bottom of the can, still without snow, and attach them so that they do not hang out when the can moves.
- We sprinkle the glass bottom of the jar with artificial snow or loose foam so as to completely cover the "podium". By the way, artificial snow for a can is quite simple to make with your own hands. There are many original recipes for its manufacture on the Internet.
- The crucial moment is “snow” in the bank. We fasten the impromptu garland with hot glue or tape to the screw cap. Eight to ten "cotton-snow" threads of different lengths are the best option for the New Year's decor of our magic jar.
- The final touch is to close the container with a lid with fixed garlands and twist it. The snow bank is ready!

Fantasy will tell you the decor for winter, Easter, autumn jars, in which you can use natural materials and a creative set of hand-made figurines, toys, accessories.

The shape of the jar itself may also be interesting. The more unusual the glass container, the more intricate the picture inside can be. And the reason for creating with your own hands and using a “can” decor can arise at any time.
The frost is getting stronger, everything is whiter outside the window, and the room smells of tangerines, the spirit of the holiday begins to wake up inside, which will come very, very soon ...
The global, popularly beloved New Year is coming soon! And every time, in December, I wake up with a desire to do something with my own hands for a Christmas tree, a table decoration, or just some souvenirs for friends. So I decided to collect interesting ideas for making such jewelry and crafts with my own hands, hand-made. Perhaps not everything will be here, but a lot of interesting things and a lot of photos and pictures for inspiration. It will be useful to everyone who has free time, for children, because they love to create and get up with their own hands, and just see how much you can do yourself, because it's easy and simple, the main thing is to want =)...
In the first section there will be ways to make various toys and decorations:
Decoupage Christmas balls
You will need:
- Christmas decorations - plastic balls (transparent or one-color);
- PVA glue, diluted with water 1: 1;
- napkins with your favorite pattern;
- scissors;
- acrylic paints;
- varnish for craquelure;
- sponge;
- artificial snow or semolina.
Step 1. First, cover the entire ball with gold paint. It is more convenient to apply paint not with smearing movements, but as if you are driving it into a ball with a brush. We are waiting for it to dry, you can use a hair dryer to speed up the process.
Step 2. Then we apply a layer of craquelure varnish (for "aging") where you want to get cracks. We dry.
Step 3. After drying, apply the main paint color to the ball. In one case I chose white, in the other lilac. It is more convenient to apply with a sponge and the end result is more beautiful - the color is deeper. Next, you need to dry the paint again. To speed up the process, we use a hair dryer - the faster the last layer dries, the more cracks appear on the ball.
Step 4. Select the fragment of the picture you like on the napkin and cut it out, after which we separate the top layer of the napkin from all the others and glue it to the ball with a brush and diluted PVA. Glue is best applied from the center to the edges. When the drawing is glued, its edges can be shaded with a sponge with paint of the main color of the ball. You can also paint the picture with acrylic paints.
Step 5. In conclusion, we apply PVA to the right places and dip it into artificial snow. Artificial snow can be replaced with semolina, beads or sequins. Vintage Christmas toys are ready!
In the same way, you can make candlesticks from glasses and decorate a bottle of champagne.
Burnt out light bulb toys
You will need:
- acrylic paint
- pieces of felt
- pencil
- sponge
Step 1. We paint the light bulb with acrylic paint, preferably with a sponge, the paint is evenly easier to apply.
Step 2. We draw a face on a light bulb to your taste, but a cheerful one is better.
Step 3. Cut out a scarf and a hat from felt and glue it to the light bulb
Step 4. Glue the loop to hang on the Christmas tree and you're done!
Volumetric paper snowflake
You will need:
- three sheets of double-sided colored paper
- PVA glue
- scissors
- ruler
- pencil.
Step 1. Cut 10 strips of paper (4 white, 4 blue, 2 blue). The length of the strip can be either the length of an A4 sheet or the width, depending on what size you want to create a snowflake. The width of the stripes also depends on the size of the snowflake.
Step 2. We take two blue stripes, find the middle and glue them strictly perpendicularly. Add blue and white stripes. At the junctions with each other, you need to glue a drop of PVA, then our "weaving" will not crumble.
Step 3. Now the "torque" moment begins. We unfold two white stripes as if "inside out" and glue them together. Repeat the same with the remaining three pairs of white stripes.
Step 4. We twist-glue the blue stripes as shown in the photo.
Step 5. The result is such a miracle! This is the first side of the snowflake. Now do the same from the first step and create another side of the snowflake.
STEP 6. You have two identical sides of the snowflake. We turn over one side and place it on the table with the letter X, place the other side on top in the + position. We glue our sides of the snowflake in the place of "weaving".
Step 7. Making the final "gluing". It is necessary to glue the blue stripes to the inside of our snowflake rays.
Step 8. You can use clothespins for this.
Step 9 Done!
Funny snowman made of cardboard
You will need:
- cardboard (cookie boxes, corrugated, but not thick)
- gouache
- brushes
- glue
- a piece of wire 12 cm (for a broom)
- contour (for pattern)
- varnish
- fiber from a washcloth (can be matted)
Step 1. We translate all the details separately. We make a hole in the hat with an awl or a thick needle. We paint with paints. We apply the pattern with a contour so that it is voluminous.
Step 2. We connect the parts together with glue. We make a broom by fixing the fibers to the wire and glue, wrapping them with thread.
An easy way to make a snowflake
You will need:
- thermal gun
- wax paper (or baking paper)
- snowflake template (hand drawn or printed)
- PVA glue
- brush
- sequins
- wire
Step 1 Draw the snowflake template you want to make. Or find and print a ready-made template. Lay the template paper on top of the wax paper. Apply glue along the outline of the template with a hot-melt gun. Let cool.
Step 2. When the glue has dried, separate the snowflake from the paper. Remove the "cobweb" from the glue, which may have formed between the transitions in the lines.
Step 3. Cover the snowflake with a brush with PVA glue
Step 4. Without letting the glue cool, cover the snowflake with sparkles on both sides.
Step 5. Bend the wire into a loop and attach it to the back of the snowflake. At the base of the loop, add a few drops of hot glue to secure.
New Year's composition from bottles
Step 1. Wash bottles. It is best to clean them by wrapping them with a wet cloth for an hour, then wash off the stickers, degrease with detergent, wipe with something alcohol-containing and dry thoroughly.
Step 2 We cover the bottles with a primer or white paint. You can make such a coating using building acrylic or latex paint for wallpaper in two layers - the first is very light, dry, and the second layer is already thoroughly painted over.
Step 3. Well, now we will roll them in sea salt!
We apply PVA glue (you can use spray glue) on those parts of the bottle where we plan to create a snowy effect and roll it in salt. You can take colored salt and then our jewelry will sparkle with all the colors of the rainbow! We dry.
Step 4 Now let's create a composition. Any branches can be covered with silver or white paint. We are waiting for it to dry, treat it with spray glue and roll it in glitter or ordinary sequins.
Glass candlesticks
You will need:
- glasses,
- cardboard,
- scissors,
- glue,
- candles,
- artificial snow (semolina),
- Christmas trees, houses, deer figurines, etc.
Step 1. Cut out a circle from thick cardboard along the diameter of the glass.
Step 2. Using glue, glue the decor (Christmas trees, houses, etc.)
Step 3. Pour artificial snow and sparkles into a glass.
Step 4. We coat the edges of the glass with glue and glue the cardboard bottom with the toy. Let's dry.
Paper crafts are something that can be done for the New Year of the Dog quickly and easily as a gift to loved ones or just to decorate the house. Paper is always in the house and making it is interesting! We offer the best paper crafts for the New Year 2018, which you can do with your own hands using step-by-step photos and videos.
In addition, consider what else you can do for the new year with your own hands at home from what you eat at hand. For such crafts, you don’t need to spend money on purchasing materials, and the result is interesting and it doesn’t look like completely unnecessary things were used. Let's look at a few master classes, from which everyone will choose what suits him.
📌 Important! Each description contains the colors of materials and a set of decor for those crafts that have already been made and shown in the photo. But it is not necessary to choose the same shades and the same decor. You can take those materials for the New Year's paper craft 2018 that you have at home.
PHOTO: Paper garland for the New Year
Several options for a decorative Christmas tree made of paper
Without an elegant Christmas tree in the New Year - no way. Of course, the main heroine of the holiday is a large fluffy live spruce or pine tree in the center of the room, or an artificial beauty dressed up with garlands and colorful toys. But you can also make small decorative Christmas trees with your own hands from paper and decorate them with a table or shelf in the office or at home for the New Year. The following are two master classes on creating such paper beauties.
For each of them we will need:
- A sheet of thick paper for the cone.
- Paper napkins of any color, you can combine several colors.
- PVA glue or pencil.
- Scissors.
- stapler.
- Pencil or any wooden stick.
- Christmas tree decor. Everything you can find at home: sequins, small beads, bells, ribbons, and so on.
And now, in turn, we will consider both options for Christmas trees made of paper napkins.
Option 1 - Christmas tree made of paper roses
- make a cone out of thick paper. We glue it with glue or a stapler.
- now we make roses from napkins. To do this, we fold each napkin in half and in half again, fix it in the middle with a stapler.
- cut out the circle.
- we have a multi-layer circle and you need to take each subsequent layer from above and twist it tightly. We do this with all layers.
- when all the layers are twisted, you need to straighten the rose a little. Thus we make all the flowers.
- cover the cone with roses. It is better to start from the bottom in a circle and go up.

- glue roses should be close to each other so that there are no gaps.
- after the whole Christmas tree is “dressed” in roses, you can decorate it with any decorative elements by simply gluing them randomly over the flowers.
Such a craft for the New Year 2018 made of paper with your own hands is very simple to perform, even a child, a teenager can handle it, and in appearance it turns out to be very effective and beautiful.
Option 2 - Christmas tree made of paper napkins using the trimming technique
A similar very simple version of the Christmas tree. All that is needed for it is listed above, we will prepare everything according to the list and proceed:
- you have to start from the bottom. Thus, we attach all the twisted squares tightly, as close as possible to each other.

When we glue the whole Christmas tree with twisted squares, we get a fluffy beauty that can also be decorated with any decorative elements.
Using these techniques (napkin roses and trimming), you can create postcards by gluing elements onto a base with a drawn outline of a Christmas tree or other pattern, a snowman, for example.
PHOTO: DIY paper Christmas tree
Christmas trees can also be made from paper using other techniques. By simply gluing circles of colored paper onto a cone, or cutting circled palms from green paper. And you can also make loops from strips of paper and stick them on the cone.
Very beautiful paper Christmas trees are obtained using the vytynanka technique. To do this, you need to fold a sheet of paper in half, draw a contour according to the template and cut through all the necessary places. Do the same with the second sheet. After connecting 2 sheets to each other at the fold.

In general, a paper cone Christmas tree can be decorated with anything. The idea is to make a construction paper cone and decorate it.
For decoration you can use:
- threads for knitting, simply wrapping or cone;
- buttons;
- tinsel and sweets, gluing them in rows alternating;
- crumpled paper petals;
- pasta;
- coffee beans and jute rope.
📌 This Christmas tree can be decorated with anything you find at home. After that, you can cover the resulting creation with golden paint or artificial snow, or set it aside as it is.
Paper crafts for the New Year in the form of a Christmas tree:


Decorative paper candles
As surprising as it may sound, you can make candles out of paper. Of course, they will not glow, but they can decorate a Christmas tree or a New Year's table.
PHOTO: Craft in the form of paper candles
Let's prepare everything that is required in the work:
- colored thick double-sided paper.
- scissors;
- glue stick;
- ruler;
- marker or marker.
When everything is ready, let's start:
- Cut strips of colored paper. Strips can be taken of any width, optimally 3-4 centimeters. To do this, you need to make marks on one and the other side of the sheet, draw lines along the ruler and cut. For one candle you need 2 strips. They can be made in one color or two shades.
- We take 2 strips and glue the ends as shown in the photo.
- Now we make weaving (see photo) and fix the tips. This is how the candle turned out.
- Cut out a circle from paper. We glue a wicker column on it.
- We cut out the flame of a candle of arbitrary shape with a rectangle at the bottom, for which the flame will be glued to the column.
- We draw a wick on both sides with a felt-tip pen, bend the rectangle and glue it to the post.
Step by step photos for making a paper Christmas candle
The finished candle can be glued to a clothespin and decorate the Christmas tree, or you can leave it as it is and place several of these candles on a shelf or on a New Year's table. Such crafts for the New Year 2018 from paper with your own hands can be made to school or kindergarten for the competition!
Santa Claus and Snow Maiden made of paper
The main characters of the New Year - Santa Claus and the Snow Maiden can also be paper. Let's try to make them with our own hands for the New Year of the Dog 2018!
Getting ready for the creative process:
- We will need colored thick paper in blue and red for the cones.
- White paper for finishing.
- Beads, any decor.
- Paints and brushes.
- Glue.
- Scissors.
- Thread (you can take cotton for knitting).
And now let's get started:
- The description will go for Santa Claus, the Snow Maiden is done in exactly the same way, but you can change the base color and decor.
- We make a cone of thick red paper.
- We cut out several (2 or 3) semicircles from white paper and cut them so that we get terry. This will be the beard. We glue in several layers on a cone. For a beard, you can also use cotton pads.
- Eyes and a nose can be painted with paints or beads can be glued: black - eyes, pink or red - nose.
- Now you can make a cap. For him, we will make a small cone of red paper and glue a strip of white on the bottom. Put a cap on Frost and fix it with a drop of glue.
- You can draw or stick any decor on the figure.
- You can glue a thread to the top of the head, for which we will hang Frost on a Christmas tree or attach a white pom-pom to the tip of the thread.
This craft is something that you can do for the New Year with your own hands and give it to your mother, friends, relatives.
📌 Using this technique, you can make more penguins, snowmen, deer, and any figurine in the New Year theme.

Santa Claus, Reindeer and Paper Towel Snowman
For such beauties, you can use ordinary paper towel rolls or make a roll of any diameter and height yourself from thick paper.
Before starting the process of creating Santa Claus, we will prepare everything that is useful in the work:
- Roll for the base.
- Felt or colored paper in red, white, light brown, black and yellow shades.
- PVA glue.
- Eye blanks, they are sold in any needlework stores. Or you can use half beads for the eyes, buttons, in the end, just cut circles out of black paper or felt.
- Scissors.
And now let's start making paper crafts for the New Year 2018 with our own hands!
First we make Santa:
- Cut out a strip of red felt whose width is equal to the height of the roll plus 2 cm, and the width is equal to the diameter of the roll.
- Cut out a semicircle of light brown felt for the face, glue it on.
- We cut out an oval from white felt, cut off a recess for the face on one side and glue it over the face detail.
- We cut out the details for shoes from black felt (two ovals connected together). Glue on the underside of the roll.
- We cut a strip of black felt, stick it in the middle of the roll - this is a belt.
- Cut out a buckle from yellow felt. We glue over the belt in front.
- Now we glue the eyes and the circle of the nose.
- Glue the cap on top of Santa.
Now we make a snowman:
- Cut out a strip of white felt whose width is equal to the height of the roll plus 2 cm, and the width is equal to the diameter of the roll.
- We glue the roll with a strip, bend the ends inside the roll from one side and the other.
- We glue the eyes, nose and buttons - circles of felt.
- We cut out a scarf from red felt and cut along the edges, we tie it to a snowman.
- We make a cap. Cut out a semicircle from red felt, glue the sides. Cut out a strip of white felt and glue it along the bottom of the cap. Glue a pom-pom to the end.
- Glue the cap on top of the Snowman.
Next is the turn of the deer:
- Cut out a strip of light brown felt whose width is equal to the height of the roll plus 2 cm, and the width is equal to the diameter of the roll.
- We glue the roll with a strip, bend the ends inside the roll from one side and the other.
- We glue the eyes and nose.
- We make a cap. Cut out a semicircle from red felt, glue the sides. Cut out a strip of white felt and glue it along the bottom of the cap. Glue a pom-pom to the end. But here we still need to cut out the horns from brown felt and glue on the sides of the cap.
- Glue the cap on top of the deer.
Thus, three figures are ready. Such paper crafts can be put under the Christmas tree.
📌 Origami paper crafts video of Santa Claus:
Christmas tree toy from strips of paper
Among the crafts for the New Year 2018 made of paper with your own hands, you must definitely make a Christmas tree toy!
We will analyze a very interesting toy from strips of colored paper step by step, first we will prepare everything you need:
- Colored paper. For one toy one use two shades.
- Scissors.
- Needle with thread. You can use fishing line, or you can use ordinary sewing thread, but thicker.
- Pair of beads.
When everything is ready, we proceed to the process of creating a Christmas tree decoration:
- Cut the paper into strips about 10-15 centimeters long and 1.5 - 2 centimeters wide. For one toy, you need 9 strips of one color and 9 of another.
- Cut out 2 circles with a diameter of 1.5 centimeters.
- Pass the thread through the needle and fasten the bead at the end.
- Now add all the stripes, alternating colors in a pile. We put on the thread over the bead 1 circle and a stack of strips from one edge.
- Then we fold the strips in half and thread the entire pile from the other edge onto the thread.
- On top of the second circle and bead. We make a loop and the toy is ready.
You can make several of these multi-colored Christmas decorations and decorate your Christmas tree or room with them. This is just one version of a Christmas tree toy made of strips of paper, and you can make a great many of them.
New Year's paper garland - video:
Ideas for New Year's crafts for the New Year 2018:

And they will be very cheap in cost, and in beauty they will not be inferior to the purchased ones. Moreover, this year the trend is the naturalness and naturalness of materials in decorating the Christmas tree and the room. So the forest beauty, dressed up with paper toys, will be not only beautiful, but also stylish and fashionable.

Snowman with a whisk
📌 Another craft is a snowman, which we will try to make out of paper by simply folding it in a certain way.
Getting ready for work:
- take paper in white, black, orange and blue;
- scissors;
- paper glue.
And now we start:
- We make two circles for the snowman's body. To do this, we take 2 sheets of a larger format and 2 sheets of a smaller one. We fold them with an accordion.
- We bend the accordions in half. On the one hand, we glue the ends with each other, we get a semicircle. We glue together 2 large semicircles and two smaller semicircles. We glue a smaller circle on top of a large one. This is the body of a snowman.
- In the same way, we make small circles for pens and glue them to the snowman.
- Cut out circles for eyes and buttons from black paper and glue them on the snowman.
- We make a cone of orange paper and attach it to the snowman in place of the nose.
- We cut out a hat from black paper, decorate it with a strip of white paper and glue it on the snowman's head.
- We cut off a long strip of blue paper, cut it along the edges and tie it to the snowman as a scarf.
- It remains to make a whisk. We fold the white paper with an accordion and fasten the ends.
- We make an accordion out of orange paper and fold it in half, attach it to a strip of white paper and attach it to the snowman's handle.
With this snowman, you can decorate the wall in the room by attaching it with pins and needles or double-sided tape to the wallpaper.
And if you make such a snowman in a smaller format, then it will be a great decoration for a postcard. Complete the postcard with paper snowflakes or a Christmas tree made using the same technique, that is, from sheets of paper folded like an accordion and glued in layers.
📌 To create beautiful crafts for the New Year 2018 from paper with your own hands, use the tips given in the article and add an important "ingredient" - fantasy! Then you will get unique crafts that you can decorate your home with and give as a New Year's present to friends and family, or send the product to school and kindergarten to competitions!
Video craft options:
💖 Happy New Year! 💖


