Crafts from vegetables (104 photos) - for school and garden. Children's crafts from vegetables. Crafts from vegetables and fruits in kindergarten
Here comes autumn. One of the first activities in kindergarten that you will encounter is an exhibition on the theme of autumn and everything related to it. You will have to make some kind of craft, it is desirable that it is not repeated by your child's classmates. Here we have collected about 40 different complexity options for crafts from vegetables and other natural materials.
Lamb.
Our article will present autumn vegetable crafts in the photo. All of these ideas are wonderful. That's why they should definitely be done. Take a branched head of cauliflower, in principle, the product is almost ready, it remains to mark the horns and eyes on it. Eyes can be bought and attached ready-made, or they can be made from plasticine or from autumn berries. Horns are made by cutting the cabbage itself with a knife in the right places or folding its individual elements and inserting it into the lamb's head. Fasten everything with glue or toothpicks.

The clock is an alarm clock.
Already, many school institutions are holding exhibitions called Autumn Fantasy. Therefore, it is time for this occasion to make crafts from vegetables. For the second craft, take:
Plasticine.
- Toothpicks.
- Round pumpkin.
- Eggplant.
We cut the pumpkin on the side by 2-3 cm, not reaching the pulp and seeds. Cut off the stem from the eggplant. Then we cut another 5-6 cm from the nose and tail of the eggplant. We cut out Roman numerals from its peel. Clock hands can be made of plasticine. And we connect everything into an alarm clock with toothpicks.

Helicopter.
- We take to create crafts:
- A couple of medium zucchini.
- A couple of small zucchini.
- Carrot.
- Skewers or toothpicks.
From one zucchini we make the body of a helicopter, from the other - its wings. A small zucchini will go to the tail, and from a thin plate of the second small zucchini and a carrot ring we make blades.

Mushrooms in the field.
It is worth noting that making crafts for the autumn ball from vegetables is a real pleasure. To create the next craft, we need to take:
- The basis is a box, cardboard, board.
- Carrot, apple, potato, greens for grass, toothpicks.
On the basis, we first lay out grass from greenery, or from fallen leaves. Carrots will be mushroom legs, and we will make hats from potatoes and an apple. We fasten the legs and hats with toothpicks, if desired, you can decorate the mushrooms.

Caterpillar.
And this craft, probably, many have seen. But it's worth remembering again. Take:
- Apples, carrots, greens. olives or other berries.
- Toothpicks.
- Base stand.
From apples connected with toothpicks, we make the body of a caterpillar, and from olives on toothpicks we get horns. We make a nose with eyes from plasticine or autumn berries. Carrot rings make excellent legs. Now it remains to place everything on the base and decorate as you please.

Cabbage lady.
Vegetable crafts made from vegetables are very popular in autumn. And thanks to this article, making them will be a real pleasure. You will need:
- Cabbage head, red sweet pepper, carrot, parsley.
- Hat.
- Toothpicks.
We sculpt a composition from a head of cabbage, parsley and a hat, make a pretty face from olives, carrots, peppers.

Hedgehog.
We select material:
- Cardboard base.
- Elongated pumpkin.
- Olives or grapes.
- Carrots, apples, potatoes, mushrooms.
- Toothpicks.
On the basis we place a clearing. We collect the hedgehog from potatoes, carrots and pumpkins, as in the figure. Now we attach the nose, eyes and thorns to it. And on the thorns we load fungi and apples, you can also leave.

Krosh from Smeshariki.
We make this character from:
Medium head of cabbage, a couple of cabbage leaves, zucchini, carrots, parsley.
A couple of zucchini rings will be the legs, put a cabbage head on them, it will be the body. From a pair of leaves, cut out the ears and insert them into the cuts on the head of cabbage. We also make pens from zucchini, you can put a carrot in one hand. From parsley and carrot tops we make hair for a hare. We make the eyes drawn or attach ready-made ones. We make a spout with teeth from the remaining material.

Spiny cactus.
If you are interested in vegetable crafts that you can make with your own hands to school, then this article was created especially for you. Here you will find, perhaps, a lot of interesting things. For example, to create the following craft, take:
- Sweet pepper or potato.
- Cucumber and toothpicks.
Cut 2/3 off potatoes. With a spoon we make a recess in the body of the potato, having scooped out the core, we make the edges carved. We prepare sweet pepper in the same way. This will be the pot. We insert a cucumber there and stick it with toothpicks, they will become thorns. The spines can be painted and the face of the cactus can be made from the remaining materials.

Magic carriage.
The hand-made carriage, as expected, is made from a pumpkin. She will also need:
- Small squash 4 pcs, toothpicks.
- For decoration - ribbons, rhinestones, beads. Flowers.
We cut out doors, windows in the pumpkin, put the squash as wheels (zucchini rings are also suitable if there are no squash). We decorate the carriage. If there is an opportunity to seat a coachman and horses, then we do it.

Stroller.
A variety of crafts can be made from vegetables. And you can be sure of this if you carefully study this publication. In general, to make a stroller you will need:
- An elongated watermelon and a pair of pineapple rings.
- A pair of zucchini or orange rings, 4 olives and toothpicks.
We scoop out the watermelon pulp, leaving the whole peel of the desired shape. The remaining peel will go to the handle. We make orange or squash wheels. Insert an olive or grape in the middle of each wheel. On the roof we make flowers from the pulp of watermelon or pineapple. All parts are fastened with toothpicks.

Candy pig.
- Again an oblong watermelon, also buttons.
- Pink felt and toothpicks.
Scooping out the pulp, we save the desired shape of the peel. With buttons we make a muzzle for a pig. Ears and tail will be felt. We make the legs from the remains of the peel of a watermelon.

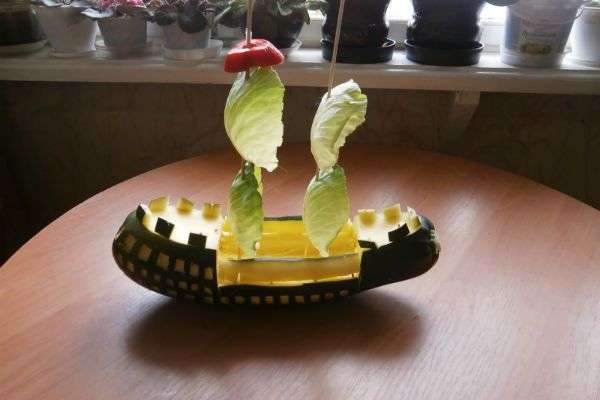
Ship.
Large eggplant or zucchini, sweet pepper (red), cabbage leaves 4 pcs.
Long skewers and toothpicks.
Cut out the shape of the boat with a knife. We make sails from skewers with cabbage leaves. And make a flag from red sweet pepper.
Basket.
Peel a large pumpkin from pulp and seeds. You can decorate it with carvings to your liking, and fill it with vegetables, fruits, berries or nuts. And maybe candy.

Kitty.
This article also presents animal crafts from vegetables. There were such examples above and now it is worth giving one more. With some effort, you can make a wonderful cat. We clean the bulb carefully, keeping the antennae. We put it on the onion ring. With the help of small incisions we make the ears of the cat. We also cut out the eyes and mouth. The tail is made from improvised materials.

Helicopter with crocodile.
- Zucchini zucchini, small cucumbers.
- Carrots, slices, toothpicks.
In the zucchini we cut out the cabin. We make the tail and wings of the helicopter from cucumbers. The propeller will be beetroot. And the steering wheel with wheels is carrot. We make a crocodile from cucumbers. We put him in the cab and, if desired and possible, we attach a plastic protective glass in front of him in the cab. We make a hat with eyes and improvised material.

Eh, bastards...
They will need a couple of yellow and long zucchini. We clean the core from them, and make the peel in the form of bast shoes. You can scratch or draw the desired patterns on them.

Lesovichok.
We make a forest clearing from fallen leaves, greenery, rowan berries, branches and flowers, we plant our zucchini on it. Next, we make a peasant out of him - a forest man, as fantasy tells us, draw a face, put on a hat, make a beard.

Frog.
If you want to know how to make crafts from vegetables, then in this article you can find a lot of interesting things. In order to make a frog, take:
Green apple, small cucumber, olive or dark grape, light grapes 5 pcs., toothpicks.
The apple will be the body, you just need to cut the mouth correctly. We fasten light grapes like arms and legs, eyes. We put on a cucumber crown on top.

Machine.
Here you will need:
Carrot, cucumber, 1 large and 3 small grapes, zucchini ring, toothpicks.
The machine itself is made from cucumber. The wheels will be carrot. Peeled zucchini half ring for the booth. And the grapes will be the headlights.

Bear is clumsy.
To create a character, prepare:
3 oval potatoes, 1 medium potato, 1 small potato, toothpicks.
Connect 2 large potatoes to the head and body, cut heaps and legs from 3 large potatoes and connect to the body. A small potato is a barrel of honey, attach to your hand. Eyes and nose can be drawn.

Fly agaric.
Prepare:
- Green zucchini, long pumpkin.
- Colored paper and glue.
- Plasticine.
- Toothpicks.
Cut off the nose of the pumpkin, leaving 8-10 cm, this is for the hat. From the zucchini make a leg of the mushroom. Connect them together with toothpicks. The hat needs to be painted red and put white dots.
Make a face out of plasticine and colored paper.

The mouse is a minnow.
- The melon is small.
- Watermelon with white rind.
- A pair of dark olives or grapes.
- Toothpicks.
With a knife, scratch the eyes, nose and mouth on the watermelon, and scratch the antennae. Make pupils from olives or grapes by cutting them in half. And make a nose out of a whole olive or grape. Make ears from 2 halves of a melon.

Monkey.
Beautiful vegetable crafts will appeal to everyone without exception. Therefore, it is worthwhile to quickly make something unusual and beautiful. For the monkey you need:
Large and small oranges, pineapple, small white-skinned watermelon, a couple of olives, toothpicks.
We cut off the pineapple on both sides, connect it with the watermelon. On the watermelon, thinly outline the eyes. We fix the halves of the olives in the form of eyes. From a large orange we make a mouth and attach it to the head. We make a nose from an olive and also attach it to the head. From a small orange, make ears and attach them.

Octopuses.
You need to find similar carrots, highly branched and add parts of the face from improvised materials to them.
- Palms.
- Sweet peppers green and red.
- Orange.
- Black and green olives.
- Green beam.
- Skewers.
Insert skewers into halved oranges and string olives along their entire length. From peppers we make the tops of palm trees. One palm tree can be made from an onion. Put olives on the tops of all palm trees.

Spider.
Long pumpkin or zucchini yellow.
- Green pumpkin, flat.
- Small carrots 12 pcs.
- The basis for the clearing.
- Fallen leaves.
- Toothpicks.
Cut a long pumpkin or zucchini and insert it into a flat one, cut it there too. Legs made from carrots. Next, we plant the spider in the clearing. We make eyes and a mouth from plasticine.

Penguins.
We cut out penguins from eggplants, make carrot faces for them, as well as paws and beaks.

Train.
It is easy to make from a few young zucchini. Wheels will be made from their rings. You can complement the image with chopsticks and also make a pipe and a nose out of carrots.

Pigs.
Thanks to our instructions, you will be able to make beautiful vegetable crafts for the exhibition. Pigs are made from potatoes, and pink is better. To it with pink plasticine we sculpt patches, ears, ponytails. Eyes are best sculpted from black plasticine. Then you can place them in a clearing or in a paddock.

Retro auto.
To the average length of the zucchini, you can attach cardboard wheels, a wire steering wheel, build a cabin from black cardboard and connect it to the zucchini.

Fairy fish.
Zucchini can be used not only beautiful and even, for example, with a curved tail, it is very suitable for creating a fabulous fish. Cardboard and plasticine with paints will also come in handy. And it will be possible to decorate it for every taste and color.

Festive service.
From 1 large and a pair of small pumpkins, you can make a tea pair with a teapot. Pieces of thin and bendable hose will help as a spout and handles. Pumpkins need to be freed from the pulp with seeds. Moreover, the cut off top of the teapot will serve as a lid for the teapot. For cups, their tops will become saucers. The next step is to decorate your service.

Cartoons - Smeshariki.
From potatoes, onions, apples and pears, as well as plasticine, zucchini and toothpicks, you can make a whole team of Smeshariki. The zucchini will become a car, and from each vegetable or fruit, make each of the cartoon characters.

Cabbage snowman.
So, from a couple of cabbages, of course, carrots (where without it), pepper, scarf and skewers, we build a snowman. We fasten the heads of cabbage together with a skewer, attach a carrot, put on a cap of pepper and tie a scarf, and the eyes and mouth can be made of plasticine.

Tractor.
- A couple of long yellow zucchini,
- Carrot.
- Plasticine.
- Cardboard base.
On the basis we make a clearing or a road. From one zucchini we make the basis of the tractor, and from the second - the cabin. We make wheels from zucchini rings. The carrot will become a pipe. Her rings will serve as a steering wheel and headlights. You can also make a plasticine man and put him in the cockpit.

Pumpkin - teremok.
We put the pumpkin in a clearing - a decorated cardboard base. Having selected the pulp from it, cut out windows and a door. Place grass on the roof. Then we decorate the house to your taste and possibilities.

Snail.
We cut the zucchini with pumpkin, as necessary, connect them on the basis. A face can be made from berries, plasticine, beads. And decorate the snail with everything that is at hand - ribbons, beads, etc.

Owl.
It will be convenient to cut a watermelon with a wood cutter. A carrot will make an excellent nose, and we make eyelids and eyes from improvised material.

Turtle.
As part of this article, the name of vegetable crafts was presented. All crafts are simple in their execution. This number also includes the latter. From 3 cucumbers, a head of cabbage, toothpicks and wire, an excellent turtle on the basis can come out. Cabbage must be cut for stability and from the same cucumber rings make your turtle shell. A third of the cucumber will go to the head. Glue bead or berry eyes on it, put on wire glasses. And you can sew or knit a tiny hat.

Various crafts made from vegetables and fruits is a very educational and exciting game for preschool children, as well as elementary school children. Funny and cute animals made of edible materials will interest your baby in any case. In this article, you will learn more about how to make fakes with your own hands.
Do not forget that the product does not have to be complicated. It would be best if your craft looks like a famous children's character.
Let's look at some original DIY crafts in step-by-step photos. They can be made from ordinary vegetables, fruits and improvised materials, as well as presented to an exhibition at a school or kindergarten.
No. 1. Snowman

Materials:
- three different sizes of black radishes;
- one red bell pepper;
- cucumber;
- carrot;
- a few carnations;
- two celery;
- wooden skewer and toothpicks.
We make a product:
1. We peel the radish so that our snowman is white. Then use toothpicks to connect the three balls together.


2. Cut off a piece of cucumber and fasten it with toothpicks on top (this is a snowman's hat).

3. We take a carrot, peel it and cut it to the size you like best, spout. On one side, we sharpen it with a knife and also fasten it with a toothpick.

4. We make eyes. To do this, with a wooden skewer, we make holes in the radish and insert cloves there.

5. Then we cut out and fasten such pretty lips from red pepper.

6. We make buttons from carrot circles.

7. We make snowman hands from celery.

Such a craft is well suited for a kindergarten for an exhibition in winter, or a kid can play with a snowman like with a doll.
Video
No. 2. Lamb

Materials:
- cauliflower;
- blackberry;
- raisins (4 pcs.);
- toothpicks for joining.
We make a product:
Cut off the cauliflower inflorescence of the desired shape. Then cut off a piece for a hat. We fasten the blackberry - this is the muzzle of a sheep. Below we fasten the legs (four raisins), and on top of the blackberry we put on a cut-off hat.


Crafts for an exhibition on the theme of autumn
No. 3. Ducks on the machine

Materials:
- a few carrots;
- black pepper for the eyes;
- toothpicks.
We make a product:
Peel one carrot, make vertical cuts and cut out four circles - these are the wheels of the machine. Use toothpicks to attach the wheels to the whole carrot.

Then take a piece of carrot, give it the shape of ducks with vertical slices and cut them into several pieces. Make black pepper eyes for the ducks. Make transverse holes on the cars and insert the ducks there.


No. 4. a lion

Materials:
- banana;
- Brussels sprouts;
- small yellow tomato;
- clove for the eyes.
We make a product:
Take a banana, draw paws on it and cut it out with a sharp knife. On the other side of the banana, cut out another paw and a lion's tail, as shown in the photo.

Take a small Brussels sprout, unwrap it and attach a yellow tomato in the middle. Make eyes out of carnations or black peppers.

No. 5. Piggy from apples

Materials:
- three apples of different sizes;
- olive;
- a piece of cheese;
- toothpicks.
We make a product:
We connect two apples (one large and one small) together with toothpicks - this will be the head and torso. Then, from the third apple, cut out four pieces, as in the photo - these are the legs and attach them to the body.

We cut out from an olive (eyes, lips and nostrils), from an apple (ears) and from cheese (piglet) and fasten all the details with toothpicks.
Helpful Hints
You can make a huge number of different crafts from vegetables and fruits.
Many of these crafts can be made together with children - this will not only bring pleasure, but also positively affect the child's imagination.
Here you will find crafts for every taste and color.
Arm yourself with the right materials and use the accumulated information to create beautiful and original crafts.
Read also:
Crafts from autumn vegetables for children
Children will love to play with paints. To make them have fun, make vegetable seals for them.
Potatoes, for example, can be cut in half and cut out a certain pattern in each half - the child will dip the potatoes in paint and stamp on paper.


In addition to potatoes, there are other vegetables that can be used.
Look closely at the pictures to see how you can surprise kids with simple vegetables and paints.


Crafts from vegetables in kindergarten: eggplant man

You will need:
1 eggplant
Glue stick
pom poms
Plastic (toy) eyes

Everything is very simple, and even small children can do the craft.
1. Glue the toy eyes to the eggplant.

2. To make a nose, you can glue a large pom-pom or cut a circle out of paper and glue it on.

3. Small pom-poms can be glued in the shape of a man's mouth. Instead of pompoms, you can also use colored paper, cardboard, or even other vegetables - a strip cut off from a carrot, for example.
DIY vegetable crafts: potato men

Making eyes
* To make the eyes of a potato man, you can use small buttons of any color (except white), which should first be sewn to a piece of white fabric - then cut the fabric in a circle, grease it with glue and stick it to the potato.
* Also, eyes can be made from: peas, berries, black pepper, seeds, colored paper, or pieces of carrot, which are fixed with a toothpick.
Making a nose
To make a bulging nose, use a button sewn to a piece of fabric - cut the fabric in a circle a couple of millimeters larger than the button. Spread the fabric with glue and attach to the potato.
Making ears
To make the ears, use pumpkin seeds - just insert them into the potato with the sharp end down. You can also make ears with plasticine.
Making hair
Hair can be made from different materials, such as thread, paper (by cutting a fringe) or thin wire.
Crafts from vegetables to school: potato ponies

INwe will need:
Three potatoes
toothpicks
Carrot
1. Insert one toothpick into a small potato - this will be the head.
2. To make the neck, take out a small potato and insert the other side of the toothpick (from step 1) into it.
3. For the body you will need a large potato. Attach it the same way.
4. Use toothpicks to make the horse's legs. Insert them into a large potato, i.e. the body of a horse.
5. To make the horse stand, attach small pieces of carrot to the toothpicks that play the role of the horse's legs.
6. You can also make ears out of carrots. Insert the ears into the pre-cut holes.
7. For the mane and tail, use knitting threads. Just cut as much as you need and stick to the craft.
How to make vegetable craft: radish flower

Before you start cutting the radish, soak it in cold water for a couple of hours - it will become firmer and fresher.

1. Cut off the bottom of the radish. Decide how many petals you want for your future flower, and think about where you will make the incisions.
2. Take a knife and start making cuts from the bottom up (see image).
* You may need to practice a little so that later all the petals of the radish flower turn out to be even.
* If you want the petals to be more loose, gently move them with your finger from the center of the flower in the opposite direction.

3. Cut the petals with scissors so that you get "arrows" (see image).
4. Repeat the previous steps to make a second layer of petals from the middle of the flower, but this time the petals should be between the outer petals.
A similar flower can be made from the peel of a tomato or kiwi:


How to make a flower from a tomato - video:
Crafts from vegetables instruction: flower decorations from vegetables
These crafts can be used as a decoration for dishes or simply as a pretty serving of vegetables for kids who are not known to be very fond of vegetables.
You can use different vegetables. In this example, cucumber and carrot are used. You will also need a toothpick.


Food Crafts: Egg Snowman

You will need:
6 large boiled eggs
6 small boiled eggs
Black pepper (peas)
1 carrot
1 skewer
1. Peel one large and one small egg from the shell and cut off the top and bottom of them.


3. Put a small egg on a large one and secure them with a skewer - thread it through.

4. Make a hat out of carrot rings. To secure it to the snowman, first make one hole with a skewer through the circles. Now put the hat on the protruding skewer.


* You can safely cut off the excess part of the skewer.
* Instead of a skewer, you can use thick, uncooked pasta.

5. Make eyes, nose and buttons using black pepper, and for the nose you can use a small piece of carrot.


6. Parsley can be used as hands for a snowman.

Children's fruit crafts: decorations from dried orange slices

You will need:
Orange
Oven
Oven rack
Satin ribbon
1. Cut the orange into several slices about 1-1.5 cm wide.

2. Place the orange slices on the wire rack.
* Do not use a baking sheet, otherwise the slices may burn.
3. Put the slices in the oven and keep them there at 130 degrees Celsius for a couple of hours (check them periodically).
4. Remove the orange slices from the oven and let them cool. You can put them on a plate to cool.

5. Now the slices can be used to decorate dishes or for a Christmas tree or interior - they not only look beautiful, but also smell good.
6. You can make holes in them and thread the tape so that the slices can be hung.

DIY fruit crafts: fruit cup

You will need:
orange or grapefruit
1. Take an apple and put it on the table with the handle down. Cut off the top part and the bottom part will act as a cup.
2. Using a knife, cut out the core of the apple.
3. To prevent the apple from turning black inside, brush it with lemon juice.
4. Make a hole in your "apple" cup for the handle. Cut a slice of kiwi and insert it into this cutout - it will act as a handle.
5. For a saucer, just cut a slice of orange or grapefruit.
You can also make such a fruit cup to decorate the table:

Crafts from berries: strawberry Christmas tree

You will need:
Scissors
Baking paper
Paper (lace) napkin
Adhesive tape (adhesive tape)
Strawberry
Chocolate
1. Make a cone out of cardboard. To learn how to make a cone, you can go to our article: Paper cone. Also cut a circle out of cardboard - this will be the base of the Christmas tree.
* Instead of a paper cone, you can look in stores for a Styrofoam cone.

2. Cover the cone with baking paper. You can push the ends of the paper inside the cone. You can use sticky tape to secure the paper to the cone.
3. Melt the chocolate to stick the cone to the base.
4. In a napkin, cut a circle with the same diameter as the base of the cone and push the cone through the napkin.
5. Prepare strawberries and divide them by size. Remove ponytails.
6. Start gluing strawberries from bottom to top, starting with the largest berries. Dip strawberries in melted chocolate and stick to the cone (wrapping paper).

* Save the smallest berries for the top of the tree.

7. You can also attach other chocolate decorations (ready-made or handmade) to the tree.
Children's crafts from vegetables and fruits: butterflies

You will need:
Clothespins
Toy (plastic) eyes
PVA glue
Sealed bag (zippered bag)
Fine brush or wire (optional)
Paints (optional)

1. Using glue, attach the toy eyes to one side of the clothespin and let the glue dry.
2. Put your favorite treats (yours or the children's) in a bag with a fastener - you can distribute them on the sides, but this is not necessary.

3. With a clothespin, grab the bag, as shown in the image.
4. If you wish, you can make a butterfly antennae from a thin brush or wire. You can also paint the clothespin if you think it's necessary.
Crafts from vegetables: pumpkin faces

Every year, autumn gives us generous harvests of vegetables and fruits, which make such delicious preserves for the winter. However, ripe gifts of nature can also be used in other ways, turning them into original and creative interior decorations. So, many children are happy to make crafts from vegetables and fruits - for exhibitions and competitions in a kindergarten or school. That's where there is a fantasy run wild! Indeed, from an “ordinary” overripe cucumber, potato or multi-colored bell pepper, you can create truly fabulous “characters”. Of course, at some points, little "craftsmen" will need the help of adults - to attach or cut out the desired part of the product. However, the result of such joint creativity will amaze both children and parents. We have selected the most original master classes with step-by-step photos of crafts from autumn vegetables and fruits. And with the help of the video, you can visually study the exciting process of creating such funny figures. So, you stock up on fruits and vegetables, and from our side - interesting ideas and inspiration!
Craft from vegetables and fruits "Apple caterpillar" for kindergarten with their own hands - a step-by-step master class with a photo

In kindergarten, competitions are usually held for the best crafts on the theme of autumn, as well as for various significant dates and holidays. Kids, with the help of their parents, create their own hand-made masterpieces and bring them to the kindergarten, where the winner of the competition is determined. Make an original craft from fruits and vegetables "Apple caterpillar" with your own hands - in our step-by-step master class with a photo, the process of making such a cute caterpillar is described in detail. Undoubtedly, your creation at an exhibition or competition will take first place!
Materials for making crafts from vegetables and fruits for kindergarten:
- medium-sized apples
- fresh carrot
- rowan berries
- plasticine
- toothpicks
- shells

Step-by-step instructions for making do-it-yourself crafts from vegetables and fruits for kindergarten
- Cut the carrots into rings and put them on toothpicks.

- Now you need to insert the toothpicks into the apples and connect them together.

- We make funny "horns" for our caterpillar - from rowan berries.

- A small shell will become a hat, and we sculpt eyes, nose and mouth from plasticine.

- It turned out a funny apple caterpillar on carrot legs.

Crafts from fruits and vegetables "Apple caterpillar" with their own hands in the garden - a master class on video
With the help of this video, you can easily master with your child a master class on making crafts from fruits and vegetables - the "Apple Caterpillar". In this case, the caterpillar can be not only green, but also red or yellow. Good luck with your fruit fantasies!
Craft from fruits and vegetables "Helicopter" for an exhibition to school - a master class with step by step photos

Such an original craft made of vegetables and fruits can be prepared for a school exhibition. As the “main” material, we choose a zucchini or a medium-sized pumpkin - fortunately, in the fall you can pick them up in any shape and for every taste. Of course, the Helicopter craft made from fruits and vegetables is quite capable for a schoolboy, but with mom or dad, the workflow will go more fun. Well, let's fly!
Necessary materials for crafts from fruits and vegetables with their own hands to school
- pumpkin or squash of suitable size and shape
- flat box - the basis for the future "helicopter"
- chopsticks - 4 pcs.
- carnations
- white and brown paper
- black cardboard - according to the size of the box
- toothpicks
- ash fruit
- glue
- awl
- felt-tip pens or colored markers

A phased master class of children's crafts from vegetables and fruits for an exhibition at school:
- We are preparing a platform for our vegetable "helicopter". To do this, take the lid from the box and stick a sheet of cardboard on it. Then we cut out two strips of white paper along the length of the box and glue them on the lid, parallel to each other.

- Again we take white paper and cut out a circle and glue it on the strips (as in the photo). We also glue two wooden sticks on the surface of the circle.

- Let's start building a helicopter. For the tail rotor, cut out two circles from brown paper (each 2 cm in diameter). We apply glue on the wrong side of one circle and lay out the ash fruits and a toothpick crosswise, with which the screw will be attached to the body of our “aircraft”. We cover the second circle with glue and apply it to the first, on top of the screw.


- In the lid of the box (platform), we make a couple of holes with an awl, where we insert a toothpick. We put the pumpkin on toothpicks and fasten the tail rotor.


- We need a nail to secure the main propeller.

- We draw windows. Everything, the original craft from vegetables and fruits "Helicopter" is ready!

Craft from vegetables "Helicopter" with your own hands for an exhibition at school - a master class on video
For crafts from vegetables "Helicopter" we need eggplant and carrots, as well as toothpicks and a knife. With the help of this video, you will learn how to make such a wonderful vegetable craft for an exhibition at a school or kindergarten with your own hands.
Photo of children's crafts from vegetables in kindergarten and school
The imagination of children is truly limitless. It would seem that ordinary vegetables - and what beauty of them you can make with your own hands! We offer you a selection of beautiful photos of children's crafts from vegetables, the authors of which are pupils of kindergarten and elementary school.


Photo of children's crafts from fruits to kindergarten and school
Autumn abundance of seasonal fruits pleases with its amazing taste and inspires creativity. The photo shows the best children's fruit crafts - according to this sample, you can make crafts for a school exhibition or kindergarten. Or eat this yummy right away.


A golden collection of unusual crafts begins with a very bright accessory. We would even say - a gadget - tape recorder from fruits, greens and vegetables.
To create this retro masterpiece you will need:
- medium size cardboard box;
- green onion;
- cucumber or young zucchini;
- carrot;
- sweet pepper;
- orange or grapefruit;
- radish;
- lemon;
- toothpicks and double-sided tape for fastening.
We reveal the entire process of manufacturing a tape recorder step by step
- We glue the front, back and top of the box with double-sided tape.
- We attach green onions to tape.
- Prepare the details for finishing the tape recorder.
- Cut cucumber or zucchini into one wide strip and two narrow ones.
- Cut off a circle of carrots, and also prepare the top and a semicircle.
- Cut two slices of lemon and orange(or grapefruit).
- Make details from radishes, peppers, carrots.
- Attach all parts to the tape recorder using toothpicks or double sided tape.
- A cassette player can be made from a plastic box or cardboard.
Master class number 2: funny little animals
The second masterpiece that you can make with your child for the exhibition is cute little animals from spotted zucchini. Looking at such pictures, I can’t believe that such beauty can be made at home with your own hands, however, to implement this idea you will need a little time, patience, desire and the following ingredients:
- 2 round zucchini;
- carrot;
- olives;
- toothpick, knife.

How to make a mouse and a dog from a zucchini?
- For each product cut the zucchini in half- the upper part will act as a muzzle, the lower part will act as the body of an animal.
- Connect 2 parts of the vegetable so that you get a figurine of an animal.
- From leftover zucchini make ears- oval for a dog and round for a mouse.
- Fasten the ears to the top of the head by making incisions on the head of the mouse. Attach the puppy's ears with toothpicks.
- For peephole cut 4 circles from the white part of the zucchini and cut 3 olives in half.
- From the halves of two olives, make pupils by attaching them with toothpicks, fix the remaining two as spouts.
- For the dog cut carrots in the shape of flowers, and for a mouse - in the form of a butterfly.
- Fasten the decorations, make a ponytail from the stalk.
Master class number 3: green turtle
Another simple master class on how to quickly and beautifully turn ordinary vegetables into an unusual animal.
To make a beautiful turtle you will need seasonal vegetables and supporting materials:
- cabbage, cut in half;
- 2-3 zucchini;
- black peppercorns;
- toothpicks.

Getting Started
- Cut the zucchini into 5 pieces 5-6 cm thick. Make a head from the extreme part, 4 paws from the rest and attach everything with toothpicks to half of the cabbage.
- Cut the remaining zucchini into circles, 1 cm thick.
- Secure the circles with toothpicks on top of the cabbage.
- Make eyes out of black peppercorns.
Fruit and vegetable crafts: crafting with kids
Not all kids like to eat vegetables and fruits, and this is not a secret for parents. What if you show the kid how bright, and at the same time, useful crafts can be in kindergarten from vegetables and fruits.
 For example, an ordinary pumpkin can turn into a creative basket or flower vase.

 A zucchini is not a zucchini at all, but plane or fairy-tale ship.
 Corn easily turns into fairy-tale characters - you just need to make a little effort and show your imagination.

 Original do-it-yourself vegetable crafts for kindergarten on the theme of autumn are obtained from almost any product that we can also eat at home in the form of salads or first courses. Tell your child about this.


Childhood is the time for a flight of fancy when an apple can turn into a funny owl, and sour lemon - in a yellow solar mouse. Such simple crafts can instill in your child a love of vegetables and fruits. In the process of work, offer him to eat a piece as a reward - he will agree with pleasure.
Simple and original crafts for kindergarten: getting ready for the exhibition
Light and unusual options for fruit and vegetable crafts are not at all uncommon today. Parents try to surprise educators and everyone around them. But first of all, of course, they strive to please their children.


 The most autumn berry watermelon- great material for cool crafts. Pull out the pulp and bones from a small watermelon, and turn the frame into a funny frog.
 Who's rushing to the fall ball in their zucchini mobile? This is Smeshariki!
 Mother's hands for the child are the most caring and most tender. They can honor the back for the night, and create similar beauty from ordinary products.
 Every good parent is ready to do anything for the sake of their child - even to do cute piglets from potatoes. The material is the simplest - potatoes and plasticine.
 You will definitely win this year's best idea contest if make such a bright dinosaur.

 Autumn is the time of pumpkin and crafts from it. We will consider any interesting way that allows


