Christmas tree template made of colored paper. Master class on making a New Year's tree from napkins. Velvety Christmas tree - an unusual photo stand
You and your child will love how easy it is to make yourself and how adorable it can look.
Christmas tree made from paper plates
To make a Christmas tree out of paper plates we will need to paint them bright green. After the paint has dried, cut the plate into pieces.

We assemble a Christmas tree garland from fluffy wire and beads.

Glue the pieces of disposable plate onto the background sheet of paper, starting from the bottom. We get a herringbone applique. We decorate the Christmas tree with beads and a star. We complement the application with cotton wool snowflakes.

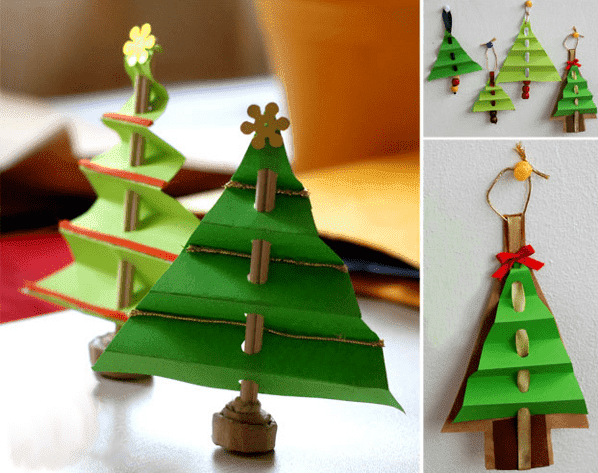
Christmas tree made of accordion paper
Considering how simple the one we offer is, absolutely any child can do it with their own hands.
So what you will need:
- a sheet of thick green paper (for example, scrapbooking paper);
- hole puncher;
- two wooden kebab skewers or Chinese chopsticks;
- bright narrow braid, cord, foil and other decorative materials;
- glue;
- scissors;
- thick brown cardboard for the barrel.

Cut out a triangle from green paper - this will be the Christmas tree. We fold it like an accordion,

in the center of which we make a large through hole with a hole punch.


Give the accordion the shape of a triangle.

We insert wooden sticks into the hole and assemble the Christmas tree a little.

We wrap the lower part of the sticks with brown cardboard tape, glue it well - you will get a stand. The little souvenir is ready!


On the folds of the Christmas tree we glue a gold cord, braid, foil or colored paper - like garlands. We decorate the top with a star, bow or snowflake.


Christmas tree made of paper strips on a cardboard roll
A very simple but effective Christmas tree can be made from paper and a cardboard toilet paper roll.
Cut out wide strips of green paper. We cut these strips on one of the sides.

Apply glue to the strip and wrap it around a cardboard roll. We do the same with the remaining strips.

We make the last strip a little narrower than the previous ones. Glue it to the very top of the cardboard roll.

Glue a cone out of paper.

We cut it at the base.

Glue the cone onto the top of the cardboard roll. This will be the top of the tree. The craft is ready!

Christmas tree made from pieces of colored paper
A voluminous Christmas tree made from pieces of colored paper looks very impressive. To make it, cut out a semicircle. Use a pencil to separate one segment of the circle.

Cut small squares from thin colored paper. A craft made from green paper of different shades will look beautiful. Apply PVA glue to the semicircle base. We wrap a piece of green paper around a pencil and glue it onto a semicircle. Glue the green pieces of paper one after another, leaving the segment separated by the pencil unfilled.

Once the entire semicircle is filled, roll it into a cone. Glue it in a place not filled with papers (we separated it with a pencil at the beginning of the work).

Take a cardboard toilet paper cylinder. We cut it on one of the sides. We paint it brown - this is the future trunk of our Christmas tree.

Glue the top of the Christmas tree to the cardboard roll. We decorate the craft with any bright New Year's materials - pompoms, beads, rhinestones or decorative buttons. Christmas tree made from pieces of paper - ready!

There are many options for how to make a Christmas tree out of paper, so you can invite your child to make his own choice and make the Christmas tree that he liked best.
Christmas tree made of twisted corrugated paper
For example, a very elegant Christmas tree can be easily made using green corrugated paper or napkins.
We make a white cardboard cone,

wrap it in green colored paper.

You can immediately make a cone out of green cardboard. You can fasten the cone not only with glue, but also with tape or a stapler. If adhesive tape is used, it must be glued on the inside so as not to impede subsequent finishing.
We cut the tissue paper into thin strips and make a fringe on one side. We twist each strip using any wooden stick. It is convenient to use matches, toothpicks or kebab skewers for this purpose.


Carefully cover our cone with curls.

We make bows from red tissue paper that can be decorated with white beads or buttons.

Glue the bows to the Christmas tree and complement them with golden-colored beads.

Decorate the top with a golden bow.

You can make a simplified version of this craft.
Christmas tree made from strips of corrugated paper

Roll a cone out of cardboard.

Cut the paper into long strips.

We wrap the cone with strips of paper, forming folds. One strip - one row.

Having wrapped the Christmas tree, we decorate it with bright beads and decorative stars.

Now you’ve already made a Christmas tree out of paper with your own hands!


For younger children, this option will be more accessible.
Christmas tree made of paper circles
A very beautiful Christmas tree is made from paper, usually used for gift wrapping.
We cut such paper into small circles or parts of more complex shapes - for example, resembling duck feet.
New Year is the most fun and children's holiday. Even adults are not afraid to look funny in red Santa hats and with a bunch of gifts. What can we say about the kids who, in this joyful chaos, are trying to take part in all the activities! The main attributes of the New Year are Santa Claus and a Christmas tree. Traditionally, a large Christmas tree is decorated with toys and tinsel, and round dances are performed around it. What if you make a non-traditional Christmas tree? A beautiful DIY paper Christmas tree will not claim a central place, but it can decorate a child’s room or become a souvenir gift. Believe me, such a Christmas tree will find its use. 
A Christmas tree is made from paper, cardboard, colored and corrugated paper, tinsel and any other available materials. It’s easy and fun to do: the kids take part in the work with great pleasure. Two-year-old children, for example, can roll plasticine balls, which later become a toy, or glue a small part to the place indicated by adults. And the memories of a joint craft will last for several days.
There are at least a dozen ways to make a paper Christmas tree with your own hands, but in any case you will need:
- Paper (colored, corrugated, thick - whatever)
- Pencil with ruler
- Glue and stapler
- Scissors
- Sometimes a compass
Model No. 1. Three-dimensional paper Christmas tree
First, the base of the tree is made - a cone. If the tree is planned to be large, the cone is made from whatman paper (it can be replaced with four A4 sheets glued together). Mark the center in the center of the wide side, draw lines from it to the two lower corners, cut it off (don’t forget to leave an allowance for gluing), cut off the semicircular base, glue it, check that it’s level. On this basis - a cone - you can make several different versions of Christmas trees. You can get a large paper tree if you make a large cone, and a small one - on a small cone. And the different methods of making needles will generally be misleading: it may seem that these are different Christmas trees.
 To make the blank cone look like a Christmas tree, we make needles from colored paper. Traditionally, the needles are green, but you can assume that there is snow or frost on the branches - the choice of color is yours. We outline the rectangles: for the lower needles, the width of the rectangle is 7 cm. We make a trapezoid from the rectangle: the upper side is cut off. The wide side is folded into a triangle and fastened with a stapler or glue, the top side is convenient to glue to the cone.
 Volumetric needles can be replaced with circles glued to the top. If you cut out circles of different shades of green, the tree will look more original.
The needles are glued in rows, starting from the bottom. To make the tree look beautiful, reduce the size of the needles every three rows. That is, we first draw rectangles 6.5 cm, then 6 cm and 5 cm. We decorate the top of the tree with a small cone, the bottom of which is cut off with triangles. If desired, the Christmas tree is decorated with sparkles. You can use ready-made glitter, or finely chop tinsel. Apply glue to the needles and sprinkle glitter on them.
The second version of the Christmas tree-cone
We build a frame, cut thin short strips from colored paper, and wrap each strip around a pencil. The stripes take on a curled appearance. With a certain skill, you can twist strips of paper with scissors: carefully draw the blade of open scissors from one end of the strip to the other, while simultaneously pulling out the strip. Glue the twisted strips to the cone. You can decorate the Christmas tree with anything: sparkles, bows, balls, stars.
The third version of the Christmas tree-cone
 We glue drop needles onto the prepared frame. We make needles from strips of green (or any other) paper, glue their ends together - we get a drop. We glue larger drops at the bottom of the cone, and smaller ones at the top.
The fourth version of the cone tree
Wide strips of paper cut into fringes are glued to the base. Again, the stripes are wider at the bottom (accordingly, the needles are longer), at the top the stripes are narrower. The color of the needles can be any: green will make it natural, multi-colored - decorative. We cut the strips into small “needles”, not cutting to the end of about 1.5-2 cm. After the glue has dried, the needles can be bent upward - carefully draw the blade of the scissors from the base of the needles to the ends. Such a Christmas tree made of corrugated paper will look beautiful.
Model No. 2. Christmas tree made of paper and cardboard
You will need double-sided cardboard. Fold a sheet of cardboard in half and draw the outline of the Christmas tree. We draw exactly the same outline on another sheet. We cut out both contours, then make slits along the axis to the middle: on one Christmas tree at the top, on the other at the bottom. We insert the parts into each other. We decorate with tinsel, balls (glass or paper), sparkles - whatever you like. The photo shows slotted toys.
A similar Christmas tree can be made from colored paper. It will require 4 sheets. Fold each sheet in half and cut out a triangle. We glue the resulting parts together and cut them at an angle with a needle. You need to tighten them before the glue dries.
Model No. 3. Christmas tree made of colored paper
 For this model you will need thick paper. It’s easy to do: cut out a triangle, fold it like an accordion, make a through hole into which we insert a stick-rod. To make the Christmas tree stable, a stick can be inserted, for example, into an eraser. This Christmas tree can become a small souvenir or decorate your workplace. She will definitely create a New Year's mood.
Model No. 4. Christmas tree using papercraft technique
 The diagram clearly shows how such a Christmas tree is made from paper. You need to cut out several circles of different diameters (the bottom of the tree is from circles of larger diameter, the top is from circles of smaller diameter). Circles are drawn and cut, needles are folded. The finished tiers are strung on a rod. We decorate the Christmas tree with sparkles, beads, foil bows - the imagination is limitless.
Model No. 5. Folding Christmas tree

For such a Christmas tree, several circles of different diameters are cut out. The diameter and number of circles depends on the desired size of the Christmas tree. Fold each circle in half 4 times, unfold and straighten the circles. The trunk of the Christmas tree can be made from an old pencil, a cocktail straw, a wooden stick - all this is wrapped in colored paper, the tip is glued. We cut a small hole in the center of each circle (it should be smaller than the diameter of the trunk to hold it tighter). We string circles in tiers onto the trunk, starting from the bottom. A Christmas tree stand can be made from a wooden spool, cork, a plastic bottle cap, plasticine, or glued together from thick paper.
Model No. 6. Paper origami - Christmas tree
This popular technique can be used to make any figures, including Christmas trees. The video will demonstrate better than any words how a paper Christmas tree is made using the origami technique. We offer two options.
But the third option is more complicated.
Model No. 7. Christmas tree in a hurry.
For this Christmas tree you will need a color printer, paper, scissors with glue, hands and a few minutes of free time. We print a Christmas tree template from paper, cut it out, fold it, and glue it together.
On the eve of the New Year, making Christmas trees with your own hands becomes relevant. Volumetric Christmas trees made of colored paper will perfectly decorate your apartment. Such a creative gift will be a pleasant surprise, especially if it is made together with children.
It will be very fun to make such a Christmas tree with children.

These Christmas trees will perfectly decorate your apartment on a festive night.

Before the New Year it is very popular to make Christmas trees out of paper.
To make this craft you will need green corrugated paper, PVA glue, green cardboard, scissors, and a toothpick.
Before you start making the Christmas tree, you should prepare the main tool for rolling paper “rolls”. To do this, the edges of the toothpick are cut off. Make a small cut on one side with a knife, slightly dividing it in half.

It’s not difficult to make such a Christmas tree

To create such a Christmas tree, prepare paper, glue and scissors.
Stages of making a Christmas tree
Using a compass, draw a large circle on the cardboard. Next cut it out. This will be the basis of the future Christmas tree.
- In order to roll the resulting circle into a cone, it should be connected in half and cut along the fold. Form a cone from the resulting semicircle. Glue the junction of the edge of the cone with its base with glue. Wait a few minutes to allow the glue to bond the cardboard well and dry.
- To make strips for quilling, take green corrugated paper and apply 1.5 centimeter wide sections on it.
- Make frequent cuts along the entire length of the resulting ribbons, without reaching the edge. This will create a fringe of tree needles.
- To make the main element of paper rolling, a spiral, one end of the strip is inserted into the forked part of a toothpick and a piece of paper is wound along the entire length onto the toothpick. In this case, it is better to twist the toothpick itself, and not the tape. To obtain identical elements, try to twist evenly and neatly.
- To prevent the rolled paper roll from unwinding, the free end is glued to the base. Let the glue dry.
- After all the elements are made, to give them the correct volume, you need to carefully fluff the cut fringe on them.
- Glue the prepared paper rolls onto the cone. It is better to start doing this from the top of the cone. To do this, the pointed end is smeared with glue and the element is put on it.
- Press the part. Next, cover the entire cone with fluffy spirals.
The Christmas tree will look brighter if it is decorated with bows and balls made of corrugated paper. To do this, you can roll multi-colored balls or squares out of it, connected in half, tying it in the middle with a thread. Glue the made Christmas tree decorations.

Such Christmas trees will create a festive atmosphere in the apartment.

To make your Christmas tree look beautiful, decorate it with bows

To make a Christmas tree, you can use the instructions
Christmas tree using quilling technique
A Christmas tree made using the quilling technique will be a beautiful and original decoration for a holiday card.
To make a Christmas tree you will need A4 colored paper, scissors, a toothpick, PVA glue, a base for the Christmas tree (it can be colored cardboard or a postcard)
To make the Christmas tree look more creative, you can use green colored paper in different shades to make paper spirals. Roll 4-5 elements of each color.
- On colored paper, draw stripes 3-5 millimeters wide and cut.
- Next, use a toothpick to start making paper rolls. To do this, insert one edge into the cut on the toothpick made with a knife and twist it evenly. Instead of a toothpick, you can use wooden kebab skewers or a regular rod. Then you can simply wind it in the middle of the selected tool.
- In order for the resulting spiral to be free, it is better to release it. When it opens up a little on the table, fasten it to the selected diameter.
- For a more interesting Christmas tree, the spiral bases can be twisted into different diameters.
- It is best to start laying out the Christmas tree on cardboard from the top, taking the smallest element. They glued everything in the shape of a cone. It can be done in an uneven order.
- The Christmas tree can be decorated with decorations in the form of twisted spirals of very small diameter or with beads.

You can use colored paper to make spirals.

A Christmas tree made using the quilling technique will be a beautiful and original decoration for a holiday card.
Christmas tree made from a cardboard toilet paper cylinder
An unconventional decoration for a New Year's room can be Christmas tree pendants made from a cardboard toilet paper roll. Such holiday symbols can be hung either as individual decorative elements or as a garland.
For decoration you will need:
- cardboard, inner part of toilet paper;
- emerald or green acrylic paint;
- bright ribbon;
- flat parts for decoration. these can be buttons, rhinestones;
- glue (moment crystal is perfect for gluing plastic; its transparent texture will be invisible, plus it dries instantly).
- scissors.
When everything you need is prepared, you can start preparing the decoration.

Christmas trees made by yourself will perfectly decorate your apartment.

These Christmas trees can be hung on the ceiling or Christmas tree

Creating a Christmas tree this way is a little easier
First, the roll should be painted in several layers and allowed to dry thoroughly. This may take up to half an hour.
In order to make a spiral from a roll, you need to, starting from the top, cut it in a single line to the bottom 1.5 cm wide. The ends will be pointed.
In order to give the tree the correct shape, you should twist the cut strip into a coil. To fix the shape, place the resulting spiral under a heavy object, such as a stack of books, for 30-60 minutes.
Unwind the future New Year's tree a little, and glue the prepared round elements on the outside that will imitate balls. They can be arranged either in a chaotic order or according to a specific algorithm.
Glue a bright thin ribbon to the top of the craft. This could be a red ribbon to decorate flowers or even a thick thread or yarn.


Creating a Christmas tree yourself is not difficult
Christmas tree made of Japanese paper
For this craft, you can take either special Japanese paper or brightly colored glossy cardboard.
You will also need: wrapping paper (magazine sheets with a bright image), white A4 sheet, skewers, pencil, scissors, ruler, PVA glue.
For the base of the Christmas tree, cut a regular sheet of paper into strips 2 cm wide. Twist all the strips into circles. Attach all the elements to each other in a circle using glue. You should get a large circle of spirals. The width of the circle is arbitrary. The wider, the more stable the figure will be.
Cut two rectangles measuring 21 by 28 cm from cardboard. Bend each of them like an accordion so that the sides are 1.5 cm wide. Round the ends of the accordion.
Fold the piece in half, gluing it end to end. A semicircle is formed
Glue the resulting semicircles together to form a circle. This will be the bottom row of tree branches. You can replace the glue with wire by piercing both semicircles and twisting its ends.
Make two rectangles of the following sizes: 18 by 28, 16 by 28, 14 by 26, 12 by 26, 8 by 25, 6 by 23.
Make accordion shapes from all rectangles, connect identical semicircles into 6 circles.
Now you need to prepare the skewers. They need to be wrapped. To do this, you will have to cut a strip several centimeters wide from a bright sheet and wrap it in a spiral.
Place all the circles of branches on a skewer. There should be wider circles at the bottom.

The Christmas tree is a very beautiful decorative element

A Christmas tree made by yourself will perfectly complement the festive atmosphere

To create such a Christmas tree, glossy paper or cardboard is suitable.
Christmas tree using origami technique
A Christmas tree made of green paper is very simple and quick to make using the origami technique. Not only children, but also adults will be happy to master the art. This technique is attractive because figures can be made from it anywhere, without having additional tools at hand.
You will need green colored paper and scissors.
Instructions
- Make a square out of paper.
- First join in half by running your finger along the bend. Then unfold and bend in half diagonally on both sides. Expand. You will get a square with highlighted stripes.
- Roll along the resulting preliminary bends, as shown in the figure.
- Fold each side to the middle.
- Unfold the resulting bend to form a pocket, and connect the edge of the pocket to the center.
- Turn the corners of the Christmas tree outward, then fold them inward.
- The tree will have 8 equal sides, which must be cut along the edges horizontally in 4 places.
- Fold the cut sides down diagonally.
- Bend the previous bend and tuck it inside the tree along the resulting line.
- The top of the head can be sewn with a thread, making it into a Christmas tree toy or a pendant for interior decoration.

This Christmas tree can be made quickly and easily.

This Christmas tree can be made without additional funds.
Christmas tree made of paper strips
Many mothers prefer to make gifts for grandparents not only with their own hands, but also begin to instill a craving for creativity in their children. It will be interesting for young children to make such a Christmas tree themselves.
For this craft you will need multi-colored construction paper, scissors, and a sheet of cardboard.
Children 3-4 years old will be able to make blanks from strips on their own. For younger children, mothers can prepare them in advance.
- Cut colored paper into even ribbons of the same width (1-1.5 cm), but of different lengths.
- Spread the blanks with glue and glue them to the cardboard in a Christmas tree shape. Place longer pieces horizontally from below, gradually shortening their length towards the top of the tree.

These Christmas trees are very easy to make.

This Christmas tree will be an excellent decoration for a Christmas tree or apartment.

You can involve children in creating a Christmas tree
Volumetric Christmas tree made of old paper
To create a New Year's beauty, you can use various available means. A product made from sheets of old paper or magazines will look especially interesting.

This Christmas tree will look unusual

A Christmas tree made by yourself will perfectly decorate the interior.
A quick and easy way to make such a New Year's decor item
- Take 2 magazines, PVA glue.
- Bend each sheet into 2 parts. Fold the protruding edge. You will get half a tree.
- For the second half, perform the same procedure with the second magazine.
- Glue both halves together to create a finished tree. You can make a base by gluing a few wine corks to the bottom.
To make the Christmas tree look more creative, you can spray it around the edges with spray paint.
Video: How to make a Christmas tree out of paper with your own hands
50 photos of ideas for creating a Christmas tree out of paper with your own hands:


A voluminous paper Christmas tree will be an elegant decoration for your desk or a nice gift for a work colleague. It looks unusual and elegant, and it is not at all difficult to make.
Christmas tree card made of paper
To make such a Christmas tree from paper, you will need paper for the base, decorative paper or unusual cardboard for decoration and decorative cord, as well as sequins or rhinestones, scissors and glue.
Using the template, cut out the parts for the card: a base from paper for the base and decorative elements from glitter paper. Glue the elements to the base, fasten the lace with which you can close the card. Decorate it outside and inside with rhinestones or sequins. This card looks stylish and elegant.
Simple Christmas tree made of paper

Cut circles of different sizes from green paper, from large to small. Make cuts on the circles and bend the ends slightly to form triangles. After you have made all the blanks, take a cork or plastic cap, stick a bamboo stick into it and string paper circles onto the “trunk”.
Ethnic Christmas tree made of paper tubes

Another idea for a postcard - this postcard will appeal to a cheerful, creative person. Cut out the base for the card from thick paper with an unusual texture. Round the corners. Then start making the Christmas tree. Take scraps of multi-colored paper: you will need 10-15 rectangles, decreasing in size. Colored magazines and posters, old packaging paper in variegated colors, etc. are perfect. Roll small “tubes” from rectangles and attach them with glue to the base of the card in descending order. Decorate the top of the Christmas tree with a bow, star, unusual button or snowflake.
More options for homemade New Year's cards -.
Christmas tree on the table from an old book

Take any old book - it’s better if it’s a small book (A5 or smaller) or a notebook. Draw a cutting stencil on it and cut out the Christmas tree with a sharp stationery knife. That's all - all you have to do is paint it with spray paint or a can and decorate the top with a star, ball or other suitable toy.
Christmas tree made of cardboard and twine

Take a sheet of thick paper and roll it into a cone. Now take twine, textile or leather cord, wool thread or any other thick thread or rope and wrap the cone tightly. Secure the ends of the twine. You can decorate such a Christmas tree with a garland, beads, snowflakes, or you can even simply stick in decorative safety pins with beautiful heads (they look like small beads) to create the impression that the tree is decorated with a scattering of small balls.
Christmas tree made from paper cupcake tins

Roll the paper into a cone as in the previous description. Take a lot of paper cupcake liners and cut out the bottoms - you're only interested in the ruffled side. Starting from the bottom of the Christmas tree, glue this corrugated paper onto the paper cone. As a result, you will get a nice fluffy voluminous paper Christmas tree.
Fantasy paper Christmas tree

Take colored paper in two shades of green. Cut it into concentric circles of decreasing size. Use gold or silver paint or glitter to decorate the edges of the circles.
Now bend the circles in half, then straighten and bend in half in another place. Coat the folds with glue and connect, placing smaller ones on larger ones and alternating colors. Decorate the top with a ribbon, rhinestone or paper star.
Christmas tree made of paper - origami

Fold a square sheet of paper twice diagonally and twice in half to mark it with folds into 8 triangles. Now bend it diagonally and place it at a right angle to you. Take the right and left corners and bend them inward - you should get a square.
Now take the corner that is facing you (the bottom corner) and bend it up and inward. This must be done on the reverse side as well. Make cuts along the top sides with scissors and cut out a “leg” for the Christmas tree, then unfold the sides of the Christmas tree and fold back the paper as shown in the picture.


Difficult? Dont be upset! Do you know what you can do using origami technique? They will look great not only on the windows, but also on the tree itself. Happy holidays!
A DIY paper Christmas tree is a very good and, most importantly, timeless idea when the question arises: what can you make and give for the New Year. A good gift combines sophistication of style, originality of idea and warmth of soul.
Of course, all these features are especially noticeable during major holidays. When the magical New Year's days arrive, we have much more free time, and it can be spent not only usefully, but also with pleasure.
For example, you can make New Year’s crafts with your children in kindergarten or school. Or you can make a Christmas tree - an original decoration for the office, and give such an unusual gift to your friends and colleagues.
We have prepared for you interesting ideas for paper Christmas trees that you can make with your own hands, including with your children. Let's consider several simple and at the same time original models - both as a gift and for decorating your home or workplace.
Let's start, of course, with crafts for the little ones. These green beauties are not the most complex, but they are definitely made, as they say, with soul. You can give them to dad and mom. And most importantly, such a decoration can be placed under a real Christmas tree next to a gift for the baby.
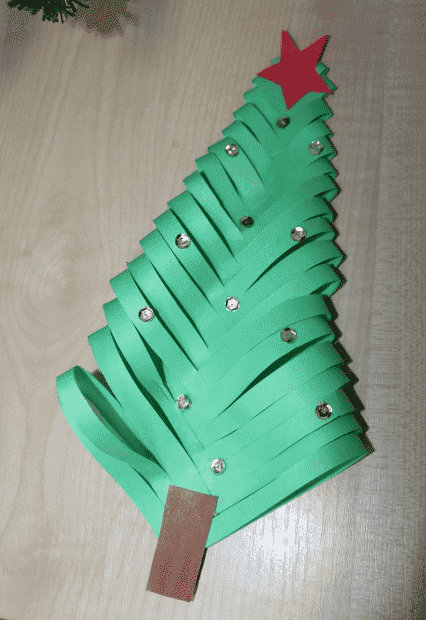
Christmas tree with rhinestones
Here, for example, is a universal model that can be made in almost any kindergarten group. The only condition is that for the little ones it is better to limit themselves to paper and glue, but in the older group you can also use beads for decoration.
We will need:
- sheets of colored paper in green, brown and red;
- glue;
- scissors;
- ruler;
- beads or beads for decoration (you can also take glitter, artificial snow and much more).

How we will do it:
Step 1. First we need to make a square blank. To do this, bend the triangle on an A4 sheet, and carefully cut off the rest.

Step 2. Turn the triangle over and draw 1 cm strips.

Step 3. We cut them from the bottom up, but we do not reach literally 1 cm to the top edge.

Step 4. Unfold the workpiece and glue each strip to the center in turn.

Step 5. After all the strips have been glued, let the workpiece lie for a while and dry. In the meantime, cut out a star on the top of the head.
By the way, you can cut quite a lot of decorations from colored paper - balls, cones and other figures. Rhinestones, beads, beads also look impressive - in a word, everything that sparkles and creates a festive mood. We glue the barrel on the bottom - and you're done.
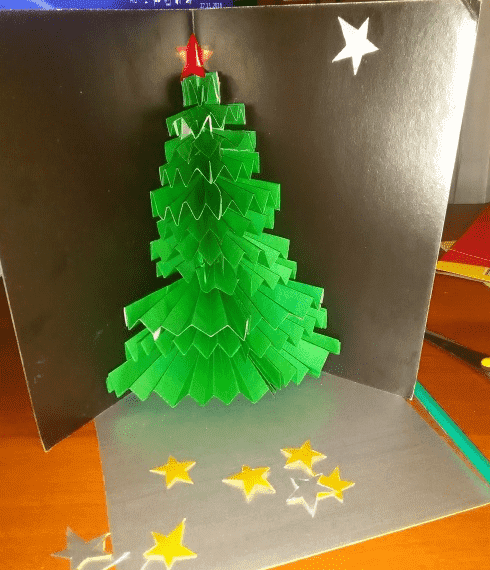
Original postcard with Christmas tree
It is customary to give cards for almost every holiday, and this good tradition is well suited for the New Year. And the best gift is the one made with your own hands. Therefore, you can make another interesting figure with your kids - a three-dimensional postcard that easily folds between two pieces of paper and becomes flat.
We will need:
- sheets of colored paper;
- a thick sheet of cardboard for the base;
- scissors;
- glue.
We will act like this:
Step 1. First you need to take a sheet of cardboard and bend it exactly in half so that the colored part remains outside. It can be a leaf of any color, but it is preferable to choose shades that contrast with green - for example, dark blue, chocolate, light blue.
It is important that not only the Christmas tree looks good against their background, but also other decorations - for example, stars, which also need to be glued to the card so that it does not seem empty.
From them you need to fold an accordion with equal folds (about 1 cm each). In the middle, the craft is bent so that the result is a bow.
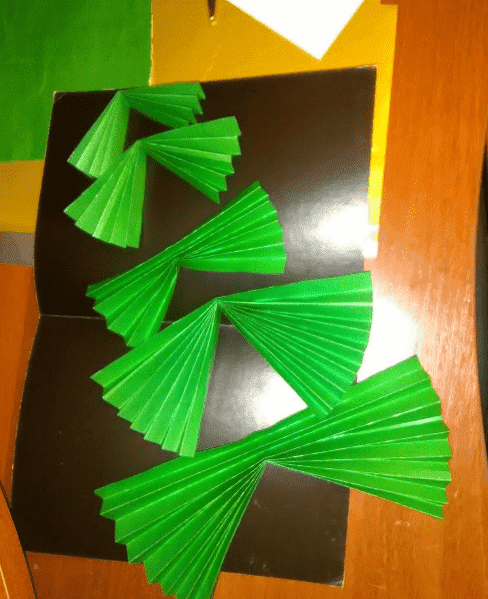
Step 3 . All these accordions need to be glued sequentially to the center of the future postcard. They should fit tightly enough to each other so that the tree looks like a complete, unified composition.
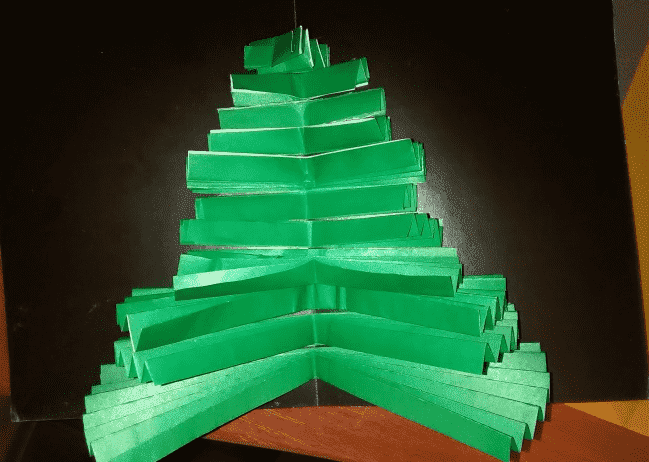
Step 4. Now carefully straighten each strip so that the Christmas tree takes on a three-dimensional appearance.
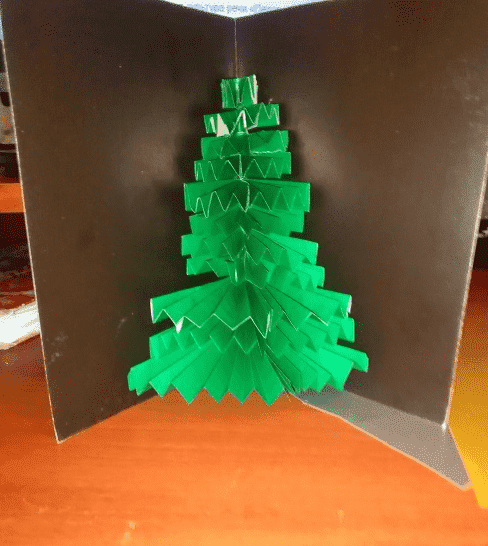
Step 5. All that remains is to glue the top of the head, stars and other decorations to the background of the card. On the reverse side you can glue a beautiful inscription made in advance, as well as snowflakes, cones, artificial snow and other elements of holiday decor.
Velvety Christmas tree - an unusual photo stand
Now let’s move on to more complex models that you can give to colleagues, family and friends, or simply treat yourself to an original decoration for your favorite holiday.
Each person has, perhaps, hundreds and thousands of photographs, but among them there will probably be that very favorite photo, which in itself creates a festive mood. Why not make a special stand for such a photo?
For production we will need:
- green cardboard - 1 sheet;
- a skein of thick green or blue-green thread;
- white bouclé threads or cotton balls;
- glue;
- pencil;
- scissors;
- beads;
- glue gun

To make a Christmas tree out of cardboard with your own hands, we will act in stages:
Step 1. First of all, fold a sheet of green cardboard in half with the wrong side out, and then draw half a Christmas tree on it. To do this, you can simply print the template or copy it from a sample.

Step 2. Cut out the workpiece along the contour (folded).

Step 3. Now let's take up the threads. They need to be folded in layers several times and cut into small pieces (1-2 cm each), placing them in a previously prepared container.

Step 4. Now comes a rather painstaking stage of work. Lubricate the surface of the Christmas tree (each branch separately) with a glue stick and glue the skeins onto it. It is better to do this in stages so that dust does not accumulate on the sheet.

Step 5. Only the top 3 sections need to be decorated in this way, since we will decorate the bottom one differently.
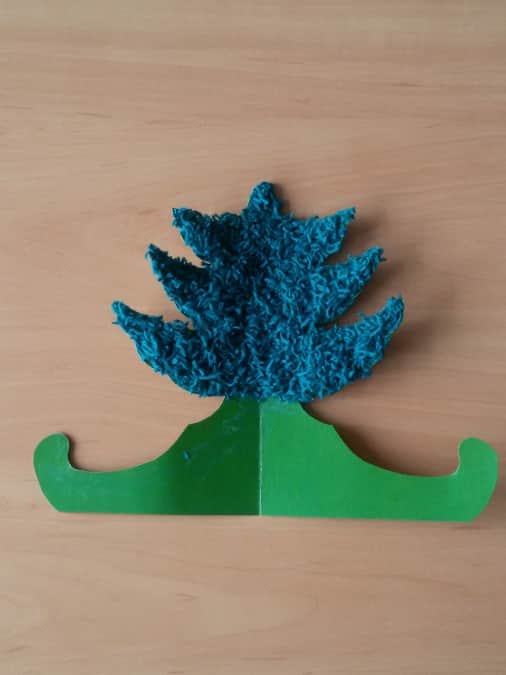
Step 6. Let our tree lie for a few minutes and the glue will dry a little. In the meantime, take a bouclé thread or simply roll up several small lumps of snow-white cotton wool.

Step 7. These lumps can be glued using a gun or glue stick. The work must be done carefully enough so that there are no glue stains left on the surface.
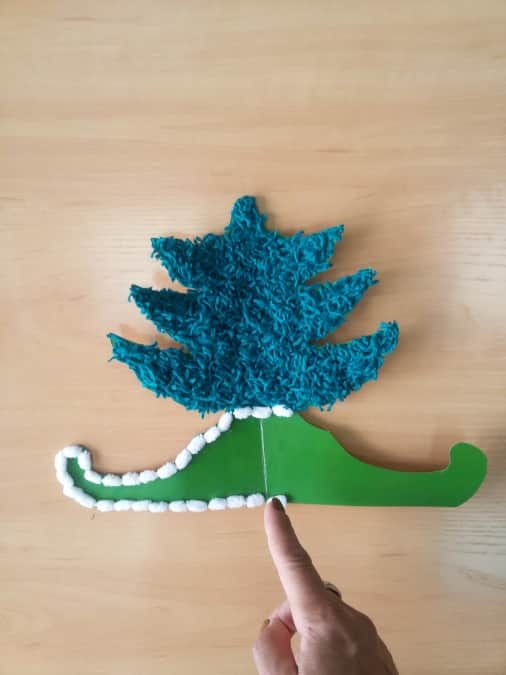
Step 8. Now you need to make tinsel for decoration. For this, weed thread or other similar material is used.

Step 9. Glue on tinsel and other decorations - you get this festive photo stand. The original New Year's gift is ready!

Origami Christmas trees
Origami is a classic style of craft making. In this way, you can make anything from paper: from flowers and animals to houses, airplanes and even submarines. But today we are waiting for the New Year, so we will look at several simple and at the same time interesting models of origami Christmas trees.
One tree and a garland
By itself, one craft may not look so impressive. But if we made 10 or even more models at once and strung them into a garland - it would be truly festive! Moreover, they should be as simple as possible and produced quickly.
So, let's make one tree, and then many such trees will create a real New Year's fairy tale. Here's how to make such a Christmas tree (see diagram):


Well, then everything is very simple. Such Christmas trees can be placed on a New Year's shelf or picked up on strings and hung above a false fireplace or in the hallway, next to a real fluffy beauty, etc. – it all depends only on the imagination and possibilities of space.

And here’s what the instructions for making a Christmas tree from paper without glue look like in the video – simple and clear.
Modular Christmas tree
But here is a variant of a more complex craft, which will result in a real masterpiece. It can be saved as a keepsake until the next holiday. Moreover, assembling such a beauty is not at all difficult, since all the modules fold the same way: you just need to sit a little and try.
Christmas tree for a corporate party in the office: simple and fast
But what about the friendly team that is preparing for the holiday, as they say, in an accelerated manner? Do you need to buy gifts, think over the scenario for the event, and perhaps even put something on the table? To decorate your workplace and hold fun competitions, you can whip up such a model.
To make it, you will need a minimum of materials that are likely to be found in every office:
- green cardboard;
- hole puncher;
- skewer or wooden stick;
- scissors;
- glue;
- decorations (figurines made of colored paper, cotton balls, ribbons and generally anything that is at hand).
You can make a Christmas tree in just a few minutes. We will act like this:
Step 1. First, fold a sheet of cardboard in the form of an accordion with a side of each fold of 1.5-2 cm.
Step 2. Then carefully make a hole exactly in the middle - if there is no hole punch, this can be done with a thick needle or awl.
Step 3. Cut off the side pieces in the form of triangles on both sides to create a Christmas tree shape.
Step 4. Insert a skewer or wooden stick into the holes (in extreme cases, a pencil will do), and then decorate our crafts.
Here's what the step-by-step instructions look like in the photo.
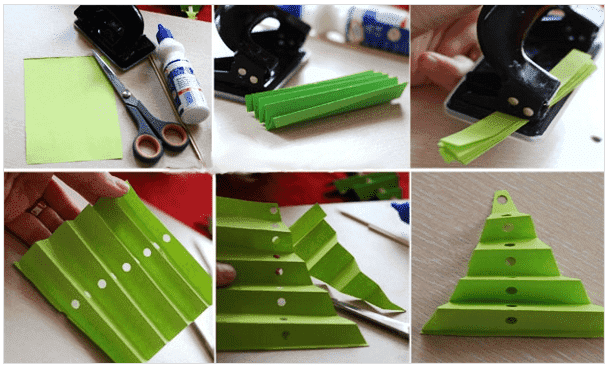
And here's what the finished crafts look like. They can be hung or placed – there are a lot of advantages.
Christmas tree made of corrugated paper: options for a gift
Paper is simply an inexhaustible source of creativity. Even from an ordinary sheet you can make dozens of different models of Christmas trees. What can we say about corrugated paper? It is indispensable for such crafts, since it imitates pine needles very well and also looks very attractive.
To make such a New Year's gift we will need:
- white cardboard;
- corrugated paper green and red;
- scissors;
- glue;
- cotton wool and other decorative elements for decoration;
- toothpicks or wooden sticks;
- compass;
- pencil;
- ruler;
- bow.
We will act like this:
Step 1. First you need to make a cone out of cardboard - this is the basis of the future Christmas tree. To do this, draw a longitudinal line 30 cm long on the surface of the cardboard, divide it in half (15 cm each), and in the center, using a compass, draw a circle with a diameter of 15 cm (i.e., radius 7.5 cm). We cut out this circle and make a cone out of it, the same height as 15 cm. You can fasten it with a stapler or glue.

Step 2. Now you need to cover the surface of this cone with green corrugated paper.

Step 3. While the workpiece is drying, let's proceed to the main stage - creating pine needles. To do this, you need to cut 120-130 strips of corrugated green paper, 1 cm wide and 15 cm long.
Then we stack several pieces on top of each other and make slits 0.5 cm wide, as shown in the photo. After that, roll them up using a toothpick or stick. The ends of the strip need to be glued together to create a fluffy pompom.

Step 4. We fluff each lump and glue it onto a cone - that’s all.

Step 5. All that remains is to decorate as your creative imagination dictates - with bows, beads, sparkles. It turns out to be a model of a real Kremlin Christmas tree - very impressive and at the same time simple.

Here is a visual video instruction that will help you understand in detail how to make a Christmas tree out of corrugated paper with your own hands for the New Year or Christmas. Here is presented another model, which, by the way, is even easier to manufacture, and certainly looks no worse.
Christmas trees using quilling technique
Quilling is one of the modern trends in the decorative arts, which, however, has already become widespread among amateurs and professionals. Without exaggeration, we can say that you can make any beautiful model from twisted paper (and this is what is called quilling).
Here, for example, are several options for Christmas trees for New Year cards.


And here are three-dimensional figures, which consist of several modules glued together.


To understand how to make such masterpieces with your own hands, you just need to master the technique of twisting paper strips. From them you can make almost any model of a paper Christmas tree.
Step-by-step instructions in the video can help with this:
Christmas tree from old magazines - for lovers of nostalgia
There may probably be old glossy magazines or even ordinary newspapers lying around the house. To “breathe” a second life into these things, you can simply use them for New Year’s crafts, including making a Christmas tree.
Don’t think that the model will turn out “different”. In fact, it will give even the most beautiful figures made by other methods a head start. Of course, it is best to use colored glossy pages - then the Christmas tree will turn out to be truly festive.

Here is an example of creating one of the simplest crafts.
Happy New Year!


