What to make from porous rubber. Foamiran - what kind of material is it? How to make crafts and flowers from foamiran with your own hands for beginners with video. DIY foamiran crafts
When installing a shower cabin, many people use the services of craftsmen. However, often the installation procedure does not take place according to technology, since the master tries to finish as quickly as possible and take money for all completed and uncompleted actions. Knowledge of installation technology will allow you to easily install a shower stall yourself or competently control the installation process by a specialist.
The main thing when installing a shower stall is to choose the right place for installation. It should be next to the hood and, if the model has many additional functions, connected to the electrical network with mandatory grounding. When assembling the pallet, you need to use a building level, since the pallet must be installed strictly horizontally. When installing a pipeline, be sure to use sealants, otherwise water leakage will force you to redo the entire job. When connecting the cabin to the water supply, you must install at least one filter. All pipes are run along the baseboards or hidden in a box or wall.
Let's look at a detailed example of installing a shower stall using Massimo as an example. This is a corner booth made in China with a high tray. Size - 100x100 cm. Bought for 30 thousand rubles. For other models and manufacturers, assembly may vary.
Tools
For installation we will need:
- wrench 19 and adjustable wrench 45;
- long Phillips screwdriver with PH2 bit;
- transparent sanitary silicone;
- construction gun for sealant;
- silicone spatula;
- spray;
- fairies;
- drill with 3 mm drill bit;
- roulette;
- bubble level 1 m;
- jigsaw;
- erasable marker;
- thread locker or cold welding;
- water supply hose 1/2″ nut-nut - 2 pcs. (length is selected according to location);
- sewer crossing 40x50;
- toilet paper.
Pallet assembly
After attaching locknuts to the studs, screw them into the pan. Short - to the center. Screw it in by hand until it stops and secure it with a nut. When tightening, do not apply much force, otherwise the thread may break. Only cold welding will help save the situation.
Screw the second locknut onto each stud with the notches facing up.
We lay the frame on the studs, tighten it and fix it on both sides with nuts.
We screw plastic brackets for the shower screen onto the 4 front studs. The perforated part should hang down.
We fasten the legs with locknuts and install the pallet in place.
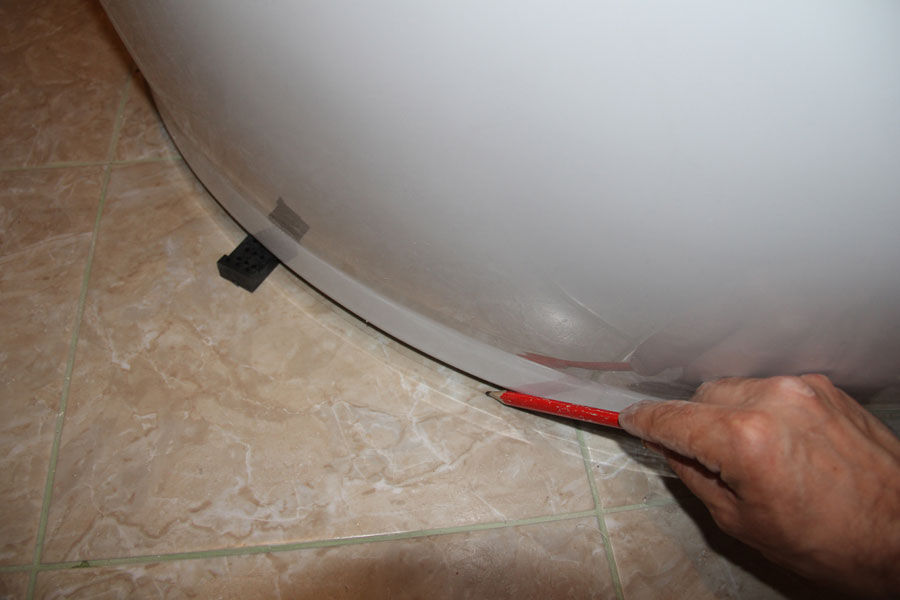
We adjust the height of the screen to the lower edge of the side of the pallet. It is adjusted to the level by twisting the legs.
The lower edge of the brackets must be set with a gap of 20 mm from the floor, without being tightened to the end.
Connection to sewerage
To install the drain and siphon, remove the protective film around the drain hole. It is better to replace the upper rubber gasket with silicone sealant. We screw on the siphon. We also treat the threads and lower connections with sealant for reliability.
You need to connect the siphon to the sewer through an adapter. This connection is also coated with silicone.


If everything works, you need to disconnect from the sewer and continue installation.
Installation of side walls
We remove the protective film from the top of the pallet, but leave the bottom protected for now.
 We move the pallet away from one wall and install an opaque wall there.
  We connect the holes in the pallet with the corner and screw it with 35 mm self-tapping screws (without much effort).


 We install the partition back and remove excess silicone. Further I will not write about removing excess, remove it immediately after pressing the parts.
 We move the pallet with the partition to the wall and try on the central panel to see if additional lining is needed.
  We apply silicone to the junction of the side wall and the central panel.
  We tie them together with 10 mm self-tapping screws.
We fasten the second side wall in the same way as the first.
Let's try on a fixed transparent partition. The bevel cut of the metal profile should be at the bottom.
If everything fits, we silicone the profile and install the partition. We set the top edge flush with the wall. From the upper outer side of the profile, drill a hole with a diameter of 3 mm and tighten the partition with the wall using self-tapping screws. This is what it looks like in practice.
Install the upper and lower profile. The rounded parts are directed towards each other, the upper profile is wider than the lower one. We apply silicone under the bottom one.
Ceiling assembly
Assembling the ceiling of the shower stall. To remove the film, unscrew the ventilation grilles and the speaker.


We install the ceiling in place, without silicone for now. It is screwed from below using 4 16 mm stainless steel screws.


We connect and check water and electricity. Do not wet the top edge of the tray.
We put the booth in place and check its stability and level.
From the inside, we treat the lower perimeter and the central pillar with silicone.
Door installation


From the handle side we put magnetic moldings on the doors. On the other sides there are L-shaped moldings with the shelf facing outwards.

We hang the doors on the upper rollers. To start the lower ones, press the buttons.
We check the smooth movement of the doors and the tightness of the connection. Doors must not open independently from any position. The connection is adjusted using screws on the upper rollers.
Screen installation

We remove the screen and make marks opposite the brackets.


We install the screen by installing wedges from below.


When the silicone dries, we spill the joints of the cabin and check the functionality of the watering cans and switch.
Installing a shower stall is a fairly simple procedure, provided you follow the instructions and know the basics of plumbing work. If you have never dealt with connecting plumbing, it is better to entrust the installation work to specialists.
When assembling a shower stall, it is very important to read the instructions before something breaks - the features of the model may affect the specifics of the installation.
Even if you decide to install the product yourself, get an assistant: you will have to accurately fit the parts and carefully follow the installation rules. Only with this approach will the shower last 15-20 years - until it wears out completely.
Learn about assembling the shower cabin yourself and installing it in the bathroom yourself from our detailed instructions with a video tutorial.
To assemble the shower cabin you will need Consumables:
- Silicone and acrylic sealant. Acrylic is a more suitable option for sealing external joints.
- Insulating tape-fum.
- PVA glue.
- A high-quality siphon (a siphon that comes with the product, usually cannot withstand loads).
- Adapter for sewerage (diameter – 32/50).
- Hoses (2 pieces, 1.5 m each) to supply hot and cold water.
Tools:
- Adjustable wrench.
- A set of screwdrivers (minimum – slotted and Phillips).
- Level to adjust the installation of the tray.
- Drill or screwdriver. It is most convenient to assemble the cabin with cordless screwdriver.
- Drills with a diameter of 3 and 6 mm.
- Screws.
- Gun for squeezing out sealant.
Experts recommend replacing the supplied metal screws with bolted connections (M5), and replacing the Chinese metal clamps for holding the hose with steel automotive ones.
How to check the quality of parts?
At the very end, when the shower stall was in place, cling to all handles, shelves, holders and other fittings. Everything is being checked and adjusted again. The best final check is a full shower, which allows you to notice all the important points and remove defects.
When assembling, you have to pay attention not only to general recommendations, but also to the instructions and installation features separately for each manufacturer and even a specific model of shower cabin.
For example, the profile of the Niagara booths does not fit well with the other parts; the walls and doors are installed in a non-standard way. But the Ika brand has another problem - the presence of leaks depends on the accuracy of the location of the doors. So If the “native” instructions contain tips not mentioned above, be sure to follow them!
A shower stall is an excellent alternative to a bathtub, especially if you have to equip a small bathroom. However, owners of spacious bathrooms are increasingly choosing comfortable and multifunctional shower cabins.
Choosing the optimal model, proper installation and careful operation is the key to long-term, comfortable and uninterrupted use of the shower stall.
Benefits of using a shower cabin
A shower cabin is a specially equipped, enclosed place for taking a shower. Today, the possibilities for using shower stalls have increased, and various additional functions have appeared: hydromassage, steam generator, stereo system and others.

Many consumers note a number of advantages of a shower cabin over a bathtub:

Shower cabins: reviews
In order for all the advantages of the shower stall to be fully realized, it is necessary to choose the right model and install it correctly.
Types of shower cabins: design and installation features
All shower cabins can be divided into two main groups:
- Shower corners are open type cabins.
- Shower boxes are closed type cabins.
Shower corners
Corner shower cabin is one of the most popular models. The cabin design does not have rear walls and a roof. The space around the shower stall is limited on one or both sides by the walls of the stall, and on the other by the walls of the bathroom.

Open showers can have a shower tray or be installed directly on the bathtub floor.
To install a shower enclosure, you can purchase a ready-made cabin kit (walls, doors and tray) or select elements separately
Depending on the depth of the pallet, open cabins can be divided into several types:

Low pallets do not have the possibility of reinstallation, as they are permanently mounted. Installing deep trays on a metal frame allows you to service hidden communications, and, if necessary, move the shower stall to another location
Shower cabins: photo
Features of the design and installation of open shower cabins:


Clear glass shower enclosures visually expand the space, adding elegance and lightness to bathroom design
Shower boxes
The shower box is a completely enclosed space with entrance doors. The enclosed cabin has a roof and walls on all sides.

This box is more convenient to use and easier to install. However, the cost for closed models is higher than for open shower cabins (you can buy an ordinary box without special functions at a price of 30,000 rubles, and a shower corner - from 7,000 rubles).
The price of closed shower cabins directly depends on the number of built-in functions, the size of the box and the material of manufacture
Shower boxes can have the following functions:

Even the most primitive models of closed cabins have a radio, overhead and side lighting, a seat, shelves, a detergent dispenser and a mirror.
Criteria for choosing a quality shower cabin
You need to choose a shower stall based on the needs of the family and the parameters of the bathroom.

Before buying a shower cabin, you need to test it: check the strength of the tray (walk along the bottom of the cabin), look at the fastening of the frame with the tray, try to swing the elements of the box (a high-quality cabin should not wobble)
Self-installation of a closed shower cabin
The installation diagram of a shower directly depends on the complexity of the design, and the assembly sequence is the same for most models.
Preparatory work
In order to have an idea of how to assemble a shower stall, you need to read the instructions that come with the kit.

Before starting installation, you need to prepare the following tools and materials:
- building level;
- silicone sealant;
- spanners;
- sharp knife;
- crosshead screwdriver;
- dye;
- brush;
- gloves;
- drain siphon;
- flexible hoses;
- fum tape or tow;
- chisel;
- hammer;
- perforator;
- a simple pencil;
- instructions for the shower cabin.
The preparatory stage involves performing a number of activities:

Pallet installation
Assembling the shower cabin should begin with installing the tray:

Fastening panels and fences
Before you begin installing the panels, you need to decide on the location of the glass. If there are no marks on the fences indicating the top and bottom of the part, then you can focus on the number of mounting holes - usually there are more of them on top.
The procedure for installing panels and fences:

At this stage, you need to check the operation of electrical devices (lighting, ventilation).
Installation of roof and doors
Before you fix the roof, you need to install lighting, a watering can and speakers on it.
The distance between the ceiling and the roof of the cabin must be at least 25-30 cm

To install the roof, you can use existing holes and, if necessary, make new ones. The roof is fixed with bolts and screws.
Shower doors are installed after installing the side, rear walls and roof
Door installation sequence:

Now you can screw on the accessories (shelves, mirror, dispenser) and fittings (handles, handrail).
Connecting the cabin to communications
Cold and hot water must be supplied to the cabin. It is desirable that the operating pressure of the cabin (1.5-4 bar) coincides with the pressure of the water main.
To connect the shower cabin to the electrical network, you must install a separate waterproof socket. The socket must be positioned so that there is no tension on the wire (optimally - on the side or behind the cabin).

For an outlet in the bathroom, it is advisable to install an RCD and allocate a separate electrical wiring line.
Assembling shower cabins (instructions): video
Installing a shower enclosure without a tray
Installing a shower corner with a tray is practically no different from installing a shower box. Differences arise if the shower cabin is mounted without a tray - on the floor of the bathroom.

Before installing the cabin, you need to prepare the base as follows:
- Decide on the size of the corner and choose a place for it.
- Waterproof the floor and adjacent walls.
- Install a drain on the floor - a grate through which water is drained into the sewer system.
- The tiles on the floor of the shower stall should have a very low degree of slip.
For high-quality water drainage, the floor slope in the drainage area must be at least 3°
Malfunction prevention and shower cabin repair
It is important to keep the shower stall clean and monitor the operation of all its elements.

In order to prevent breakdown of the most important parts (mixer, nozzles, steam generator), you should take care of the quality of the water and install mechanical water purification filters. Such measures will significantly reduce the risk of calcium formations on working elements.

Once every three months, cartridges or cartridges in filters must be changed
Over time, the shower stall may begin to leak. The main cause of the malfunction is poor grouting or damage to the silicone sealant.

In this case, the cabin in places of leakage must be disassembled, the parts must be cleaned of dirt and remnants of the old sealant layer. After this, apply a new layer of silicone sealant, assemble the cabin and rub the seams well.

It is better to entrust the assembly of a multifunctional cabin with a complex design to a professional, but you can install a simple box or corner yourself, the main thing is not to rush and strictly follow the instructions.
The growing popularity of shower cabins is influenced by their economy and ease of installation. The assembly of a shower cabin of different models is carried out according to the same plan. The instructions will tell you the installation procedure.
Assembly steps common to all cabin types
The shower enclosure is delivered from the retail outlet in disassembled and packaged condition. The multitude of packages with parts can be confusing at first due to their diversity. All components are sorted, grouped and arranged in packages in such a way as to suggest how to properly assemble the shower cabin in order to consistently complete all the steps for assembling the kit.
Some box models are designed to allow for self-assembly from the inside. This is convenient when installing a shower enclosure in cramped conditions of a small room.
Installation of the corner requires compliance with a certain sequence. Assembling a shower cabin with your own hands can be done alone within a few hours. This provides the user with some advantages when minor repairs are required.
The owner of a modern device, who has completed the installation himself, will not be at a loss when faced with the question: how to disassemble the shower stall. At any time, he can partially disassemble, carry out minor repairs, and reassemble the structure again, without resorting to paid cabin repair services.
Removing and sorting shower components
The cabin is delivered to its destination in several packages. Separately packed:
- Rear walls;
- Glass, doors and vertical profiles;
- Central panel;
- Pallet, roof, horizontal profiles and components.
Markings on the boxes allow you to determine what components are contained in them without looking inside. Assembling a shower cabin with your own hands begins with one by one opening the packages with the necessary parts. Manufacturers recommend that after purchasing the box, you unpack it and check the contents.
Pallet preparation
The corner set with a high tray includes supporting structures, a screen, and fittings for fastening. In some models it is sold already attached to the support frame. In this case, it is enough to mount a siphon and adjustable heels. To avoid damage to the surface layer, the protective film should be removed no earlier than the completion of all work related to the installation of the shower. The box with a low pallet is installed on a scaffold.
Proper installation ensures that the corner booth is stable and able to support the significant weight of the occupant. Once assembled, the pallet is sent to the site.

Using a building level, by screwing/unscrewing the heels, it is set in a horizontal position, ensuring the stability of the entire structure.
Frame assembly
Horizontal slats are placed on the pallet. They are moved to the rear side and secured with self-tapping screws. Vertical corners and top slats are mounted on them. The door opening guides are attached. The resulting structure forms a frame on which the rear and central panels are installed. If you follow a certain order, you can easily assemble the cabin yourself. If the installation of the frame is carried out with 4 hands, preferably the assembly order can be changed. After reading the instructions, which describe in detail how to assemble a shower stall, install a spatial structure from a corner and profiles, then fasten it to a pallet.
Installation of the central panel and rear walls
 The center panel requires the most attention. Before installing it, install all the hanging parts. The mixer, hose connections, and control panels are attached to it. Once assembled, the panel is placed in a frame, previously connected to the pallet, and screwed with self-tapping screws.
Shelves are mounted on the back walls. The rear panels are secured using special brackets. Depending on the design, silicone sealant or special profiled gaskets included in the kit are used for this.
Dome preparation
A tropical shower and lighting are attached to the dome. Speaker with decorative covers and fan. The dome is installed on the cabin and secured to the rear walls. According to the designations, connect the backlight, speaker, fan and power supply. The ends of the wires are equipped with locking connectors, eliminating installation errors.
Completing the build
Before hanging the doors, they should be prepared. Rollers are attached to the canvas, two at the top and bottom. There are corresponding holes for their installation on the doors. The upper two-wheel rollers have a regulating device, the lower ones are spring-loaded. Installation of door locks on the lower guide is necessary to prevent collisions with the rear walls when moving.
Travel limiters are attached to the door guides. The door is brought inside the cabin, the upper rollers are inserted into the upper profile. The lower rollers are placed in the guide rail and secured with a spring-loaded clamp. The end parts of the doors are secured with magnetic tapes and splash-proof moldings.
Hanging the doors completes the assembly of the shower stall. Before you start using it, you should make sure that all connections are assembled correctly and that all connections are secure.

Functionality check
- Guided by the instructions on how to assemble the shower cabin and the rules of use, alternately pressing the buttons on the control panel, make sure that they are working.
- Be sure to make sure that the pallet is in a stable position. If swaying is detected, it is eliminated by turning the adjustable heels of the legs.
- The drain should be inspected especially carefully. Its reliability will protect against leaks, which lead, at a minimum, to unpleasant explanations with the neighbors below. Reliable drainage is ensured by special gaskets on the threaded connections of the siphon. To obtain the best result, use silicone sealant.
Some nuances
In some cases, it is advisable to perform preliminary assembly to familiarize yourself with how to assemble a shower cabin. This is useful to do in order to understand the installation principles, mark the holes, and, if necessary, purchase missing fittings.
The installed drain must be equipped with additional outlets for connecting other plumbing fixtures. We should not forget about including an audit in the sewerage system.
The process of operating plumbing fixtures involves periodic inspections and ongoing repairs. Loose fastenings, depressurized joints, replacement of doors or rain showers necessitate complete or partial dismantling. If the assembly was carried out independently, the question of how to disassemble the shower stall does not cause confusion. When disassembling, follow the reverse order of installation. Assembling the cabin yourself saves money and increases confidence in the correct use of this convenient plumbing equipment.
Shower assembly video:
More detailed video:


