Flowers from felt patterns. Simple felt rose. Making a flower blank from felt
Making a bouquet of artificial flowers with your own hands is easy and simple. Any needlewoman, whether a beginner or more experienced, will cope with such a task. We suggest you make these crafts from felt.
Felt is an ideal material for needlework. It keeps its shape perfectly, the flowers from it are voluminous. Well, the color scheme of this material allows you to create any flower: from a simple chamomile to a wonderful lily. Such a bouquet will be a wonderful gift for any woman. It will be much brighter and warmer than a bouquet of real flowers. Especially since they last much longer. Such a bouquet will suit any interior.


Cooking Tools
A beginner needlewoman will help to make flowers from felt with a master class with a photo presented in this article. So, before starting work, it is necessary to prepare the tools and materials that may be needed in the course of working with felt:
- Felt of the desired color, size and thickness;
- Scissors (simple and curly);
- Glue;
- Needles and threads;
- Disappearing or washable marker;
- Patterns for patterns;
- Beautiful beads or buttons;
- pins;
- Mouline threads of different colors.

Flower patterns
Before you start creating felt flowers, you need to review the templates and choose the flower you like best. You can view them online on the Internet and save one you like, or download a whole file with templates. Next, the desired template is printed. Here are some of them.


Master class on creating a flower from felt
This section presents a master class on making a classic rose that will suit any look and any outfit.

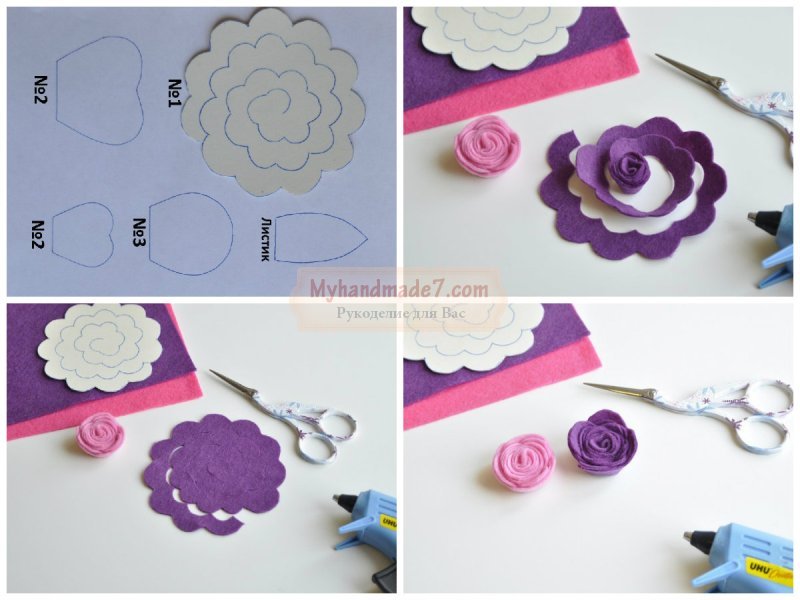
So, having prepared all the tools and material, we proceed to the pattern. For this rose, you need quite a bit of felt. A circle is drawn on a piece of material, with a diameter of about 10 cm. The larger the diameter, the more voluminous the rose will turn out. However, you should not make it very large, then the flower will come out rough and sloppy. Further, a spiral is drawn on the circle from the outer edge to the middle. The line width determines the size of the petals. Now, using either curly scissors or ordinary scissors, we cut out semicircular future petals.

The flower assembly process begins: the spiral folds into a rose, starting from the middle. Having rolled up a little of the core of the flower, it is fixed with a pin and fixed with glue.

After the glue has dried, the whole rose is twisted to the end.

The lower part is also reinforced with glue.

The edges of the rose can be decorated with threads, sewn with a stitch, or you can leave it unfinished. After all, the edges of the felt can be left as is. They do not fluff and do not fluff. Everything, the rose is ready!

You can create such roses of different sizes and colors, and collect them on the basis of a hairpin. Thus, an original hair accessory will come out.

Or make a couple of petals from green felt, attach them together with a rose to the base for a brooch. Then you get a beautiful decoration for any clothing. But it is more suitable for a coat or an evening dress.
Now there is no problem to find a suitable pattern for anything, including flower patterns from felt. Below are patterns of the prettiest colors obtained from felt. The imagination of the needlewoman will help to make them unique. You can additionally decorate them with beautiful decor, or create your own unique bouquet of different flowers.
Simple and so charming DIY felt flowers can be performed by a novice craftswoman who decided to try a new popular material for creativity. While the creation of flowers from foamiran is gaining momentum in popularity, you will probably be interested in getting to know the “warm” master classes. For such crafts, you only need a glue gun (it is he who provides a secure fixation for the elements) and scissors, and in stores you can choose material of any shade.
DIY felt flower template
For those needlewomen who decided to learn how to create DIY felt flowers, photo We have prepared the most delicate and beautiful buds, as well as some options for using ready-made flowers for decoration, interior design, creating stylish accessories and jewelry for the little princesses.
For example, one of the most original ideas is to decorate a cardboard figure with felt buds, a figure that you can prepare for your daughter's birthday. If you decorate such a figure with neat miniature buds, you will get a bright holiday decoration that will keep the warmest memories of this day.

We will take a closer look at the process of creating neat buds, and the photo will help us with this. master class, do-it-yourself felt flowers may be different, respectively, and the techniques for their creation also differ from each other. Some buds are whole, i.e. for their implementation, a whole piece of felt is used, which, for example, is twisted, while others are a modular “construction”, they are glued from individual petals.
First you need to buy material, since we will be making very delicate buds, it is best to choose the thinnest felt. For flowers, you can use bright colors, and for leaves you need several shades of green. When working with such material, you will definitely need a thermal gun, as well as sharp scissors. To circle DIY felt flower template, it is advisable to use a self-disappearing marker, which you can buy in fabric stores.
As a rule, needlewomen use templates in the process of creating felt buds, especially if you need to cut out many petals and leaves of the same size and shape. In this case, templates are indispensable helpers. The template you like should be printed on white paper and cut out along the contour. Then the template is applied to the fabric (you can additionally fix it with sewing pins so that it does not move) and circle it with a marker. When working with felt, there is no need to leave seam allowances, since this material does not require additional processing of the edge.

DIY felt flowers master class
Now that you know what materials you need, you can DIY felt flowers, templates print them out or draw them yourself. For the rose, you will need a circle with a diameter of about 10 cm. You can cut the blank without a pattern, but if you use it, you can make a beautiful blank with a wavy edge. It is necessary to transfer the pattern to the material, and then cut along the lines.
You have a spiral that needs to be twisted to make a bud. You can twist from either end: from the edge or from the center. As you twist, it is necessary to coat with glue - every 2-3 cm. Thus, the bud will be well fixed. Sometimes ordinary hand stitches are used to secure the buds, but then the creative process is delayed. When you twist your spiral, the rosette is ready, and it remains only to supplement it with leaves of green shades.

Two-tone buds look beautiful, for example, a blue center and a pink edging. One strip must be cut pink - 4 by 30 cm. Cuts should be made along the entire length on one side, leaving a strip of 0.5 cm uncut. Between the cuts - 1 cm. On both sides of the strip, the corners must be carefully rounded. The blue stripe will be narrower and shorter - 2 by 18 cm. Cuts should also be made along the entire length, but more frequent, with an interval of 0.5 cm.
First, we twist the blue strip into a roll, periodically fixing it with glue at the bottom, where the uncut strip remains. Blue we will have the middle of the flower, and around it is necessary to twist the pink fringe. Glue the tip of the strip from below, and then wind it around the middle, also fixing it in places with glue. These are the simplest do-it-yourself felt flowers, schemes for which you don't need. Such an elementary craft is suitable for beginners, it will help you get the first skills in working with this material, and study its properties.

How to make DIY felt flowers
According to the execution technique, the next flower will differ from the previous options, because in this case we will collect it by petals. The center will be yellow, and the petals will be blue. Decide for yourself whether you need a pattern for such a simple petal, in any case, you can draw it yourself on a piece of paper or print out the template we have proposed. Petals need large - 6 pieces, and small - 4 pieces. For the middle, cut out a strip: 18 cm long and 1.5 cm wide, on which cuts should be made along the entire length, as in the previous master class with a fluffy flower. The strip must be twisted into a roll and fix the edge with glue.
When the core is ready, you can glue the cut out petals around it one at a time: first we fasten the small ones along the bottom edge, then the large ones. The main rule of a beautiful “modular” flower is that the petals must be glued in a checkerboard pattern so that each next row overlaps the gaps of the previous row.

In such a flower, the core can be two-color, in which case two strips of a different color should be cut off, each of which should be cut into a fringe. You can increase the number of rows of petals.
Felt daisies look unique, for which you will need three strips of different colors: 30x4 cm, 15x2 cm, 15x3 cm. The middle will be the narrowest strip, on which frequent cuts should be made along the entire length, the second strip should be cut in the same way - 15 by 3 cm. First, a narrow strip is twisted into a roll, then the one that is slightly wider, forming the middle.
A wide and long strip will be used to get the petals. It is cut along the entire length, trying to keep the gap between the cuts the same - at least 1 cm. Then, with manicure scissors, it is necessary to round the edges of the petals, as shown in the master class.
We have provided you with some of the simplest solutions, how to make flowers from felt with your own hands, and you can use the finished flowers in different ways, for example, decorate them.

DIY felt flowers: schemes
If you decide to master the process of how to create do-it-yourself felt flowers, schemes, templates they will help you find the right idea for creativity. For example, you can make a stylish hairpin or a bright brooch. In addition to accessories, such felt floral elements are used to decorate the interior, you can make a flower wreath or a composition that will decorate a children's room.
Of course, not all felt flowers are as simple as the options described above; in most cases, the petals must first be given the necessary shape: sew or glue them along the bottom edge.

An incredibly beautiful, natural and voluminous dahlia flower is obtained, which can become a stylish accessory, for example, a brooch or. The material for dahlia should be chosen dense so that the petals keep their shape well. You can take the material of the same color or combine several similar shades.
In the process, you will need scissors, a needle and thread and a hot glue gun. Since we need to cut out a lot of blanks for petals of the same shape, it is better to make cardboard templates.
As a base, we will take an 8 cm red circle, a 4 cm circle from cardboard and a green circle 5 cm in diameter. The material must be cut into strips, we need three strips of different widths: 4, 3 and 2.5 cm. Next, each strip must be cut into squares. For petals of three sizes, templates should be prepared. Now you can fold the squares of the appropriate size in a stack and cut the petals according to the template.

But even when you cut out the blanks for the petals according to the template, you still have not ready the petals from which we will make our flower. Each blank should be sewn along the bottom edge with hand stitches. In the same way, process the edges of all blanks.
When we have prepared the petals, they must be made “convenient” for gluing, which means that the edge with which you will glue the petal to the base must be flat. Experienced needlewomen advise using the most accessible way for every housewife: put a hot pot filled with water on top. Under the weight of the pan and under the influence of heat, the edges of the blanks will become pressed. You can also use clothespins, this step will take about two hours.
It is necessary to glue the petals on the base from the largest ones, which will be located along the contour, to the smallest ones - which we will glue in the middle. To decorate the core, twist a strip of felt into a tight roll and glue it in the center.

DIY felt flowers: photo
So that you can easily do DIY felt flowers, step by step we recommend that you use the description. In the photographs, we have shown step by step how to get neat petals and make a voluminous dahlia from them. You can easily compose an original one using the created felt flowers. If you want to make flowers for a bouquet, then you need to fix them on a wooden skewer, and then compose a composition.

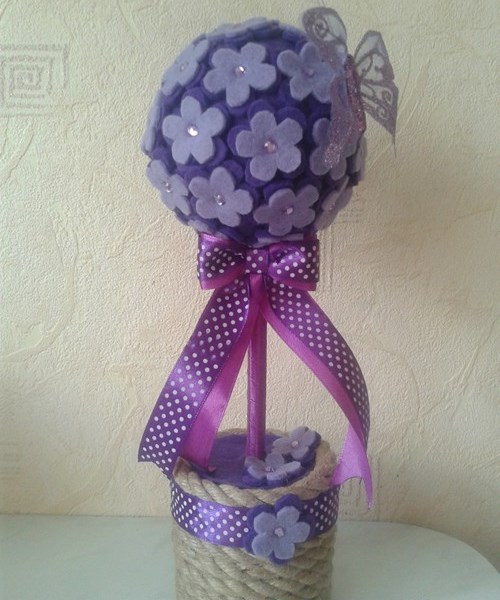
A unique craft to decorate your interior will turn out if medium-sized felt buds are used to decorate a topiary on a round foam base.
Needlewomen will also like a master class on creating, which can decorate your hairpin. Beads are also used to decorate the edges of the petals, which are carefully sewn on with hand stitches.
Needlewomen use many materials to make flowers. Most often these are napkins, fabric and beads. Felt flowers are the simplest and at the same time incredibly beautiful. It is from this fabric that you can make crafts that are ideal for decorating any interior items and decorations. Working with this material brings only positive emotions and does not cause difficulties. Due to this, felt is incredibly popular among needlewomen.
Needlewomen use many materials to make flowers.
In order to make such flowers, no schemes and templates are needed. It is enough just to cut circles of the same diameter and you can immediately start sewing. Despite the obvious ease of manufacture, the end result is an incredibly beautiful decoration.

What is necessary:
- piece of felt;
- cup;
- threads;
- needle;
- synthetic winterizer;
- scissors.
Progress:
- Using a glass, draw five circles on the fabric and cut them out.
- Fold the circle in half and stitch it along the edge, thus forming a petal.
- Pull the thread, but do not cut.
- Sew all the other petals with the same thread.
- Close the manufactured parts in a circle, stitching the first and last of them at the base.
- Draw circles of a slightly smaller diameter on the fabric.
- Sew them in the same way as the larger ones, be sure to close them in a circle.
- Cut out an even smaller circle.
- Fill it with padding polyester and sew, sweep around the perimeter.
- Baste the central part first to the smaller petals, and then to the larger ones.
Gallery: felt flowers (25 photos)


Rose from felt: a lesson for beginners (video)
How to make a felt rose: an easy template
Such roses will be the perfect decoration for a regular hair clip or hair tie. You can also make a brooch out of them or use them when decorating interior items. Beautiful roses will give any item a refined look without exception.

What is necessary:
- felt;
- scissors (curly and ordinary);
- glue;
- needle;
- threads;
- marker;
- sample;
- floss threads;
- beads;
- pins.
Progress:
- Using the template, draw on the fabric and cut out all the details with curly scissors.
- Give each element the desired shape and coat with glue a little.
- Twist the flower and secure at the bottom with glue.
Attach beads in the center of the bud.
DIY felt chamomile: a scheme for beginners
The easiest way to make it is chamomile. In order to make these felt flowers, you need a minimum of materials and time. Thanks to step-by-step descriptions, even a beginner will cope with this work.
What is necessary:
- yellow and yellow felt;
- yellow microbead;
- threads;
- needle;
- scissors.

The easiest way to make it is chamomile
Progress:
- Draw a circle on white felt.
- In the center of this circle, draw another one, but much smaller.
- Cut the large circle into strips.
- Using scissors, turn the edges of these strips into petals.
- Draw a circle on yellow felt, the diameter of which should correspond to the diameter of the central part of the large workpiece.
Sew the yellow part in the center of the white one, using threads and microbeads.
How to make a three-dimensional flower
Despite the fact that voluminous flowers are made from a large number of parts, in this case, even patterns are not required. Beauty is created from simple elements, which are easy to cut even for a child.
What is necessary:
- felt;
- scissors;
- glue.
Despite the fact that voluminous flowers are made from a large number of parts, in this case, even patterns are not required.
Progress:
- Cut out at least 21 small rectangular pieces from the fabric.
- Round each element on one side, and make a fringe on the other.
- Pinch the rounded side of the future petals and fix with glue.
- From small petals form a flower.
- Cut a thin strip from the yellow felt.
- On one side of the strip, make frequent cuts, then roll it up.
- Fix the yellow part with glue in the center of the flower.
Important! All petals should be different sizes. This is the only way to achieve the perfect result.
How to make sunflowers from felt: step by step instructions
A handmade bouquet of sunflowers is the best gift for a loved one. Each flower will give a sunny mood and a lot of positive emotions. To make it is a matter of several hours.
What is necessary:
- yellow and black felt;
- beads;
- threads;
- scissors.
Progress:
- Cut out a circle from black material.
- From yellow fabric make eighteen large rectangles and twelve small ones.
- Narrow each rectangular part at the bottom a little, and make a sharp end at the top.
- Sew large petals along the edge of the black circle, folding each of them.
- Closer to the center, attach smaller petals in the same way.
- Cut out a couple more circles from black fabric, but of different diameters and make a few cuts along the edges.
- Sew these two parts in the very center.
- In the core, with the help of threads, fix the beads.
Tip: in addition, you can make stems for sunflowers from wire, and leaves from green felt.
DIY felt aster
These flowers look amazing in a basket and vase.. Even just by attaching them to a hairpin, you can create a perfect and unusual image. The very process of making volumetric asters is a fascinating and quite simple task. If desired, absolutely anyone can create such a masterpiece.
What is necessary:
- felt;
- pencil with soft lead;
- hot glue;
- scissors;
- needle;
- floss threads;
- ordinary sewing threads;
- pins;
- rhinestones;
- beads.
Progress:
- On the fabric, draw a flower with fairly thin petals.
- Cut the workpiece along the marked lines and be sure to cut through each petal as close to the center as possible.
- By the same principle, draw and cut four more blanks, each of which should be a little smaller than the previous one, but not by much.
- Sheathe each petal neatly with floss threads.
- Put the blanks one on top of the other.
- Immediately sew them together and give the petals the correct shape, slightly lifting them up.
- Cut out a small circle from the contrasting felt.
- With the help of threads and a needle, form a ball from this circle.
- Glue it in the very center.
Decorate the core with several beads and rhinestones, fix them with hot glue.
Self-assembled from scraps of felt bouquets will never go unnoticed. Regardless of whether it is buttercups or violets, daisies or roses, they will always be flawless, original and unique. Making them is a fairly easy and fun process. This needlework is the best way to work with children. Little fashionistas will definitely like the independent production of hairpins or brooches in the form of a flower. Having made the first flower, you can no longer stop: you want to try your skills in making other, more advanced options. After all, felt crafts can be not only small and flat, but also quite large and voluminous.
Decorations for clothes or even interior items can be made with your own hands. Today we invite you to learn how to make beautiful flowers from felt - the favorite material of many needlewomen.
It is not difficult to make flowers from felt, and it takes a little time to create
It is not difficult to do this, and it takes a little time to create flowers. And as a bonus, we will look at an example of creating a felt topiary.
What are
Felt flowers are a decoration that can be used for completely different purposes. They can be of various shapes or colors, and have from one to five layers (and even more). Each of the options will look special. You can also create elegant topiary from them, which will harmoniously complement the interior of any home.
This is interesting: Felt is a felt made from the wool of a rabbit and a goat. It is a non-woven textile fabric. Wool and synthetic fibers are often used for the base. The edges of the wool have small “notches”, this is what provides an excellent adhesion of the fibers to each other.

Felt is often used to make various fakes.
Necessary tools and materials
- Felt;
- Glue gun or Moment glue;
- Scissors;
- Needle and thread;
- Tricks and pins;
- Decorating elements (beads, pebbles, sequins, etc.);
- Hearts for flowers (can be bought at needlework stores);
- Mouline threads (for processing edges on some products).
It is very easy to create flowers from felt, because this material is malleable enough to work with. It is distinguished by its special density and thickness. Most often, multi-colored sheets of felt are on sale with a thickness of 2-2.5 millimeters and a size of 30x40 centimeters. Slightly less often are sheets 20x30 centimeters in size with a thickness of 4 millimeters. You can choose any option you like or create a new one, because handmade products are always exclusive.
Patterns and patterns

To create flowers from felt, you can choose completely different color templates

From these patterns you can make voluminous flowers

From this template you can make a flower with many leaves
A huge number of patterns can be found in specialized stores and online catalogs. Most often, these are simple uncomplicated figures that even a beginner can sew. But if you wish, you can choose a more complex pattern, for example, for a multi-layered flower.
Step by step instructions for making felt flowers
In our article you will find several different options for making flowers from felt. The master classes below will help beginners master various techniques for creating beautiful jewelry.
Rose
To create a rose you will need:
- Felt;
- Scissors;
- Needle and thread;
- pins or glue;
- Sample.
Step-by-step instruction:
- Start at the base of the flower. Prepare a circle with a diameter of 10 centimeters. Cut semicircular petals along the edges, gradually moving from the outer to the inner edge.
- Roll the center piece into a roll to create the center of the felt.
- It must be secured with a pin or Moment glue. If you decide to use glue, wait for it to dry completely and wrap the rest of the fabric on the resulting base. Fasten the cut so that it is not visible.
Photo gallery: Making a cute rose

Illustration for paragraph 1

Illustration for paragraph 2

Illustration for paragraph 2

Illustration for point 3

Illustration for point 3

It will look like roses made of felt of different colors
Violet
For work, prepare the following materials:
- Fabric (several sheets of different colors - for the base and petals);
- Scissors;
- Threads in the tone of felt for the petals;
- Needle;
- Sample.
Step-by-step instruction:
- Prepare 5 templates for future petals with a diameter of 4 centimeters.
- Take one of the petals and fold it in half a few times. You should get petals folded in a corner.
- Attach the corners to one of the blanks with a few stitches.
- Repeat the steps on the remaining leaflets-corners. To make them neat, follow the direction of the stitches and petals. They must be directed in the same direction.
- After finishing work, straighten all the petals.
- Sew them together.
- Lift the petals up and fasten them to the base of the violet.
Instructions on step by step photos

You don't need a lot of tools to make a felt violet.

Illustration for paragraph 1

Illustration for paragraph 2

Illustration for paragraph 2

Illustration for point 3

Illustration for point 3

Illustration for paragraph 4

Illustration for point 5

Illustration for paragraph 6

Illustration for paragraph 7

This is what a felt violet will look like
Chrysanthemum
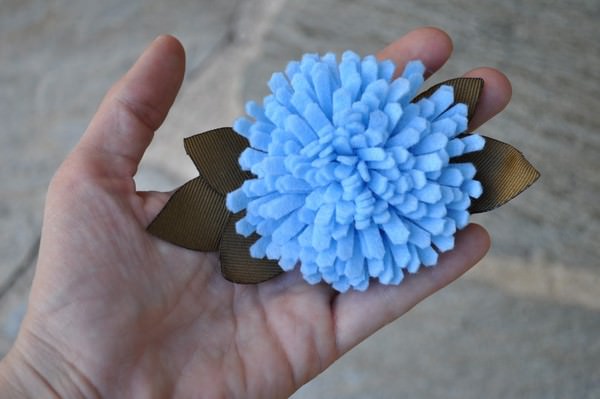
An original and beautiful flower in the form of a chrysanthemum can be used as a decoration for clothes or accessories, such as handbags.
You will need:
- Textile;
- Scissors;
- pins;
- Threads;
- Thick needle.
Step-by-step instruction:
- Fold the strip of fabric in half. Fasten it with sewing pins.
- From the side of the fold of the material, make the same cuts at the same distance.
- Sew the strip with large stitches and roll it into a roll, creating petals. Sew these layers together, thus holding the petals together.
- Straighten the felt and shape the flower.
Master class on creation

Illustration for paragraph 1

Illustration for paragraph 2

Illustration for point 3

This is what the finished flower will look like
Peony
To create a peony, you will need to make a lot of petals. With a little time, you can make a very unusual and stylish flower.
Necessary materials:
- Felt of several colors;
- Scissors and pins;
- Glue "Moment";
- Needle and thread.
Step-by-step instruction:
- Cut out rectangular parts, cut the edges from one so that their outline resembles natural shapes. You can look at photos of live peonies. On the other hand, round them up.
- You should have about 20 petals of the same size and shape.
- Attach the rounded edge to the other petal with glue.
- Shape the product.
- Cut out a strip of yellow felt. Cut it off at one end. Next, roll it into a small roll and fix it with glue in this position. This will be the center of the peony.
Do-it-yourself pink-white peony in the photo

Illustration for paragraph 1

Illustration for paragraph 2

Illustration for point 3

Illustration for point 5

It will look like a finished peony made of felt
Hydrangea
To make hydrangea, prepare:
- Felt;
- Glue "Moment";
- Scissors.
Step-by-step instruction:
- Cut out 12 identical circles with a diameter of 2 centimeters and 1 circle with a diameter of 3 centimeters from felt.
- In the middle of each finished circle, apply glue and shape the petals.
- Take a large circle and use glue to attach 4 prepared petals to it.
- Then, in the same way, on the basis, fix the following parts until completely filled.
Photo gallery: Beautiful hydrangea in stages

Illustration for paragraph 1

Illustration for paragraph 2

Illustration for point 3

Illustration for paragraph 4

Two handmade felt hydrangeas
big flower
This flower will be slightly larger than the previous options, but it can also be used as decoration for home decoration or clothes.
Necessary materials:
- Felt;
- Scissors;
- Glue gun;
- Cores for the middle of the flower (sold in needlework stores);
- Sample.
Step-by-step instruction:
- First, prepare the base for the felt petals.
- Draw 6 circles with a diameter of 12 centimeters on the fabric and cut them out.
- Use hot glue to secure the petals to one mug.
- Gradually add subsequent rows. In our example, there are 4.
- Make a flower core. Fold the circle twice.
- Then fold it in half again.
- Trim the ends.
- Lubricate the edges of the core with glue and fix in the center of the base of the flower.
- For the middle you will need 5 circles.
Large flower for decor on step by step photos

To make a flower, prepare scissors, a pencil and felt

Illustration for paragraph 1

Illustration for paragraph 2

Illustration for point 3

Illustration for point 5

Illustration for paragraph 6

Illustration for paragraph 7

Illustration for point 8

Illustration for point 9

Illustration for point 9

The finished flower can be used as a decorative element
Video: How to make felt flowers?
Topiary
Topiary is also called the tree of happiness. Recently, this decoration has gained incredible popularity. Topiaries are made from different materials. In our master class, we will teach you how to make such a decoration-bouquet of felt. Follow the step by step instructions below. The finished product will be an excellent decoration for the interior of your home.
This is interesting: Topiary - figured cutting of trees in order to give them interesting and unusual shapes.
"Pink Chrysanthemum"
For work you will need:
- Felt (8 sheets measuring 30 by 28 centimeters);
- Sisal (greens);
- planter;
- Green thread (it is better to use wool);
- Satin ribbon 1 cm wide and 1 meter long;
- Postcard;
- Styrofoam ball with a diameter of 10 centimeters;
- Butterfly on a shelf;
- Ladybug;
- Green paper (1 sheet);
- A stick (in our example, a straight one is used, but you can also take a curved one. It is sold in a needlework store);
- Cement and sand (it depends on the size of the pot used, the minimum material required is 200 grams);
- Water;
- Glue gun;
- Scissors.
Step-by-step instruction:
- First make a crown. To do this, cut the felt into strips 7 centimeters wide.
- Make a chrysanthemum from each strip.
- Cover the ball with green paper. Attach the finished flowers to the foam ball with glue.
- Now start creating the trunk. Take a stick and glue it tightly with green woolen thread.
- When the base is completely dry, attach the crown to it with glue.
- In a pot, knead a thick solution of cement and sand (1: 1) and place the trunk in it exactly in the center.
- Place a decorative butterfly nearby.
- Top the cement with sisal. Set the topiary base aside until the cement has completely dried.
- Start decorating. Take a card and pierce it with a hole punch. String it on a satin ribbon and secure under the topiary crown with a bow.
- Plant a ladybug in the grass.
- If desired, you can attach a note with the inscription "handmade" to the pots.
This topiary will be a wonderful gift for your family and friends.
Topiary of multi-colored chrysanthemums (work scheme)

Illustration for paragraph 1

Illustration for paragraph 2

Illustration for point 3

Illustration for points 4-6

Illustration for paragraph 7

Illustration for point 8

Illustration for point 9

Illustration for paragraph 10

Illustration for paragraph 11

Topiary with chrysanthemums will serve as a great addition to your interior

Such a topiary can be presented to relatives or friends.
Bouquet using brads
Necessary materials:
- Felt (green and white);
- Mini brads (300-400 pieces);
- Styrofoam ball (diameter 13 centimeters);
- Scissors;
- Stick;
- Medium flower pot;
- Paint or thread for the barrel;
- Glue gun;
- Wood shavings or Spanish moss.
Step-by-step instruction:
- Cut the felt into squares of the appropriate size. Determine the quantity yourself.
- All blanks must be the same size (prepare the diagram in advance).
- You can cut them with scissors or a special machine.
- In our example, more than 300 flowers are used. They can all be prepared at once or made as needed.
- Insert mini brads into the middle of each flower and secure them with glue.
- Next, insert the finished flowers into the foam base.
- Plant the flowers as closely as possible to each other so that their petals are directed upwards.
- We recommend alternating the process of cutting flowers and attaching them to the ball. For comfortable work, it is better to place the foam base in a flower pot.
- Do not leave free space so that the crown is full and lush, without gaps.
- After you have completely made the crown, proceed to create the trunk. Dye the stick in the desired color or wrap it with woolen threads. After the paint has dried, put on the crown and place the stick in the pot.
- For reliable fastening, pre-lubricate the end of the stick with glue.
- Start decorating the pot. Apply glue to it and cover with moss or shavings.
How to do it step by step

Illustration for paragraph 1

Illustration for paragraph 1

Illustration for point 3

Illustration for point 3

Illustration for paragraph 4

Illustration for point 5

Illustration for point 5

Illustration for paragraph 6

Illustration for paragraph 7

Illustration for paragraph 7

Illustration for point 9

Illustration for point 9

Illustration for paragraph 10

Beautiful topiary with decorative ornaments in the middle of the flower
Photo gallery of other options

Butterfly made of felt harmoniously complements the composition

Bright and interesting floral arrangement will be a great addition to your interior.

Delicate topiary in light green-pink flowers will appeal to any girl

A good example of decorating a topiary

With a little effort, you can create such an amazing tree that does not need to be looked after.
Purple is the trend of the season
The beauty of felt is that it is very malleable and therefore easy to work with. The edges of the felt do not crumble and do not require special processing. And the density of the fabric allows you to form different flowers from it, which perfectly keep their shape. We hope you will see for yourself!
The original decorative decoration in the style of Handmade - flowers made of felt. It's easy to do and pretty quick, but it turns out very unusual and beautiful.
Felt, it should be noted, is a favorite material for needlework masters. How many opportunities it opens up for creating a designer gizmo. Judge for yourself how original the flower brooch will look on a black dress. And in general on a dress of any solid color. After all, sometimes a small accessory is enough to make the same outfit look fresh and new. And with felt decorations, you can complement the appearance of the box, arrange a postcard or photo album. Felt flowers look original on handbags, hairpins, as a decoration for hairbands, as well as in the design of any gift souvenirs.

A few words about what is felt, and what are the reasons for its popularity. Felt is nothing more than felt made from the wool of a rabbit or goat. In turn, felt is a non-woven textile. Wool or synthetic fibers can be used as a base. The choice of wool is due to the peculiarity of its structure. The fact is that the edges of its fibers have so-called "notches". This ensures good adhesion of the fibers to each other.

Making flowers from felt with your own hands is an exciting and not difficult task. And all this thanks to the pliability of the material. It differs in its density and thickness. Felt can be bought at almost any needlework store or ordered online. More often on sale there are felt sheets with a thickness of 2-2.5 mm and a size of 30 * 40 cm, as well as a thickness of 4 mm with a size of 20 * 30 cm.
At the stage of choosing shades, you can show all the richness of your own imagination. The creative process is fully consistent with the author's intent and imagination, and therefore products can be created in any color scheme. Fortunately, the modern market for needlework products makes it easy to implement even the most daring ideas. Someone uses ready-made felt sheets with floral prints. Others prefer to combine the original contrasting colors. The boundaries of this process are determined solely by the taste of the master.
Materials for flowers from felt
- scissors
- glue for fabric
- pins
- thread and needle
- all kinds of beads, beads and buttons of different sizes for decorating flower cores;
- floss threads, the shades of which should differ by several tones in one direction or another from the original color of the felt. They are used to decorate the edges of future flowers.
Felt flowers, patterns of which can be found in large quantities in the catalogs of online magazines, as a rule, are very plainly designed. An ordinary chamomile pattern can be used as a basis. But the work, made in several layers of contrasting or monochrome colors, acquires a completely different idea. Cut out paper petals. This will be the template. Here are some ready-made patterns for felt flowers:


Consider the assembly process using the example of a flower made according to this pattern:

First, you need to recreate the template pattern directly on the fabric.


Then the edge of each petal is sheathed with a skillful seam using floss or not processed at all.
We put the petals on top of each other from largest to smallest (or vice versa) and sew in the center to form a deepening of the future flower (you need to sew tightly). And let's move on to creating the core. A circle cut out of felt is planted on glue and placed in the middle of the flower.

Sequins, pre-prepared beads, beautiful beads will give the author's originality to the resulting work of art.
Depending on the intended purpose of the product, we attach a pin or sew an elastic band to its reverse side.

We post a few more photos of flowers that inspire new creations. Each of these flowers uses French knots as an additional decoration:


The felt flowers presented below are master classes from the masters of needlework. These works will help beginners master the simple creativity of creating decorative floral elements.
Felt rose (master class)
This amazing accessory is ready to "settle" on an evening dress or coat of its resourceful owner.


Let's start at the base of the flower. To do this, prepare a circle, the diameter of which will be 10 cm. Cut out semicircular petals along the edges of the circle, gradually moving from the outer edge inwards.

The central part is rolled up, thus forming the core of the future rose.

It must be fixed with a pin and filled with a layer of glue. After the glue dries, it is necessary to wind the rest of the felt on the resulting bud and close the cut from the bottom side.


Here is such a wonderful rose will turn out in the end!

If you make a few roses, glue them to a piece of fabric and sew on a metal clasp, you will get a wonderful brooch!

For clarity, a few more roses made according to a similar principle:


How to decorate from felt shows Tsvoric (TSVORIK) (music by Key.peter):


Felt violet (master class)

Materials for work:
- felt (sheets of two different colors: lilac for petals, green for leaves)
- scissors
- threads, the color of which must match the color of the violet

Let's prepare 5 templates for future petals (diameter - 4 cm):

Take one of the petals in your hands and fold it in half twice. We get a petal in the form of a corner:

With a couple of stitches we attach a corner to one of the blanks:

Repeat the steps for the rest of the corner petals. To achieve the desired neat effect, carefully monitor the direction of the petals (they should be directed in one direction):


At the end of the work, the flower should be well straightened:

Let's move on to cutting the leaves:

We sew them together:

Raising the petal, we fasten the leaves with the base:

We enjoy the result!
With such flowers you can decorate, for example, a rim:

Chrysanthemum from felt (master class)

The strip of felt must be folded in half (in width). For reliability, fasten with sewing pins.

On the side where the fold was made, we form the same cuts.

We sew a strip with matching threads with large stitches and roll it into a roll, forming petals. We fix by sewing the layers together in several places.

It remains to straighten the felt and form a beautiful flower!
This flower will consist of a large number of petals.

Having cut out rectangles from felt, we have a fringe on one edge, and round off the other. Petals should be about 20. They should all be different sizes.

We pinch the edge that was rounded and fix the petal with glue.

We form a flower:

Cut out a yellow stripe. Cut it on one side. Then we roll it up and fix it with glue. We get the finished core.

To use the flower as a flower, you need to attach a small piece of felt to the base from the wrong side, and then chop everything with a pin or a metal fastener.
Felt hydrangea (master class)

Flower materials:
- scissors
- glue gun
It is necessary to cut out 13 felt circles of the following sizes: 1 piece - 3 cm in diameter, 12 pieces - 2 cm in diameter.

We apply glue (hot) to the center of each circle and thus form the future petals.

We take a large circle and, using a glue gun, distribute 4 prepared petals around its perimeter.

Glue the next four between these petals. Repeat until the circle is filled.

Pillow with flowers made of felt

First, cut out the petals from the felt:

Using the template, we prepare 6 felt circles (diameter - 12cm)

Glue the petals to one of the circles using hot glue.

Gradually add the next row (total - 4)

We create the middle. Fold the circle twice:

Fold in half again:

Trimming the end:

Smeared with glue, attach to the blank of the future flower.

5 circles go to the middle.

The result should be such a charming flower:

Decorate the pillow with the resulting flower.
And now the most interesting! When creating flowers from felt with your own hands, you should carefully look at the various options for their inflorescence and the shape of the petals in wildlife. It is this observation that will tell the needlewoman the shape and ratio of the sizes of the necessary blanks.
The whole charm of this creativity lies in the fact that absolutely any of the colors existing in nature can be reproduced in felt: both delicate, and contrasting, and lush multi-colored ... You just need to choose the color of felt that matches the future shade of the product. Then cut out blanks in the form and circles for the future core, first from paper, and then from fabric.
At the last stage, it is necessary to assemble all the prepared elements with glue or stitches so that a flower is obtained. And then, based on our own ideas about how to reflect the images of wildlife in art and creativity, we decorate our work with all sorts of improvised means. It can be embroidery or glass beads or shiny sequins. Everything that the soul desires.
See an example of decor in the master class on creating


