How to carefully make a moon manicure at home. We make a beautiful and fashionable moon manicure
It is not necessary to contact a specialist to make an elegant moon manicure on your hands. You can master this technique at home - you only need desire and free time.
To look attractive and spectacular, women need to carefully care for their hair and hands. Good styling and neat manicure really give the girl confidence in her own irresistibility. But if the girls are used to looking after their hair on their own, then in the case of a manicure, you have to contact a specialist.
But in order to save money, the girls are interested in how to make a moon manicure at home. In practice, this turns out to be not so difficult: to learn, you only need a little free time and patience.
What is a moon manicure?
Most women prefer classic nail designs, which are distinguished by their versatility and modesty. Among these coatings, French and moon manicure are considered the most popular.
When performing a French, the master paints only the edge of the marigold to make a kind of smile. Lunar coating looks completely different - the varnish is applied to the base of the nail plate, like a hole.
It is interesting to know that lunar design has already been popular before. Women wore such a covering back in the 30s of the last century. Then almond-shaped nails, painted to match the dress, were in fashion.
What is the preferred nail shape?
Before you make a moon manicure with varnish, you need to give your nails the desired shape. This design is quite versatile, and looks impressive enough on both long and short nails. Most often, girls choose short square-shaped nails (often with rounded corners).
"Moon" is better not to perform on long pointed nails - such a coating looks rough, and often vulgar.
Design Options
It is worth noting that most girls have already abandoned classic varnishes and began to use shellacs. This type of coating is distinguished by its durability: the nails retain their neat appearance until the next correction.

If you do not know how to make a moon manicure with gel polish and you do not have the necessary equipment, of course, it is better to contact the salon. There it will take a little time (the procedure lasts about an hour), and the result will definitely exceed your expectations.
Types of the "moon"
The popularity of the "moon" among women led to the emergence of new forms of this design:
- Classic - the entire nail is painted, excluding the growth zone (as in the 30s)
- Popular - the master paints the base of the nail in any color you like. This design is often combined with a French manicure using pastel-colored polishes. The result is an elegant nude finish.
- Dior - this is how it is customary to call a special type of coating that has appeared quite recently. The master paints both the growth zone and the main part of the nail, leaving a transparent hole between them. Its width can vary depending on the wishes of the client. Such nails look equally good both in pastel colors and with bright and rich colors.
How to make a "moon" at home
Today, many girls are wondering how to make a moon manicure at home. In fact, this coating is not the most difficult, and therefore every girl can master it.
What will be required?
To master the coating technique, the first step is to acquire everything you need for this:
- Manicure set (for cleaning nails)
- Two types of varnishes (it is desirable to combine bright and pastel)
- French stripes
- Acetone (in case you need to tweak something)
- Fixative (can be replaced with clear varnish)
Step-by-step instruction
If you do not know how to make a moon manicure, but really want to see it on your nails, start by carefully studying the step-by-step instructions.
Initially, you should give the nails the desired shape and perform a deep cleaning of the cuticles. When the nails are prepared, you can begin.
The first step is to apply the main varnish (usually pastel colors) along the entire length of the nail. After waiting for the layer to dry completely, you should stick the stencils for the jacket at a short distance from the growth zone (choose the depth of the hole to your taste). This is followed by the application of the main, bright layer. Be careful not to go beyond the edges of the stencil - this will make the coating untidy.

At the end, the nails are covered with a fixative. If desired, the line of the hole on one or two nails can be painted over with shiny varnish or rhinestones can be used.
There is an option on how to make a moon manicure at home in a different way. To do this, immediately after cleaning, you should stick the stencils and varnish the nails in several layers. This design is easier to make (you won’t worry about the bottom layer not drying out enough) and looks more delicate.
Learning to use shellac
The advantages of gel polishes are obvious, and therefore more and more girls prefer it.
Many have already acquired everything necessary to perform such coverage at home. If you also want to understand how to make a moon manicure with shellac, be sure to go to a cosmetics store and purchase everything you need:
- UV lamp (there are miniature USB models that can dry nails in 10-15 seconds)
- The basis
- Lacquer in the color you want
- Degreaser
- stencils
- Fixer
The technology of applying shellac is not much different from the usual coating of nails. But when using gel polishes, it is necessary not only to perform a manicure, but also to polish the entire surface of the nail with a buff. You should not overdo it - just remove the shiny layer.

After that, the base is applied and the nails are sent to the lamp for a few seconds (you need to look at the box of your UV lamp for the exact time, as this indicator varies from manufacturer to manufacturer).
Considering that shellacs are easy to work with and do not reprint, you can try to make a “moon” in the Dior style. To do this, carefully cut the French stencils (to make them thin) and glue where you want to see the hole.
In the growth zone of the nail, colored varnish is applied (at the base it is better not to use too dark tones - it will give the impression that you are sick or pinched the nail). On the other side of the stencil, apply any varnish that you like.

After waiting for the color layer to dry completely, you can carefully remove the stencils: an intricate manicure with a small transparent hole will appear on the nails. Next, the entire surface of the nail should be covered with a fixative (it can be in several layers) and sent back to the lamp.
At the final stage, the nails must be wiped with a degreaser to remove the sticky layer of shellac. When the manicure is completely ready, it is recommended to lubricate the cuticles with nourishing oil and enjoy the spectacular design for 2-3 weeks.
After learning how to make a moon manicure at home, you can safely experiment with colors and designs. During the training, you will need little "secrets" of the masters, which greatly facilitate the work:
- French stencils are usually removed after the varnish has dried, but if the coating is not of sufficient quality, the varnish may fall off. That is why it is better to experiment with the stencil in advance and understand when it is more convenient for you to remove it.
- The fixer and base must always be used - this will protect your nails from the negative effects of varnishes, and also make the coating more durable.
"Moon" is a truly versatile and stylish cover that is perfect for every woman. With such a manicure, you are not ashamed either in the office or in a restaurant, and therefore feel free to experiment with the appearance of your nails.
Learning to make a beautiful moon manicure on our own: video
These days, the moon manicure has found a new lease of life, thanks to the fashion house Dior, who staged a fashion show where the models had their nails painted in the moon design.
Each fashionista will be able to independently make a beautiful moon manicure. The photos show step by step how you can make up your nails in an original way at home. The procedure is easy to perform using special stencils. Some girls have learned to draw a crescent shape on the nail plate by hand.
How to make a moon manicure - step by step photo stencil
 The image in the form of a crescent is the fashion trend of the season. Famous personalities such as Rihanna, Megan Fox, Irina Dubtsova, Alena Vodonaeva and other stars have been seen with a moon manicure. The image becomes interesting and attractive. This pattern is perfect for any event. A step-by-step photo of a moon manicure will help you properly apply varnish at home.
In a special store for cosmetologists and hairdressers, you can buy ready-made stencils for manicure in the form of a smile. Sometimes stickers are sold in departments of household chemicals. The moon manicure technique is easy to use. 
For the procedure you will need:


Such a simple option is available to every woman who wants to stand out. Lunar manicure, photo shown step by step, looks good on long, medium and short nails.
How to make a moon manicure without a stencil - step by step photo
 If a special stencil is not purchased, but you really want to make a moon manicure, then it is recommended to follow another step-by-step instruction. Some girls use scotch tape at home to mark the place of the “smile”. However, there is another technology. You can draw a crescent moon on your nails yourself or by hand.
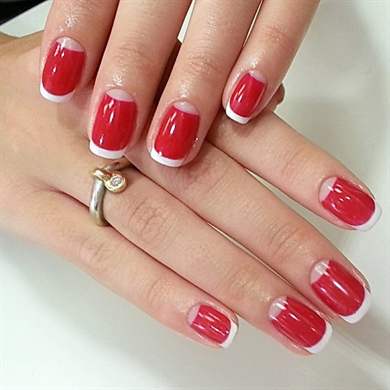
To perform the procedure, you need to take 2 varnishes of different colors. It is recommended to choose contrasting shades. For example, as in the photo, red and blue varnish.
- The nails are covered with red varnish and wait for complete drying.
- A small indent is made from the base of the nail or lunula, covering the rest with blue varnish.
- After the second layer has dried, you can apply a base coat.
 In order for the “smile” to be even, you can use a lip pencil. With it, draw a suitable contour.
Moon Manicure Designs and Ideas
 Fashionable manicure can be varied. It all depends on the shades of varnish used, ideas and individual preferences. You can create a stylish look with a bright palette, or use pastel colors. Very often, masters use such combinations of varnishes as red, white, black, lilac, blue, purple, mint, green, turquoise, pink and other tones.
 If the border of the combination of two shades is not even, then you can mask this area with rhinestones or sparkles. The trend of the season is, which can perfectly harmonize with the lunar image.
 Some masters paint all nails in lunar technology. An interesting image with alternating different options. So, for example, several nails can be painted in a monochromatic way.
 When choosing a performance technology, it is recommended to take into account the event for which the manicure is being done. So, an image with pastel shades will be an ideal option for work. And complete a festive or solemn image.
Lunar manicure remains one of the fashion trends in the field of nail art: it is made with gel polish or using other means, it does not matter. A distinctive feature of this nail design is the design of an arcuate strip at the base of the nail, resembling a crescent moon and contrasting in color with the main coating of most of the plate. This strip is called the lunula. This type of manicure design got its name from her.
Lunar French, or French “vice versa”, which became popular in the first half of the 20th century, still has many fans. And all because it is not difficult to make a manicure with holes on your own. And you can use one of the existing techniques. A fashionista who is interested in how to make a moon manicure at home will find a lot of useful information below.


Hole design options include:
- stencil drawing technique;
- moon manicure with gel polish applied with a decorative brush;
- gluing glitter transfer foil.
Stencil technique in lunar nail design
Before you make a moon jacket using a stencil, you need to stock up on the following: a base tool, a pair of gel polishes of different tones, a fixative coating, stencils, a lint-free napkin, a manicure kit.
The sequence of actions is as follows:
- On the nails freed in advance from the remnants of the previous coatings and filed in the right direction, the base is applied in a single layer and dried.
- Gel polish of the main color is applied in two layers and dried well.
- A stencil is glued to each nail. A second type of varnish is applied to the hole area and dried. The workpiece is removed.
- The surface of each nail is covered with a fixing agent and dried.
Lunar nail design technique with colored foil
When there is no stencil at hand, then the jacket “on the contrary” can be performed using transfer foil.

In addition to the manicure set standard for the lunar technique (base coat, degreaser, gel polish, fixing agent, UV lamp), you will have to prepare the transfer foil directly and what it will be attached to - a special glue.
A manicure with a hole using foil is performed according to the following scheme:
- Prepare the nails, give them a convenient configuration, remove the remnants of coatings, degrease the plates.
- After applying the base coat in one layer, dry it under the device.
- After applying two layers of colored gel polish, dry it too.
- Having covered the nails superficially, dry them under the lamp.
- Apply glue to the area of \u200b\u200bthe nail plate where the hole will be located, and allow the product to dry. Moreover, the composition should acquire a transparent shade.
- For more convenient handling, the foil is cut into small rectangles having dimensions equal to the length and width of each nail.
- With a matte surface, each prepared piece is applied to the area of \u200b\u200bthe nail where the glue is applied.
- The foil is pressed closely against the adhesive layer, and then jerked off.
- A colored imprint should remain on the adhesive strip. If this does not happen, the procedure is repeated.
- A fixing coat is applied to the nails and allowed to dry.
Lunar manicure technique with gel polish and brush
Lunar manicure with gel polish involves the presence of a base, two gel polishes of contrasting color, a fixative coating, and a brush for applying decor.
Instructions for creating lunar technology with gel polish:
- Having given the nails the desired shape and removing the cuticle with the old varnish, the plates are covered with the base composition and dried.
- A couple of layers of the main color coating are applied to the plates and dried thoroughly.
- They take a second gel polish to decorate the area of \u200b\u200bthe hole and designate the outlines of the future strip with it.
- The place of the hole is completely stained with the type of varnish taken and dried.
- After applying a top coat on top, allow the plates to dry thoroughly.
Since the moon nail design is a continuation of French traditions in manicure, and often combined with them, then we will consider how to do a moon French manicure at home.
Such a moon manicure with shellac is highly resistant (it lasts about 2-3 weeks), it is distinguished by the brightness and saturation of the colors used. Shellac is a coating that has a biogel in its composition, which has absorbed the best properties of varnish and gel. From the moment it is applied to complete drying, it does not take more than 2-3 minutes, which cannot but rejoice those representatives of the fair sex, whose time limit is very limited.
Lunar french nail design technique
The classic jacket is the basis of modern lunar reverse design. The classic version of the jacket is characterized by the presence of lighter coatings with pastel shades and a white hole. But the crescent in French manicure design is not located at the base of the nail, but at its end. Therefore, the moon manicure is called the “inverted” jacket.

When a matching moon jacket is created, the strip is indicated on both sides - both at the end and at the base of the nail plate.
The most popular color combinations of lunar design are:
- red lunar and white;
- black with silver/gold;
- white with chocolate;
- purple with blue;
- orange with yellow;
- black with beige;
- yellow with green;
- black with peach;
- White and black;
- purple with white;
- other combinations based on personal color preferences.
It is easy to make for yourself or a friend. The main thing is to have at hand the necessary materials and fixtures. An excellent addition to an inverted jacket are rhinestones, sparkles and other decorations.
Nail art is a great way to spice up your style and add a little extravagance to your look. A perfect solution would be the moon manicure, which gained popularity in 2013 and became the main trend of 2014-2015.
What is a moon manicure
The moon or hole is a white area near the nail bed, which indicates the transition of the plate to the base. Previously, traditional healers determined the health and lifestyle of the patient by the condition of this area of the nail. In ancient times, girls tinted the hole with white to create a snow-white effect.
The second wave of popularity of the moon manicure came at the beginning of the 20th century. In the 1920s and 1930s, women of fashion deliberately painted over their nails not along the entire length in order to visually reduce them and give them a certain roundness.
The technique for performing such nail art is similar to an inverted jacket or Shanghai manicure. To cover the plate with varnish, a special stencil is used, only it is attached not to the end of the nail, but to the base, creating a stylish and cute semicircle.
Advantages moon manicure:
- This is a great way to enhance the beauty of square or rectangular nails. Visually, they will become less sharp;
- If you are planning to attend a retro-style party, such nail art will be the perfect end to a vintage look;
- It is very easy to perform at home, even with minimal experience;
- Building up is not a problem for adjusting this style. You can also not be afraid of cutting nails, because the tips are practically not involved in creating the desired design.


Video: stylish moon manicure
Video: elegant manicure
Video: moon black and white manicure
How to make a moon manicure
To create this style at home, you will need to prepare templates for yourself. Many craftswomen cut out circles from cardboard, paper or tape. With adhesive tape, you need to be as careful as possible, because if the varnish is not completely dry, traces will remain on the nail. You can buy stencils at a beauty supply store. Stripes for a classic jacket are also suitable.
After you need to decide on a combination of colors. The following combinations look very beautiful: red-black (this is the most popular moon manicure of 2015 after Valentino's show), black-silver, beige-white, blue-purple. All colors look great with gold. Naturally, before doing nail art, you need to decide on the general image so that the nails fit organically into the style.
Instruction how to make a moon manicure step by step:
- Wipe off the remnants of the old varnish from the nail plate, file in the right places, be sure to remove the cuticle. To do this, you can use tools for unedged manicure;
- Cover the nail with the base coat that is needed to level it, let the varnish dry;
- Now apply the selected color for the moon on the nails, this will be the basis of the nail art;
- After that, close the painted moon with a stencil and paint the nail with the main color;
- It remains only to fix the manicure with a transparent or matte varnish. A good option is to cover the plate with glitter to create a holographic effect.


Ombre style is very fashionable this year. It is used to tattoo lips, dye hair and eyelashes, and now also to create unique nail art. To do moon ombre on nails, You will need:
- Clean and prepare the nails, as described above;
- Now paint the moon using the stencil;
- After that, you need to take a piece of a simple sponge (you can even take it for washing dishes). On the sponge, apply several colors of shades of the selected varnish. For example, for green it will be: light green, turquoise, green, dark green. Using gentle pressure movements, apply paint to the plate. Make sure that there are no stains, if necessary, walk around the site again;
- Glitter looks very nice on such a manicure - they do not clog the color gradient. They can be used as a fortifier.
You can use not only shades of the same color, but also contrasting palettes. Then you get a very beautiful and cute nail art. But at the same time, it should be noted that a monochromatic ombre looks more impressive than a multi-colored one.


Tips for creating a moon manicure:
- Many fashionistas cover their nails with foil, paper, or glitter on the moon. This gives them luxury;
- To create a unique style, you can also attach a piece of lace or mesh to the place of the hole;
- The darker the colors, the more effective the manicure will come out;
- If you want the manicure to "live" as long as possible, then the nails need to be painted with Shellac varnish or coated with a special gel;
- Depending on the season, event or mood, you can draw patterns on the hole. Let's say if it's spring now - let it be a leaf, summer - a juicy slice of fruit, autumn - a leaf, and winter - a snowflake;
- To create a cute style, we recommend attaching rhinestones, beads, sparkles, or glass pebbles to the moon.
Experiment with different colors and styles to get your perfect moon manicure. Any beauty salon can provide you with such a procedure, while the cost is quite low. In an average salon in Russia and Ukraine, a lunar trendy manicure will cost $10. And, say, in Voronezh or Kyiv, about 9 USD.
Lunar manicure calendar
Before doing any nail art, it is right to look at the moon phase calendar. All beauty procedures are very dependent on which lunar day and month they are performed. Depending on your zodiac sign, you need to be able to choose the right day.
- In ancient times, they said that cutting your nails after sunset on Friday is for money;
- Regardless of what your horoscope says, it is undesirable for girls not born on Sunday to do any cosmetic procedures on this day of the week;
- Avoid nail salons during your period.
The phases of the moon are not determined by months. This calendar depends on what sign the satellite is in now. Pisces, Gemini, Taurus are considered the most unfavorable. "Good" astrologers call the signs Capricorn, Sagittarius, Aquarius and Aries. Libra, Virgo, Leo are neutral. At the same time, Cancer and Scorpio are more positive than negative.
But at the same time, in the winter months - January, December and February - a suspension of growth is possible, which is in no way connected with the phase. In the spring, the body suffers from beriberi, so March, April and May are the months of nail foliation. But in summer and autumn (from June to November), nails grow quickly, they are strong and beautiful. July, August, September is a great time for any beauty treatments. And in October, better pay more attention to vitamin baths.
Lunar manicure is always at the height of fashion, and has not left the fashion catwalks for many seasons. Although the appearance of this trend is not due to yesterday's trends, but to a rather distant past. The history of its design is very interesting, because in the thirties and forties of the last century, this manicure was called a Hollywood jacket. In those days, fashion changed as rapidly as it does today, and therefore the phrase “everything new is well forgotten old” is perfectly applicable to the moon manicure. In 2010, with the help of the Christian Dior show, the moon manicure became the most popular nail art technique, and the best fashion houses still do not change it. How to make a moon manicure with gel polish? Details in this article.
 Running colors and shades of moon manicure

In 2017, the most fashionable shades of the moon manicure will be bright and rich colors, and the deeper the color, the better. Most in demand:
- Ruby;
- Emerald;
- Sapphire;
- Black;
- Pearl;
- Pink;
- Lime;
- Orange;
- Citric
Moreover, the nail hole can be of various shapes: from a sweet smile to an exclusive rhombus. Feel free to experiment!


Lunar manicure technology

When performing a moon manicure, various shades and textures are combined, the holes can also be in different variations: wide and narrow, because the result of your manicure will depend only on a riot of imagination. With it, you can create the newest original images that will amaze others. The best option for making this manicure is to follow at least one of three techniques: stencil, decor brush and foil.
Manicure tools

In the course of creating your nail art masterpiece, you will need serving tools:
- Base coat, it is better if it is some kind of vitamin varnish, which will slowly restore your nails, and a beautiful manicure will last;
- Gel polishes for nails. Modern French is bright colors, so choose the most contrasting shades of varnishes;
- Stencils;
- Top or finish coat, preferably with a wet gloss effect, so your manicure will look more natural on the nails.
- Brush for decorating;
- Glue for foil;
- A dehydrator is a tool that degreases the surface of the nail;
- Ultraviolet lamp;
- Foil;
- Nail file for pushing back the cuticle or removing it.

All of these tools will be needed for all three ways to apply a moon manicure, so if you use any one, then simply exclude accessories from this list.

Stenciled
First you need to remove the cuticle to free the nail hole, sand it and give the future nail the shape you want to see. Finish this step by applying a base coat.

The next step is to apply one or two coats of base coat. Dry it in a lamp or wait until it dries itself.

Next, you need to stick the stencil so that the hole turns out to be concave, and we follow the chosen design, either glue it on the edge of the nail - then it’s a classic moon manicure, or glue it, rearranging it upside down, then we will see the “inverted jacket” option. After these manipulations, you need to paint over the hole with a contrasting varnish.

We wait until it dries and cover the nail with a finish coat, of course, the stencil must be removed before that.

Using a decor brush

A decorating brush or a flat brush will be needed when creating the second type of moon manicure. All the first steps are the same with the first option: remove the cuticle, give the desired shape to the nails, cover with a base varnish and apply one or two layers of base. Next, a brush will already be used, with which we outline the boundaries of the future hole, dip it in a contrasting varnish and simply paint over the space of the hole. Do not forget, after the varnish dries, apply a top coat and complete this moon manicure method.

With foil
At the first step, you need to carefully remove the cuticle, sand the nail, giving it the desired shape, and then apply a dehydrator so that the nail platinum becomes smooth and the foil fits better on it. Next, we cover the nails with a base varnish, here you will need two or three layers of varnish, which must be dried in an ultraviolet lamp. Then we cover the nail with a top coat and carefully remove the excess varnish, the same sticky layer after drying. Next, foil comes into play, carefully apply glue to the back of the material and glue it. After drying, it will become completely transparent.

Remember, you need to apply the foil with the matte side to the nail, and of course you need to attach a small square, and not a whole piece. After drying, tear off the foil with a sharp movement and fix a thin, iridescent hole with a finish coating.

All of the above methods are quite realistic to implement at home, it is only important to find time for training!
A video selection with examples of applying a moon manicure with gel polish is below.


