How to make a pumpkin out of fabric. Crafts for children on Halloween from pumpkins, paper and cardboard: Do it yourself. Decorative pumpkin pillows on the sofa

Pumpkin. Just a pumpkin. But cute!)))
Pumpkin dimensions: Petal 9 x 23 cm, stem - in the drawing.
If we take the ratio of sizes a to b equal to 1 to 3, then we get an even ball, an ordinary ball is round. And if the ratio is changed in the direction of decreasing the height, then just a flatter product is obtained.
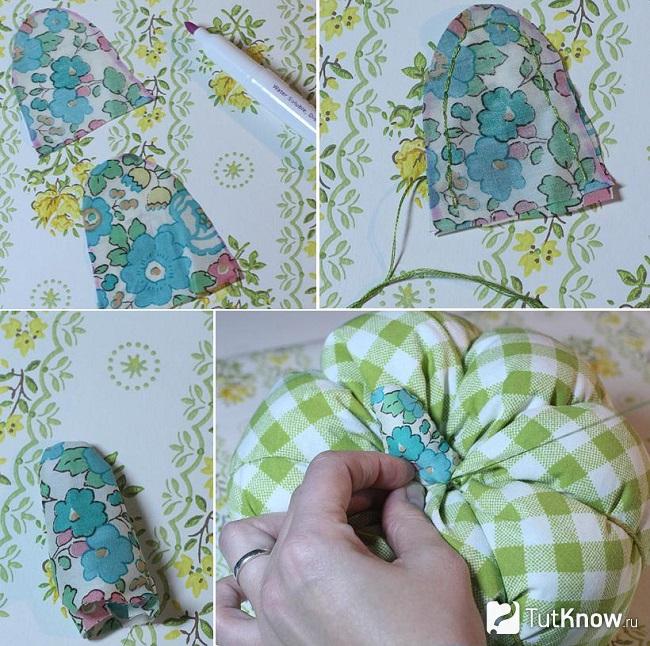
 Work procedure.1. First, sew three pieces together, alternating colors so that the pairs are in the finished pumpkin opposite. Then assemble the halves with each other, starting from one "tail" of the pumpkin to the other, without finishing 4-5 centimeters on each side. The hole will turn out, as it were, on the bottom of the pumpkin. You can do it on the side, but on the bottom it will be less noticeable. Turn inside out and stuff the pumpkin through this hole, cutting off the allowance close to the seam. Where the hole is, do not cut off the excess fabric, otherwise it will be difficult to sew. In the figure, the numbers show the order of stitching. Green lines - we sew red lines on a typewriter - we leave them unsewn, and then we finish manually with a blind seam after stuffing.


2. Now we need a long needle. Take a yarn of a suitable color (or cotton twine, or some other cord that suits you), thread a double thread into the needle and start wrapping around the pumpkin. The algorithm is like this. Where you will have the bottom of the pumpkin, stick the needle, if it is long, then immediately bring it up through the pumpkin, if it is short, flatten the pumpkin as much as you can, pierce it so that the needle appears, and pick it up with pliers to pull it out. If you have a short needle, then you will need an assistant, because it will be difficult to cope with the task alone.


Wrap around each slice in turn in the middle with a thread, returning to the bottom and tying the ends of the threads. When all the slices are tied, collect all the ends of the threads in a bundle and cut. trim - you get the same dried flower with which the pumpkin bloomed in the spring.))
3. Cut out the stalk, manually lay the stitches along the dotted lines with a “needle forward” seam as follows.


Fold a thread of a suitable color four times.2. Start sewing from the widest part to the narrowest.3. Pintuck along the dotted line, first iron it with your finger on the table - this is enough to see where to sew the line. Tucks look OUT!4. Stitch width small - approx. 0.25 cm.5. Just leave the ends of the threads hanging out without tying a knot - we still need them.


4. Then sew the stalk with a blind seam, tucking the allowances inward. Take a double thread, but you can also fold it four times - so that later it does not break inadvertently when pulled together. Sew from the narrow part to the wide part - then just drag the thread up to the narrow tip, so that you can then tighten the seam and pick it up.


Tuck the allowance along the wide part of the stalk and bast it on a live thread so that it does not hang out and is not distracting. Place the stalk on the pumpkin, pin it with pins and sew with a blind seam to the pumpkin.


5. Fill the stalk through the narrow upper hole, distributing the holofiber along the entire length. And here we need the threads that we left hanging on each seam. Take these threads, including the thread from the blind seam, which are closer to this very seam, and begin to pull them up, picking up the stem and giving it as bent shape as you want. Having achieved the desired look, tie each thread with a knot to fix the shape, and cut off the tip. Then tuck in the allowances of the upper hole, flatten it and sew the edges with a blind seam. The stem is ready.


Do you know how easy it is to make pumpkin decorations for the home, crafts for kindergarten and school? Thanks to our step-by-step master classes, learn how to sew pumpkin pillows.
How easy is it to make home decorations from pumpkins?

Here are some elegant decor items you will get. To make a pumpkin so irresistible, you will need:
- dye;
- artificial flowers;
- wire;
- pliers;
- scissors;
- primer;
- shine;
- tassel;
- pumpkins.

It is better to buy a small vegetable, now they sell portioned varieties. Having acquired such pumpkins, you will need to paint them with a primer, let them dry.

Wrap a wire around a pencil or a branch, cut off the excess part with pliers. Screw artificial flowers to the back end, which can even be cut out of paper. Fix this decorative element on the tail of the vegetable, cover the peel with glitter.
Decorate a few fruits like this and put them in beautiful flowerpots.

Such pumpkins will be an excellent gift, an unusual present. You can give it to your friends on Halloween, when this vegetable is in the spotlight.
It's so easy to make an elegant souvenir from a pumpkin. This is a great gift for Halloween or any other holiday.
Decorative pumpkin pillows on the sofa

To create this piece of furniture you will need:
- textile;
- scissors;
- threads;
- filler;
- a thread.

From the prepared fabric, cut a rectangle whose length is 2 times the width. Fold it right sides, sew the sides on the wrong side.
Turn the resulting bag on the front side, fill it with filler. Make sure that the internal content is uniform. Sew around the edge with a basting stitch using a strong thread. Tighten it and fix it in the center of the product.

Take a needle with a large eye, insert a thread into it. To sew the pumpkin-shaped pillow further, pierce with a needle from the bottom up, giving it a flattened shape. Then, using the same thread, divide the resulting workpiece into 6 or 8 segments.

Secure the thread well by tying it into 2 knots. Make a cutting for this vegetable. To do this, you need to cut out two identical oval-shaped pieces from the fabric and fold them with their right sides to each other.
Trim the bottom edge of these blanks, it should be straight. Sew these two elements together, leaving the straight edge free for now. Fill the figure with filler through it and sew it to the pumpkin.
Here you will get such beautiful ones on the sofa.

From this vegetable you can make amazing objects.
Pumpkin crafts - master class

To make such a beautiful house for a toy mouse, you will need:
- spacious pumpkin;
- newspapers;
- spoon;
- marker.

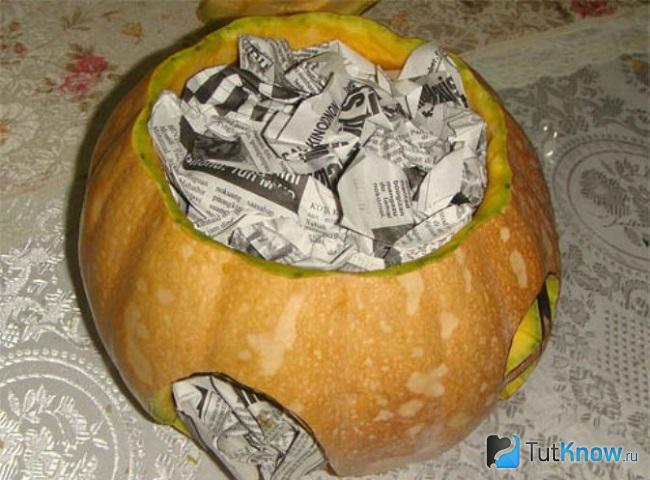
Now stuff the pumpkin with newspapers, they will absorb excess moisture, allowing the vegetable to dry faster. When this paper becomes damp, remove it and place other crumpled sheets. Thus, you need to act until the pumpkin inside dries out.
Replace the dry lid. Glue where the entrance is, a porch made of thick cardboard. It remains to sew such a funny mouse or other animal, and you can send the craft to the competition or decorate your room with it.

If you want the fairy house to look like a real one, then place a candle inside. But you can not leave the flame unattended.

See what other pumpkin crafts you can make.

In the top left photo you see figurines, each made from two pumpkins of different sizes. With the help of pieces of wooden skewers, a small pumpkin is attached from above to a large one. It turned out to be a whole family. For dad, you need to make a hat out of cardboard, for mom - hair from straw or yarn, and for the daughter - a bow that is tied to the tail of a pumpkin.
All characters need to draw eyes and a smiling mouth, color their clothes or stick decorative stickers on these places.
No less funny characters are located on the top right photo. Some need to put on a hat or glasses, glue on a mustache and attach a long carrot nose.
For pumpkin crafts (bottom left photo), you will need:
- straw;
- old hats;
- pumpkins;
- acrylic paints and brushes.
For the next do-it-yourself pumpkin craft (photo on the bottom right), you will need several of these vegetables of different sizes. From one you will make the head, from the other you will make the body.
- Turn small pumpkins or zucchini into teddy bear paws. His eyes, ears and nose can be made from pumpkin scraps or squash. All this is fixed with toothpicks or wooden skewers.
- A barrel of honey is also made from this vegetable. It is better to create an inscription on the surface so that it is clear what is inside. To do this, you first need to write the word “honey” on the pumpkin with a marker in block letters, then cut the peel in this place with a clerical knife.
- Cut off the top of the pumpkin and scoop out the pulp. Dry the pumpkin with newspapers, you get a great craft, and a container for storing honey.
pumpkin for halloween
If you need decoration for this holiday, be sure to use this traditional autumn vegetable. For pumpkin crafts (top left photo), you will need these vegetables. The lid is removed from each, the pulp is removed, the upper edge is cut into wavy lines.
You can also cut it out in squares, as for pumpkin crafts - top right photo.

To make the house look cozy in the evening, put a candle inside the vegetable and light it. If you liked carving on a pumpkin, then you will definitely fall in love with carving from vegetables and fruits. Armed with special knives, after practicing, you can cut maple leaves or such amazing chrysanthemums on it.

But a funny cat can be made without even having experience. The main thing is that you have two pumpkins of different sizes. Attach the small one to the large one as a head. To make a Matroskin cat, you need to remove the skin from the pumpkin in strips. Also, using a sharp knife, cut out his eyes and smiling mouth. The pupils will become raisins or buttons, and the straws from the cocktail will turn into his mustache. Ears cut out of pieces of pumpkins, attach them to the head with toothpicks.

Here is a list of what was required for the job:
- two pumpkins of different sizes;
- sharp knife;
- buttons or raisins;
- straws for a cocktail;
- toothpicks.
All parts are dried, then coated with black varnish. When all this is dry, the ears are attached to the head with toothpicks. On the upper part of the body, in a circle, metal threaded rods or self-tapping screws are attached. A bowl of candles is placed between it.
When it is necessary for the lamp to give light, it is lit, a cat's head is put on top.

These beautiful lamps are made by hand, or you can simply cut out his mask from a pumpkin and hang such a decoration on the wall.

This vegetable can also be used when you make crafts on the theme of autumn. Now this is very relevant, since kindergarten and school are asked to bring such hand-made works.
If growing pumpkins in your backyard has become your usual business, then there will be no problems with the source material. But it will not be difficult for residents of the metropolis to get a pumpkin, as these vegetables are sold in shops and markets.
Pumpkin box

As planned, a toy mouse will live in it, but at the same time, all sorts of little things can be stored in this vegetable. For this DIY pumpkin craft, you need to prepare:
- pumpkin;
- cardboard;
- paints;
- brushes;
- wire;
- a twig or wooden skewer;
- dense green fabric;
- scissors;
- glue gun.
To help the pumpkin dry better when you remove the top, immediately make holes for the door and windows.
- From a dense green fabric, cut a large leaf, and the second one is small. Glue a small vegetable on the side, and a large one on its lid.
- To make a canopy over the porch, cut a strip of cardboard, fold it into an accordion. Now straighten it a little, you will get a wonderful roof, to which you need to glue the decorative elements of the sidewall.
- Cut out porch decorations from cardboard. If the material is thin, then glue several sheets of cardboard. In the same way, make a door and a handle for it.
- You can make steps by taking the basis of this form. Cardboard is wetted in a mixture of water and PVA, taken in the same proportion. Now this soft pliable material is placed on the mold. When it dries, remove it from her and cover with brown paint. When it dries, varnish the steps.
- Paint the other elements of the porch in the same way, and bend the wire in the form of a railing. Stick it with one side from two sides of the step.
- Make a flashlight out of cardboard, attach a wire to it on one side. Make shutters, cut tulle for curtains.
- Wind the wire around a wooden stick or skewer, remove it from it and paint it yellow. Attach these tendrils to a large pumpkin leaf.
- While you were making the elements, the inside of the vegetable has dried up, you can start decorating it. Attach the steps by pushing the second ends of the wire railing into the gourd. Attach a flashlight to the side in the same way.
- Using a glue gun, glue the shutters on the windows, attach the tulle here.

If you want, place a ladder at the back. For steps, you can use wooden skewers or twigs, cut them into equal segments. On one and the other side, tie them with a rope, also paint with brown paint and varnish.

But this is a pumpkin box, you can put various objects in it. To add strength to it, a well-dried vegetable should be varnished and allowed to dry. To make the pumpkin shine better, coat it on the outside with the same clear varnish. The lid will fit better if you fold a strip of cardboard in half and glue it inside the lid, laying it on the end.

Here are some wonderful pumpkin crafts you can make. If you want to quickly create a masterpiece, then make a vase out of these vegetables. To do this, you just need to cut off the top and take out the pulp, dry the inside of the vegetable, varnish it. When it dries, pour water here and put flowers.

The pulp is used in cooking. Take out the seeds, wash them, dry them and you will have a delicious healthy treat.
See what an original gift you can make with a little imagination. Then the pumpkin will turn into a clock.

Also prepare its shell, varnish inside. Place the clock mechanism here, and fix the hands on the outside. Put artificial flowers in the upper hole of the round-sided beauty, and an unusual present is ready.
After such inspiring works, it's time to have a tasty snack. Make pumpkin soup. It is done very simply.
- Remove the seeds from the pumpkin along with the adjacent fibers. They need to be thrown away, and the seeds washed and dried. Carefully remove the pulp from the pumpkin, cut it into cubes. Place in simmering beef broth or plain simmering water.
- Boil for 20-30 minutes - the pumpkin should become soft. Then turn off the heat, wait until the soup cools down and turn it into a puree with a blender, salt. So that it is not too liquid, it is better to remove excess liquid in advance.
- Warm up the cream soup. Pour it into the pumpkin. Put a piece of butter or pour a little milk in the center. Decorate with greens.

After such a delicious snack, there will be a desire to make other crafts.

You can carve flowers on the surface of this bed queen or decorate it with:
- pumpkin;
- bush chrysanthemums;
- toothpicks;
It's pretty easy to make a flower basket out of a pumpkin. You need to cut the vegetable as in the photo, take out the pulp, dry the pumpkin. Now flowers are placed inside the basket, and if you wish, then fruits.

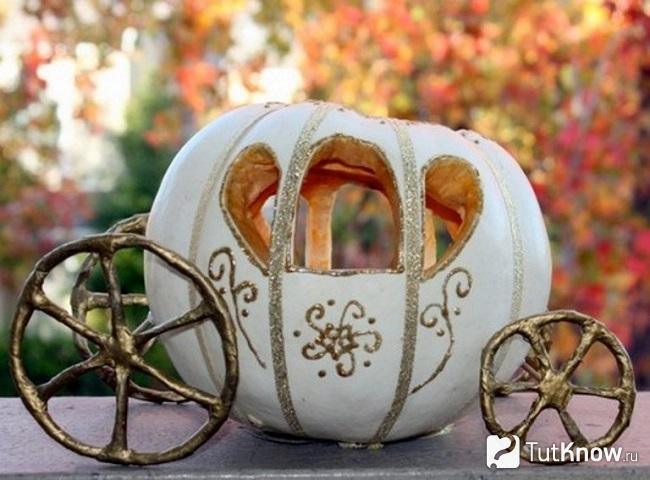
How easy is it to make a pumpkin carriage?
If Cinderella knew what kind of carriage can be made from a pumpkin, she would certainly want to ride in such a carriage.
Take:
- pumpkin;
- marker;
- spoon
- gold paint;
- wire;
- foil.
- On the pumpkin, draw the outlines of the doors of the future carriage, cut out according to these markings with a knife. Remove the pulp with a spoon and knife.
- When the pumpkin is dry, paint the monogram with gold paint.
- Twist the wheels from the wire, wrap foil around them. Pierce a pumpkin with a metal rod, use wire to fix these connecting elements on the wheels. So you need to do the front and back pair.
If you have metal parts in your workshop, make wheels out of round ones. Others turn into a door, window and other elements of the carriage.

Here are some wonderful pumpkin crafts you can make. The main thing is desire and imagination. And to inspire you even more, we have prepared useful master classes on this topic in video format:
And here is a video on how to make an autumn pumpkin vase:
It turned out that we are similar in many ways, which allowed us to get closer in the future. But we will start with the classic options for dealing with the main symbol of Halloween, which is also called the head or Jack-o'-lantern.
According to legend, Jack was a drinker and, as a result of his risky disputes with Satan, was forced to wander the world. He was not allowed into heaven and he did not fit in hell. Therefore, with him he carries a gourd lamp with a smoldering ember. Since then, such a composition has become a symbol of a lighthouse that helps lost souls to rest in peace.
Every year on October 31, many parts of the world celebrate (sometimes on a grand scale) the beautiful Night of the Floating Apples. Of course, such a celebration is more typical for countries like Mexico, but in Russia and the CIS countries, the tradition of carving pumpkins at the end of October is gaining momentum. And it's great! Agree, in our traditions there is nothing even close to similar.
Let's start with the most classic way to create a festive accessory - carving a pumpkin.
How to make a pumpkin for Halloween: detailed instructions with photos
Carving a beautiful Halloween addition from a pumpkin is not that difficult. It is enough to prepare the following tools and materials:
- pumpkin,
- scotch,
- sharp knife,
- spoon (choose the size depending on the size of the pumpkin),
- scissors,
- something long and sharp (wooden skewer, awl or knitting needle),
- marker (best food),
- stencil (if you can do it, you can draw a face or a drawing already on the pumpkin itself),
- one or more candles (you can use a small battery-operated lamp).
Progress
- First, cut off the lid of the pumpkin. To do this, draw a contour with a marker and cut out this element with a knife. A lot of effort will have to be made, especially if the pumpkin is large. The juice that comes out can be wiped off with a rag. If you stuck the knife deep enough, you should be able to remove the lid without any problems.
- Cut the seeds off the top and scoop them out from the inside of the pumpkin. If the fruit is large, it will be much easier to do it with your hands. Otherwise, use a spoon.
- Don't forget to take out the pulp. To do this, make notches inside the vegetable with a knife and remove the soft contents with a spoon. Cut off the pulp from the lid, leaving a hard layer.
- Now attach a pre-prepared template with the image you like (there will also be several photo options below). Stick it with tape so that the image does not slip.
- Now the image needs to be translated into a pumpkin. To do this, make small holes along the template with an awl along the entire contour.
- After that, with a sharp knife, connect all the dots together, cutting out the pattern. The more complex the selected composition, the more time it will take for this stage.
That's all. It remains only to put candles or a small lamp inside. For greater safety, you can degrease the pumpkin with alcohol.
For everyone who wants to see all the actions in detail, I advise you to watch the video:
Stencils and Templates for the Pumpkin Head
For pumpkin carving, the following templates will come in handy:


By the way, these ideas can be used in makeup.
Other ways to process pumpkin
If you want to do something less traditional, then the following ideas will come in handy for this.
Scary and toothy pumpkin head
Perfect for little pumpkins. For this, you will need a gourd, a small sharp knife, plastic vampire teeth, and a pair of round-tipped pins. Cut a hole large enough for plastic teeth to fit in. After that, they must be placed in the opening and stick the eyes-pins.

Cut out drawings ... with a drill
An alternative way to create patterns (if you prefer them rather than faces) can be realized if you use a drill with drills of different diameters. In this case, at the stage of creating a drawing, mark the places where the pattern should be located and drill holes.

small pumpkin candles
Usually pumpkins are used as lamps. But why not make an original candle out of a small fruit? To do this, you will need to cut off the top (you can use a metal baking dish). After completing all the other steps, you will need to insert a wick inside the cleaned pumpkin and fill it with melted wax. While the wax has not hardened, secure the wick in a vertical position.
Use wax in contrasting pumpkin colors for vibrant colors. The vegetable itself can be additionally decorated with rhinestones or painted.
Decorative pumpkins: for those who don't like carving
To decorate your home for Halloween, you don't have to struggle with cutting and removing the pulp. You can leave the fruit whole. It will also keep for much longer.
colorful pumpkins
This collection contains several options. Firstly, you can simply paint the vegetables at your discretion (for example, with acrylic paints). You can also glue rhinestones or use markers.
We decorate with a garland
If you have some glue and a solid piece of garland with balls, then you can glue it to the pumpkin. To do this, coat the vegetable with glue and attach the garland to it in layers.
Confetti
Grab some confetti or create your own with a hole punch and colorful paper. Coat the pumpkin with glue and sprinkle with the resulting circles. On top, you can make an additional layer of glue so that the confetti does not fly around.

pumpkin unicorns
Of all the ideas presented, this one is the most interesting and unusual (especially if you are creating a surprise for a girl). For it, you will need a pumpkin, foamiran for the ears, acrylic paints (you can take a balloon), polymer clay, glue and wooden skewers.
First, color the pumpkin and cut off the twig. After that, glue the ears made in advance from foamiran. Twist the horn and stick a skewer into it, bake the structure (if the clay is baked). After that, stick the structure into the “forehead” of the unicorn. Make a mane out of several polymer clay sausages and attach it to the creature's head as well. Color the muzzle.
Pumpkins in a variety of interpretations
On Halloween, it is not necessary to use only live vegetables. You can use them in a variety of ways to decorate yourself and the room.
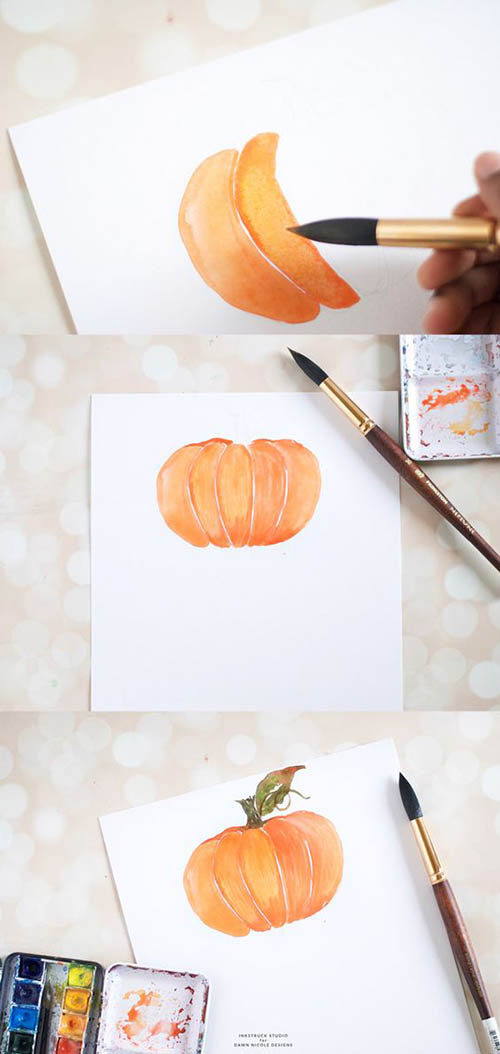
Draw a pumpkin
Think it's difficult? In fact, it is enough to have watercolor paints on hand and this simple master class. Agree, everyone will draw such slices?
Halloween costume
You or your child can appear as a charming pumpkin. In the first version presented, you only need a large amount of orange mesh, which can be assembled like a skirt, make a green border and sew on a scary face.

The same was done for the second variation.

But the next suit is easy to turn into a man's. To do this, you just need to replace the pack with red or green pants.

See even more options for holiday costumes in this article.
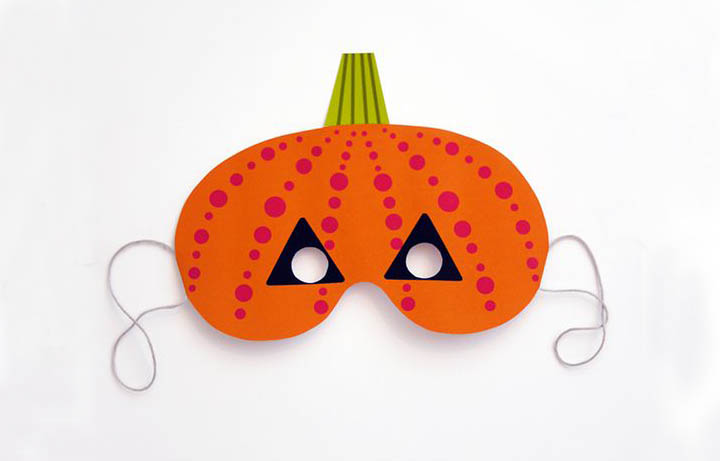
pumpkin mask
To create one you will need colored cardboard, colored paper or paints and a thin rubber band. Cut out the mask using the template below. Cut out the rest of the details from colored paper or paint with paints. Make holes on the side, thread the rubber band through.
paper pumpkins
To create such a paper pumpkin, you will need a template (available in the master class), thick decorative paper, a glue gun and scissors. Here it will be enough to cut out the base, glue it along the upper pieces and attach all the other elements.

Papier mache
Also paper, but the result is much more realistic. For such a pumpkin, you will need a balloon, threads, lots of newspaper strips, a primer and acrylic paints.
To begin, inflate the balloon (not very tightly), tie a ponytail and tie threads (better twine) to it so that the balloon can be broken into several sections. Tie the ends of the threads tightly at the opposite base. After that, start gluing the strips to the base (more on this). After applying all layers and drying them, prime the product and leave to dry, then paint.

Thread garland
There is nothing easier than making a garland of many pumpkins from threads. To do this, you only need a couple of colors of thread and a "fluffy" wire for the legs. Each fruit is a skein of thread, fastened with fluffy wire.
From cinnamon sticks and lid rings
Take 22 metal lid rings, twine and a few cinnamon sticks. Connect the rings like bagels on a bunch and place cinnamon sticks inside.
fabric pumpkin
For her, take a bag of fabric and stuff it tightly. Then fasten a knot with threads at one end and pull it out at the opposite. Distribute the threads as in the papier-mâché master class. You can use a stick as a ponytail.


Pipes in motion
A piece of corrugated pipe can easily turn into a festive fruit if you connect it together, paint it and make a stick-tail.

But what about acorns?
Have you ever thought that acorns look like little pumpkins? If they are painted in an appropriate way, you will get a bright likeness of pumpkins.

Kawaii felt pumpkin for Halloween
And here is a guest post from Nastya. Anastasia is a very creative and diversified person - a needlewoman, layout designer, caring mother. And in every direction she brings a piece of herself, creating something new and magnificent. What wonderful toys she makes out of wool and felt! How to optimize sites (and at the same time create designs)! I’m generally silent about the role of a young mother and the combination of all this.
So, I give the floor to Anastasia herself, who will tell us how to make a do-it-yourself Halloween pumpkin from felt - a wonderful cute souvenir for family and friends on the Night of Floating Apples ^^ After all, who said that a pumpkin must be hard?
My name is Kalashnikova Anastasia, and I present to you today this small master class. Halloween is coming soon, so I suggest sewing its symbol out of felt - a cute pumpkin. The toy consists of simple details, so it is perfect for creativity with children.
You will need:

- Orange, white and black felt;
- Orange and white floss;
- Needle;
- Scissors;
- A little synthetic winterizer;
- Black beads for the eyes;
- Tape or magnet optional
You can download the pattern HERE, this is what it looks like:

The process of making a pumpkin
First of all, cut out all the necessary details from the felt. According to the pattern given above, the toy will turn out to be about 5 * 5 centimeters.
Using a fading pencil or pencil, draw curved lines to represent the segments of the pumpkin. Sew them with a back stitch, I used two strands of light orange floss.

The first line is ready

And from the reverse side:

Now it's the turn of the eye. Place them in accordance with the pattern, just above the center line of the pumpkin body. Then sew with overlock stitch or needle-forward stitch.


Sew the stalk from the front.

My favorite moment: choosing the expression of the toy's face. See how much it changes when I just change the location of the eye-beads))


The muzzle is almost finished!

You can embroider the mouth with black floss or cut it out of felt. My toys are intended for children, so I do not use glue when making them.

Well, the muzzle of the pumpkin is ready. On the reverse side of the toy, I sew a pocket with a magnet, but if you wish, you can replace it with a ribbon.
Then sew both parts of the pumpkin with your favorite stitch. Don't forget to leave a hole for stuffing.

Stuff with a small amount of synthetic winterizer to give the toy volume.


Sew up the hole and voila! The cute pumpkin is ready!

If desired, you can sew the second half of the handle on the back:


Photo of a pumpkin and her owl friend ^^


If you liked my little master class, you can get acquainted with the rest of the Halloween toys in the article “Halloween Felt Crafts for Kids. Patterns and master classes.
Creative inspiration to you!
On my own behalf, I want to add that I hope to meet Anastasia on my blog more than once. This concludes the post about Halloween pumpkins and hope to see you here more than once.
Sincerely, Anastasia Skoreva and Anastasia Kalashnikova
We invite you to decorate your home for Halloween with your own hands. This project is not as easy as this, but by doing it, you will gain not only cute decorative pumpkins in your home, but also confidence in your decorating skills!
You will need:
1. Fabric (it is not necessary to use orange fabric, you can take fabric of completely different colors and patterns)
2. Scissors
3. Rope (thick thread)
5. Thread and needle
8. Filler (you can use synthetic filler or any other)
Instruction
Step 1: Use scissors to cut off a piece of fabric that will soon turn into an adorable decorative gourd. A simple rule applies to the size of this piece of fabric: the width of the piece should be twice as large as the length. You can make a composition both from the same and from pumpkins of different sizes. Fold the fabric in half, right side in. At a distance of 1 cm, draw a line from the right and top edge. Make seams along the lines.  Step 2: When you have finished sewing to the end of the top line, do not cut the thread. You need to pull the thread, tightening it and picking up the seam. Make a few stitches to secure it in this position. Turn the formed bag inside out.
  Step 3: Stuff the bag with filler. It is desirable that the filler be homogeneous. Along the edge of the bag, make another seam, which will also need to be tightened. While tightening the thread, guide the edge of the fabric inward. After pulling the thread tight enough, fix it with a few stitches in this position.
  Step 4: Take a thick thread or rope and a large needle. Insert the needle into the bottom base of the gourd and pull it up. This way you will give it a more flattened shape, and also make the first turn in wrapping the bag with rope to shape the sections of the future pumpkin. The number of sections depends on the size of your pumpkin, but should generally be in the order of 6-8.
  Step 5: Fix the rope.
  Step 6: It remains only to make a cutting so that the pumpkin looks more natural. To do this, cut out of the fabric (you can take a fabric with a different pattern) 2 identical pieces of an oval shape.
Fold them right side in and sew along the outline, leaving the bottom edge open.
Turn the fabric inside out and place the filler inside. Sew up the bottom edge. Next, sew the stalk to the pumpkin.  Step 7: that's it, your decorative pumpkin is ready!
  1
1
Other interesting articles
Pumpkin is one of the main attributes of the Halloween holiday and the coming autumn. The orange-colored fruit symbolizes the time of harvest and is an excellent seasonal decoration for the interior or dining table, even for those who are not going to celebrate this holiday.
In this collection, we have collected a lot of ideas for decorating a pumpkin and making crafts for Halloween in different techniques and styles, as well as options for creating this cute vegetable from improvised materials.
Pumpkin decor without a knife
A pumpkin with a geometric or floral ornament will create a positive mood on the eve of All Saints' Day. Using stencils and your own artistic abilities, you can easily add variety to the festive interior.
Alisa Burke
Advice: Do not forget that after coloring the pumpkin becomes inedible.
Silver or gold colors will make the pumpkin a glamorous element of the festive interior. For painting, it will be most convenient to use aerosol cans.

Call it a day, Megan Morris
Lacy pumpkins are moderately gloomy, but surprisingly beautiful. By wrapping the fruit in nylon or gluing separate openwork patterns, you will turn Halloween into an elegant and feminine holiday.

Stylissim, living sweet living
On a black-painted pumpkin, rhinestones and marbles will look festive and mysterious.

Phunu, Huffington Post
Also, do not forget about sequins, with their help you can also quickly and easily turn a banal vegetable into an art object.

Familyholiday, Paisagismo
In addition to stones, wire can become a decoration material.

Good Housekeeping, The Magic Brush Inc.
The pumpkin stalk can be tied with a beautiful bow, and the fruit itself will be decorated with an inscription or a pattern of buttons. And from small pumpkins with the help of bandages and stickers, you can make a whole family.

Diva de Plantao, Memetales
carving pumpkins
A pumpkin can be a great interior decoration. You can make a flower vase out of it or just carve it into a pretty face.

Eileen Goodall
Get creative and use old stuff to make the Halloween symbol even creepier.

The Fox 94.1
There are many templates for carving a pumpkin, you can make your fruit unique by placing scary rats in the holes.

Motley News and Photos, My Halloween ideas
An illuminated pumpkin can please not only children, but also real aesthetes. To do this, you need interesting templates or your own imagination.

Dump a day, Nisagra Designs
Autumn leaves, simple flowers... Literally anything can inspire you to decorate a pumpkin.

Home Display
Crafts in the form of pumpkins
Sew a pumpkin with your own hands, then the decor element will look according to your tastes and will last more than one season.

Ruchkodelki, Fair of Masters
Even velvet can serve as material for a pumpkin, and it will be convenient to make a stem, for example, from felt.

Stillwishingforfaries
You will need handy materials. Wrap a ball with thread or connect metal plates together.

Designer MacGyver, Digsdigs
Decorate the pumpkin with fresh flowers, then your holiday will also have a spring mood.

Crafts 'n Coffee, Noinetcafe
Paper or even a washcloth: everything can become a material for creating crafts in the form of a pumpkin.

Sand and Sisal, Etsy
Do not forget that the festive table can also convey the atmosphere of the holiday. Use foods in characteristic colors and little tricks to make each dish look Halloween-inspired.

Buvdevskaya, Eventoclick


