How to cut out animal figures from paper. Amazing three-dimensional figures of animals and birds made of paper. Gluing three-dimensional shapes is quite simple
Making crafts with your own hands develops perseverance in children, reveals creative talents and develops fine motor skills of their fingers. The result of your children’s efforts can be saved as a keepsake or decorated in the nursery’s room. If you are thinking about what to do with your child for the evening, DIY paper crafts are the best choice. This technique is very simple to perform, and the result will in any case please the whole family. So let's get started.
SpongeBob and his friends
SpongeBob SquarePants is a very popular cartoon, your child has probably seen its characters. We invite you and your child to revive the main characters using a very simple technique. You only need to print out the diagrams that are attached to the article, cut along the contour and glue in the right places.
Harry the snail is SpongeBob's pet. It appears in almost every episode of the cartoon. It's very easy to create such a beautiful snail. Print out the diagram below:
After you have printed the diagram, cut it along the indicated outline and glue it on the white indents and that’s it. Your snail is ready. Ultimately it will look like this:

Mr. Krabbs is the owner of the Krusty Krabbs restaurant and SpongeBob's boss. More than his daughter Pearl, he loves only money.
Assemble the businessman by placing all the white parts inside and drain them.
The parts are small and there are a lot of them, there is a chance that it will be very difficult for children to handle them, so you will have to help him.
As a result, you will get something like this:
Patrick is SpongeBob's best friend and accompanies him throughout the entire cartoon. This wonderful pink star will perfectly decorate a collection of three-dimensional dolls.
Fold and glue Patrick according to the same pattern as the previous figures, and you will get such a simple and good-natured character.
Now is the time to create SpongeBob himself. This is the main character. An employee of the month since the beginning of Krusty Krabbs, he loves his job and the Krabby Patties he makes. He is also a sympathetic and devoted friend. See diagram below:
If you have already made all the previous characters, then you know exactly how to assemble the Sponge. You'll get a friend like this.
Animal world
Volumetric crafts made of paper and cardboard in the shape of animals are not only a way to keep your child busy for a while, but also an excellent opportunity to better remember and visualize the idea of animals. Let's begin.
“Sly Fox” is a simple craft that will help your child create his own personal fox. Download the diagram and print it on a color printer.
Once you have the printed diagram in your hands, arm yourself with glue and glue the cut out parts according to the instructions. If you do everything right, you will end up with such an adorable little fox.

"Bunny." This time we will collect a shy bunny, it can be a great decoration for your desktop. Download the diagram and print it.
The further algorithm of actions is exactly the same. We cut along the contour taking into account the indentations and glue according to the diagram. In the end you will end up with a little bunny like this.

"Squirrel". A beautiful forest squirrel along with a nut will keep company with the previously made figures. We cut it along the contour and glue it in accordance with the instructions, and then you will certainly get a squirrel like this.

These are the realistic animals we got.
Video on the topic of the article
For your convenience, watch a selection of videos on this topic.
Calvin Nichols is a Canadian paper artist who has been creating for over a quarter of a century. . His craft skillfully intertwines art, the beauty of wild nature, and an original idea.
His menagerie already includes a huge number of animals, such as owls, wolves, lynxes, bears and even hedgehogs. He creates all this beauty with the help of wooden and metal tools. And the technique is quite simple - carefully cut out the parts, give them the necessary volumes and shapes. And in the process of work, it is necessary to monitor the correct arrangement of light and shadows. They are the ones who give all the products such realism.


Just look at these works of art! It turns out that they can be so alive, so natural and just about ready to crawl out of the paintings and come to meet us. Just don’t be scared, all the little animals are kind, cute and even tame, because they are made of paper by human hands.


It seems that I have unraveled the secret of the skillful Calvin - he creates wonderful paintings and crafts from the bottom of his heart, loving his fabulous menagerie and respecting Mother Nature. Who knows, maybe I can do something similar after a lot of painstaking training? Worth a try!

Such three-dimensional figures can be made of any shape, they can be multi-colored, they can be decorated with beads or lace and a beautiful inscription can be made. In such an unusual box you can store jewelry or all sorts of women's little things.
Many fathers and mothers are occupied with the question of how to explain this or that question to a child in the most accessible way. When a child grows up, the time comes to explain to him complex geometric shapes - cube, sphere, etc. It is much easier to show these figures to a child. To give a child three-dimensional models of geometric shapes, they need to be made from something.
The most convenient and easiest to make is paper crafts in the origami style.

There are many different shapes that people have learned to make from paper and not necessarily geometric ones. These can be voluminous hearts that you can use as decorations for Valentine's Day or stars that will complement the decor in the nursery.
Volumetric paper figures: diagrams of geometric shapes
Creating three-dimensional geometric shapes is not only exciting, but also useful. The child learns to think spatially, which is very necessary.
The simplest way to make a three-dimensional geometric figure is to print the templates and cut along the dotted line, then glue them according to the instructions.
But you can also make such figures yourself. For this you will need: cardboard, colored or white paper, pencil, ruler, scissors and glue.

How to make a paper cube:
- On a piece of paper, draw 4 identical squares with sides 4 cm in a row in a row.
- From the second square, up and down, draw an identical square. You should get a pattern of 6 squares in the form of a cross.
- On the protruding squares, draw valves in the form of trapezoids (width no more than 0.7 cm).
- Cut out a template - a future sample for working with cardboard or other thick paper.
- Bend the figure along the drawn lines, coat the small trapezoid flaps with glue and connect all sides together.
If desired, each side of the cube can be covered with colored paper. And if one side with the flap is not fixed with glue, you will end up with a small box that can be used as gift wrapping.
Amusing volumetric paper animals: toys for kids
Children love to cut out, glue, and draw - such activities broaden the child’s horizons, develop attentiveness and perseverance. Using ready-made diagrams on the Internet or in creative magazines, schoolchildren can create different animal figures.

Gluing three-dimensional shapes is quite simple:
- Having chosen the desired animal, you need to print the diagram.
- Cut out the parts according to the template, leaving a small margin for gluing.
- Make folds along the line and glue the figure.
You can make easy crafts yourself. A bear, a fox, a dog, a cat, a bee - all these animals will be made using identical technology.
Whatever craft you make, you need to let it dry completely. If you handle wet glue with your hand, you can leave dirty fingerprints on the paper.
To create a simple craft, you will need white and green paper, scissors, and glue.
DIY little bunny toy:
- Two strips 3 cm wide and 10 and 7 cm long;
- Two semicircles in the shape of ears;
- Two eyes (blanks);
- A free-form green piece of paper for the “grass.”
Fold the strips and glue the ends together. You should get two wide rings. Glue a larger ring onto a green piece of grass - the body of a bunny, and glue the head onto it. Attach the ears evenly to the back of the head. Draw or glue ready-made eyes, make a mouth - the bunny is ready.
Do-it-yourself three-dimensional paintings from toilet paper: master class
Any creative work is inextricably linked with extraordinary thinking. Crafts made from improvised materials help both children and adults look at these things from a different angle.
Three-dimensional pictures made from toilet paper are not very well known in ordinary circles. But where there is room for creative thinking, there is always something new and interesting.

To create a picture you will need:
- Toilet paper;
- PVA glue;
- Thick cardboard;
- Gouache;
- Brushes 2-3 pcs. different sizes;
- Acrylic varnish;
- Glue container;
- Pencil.
The way you work with paper also determines its appearance. Before gluing the paper onto the cardboard, you need to soak it well.
How to make a three-dimensional picture from toilet paper:
- It is better to cover the cardboard with one or several layers of soaked paper. To do this, apply a thin and even layer of PVA glue to the cardboard and then apply a strip of paper. After drying, we have a ready-made base for the painting.
- Let's draw a tree.
- Take glue into a bowl and dilute it a little with water.
- To create a tree trunk, the most convenient way is to twist soaked paper into a spiral. Lay it out according to the pattern of the tree trunk and its branches.
- To create tree leaves, a suitable method is to layer many small pieces of paper. Twist small pieces into paper balls, soak in glue and lay out according to the template. This will give the tree volume and, of course, make the picture clearer due to the difference in textures.
The finished picture can be inserted into a regular wooden frame without glass.
The painting should be painted on dry paper.
For coloring it is better to use gouache. Ordinary watercolor paint will not lay down in a dense layer on the paper and will show through. For paint, use a high-quality brush that will not disintegrate.
Original do-it-yourself voluminous paper birds: origami patterns
With a little practice, you can create complex and interesting three-dimensional paper shapes with your own hands. You need to start with the simplest shapes that can be printed, cut and glued.

The origami technique is not as easy as folding according to a ready-made template, but it is very interesting. It happens without cutting.
This work with origami involves the use of a square sheet of paper, which must first be cut out.
Do-it-yourself volumetric owl: working with paper
- We bend a sheet of paper 40x40 cm diagonally, unbend it and bend it along the second diagonal.
- We turn the sheet over with the curves facing up and fold it in half towards itself.
- Unbend and bend in half again from left to right. We fold the sheet along these folds into a square and place it in front of us in the form of a diamond.
- We bend the lower edges towards the center, forming two triangles. We bend the upper triangle and unbend it back.
- Unfold the side triangles and open the bottom corner. Turn the craft over and also open the bottom corner.
- We bend the upper half of the top layer in half “towards ourselves”.
- In the same way, bend the upper half of the second layer back.
- We bend the side edges of the top layer, forming 2 triangles. We bend the bottom layer back in the same way.
- Fold the right half of the top layer in half to the left. Turn over and repeat the action.
- At the same time, we turn the left half to the right and pull the lower part up - we get a wing.
- We bend the left half to the right - onto the wing, and bring the back half forward. We make the second wing identical to the first.
- We bend the top corner down and form the head. Turn the product over.
- We cut the corners on the sides and lift up the resulting triangles. Turn it over.
- We make a cut in the lower corner, and from the top layer we bend triangles to the side—the owl’s feet. Your bird is ready!
The owl will be white and can be decorated. For drawing, use watercolors, gouache or a regular felt-tip pen.
Volumetric paper applique: templates and pictures from lumps of paper
It is also interesting to be creative with small children. A very popular type of needlework for kids is creating pictures from lumps of colored paper. This work is quite easy, but at the same time painstaking, because you have to work with small pieces of paper.

Working with paper balls develops the motor skills of the fingers, which determines the development of the baby’s speech and his further mental development.
For work we will need - colored cardboard, thin colored paper (ideally napkins), glue, pencil.
When working, it is important not to forget about alternating colors, because the picture should be bright and colorful.
Before you start creating a picture, you need to draw simple toy figures on a sheet of cardboard. It could be a doll, a car, a butterfly or a whole house.
To make a picture from lumps, you need to cut a napkin into many small squares. Crush each piece with your hands, dip it in glue and apply it to the drawing, forming a three-dimensional picture.
Simple three-dimensional paper crafts for children: how to surprise a child
Creative work with your children will help you pass the cold winter evenings. Every kid wants to have toy furniture that can be made from ordinary paper and cardboard.

Armed with a good mood, you need to use your imagination. Take a couple of sheets of cardboard, scissors, glue, a plastic bottle, paint and openwork ribbon - with these simple things you can create a beautiful table for a doll.
DIY doll table:
- Prepare materials. Cut off part of the bottle from the neck to 12-15 centimeters. Cut 2 ovals from cardboard - the future shape of the table.
- Glue 1 oval onto the neck of the bottle. Paint the bottle any color and wait until it dries.
- Glue the openwork to the rim of the oval and glue the 2nd oval on top.
The finished table can be decorated with beads and flowers and used as decoration.
In addition to the table, you can make a whole set of furniture - chairs, a bed, an armchair. If you can’t draw the details manually, you can find ready-made diagrams on the Internet. It is very easy to use them to cut out various three-dimensional crafts.
Master class: three-dimensional paper crafts (video)
Looking at these crafts, it’s hard to believe that everything can be done with your own hands from the simplest material of paper. Kids can make light appliques, and older children will be interested in voluminous crafts that will be a good gift for any occasion. The main thing in this creativity is accuracy and perseverance, only then will all the crafts turn out beautiful and interesting.
Animal characters of Russian folk tales made of paper for a tabletop theater with your own hands
Do-it-yourself voluminous toys made of colored paper for children. Master class with step-by-step photos
Fairy-tale characters for tabletop theater. Master class with photos
Derkach Anastasia Sergeevna, Additional education teacher, MBOU DOD CDT "Commonwealth", Creative Association "Peacock", Novosibirsk
Description: This master class is intended for children from 7 years old, additional education teachers, educators and creative people who love to create beautiful and unique things with their own hands.
Purpose: Interior decoration, toy, gift, characters for tabletop theater
Target: Making fairy-tale characters from colored paper
Tasks:
- develop practical skills in working with paper;
- develop interest in artistic creativity;
- develop fine motor skills, eye, imagination, aesthetic taste, compositional skills and spatial thinking;
- consolidate skills in handling simple tools - scissors, paper
- improve design and application skills and abilities;
- cultivate independence, accuracy in work, patience, perseverance
Manufacturing technique:
- applique
- design
- paper plastic
Materials and tools:
- a simple pencil
- colored paper for copier
- ruler
- a set of colored paper
- scissors
- glue

Safety rules when working with scissors
1. Use well-adjusted and sharpened scissors
2. Scissors should have blunt, rounded ends
3. Place the scissors with the rings facing you
4. Watch the movement of the blades while cutting
5. Don't leave scissors open
6. Pass the scissors rings first
7. Don’t play with scissors, don’t bring them to your face
8. Use scissors as intended
Rules for working with PVA glue
1. When working with glue, use a brush if necessary.
2. Take the amount of glue that is required to complete the job at this stage
3. It is necessary to apply the glue in an even thin layer
4. Remove excess glue with a paper napkin
5. Try not to get the glue on your clothes, face, or especially your eyes.
6. After work, close the glue tightly and put it away
7. Wash your hands and work area with soap and water
Paper animal templates:


Animal characters in Russian folk tales represent a whole gallery of diverse characters. Of course, all these characters metaphorically reflect the world of people - their actions, the fears of the weak before the strong, resourcefulness and kindness. It is worth noting that the characterization of animals in a fairy tale is characterized by a tendency to typify the image, that is, the hero is clearly distinguished by one quality inherent in a person.
For example, the hare is always cowardly, and the cat personifies justice.

Often cat in fairy tales he openly demonstrates his playful disposition; in many stories he turns out to be a robber or even a thief. But at the same time, the cat is distinguished by justice and a lively resourceful mind. Thanks to his eloquence, he gets out of any difficult situations, helps the offended, and protects his friends. Moreover, the cat does not have obvious power; its true power lies in the word. The wise words of a cat can strike fear into animals many times larger than him. For example, in the fairy tale “The Cat and the Fox,” the cat calls himself Voivode and makes even such strong animal characters as the bear and the wolf tremble. You can also remember the fairy tale “The Cat is a Gray Brow, a Goat and a Ram,” in which a cat and his friends cleverly deceive the wolves.

Hare– the hero is weak, but cunning. He often acts as the personification of cowardice, however, thanks to his dexterity and resourcefulness, he easily gets out of difficult situations. For example, in the fairy tale “The Boasting Hare,” the hero helps save a crow. The obvious evolution of the image of the hare in fairy tales: at first it appears to us as a symbol of cowardice and timidity (“The Fox and the Hare”), but as the story progresses we see how this cowardly hero is transformed. He can outsmart even a wolf and save his friends.

Mouse in fairy tales, she is hardworking and kind, although it is often emphasized that “a mouse’s brain is smaller than a pea.” She often acts as a savior, and the reward for this is not at all large - just a spoonful of porridge, for example. The mouse often helps people - carries water in the fairy tale “Fear has Big Eyes” and can even save lives (“Daughter and Stepdaughter”). This is a strong animal character, who sometimes plays a decisive role in the development of the plot of a fairy tale - he helps to pull out a turnip ("Turnip"), and does something completely impossible and beyond the strength of people - breaks the golden egg ("Hen"). Despite its small size, the role of the mouse in fairy tales turns out to be very significant.

In the animal world of fairy tales, there is a special type of hero - a rogue and a deceiver, of course this
Fox. This is a stable image in which cunning, a tendency to deception and tricks dominate. The fox will do anything to get what she wants - she will pretend to be weak and helpless, and use all her charm and eloquence.
In Russian fairy tales, this type is always contrasted with a simpleton character. It could be a wolf, whom the fox successfully fools, a rooster (“Cat, Rooster and Fox”), or a weak hare, whom she drives out of her hut (“The Fox and the Hare”). The fox is often punished for his misdeeds, especially when he attacks weak, helpless heroes. For example, the Fox in the fairy tale “The Fox with a Rock” runs away and hides in a hole.
In Russian fairy tales, positive animal characters are very widely represented. They always win thanks to their intelligence and resourcefulness.
Progress:
The basis is that all animals are prepared in the same way.1. Take a sheet of copier paper in A-4 format

2. Fold so that the top part is approximately 1 - 1.5 cm


3. Spread a thin strip with glue

4. Glue

5. Fold the workpiece like an accordion (into 4 parts)


The blank is ready, you can decorate it and start creating the image
DIY paper pig for children. Master class with photos
Pink paper blank

We cut out all the necessary details for decoration from colored paper.

Collecting eyes, Piglet

Ears


Glue the ears to the top

Eyes

For the nose, cut out a strip and roll it up


Glue it


Add legs to the bottom of the workpiece and, of course, don’t forget about the tail

Cut out the cheeks and the top from orange paper.


Let's make a bouquet of daisies for him

The piglet is ready!
If you make two more, you can play the fairy tale "The Three Little Pigs"

DIY paper hare for children. Master class with photos
We make a toy blank from a white sheet.

We cut out all the necessary details for decoration from colored paper.

Glue it


On the top of the workpiece, carefully glue the ears and muzzle


Glue the paws and tail to the bottom of the workpiece


Making carrots for the bunny

Our bunny is ready!

Proverbs and sayings about the hare
There won’t be anything faster than a hare, but even that one gets caught.
The hare's legs are worn.
As cowardly as a hare, as lascivious as a cat.
You can't catch a hare without a dog.
The hare is a coward - and he loves to hunt.
They follow the hare's trail to the bear.
The hare's feet feed.
It meanders like a hare.
The hare runs from the fox, the frog runs from the hare.
The hare is afraid of himself.
You can't lure a hare onto a drum.
The hare cannot escape the dog.
DIY paper fox for children. Master class with photos
We make a basic blank from an orange sheet.
Cut out all the necessary details for decoration from colored paper

Let's start assembly


Our fox is ready!
Proverbs about the fox
There is no animal more cunning than a fox.
Every fox praises its tail.
They care for a fox, they coax a cat.
They appointed a fox as a governor in the forest: there are many feathers, but no birds.
The fox will cover everything with its tail.
The old fox doesn't let himself be caught twice.
The fox lives better than the wolf.
If the fox had not arrived in time, the sheep would have eaten the wolf.
Every fox takes care of its own tail.
The forests sleep, and in their sleep they pluck chickens.
A fox went to steal chickens and got caught in his mouth.
A fox even has ears on the top of its head in a dream.
That's why they beat the fox so that it doesn't go to the chicken coop.
The fox is a cheat, the fox is a flatterer.
You can't teach an old fox tricks.
Where the fox passes, the chickens do not lay eggs.
Cunning like a fox, cowardly like a hare.
A fox leaf: it will fit in one ear and come out of the other.
The old fox digs with its snout and covers its tracks with its tail.
Lisa Patrikeevna has ears on top of her head.
You can already play with the fox. She knows how to open her mouth and talk.
The secret is that on the back there are two pockets where you need to insert your hand and control the toy


DIY paper cat for children. Master class with photos
Basic blank form made of yellow paper
Cut out all other details from colored paper

We decorate


We make a bow out of green paper, like the eyes of a cat

Glue on the bow and our cat is ready!


Proverbs and sayings about cats
The mouse and the cat are a beast.
A well-fed cat plays with a mouse.
The cat knows whose meat it ate.
At night all cats are gray.
Why is the cat smooth: he ate and turned on his side.
It's not all Maslenitsa - there will be Lent.
Cat - toys. Tears for the mouse.
The cat sleeps, and even catches mice in its sleep.
If a cat doesn’t catch mice, then what’s the point of a cat?
The cat is a fish hunter, but he is afraid of water.
You can't buy a pig in a poke.
A cat's paw is soft, and its claw is sharp.
The cat is on the stove, the dog is on the porch.
The cat is on the threshold, and the mouse is in the corner.
Don't pet a cat against its grain.
The cats are from the yard, and the mice are on the tables.
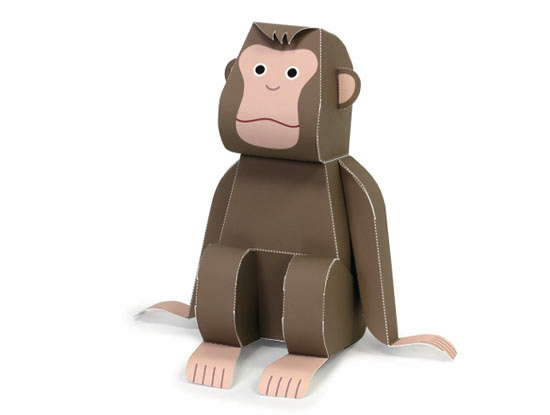
And again, voluminous paper crafts - forest animals: hare, fox, owl, monkey and squirrel. The author illustrated very cute forest animals, the design is quite simple, but the model diagrams themselves will still require some perseverance in assembly.
Gluing three-dimensional paper figures is very interesting and completely uncomplicated. Together with your children, you can collect and glue a lot of funny little animals, and then populate a whole paper forest with them. In addition, assembling such models is useful for children to develop fine motor skills.
Paper animal diagrams
All children love making, cutting and gluing fun crafts. But working on three-dimensional toys contributes to the development of a child’s spatial thinking. I suggest you join the children and get creative with them.
Using ready-made diagrams that can be downloaded on the Internet, it’s easy to make a lot of original three-dimensional figurines of forest inhabitants together with the children. This entertainment will keep your child busy and provide many hours of useful and educational activities.
To complete this work, we will need to download the diagrams and assembly instructions and print them on a color printer. Then, using scissors, cut out all the parts and, according to the instructions included, assemble and glue three-dimensional figures of animals or even a whole tree.
Let's start by making a cunning fox out of paper.
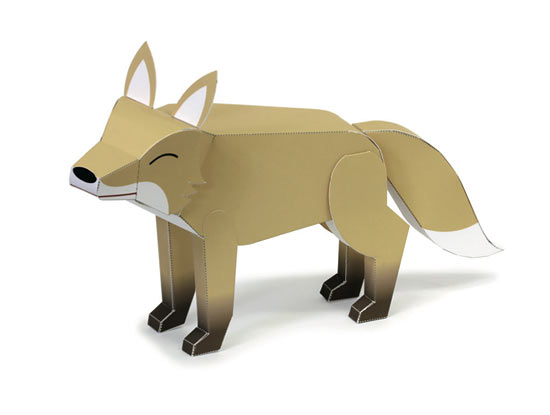
After we print out the sheets with the parts, we take scissors and cut them out taking into account the gluing allowances. Then we bend the parts along the dotted lines and glue them together according to the instructions and diagram. We glue on the ears and tail and as a result we get a real red-haired rogue.
As we remember from fairy tales, the fox always hunted a bunny and a paper bunny will keep our fox company.

The algorithm for creating a three-dimensional paper bunny craft is the same as for creating a chanterelle. ,
We print it on a printer, cut it out, bend it along the marked lines, glue it together and assemble the animal toy.
The forest is home to not only the hare and fox, but also various birds. A voluminous paper bird is made in the same way as

And of course, what is a forest without trees? and collect it as described above.


