Leather weaving in various ways. Weaving from rubber bands on the machine: easy patterns for beginners
Leather weaving. How to weave bracelets in various ways.Weaving allows you to connect individual elements to each other into a durable product. Weaving elements are leather cords that are woven together into round or flat braids. All braided bracelets (except for “circular braids”) require leather with a thickness of 1.2-2.0 mm.
AFGHAN BRIDGE.

This type of weaving is widespread in the East. This is how waist belts, horse harness, bag handles, etc. are woven. By learning how to weave such a bracelet, you will simultaneously learn a simple and durable way to connect leather strips without using metal fittings. 1. Cut out two strips of leather 5 mm wide and 160 mm long.
2. Use a blunt awl to mark the edges of the slots according to the dimensions shown here, or change them as desired.
RULE:
a) the distance between the slots is equal to half the width of the strip;
b) the number of slots on the strips differs by one (in our case, these are six and seven).
3. Make cuts with a chisel with a blade width of 6 mm.
4. Sharpen the ends of the strips with a chisel or knife.
5. Take the strip with seven slots in your left hand, with the end free of slots towards you. Expand the nearest slot with a trowel or screwdriver. Pass the short end of the six-slot strip down through this widened slot, pull lightly and straighten the weave.
6. Short end of the six-slot strip, sand and glue the seven-slot strips to the bakhtarma.
7. Using a trowel to expand the nearest slot on the six-slot strip, pass the seven-slot strip through this slot from bottom to top.
8. Now the principle of weaving has become clear. Pass the bottom strip through the top strip each time.
9. At the end of weaving, hem the short end of the strip with seven slots and glue the strips with six slots to the bakhtarma.
10. The choice of the length of the bracelet is up to you. Trim off the excess from the ends of the strips. Punch holes. Install a fastener.
SINGLE PUZZLE. 
This and the next bracelets are the embodiment in the skin of logical problems about braids. Fans of such problems are referred to books on entertaining mathematics.
1. Trim exactly one edge of the cooked leather.
2. Mark the ends of the slots, and then cut them with a knife. The length of the slots is 160 mm, the width of the cords is 3-4 mm.
3. Now cut off the second edge of the bracelet.
4. Weave.
Mentally mark the top and bottom of the weave and number the cords from left to right: 1,2,3.
First cycle:
- 3rd between 1st and 2nd;
- the bottom of the weave between the 1st and 2nd (reversing the cords should not bother you);
- 2nd to 1st, 3rd to 2nd;
- the bottom of the weave between the 3rd and 2nd. After the end of the cycle, the normal arrangement of the cords is restored.
Second cycle:
This cycle can be repeated 2-3 times until the end of weaving.
- 1st to 3rd;
- the bottom of the weave between the 1st and 2nd;
- 2nd to 1st, 3rd to 2nd;
- the bottom of the weave between the 2nd and 3rd.
Stop when weaving becomes impossible due to the tight arrangement of the elements.
5. Using a blunt awl or ironer and tweezers, spread the weave evenly over the bracelet. Chop off the edges with a semicircular chisel, punch the bartack holes, set the bartack.
DOUBLE PUZZLE.

Puzzle variant. in which six are used instead of three strips of weaving. In this case, each pair of strips: is taken as one strip, and weaving is performed in the same way as in the case of a single puzzle. Options with nine polonium are possible, while three bands are taken as one.
GIRL'S SPIDER.

1. Cut three cords 220-250mm long and 3mm wide.
2. Gather the sides of the cords with a single strip of glue. The length of such an assembled strip is 25 mm. The opposite end of the cords must be free. Insert the assembled end into a clothespin or clamp.

3. Mentally number the cords from left to right: 1,2,3.
Weaving pattern: 3rd to 2nd, 1st to 3rd, 2nd to 1st, 3rd to 2nd, etc.

Make sure the cords are evenly spaced in the braid.
4. When the length of the braided part reaches 140mm. clamp the edge of the braided part with a large clothespin or pliers so that the loose ends of the cords remain free. Glue the loose ends into a single strip with glue.
5. Now chop off the edges of the bracelet with a chisel so that the length of the unbraided ends is 10 mm. 
6. Make two parts for finishing the ends of the bracelet. Details are shown in the picture.
7. File the non-braided ends of the bracelet from the side.
8. Connect the ends of the bracelet with the details of the design of the ends with Moment glue, gluing the decorated parts to the ends of the bracelet.
9. Make and install the backtack.
A SPIDER FROM FOUR CORDS.

1. Cut four cords 220-250mm long and 4mm wide.
2. Gather the side surfaces of the ends of the cords with glue in one strip.
The length of this strip is 25 mm. The opposite end of the cords must be free. Clamp the assembled end with a clothespin.
3. Mentally number the cords from left to right from 1st to 4th.
Weaving scheme: 5th on the 2nd, 1st on the 3rd, 4th under the 2nd and on the 1st.

Further, the weaving pattern is as follows: the leftmost “ON”, the rightmost “ON and ON”.
4. Repeat steps. 4-9 "Girl's braid". The details of the design of the ends of the bracelet are similar to those given above. Change the width of the glued area according to the width of the cords.
CIRCULAR BRAID.

For its manufacture, in addition to thin skin, you will need a rope around which cords are woven.
1. Cut four cords 250 mm long and prepare a rope of the same length with a diameter of 3 to 5 mm.
2. Glue the ends of the cords to the end of the rope in a circle. The length of the glued area is approximately 15-20 mm. Additionally, secure the place where the cords are glued by tightly wrapping them with thread.
3. Divide the cords into two pairs - left and right. Mentally number the cords from left to right from 1st to 4th. Take the left cords in your left hand, and the right cords in your right.
4. Weave according to the scheme:
Draw the 1st cord behind the rope and skipping between the 3rd and 4th, lay it on the 3rd, draw the 4th cord behind the rope and, skipping between the rope and the 2nd, lay it on the 1st.

Next, weave like this:
the extreme left cord - under the extreme right, the extreme right - under the extreme left.
5. When the length of the braided part reaches 130-140 mm, you should fix the end of the weaving. To do this, wrap the end of the weave with a thread. Glue the loose ends to the rope.
6. Trim non-woven areas. Their length should be 10 mm.
7. Make two end pieces.
8. Lubricate the non-woven ends with Moment glue and leave to dry. Now grease the details of the design of the ends with glue from the side of the bakhtarma.
9. Fold the tubes of the decoration around the braided ends of the bracelet so that the threads are completely covered. Flatten the ends of these tubes by lightly tapping them with a shoe hammer. Perhaps the place of gluing on the tube itself will have to be glued additionally.
10. Punch holes in the bartack and install it.
HARLEQUIN.

This is a variant of the circular braid, which is woven with two pairs of cords - one of them is light, the other is dark. Place a pair of dark cords on the left and a pair of light cords on the right and follow all the instructions for weaving the previous bracelet.

How to learn to weave from newspaper tubes? Schemes, techniques and master classes of weaving from newspaper tubes. The most beautiful crafts from newspaper tubes.
The talent and skills of some people are sometimes simply amazing. It would seem that what can be done from an ordinary newspaper? Well, cap, well, airplane, well, what else? An, no, there are such masters of their craft who manage to create from old newspapers not just a work of art, but a whole masterpiece.
Ideas for boxes, crafts, vases, baskets, boxes from newspaper tubes: photos of the most beautiful products
Just look at these wonderful crafts made from ordinary newspaper tubes. Their beauty is simply breathtaking!


Unusual vases from newspaper tubes


How to make, twist newspaper tubes from newspapers and paint?

We twist tubes from newspapers
For those needlewomen who take up the process of twisting newspaper tubes for the first time, this business may seem very difficult and almost impossible. But over time, having stuffed your hand, you can achieve pretty good results when the newspapers seem to fold themselves into tubes.
So, here is a list of materials needed for twisting newspaper tubes:
- Newspapers
- PVA glue or stationery glue stick
- Knife, stationery knife or scissors (as you prefer)
- Thin knitting needle 0.5-1 mm or skewer

Algorithm for twisting newspapers into tubes:
- We take a newspaper or a stack of newspapers.
- We fold all the pages in such a way that they lie clearly under each other.
- Fold the newspaper in half.
- Again, we make sure that the edges of the newspaper do not overlap each other.
- Cut the folded newspaper in half.
- The resulting halves of the newspaper are again folded in half.
- We cut the halves of the newspapers along a new fold.
- The resulting quarters of newspapers are sorted into two piles.
- We put strips of newspaper with white edges in one pile - the tubes twisted from them will be pure white.
- We put strips with letters in another pile - the tubes twisted from them will be printed.
- We take one of the strips of the newspaper.
- We put a knitting needle in its lower right corner.
- The needle is placed at an angle of 25-30 degrees.
- Holding the tip of the newspaper, we begin to twist the knitting needle, while winding the paper around it.
- We try to roll up the newspaper as tightly as possible.
- Having twisted almost the entire tube, coat its edge with glue and glue it to the tube.
- We take out the needle.
- We give the finished tube 15-20 minutes to dry.

It is worth paying attention to the fact that the final version of the finished tube will have two ends of different thickness - on the one hand the tube will be thicker, and on the other thinner. Such a structure of the tubes is necessary in order to "build up" them. "Extension" is a procedure based on the creation of long tubes. It consists in the fact that the thinner end of the other tube is “screwed” and “pasted” into the thicker end of one tube. Thus, one long newspaper tube is obtained.
Instructions for twisting tubes from newspapers: Video
You can paint tubes from newspapers after the fact - when the product is completely ready. However, this option is only suitable for cases where the craft is done in one color. If the product is conceived in different colors, then it is advisable to paint over the tubes in advance.
You can dye newspaper tubes with any dyes:
- watercolor
- gouache
- acrylic paints
- aerosol cans
- stain (letters will show through)
- food colorings
- eyebrow, hair dye
- brilliant green
- basma
- wood paint
- colorless paint with the addition of color (this way you can do it on
- the basis of one paint at once several different shades of paint)
How to paint tubes from newspapers: Video
- It is immediately worth highlighting two types of dyes, which are the most popular among masters of weaving from newspaper tubes - these are acrylic paints and water-based stain. Both of these water-based dyes allow the paper to be thoroughly and densely colored. At the same time, during weaving, no paint remains on the hands and surface, which is important in this process.
- In order to make the product more durable and water resistant, it is desirable to varnish it at the stage of tubes. The ideal option is when the varnish is applied in 2 layers.
- By the way, in the case of varnish, you can save on paint - color can be added directly to the varnish.
- The dyed tubes must be thoroughly dried in the oven, in the sun or in front of the oven.
How and where to start weaving from newspaper tubes?

- Often the design of newspaper crafts consists of a bottom, guides and woven tubes.
- In the form of guides, several tubes of the required length are used - the length directly depends on the height of the craft.
- There may be several tubes for weaving - it is better for beginners to start with one tube.
- It is advisable to make the bottom of the craft wicker - so the product will look more attractive. With this type of weaving, the core of the bottom is first made, the ends of which will later become the racks of the craft, and then the tubes are braided around it, creating a round (or other shape) bottom.
- But you can also make a solid bottom - it is created from two circles cut out of thick cardboard. The vertical racks of the craft are glued to the lower circle (they need to be slightly flattened at the attachment point), and on top they are fixed with another circle with glue.
- As a basis for crafts, you can use a jar, vase, glass or other container that is suitable in size. The base is installed on the bottom, and the racks are fixed in its upper part with clothespins for evenness of the product.
- When the bottom, base and guides are in place, you can begin to braid them with a paper vine.
Ways to weave newspaper tubes for beginners: step by step instructions, master class

For beginner needlewomen, the easiest way to weave from a newspaper vine is suitable - a single one with a solid bottom:
- We take the finished frame of the future crafts.
- One of the tubes, which will act as a vine, is slightly flattened at the end.
- Glue the flattened end of the vine to the bottom of the craft.
- We start the vine behind the nearest guide (with this type of weaving there should be an odd number of them) from the outside.
- We bring the vine inside the craft.
- We braid the next guide from the inside.
- We bring the vine out of the craft and wrap it around the next guide from the outside.
- Thus, we continue in a circle along the entire height of the craft.
- In the process of work, the vine will end, so we build it up along the way.
- We make sure that the vine lays down tightly, and the racks stand straight.
- Having stuffed your hand a little, you can try to weave several vines at once (2-3).
Types of weaving from newspaper tubes for beginners - bending simple, double, rod, complex, pigtail, lazy, izida, volume: weaving pattern for beginners, photo

The scheme of weaving in the technique of a rod of three rods


The scheme of weaving from newspaper tubes using the technique of "isida"

Weaving pattern from newspaper tubes "double bend"

Complex bend - scheme


Weaving scheme "lazy braid"
The bottom of newspaper tubes is square, rectangular, round, oval: how to weave for beginners?
How to weave a simple round bottom from newspaper tubes: Video
How to weave a square bottom from newspaper tubes: Video
How to weave an oval bottom from newspaper tubes: Video
How to weave a rectangular bottom from newspaper tubes: Video
How to weave handles at a basket of newspaper tubes: patterns for beginners
Twisted handle for a basket of newspaper tubes: Video
Newspaper basket handle: Video
How to finish weaving from newspaper tubes?
The simplest bends from newspaper tubes: Video
Basket of newspaper tubes: technique, weaving patterns

The scheme of weaving a box of newspaper tubes
Newspaper tube weaving patterns for beginners

Summing up, it is worth saying that you should not be afraid to start something new. Even the most eminent needlewomen were once beginners. They also did not succeed all at once, they were also upset and intended to abandon their hobby. But nevertheless, over time, everything fell into place - the tubes began to roll up faster, the patterns became more complex and ornate, and the crafts were simply mesmerizing. So, dear readers, go ahead, study, fill your hand, and skill will surely overtake you!
How to weave a box of newspaper tubes: Video
How to weave a lid for a box of newspaper tubes: Video
Weaving from rubber bands on a loom is a fashionable modern hobby that a huge number of children and adolescents are fond of. This weaving technology allows you to create jewelry items, three-dimensional figures of animals, birds, and all kinds of objects. Each of the listed items can be made using a specific technology.
The technique of weaving from small rubber bands allows you to step by step create not only funny bracelets - but also toys, figurines, key chains, baubles, jewelry, accessories and more. Knitting from elastic bands can be done in different ways: on a large or small loom, on a slingshot, using a fork, weaving amigurumi (only with a hook), weaving on fingers.
Weaving from rubber bands on a loom is a fashionable modern hobby
One of the easiest bracelets that can be made using a loom is the rainbow one.
In the process of weaving, the following materials and tools will be required:
- machine;
- hook;
- elastic bands of rainbow colors;
- black rubber bands;
- figure-eight clasp.
How to weave rainbow bracelets:
- The machine is assembled in such a way that its central part is in a mixed position with respect to the extreme ones.
- Next, you need to position the machine so that the open part of its protrusions looks in the direction from the needlewoman.
- On each extreme pin of the 1st row, 1 purple elastic band is thrown.
- Pink rubber bands are stretched in each part, capturing the 1st and 2nd row.
- Similarly, on the 2nd and 3rd row, it is stretched along the orange elastic band.
- On 3 and 4 - yellow, on 4-5 - green, on 5-6 - blue.
- According to this principle, the entire machine is filled. After the end of the colors, their use must be repeated.
- On the last pins, 1 rubber band is thrown without stretch. Subject to the specified sequence of colors, the last shade will be pink.
- The result is 3 lines formed by colored rubber bands.
- Black elastic bands are stretched in rows - across the formed colored lines. Since the middle of each row is slightly forward, the stretched elastic bands form a triangle shape.
At this stage, the work on stretching the rubber bands ends, then you need to proceed directly to the weaving of the bracelet.
Gallery: weaving from rubber bands (25 photos)


Weaving a rainbow bracelet
Weaving a rainbow bracelet is quite simple. This is due to the fact that the same actions must be performed along its entire length.
Weaving takes place according to the following technology:
- The machine is turned over to the needlewoman so that the last row is the first.
- A hook is inserted into the cavity of the extreme pin. Next, the purple elastic band is captured, then it is removed, stretched between the black line and the pin. Then the removed loop is thrown onto the next pin of the same line.
- Similarly, all the purple elements of the first row are thrown.
- The hook is placed in the pin of the second row, picks up the blue elastic band, forms a loop and throws it over the pin in front.
- All colors and rows are knitted in the same way.
- Now you need to move on to free purple rubber bands. One of its sides is stretched into half a pin, and then, together with the second, it clings to a hook. According to this principle, all free purple elastic bands are collected on the hook.
- Then the black element is crocheted and pulled through all the purple loops located on its shaft.
- The second black loop is picked up with a hook.
- Both loops are fastened with a clasp.
- Then you need to pull a little on the fastener and remove all the loops from the machine, except for those that form the last row.
- A hook is passed through the pink and black elastic, and then all the loops are removed from the loom.
- Loose pink and black loops are pulled over the front of the loom. This is necessary in order to knit the bracelet of the desired length.
- Next, the above described procedure for stretching and weaving the bracelet is repeated until it acquires the desired length.
- After that, the free extreme elastic bands cling to the second part of the fastener.

Weaving a rainbow bracelet is quite simple
It is not necessary to weave such a bracelet in rainbow colors, it can be plain, and you can also lay out a certain pattern with rubber bands.
Bracelet transformation
A braided bracelet knitted in this way can be changed into a striped accessory. This will require black rubber bands and elements of bright saturated colors.
- One part of the bracelet is removed from the clasp and fastened.
- Through it, colored elastic bands are put on the bracelet in turn. First, a black element is put on the base, after it 2 pink ones.
- Next to the pink ones, you again need to place a black part, and after it - 2 orange ones.
- Orange are covered with a black, and then a yellow pair.
- After two yellow elastic bands, a black one is strung again, and then a green one.
- The entire bracelet is covered in the same way.
At the end, the fixed end of the jewelry should be fixed in the clasp.
Cat fresco made of rubber bands on the machine (video)
How to weave a bracelet on a round loom?
A round loom allows you to weave a bracelet that does not require the use of a clasp.
For weaving you will need:
- round machine;
- black and orange rubber bands.

Round loom allows you to weave a bracelet that does not require the use of a clasp
How to weave a light bracelet - instructions for beginners:
- Along the extreme lines, capturing two nearby rows, black elastic bands are pulled. The tension should be done in such a way that the new elastic band intersects on 1 pin with the previous one.
- Orange elements are stretched in the middle in the same way.
- Next, new black elastic bands are stretched between the middle and inner line in every second row.
- Orange elements are stretched between the outer and middle line in those rows where there are no black transverse details.
- The machine is positioned so that the working triangle is turned to the needlewoman with a side, and not an angle.
- An orange rubber band is put on the first triangle.
- The hook is placed inside the first outer pin, catches the lower elastic band, pulls it out and throws it on the next pin. This should be done with all the elements of each row.
- After all the elements are knitted, the bracelet can be removed from the loom.
If there is a desire to make a bracelet on a smaller round loom, it should not be closed, but placed on a clasp, as in the previous version.
How to weave a simple figure on a small loom?
What other machines are there besides those described above? The most interesting, and at the same time, simple figures can be made on a mini-machine. To make an octopus, you only need a loom, a hook and colored rubber bands.
Weaving pattern on a small loom:
- 3 red elastic bands are put on the pins diagonally, while they should be twisted together with a figure eight.
- 6 yellow elements are pulled over the pins, forming a rectangle shape.
- Red loops rise and fall into the middle of the weave.
- From the last last pins, 1 yellow loop is removed, taken out to the auxiliary poles on both sides.
- The next layer is formed by yellow rubber bands stretched over all the pillars in a circle.
- The bottom layer rises up.
- Then another layer of a different color is stretched, and the lower loops are removed upward.
- 5 rows are knitted in this way.
- On the sixth layer, you should make eyes. The eyes are put on the rubber bands of the near row, and then the 7th layer is woven.
- On the 8th row, a mouth is made. To do this, put on a black elastic band on the middle element of the middle row.
- The paws are woven with a hook. First of all, a chain of 8 elements is made. Next, each of the legs is removed on single rubber bands, which are placed in turn on the machine.
- The bottom layer is thrown up, a new layer is added to the middle weaving cavity. The design is neatly crocheted and removed from the machine.

To make an octopus, you only need a loom, a hook and colored rubber bands
Weaving on a mini-loom: ideas
Similarly, you can make not only an octopus, but also other domed objects, for example:
- doll cap;
- bell;
- decorative nozzle for a pen or pencil;
- decorative bottle cap
- minion figurines;
- by making the body longer than the minion, you can make a squid.

On a mini-loom, you can weave, for example, a minion
In this way, you can make the basis for creating volumetric pendants, earrings. In the future, the domed base is decorated, placed on a tourniquet or fittings and used as a homemade decoration. Such light figures can be the beginning of laborious work. For example, needlewomen create entire cities from a variety of rubber figures.
Bracelet "Dragon Scales" from elastic bands on the machine (video)
Flat braids and voluminous cords woven from leather strips serve to decorate and decorate products. They are also the basis for braided bracelets and belts, bag straps, hair bands, etc.
flat braids
For weaving braids, strips of soft elastic leather with a smooth wrong side (as we remember, bakhtarma) are needed.
The beginning of weaving will not cause complications if we leave one end of the leather strip 2–3 cm uncut. If we weave from separate straps, each of them should be nailed to the table; if they are too thin, it is advisable to tie them up before weaving, straightening them. You need to try to weave as tightly as possible, because tight weaving will stretch less when used.
At the end of weaving, lightly beat the product with a shoe hammer and stretch it a little with our hands to smooth out the bumps.
A pigtail of three straps is woven according to the principle of an ordinary braid.
A four-layer pigtail can be woven in various ways. Figure 29 shows the sequence of weaving stripes.
Rice. 29
The 5 strap braid can also be done in a variety of ways; Figure 30 shows an example of a French braid.

Rice. thirty
From two sufficiently long straps, a thick beautiful cord of square section is obtained (Fig. 31). To begin with, the strips need to be laid crosswise and glued. In the figures, the place of gluing is indicated by a cross. As a result, 4 strips are formed, indicated in Figure 32 by the numbers 1, 2, 3, 4. When weaving, for convenience, similar designations can be made with a ballpoint pen at the ends of the strips.

Rice. 31
The order of weaving is shown in Figure 32:
A– strip 4 is bent towards strip 3; strip 2 - crosswise into 3 and 4;
b- strip 3 is folded crosswise over 1 and 2;
V - strip 1 is folded over and pulled through the loop formed by strip 4;
G - all strips are evenly pulled to the sides, as a result, the first crossing is formed;
di- the drawings are given for clarity and repeat the weave shown in the drawings a-g. Subsequent weaving is done in exactly the same way.
Very beautiful bracelets are obtained from such a square cord. To connect the cord into a ring, the open ends are inserted into the initial crossing and tied with a fringe. Or you can cut off the excess cord, cross the ends and glue them.
When braiding a rope or a household cord with four strips of leather, you will get a handle for a bag that will never stretch on you. The ends of the strips (1, 2, 3, 4) must be glued in pairs and fastened to the rope with glue and a needle and thread (Fig. 33 a).


Rice. 33
On fig. 33 shows in detail the order of weaving:
b - lay strip 1 to the right above strip 3 and above the cord;
V - lay strip 2 to the left under strip 4 and above strip 1 and cord;
G - take the strip 3 back to the right, under the strip 4 and the cord.
The subsequent braiding should be carried out in the same sequence.
When weaving, you need to make sure that the skin lies with bakhtarma to the rope.
In order to connect the braided cord into a ring, one strip must be left longer, the ends of the rest are scraped and glued to the ring. A long strip from the side of the bakhtarma is smeared with glue, wrapped around the other ends and the ring itself (Fig. 34).

Rice. 34
From such a cord, you can make not only handles for bags, but also bracelets, neck jewelry, belts, hair bands, etc.
round weave
The essence of round weaving is that the strap is sent from the back to the opposite side, then it is passed between two or more straps to the side from which it was taken.
Round weaving can be used to make bracelets, leather necklaces, straps for tightening bags, loops for bags, pens, belts.
Any leather can serve as a material for weaving, it all depends on the purpose of weaving. If thin weaving is necessary, the belts are planed, doubled and fattened. When thinning the belt, you can leave the end of it whole, but it is even better if the belt is taken at the rate of double the length and first folded in half. If desired, the tip of the weave can be completed with a ball or knot; for this purpose, you can also use separate strips of leather, tied at a distance of 5 - 10 cm from the end.
It will be easier to start weaving if the straps are tied in pairs, turning the right sides to each other. Round weaving is made only from an even number of straps. In the process of weaving, you should also pay attention to the proper density. Having reached the end, we temporarily tie it, then, putting the product on the table, with the help of a board, a roller, pressing hard, roll it so that the weaving takes on a beautiful round shape. For bag loops, you need to test for strength if they are woven into a thick belt.
Round weaving can be made rectangular. In this case, the shape is corrected not by rolling, but by a shoe hammer. A rectangular shape can be achieved by aligning the sides with a bone.
It depends on the beginning of weaving whether the colored strip will spiral or run vertically. You can try other types of weaving with the introduction of color. Their number is impossible to enumerate. The choice of weaving depends on the imagination of the author. We can give you one piece of advice: you should not use leather in bright colors of industrial coloring. The combination of two related shades will be more interesting than contrasting, flashy, detrimental to form and design.
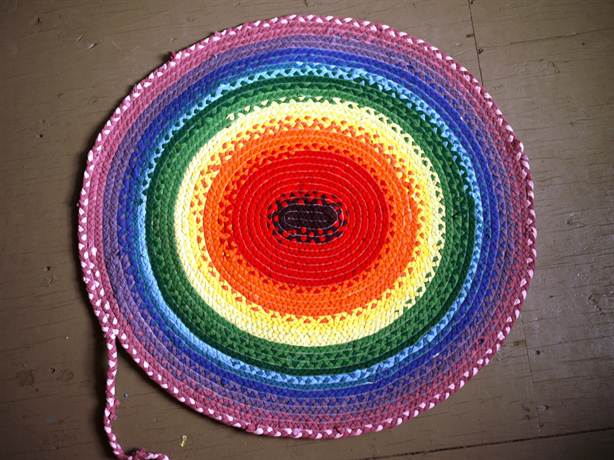
While visiting your grandmother, you must have seen her small rugs made by hand. Our ancestors did not throw away old things, they gave them a second life. After learning how to weave a patchwork rug without a hook, you can create it yourself. It will not only decorate your home, but also a very practical thing to use.
There are quite large crochet hooks on sale, but such a rug can be made without tools.
round rug
The simplest version of a rug made of shreds of fabric is round. To make it you will need:
- Old things made of fabric;
- Scissors;
- Needle;
- Threads.
If you just want to recycle old things by creating a door mat for shoes, you can safely take any fabric. If you have ideas to fit this product into the interior, carefully select the color and texture of the fabric.
Start by cutting your fabric into long strips.
If the fabric is fraying a lot, it is better to sew each strip and turn it inside out, leaving the seam inside. This is a rather time-consuming task, but a product made of treated fabric looks neater and will last longer.
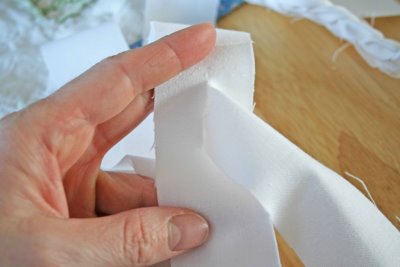
From the obtained pieces of fabric you need to weave a braid. The tighter it is, the stiffer the resulting mat will be, respectively, if you want a soft mat, then do not twist the braid too much.
Fasten the ends of the patches with a pin.

And start weaving.
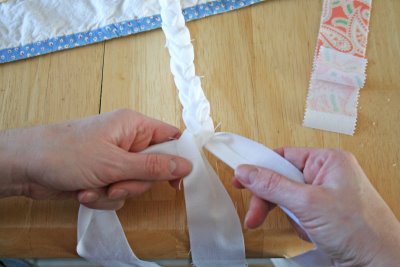
Having reached the end of the ropes, you need to lengthen them. If you tie a knot, it will turn out rude and ugly. There are two options - carefully sew on a new end or make cuts at the ends of the patches and stretch an additional rope through the working end and insert its tail into the cut. Tighten gently and you have a long rope with no knots or stitching. The whole process is clearly visible in the photo:


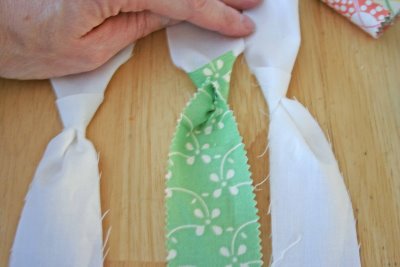
You need to weave a sufficiently long pigtail.

Do not process its ends yet, but simply grab them with a pin so that they do not bloom. If during the process of making the rug you want it to be larger, simply attach new pieces of fabric and braid the braid to the desired diameter of the finished rug.


Instead of a thread, you can twist the pigtail with a ribbon. To do this, weave it with zigzag stitches either into the side of the carpet, or into the working pigtail thread. Tighten the tape, and it will connect the parts together.
For more strength, it is better to completely weave or stitch the edge row of the rug, then the product will definitely not fall apart.

Round rug is ready!

Bathroom decoration
Convenient and practical rug for the bathroom can be made with your own hands. For this you will need:
- Old towels;
- Ruler and tailor's chalk;
- Sewing machine;
- Tailor's scissors.
The manufacturing process of such a rug differs little from that described above. First, cut the towels into long pieces 4-5 cm wide.

Connect the first three pieces with a sewing machine. You also need to build up the “working thread” using this sewing tool.

When weaving a pigtail, the raw edges must be folded inward.

During the assembly process, you need to stitch the rows on the machine.

Bath mat is ready! It is very soft and pleasant to the touch, absorbs moisture well and can be washed.
Woven patterns
Patchwork rugs can be woven using a warp. It looks like a small loom. Make a wood frame to match the size of your rug. It can be rectangular or square, it all depends on your idea. Carnations need to be stuffed onto the frame at a distance of 2-2.5 cm from each other.
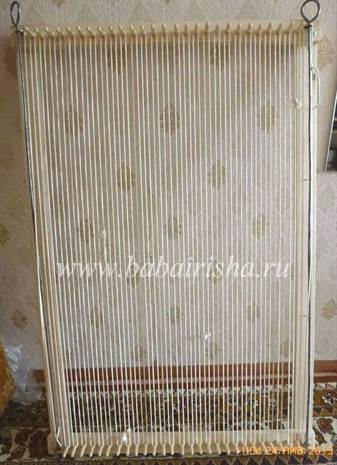
For these purposes, you can use a furniture board or an old table. It is not difficult to make a machine, and it will serve you for a long time.

On them, strengthen the warp threads made from pieces of fabric. On the leftmost warp thread, fasten the working thread. It's best to sew it on. Weave the rug by passing the rope over one warp thread and under the other. You can use more complex techniques and weave with two working threads at once. In the process of weaving, the fabric must be constantly pushed up so that it is more dense.


