Craft on the theme of the main road for children. Applications in kindergarten on the topic of the rules of the road
In kindergarten and elementary school, much attention is paid to teaching children the rules of the road. Classes and lessons on this topic are planned. In kindergarten, each group necessarily has a road corner, where children in a playful way get acquainted with traffic lights, road markings, the most common road signs and street crossing rules.
There are also events for children on this topic with the invitation of road workers or artists. Often they organize a competition "The road through the eyes of children." Crafts are done either in the garden with a teacher, or a homework assignment is given. Parents are also involved in joint activities. This article will help moms and dads find interesting ideas for such a contest.
Traffic light manufacturing
The very first thing children learn about traffic rules is their meaning and their proper placement. Even in the younger group, kids consolidate their knowledge in the classroom for fine arts. Drawing circles of the desired color or making an application on a black rectangle, children consolidate their knowledge. It will be a very right decision to start work for the "Road through the Eyes of Children" contest with traffic light crafts.
Such work needs to be put at the crossroads of the "road", so you need a leg and a stand. This can be done simply from cardboard, but it’s more interesting to take an old felt-tip pen, remove the rod and insert it with one side into a matchbox, and glue the other side to a square of thick cardboard with PVA glue.
All the details of the structure must be pasted over with colored paper, and on the matchbox, arrange circles of different ones in the correct order. At the same time, the child will repeat their arrangement. Red is always on top, yellow is in the middle, green is always on the bottom. Tell your child why the lights are arranged the way they are. After all, not all people distinguish colors. Some are guided only by the spatial arrangement. They know that once the overhead light is on, you need to stand still. Bottom - you can go.
paper machine
The next option for "The road through the eyes of children" is crafts and cardboard. The cardboard cylinder remaining after using toilet paper must be pasted over with colored paper. Cut out 4 wheels from black cardboard and attach two in front and behind. In the middle of the machine, cut a hole for the driver, making an incision in the shape of the letter "H". By bending part of the cardboard back we get a driver's seat, we cut the curved part forward with scissors in the shape of a circle. Having painted it or made an application, we get the steering wheel.

Small parts of the car are made of colored paper. The photo shows a racing car, but you can just make a few cars of different colors and place them on different sections of the "Road through the eyes of children". DIY machines could be various. If you have a large road planned, then you can make bigger cars. Description follows below.
plastic cars
For the manufacture of machines, various foam plastic and wooden blocks, matchboxes and the matches themselves, boxes from Kinder Surprise and cardboard packaging for eggs are suitable. Now we will talk about the use of used plastic cans and bottles for work.

The photo shows cars for the contest "Road through the eyes of children". Crafts from plastic bottles are often used to make some figures. For the presented products, you need to take used plastic packaging from the gel for washing clothes. Only the jar must first be thoroughly washed so that no chemicals remain.
With the help of an awl, holes are punched for the wheels made of corks. You can just put them on PVA glue. But then the car won't move. To make the car mobile, you will have to find either old wheels from another broken car, or pick up a rod for wheels made of waste material. These can be wooden sticks, metal rods, a felt-tip pen, a pencil, etc. To decorate crafts in the form of such cars for the Road Through the Eyes of Children contest, you need to use self-adhesives of different colors or, in extreme cases, use colored paper and tape.
houses
All children understand that there are houses along every road. So, if a child wants to make a house, then such products are quite suitable for this topic.

Moreover, it is very easy to make DIY crafts in the form of multi-storey buildings for the "Road through the Eyes of Children". It is only necessary to have a milk carton, glue it with colored paper and paint it, making windows, a roof and a door.
After reviewing the material of the article, parents will be able to help the child select the necessary material for the "Road Through the Eyes of Children" contest (for crafts). How to do them is described in detail. You can come up with something of your own, based on the options you see.
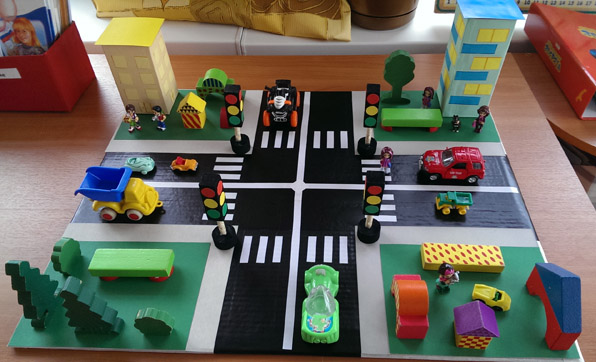
Master class for making a game layout "City Street"
Norkina Oksana SergeevnaTeacher MADOU kindergarten No. 21 "Rosinka" of the combined type of the urban district of the city of Kumertau of the Republic of Bashkortostan
The master class is designed for educators, but parents can also come in handy.
Purpose: training in game modeling, the formation of safe behavior on the roadway.
Target: making a model for game modeling in work with children of senior preschool age.
Tasks:
- to acquaint children with the rules of the road, the purpose and signals of traffic lights, with road signs, to expand knowledge about the rules for the safe behavior of children on the street;
- to activate children for independent activity in the corner of traffic rules,
The game layout can be used for the development of fine motor skills, visual perception, social orientation, orientation in space.
Description:
Stage I - the basis for the layout To make the basis of the “City Street” game layout, we need: 2 pieces from an MDF panel (I have them 53 cm each), a piano hinge, screws and nuts for fastening.

We drill holes in the MDF panels with a drill in the selected places, fasten the piano hinge with screws and nuts.

In order for our layout to stand at an angle of 90 degrees and not fall back, on one side we fasten the corner limiter (I have this part of the attachment from the old curtain), paint over the lower part of our layout with black paint.

Now we will draw up the upper vertical part of the layout. To design it, we take 2 pictures with the image of houses (I arranged these for myself).


We print the pictures in duplicate, laminate, if there is no laminator, then you can simply paste over with tape. The picture becomes brighter and it is easier to take care of the layout - to wipe the dust, for example.
We paste one copy of our laminated pictures, joining to the layout, that's what we should get.

Now we will give the card volume. To do this, we cut out the buildings at our discretion from the second copies, and paste them on pre-prepared blanks from the ceiling tiles - single background and double foreground, in my work I used the adhesive for ceiling tiles "Master"

Cut out buildings with a utility knife

We stick (I use the same “Master”) on the layout, our street has “depth”.

We turn to the design of the roadway. We take construction tape, highlight the pedestrian crossing, the dividing strip, that is, what we will paint over with white, close everything else.

In my work I use ordinary aerosol paints in a spray can, they are sold at any hardware store, they dry quickly, they are easy to use. Highlighted all the lines in white - remove the adhesive tape. The roadway and the crossing are ready.

Stage II - Paper machines. Now it prints templates for paper machines, there are a lot of them on the Internet, for example, let's take these.


The image is scaled down. Click to see original.
We laminate the printed templates (1 sheet of laminated film - 2 sheets of templates with cars), fold the sheets with the white sides inward. We laminate in order to make the cars more rigid, bright and make it possible to wipe them. When the sheet is laminated, we cut it along the contour and we get 2 sheets laminated along the colored side, the second side remains unlaminated (paper) - the paper sticks together better, and the laminated cars shine. This is what a laminated sheet with templates cut from 3 sides looks like.

Cut out car templates, glue.

Stage III - road signs. Now we turn to the manufacture of road signs.
Materials: it took me 2 sheets of ordinary white office paper, ceiling tiles (better washable), stationery knife, toothpicks, glue master, mosaic of 3 colors (red, yellow, green), laminated sheet with sign blanks, I used this one.

The image is scaled down. Click to see original.
We cut and paste 1 copy on the tile, cut it out with a clerical knife along the contour, on the other hand we paste 2 copies (if you wish, you can not stick the second part of the sign. We make a stand for our signs. Birch a sheet of white paper and cut strips of 4-5 mm along the long side sheet. For one sign, you need 5 strips.. Take one strip and wind it on a toothpick forming a tight "roll" - this is the upper part of the stand. Glue 4 strips into a long strip, twist into a "roll". On a large roll, put a small one on top, We dip the edge of the toothpick in glue, pierce our "rolls", pierce the blank with the road sign with the other edge of the toothpick. All our sign is ready.

To make the traffic light more voluminous, add a small mosaic of the corresponding colors to the lights, pierce the holes with an awl, insert the mosaic.

Our fleet

Our signs

Thank you all for your attention!
Marina Shevelkova
"Traffic Laws". Application lesson in the senior group
Application lesson in the senior group « traffic rules and I"
Continue to teach children to make a composition from colored paper;
Strengthen the ability to cut out of paper;
To consolidate the skills of working with scissors, glue;
Develop attention and creativity.
Lesson progress
Today we will talk about traffic rules. You travel with your moms and dads on the bus, go to kindergarten, to shops and you often have to cross road. You are participants traffic, which means you should know Traffic Laws.
Guys, how cross the road correctly?
Children: At the traffic light.
What if there is no traffic light nearby?
Children: Let's go road along the pedestrian crossing.
The teacher demonstrates a mock-up of a traffic light.
caregiver: Guys, what do you think, what is a traffic light for?
caregiver: Well done! Right, the traffic light helps to regulate traffic and
caregiver: How many signals does a traffic light have?
caregiver: What color are they?
Children: Red, yellow, green
Well done boys. Now we will execute application"A car at a traffic light."
As part of the thematic week on traffic rules, applique "Car at traffic lights". The children were given a preliminary Job: looking at illustrations, talking, reading art. literature, mobile and didactic games "Red, Yellow, Green" "Traffic light", learning songs, poems, solving riddles.

Long-term planning of classes on art activity (application) in the senior group SEPTEMBER. 1. "Magic Flowers". Objectives: to consolidate cutting skills; introduce different ways of composing colors in the overall composition.
Natalya Efremova
Application on traffic rules "Traffic light" (second junior group)
Application on the rules of the road « Traffic light"in second junior group
Continue to introduce children to work traffic light, about signals for people and machines; learn to recognize signals traffic light;
Develop logical thinking, children's attention.
Activate in the speech of children words: traffic light, pedestrian crossing, carriageway, sidewalk.
to compose an object from several parts, observing a certain sequence.
Cultivate attention, skills of conscious use of knowledge traffic rules in everyday life.
Material and equipment: Layout traffic light, layout roads, models of cars, illustrations of street movements, audio recording, applique « Traffic light", details for traffic light(rectangle, three circles of the same size / red-yellow-green /, glue, brushes, napkins.
The children were talked about traffic rules. The children took an active part in applications.


An outdoor game according to the rules of the road "Traffic Light" Purpose: to continue to consolidate children's knowledge about the rules of traffic rules, to continue to learn to act on a traffic light signal. Develop attention. Material:.
Conversation on the rules of the road “All the guys need to know how to walk down the street” (second junior group) Topic: “All the guys need to know how to walk down the street” Purpose: -give elementary ideas about traffic; - to consolidate knowledge of meaning.
Synopsis of directly educational activities on the rules of the road "Traffic Light" (second junior group) Lesson on the rules of the road "Traffic Light" in the second junior group Program content: To form knowledge of the rules for crossing the street.
Abstract of the lesson on teaching the rules of the road "Our friend is a traffic light" (middle group) Objectives: Educational: to introduce children to the rules of behavior on the road, with the concepts of "pedestrian crossing", "traffic light". Refine views.
Summary of the lesson on the rules of the road in the preparatory group "Traffic Light" Summary of the lesson on traffic rules in the preparatory group "Traffic Light" Objectives: To repeat and consolidate the rules of the road among preschool children.
Layout according to the rules of the road "Senior Traffic Light" It is very important from early childhood to lay the foundations of safe behavior in children, in our case it is on the road. Such work must be carried out.
Master class on the rules of the road "Cheerful traffic light!" Master class on the rules of the road "Cheerful traffic light!" "Cheerful traffic light" For the manufacture of this craft "Cheerful traffic light" will be required.
Open lesson on the rules of the road "Traffic light is our best assistant" Dear colleagues, I present to your attention an open lesson on the rules of the road. Purpose: To define the concept of "traffic light"; to understand.
Entertainment according to the rules of the road “We will go, we will rush” (younger group) Tasks: organize the activities of children at the holiday, bring them joy, good mood; develop musical and rhythmic hearing, auditory.
Quiz on the rules of the road "Traffic Light" Quiz on the rules of the road "Traffic Light" Completed by the educator Shishatskaya Larisa Viktorovna Course of the event 1. Organizational.
Application on the topic "SDA"
Lyubov Fedosova
Application on the topic "SDA"

In our kindergarten, a competition was held for the best traffic rules application. My children and I also decided to do a team work.
Preliminary work done educator:
Black-and-white blanks of pictures of houses, animals, nature, cars were selected, subsequently decorated.
- on the drawing paper was drawn a crossroads with pedestrians.


A lesson was held with the children on the rules of the road, on the rules of behavior for pedestrians and drivers on the road, they repeated once again why a traffic light and a zebra are needed.
To work with children we it took:
Paper towels to remove excess glue when sticking


The children worked with passion, each glued their favorite picture. When the poster was ready and displayed in the group, the guys came up and showed their glued picture with pleasure. This work was very instructive for our children, because in the process of such a peculiar game, we discussed the rules of the road more than once.
Application collective from natural material on the theme "Leaf fall" (middle group) Collective application from natural material. Theme "Leaf fall" (middle group) Purpose: to teach children to create a collective composition from.
Application using cotton pads on the theme "Winter" Application using cotton pads on the theme "Winter" Hello, dear colleagues! I want to bring to your attention the application with.
Application in the preparatory group on the theme "Cockerel-symbol of 2017". Good winter evening to all colleagues. The outgoing year, the year of the monkey, is coming to an end and it is being replaced by a mischievous, loud, bright and perky one.
Photo report “Application in the second junior group on the topic “Bus” The theme of the week is “Transport”. Age of children: 2.3 years IMG] / Objectives: To learn to distinguish in appearance and name trucks and cars.
Collective application of paper napkins on the topic: "Mimosa" Goals and objectives: To teach children to crush small lumps with their fingers - flowers from pieces of a napkin. Learn to compose a composition from lumps. Develop.
Collective application on the theme "Fish in the aquarium" in the senior group. Program content: develop artistic imagination, aesthetic taste. Develop a sense of composition. Reinforce what you have learned so far.
Collective application in the preparatory group on the topic "Knowledge Day" Educational areas: cognitive development, social and communicative development, artistic and aesthetic development, Preliminary.
Synopsis of OOD on artistic creativity (application) on the theme “Flower for Mom” (postcard) Purpose: To make a card for mom for the holiday of March 8. Tasks: 1. Learn to create images using the paper-plastic technique. 2. Learn in advance.
Summary of the lesson “Healthy. Application "Vitamin plate" Summary of the lesson in the second junior group on the topic "Healthy" Application "Vitamin plate" Purpose: To form children's ability to work.
Mosaic application in a group of different ages on the topic “Transport. Boat» TOPIC: Transport. Ship. OBJECTIVES: repeat knowledge about modes of transport; learn to create an image of a boat based on ideas about the outside.
Crafts for children on the topic of traffic rules

The children went to school and they are taught what will be useful in later life - to read, write, count, draw, exercise, and also know the basic rules. In order for the child to better understand the rules of the road, it is necessary not only to talk about them, but also to show them with a good example. In this article we will look at how to make crafts on the topic of the rules of the road with your own hands.
A visual guide to the rules of the road for children
You will need: cardboard boxes, colored paper and cardboard, scissors, glue, felt-tip pens, a simple pencil, a ruler, toy cars, a traffic cop.
Master Class
Traffic light in the form of a traffic policeman

You will need: plumbing pipe, wooden stick, acrylic lacquer and paints, whistle, cap, shoulder straps, traffic cop's baton, jigsaw, drill, simple pencil, glue. If some materials are not available, do not despair! Make a rod, a cap, shoulder straps out of cardboard by cutting out the cardboard of the desired shape.

Do crafts with your child, trust him with work, suggest and help. Thus, you will have a useful and fun leisure time with your hands.
svoimirukamy.com
A selection of crafts on the topic: Rules of the road

Unfortunately, children often become participants in various accidents. And all this happens because many of them do not know the basic rules. Learning the rules of the road on the roads and streets of the city is easy. Parents and employees of educational institutions should help the child in this matter. In educational institutions, traffic rules lessons are often held. And these lessons end with the fact that children make various crafts on them. Therefore, in this article we decided to bring you crafts on the topic of traffic rules for children. Children can easily make these crafts with their own hands if they look at the photo.
What crafts to make on the topic: Rules of the road
A traffic light is a simple craft. Several variants.
The easiest craft option is a traffic light. Indeed, even a child who attends a kindergarten can do such a craft. In the process of creating such a product, do not forget to remind the child of what the colors of the traffic light mean.

As a basis for crafts, there will be a landscape sheet. It needs to be painted black. You can also draw a rectangle on the sheet and decorate it accordingly. Cut out circles from colored paper and glue them to your traffic light.
A traffic light can be made out of a box.

In addition, you can use old CDs to create a traffic light. A kind traffic light that expresses its emotions can clearly explain the rules of behavior at a traffic light.

The traffic light that has the head of a policeman looks very interesting. Attach handles and legs to the traffic light.

An old bottle is a great option for making crafts. You just paint it in the base color, draw traffic light circles on it. Don't forget to attach the legs to the bottle. Cut out pens from paper and insert the main attributes of a policeman into them.

Applications on the topic of traffic rules.
The next simple crafts are applications. Preschool children can also cope with this task. Applications can be made of colored paper and cardboard.

More applications can be made from plasticine. At the beginning, it is necessary to apply a drawing on thick paper, after which it should be decorated with plasticine.

Another picture from plasticine. She looks very unusual and bright.

Paper figurines.
Craft rules of the road for children should be interesting. From paper, you can make a wide variety of crafts on this topic. And they will all be interesting in their own way.

Complex applications.
It is worth saying that crafts about the rules of the road for children can be not only simple. And if the children use the help of their parents, then they will be able to make more complex applications together with them, which will clearly explain the rules of behavior on the roads.


Finally
As you can see, making crafts on the topic of traffic rules is very simple. In this case, the child fantasizes and remembers important rules that will later help him maintain his health and life.
Children in primary and secondary preschool age are not always serious about the rules of safe behavior on the road. In this case, an adult can use creative activities to visually show the child the rules of the road. Together with the baby, you can make crafts on the topic of traffic rules.
Children's paper crafts for preschoolers according to traffic rules
To create crafts according to the rules of the road, you can make it from various materials:
- from colored paper;
- acrylic paints;
- plasticine.
- traffic light template;
- white sheets of A4 paper;
- cardboard;
- colored pencils or acrylic paints (optional);
- tassel.
Colored paper crafts are the most popular.
DIY crafts according to traffic rules
To make cards, we need:
- Print out the traffic light template.
- Place the template on black paper and trace around.
- Cut out the traffic light.
- Draw three circles on black paper and cut them out.
- We cut out 3 squares from red, yellow and green paper and draw three circles of the same diameter inside. Cut out.

- Glue the colored circles on the black circles.
- We bend the resulting circles in half.
- We glue all three circles to the traffic light, while we glue only one half of the circle with glue. Thus, the other half will be able to move, and when we lift the half up, the black color of the circle will cover the color one, as if the traffic light is “off”.
- We take a sheet of white paper and print out blanks of road signs.

- The child paints all the sign templates with the desired color following the instructions of the adult.

- In order for the signs to last as long as possible, you can stick them on thick cardboard.
- big box;
- glue;
- colored paper;
- tassel;
- non-spill glass;
- several small medicine boxes;
- plasticine;
- toothpicks.
- Glue the white stripes onto the black cardstock to make a zebra crossing.
- Make strips of white paper 1 cm wide - 2 central solid strips and 8 cuts.
- Make a roadway out of gray or black cardboard and white stripes.
- Make trees and a traffic light out of colored paper.
- Take a large sheet of cardboard on which the whole craft will be located.
- Place toy cars on the track, you can put a traffic cop at the intersection.
- Draw the face of the character and traffic light circles with a simple pencil.
- Drill two identical holes for the shoulders with a drill.
- Put the cap on top of the pipe.
- Cut out the doors.

- Make a sight glass separator from the seventh spatula.

- Glue the wheels using plates.
- Draw logos with a felt-tip pen.

- Paste the interior with colored paper. It is better to use a brown color that resembles natural leather.
- Glue windows on the facades of houses and buildings.
- Circle the windows with a felt-tip pen.
- Glue a track onto a large sheet, then a zebra, buildings and trees.
- Paint with paints and let them dry.
- Insert a stick and glue shoulder straps.
- Hang the whistle and wand on opposite sides.
- Close and seal the box with tape.
- Cut the windshield across the box.
- Bend the windshield forward and make a wide slot.
- Make a radiator grill with 6 spatulas.
- Make houses and other buildings (shops, schools) by pasting the boxes with colored paper.
- Make windows by cutting colored paper into squares and rectangles.
- Make the roofs of the buildings by cutting a strip of cardboard and gluing it on top of the box.
- Cut a sheet of white paper into strips 5 cm wide.
- Cut the pipe in half crosswise.
- Draw a silhouette of the doors with a pencil.
- Secure with tape.

- Make the seats by bending the back down.
- Paint the car with acrylic paint.
- Cut off the base of the paper cups and glue on the headlights. From the rest of the glasses make an exhaust pipe.

- Make emergency lights out of traffic jams.
- Glue on a red button with a smiley face on it.
- colored paper;
- white sheets of paper;
- a glass of water;
- acrylic paints or colored pencils;
- brush.
- candy box;
- brush;
- scissors;
- acrylic paints;
- toothpicks;
- non-spill glass;
- small boxes (you can take from under the medicines).


Creating cards with traffic rules
Older children can use acrylics and paint over the signs. Thus, when coloring, the child learns the material better, since he himself creates cards.
Craft "On the road"
To get acquainted with the rules of the road, you can make a voluminous craft. For this you need:
The whole road will be built in a large box, in which one wide sidewall needs to be cut off.


Thus, it is possible to create several boxes with different trajectory of the movement of cars and design of buildings.
Crafts for children on the topic of traffic rules
A visual guide to the rules of the road for children
You will need: cardboard boxes, colored paper and cardboard, scissors, glue, felt-tip pens, a simple pencil, a ruler, toy cars, a traffic cop.
You will need: plumbing pipe, wooden stick, acrylic lacquer and paints, whistle, cap, shoulder straps, traffic cop's baton, jigsaw, drill, simple pencil, glue. If some materials are not available, do not despair! Make a rod, a cap, shoulder straps out of cardboard by cutting out the cardboard of the desired shape.
You will need: deep cardboard box, disposable paper plates and cups, acrylic paint, pencil, ruler, tape, stationery knife, long wooden spatulas, 2 orange corks, red flat button, colored paper, felt-tip pens.
svoimirukamy.com
Traffic light in the form of a traffic policeman

The children went to school and they are taught what will be useful in later life - to read, write, count, draw, exercise, and also know the basic rules. In order for the child to better understand the rules of the road, it is necessary not only to talk about them, but also to show them with a good example. In this article we will look at how to make crafts on the topic of the rules of the road with your own hands.
Master Class
Cardboard convertible
Do crafts with your child, trust him with work, suggest and help. Thus, you will have a useful and fun leisure time with your hands.
Useful crafts on the theme "Rules of the road" for children
Parents and kindergarten teachers teach children the rules of the road from an early age. The study continues at school. Crafts on the topic "Rules of the road" will be an excellent teaching aid, the photos will clearly show how to make them correctly. Participate in the creative process with your child, accompanying the work with stories about how to cross the road correctly, what colors of traffic lights mean “stop”, “get ready” and “go ahead”. When creating crafts, a variety of materials are used: colored paper and cardboard, paints and plasticine. Let's consider some of them.
Have your child make cards out of colored paper. For work, prepare the following materials:
After the materials are prepared, print the finished template.

Step 1. Lay the stencil on black paper.
Step 2 Circle it.
Step 3. Cut out the traffic light with scissors.
Step 4 Draw three circles on a black sheet.
Step 5. Cut them out.
Step 6. Place a red, green, and orange leaf in front of you.
Step 7. Draw on it three circles with a diameter equal to the template.
Step 8. Cut them out.

Step 9. Glue the colored circles onto the black ones.
Step 10 Bend them in half.
Glue 3 circles to the traffic light. But apply glue only on one half so that the second can move. Raising the half up, you will cover the color with a black circle. Thus, the traffic light will turn on and off.

DIY craft cards on the theme "Traffic" with photo instructions
Very often, in lessons and classes on traffic rules, cards are used that depict road signs. The teacher or educator asks a thematic question, and the children raise a card with the correct answer. This method promotes rapid learning. So invite your child to make such cards.
Step 1. Take a white sheet of paper and print out the blanks.

Step 2. Let the child color the signs in the desired color. The task of an adult is to check the correctness of actions.

Step 3. Stick the sheet with the painted signs on the cardboard, then they will last longer.
Acrylic paints can be used instead of pencils. By doing this, the child will better learn the rules of the road.
"Careful on the road"
Useful crafts on the topic "Rules of the road" to school will be an excellent tool for class hours.
For the first acquaintance, make a three-dimensional figure. For work, prepare the following materials:
Step 1. Take a large box and put it in front of you, after cutting off one side part. In it you will build a road.

Step 2. Paint the bottom of the box with green paint - this will be the lawn.
Step 3 Take some black paper and cut out a few strips from it. Glue them as you wish. For example, make a road with an intersection.

Step 4. Make a pedestrian crossing. To do this, cut out several thin strips of white paper and stick them on the place where the transition will be located.

Step 5 Decorate your composition with trees along the road. Take a toothpick and brown plasticine. Draw a crown on green paper and cut it out.
Step 6. Roll the plasticine into a sausage and insert a toothpick into it.
Step 7. On the other side of the toothpick, attach flat plasticine so that the tree does not fall.
Step 8. Fix the crown.

Step 9. Find traffic signs on the Internet, print them out or draw them yourself and place them on the road.

Step 10. Make a stand out of plasticine, stick a toothpick into it and attach a sign to it.
There must be a traffic light on the road.

And put houses away from the road.
Step 1. Cover the medicine boxes with colored paper.
Step 2. Cut out the windows from thick colored paper.

Step 3. Put all the elements in their places.
Step 4. If there is a road, then there must be cars. Blind them from plasticine or arrange small models.

By turning on the fantasy, you can make boxes with a variety of trajectories of movement. We offer you several options.


Video selection of crafts according to traffic rules.
By creating crafts on the topic "Rules of the road", you can teach your child seriousness and direct them on the right path. Thus, you will show him how traffic rules affect a person's life. Performing various crafts, the child will be able to safely participate in thematic competitions. Using colored paper and cardboard, plasticine and other additional materials, you can make decorative elements for your crafts.


There are many ideas that will teach a child the rules of the road. Themed crafts will tell a small audience how to behave on the road.
Many parents are wondering how to explain the rules of the road to their baby,
to keep him interested. Just listening to stories from life and watching pictures of the relevant topics is not very pleasant for kids. Curious fidgets seek adventure. We give advice to all dads and moms - turn familiarization with traffic rules into an exciting game, invite your child to do the attributes for it with your own hands. Ideas and technologies for their implementation, we will tell you in this article. Craft on the topic "Rules of the road" - that's what we'll talk about with you right now.
paper application
It develops imagination, thinking, motor skills and such kind of needlework as appliqué very well. Ordinary colored paper with a pencil, scissors and glue can be turned into interesting crafts on the topic of traffic rules. When performing plot applications with the baby, discuss with him such moments as the correct crossing of the street, the meaning of traffic signals, purpose and others. Crafts on the topic "Rules of the road" in the form of an application after can become the basis of a board game. Glue a road, a pedestrian crossing, a sidewalk, a marking on a large sheet of cardboard made of colored paper. And how to perform other attributes for such a game, we will discuss further.

Cardboard figurines
Crafts on the topic "Road Rules" in the form of a board educational game assumes the presence of such components as traffic lights, houses, cars. You can make them out of cardboard. A good material for this type of work are boxes from matches, medicines or any other goods. To make a building, you just need to glue a rectangular box with paper and draw windows and doors on it. The traffic light is designed in the same way. Cars can be modeled from matchboxes, gluing them together, and then decorating with colored paper and drawing details (wheels, windows, headlights). You can not do in such a game without pedestrians. They can be small toys from "kinder surprise" or little men made of acorns and chestnuts.
Toy "Traffic Light": craft on the theme "Rules of the road"
From an ordinary box of juice or kefir, you can make a traffic light with your child. Paste the box over the entire area with white or gray paper. Cut out four green, yellow and red circles from colored paper, attach them to the walls of a cardboard container. From gray paper, complete sixteen of the same details. On each of the circles, drop a little glue in one place and glue these parts over the colored ones. It will turn out that all the windows of the traffic light will be closed with gray circles. The meaning of such a toy is that during the game the child himself must open (raise the gray part) one or another traffic light signal, depending on the situation being played.

The craft on the topic "Rules of the road" allows kids not only to gain theoretical knowledge, but also practical. Considering various situations in the form of a game, children learn how to act in certain cases, learn to make the right decisions. Create beautiful and informative attributes for learning traffic rules with your children.


